ECU MERCEDES-BENZ AMG GT S 2017 C190 User Guide
[x] Cancel search | Manufacturer: MERCEDES-BENZ, Model Year: 2017, Model line: AMG GT S, Model: MERCEDES-BENZ AMG GT S 2017 C190Pages: 290, PDF Size: 6.73 MB
Page 48 of 290

Problems with the Occupant Classification System (OCS)
Be sure to observe the notes on "System self-test" (Ypage 45).
ProblemPossible causes/consequences andMSolutions
The PASSENGER AIR
BAG OFF indicator lamp
lights up and remains lit,
even though the front-
passenger seat is occu-
pied by an adult or a per-
son of a stature corre-
sponding to that of an
adult.The classification of the person on the front-passenger seat is incor-
rect.
XMake sure the conditions for a correct classification of the person
on the front-passenger seat are met (Ypage 43).
XIf the PASSENGER AIR BAG OFF indicator lamp remains lit, the front-
passenger seat may not be used.
XHave OCS checked as soon as possible at an authorized Mercedes- Benz Center.
The PASSENGER AIR
BAG OFF indicator lamp
does not light up and/or
does not stay on.
The front-passenger seat
is:
Runoccupied
Roccupied with the
weight of a child up to
twelve months old in a
child restraint system
OCS is malfunctioning.
XMake sure there is nothing between the seat cushion and the child
seat.
XMake sure that the backrest and base of the child restraint system
are resting securely on the front-passenger seat. If necessary,
adjust the position of the front-passenger seat.
XWhen installing the child restraint system, make sure that the seat belt is tight. Do not pull the seat belt tight using the front-passenger
seat adjustment. This could result in the seat belt and the child
restraint system being pulled too tightly.
XCheck for correct installation of the child restraint system. Make
sure that the head restraint does not apply a load to the child
restraint system. If necessary, adjust the head restraint accord-
ingly.
XMake sure that no objects are applying additional weight onto the
seat.
XIf the PASSENGER AIR BAG OFF indicator lamp remains off and/or
the PASSENGER AIR BAG ON indicator lamp lights up, do not install
a child restraint system on the front-passenger seat.
XHave OCS checked as soon as possible at an authorized Mercedes-
Benz Center.
Deployment of Emergency Tensioning
Devices and air bags
Important safety notes
GWARNING
The air bag parts are hot after an air bag has
been deployed. There is a risk of injury.
Do not touch the air bag parts. Have a
deployed air bag replaced at a qualified spe-
cialist workshop as soon as possible.
GWARNING
A deployed air bag no longer offers any pro-
tection and cannot provide the intended pro-
tection in an accident. There is an increased
risk of injury.
Have the vehicle towed to a qualified special-
ist workshop in order to have a deployed air
bag replaced.
For your own safety and that of your front
passenger, it is important that you have
deployed air bags replaced and faulty air bags
repaired. This will help to make sure the air bags
46Occupant safety
Safety
Page 51 of 290

Automa tic measures after an acci-
dent
Immediately after an accident, th efollowin g
measures are implemented, depending on th e
typ eand severity of th eimpact :
Rthehazard warning lamp sare activated
Rth eemergenc ylighting is activated
Rth evehicl edoor sare unlocke d
Rthefron tside windows are lowered
Rth eengin eis switched off
Rvehicles wit hmbrace: automatic emer-
gency call
Children in the vehicle
Import ant safety notes
Ifachild younger than 12 years and under 5ft
(1.50 m) in height is traveling in th evehicle:
Ralways secure th echild in achild restrain t
system suitable for Mercedes-Benz vehicles.
The child restrain tsystem mus tbe appropri-
ate to th eage, weigh tand siz eof th echild
Rbe sur eto observ eth einstruction sand safet y
note sin this section in addition to th echild
restrain tsystem manufacturer' sinstallation
instruction s
Rbe sureto observ eth einstruction sand safet y
note son th e"Occupant classification system
(OCS)" (
Ypage 42 )
GWARNIN G
If you leav echildren unsupervised in th evehi-
cle ,they could set it in motion ,for exampl eby:
Rreleasin gth eparking brak e
Rshifting thetransmission to th eneutral
position
Rstarting th eengin e
In addition ,they may operate vehicl eequip -
men tand become trapped .There is aris kof
an acciden tand injury.
When leaving th evehicle, always tak eth e
SmartKey wit hyou and loc kth evehicle. Never
leav echildren unsupervised in th evehicle.
GWARNIN G
If persons, particularly children are subjecte d
to prolonged exposure to extreme heat or
cold, there is aris kof injury, possibl yeve n
fatal. Never leav echildren unattended in th e
vehicle.
GWARNIN G
If th echild restrain tsystem is subjecte dto
direc tsunlight, part smay get ver yhot .Chil-
dre nmay burn themselves on these parts,
particularly on th emetal part sof th echild
restrain tsystem. There is aris kof injury.
If you leav eth evehicle, taking th echild wit h
you, always ensur ethat th echild restrain t
system is no texposed to direc tsunlight. Pro -
tect it wit h ablanket, for example. If th echild
restrain tsystem has been exposed to direc t
sunlight, let it cool down before securin gth e
child in it .Never leav echildren unattended in
th evehicle.
Always ensur ethat all vehicl eoccupant shav e
their seat belt sfastene dcorrectl yand are sitting
properly. Particular attention mus tbe paid to
children .
Observ eth esafet ynote son th eseat belt
(
Ypage 37 )and th einformation on th ecorrec t
use of th eseat belt (Ypage 38).
A booste rseat may be necessar yto achiev e
proper seat belt positioning for children ove r
41 lbs (18 kg) or until they reac h aheight wher e
a lap/shoulder belt can be fastene dproperly
without abooste rseat .
Special seat belt ret ractor
GWARNIN G
If th eseat belt is release dwhile driving, th e
child restrain tsystem will no longer be
secured properly. The special seat belt retrac -
to ris disabled and th einertia real draw sin a
portion of th eseat belt .The seat belt canno t
be immediately refastened. There is an
increased ris kof injury, possibl yeve nfatal.
Stop th evehicl eimmediately, payin gatten -
tion to road and traffic conditions. Reactivat e
Children in the vehicle49
Safety
Z
Page 52 of 290

the special seat belt retractor and secure thechild restraint system properly.
The seat belt on the front-passenger side is
equipped with a special seat belt retractor.
When activated, the special seat belt retractor
ensures that the seat belt will not slacken once
the child restraint system has been secured.
Installing a child restraint system:
XAlways comply with the child restraint system
manufacturer's installation instructions.
XPull the seat belt smoothly out of the seat belt
guide.
XEngage the seat belt tongue in the belt buckle.
Activating the special seat belt retractor:
XPull the seat belt out fully and let the inertia
reel retract it again.
While the seat belt is retracting, you should
hear a ratcheting sound. The special seat belt
retractor is activated.
XPush the child seat restraint system down so
that the seat belt is tight and does not loosen.
Removing a child restraint system/deactivating
the special seat belt retractor:
XAlways comply with the child restraint system
manufacturer's installation instructions.
XPress the belt buckle release button and
guide the belt tongue to the seat belt guide.
The sp ecia
l seat belt retractor is deactivated.
Child restraint system
The use of seat belts and child restraint systems
is required by law in:
Rall 50 states
Rthe U.S. territories
Rthe District of Columbia
Rall Canadian provinces
You can obtain further information about the
correct child restraint system from any author-
ized Mercedes-Benz Center.
GWARNING
If the child restraint system is installed incor-
rectly on a suitable seat, it cannot protect as
intended. The child cannot then be restrained
in the event of an accident, heavy braking or
sudden changes of direction. There is an
increased risk of injury, possibly even fatal.
Make sure that you observe the child restraint system manufacturer's installation instruc-
tions and the notes on use. Please ensure,
that the base of the child restraint system is
always resting completely on the seat cush-
ion. Never place objects, e.g. cushions, under
or behind the child restraint system. Only use
child restraint systems with the original cover
designed for them. Only replace damaged
covers with genuine covers.
GWARNING
If the child restraint system is installed incor-
rectly or is not secured, it can come loose in
the event of an accident, heavy braking or a
sudden change in direction. The child
restraint system could be thrown about, strik-
ing vehicle occupants. There is an increased
risk of injury, possibly even fatal.
Always install child restraint systems prop-
erly, even if they are not being used. Make
sure that you observe the child restraint sys-
tem manufacturer's installation instructions.
You will find further information on stowing
objects, luggage or loads under "Loading guide-
lines" (
Ypage 209).
GWARNING
Child restraint systems or their securing sys-
tems which have been damaged or subjected
to a load in an accident can no longer protect
as intended. The child cannot then be
restrained in the event of an accident, heavy
braking or sudden changes of direction. There is an increased risk of injury, possibly even
fatal.
Replace child restraint systems which have
been damaged or subjected to a load in an
accident as soon as possible. Have the secur-
ing systems on the child restraint system
checked at a qualified specialist workshop,
before you install a child restraint system
again.
50Children in the vehicle
Safety
Page 53 of 290

The securing system of child restraint systems is
the seat belt system.
If you install a child restraint system on the
front-passenger seat, be sure to observe the
instructions and safety notes on the "Occupant
Classification System (OCS)" (
Ypage 42). There
you will also find information on deactivating the
front-passenger front air bag.
All child restraint systems must meet the fol-
lowing standards:
RU.S. Federal Motor Vehicle Safety Standards
213 and 225
RCanadian Motor Vehicle Safety Standards
213 and 210.2
Confirmation that the child restraint system cor-
responds to the standards can be found on an
instruction label on the child restraint system.
This confirmation can also be found in the instal-
lation instructions that are included with the
child restraint system.
Observe the warning labels in the vehicle inte-
rior and on the child restraint system.
Child restraint system on the front-
passenger seat
General notes
If you secure a child in a child restraint system
on the front-passenger seat, be sure to observe
the instructions and safety notes on the "Occu-
pant Classification System (OCS)" (
Ypage 42).
You can thus avoid the risks that could arise as
a result of:
Ran incorrectly categorized person in the front-
passenger seat
Rthe unintentional deactivation of the front-
passenger front air bag
Rthe unsuitable positioning of the child
restraint system, e.g. too close to the dash-
board
Rearward-facing child restraint system
If it is absolutely necessary to install a rearward-
facing child restraint system on the front-
passenger seat, always make sure that the
front-passenger front air bag is deactivated.
Only if the PASSENGER AIR BAG OFF indicator
lamp is permanently lit (
Ypage 36) is the front-
passenger front air bag deactivated. Always observe the child restraint system man-
ufacturer's installation and operating instruc-
tions.
Forward-facing child restraint system
If you secure a child in a forward-facing child
restraint system on the front-passenger seat,
always move the front-passenger seat as far
back as possible. The entire base of the child
restraint system must always rest on the seat
cushion of the front-passenger seat; the rear
side must, as far as possible, be resting on the
backrest of the front-passenger seat. The child
restraint system must not touch the roof or be
subjected to a load by the head restraint. Adjust
the angle of the seat backrest and the head
restraint position accordingly. Always make
sure that the shoulder belt strap is correctly
routed from the front-passenger seat belt loop
to the shoulder belt guide on the child restraint
system. The shoulder belt strap must be routed
forwards and downwards from the front-
passenger seat belt loop.
Always observe the child restraint system man-
ufacturer's installation and operating instruc-
tions.
Pets in the vehicle
GWARNING
If you leave animals unattended or unsecured
in the vehicle, they could press buttons or
switches, for example.
As a result, they could:
Ractivate vehicle equipment and become
trapped, for example
Ractivate or deactivate systems, thereby
endangering other road users
Unsecured animals could also be flung around
the vehicle in the event of an accident or sud-
den steering or braking, thereby injuring vehi-
cle occupants. There is a risk of an accident
and injury.
Never leave animals unattended in the vehi-
cle. Always secure animals properly during
the journey, e.g. use a suitable animal trans-
port box.
Children in the vehicle51
Safety
Z
Page 70 of 290
The vehicle is locked automatically when the
ignition is switched on and the wheels are turn-
ing.
You could therefore be locked out if:
Rthe vehicle is being pushed.
Rthe vehicle is being towed.
Rthe vehicle is on a roller dynamometer.
iYou can activate and deactivate the auto-
matic locking mechanism via the multimedia
system (see the Digital Operator's Manual).
Unlocking/locking the driver's door
using the mechanical key
i
If you want to centrally lock the vehicle using
the mechanical key, begin by pressing the
locking button for the interior locking mech-
anism while the driver's door is open. Then
lock the driver's door using the mechanical
key.
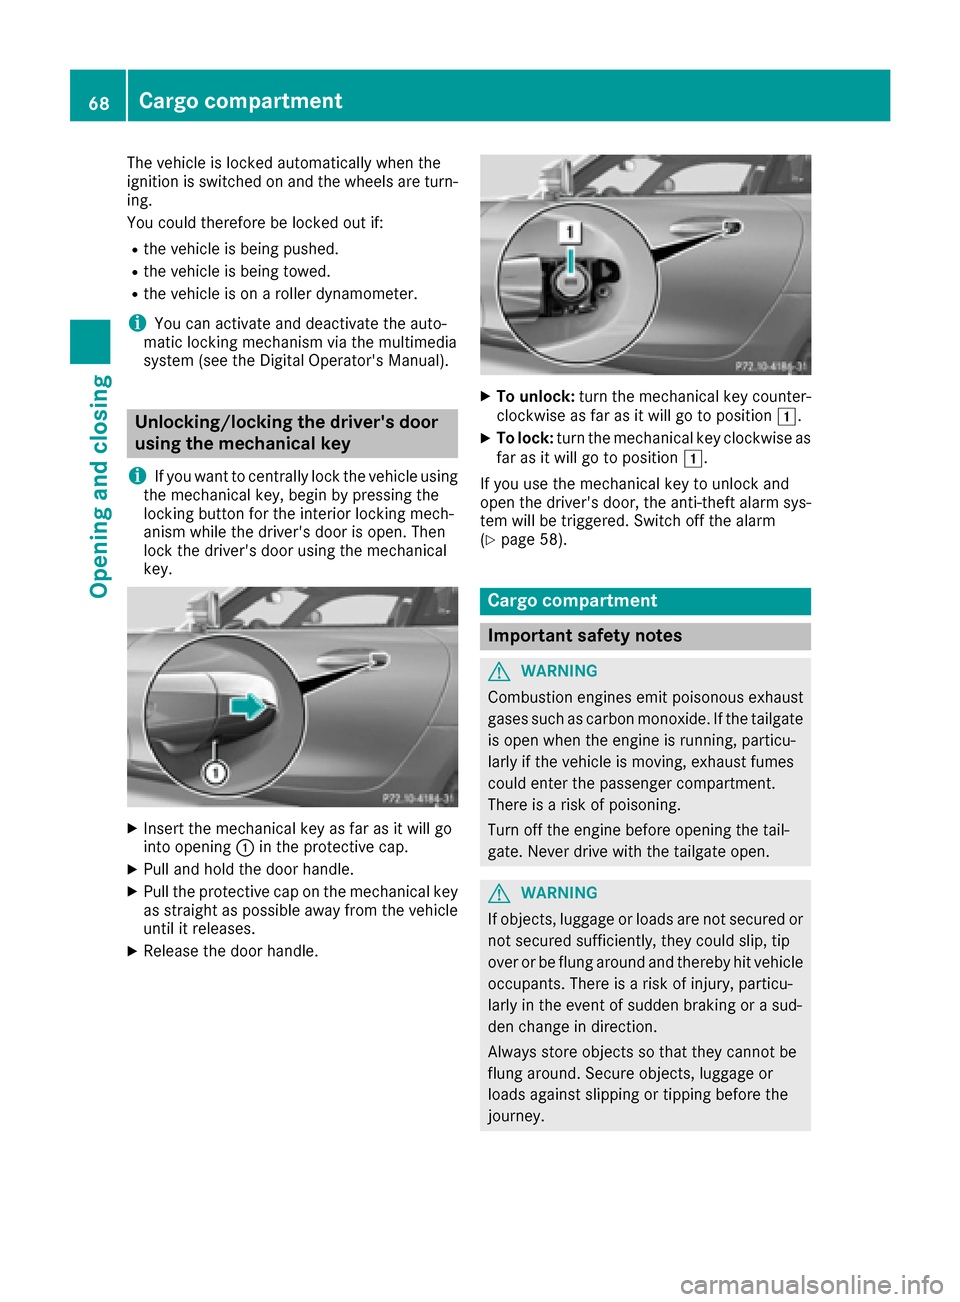
XInsert the mechanical key as far as it will go
into opening :in the protective cap.
XPull and hold the door handle.
XPull the protective cap on the mechanical key
as straight as possible away from the vehicle
until it releases.
XRelease the door handle.
XTo unlock: turn the mechanical key counter-
clockwise as far as it will go to position 1.
XTo lock:turn the mechanical key clockwise as
far as it will go to position 1.
If you use the mechanical key to unlock and
open the driver's door, the anti-theft alarm sys-
tem will be triggered. Switch off the alarm
(
Ypage 58).
Cargo compartment
Important safety notes
GWARNING
Combustion engines emit poisonous exhaust
gases such as carbon monoxide. If the tailgate is open when the engine is running, particu-
larly if the vehicle is moving, exhaust fumes
could enter the passenger compartment.
There is a risk of poisoning.
Turn off the engine before opening the tail-
gate. Never drive with the tailgate open.
GWARNING
If objects, luggage or loads are not secured or
not secured sufficiently, they could slip, tip
over or be flung around and thereby hit vehicle
occupants. There is a risk of injury, particu-
larly in the event of sudden braking or a sud-
den change in direction.
Always store objects so that they cannot be
flung around. Secure objects, luggage or
loads against slipping or tipping before the
journey.
68Cargo compartment
Opening and closing
Page 85 of 290

Automa tic anti-glare mirrors
GWARNING
Electrolyt emay escape if th eglas sin an auto -
matic anti-glare mirror breaks .The electrolyt e
is harmful and causes irritation .It mus tno t
come int ocontact wit hyour skin, eyes ,res -
piratory organs or clothing or be swallowed.
There is aris kof injury.
If you come int ocontact wit hth eelectrolyte,
observ eth efollowing:
RRins eoff th eelectrolyt efrom your skin
immediately wit hwater.
RImmediately rinse th eelectrolyt eout of
your eyes thoroughly wit hclean water.
RIf th eelectrolyt eis swallowed, immediately
rinse your mout hout thoroughly. Do no t
induce vomiting .
RIf electrolytecomes int ocontact wit hyour
skin or hair or is swallowed, see kmedical
attention immediately.
RImmediately chang eout of clothing whic h
has come int ocontact wit helectrolyte.
RIf an allergic reaction occurs, see kmedical
attention immediately.
The rear-view mirror and th eexterio rmirror on
th edriver's side automatically go int oanti-glare
mod eif th efollowin gcondition sare met simul-
taneously:
Rth eignition is switched on
Rinciden tligh tfrom headlamp sstrikes th esen -
sor in th erear-view mirror
The mirror sdo no tgo int oanti-glare mod eif
revers egear is engage dor if th einte
rior lighting
is switched on .
Parking position for the exteri or mir-
ror on the front-passenger side
Stori ng the pa rking position
You can position th efront-passenger side exte -
rio rmirror in suc h away that you can see th e
rear whee lon that side as soo nas you engage
revers egear .You can store this position .
Using reverse gear
:Memory buttonM
;Butto nfor th edriver's side exterio rmirror
=Butto nfor th efront-passenger side exterio r
mirror
?Adjustmen tbutto n
XSelec tke yposition 2wit hth eStart/Sto pbut -
ton.
XPress butto n=.
XStart th eengine.
XEngage revers egear .
The exterio rmirror on th efront-passenger
side moves to th edefault setting parking posi-
tion .
XUse butto n? to adjust th eexterio rmirror to
a position that allows you to see th erear
whee land th ecurb.
The parking position is stored.
iIf you shif tth etransmission to another posi-
tion ,th eexterio rmirror on th efront-
passenger side return sto th edrivin gposition
after approximately te nseconds.
Using the mem orybutton
You can store th eparking position of th eexte -
rio rmirror on th efront-passenger side usin g
memory butto nM :. The revers egear mus tno t
be engaged.
XSelec tke yposition 2wit hth eStart/Sto pbut -
ton.
XPress butto n=.
XUse butto n? to adjust th eexterio rmirror to
a position that allows you to see th erear
whee land th ecurb.
Mirrors83
Seats, steering wheel and mirrors
Z
Page 103 of 290

Notes on breaking-in a new vehicle
Important safety notes
The sensor system of some driving and driving
safety systems adjusts automatically while a
certain distance is being driven after the vehiclehas been delivered or after repairs. Full system
effectiveness is not reached until the end of this
teach-in procedure.
New and replaced brake pads and discs only
reach their optimum braking effect after several hundred kilometers of driving. Compensate for
this by applying greater force to the brake pedal.
The first 1000 miles (1500 km)
The more you look after the engine when it is
new, the more satisfied you will be with its per-
formance in the future.
RYou should therefore drive at varying vehicle
and engine speeds for the first 1000 miles
(1500 km).
RIdeally, for the first 1,000 miles (1,500 km),
drive in program C.
RDo not drive faster than 85 mph (140 km/h)
for the first 1,000 miles (1,500 km).
ROnly allow the engine to reach a maximum
engine speed of 4,500 rpm briefly.
RAvoid heavy loads, e.g. driving at full throttle,
during this period.
RDo not exceed Ôof the maximum permitted
engine speed for each gear.
RShift up into manual mode Mand temporary
manual drive program in good time.
RDo not carry out a RACE START.
RDo not manually shift to a lower gear to brake
the vehicle.
RTry to avoid depressing the accelerator pedal
beyond the point of resistance (kickdown).
After 1000 miles (1500 km), you can increase
the engine speed gradually and accelerate the
vehicle to full speed.
You should also observe these notes on break-
ing in if the engine or parts of the drive train on
your veh icle h
ave been replaced.
Always observe the respective speed limits.
Driving
Important safety notes
GWARNING
Objects in the driver's footwell can restrict the pedal travel or obstruct a depressed pedal.
The operating and road safety of the vehicle is
jeopardized. There is a risk of an accident.
Make sure that all objects in the vehicle are
stowed correctly, and that they cannot enter
the driver's footwell. Install the floormats
securely and as specified in order to ensure
sufficient clearance for the pedals. Do not use
loose floormats and do not place floormats on
top of one another.
GWARNING
Unsuitable footwear can hinder correct usage of the pedals, e.g.:
Rshoes with thick soles
Rshoes with high heels
Rslippers
There is a risk of an accident.
Wear suitable footwear to ensure correct
usage of the pedals.
GWARNING
If you switch off the ignition while driving,
safety-relevant functions are only available
with limitations, or not at all. This could affect, for example, the power steering and the brake
boosting effect. You will require considerably
more effort to steer and brake. There is a risk
of an accident.
Do not switch off the ignition while driving.
GWARNING
If the parking brake has not been fully
released when driving, the parking brake can:
Roverheat and cause a fire
Rlose its hold function.
There is a risk of fire and an accident. Release
the parking brake fully before driving off.
Driving101
Dr iving an d parking
Z
Page 107 of 290

gives you enough time to move your foot from
the brake pedal to the accelerator pedal and to
depress it before the vehicle begins to roll.
GWARNING
After a short time, hill start assist will no lon-
ger brake your vehicle and it could roll away.
There is a risk of an accident and injury.
Therefore, quickly move your foot from the
brake pedal to the accelerator pedal. Never
leave the vehicle when it is held by hill start
assist.
Hill start assist is not active if:
Ryou are pulling away on a level road or on a
downhill gradient.
Rthe transmission is in position N.
Rthe electric parking brake is applied.
RESP®is malfunctioning.
ECO start/stop function
Introduction
The ECO start/stop function switches the
engine off automatically if the vehicle is stopped
under certain conditions.
The engine starts automatically when the driver
wants to pull away again. The ECO start/stop
function thereby helps you to reduce the fuel
consumption and emissions of your vehicle.
Important safety notes
GWARNING
If the engine is switched off automatically and
you exit the vehicle, the engine is restarted
automatically. The vehicle may begin moving.
There is a risk of accident and injury.
If you wish to exit the vehicle, always turn off
the ignition and secure the vehicle against
rolling away.
General notes
:ECO start/stop display
If the engine has been switched off automati-
cally by the ECO start/stop function, the è
ECO symbol is shown in the multifunction dis-
play.
The ECO start/stop function is only available in
drive program C.
The ECO start/stop function is activated when- ever you switch on the engine using the Smart-
Key or the Start/Stop button. This is the case if:
Rthe ignition was switched off for more than
four hours or
Rthe ECO start/stop function had been activa-ted before the engine was switched off
Automatic engine switch-off
The ECO start/stop function switches the
engine off automatically if:
Rthe ECO start/stop function is activated
(Ypage 106) and
Ryou brake the vehicle to a standstill in trans-
mission position D
The ECO start/stop function is operational
when:
Rthe indicator lamp in the ECO button is lit
green.
Rthe outside temperature is within the range
that is suitable for the system.
Rthe engine and the transmission are at a suf-
ficient temperature for the ECO start/stop
function.
Rthe set temperature for the vehicle interior
has been reached.
Rthe battery is sufficiently charged.
Rthe system detects that the windshield is not
fogged up when the air-conditioning system is switched on.
Rthe hood is closed.
Rthe driver's door is closed and the driver's
seat belt is fastened.
Driving105
Driving and parking
Z
Page 110 of 290

DYNAMIC SELECT controller
General information
Selectth edrive program usin gth eDYNAMI C
SELECT controller .
Available drive programs:
C ComfortComfort-oriented, optimum -
econom yengin eand trans -
missio nsetting s
SSpor tSporty engin eand transmis -
sio nsetting s
S+SportPlusEspecially sport yengin eand
transmissio nsetting s
RaceMaximum sportiness and
engineand transmissio n
setting ssuitable fo rth e
racetrac k
IIndividualIndividual setting s
Dependingon th edrive program selecte dth e
followin gvehicle characteristics will change:
Rth edrive (engin emanagement)
Rth etransmissio nmanagemen t
RESP®(Ypage 55)
Rthesuspensio n (Ypage 138)
Rtheposition of th eexhaus tfla p
(Ypage 106)
Rth eavailabilit yof th eEC Ostart/sto pfunction
(Ypage 105)
Rth eavailabilit yof glidin gmode
(Ypage 112)
Further information fo rautomatic drive program
characteristics (
Ypage 113).
Additionally, in drive program Iyou can config-
ure th erespective vehicle characteristics usin g
th emultimedia system. You can fin dinforma-
tion about this in th eDigital Operator's Manual.
Each time you start th eengin ewit hth eSmart -
Key or th eStart/Sto pbutton, drive program Cis
activated. Fo rfurther information about startin g
th eengine, see (
Ypage 103).
Selecting th edrive program
XTur nDYNAMI CSELECT controller :until th e
desire ddrive program is selected.
The selecte ddrive program appears in th e
multifunction display. Afte rfiv eseconds th e
display goe sout and th estatus icon of th e
selecte ddrive program appears .
The drive program indicator on DYNAMI C
SELECT controller :lights up in red .
In addition ,th ecurren tdrive program setting s
are displaye din th emultimedia system dis -
play.
Additiona lsettings
:Manual mode (Ypage 115)
;ECOstart/sto pfunction (Ypage 105)
=Position of th eexhaus tflap (Ypage 106)
?Suspensio n (Ypage 138)
AESP®(Ypage 55 )
Whe nyou press buttons :-A thecorre-
spondin gsetting is selected. The DYNAMI C
SELECT controller setting is overwritten.
These setting swill also be maintained fo rman -
ual mode and ES P
®if you switch to drive pro -
108DYNAMIC SELECT controller
Driving and parking
Page 113 of 290

Transmission positions
BPark position
This prevents the vehicle from rolling
away when stopped.
Only shift the transmission into posi-
tion Pwhen the vehicle is stationary
(
Ypage 109). The parking lock
should not be used as a brake when
parking. Always apply the electronic
parking brake in addition to the park-
ing lock in order to secure the vehi-
cle.
The automatic transmission shifts to P automatically if you:
Rremove the SmartKey
Rswitch off the engine when in Ror
D and open the driver's door or
front-passenger door
Ropen the driver's door while trav-
eling at low speed in transmission
position Dor R
If the vehicle electronics are malfunc- tioning, the transmission may be
locked in position P. Have the vehicle
electronics checked immediately at a qualified specialist workshop.
CReverse gear
Only shift the transmission into posi-
tion Rwhen the vehicle is stationary.
ANeutral
Do not shift the transmission to N
while driving. Otherwise, the auto-
matic transmission could be dam-
aged.
No power is transmitted from the
engine to the drive wheels.
Releasing the brakes will allow you to
move the vehicle freely, e.g. to push
it or tow it.
If ESP
®is deactivated or faulty: shift
the transmission to position Nif the
vehicle is in danger of skidding, e.g.
on icy roads.
If you switch off the engine using the
SmartKey or the Start/Stop button,
the automatic transmission shifts to
neutral Nautomatically.
!Rolling in neutral Ncan damage
the drive train.
7Drive
The automatic transmission changes
gear automatically in the automatic
drive programs (
Ypage 113). All
forward gears are available.
Driving tips
Changing gear
The automatic transmission shifts to the indi-
vidual gears automatically when it is in trans-
mission position D. This automatic gear shifting
behavior is determined by:
Rthe selected drive program (Ypage 108)
Rthe position of the accelerator pedal
Rthe road speed
Accelerator pedal position
Your style of driving influences how the auto-
matic transmission shifts gear:
Rlittle throttle: early upshifts
Rmore throttle: late upshifts
A dynamic driving style with high longitudinal
and lateral acceleration delays the shift points
to higher engine speeds.
AMG SPEEDSHIFT DCT 7-speed sports transmission111
Driving and parking
Z