sensor MERCEDES-BENZ B-CLASS 2012 User Guide
[x] Cancel search | Manufacturer: MERCEDES-BENZ, Model Year: 2012, Model line: B-CLASS, Model: MERCEDES-BENZ B-CLASS 2012Pages: 340, PDF Size: 3.09 MB
Page 63 of 340
Due to the nature of the system, particularly
complicated driving
conditions
may cause the
system to display unnecessary warnings.
With the help of the radar sensor system, the
distance warning function can detect
obstacles that are in the path of your vehicle
for an extended period of time.
At speeds up to 40 mph (70 km/h), the
distance warning function may also detect
stationary obstacles, for example stopped or
parked vehicles.
If you approach an obstacle and the distance
warning function detects a risk of a collision,
the system will initially alert you both visually
and acoustically.
In particular, the detection of obstacles can
be impaired if:
R dirt on the sensors or anything else
covering the sensors
R snow or heavy rain
R interference by other radar sources
R there are strong radar reflections, for
example in parking garages
R a narrow vehicle traveling in front, e.g. a
motorbike
R a vehicle traveling in front on a different line
relative to the center of your vehicle
Following damage to the front end of the
vehicle, have the configuration and operation
of the radar sensor checked at a qualified
specialist workshop. This also applies to
collisions at low speeds where there is no
visible damage to the front of the vehicle.
Adaptive Brake Assist i
Observe the "Important safety notes"
section for driving safety systems
(Y page 59). G
WARNING
Adaptive Brake Assist cannot always clearly
identify objects and complex traffic
situations. In these cases, Adaptive Brake
Assist may not
intervene. There is a risk of an
accident. Always pay careful attention to the traffic
situation and be ready to brake.
G
WARNING
Adaptive Brake Assist does not react:
R to people or animals
R to oncoming vehicles
R to crossing traffic
R to stationary obstacles
R when cornering
As a result, Adaptive Brake Assist may not
intervene in all critical conditions. There is a
risk of an accident.
Always pay careful attention to the traffic
situation and be ready to brake.
Adaptive Brake Assist provides braking
assistance in hazardous situations at speeds
greater than 20 mph (30 km/h ) and uses
radar sensor technology to assess the traffic
situation.
With the help of a sensor system, adaptive
Brake Assist
can detect obstacles that are in
the path of your vehicle for an extended
period of time.
Should you approach an obstacle and
Adaptive Brake Assist has detected a risk of
collision, Adaptive Brake Assist calculates the
braking force necessary to avoid a rear-end
collision. Should you apply the brakes
vigorously, Adaptive Brake Assist will
automatically increase the braking force to a
level suitable for the traffic conditions.
X Keep the brake pedal depressed until the
emergency braking situation is over.
ABS prevents the wheels from locking.
The brakes will work normally again if:
R you release the brake pedal.
R there is no
longer any danger of a rear-end
collision.
R no obstacle is detected in front of your
vehicle.
Adaptive Brake Assist is then deactivated. Driving safety systems
61
Safety Z
ProCarManuals.com
Page 64 of 340
Up to vehicle speeds of around 155 mph
(250 km/h
),
adaptive Brake Assist is capable
of reacting to moving objects that have
already been recognized as such at least once
over the period of observation. Adaptive
Brake Assist does not react to stationary
obstacles.
If Adaptive Brake Assist is not available due
to a malfunction in the radar sensor system,
the brake system remains available with full
brake boosting effect and BAS.
In particular, the detection of obstacles can
be impaired if there is:
R dirt on the sensors or anything else
covering the sensors
R snow or heavy rain
R interference by other radar sources
R there are strong radar reflections, for
example in parking garages
R a narrow vehicle traveling in front, e.g. a
motorbike
R a vehicle traveling in front on a different line
relative to the center of your vehicle
Following damage to the front end of the
vehicle, have the configuration and operation
of the radar sensor checked at a qualified
specialist workshop. This also applies to
collisions at low speeds where there is no
visible damage to the front of the vehicle. Adaptive brake lights
If you brake sharply from a speed of more
than 50 km/h
or if braking is assisted by BAS
or Adaptive Brake Assist, the brake lamps
flash rapidly. In this way, traffic traveling
behind you is warned in an even more
noticeable manner.
If you brake sharply to a standstill from a
speed of more than 70 km/h, the hazard
warning lamps are activated automatically. If
the brakes are applied again, the brake lamps
light up continuously. The hazard warning
lamps switch off automatically if you travel
faster than 10 km/h. You can also switch off the hazard warning lamps using the hazard
warning button (Y page 101).
i
Adaptive brake lamps
are only available in
certain countries. ESP
®
(Electronic Stability Program)
General notes i
Observe the "Important safety notes"
section ( Y page 59).
ESP ®
monitors driving stability and traction,
i.e. power transmission
between the tires and
the road surface.
If ESP ®
detects that the vehicle is deviating
from the direction desired by the driver, one
or more wheels are braked to stabilize the
vehicle. The engine output is also modified to
keep the vehicle on the desired course within
physical limits. ESP ®
assists the driver when
pulling away on wet or slippery roads. ESP ®
can also stabilize the vehicle during braking.
ETS (Electronic Traction System) i
Observe the "Important safety notes"
section for driving safety systems
(Y page 59).
ETS traction control is part of ESP ®
.
ETS brakes the drive wheels individually if
they spin. This enables you to pull away and
accelerate on slippery surfaces, for example
if the road surface is slippery on one side.
ETS remains active when you deactivate
ESP ®
.
Important safety notes G
WARNING
If ESP ®
is malfunctioning, ESP ®
is unable to
stabilize the vehicle. Additionally, further
driving safety systems are deactivated. This
increases the risk
of skidding and an accident.
Drive on carefully. Have ESP ®
checked at a
qualified specialist workshop. 62
Driving safety systems
Safety
ProCarManuals.com
Page 95 of 340
defroster is switched on and the outside
temperature is
low.
Mirror heating lasts up to
10 minutes.
i You can also heat up the exterior mirrors
manually by switching on the rear window
defroster.
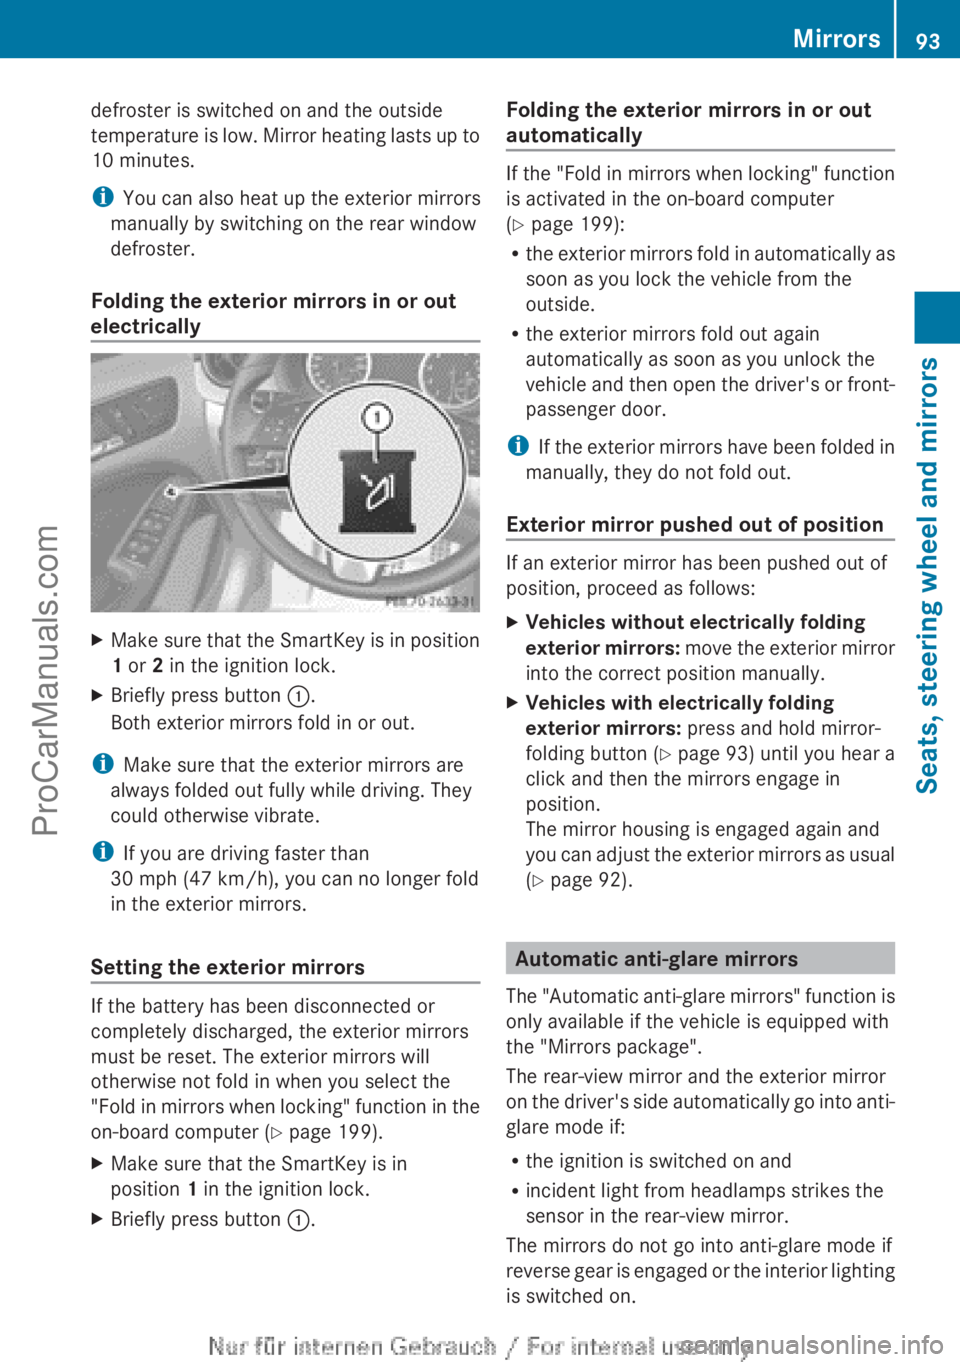
Folding the exterior mirrors in or out
electrically X
Make sure that the SmartKey is in position
1 or 2 in the ignition lock.
X Briefly press button :.
Both exterior mirrors fold in or out.
i Make sure that the exterior mirrors are
always folded out fully while driving. They
could otherwise vibrate.
i If you are driving faster than
30 mph (47 km/h ), you can no longer fold
in the exterior mirrors.
Setting the exterior mirrors If the battery has been disconnected or
completely discharged, the exterior mirrors
must be reset. The exterior mirrors will
otherwise not fold in when you select the
"Fold in
mirrors
when locking" function in the
on-board computer (Y page 199).
X Make sure that the SmartKey is in
position 1 in the ignition lock.
X Briefly press button :. Folding the exterior mirrors in or out
automatically If the "Fold in mirrors when locking" function
is activated in the on-board computer
(Y page 199):
R
the exterior mirrors
fold in automatically as
soon as you lock the vehicle from the
outside.
R the exterior mirrors fold out again
automatically as soon as you unlock the
vehicle and then open the driver's or front-
passenger door.
i If the exterior mirrors have been folded in
manually, they do not fold out.
Exterior mirror pushed out of position If an exterior mirror has been pushed out of
position, proceed as follows:
X
Vehicles without electrically folding
exterior mirrors:
move
the exterior mirror
into the correct position manually.
X Vehicles with electrically folding
exterior mirrors: press and hold mirror-
folding button ( Y page
93) until you hear a
click and then the mirrors engage in
position.
The mirror housing is engaged again and
you can adjust the exterior mirrors as usual
(Y page 92). Automatic anti-glare mirrors
The "Automatic anti-glare
mirrors" function is
only available if the vehicle is equipped with
the "Mirrors package".
The rear-view mirror and the exterior mirror
on the driver's side automatically go into anti-
glare mode if:
R the ignition is switched on and
R incident light from headlamps strikes the
sensor in the rear-view mirror.
The mirrors do not go into anti-glare mode if
reverse gear is engaged or the interior lighting
is switched on. Mirrors
93
Seats, steering wheel and mirrors Z
ProCarManuals.com
Page 100 of 340
Useful information
i This Operator's Manual describes all
models and all standard and optional
equipment of your vehicle available at the
time of publication of the Operator's
Manual. Country-specific differences are
possible. Please note
that your vehicle may
not be equipped with all features
described. This also applies to safety-
related systems and functions.
i Read the information on qualified
specialist workshops: ( Y page 24).Exterior lighting
General notes
For reasons of safety, Mercedes-Benz
recommends that you drive with the lights
switched on even
during the daytime. In some
countries, operation of the headlamps varies
due to legal requirements and self-imposed
obligations. Driving abroad
Conversion to symmetrical low beam Switch the headlamps to symmetrical low
beam in countries in which traffic drives on
the opposite
side
of the road from the country
where the vehicle is registered. This prevents
glare to oncoming traffic. When using
symmetrical lights, the edge of the road is not
lit as widely and as far ahead as normal.
Have the headlamps converted at a qualified
specialist workshop as close to the border as
possible before driving in these countries.
Conversion to asymmetrical low beam
after returning Have the headlamps converted back to
asymmetrical low-beam headlamps at a
qualified specialist workshop as soon as
possible after crossing the border again. Setting the exterior lighting
Setting options Exterior lighting can be set using:
R
the light switch
R the combination switch ( Y page 100)
R the on-board computer (Y page 197)
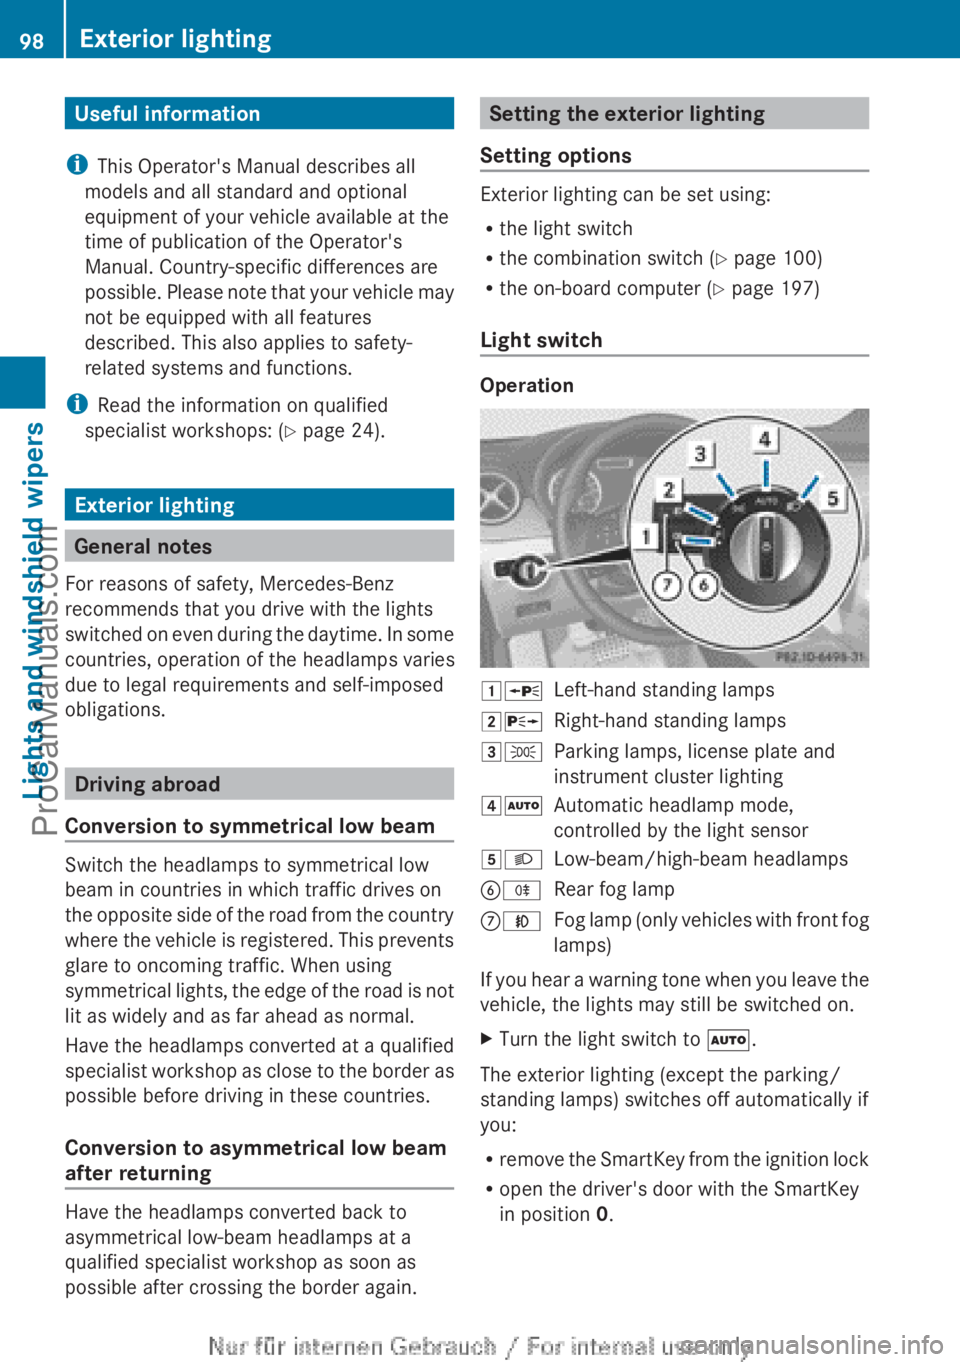
Light switch Operation
1W
Left-hand standing lamps
2X Right-hand standing lamps
3T Parking lamps, license plate and
instrument cluster lighting
4Ã Automatic headlamp mode,
controlled by the light sensor
5L Low-beam/high-beam headlamps
BR Rear fog lamp
CN Fog lamp (only vehicles with front fog
lamps)
If you hear a warning tone when you leave the
vehicle, the lights may still be switched on.
X Turn the light switch to Ã.
The exterior lighting (except the parking/
standing lamps) switches off automatically if
you:
R remove the
SmartKey
from the ignition lock
R open the driver's door with the SmartKey
in position 0.98
Exterior lighting
Lights and windshield wipers
ProCarManuals.com
Page 101 of 340
Automatic headlamp mode
G
WARNING
When the light switch is set to Ã,
the low-
beam headlamps may not be switched on
automatically if there is fog, snow or other
causes of poor visibility due to the weather
conditions
such as spray. There is a risk of an
accident.
In such situations, turn the light switch to
L.
The automatic headlamp feature is only an
aid. The driver is responsible for the vehicle's
lighting at all times.
à is the favored light switch setting. The
light setting is automatically selected
according to the brightness of the ambient
light (exception: poor visibility due to weather
conditions such as fog, snow or spray):
R SmartKey in position 1 in the ignition lock:
the parking lamps are switched on or off
automatically depending on the brightness
of the ambient light.
R With the engine running: if you have
activated the daytime running lamps
function via the on-board computer, the
daytime running lamps or the low-beam
headlamps and parking lamps are switched
on or off automatically depending on the
brightness of the ambient light.
X To switch on automatic headlamp
mode: turn the light switch to Ã.
The daytime running lamps improve the
visibility of your vehicle during the day. The
daytime running lamps
function is required by
law in Canada.
When the engine is running and the vehicle is
stationary: if you move the selector lever from
a drive position to P, the daytime running
lamps/low-beam headlamps go out after
three minutes.
When the engine is running, the vehicle is
stationary and in high ambient light: if you
turn the light switch to T, you turn on the
daytime running lamps and parking lamps. If the engine is running and you turn the light
switch to L, the manual settings take
precedence over the daytime running lamps.
Low-beam headlamps
Even if the light sensor does not detect that
it is dark, the parking lamps and low-beam
headlamps switch on when the ignition is
switched
on and
the light switch is set to the
L position. This is a particularly useful
function in the event of rain and fog.
X To switch on the low-beam headlamps:
turn the SmartKey in the ignition lock to
position 2 or start the engine.
X Turn the light switch to L.
The green L indicator lamp in the
instrument cluster lights up.
Front fog lamps
In conditions where visibility is poor due to
fog, snow or rain, the fog lamps improve
visibility as well as making it easier for other
road users to see you. They can be operated
together with the parking lamps or together
with the parking lamps and low-beam
headlamps.
X To switch on the front fog lamps: turn
the SmartKey in
the ignition lock to position
2 or start the engine.
X Turn the light switch to L or Ã.
X Press the N button.
The green N indicator lamp in the
instrument cluster lights up.
X To switch off the front fog lamps: press
the N button.
The green N indicator lamp in the
instrument cluster goes out.
Only vehicles with front fog lamps are
equipped with the "fog lamp" function;
information on the fog lamp function for
vehicles with Intelligent Light System
(Y page 102). Exterior lighting
99Lights and windshield wipers Z
ProCarManuals.com
Page 104 of 340
Active:
R
if you are driving at speeds below 25 mph
(40 km/h )
and switch on the turn signal or
turn the steering wheel.
R if you are driving at speeds between
25 mph (40 km/h) and 45 mph (70 km/h)
and turn the steering wheel.
Not active: if you are driving at speeds above
25 mph (40 km/h) or switch off the turn
signal or turn the steering wheel to the
straight-ahead position.
The cornering lamp may remain lit for a short
time, but is automatically switched off after
no more than three minutes. Extended range fog lamps
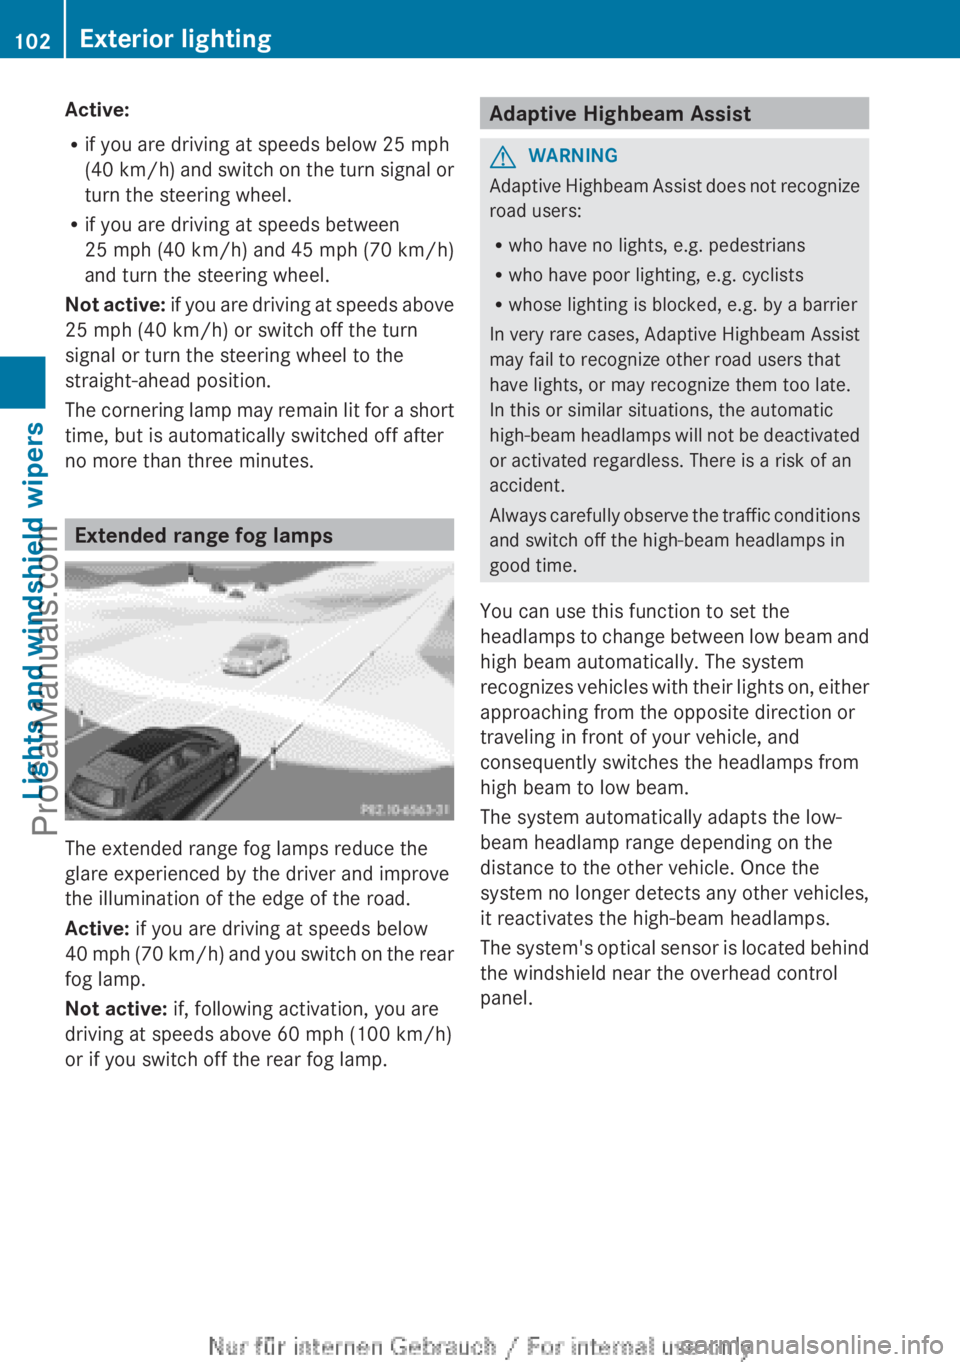
The extended range fog lamps reduce the
glare experienced by the driver and improve
the illumination of the edge of the road.
Active:
if you are driving at speeds below
40 mph (70
km/h) and you switch on the rear
fog lamp.
Not active: if, following activation, you are
driving at speeds above 60 mph (100 km/h)
or if you switch off the rear fog lamp. Adaptive Highbeam Assist
G
WARNING
Adaptive Highbeam Assist does not recognize
road users:
R who have no lights, e.g. pedestrians
R who have poor lighting, e.g. cyclists
R whose lighting is blocked, e.g. by a barrier
In very rare
cases, Adaptive Highbeam Assist
may fail to recognize other road users that
have lights, or may recognize them too late.
In this or similar situations, the automatic
high-beam headlamps will not be deactivated
or activated regardless. There is a risk of an
accident.
Always carefully observe the traffic conditions
and switch off the high-beam headlamps in
good time.
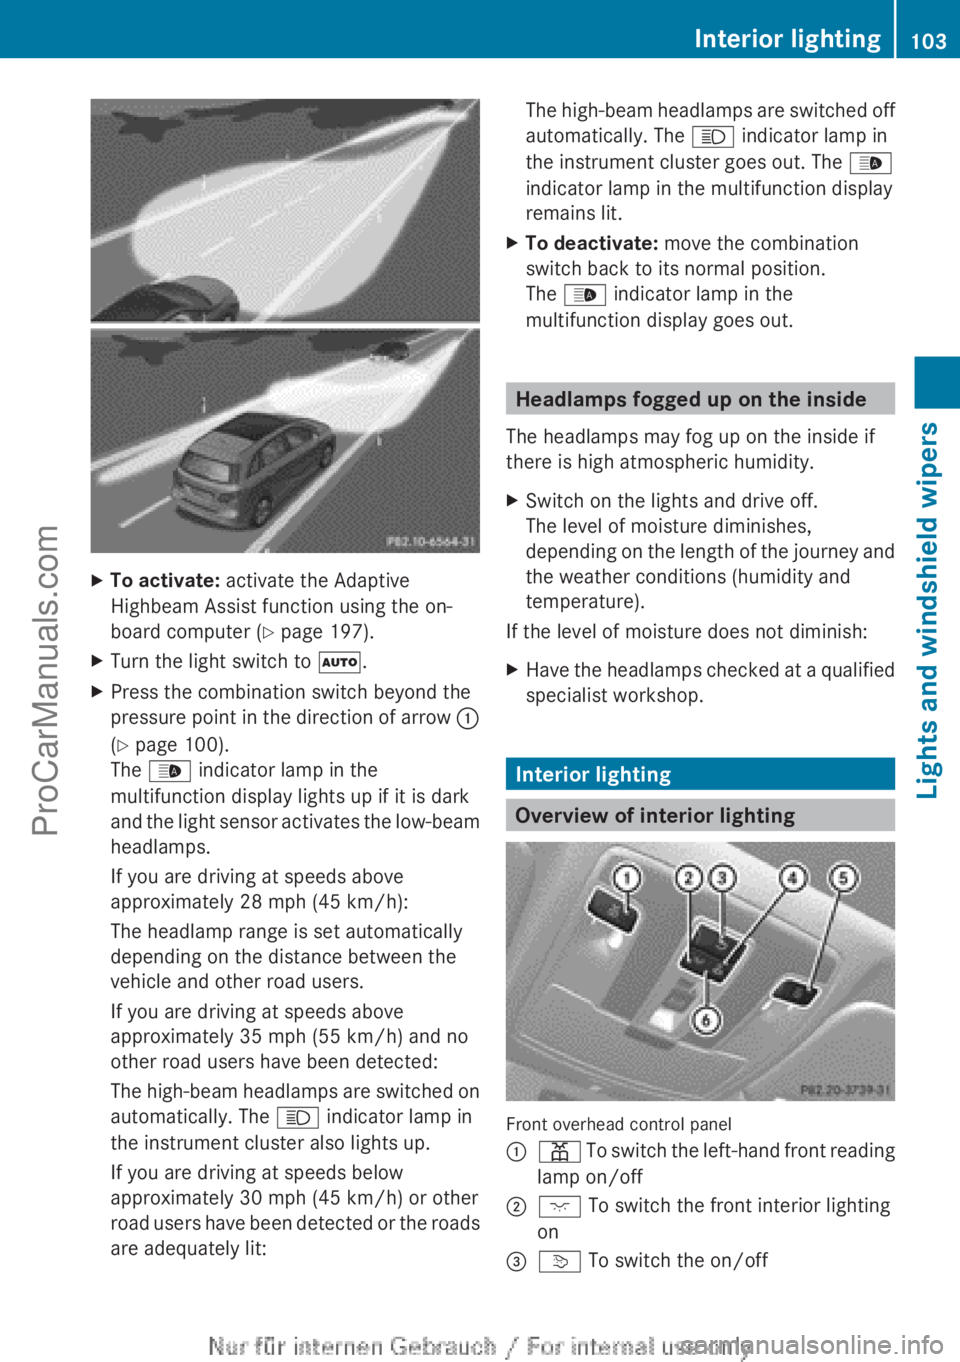
You can use this function to set the
headlamps to change between low beam and
high beam automatically. The system
recognizes vehicles with their lights on, either
approaching from the opposite direction or
traveling in front of your vehicle, and
consequently switches the headlamps from
high beam to low beam.
The system automatically adapts the low-
beam headlamp range depending on the
distance to the other vehicle. Once the
system no longer detects any other vehicles,
it reactivates the high-beam headlamps.
The system's optical sensor is located behind
the windshield near the overhead control
panel. 102
Exterior lighting
Lights and windshield wipers
ProCarManuals.com
Page 105 of 340
X
To activate: activate the Adaptive
Highbeam Assist function using the on-
board computer ( Y page 197).
X Turn the light switch to Ã.
X Press the combination switch beyond the
pressure point in
the direction of arrow :
(Y page 100).
The _ indicator lamp in the
multifunction display lights up if it is dark
and the light sensor activates the low-beam
headlamps.
If you are driving at speeds above
approximately 28 mph (45 km/h):
The headlamp range is set automatically
depending on the distance between the
vehicle and other road users.
If you are driving at speeds above
approximately 35 mph (55 km/h) and no
other road users have been detected:
The high-beam headlamps are switched on
automatically. The K indicator lamp in
the instrument cluster also lights up.
If you are driving at speeds below
approximately 30 mph (45 km/h) or other
road users have been detected or the roads
are adequately lit: The high-beam headlamps are switched off
automatically. The
K indicator lamp in
the instrument cluster goes out. The _
indicator lamp in the multifunction display
remains lit.
X To deactivate: move the combination
switch back to its normal position.
The _ indicator lamp in the
multifunction display goes out. Headlamps fogged up on the inside
The headlamps may fog up on the inside if
there is high atmospheric humidity.
X Switch on the lights and drive off.
The level of moisture diminishes,
depending on the
length of the journey and
the weather conditions (humidity and
temperature).
If the level of moisture does not diminish:
X Have the headlamps checked at a qualified
specialist workshop. Interior lighting
Overview of interior lighting
Front overhead control panel
:
p To switch the left-hand front reading
lamp on/off
; c To switch the front interior lighting
on
= v
To switch the on/off Interior lighting
103
Lights and windshield wipers Z
ProCarManuals.com
Page 114 of 340
!
If the windshield wipers leave smears on
the windshield after the vehicle has been
washed in an automatic car wash, wax or
other residues may be the reason for this.
Clean the windshield using washer fluid
after washing the vehicle in an automatic
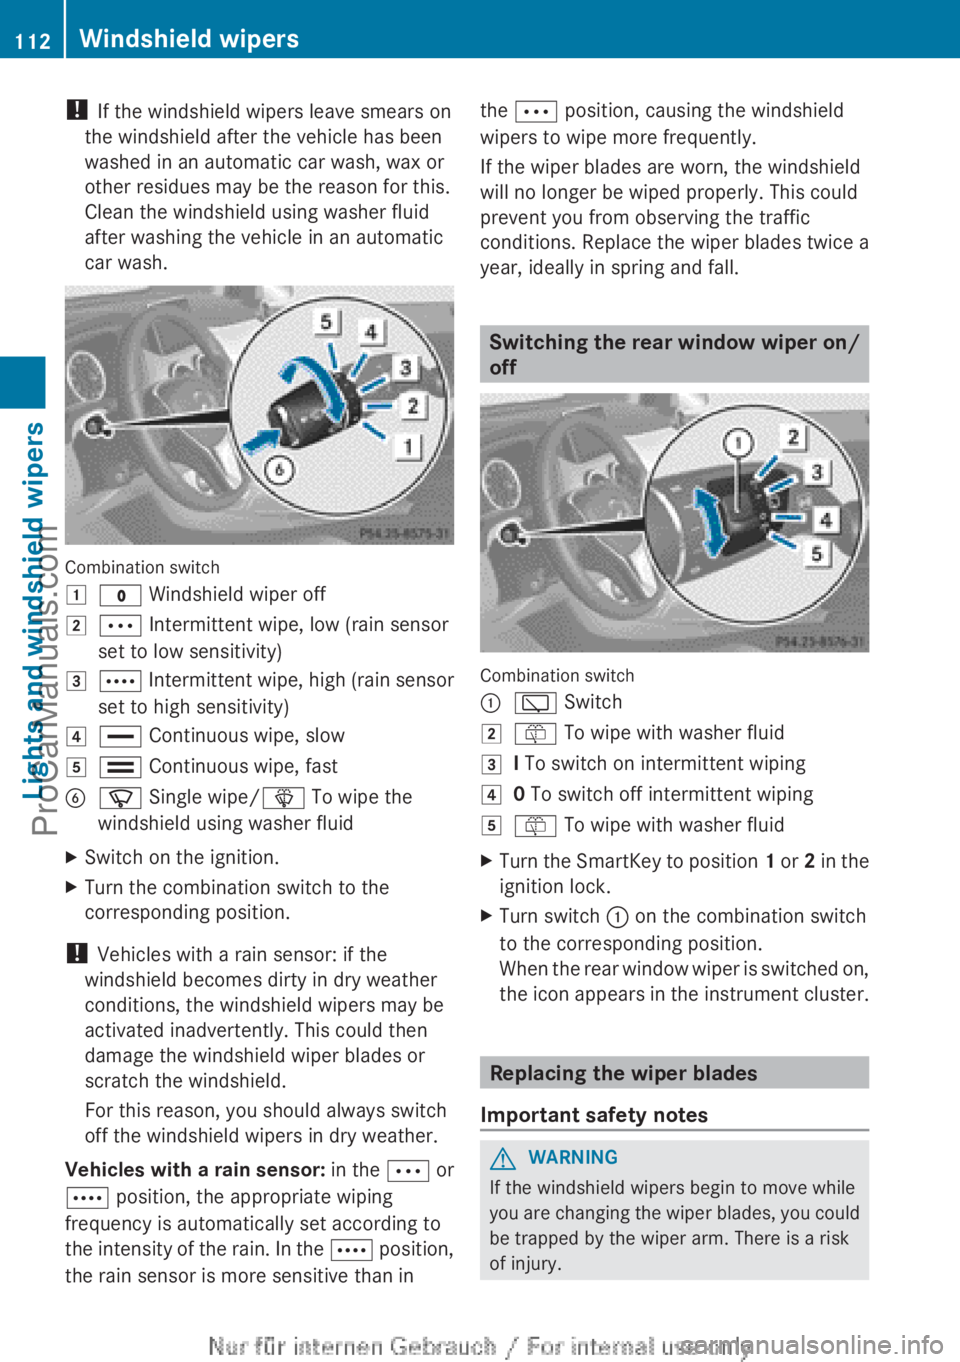
car wash. Combination switch
1
$ Windshield wiper off
2 Ä Intermittent wipe, low (rain sensor
set to low sensitivity)
3 Å Intermittent wipe, high (rain sensor
set to high sensitivity)
4 ° Continuous wipe, slow
5 ¯
Continuous wipe, fast
B í Single wipe/ î To wipe the
windshield using washer fluid
X Switch on the ignition.
X Turn the combination switch to the
corresponding position.
! Vehicles with a rain sensor: if the
windshield becomes dirty in dry weather
conditions, the windshield wipers may be
activated inadvertently. This could then
damage the windshield wiper blades or
scratch the windshield.
For this reason, you should always switch
off the windshield wipers in dry weather.
Vehicles with
a
rain sensor: in the Ä or
Å position, the appropriate wiping
frequency is automatically set according to
the intensity of the rain. In the Å position,
the rain sensor is more sensitive than in the Ä position, causing the windshield
wipers to wipe more frequently.
If the wiper blades are worn, the windshield
will no longer be wiped properly. This could
prevent you from observing the traffic
conditions. Replace the wiper blades twice a
year, ideally in spring and fall.
Switching the rear window wiper on/
off
Combination switch
:
è Switch
2 ô To wipe with washer fluid
3 I To switch on intermittent wiping
4 0 To switch off intermittent wiping
5 ô To wipe with washer fluid
X Turn the SmartKey to position 1 or
2
in the
ignition lock.
X Turn switch : on the combination switch
to the corresponding position.
When the rear
window wiper is switched on,
the icon appears in the instrument cluster. Replacing the wiper blades
Important safety notes G
WARNING
If the windshield wipers begin to move while
you are changing
the wiper blades, you could
be trapped by the wiper arm. There is a risk
of injury. 112
Windshield wipers
Lights and windshield wipers
ProCarManuals.com
Page 162 of 340
In such cases, DISTRONIC PLUS may:
R
give an unnecessary warning and then
brake the vehicle
R neither give a warning nor intervene
R accelerate unexpectedly
There is a risk of an accident.
Continue to drive carefully and be ready to
brake, in particular when warned to do so by
DISTRONIC PLUS. G
WARNING
DISTRONIC PLUS brakes your vehicle with up
to 40% of the maximum braking force. If this
braking force is
insufficient, DISTRONIC PLUS
warns you visually and audibly. There is a risk
of an accident.
In such cases, apply the brakes yourself and
try to take evasive action.
! If DISTRONIC PLUS or the HOLD function
is activated, the vehicle brakes
automatically in certain situations. To
prevent damage to the vehicle, deactivate
DISTRONIC PLUS and the HOLD function in
the following or other similar situations:
R when towing the vehicle
R in the car wash
If you fail to adapt your driving style,
DISTRONIC PLUS can neither reduce the risk
of accident nor override the laws of physics.
DISTRONIC PLUS cannot take into account
the road, traffic and weather conditions.
DISTRONIC PLUS is only an aid. You are
responsible for the distance to the vehicle in
front, for vehicle speed, for braking in good
time and for staying in your lane.
Do not use DISTRONIC PLUS:
R in road and traffic conditions which do not
allow you to maintain a constant speed e.g.
in heavy traffic or on winding roads
R on slippery road surfaces. Braking or
accelerating could cause the drive wheels to lose traction and the vehicle could then
skid
R when there is
poor visibility, e.g. due to fog,
heavy rain or snow
DISTRONIC PLUS may not detect narrow
vehicles driving in front, e.g. motorcycles, or
vehicles driving on a different line.
In particular, the detection of obstacles can
be impaired if:
R dirt on the sensors or anything else
covering the sensors
R snow or heavy rain
R interference by other radar sources
R strong radar reflections, for example, in
parking garages
If DISTRONIC PLUS no longer detects a
vehicle in front, DISTRONIC PLUS may
unexpectedly accelerate the vehicle to the
stored speed.
This speed may:
R be too high if you are driving in a filter lane
or an exit lane
R be so high when driving in the right-hand
lane that you overtake vehicles in the left-
hand lane
R be so high when driving in the left-hand lane
that you overtake vehicles in the right-hand
lane
If there is a change of drivers, advise the new
driver of the speed stored.
General notes DISTRONIC PLUS regulates the speed and
automatically helps you maintain the
distance to the vehicle detected in front.
DISTRONIC PLUS brakes automatically so
that the set speed is not exceeded.
On long and steep downhill gradients,
especially if the vehicle is laden, you must
select a low gear in good time. For this, you
will need to have selected manual drive
program
M(Y page 154).
By doing so, you will
make use of the braking effect of the engine.
This relieves the load on the brake system and 160
Driving systems
Driving and parking
ProCarManuals.com
Page 163 of 340
prevents the brakes from overheating and
wearing too quickly.
If a
slower-moving
vehicle is detected in front,
DISTRONIC PLUS brakes your vehicle. It
maintains the preset distance to the vehicle
in front.
If DISTRONIC PLUS detects that there is a risk
of a collision, you will be warned visually and
acoustically. DISTRONIC PLUS cannot
prevent a collision without your intervention.
An intermittent warning tone will then sound
and the distance warning lamp will light up in
the instrument cluster. Brake immediately in
order to increase the distance to the vehicle
in front or take evasive action provided it is
safe to do so.
For DISTRONIC PLUS to assist you when
driving, the radar sensor system must be:
R activated (Y page 199)
R operational
DISTRONIC PLUS is automatically
deactivated if:
R you are driving slower than 15 mph
(25 km/h) and there is no longer a vehicle
in front or
R the vehicle in front is no longer detected
If there is no vehicle in front, DISTRONIC
PLUS operates in the same way as cruise
control in the speed range between 20 mph
(30 km/h) and 120 mph (200 km/h). If a
vehicle is driving in front of you, it operates in
the speed range between 0 mph (0 km/h) and
120 mph (200 km/h).
Do not use DISTRONIC PLUS while driving on
roads with steep gradients.
As DISTRONIC PLUS transmits radar waves,
it can resemble the radar detectors of the
responsible authorities. You can refer to the
relevant chapter in the Operator's Manual if
questions are asked about this.
i This device complies with RSS-210 of
Industry Canada. Operation is subject to
the following two conditions:
1. This device may not cause harmful
interference, and 2. this device must accept any interference
received, including interference that may
cause undesired operation of the device.
Removal, tampering, or altering of the
device will void any warranties, and is not
permitted. Do not
tamper with, alter, or use
in any non-approved way.
Any unauthorized modification to this
device could void the user's authority to
operate the equipment.
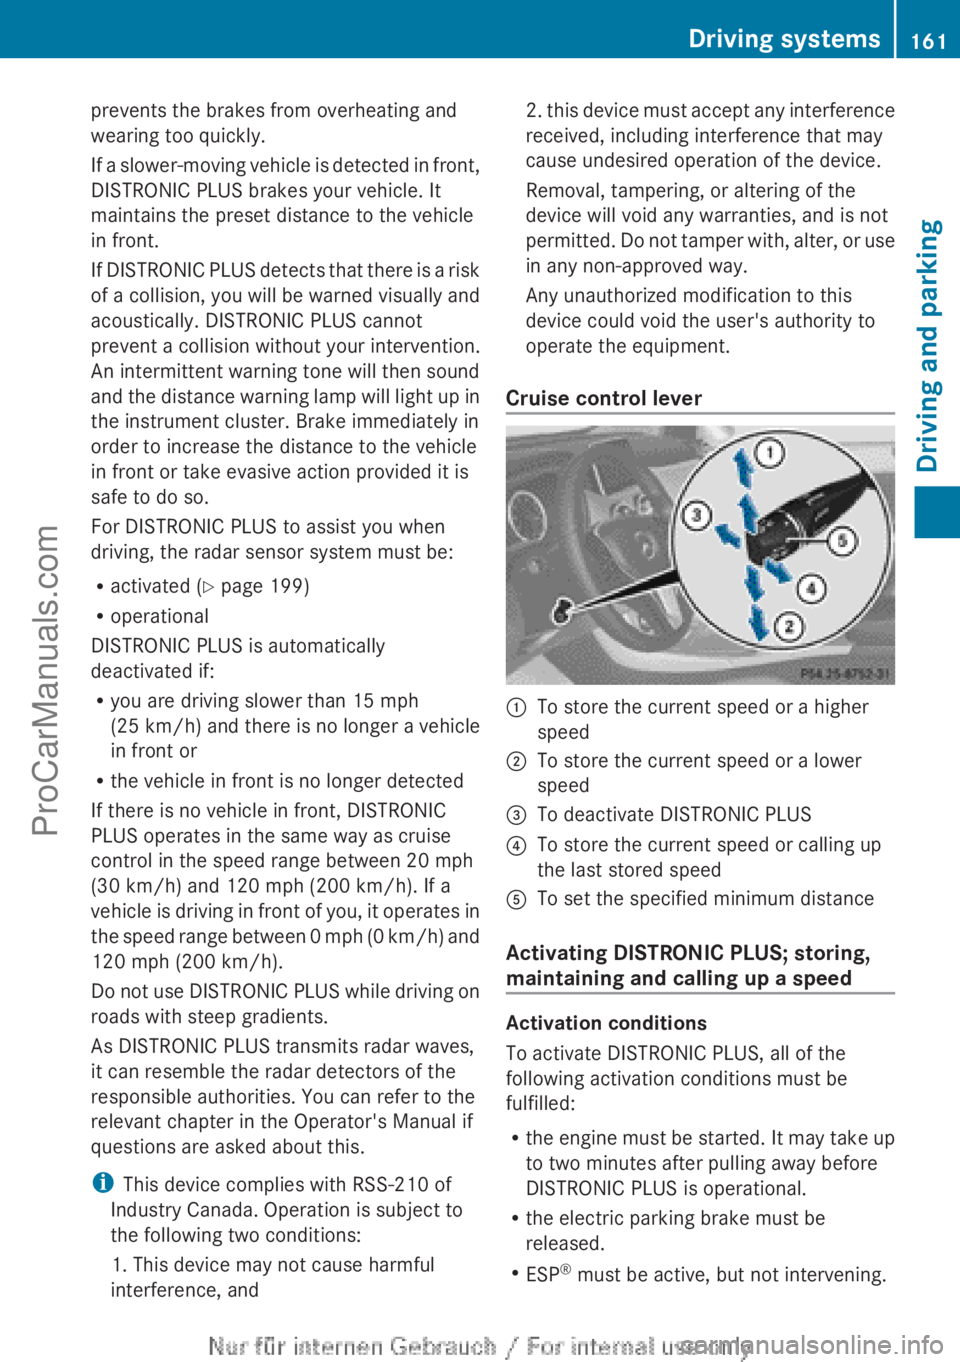
Cruise control lever :
To store the current speed or a higher
speed
; To store the current speed or a lower
speed
= To deactivate DISTRONIC PLUS
? To store the current speed or calling up
the last stored speed
A To set the specified minimum distance
Activating DISTRONIC PLUS; storing,
maintaining and calling up a speed Activation conditions
To activate DISTRONIC PLUS, all of the
following activation conditions must be
fulfilled:
R
the engine must
be started. It may take up
to two minutes after pulling away before
DISTRONIC PLUS is operational.
R the electric parking brake must be
released.
R ESP ®
must be active, but not intervening. Driving systems
161
Driving and parking Z
ProCarManuals.com