air condition MERCEDES-BENZ B-Class 2017 W246 User Guide
[x] Cancel search | Manufacturer: MERCEDES-BENZ, Model Year: 2017, Model line: B-Class, Model: MERCEDES-BENZ B-Class 2017 W246Pages: 290, PDF Size: 19.81 MB
Page 48 of 290
Requirements
To be classified correctly, the front passenger
must sit:
R with the seat belt fastened correctly
R in an almost upright position with their back
against the seat backrest
R with their feet resting on the floor, if possible
If the front passenger does not observe these
conditions, OCS may produce a false classifica- tion, e.g. because the front passenger:
R transfers their weight by supporting them-
selves on a vehicle armrest
R sits in such a way that their weight is raised
from the seat cushion
If it is absolutely necessary to install a child
restraint system on the front-passenger seat, be
sure to observe the correct positioning of the
child restraint system. Never place objects
under or behind the child restraint system, e.g. a
cushion. The entire base of the child restraint
system must always rest on the seat cushion of
the front-passenger seat. The backrest of the
forward-facing child restraint system must lie as flat as possible against the backrest of the front-
passenger seat.
The child restraint system must not touch the
roof or be subjected to a load by the head
restraint. Adjust the angle of the seat backrest
and the head restraint position accordingly.
Only then can OCS be guaranteed to function
correctly. Always observe the child restraint sys-
tem manufacturer's installation and operating
instructions.
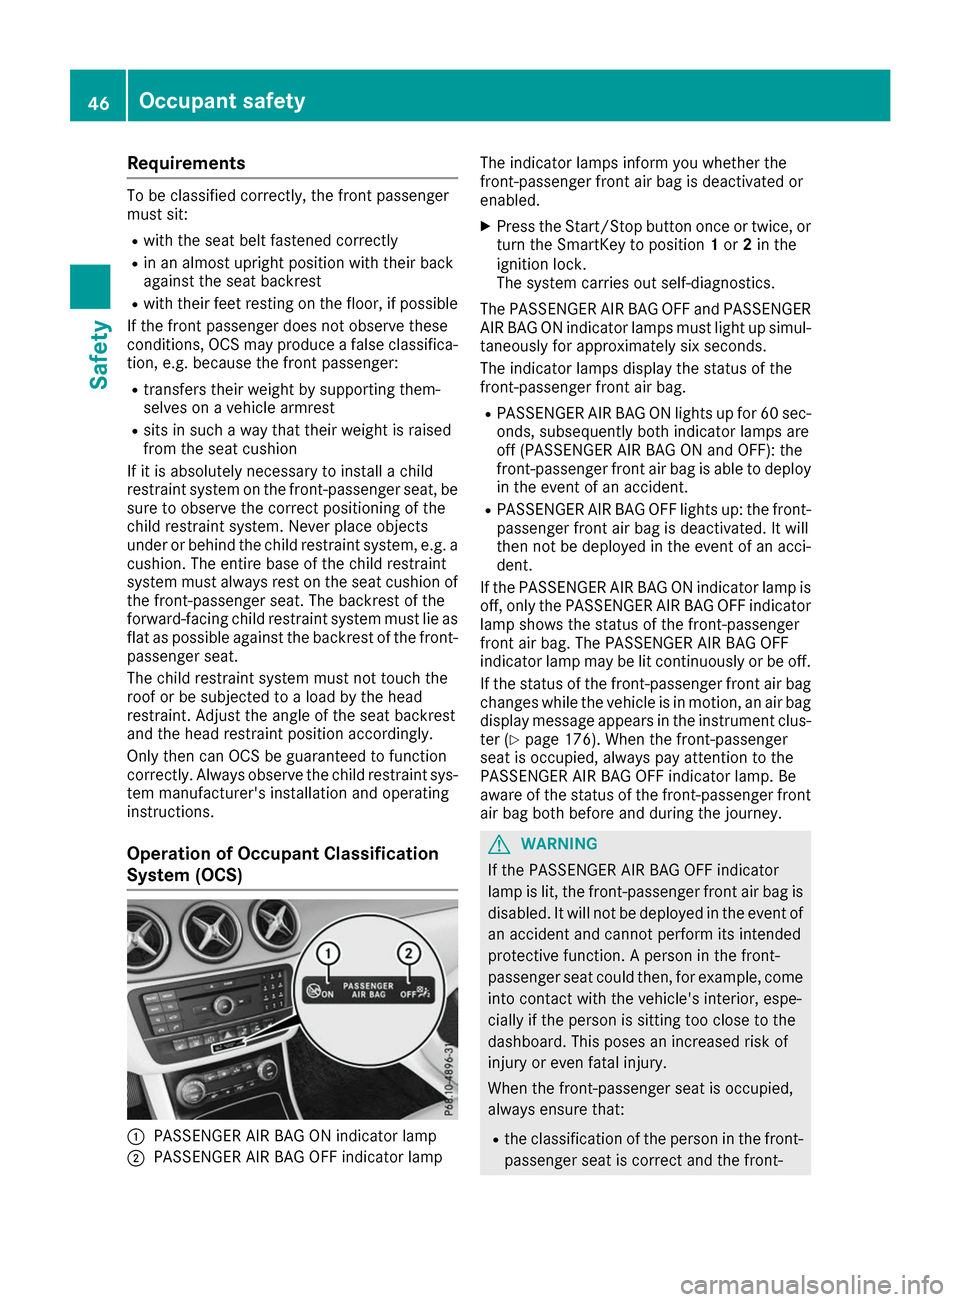
Operation of Occupant Classification
System (OCS) 0043
PASSENGER AIR BAG ON indicator lamp
0044 PASSENGER AIR BAG OFF indicator lamp The indicator lamps inform you whether the
front-passenger front air bag is deactivated or
enabled.
X Press the Start/Stop button once or twice, or
turn the SmartKey to position 1or 2in the
ignition lock.
The system carries out self-diagnostics.
The PASSENGER AIR BAG OFF and PASSENGER
AIR BAG ON indicator lamps must light up simul- taneously for approximately six seconds.
The indicator lamps display the status of the
front-passenger front air bag.
R PASSENGER AIR BAG ON lights up for 60 sec-
onds, subsequently both indicator lamps are
off (PASSENGER AIR BAG ON and OFF): the
front-passenger front air bag is able to deploy in the event of an accident.
R PASSENGER AIR BAG OFF lights up: the front-
passenger front air bag is deactivated. It will
then not be deployed in the event of an acci-
dent.
If the PASSENGER AIR BAG ON indicator lamp is
off, only the PASSENGER AIR BAG OFF indicator lamp shows the status of the front-passenger
front air bag. The PASSENGER AIR BAG OFF
indicator lamp may be lit continuously or be off.
If the status of the front-passenger front air bag
changes while the vehicle is in motion, an air bag display message appears in the instrument clus-
ter (Y page 176). When the front-passenger
seat is occupied, always pay attention to the
PASSENGER AIR BAG OFF indicator lamp. Be
aware of the status of the front-passenger front air bag both before and during the journey. G
WARNING
If the PASSENGER AIR BAG OFF indicator
lamp is lit, the front-passenger front air bag is disabled. It will not be deployed in the event of
an accident and cannot perform its intended
protective function. A person in the front-
passenger seat could then, for example, come
into contact with the vehicle's interior, espe-
cially if the person is sitting too close to the
dashboard. This poses an increased risk of
injury or even fatal injury.
When the front-passenger seat is occupied,
always ensure that:
R the classification of the person in the front-
passenger seat is correct and the front- 46
Occupant safetySafety
Page 52 of 290
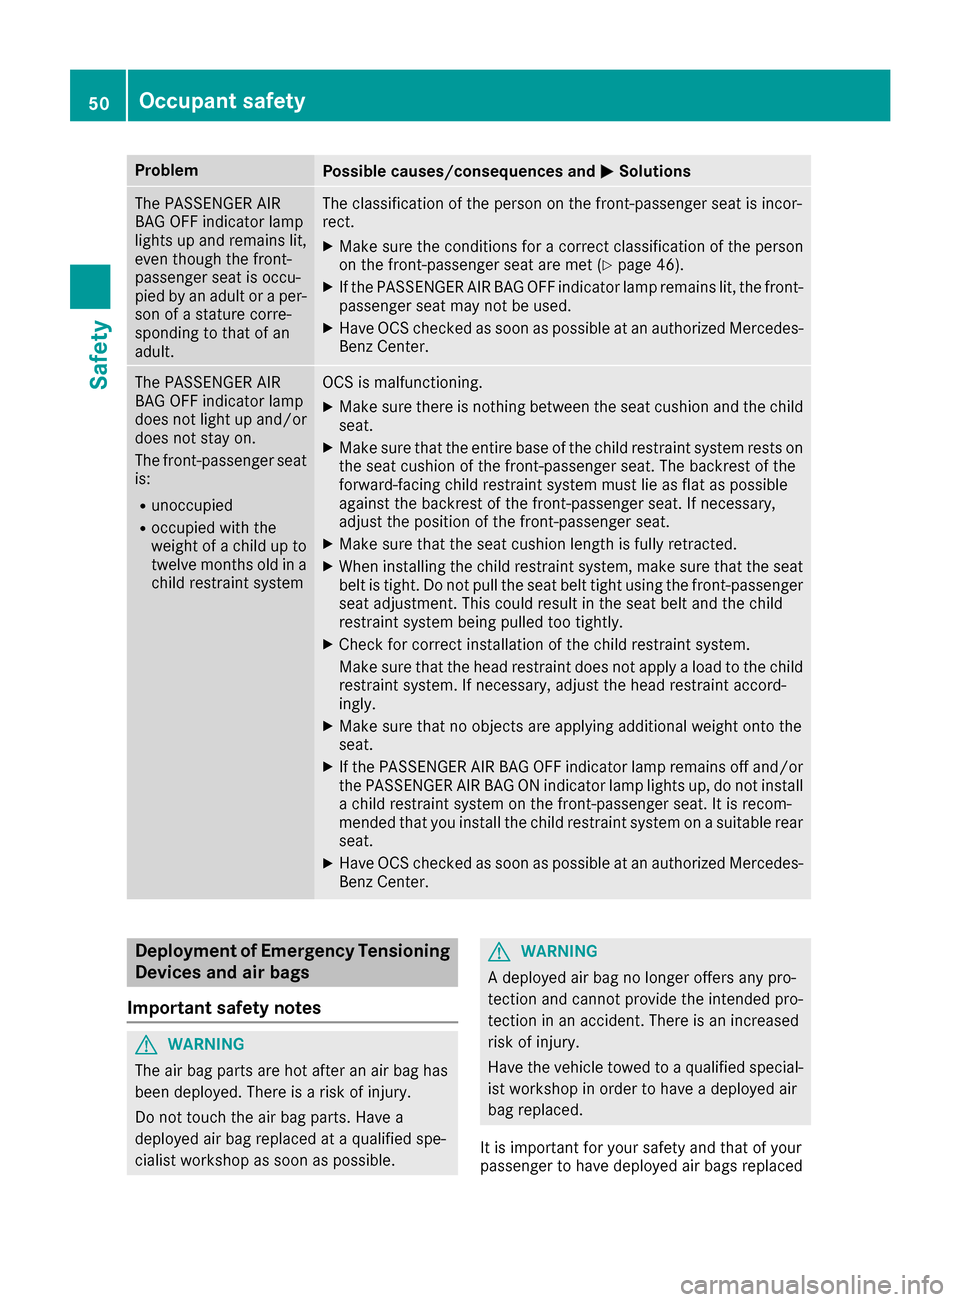
Problem
Possible causes/consequences and
0050
0050Solutions The PASSENGER AIR
BAG OFF indicator lamp
lights up and remains lit,
even though the front-
passenger seat is occu-
pied by an adult or a per-
son of a stature corre-
sponding to that of an
adult. The classification of the person on the front-passenger seat is incor-
rect.
X Make sure the conditions for a correct classification of the person
on the front-passenger seat are met (Y page 46).
X If the PASSENGER AIR BAG OFF indicator lamp remains lit, the front-
passenger seat may not be used.
X Have OCS checked as soon as possible at an authorized Mercedes-
Benz Center. The PASSENGER AIR
BAG OFF indicator lamp
does not light up and/or
does not stay on.
The front-passenger seatis:
R unoccupied
R occupied with the
weight of a child up to
twelve months old in achild restraint system OCS is malfunctioning.
X Make sure there is nothing between the seat cushion and the child
seat.
X Make sure that the entire base of the child restraint system rests on
the seat cushion of the front-passenger seat. The backrest of the
forward-facing child restraint system must lie as flat as possible
against the backrest of the front-passenger seat. If necessary,
adjust the position of the front-passenger seat.
X Make sure that the seat cushion length is fully retracted.
X When installing the child restraint system, make sure that the seat
belt is tight. Do not pull the seat belt tight using the front-passenger seat adjustment. This could result in the seat belt and the child
restraint system being pulled too tightly.
X Check for correct installation of the child restraint system.
Make sure that the head restraint does not apply a load to the child
restraint system. If necessary, adjust the head restraint accord-
ingly.
X Make sure that no objects are applying additional weight onto the
seat.
X If the PASSENGER AIR BAG OFF indicator lamp remains off and/or
the PASSENGER AIR BAG ON indicator lamp lights up, do not install a child restraint system on the front-passenger seat. It is recom-
mended that you install the child restraint system on a suitable rear
seat.
X Have OCS checked as soon as possible at an authorized Mercedes-
Benz Center. Deployment of Emergency Tensioning
Devices and air bags
Important safety notes G
WARNING
The air bag parts are hot after an air bag has
been deployed. There is a risk of injury.
Do not touch the air bag parts. Have a
deployed air bag replaced at a qualified spe-
cialist workshop as soon as possible. G
WARNING
A deployed air bag no longer offers any pro-
tection and cannot provide the intended pro-
tection in an accident. There is an increased
risk of injury.
Have the vehicle towed to a qualified special- ist workshop in order to have a deployed air
bag replaced.
It is important for your safety and that of your
passenger to have deployed air bags replaced 50
Occupant safetySafety
Page 54 of 290
sive role in the deployment of an air bag. Nor do
they provide an indication of air bag deploy-
ment.
The vehicle can be deformed considerably, with-
out an air bag being deployed. This is the case if only parts which are relatively easily deformed
are affected and the rate of deceleration is not
high. Conversely, air bags may be deployed even
though the vehicle suffers only minor deforma-
tion. This is the case if, for example, very rigid
vehicle parts such as longitudinal body mem-
bers are hit, and sufficient deceleration occurs
as a result.
If the restraint system control unit detects a side
impact, the relevant restraint system compo-
nents are deployed independently of each other.
R Side impact air bags on the side where the
impact takes place, independently of the
Emergency Tensioning Device and the use of the seat belt on the driver's seat and outer
seats in the second row
The side impact air bag on the front-
passenger side deploys under the following
conditions:
- the OCS system detects that the front-
passenger seat is occupied or
- the seat belt buckle tongue is engaged in
the belt buckle of the front-passenger seat
R Window curtain air bag on the side of impact,
independently of the use of the seat belt and
independently of whether the front-
passenger seat is occupied
R Emergency Tensioning Devices, if the system
determines that deployment can offer addi-
tional protection in this situation
i Not all air bags are deployed in an accident.
The different air bag systems work independ- ently of each other.
How the air bag system works is determined
by the severity of the accident detected,
especially the vehicle deceleration or accel-
eration and the apparent type of accident:
R Frontal collision
R Side impact Automatic measures after an acci-
dent
Immediately after an accident, the following
measures are implemented, depending on the
type and severity of the impact:
R the hazard warning lamps are activated
R the emergency lighting is activated
R the vehicle doors are unlocked
R the front side windows are lowered
R the drive system and the high-voltage electri-
cal system are switched off
R vehicles with mbrace: automatic emergency
call Children in the vehicle
Important safety notes
Accident statistics show that children secured
in the rear seats are safer than children secured
in the front-passenger seat. For this reason,
Mercedes-Benz strongly advises that you install a child restraint system on a rear seat. Children
are generally better protected there.
If a child younger than twelve years old and
under 5 ft (1.50 m)in height is traveling in the
vehicle:
R always secure the child in a child restraint
system suitable for Mercedes-Benz vehicles.
The child restraint system must be appropri-
ate to the age, weight and size of the child
R be sure to observe the instructions and safety
notes in this section in addition to the child
restraint system manufacturer's installation
instructions
R be sure to observe the instructions and safety
notes on the "Occupant classification system
(OCS)" (Y page 45) G
WARNING
If children are left unsupervised in the vehicle, they could:
R open the doors, thus endangering other
people or road users.
R get out and disrupt traffic.
R operate the vehicle's equipment. 52
Children in the vehicleSafety
Page 61 of 290
vehicle in front, for vehicle speed, for braking in
good time, and for staying in lane. Always adapt your driving style to suit the prevailing road and
weather conditions and maintain a safe distance from the vehicle in front. Drive carefully.
The driving safety systems described only work
as effectively as possible when there is ade-
quate contact between the tires and the road
surface. Please pay special attention to the
notes on tires, recommended minimum tire
tread depths, etc. (Y page 257).
In wintry driving conditions, always use winter
tires (M+S tires) and if necessary, snow chains.
Only in this way will the driving safety systems
described in this section work as effectively as
possible. ABS (Anti-lock Braking System)
General information ABS regulates brake pressure in such a way that
the wheels do not lock when you brake. This
allows you to continue steering the vehicle when braking.
The 0025 ABS warning lamp in the instrument
cluster lights up when the ignition is switched
on. It goes out when the engine is running.
ABS works from a speed of about 5 mph
(8 km/h), regardless of road-surface conditions. ABS works on slippery surfaces, even when you
only brake gently.
Important safety notes i
Observe the "Important safety notes" sec-
tion (Y page 58). G
WARNING
If ABS is faulty, the wheels could lock when
braking. The steerability and braking charac-
teristics may be severely impaired. Addition-
ally, further driving safety systems are deac-
tivated. There is an increased danger of skid- ding and accidents.
Drive on carefully. Have ABS checked imme-
diately at a qualified specialist workshop.
When ABS is malfunctioning, other systems,
including driving safety systems, will also
become inoperative. Observe the information
on the ABS warning lamp (Y page 193) and dis-play messages which may be shown in the
instrument cluster (Y
page 168).
Braking X
If ABS intervenes: continue to depress the
brake pedal vigorously until the braking sit-
uation is over.
X To make a full brake application: depress
the brake pedal with full force.
If ABS intervenes when braking, you will feel a
pulsing in the brake pedal.
The pulsating brake pedal can be an indication
of hazardous road conditions, and functions as a reminder to take extra care while driving. BAS (Brake Assist System)
General information BAS operates in emergency braking situations.
If you depress the brake pedal quickly, BAS
automatically boosts the braking force, thus
shortening the stopping distance.
Important safety notes i
Observe the "Important safety notes" sec-
tion (Y page 58). G
WARNING
If BAS is malfunctioning, the braking distance
in an emergency braking situation is
increased. There is a risk of an accident.
In an emergency braking situation, depress
the brake pedal with full force. ABS prevents
the wheels from locking.
Braking X
Keep the brake pedal firmly depressed until
the emergency braking situation is over.
ABS prevents the wheels from locking.
The brakes will function as usual once you
release the brake pedal. BAS is deactivated. Driving safety systems
59Safety Z
Page 81 of 290
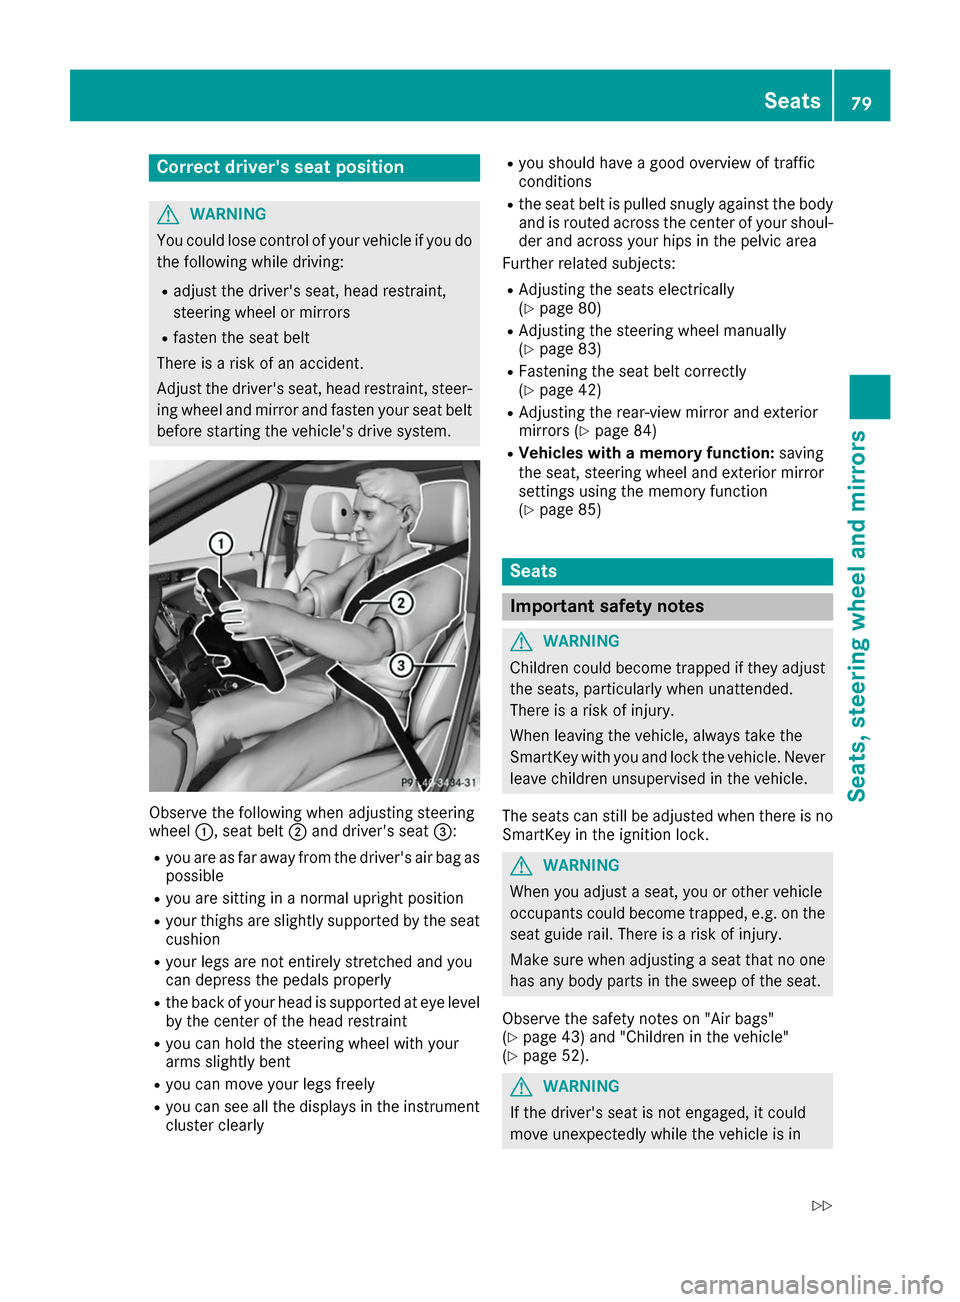
Correct driver's seat position
G
WARNING
You could lose control of your vehicle if you do the following while driving:
R adjust the driver's seat, head restraint,
steering wheel or mirrors
R fasten the seat belt
There is a risk of an accident.
Adjust the driver's seat, head restraint, steer-
ing wheel and mirror and fasten your seat belt before starting the vehicle's drive system. Observe the following when adjusting steering
wheel
0043, seat belt 0044and driver's seat 0087:
R you are as far away from the driver's air bag as
possible
R you are sitting in a normal upright position
R your thighs are slightly supported by the seat
cushion
R your legs are not entirely stretched and you
can depress the pedals properly
R the back of your head is supported at eye level
by the center of the head restraint
R you can hold the steering wheel with your
arms slightly bent
R you can move your legs freely
R you can see all the displays in the instrument
cluster clearly R
you should have a good overview of traffic
conditions
R the seat belt is pulled snugly against the body
and is routed across the center of your shoul-
der and across your hips in the pelvic area
Further related subjects:
R Adjusting the seats electrically
(Y page 80)
R Adjusting the steering wheel manually
(Y page 83)
R Fastening the seat belt correctly
(Y page 42)
R Adjusting the rear-view mirror and exterior
mirrors (Y page 84)
R Vehicles with a memory function: saving
the seat, steering wheel and exterior mirror
settings using the memory function
(Y page 85) Seats
Important safety notes
G
WARNING
Children could become trapped if they adjust the seats, particularly when unattended.
There is a risk of injury.
When leaving the vehicle, always take the
SmartKey with you and lock the vehicle. Neverleave children unsupervised in the vehicle.
The seats can still be adjusted when there is no
SmartKey in the ignition lock. G
WARNING
When you adjust a seat, you or other vehicle
occupants could become trapped, e.g. on the seat guide rail. There is a risk of injury.
Make sure when adjusting a seat that no one
has any body parts in the sweep of the seat.
Observe the safety notes on "Air bags"
(Y page 43) and "Children in the vehicle"
(Y page 52). G
WARNING
If the driver's seat is not engaged, it could
move unexpectedly while the vehicle is in Seats
79Seats, steering wheel and mirrors
Z
Page 86 of 290
Exterior mirrors
Adjusting the exterior mirrors G
WARNING
You could lose control of your vehicle if you do the following while driving:
R adjust the driver's seat, head restraint,
steering wheel or mirrors
R fasten the seat belt
There is a risk of an accident.
Adjust the driver's seat, head restraint, steer-
ing wheel and mirror and fasten your seat belt before starting the vehicle's drive system. G
WARNING
The exterior mirror on the front-passenger
side reduces the size of the image. Visible
objects are actually closer than they appear.
This means that you could misjudge the dis-
tance from road users traveling behind, e.g.
when changing lane. There is a risk of an acci-
dent.
For this reason, always make sure of the
actual distance from the road users traveling
behind by glancing over your shoulder. X
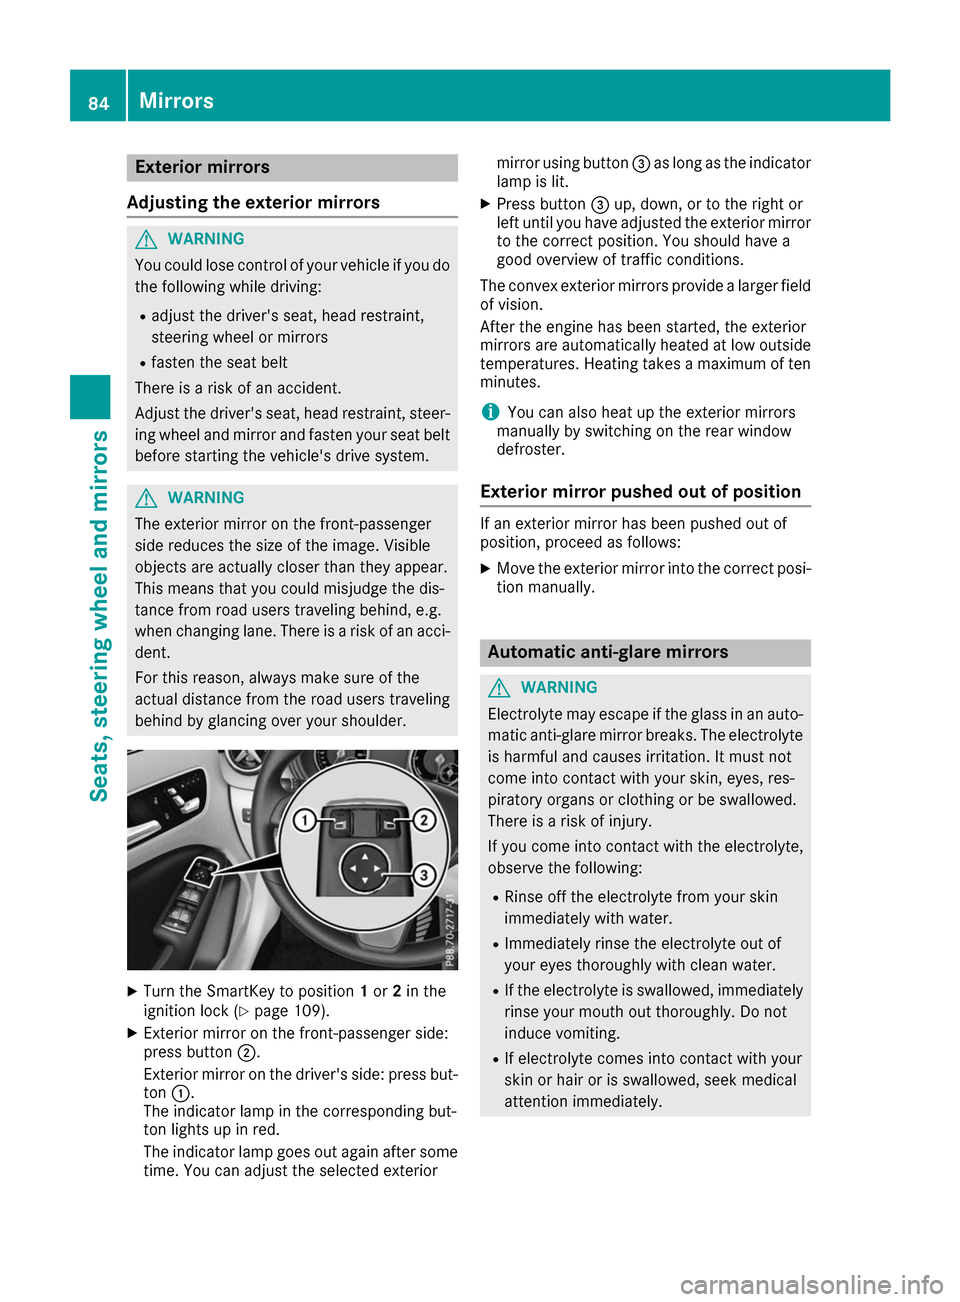
Turn the SmartKey to position 1or 2in the
ignition lock (Y page 109).
X Exterior mirror on the front-passenger side:
press button 0044.
Exterior mirror on the driver's side: press but- ton 0043.
The indicator lamp in the corresponding but-
ton lights up in red.
The indicator lamp goes out again after some
time. You can adjust the selected exterior mirror using button
0087as long as the indicator
lamp is lit.
X Press button 0087up, down, or to the right or
left until you have adjusted the exterior mirror
to the correct position. You should have a
good overview of traffic conditions.
The convex exterior mirrors provide a larger field
of vision.
After the engine has been started, the exterior
mirrors are automatically heated at low outside temperatures. Heating takes a maximum of ten
minutes.
i You can also heat up the exterior mirrors
manually by switching on the rear window
defroster.
Exterior mirror pushed out of position If an exterior mirror has been pushed out of
position, proceed as follows:
X Move the exterior mirror into the correct posi-
tion manually. Automatic anti-glare mirrors
G
WARNING
Electrolyte may escape if the glass in an auto- matic anti-glare mirror breaks. The electrolyte
is harmful and causes irritation. It must not
come into contact with your skin, eyes, res-
piratory organs or clothing or be swallowed.
There is a risk of injury.
If you come into contact with the electrolyte,
observe the following:
R Rinse off the electrolyte from your skin
immediately with water.
R Immediately rinse the electrolyte out of
your eyes thoroughly with clean water.
R If the electrolyte is swallowed, immediately
rinse your mouth out thoroughly. Do not
induce vomiting.
R If electrolyte comes into contact with your
skin or hair or is swallowed, seek medical
attention immediately. 84
MirrorsSeats, steering wheel and mirrors
Page 91 of 290
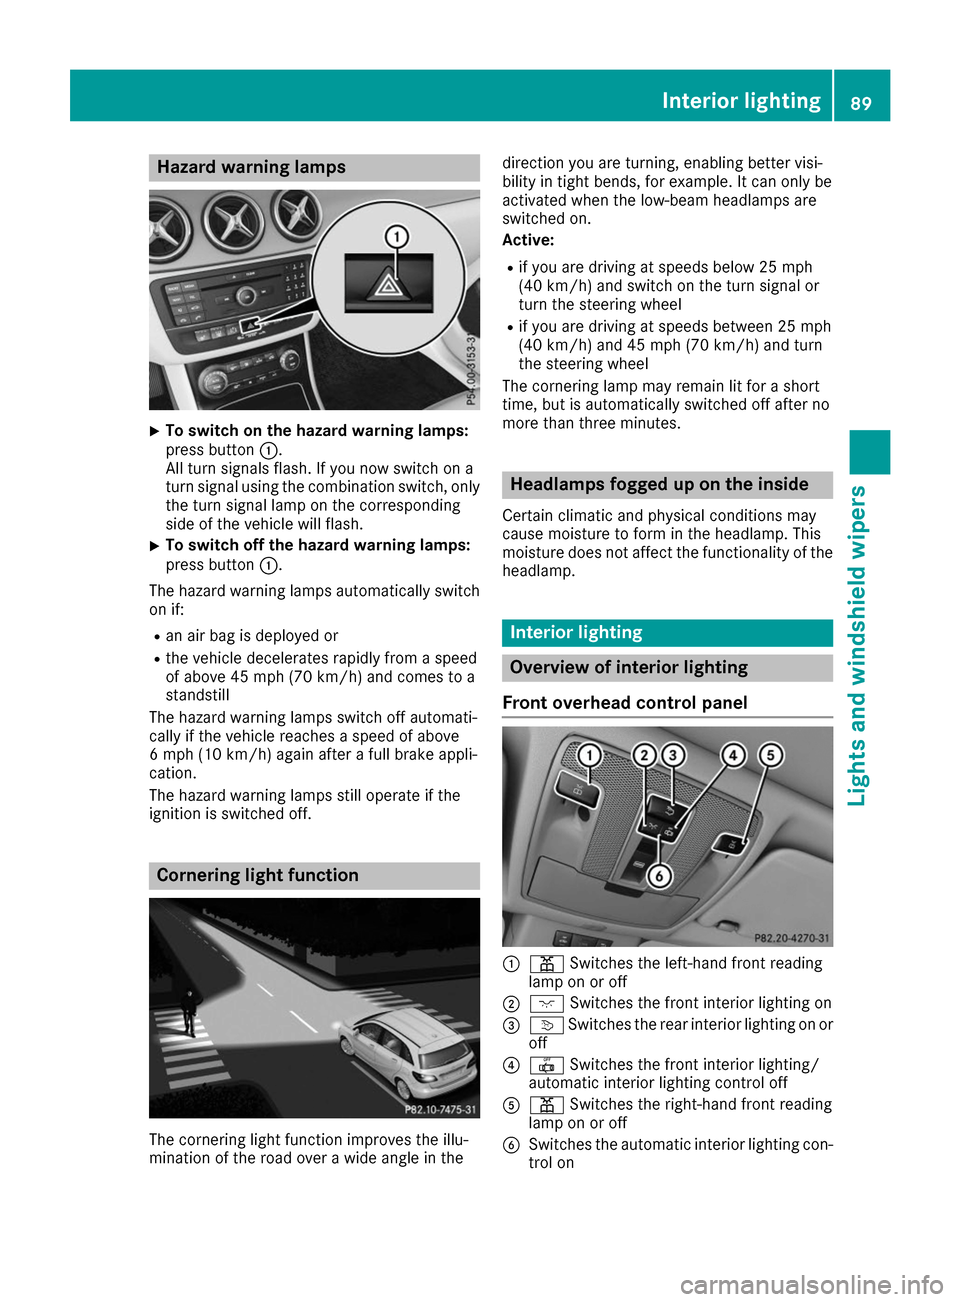
Hazard warning lamps
X
To switch on the hazard warning lamps:
press button
0043.
All turn signals flash. If you now switch on a
turn signal using the combination switch, only the turn signal lamp on the corresponding
side of the vehicle will flash.
X To switch off the hazard warning lamps:
press button
0043.
The hazard warning lamps automatically switch
on if:
R an air bag is deployed or
R the vehicle decelerates rapidly from a speed
of above 45 mph (70 km/h) and comes to a
standstill
The hazard warning lamps switch off automati-
cally if the vehicle reaches a speed of above
6 mph (10 km/h) again after a full brake appli-
cation.
The hazard warning lamps still operate if the
ignition is switched off. Cornering light function
The cornering light function improves the illu-
mination of the road over a wide angle in the direction you are turning, enabling better visi-
bility in tight bends, for example. It can only be
activated when the low-beam headlamps are
switched on.
Active:
R if you are driving at speeds below 25 mph
(40 km/h) and switch on the turn signal or
turn the steering wheel
R if you are driving at speeds between 25 mph
(40 km/h) and 45 mph (70 km/h) and turn
the steering wheel
The cornering lamp may remain lit for a short
time, but is automatically switched off after no
more than three minutes. Headlamps fogged up on the inside
Certain climatic and physical conditions may
cause moisture to form in the headlamp. This
moisture does not affect the functionality of the headlamp. Interior lighting
Overview of interior lighting
Front overhead control panel 0043
003D Switches the left-hand front reading
lamp on or off
0044 004A Switches the front interior lighting on
0087 0043 Switches the rear interior lighting on or
off
0085 0033 Switches the front interior lighting/
automatic interior lighting control off
0083 003D Switches the right-hand front reading
lamp on or off
0084 Switches the automatic interior lighting con-
trol on Interior lighting
89Lights and windshield wipers Z
Page 101 of 290
Overview of climate control systems
General notes
Observe the settings recommended on the fol-
lowing pages. The windows could otherwise fog up.
To prevent the windows from fogging up:
R switch off climate control only briefly
R switch on air-recirculation mode only briefly
R switch on the cooling with air dehumidifica-
tion function
R switch on the defrost windshield function
briefly, if required
The dual-zone automatic climate control regu-
lates the temperature and the humidity in the
vehicle interior and filters undesirable substan-
ces out of the air.
Dual-zone automatic climate control is only
operational when the vehicle is ready to drive.
Optimum operation is only achieved with the
side windows closed.
Always keep the ventilation flaps behind the
side paneling in the cargo compartment clear.
Otherwise the vehicle will not be ventilated cor- rectly. i
Ventilate the vehicle for a brief period during
warm weather, e.g. using the convenience
opening feature (Y page 76). This will speed
up the cooling process and the desired inte-
rior temperature will be reached more
quickly.
i The integrated filter filters out most parti-
cles of dust and soot and completely filters
out pollen. It also reduces gaseous pollutants and odors. A clogged filter reduces the
amount of air supplied to the vehicle interior.
For this reason, you should always observe
the interval for replacing the filter, which is
specified in the Maintenance Booklet. As it
depends on environmental conditions, e.g.
heavy air pollution, the interval may be
shorter than stated in the Maintenance Book-
let.
i It is possible that under certain circumstan-
ces the residual heat function may be activa-
ted automatically an hour after the SmartKey has been removed in order to dry the auto-
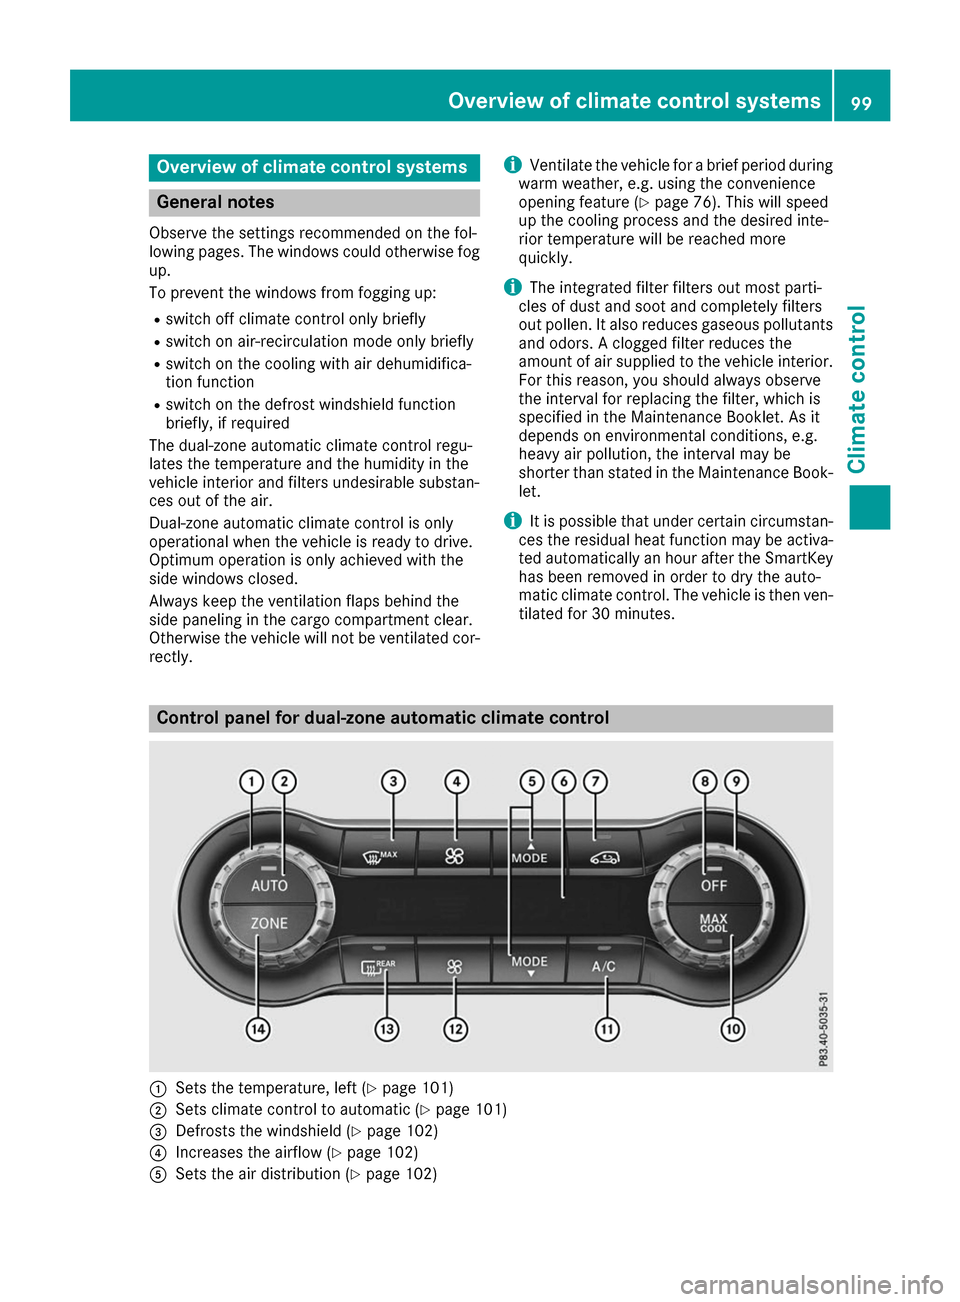
matic climate control. The vehicle is then ven-tilated for 30 minutes. Control panel for dual-zone automatic climate control
0043
Sets the temperature, left (Y page 101)
0044 Sets climate control to automatic (Y page 101)
0087 Defrosts the windshield (Y page 102)
0085 Increases the airflow (Y page 102)
0083 Sets the air distribution (Y page 102) Overview of climate control systems
99Climate control
Page 107 of 290
Notes on the automatic reversing feature for the
side windows (Y page 75).
i If you open the side windows manually after
closing them with the convenience closing
feature, they will remain in this position when
opened using the convenience opening fea-
ture. Pre-entry climate control via Smart-
Key
General notes Before getting in, the vehicle interior can be
briefly warmed or ventilated in advance. In addi-
tion, the air from the air vent can be pre-cooled.
The high-voltage battery must be sufficiently
charged before the "Pre-entry climate control
via key" function can be activated.
Activating/deactivating When the vehicle is unlocked using the Smart-
Key or KEYLESS-GO, the climate control func-
tions are activated.
The pre-cooling and pre-heating climate control functions last 5 minutes.
When the vehicle is pre-cooled, the following
functions are activated as necessary:
R Climate control system
R Cooling with air dehumidification
R Blower
When the vehicle is pre-heated, the following
functions are activated as necessary:
R Climate control system
R Blower
R Seat heating
R Windshield heating
R Rear window defroster
Pre-entry climate control is automatically
switched off when operational readiness mode
is requested.
Activating or deactivating You can activate and deactivate the pre-entry
climate control (via SmartKey) function using
the on-board computer in the E-CELL
E-CELL submenu
(Y page 164). i
If the condition of charge of the high-voltage
battery is below the specified minimum con-
dition of charge, pre-entry climate control will not be activated even if it has been set. Pre-entry climate control at departure
time and immediate pre-entry climate
control
Important safety notes G
WARNING
If persons, particularly children are subjected to prolonged exposure to extreme heat or
cold, there is a risk of injury, possibly even
fatal. Never leave children unattended in the
vehicle.
General notes Using the "Pre-entry climate control at depar-
ture time" function, you can cool or heat the
vehicle interior prior to the desired departure
time.
When using the "Pre-entry climate control at
departure time" function, the condition of
charge of the high-voltage battery must be
higher than the specified minimum condition of charge.
The running time of the climate control may be
reduced if:
R the vehicle is not connected to an electric
power supply
R the high-voltage battery is not fully charged
With active "Pre-entry climate control at depar-
ture time" the condition of charge of the high-
voltage battery can be reduced, even if the
charge cable connector is connected.
In certain situations, the desired interior tem-
perature cannot be reached.
When the vehicle is cooled, the following func-
tions are activated as necessary:
R Climate control system
R Cooling with air dehumidification
R Blower
When the vehicle is heated, the following func-
tions are activated as necessary:
R Climate control system
R Blower Operating the climate control systems
105Climate control Z
Page 110 of 290
Notes on breaking-in a new vehicle
The sensor system of some driving and driving
safety systems adjusts automatically while a
certain distance is being driven after the vehicle
has been delivered or after repairs. Full system
effectiveness is not reached until the end of this teach-in procedure.
New and replaced brake pads and discs only
reach their optimum braking effect after several
hundred kilometers of driving. Compensate for
this by applying greater force to the brake pedal. Driving
Important safety notes
G
WARNING
Objects in the driver's footwell can restrict the pedal travel or obstruct a depressed pedal.
The operating and road safety of the vehicle is
jeopardized. There is a risk of an accident.
Make sure that all objects in the vehicle are
stowed correctly, and that they cannot enter
the driver's footwell. Install the floormats
securely and as specified in order to ensure
sufficient clearance for the pedals. Do not use loose floormats and do not place floormats on
top of one another. G
WARNING
Unsuitable footwear can hinder correct usage of the pedals, e.g.:
R shoes with thick soles
R shoes with high heels
R slippers
There is a risk of an accident.
Wear suitable footwear to ensure correct
usage of the pedals. G
WARNING
If you switch off the ignition while driving,
safety-relevant functions are only available
with limitations, or not at all. This could affect, for example, the power steering and the brake
boosting effect. You will require considerably more effort to steer and brake. There is a risk
of an accident.
Do not switch off the ignition while driving. G
WARNING
If the parking brake has not been fully
released when driving, the parking brake can:
R overheat and cause a fire
R lose its hold function.
There is a risk of fire and an accident. Release
the parking brake fully before driving off.
! Before driving away, you must ensure that,
for your own safety and to avoid damage, the charging cable has been removed from the
vehicle socket. Otherwise, you cannot shift
the transmission out of position P.
The braking performance of the electric motor
using recuperative braking is, in some operating modes, either reduced or not effective:
R when the condition of charge of the high-volt-
age battery increases
R if the high-voltage battery is not yet at a nor-
mal operating temperature
R when driving close to the maximum speed
R when the vehicle is almost stationary
R in transmission position N
R during and after ESP stability control
If you do not make an additional effort to apply
the brake yourself, the braking effect may not be sufficient. If necessary, counteract the reduced
regenerative braking effect by applying the
brake yourself.
Before commencing your journey, ensure that
the charging cable required for charging the
high-voltage battery is in the vehicle. 108
DrivingDriving an
d parking