roof MERCEDES-BENZ B-Class 2017 W246 User Guide
[x] Cancel search | Manufacturer: MERCEDES-BENZ, Model Year: 2017, Model line: B-Class, Model: MERCEDES-BENZ B-Class 2017 W246Pages: 290, PDF Size: 19.81 MB
Page 138 of 290
their traction. There is an increased danger of
skidding and accidents.
Do not increase the recuperation level on slip- pery road surfaces.
Have your vehicle winter-proofed at a qualified
specialist workshop at the onset of winter.
Drive particularly carefully on slippery road sur- faces. Avoid sudden acceleration, steering and
braking maneuvers. Do not use cruise control.
If the vehicle threatens to skid or cannot be
stopped when moving at low speed:
X Shift the DIRECT SELECT lever to position N.
The outside temperature indicator is not
designed to serve as an ice-warning device and is therefore unsuitable for that purpose.
Changes in the outside temperature are dis-
played after a short delay.
Indicated temperatures just above the freezing
point do not guarantee that the road surface is
free of ice. The road may still be icy, especially in
wooded areas or on bridges.
You should pay special attention to road condi-
tions when temperatures are around freezing
point.
For more information on driving with snow
chains, see (Y page 259).
For more information on driving with summer
tires, see (Y page 259).
Observe the notes in the "Winter operation" sec-
tion (Y page 259). Driving systems
Cruise control
General notes Cruise control maintains a constant road speed
for you. It brakes automatically in order to avoid
exceeding the set speed. Change into transmis-
sion position D-
(Y page 115) on long and steep
downhill gradients. This increases recuperation
in overrun mode. This relieves the load on the
brake system and prevents the brakes from
overheating and wearing too quickly.
When the engine is running, you can use the
cruise control lever to limit the speed to any
speed between 20 mph (30 km/h) and the tech-
nically permitted maximum speed of the vehicle. Use cruise control only if road and traffic con-
ditions make it appropriate to maintain a steady
speed for a prolonged period.
The speed indicated in the speedometer may
differ slightly from the speed stored.
Important safety notes If you fail to adapt your driving style, cruise con-
trol can neither reduce the risk of an accident
nor override the laws of physics. Cruise control
cannot take into account the road, traffic and
weather conditions. Cruise control is only an
aid. You are responsible for the distance to the
vehicle in front, for vehicle speed, for braking in
good time and for staying in your lane.
Do not use cruise control:
R in road and traffic conditions which do not
allow you to maintain a constant speed e.g. in
heavy traffic or on winding roads
R on slippery road surfaces. Braking or accel-
erating could cause the drive wheels to lose
traction and the vehicle could then skid
R in poor visibility, e.g. due to fog, heavy rain or
snow
If there is a change of drivers, advise the new
driver of the speed stored.
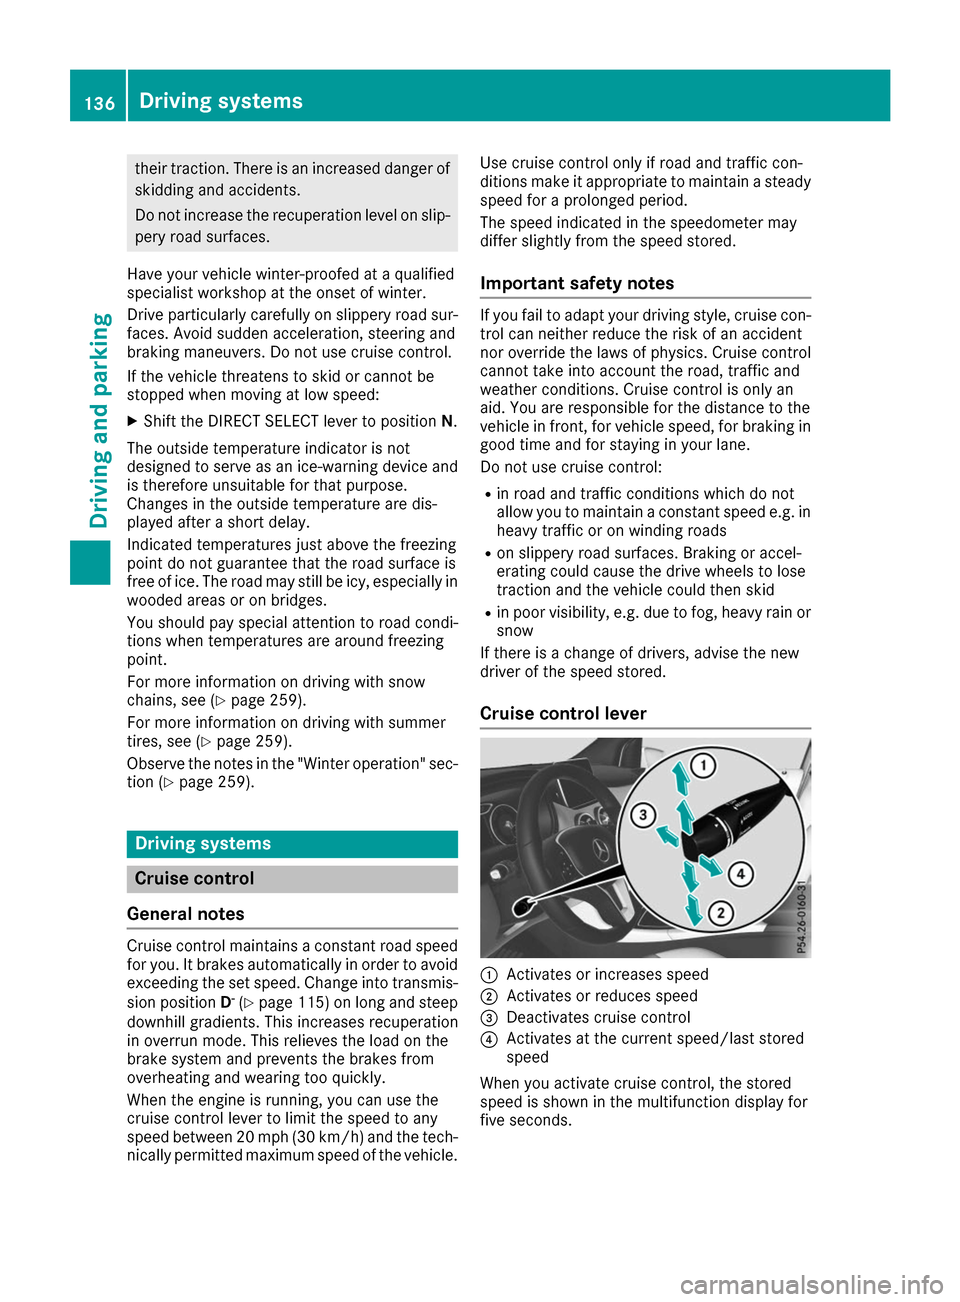
Cruise control lever 0043
Activates or increases speed
0044 Activates or reduces speed
0087 Deactivates cruise control
0085 Activates at the current speed/last stored
speed
When you activate cruise control, the stored
speed is shown in the multifunction display for
five seconds. 136
Driving systemsDriving an
d parking
Page 217 of 290
X
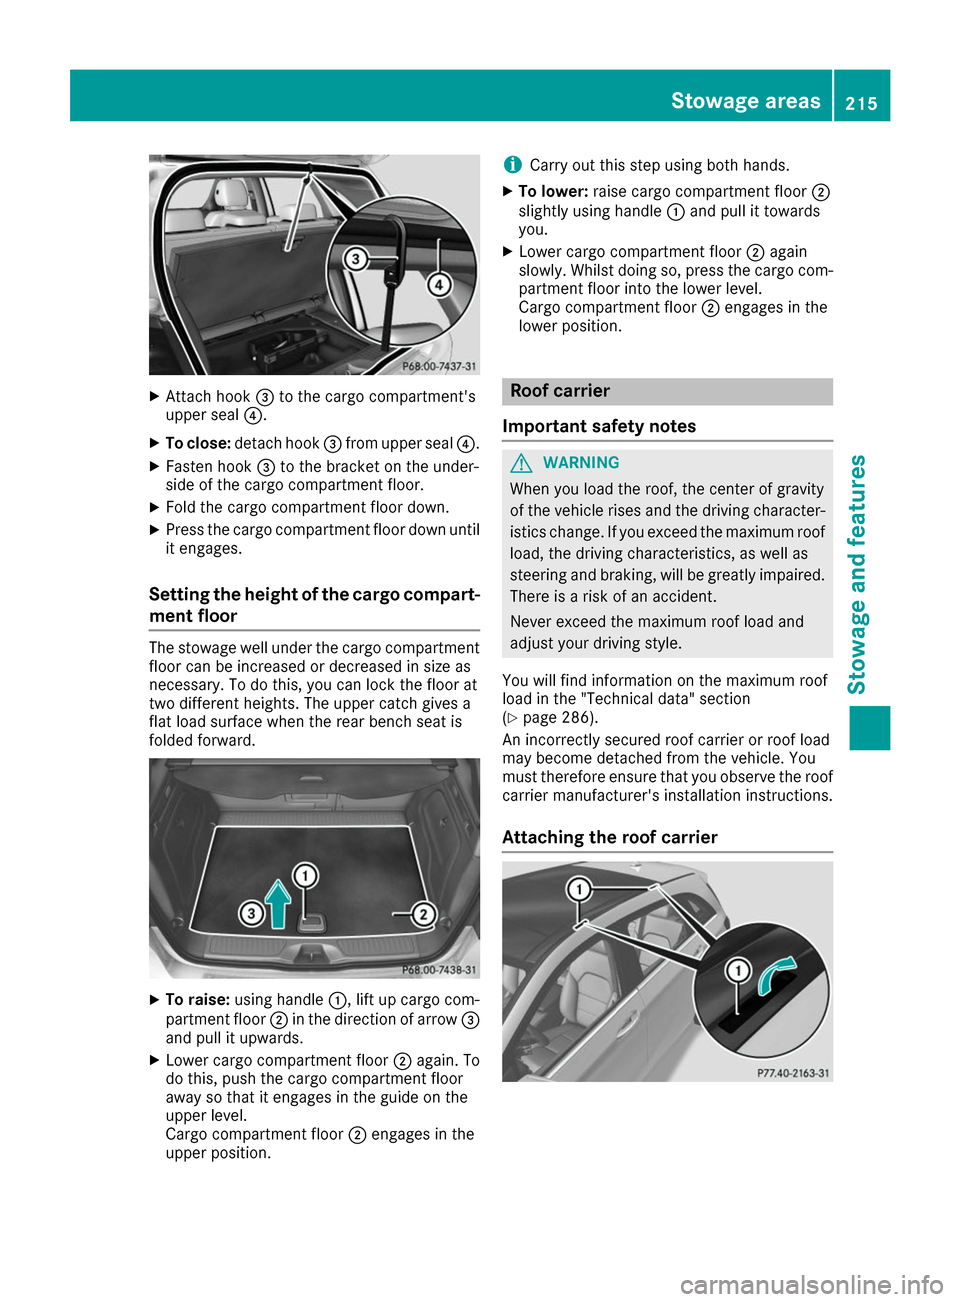
Attach hook 0087to the cargo compartment's
upper seal 0085.
X To close: detach hook 0087from upper seal 0085.
X Fasten hook 0087to the bracket on the under-
side of the cargo compartment floor.
X Fold the cargo compartment floor down.
X Press the cargo compartment floor down until
it engages.
Setting the height of the cargo compart- ment floor The stowage well under the cargo compartment
floor can be increased or decreased in size as
necessary. To do this, you can lock the floor at
two different heights. The upper catch gives a
flat load surface when the rear bench seat is
folded forward. X
To raise: using handle 0043, lift up cargo com-
partment floor 0044in the direction of arrow 0087
and pull it upwards.
X Lower cargo compartment floor 0044again. To
do this, push the cargo compartment floor
away so that it engages in the guide on the
upper level.
Cargo compartment floor 0044engages in the
upper position. i
Carry out this step using both hands.
X To lower: raise cargo compartment floor 0044
slightly using handle 0043and pull it towards
you.
X Lower cargo compartment floor 0044again
slowly. Whilst doing so, press the cargo com-
partment floor into the lower level.
Cargo compartment floor 0044engages in the
lower position. Roof carrier
Important safety notes G
WARNING
When you load the roof, the center of gravity
of the vehicle rises and the driving character- istics change. If you exceed the maximum roof
load, the driving characteristics, as well as
steering and braking, will be greatly impaired.There is a risk of an accident.
Never exceed the maximum roof load and
adjust your driving style.
You will find information on the maximum roof
load in the "Technical data" section
(Y page 286).
An incorrectly secured roof carrier or roof load
may become detached from the vehicle. You
must therefore ensure that you observe the roof
carrier manufacturer's installation instructions.
Attaching the roof carrier Stowage areas
215Stowage an d features Z
Page 218 of 290
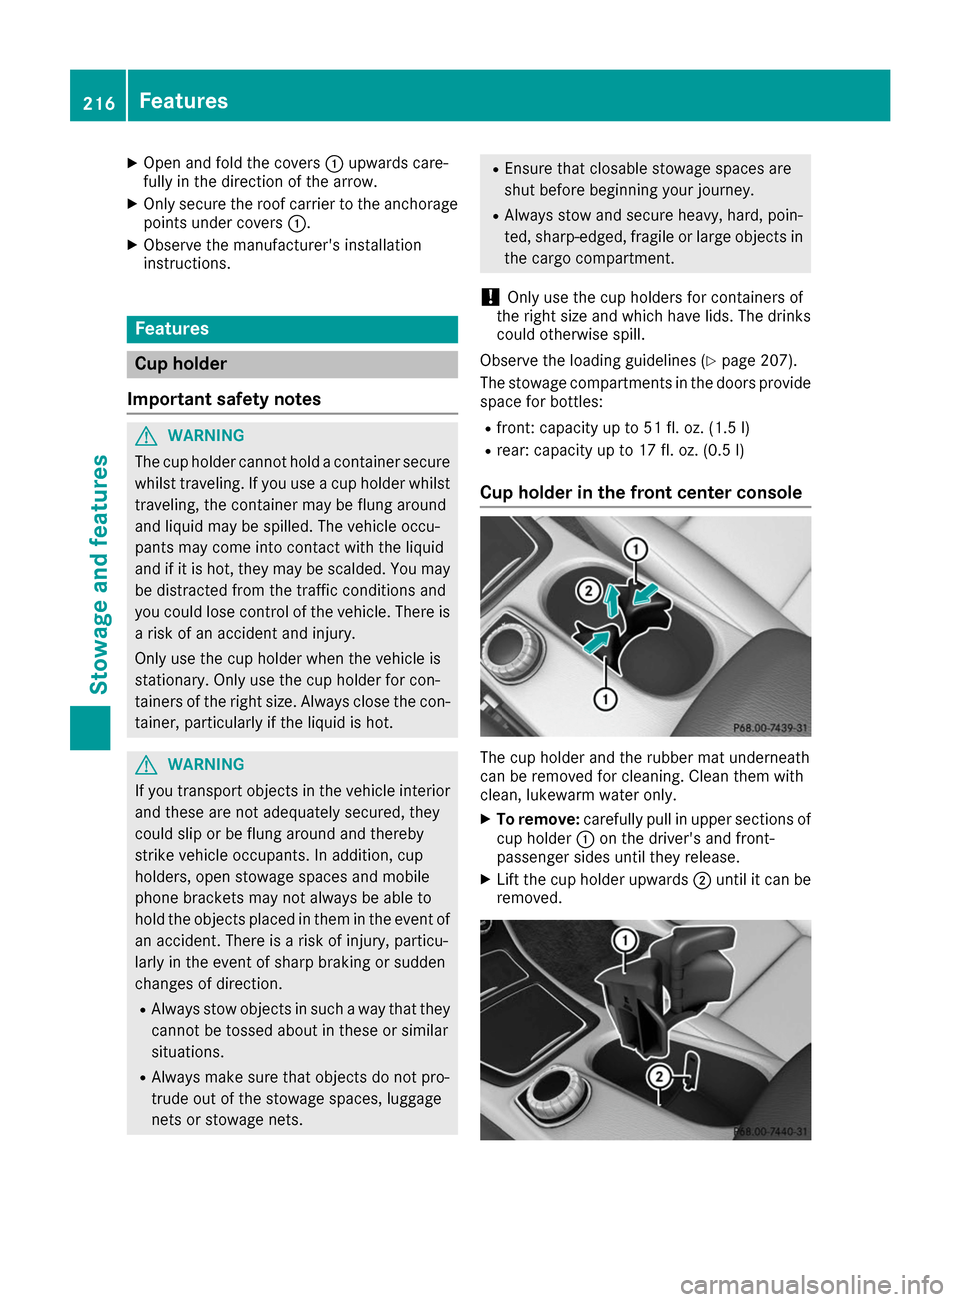
X
Open and fold the covers 0043upwards care-
fully in the direction of the arrow.
X Only secure the roof carrier to the anchorage
points under covers 0043.
X Observe the manufacturer's installation
instructions. Features
Cup holder
Important safety notes G
WARNING
The cup holder cannot hold a container secure whilst traveling. If you use a cup holder whilsttraveling, the container may be flung around
and liquid may be spilled. The vehicle occu-
pants may come into contact with the liquid
and if it is hot, they may be scalded. You may
be distracted from the traffic conditions and
you could lose control of the vehicle. There is a risk of an accident and injury.
Only use the cup holder when the vehicle is
stationary. Only use the cup holder for con-
tainers of the right size. Always close the con-
tainer, particularly if the liquid is hot. G
WARNING
If you transport objects in the vehicle interior and these are not adequately secured, they
could slip or be flung around and thereby
strike vehicle occupants. In addition, cup
holders, open stowage spaces and mobile
phone brackets may not always be able to
hold the objects placed in them in the event of an accident. There is a risk of injury, particu-
larly in the event of sharp braking or sudden
changes of direction.
R Always stow objects in such a way that they
cannot be tossed about in these or similar
situations.
R Always make sure that objects do not pro-
trude out of the stowage spaces, luggage
nets or stowage nets. R
Ensure that closable stowage spaces are
shut before beginning your journey.
R Always stow and secure heavy, hard, poin-
ted, sharp-edged, fragile or large objects in
the cargo compartment.
! Only use the cup holders for containers of
the right size and which have lids. The drinks could otherwise spill.
Observe the loading guidelines (Y page 207).
The stowage compartments in the doors provide
space for bottles:
R front: capacity up to 51 fl. oz. (1.5 l)
R rear: capacity up to 17 fl. oz. (0.5 l)
Cup holder in the front center console The cup holder and the rubber mat underneath
can be removed for cleaning. Clean them with
clean, lukewarm water only.
X To remove: carefully pull in upper sections of
cup holder 0043on the driver's and front-
passenger sides until they release.
X Lift the cup holder upwards 0044until it can be
removed. 216
FeaturesStowage and features
Page 237 of 290
!
When washing your vehicle in a tow-through
car wash, make sure that the selector lever is
in position N, otherwise the vehicle could be
damaged.
! Make sure that:
R the side windows are fully closed.
R the ventilation/heating is switched off (the
OFF button has been pressed/the airflow
control is set to position 0).
R the windshield wiper switch is at position 0.
The vehicle may otherwise be damaged.
You can wash the vehicle in an automatic car
wash from the very start.
If the vehicle is very dirty, pre-wash it before
cleaning it in an automatic car wash.
After using an automatic car wash, wipe off wax from the windshield and the wiper blades. This
will prevent smears and reduce wiping noises
caused by residue on the windshield.
Washing by hand In some countries, washing by hand is only
allowed at specially equipped washing bays.
Observe the legal requirements in each country.
X Do not use hot water and do not wash the
vehicle in direct sunlight.
X Use a soft sponge to clean.
X Use a mild cleaning agent, such as a car
shampoo approved by Mercedes-Benz.
X Thoroughly hose down the vehicle with a gen-
tle jet of water.
X Do not point the water jet directly towards the
air inlet.
X Use plenty of water and rinse out the sponge
frequently.
X Rinse the vehicle with clean water and dry
thoroughly with a chamois.
X Do not let the cleaning agent dry on the paint-
work.
Carefully remove all deposits of road salt as
soon as possible when driving in winter.
Power washers G
WARNING
The water jet from a circular jet nozzle (dirt
blasters) can cause invisible exterior damage to the tires or chassis components. Compo- nents damaged in this way may fail unexpect-
edly. There is a risk of an accident.
Do not use power washers with circular jet
nozzles to clean the vehicle. Have damaged
tires or chassis components replaced imme-
diately.
! Always maintain a distance of at least
11.8 in (30 cm) between the vehicle and the
power washer nozzle. Information about the
correct distance is available from the equip-
ment manufacturer.
Move the power washer nozzle around when
cleaning your vehicle.
Do not aim directly at any of the following:
R Tires
R Door gaps, roof gaps, joints, etc.
R Electrical components
R Battery
R Connectors
R Lamps
R Seals
R Trim
R Ventilation slots
Damaged seals or electrical components can
lead to leaks or failures.
! Vehicles with decorative film: parts of your
vehicle are covered with a decorative film.
Maintain a distance of at least 27.5 in (70 cm)
between the parts of the vehicle covered with
the film and the nozzle of the high pressure
cleaner.
Information about the correct distance is
available from the equipment manufacturer.
Move the power washer nozzle around when
cleaning your vehicle.
Cleaning the paintwork !
Do not affix:
R stickers
R films
R magnetic plates or similar items
to painted surfaces. You could otherwise
damage the paintwork.
Scratches, corrosive deposits, areas affected by
corrosion and damage caused by inadequate Care
235Maintenance and care Z
Page 261 of 290
with run-flat characteristics)" section
(Y page 242).
R Only mount tires of the correct size onto the
wheels.
R Break in new tires at moderate speeds for the
first 60 miles (100 km). The ne w tires only
reach their full performance after this dis-
tance.
R Do not drive with tires which have too little
tread depth, as this significantly reduces the
traction on wet roads (hydroplaning).
R Replace the tires after six years at the latest,
regardless of wear. MOExtended tires (tires with run-flat
properties)
With MOExtended tires (tires with run flat char-
acteristics), you can continue to drive your vehi- cle even if there is a total loss of pressure in one
or more tires.
MOExtended tires may only be used in conjunc-
tion with an active tire pressure monitor and
only on wheels specifically tested by Mercedes- Benz.
Notes on driving with MOExtended tires with a
flat tire (Y page 242).
Vehicles equipped with MOExtended tires are
not equipped with a TIREFIT kit at the factory. It
is therefore recommended that you additionally
equip your vehicle with a TIREFIT kit if you mount
tires that do not feature run-flat properties, e.g. winter tires. A TIREFIT kit may be obtained from
a qualified specialist workshop. Winter operation
General notes
Have your vehicle winter-proofed at a qualified
specialist workshop at the onset of winter.
Observe the notes in the "Changing a wheel"
section (Y page 275). Driving with summer tires
At temperatures below 45 ‡ (+7 †), summer
tires lose el asticity and therefore traction and
braking power. Change the tires on your vehicle to M+S tires. Using summer tires at very cold
temperatures could cause cracks to form, thereby damaging the tires permanently.
Mercedes-Benz cannot accept responsibility for
this type of damage. G
WARNING
Damaged tires can cause tire inflation pres-
sure loss. As a result, you could lose control of your vehicle. There is a risk of accident.
Check the tires regularly for signs of damage
and replace any damaged tires immediately. M+S tires
G
WARNING
M+S tires with a tire tread depth of less than
00CF in(4 mm) are not suitable for use in winter
and do not provide sufficient traction. There is
a risk of an accident.
M+S tires with a tread depth of less than 00CFin
(4 mm) must be replaced immediately.
At temperatures below 45 ‡(+7 †), use winter
tires or all-season tires. Both types of tire are
identified by the M+S marking.
Only winter tires bearing the 004Dsnowflake
symbol in addition to the M+S marking provide
the best possible grip in wintry road conditions.
Only these tires will allow driving safety systems
such as ABS and ESP ®
to function optimally in
winter. These tires have been developed specif-
ically for driving in snow.
Use M+S tires of the same make and tread on all wheels to maintain safe handling characteris-
tics.
Always observe the maximum permissible
speed specified for the M+S tires you have
mounted.
When you have mounted the M+S tires:
X Check the tire pressures (Y page 260).
X Restart the tire pressure monitor
(Y page 265). Snow chains
G
WARNING
If snow chains are mounted on the rear
wheels, the snow chains could cause abrasion Winter operation
259Wheels and tires
Z
Page 277 of 290
PSI (pounds per square inch)
A standard unit of measure for tire pressure.
Aspect ratio
Relationship between tire height and tire width
in percent.
Tire pressure
This is pressure inside the tire applying an out-
ward force to each square inch of the tire's sur-
face. The tire pressure is specified in pounds per
square inch (psi), in kilopascal (kPa) or in bar.
The tire pressure should only be corrected when
the tires are cold.
Cold tire pressure
The tires are cold:
R if the vehicle has been parked with the tires
out of direct sunlight for at least three hours
and
R if the vehicle has not been driven further than
1 mile (1.6 km)
Tread
The part of the tire that comes into contact with
the road.
BeadThe tire bead ensures that the tire sits securely
on the wheel. There are several steel wires in the
bead to prevent the tire from coming loose from the wheel rim.
Sidewall
The part of the tire between the tread and the
bead.
Weight of optional extras The combined weight of those optional extras
that weigh more than the replaced standard
parts and more than 2.3 kg (5 lbs). These
optional extras, such as high-performance
brakes, level control, a roof rack or a high-per-
formance battery, are not included in the curb
weight and the weight of the accessories.
TIN (Tire Identification Number) This is a unique identifier which can be used by
a tire manufacturer to identify tires, for example for a product recall, and thus identify the pur-
chasers. The TIN is made up of the manufactur-
er's identity code, tire size, tire type code and
the manufacturing date. Load bearing index
The load bearing index (also load index) is a code that contains the maximum load bearing capa-
city of a tire.
Traction
Traction is the result of friction between the tires and the road surface.
Treadwear indicatorsNarrow bars (tread wear bars) that are distrib-
uted over the tire tread. If the tire tread is level
with the bars, the wear limit of 00CDin (1.6 mm)
has been reached.
Occupant distribution The distribution of occupants in a vehicle at theirdesignated seating positions.
Total load limit Nominal load and luggage load plus 68 kg
(150 lbs) multiplied by the number of seats in
the vehicle. Changing a wheel
Flat tire
The "Breakdown assistance" section
(Y page 241) contains information and notes on
how to deal with a flat tire. Information on driv-
ing with MOExtended tires in the event of a flat
tire can be found under "MOExtended tires (tires with run-flat characteristics" (Y page 242). Rotating the wheels
G
WARNING
Interchanging the front and rear wheels may
severely impair the driving characteristics if
the wheels or tires have different dimensions. The wheel brakes or suspension components
may also be damaged. There is a risk of acci-
dent.
Rotate front and rear wheels only if the wheels and tires are of the same dimensions.
! On vehicles equipped with a tire pressure
monitor, electronic components are located
in the wheel. Changing a wheel
275Wheels and tires Z
Page 283 of 290
Information regarding technical data
i The data stated here specifically refers to a
vehicle with standard equipment. Consult an
authorized Mercedes-Benz Center for the
data for all vehicle variants and trim levels. Vehicle electronics
Installing two-way radios and mobile
phones (RF transmitters)
G
WARNING
The electromagnetic radiation from modified
or incorrectly retrofitted RF-transmitters can
interfere with the vehicle electronics. This can compromise the operational safety of the
vehicle. There is a risk of an accident.
You should have all work to electrical and
electronic equipment carried out at a qualified
specialist workshop. G
WARNING
The electromagnetic radiation from incor-
rectly operated RF transmitters can interfere
with the vehicle electronics, for example:
R if the RF transmitter is not connected with
an exterior antenna
R the exterior antenna has been installed
incorrectly or is not a low-reflection type
This can compromise the operational safety
of the vehicle. There is a risk of an accident.
Have the low-reflection exterior antenna
mounted at a qualified specialist workshop.
When operating RF transmitters in the vehi-
cle, always connect them with the low-reflec-
tion exterior antenna.
! The operating permit may be invalidated if
the instructions for installation and use of RF
transmitters are not observed. In particular, the following conditions must be
complied with:
R only approved wavebands may be used.
R observe the maximum permissible output
in these wavebands.
R only approved antenna positions may be
used.
Excessive levels of electromagnetic radiation
may cause damage to your health and the health
of others. Using an exterior antenna takes into
account current scientific discussions relating
to the possible health hazards that may result
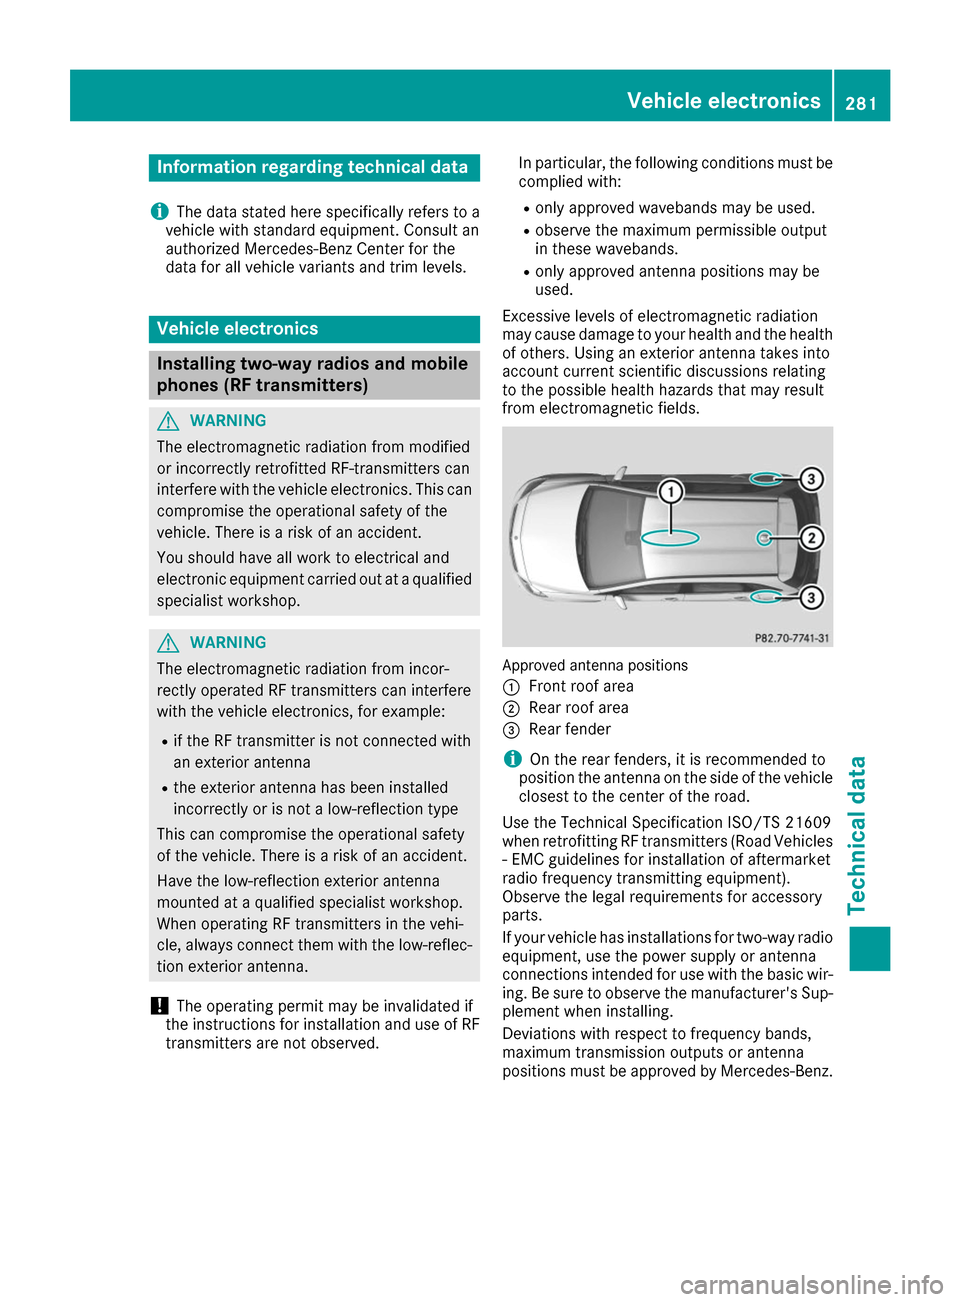
from electromagnetic fields. Approved antenna positions
0043
Front roof area
0044 Rear roof area
0087 Rear fender
i On the rear fenders, it is recommended to
position the antenna on the side of the vehicle
closest to the center of the road.
Use the Technical Specification ISO/TS 21609
when retrofitting RF transmitters (Road Vehicles - EMC guidelines for installation of aftermarket
radio frequency transmitting equipment).
Observe the legal requirements for accessory
parts.
If your vehicle has installations for two-way radio
equipment, use the power supply or antenna
connections intended for use with the basic wir-
ing. Be sure to observe the manufacturer's Sup- plement when installing.
Deviations with respect to frequency bands,
maximum transmission outputs or antenna
positions must be approved by Mercedes-Benz. Vehicle electronics
281Technical data Z
Page 288 of 290
Filling capacities
Missing values were not available at time of
going to print. All models Capacity
Refrigerant
PAG oil
Vehicle data
General notes
Please note that for the specified vehicle data: R the heights specified may vary as a result of:
- tires
- load
- condition of the suspension
- optional equipment
R optional equipment reduces the maximum
payload
The range depends on the drive program selec- ted and can vary due to:
R higher and lower outside temperatures
R the style of driving
R activated electrical consumers
i Further information on the range can be
found in the Trip
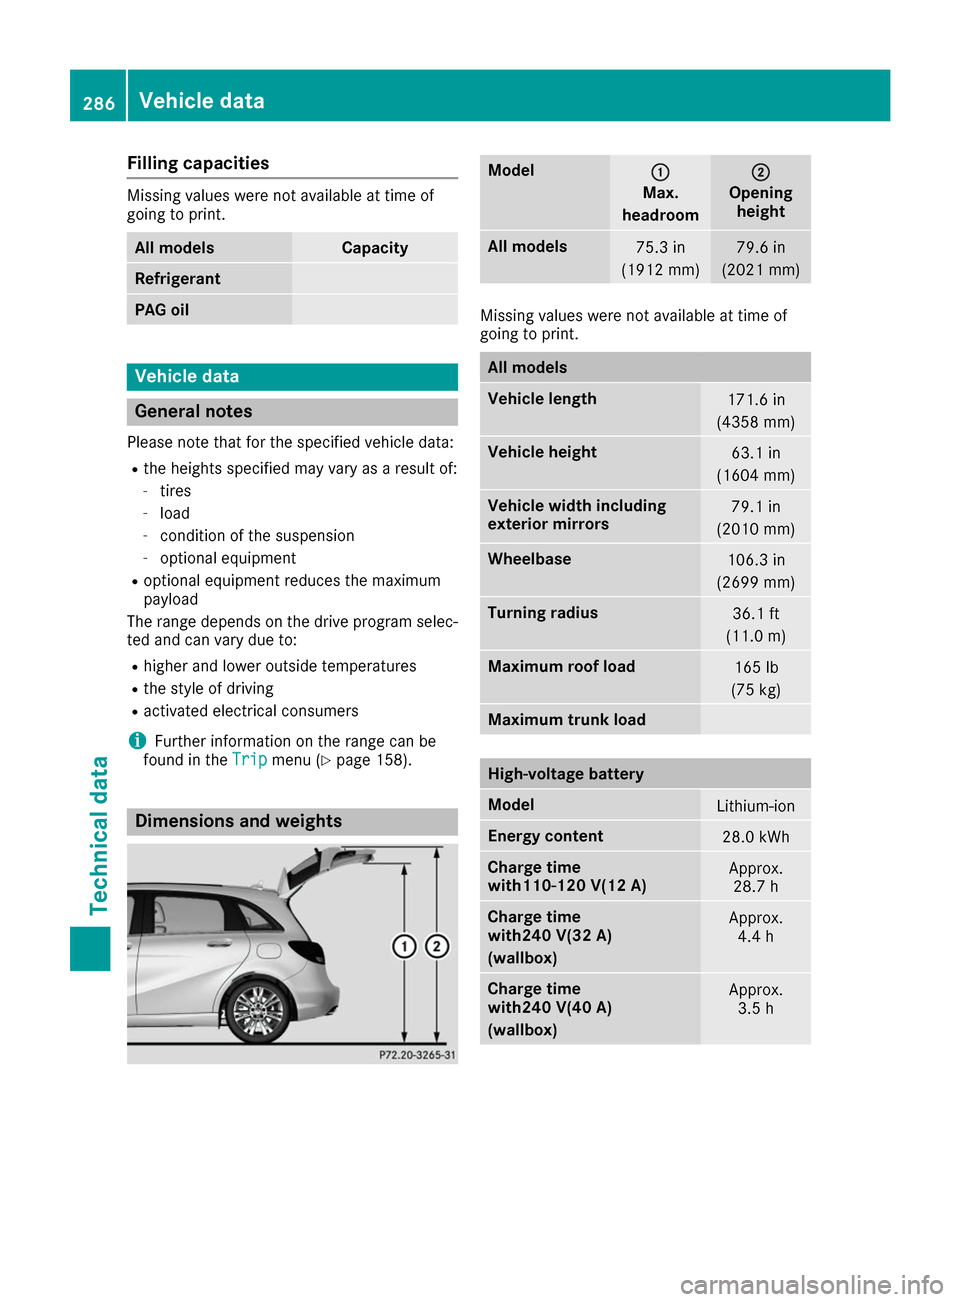
Trip menu (Y page 158). Dimensions and weights Model
0043 0043
Max.
headroom 0044
0044
Opening height All models
75.3 in
(1912 mm) 79.6 in
(2021 mm) Missing values
were not available at time of
going to print. All models
Vehicle length
171.6 in
(4358 mm) Vehicle height
63.1 in
(1604 mm) Vehicle width including
exterior mirrors
79.1 in
(2010 mm) Wheelbase
106.3 in
(2699 mm) Turning radius
36.1 ft
(11.0 m) Maximum roof load
165 lb
(75 kg) Maximum trunk load
High-voltage battery
Model
Lithium-ion
Energy content
28.0 kWh
Charge time
with110-120
V(12 A) Approx.
28.7 h Charge time
with240 V(32 A)
(wallbox)
Approx.
4.4 h Charge time
with240 V(40 A)
(wallbox)
Approx.
3.5 h 286
Vehicle dataTechnical data