Open MERCEDES-BENZ B-Class 2017 W246 Service Manual
[x] Cancel search | Manufacturer: MERCEDES-BENZ, Model Year: 2017, Model line: B-Class, Model: MERCEDES-BENZ B-Class 2017 W246Pages: 290, PDF Size: 19.81 MB
Page 96 of 290
X
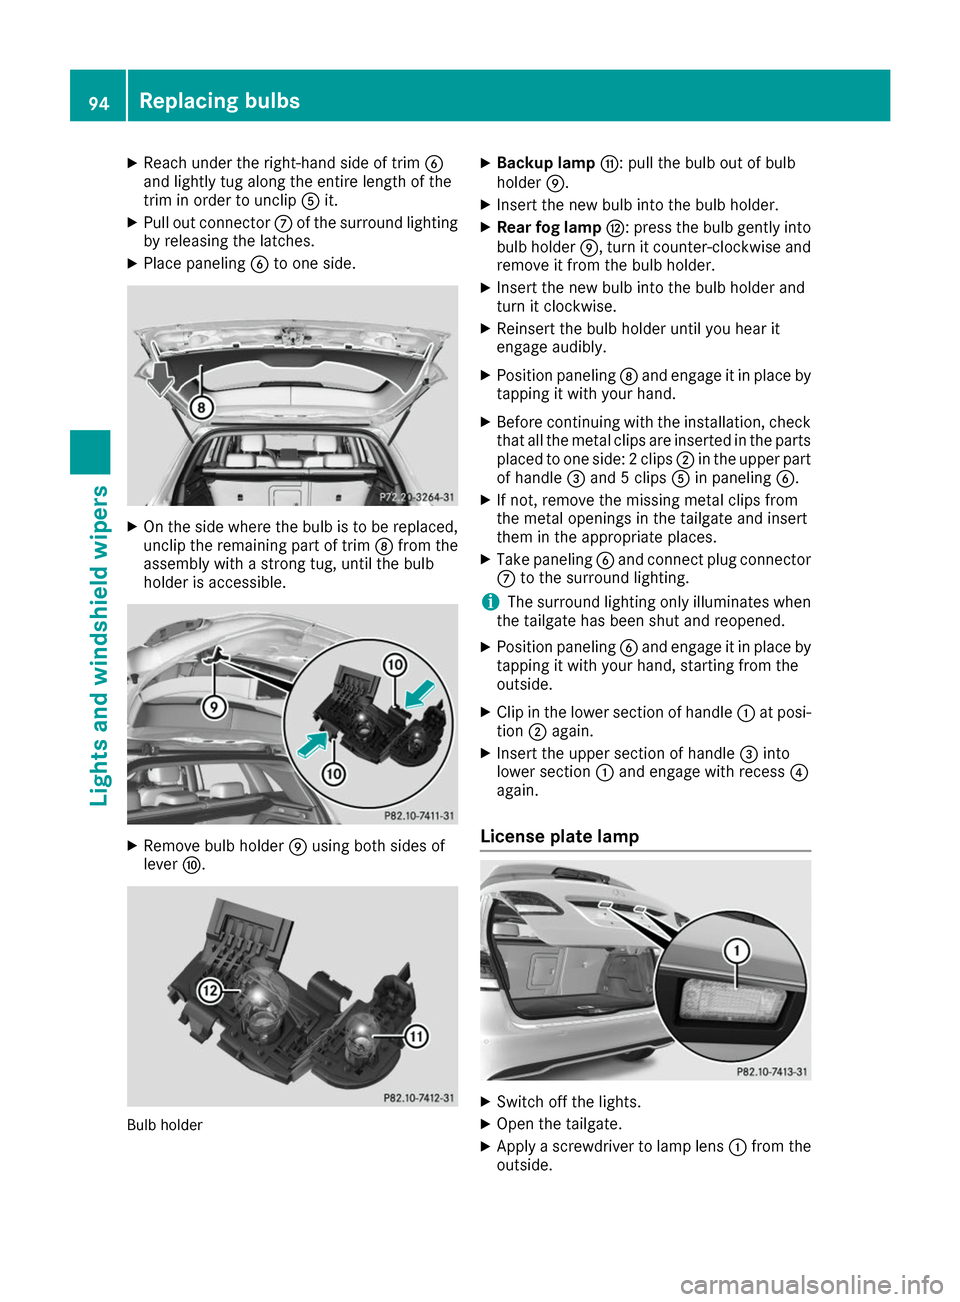
Reach under the right-hand side of trim 0084
and lightly tug along the entire length of the
trim in order to unclip 0083it.
X Pull out connector 006Bof the surround lighting
by releasing the latches.
X Place paneling 0084to one side. X
On the side where the bulb is to be replaced,
unclip the remaining part of trim 006Cfrom the
assembly with a strong tug, until the bulb
holder is accessible. X
Remove bulb holder 006Dusing both sides of
lever 006E. Bulb holder X
Backup lamp 006F: pull the bulb out of bulb
holder 006D.
X Insert the new bulb into the bulb holder.
X Rear fog lamp 0070: press the bulb gently into
bulb holder 006D, turn it counter-clockwise and
remove it from the bulb holder.
X Insert the new bulb into the bulb holder and
turn it clockwise.
X Reinsert the bulb holder until you hear it
engage audibly.
X Position paneling 006Cand engage it in place by
tapping it with your hand.
X Before continuing with the installation, check
that all the metal clips are inserted in the parts placed to one side: 2 clips 0044in the upper part
of handle 0087and 5 clips 0083in paneling 0084.
X If not, remove the missing metal clips from
the metal openings in the tailgate and insert
them in the appropriate places.
X Take paneling 0084and connect plug connector
006B to the surround lighting.
i The surround lighting only illuminates when
the tailgate has been shut and reopened.
X Position paneling 0084and engage it in place by
tapping it with your hand, starting from the
outside.
X Clip in the lower section of handle 0043at posi-
tion 0044again.
X Insert the upper section of handle 0087into
lower section 0043and engage with recess 0085
again.
License plate lamp X
Switch off the lights.
X Open the tailgate.
X Apply a screwdriver to lamp lens 0043from the
outside. 94
Replacing bulbsLights and windshield wipers
Page 98 of 290
Replacing the wiper blades
Important safety notes G
WARNING
If the windshield wipers begin to move while
you are changing the wiper blades, you could be trapped by the wiper arm. There is a risk of
injury.
Always switch off the windshield wipers and
ignition before changing the wiper blades.
! To avoid damaging the wiper blades, make
sure that you touch only the wiper arm of the
wiper.
! Never open the hood/tailgate if a wiper arm
has been folded away from the windshield/
rear window.
Never fold a windshield wiper arm without a
wiper blade back onto the windshield/rear
window.
Hold the windshield wiper arm firmly when
you change the wiper blade. If you release the
wiper arm without a wiper blade and it falls
onto the windshield/rear window, the wind-
shield/rear window may be damaged by the
force of the impact.
Mercedes-Benz recommends that you have
the wiper blades changed at a qualified spe-
cialist workshop.
Changing the windshield wiper blades Removing the wiper blades
X Vehicles without KEYLESS-GO: remove the
SmartKey from the ignition lock.
X Vehicles with KEYLESS-GO: switch off the
engine.
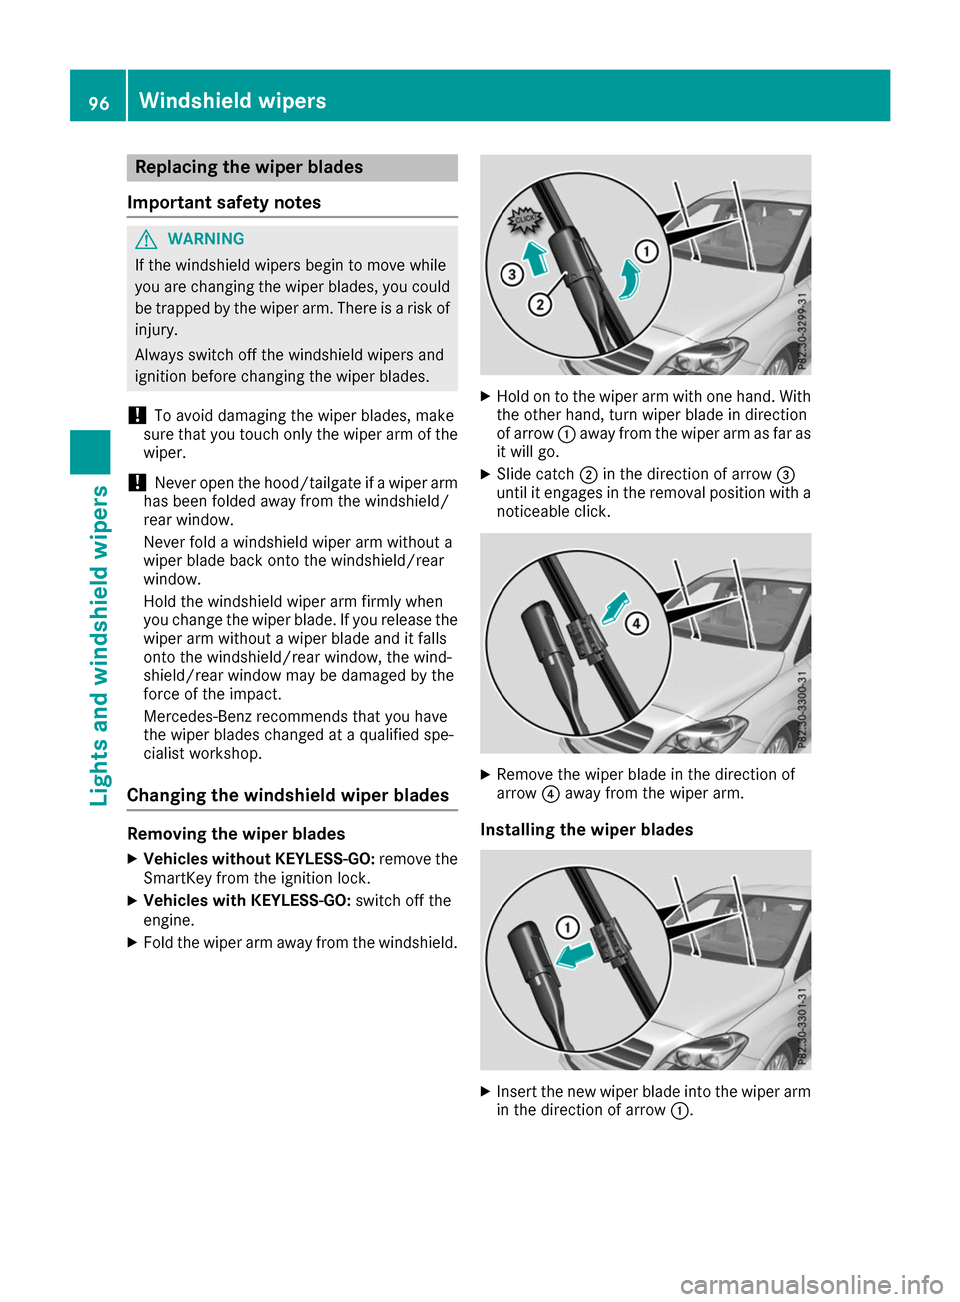
X Fold the wiper arm away from the windshield. X
Hold on to the wiper arm with one hand. With
the other hand, turn wiper blade in direction
of arrow 0043away from the wiper arm as far as
it will go.
X Slide catch 0044in the direction of arrow 0087
until it engages in the removal position with a noticeable click. X
Remove the wiper blade in the direction of
arrow 0085away from the wiper arm.
Installing the wiper blades X
Insert the new wiper blade into the wiper arm
in the direction of arrow 0043.96
Windshield wipersLights and windshield wipers
Page 101 of 290
Overview of climate control systems
General notes
Observe the settings recommended on the fol-
lowing pages. The windows could otherwise fog up.
To prevent the windows from fogging up:
R switch off climate control only briefly
R switch on air-recirculation mode only briefly
R switch on the cooling with air dehumidifica-
tion function
R switch on the defrost windshield function
briefly, if required
The dual-zone automatic climate control regu-
lates the temperature and the humidity in the
vehicle interior and filters undesirable substan-
ces out of the air.
Dual-zone automatic climate control is only
operational when the vehicle is ready to drive.
Optimum operation is only achieved with the
side windows closed.
Always keep the ventilation flaps behind the
side paneling in the cargo compartment clear.
Otherwise the vehicle will not be ventilated cor- rectly. i
Ventilate the vehicle for a brief period during
warm weather, e.g. using the convenience
opening feature (Y page 76). This will speed
up the cooling process and the desired inte-
rior temperature will be reached more
quickly.
i The integrated filter filters out most parti-
cles of dust and soot and completely filters
out pollen. It also reduces gaseous pollutants and odors. A clogged filter reduces the
amount of air supplied to the vehicle interior.
For this reason, you should always observe
the interval for replacing the filter, which is
specified in the Maintenance Booklet. As it
depends on environmental conditions, e.g.
heavy air pollution, the interval may be
shorter than stated in the Maintenance Book-
let.
i It is possible that under certain circumstan-
ces the residual heat function may be activa-
ted automatically an hour after the SmartKey has been removed in order to dry the auto-
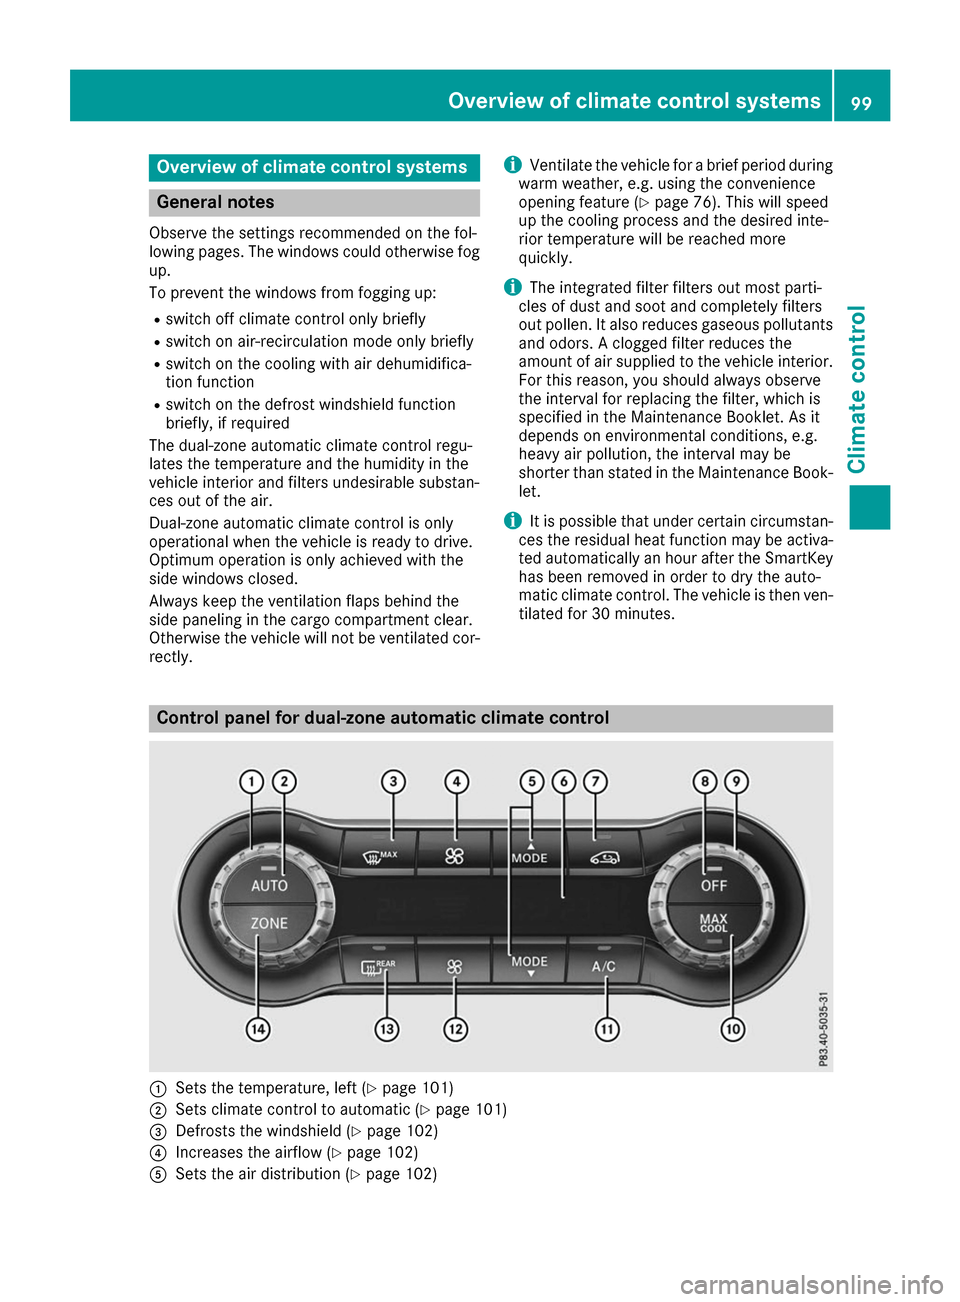
matic climate control. The vehicle is then ven-tilated for 30 minutes. Control panel for dual-zone automatic climate control
0043
Sets the temperature, left (Y page 101)
0044 Sets climate control to automatic (Y page 101)
0087 Defrosts the windshield (Y page 102)
0085 Increases the airflow (Y page 102)
0083 Sets the air distribution (Y page 102) Overview of climate control systems
99Climate control
Page 106 of 290
Switching air-recirculation mode
on/off
General notes You can deactivate the flow of fresh air if
unpleasant odors are entering the vehicle from
outside. The air already inside the vehicle will
then be recirculated.
If you switch on air-recirculation mode, the win-
dows can fog up more quickly, in particular at
low temperatures. Only use air-recirculation
mode briefly to prevent the windows from fog-
ging up.
Activating/deactivating X
Turn the SmartKey to position 2in the ignition
lock (Y page 109).
X To activate: press the008Abutton.
The indicator lamp in the 008Abutton lights
up.
Air-recirculation mode switches on automati-
cally:
R at high outside temperatures
R at high levels of pollution
When air-recirculation mode is activated auto-
matically, the indicator lamp in the 008Abutton
is not lit. Outside air is added after about
30 minutes.
X To deactivate: press the008Abutton.
The indicator lamp in the 008Abutton goes
out.
i Air-recirculation mode deactivates auto-
matically:
R after approximately five minutes at outside
temperatures below approximately 45 ‡
(7 †)
R after approximately five minutes if the
"Cooling with air dehumidification" func-
tion is deactivated
R after approximately 30 minutes at outside
temperatures above approximately 45 ‡
(7 †) if the cooling with air dehumidifica-
tion function is activated Convenience opening or closing using
the air-recirculation button G
WARNING
When using the convenience closing feature,
parts of the body could be trapped in the clos- ing area when a side window is being closed. There is a risk of injury.
Observe the complete closing procedure
when the convenience closing feature is oper-
ating. Make sure that no body parts are in
close proximity during the closing procedure. G
WARNING
During convenience opening parts of the body could be drawn in or become trapped
between the side window and window frame.
There is a risk of injury.
Make sure that nobody touches the side win-
dow during the opening procedure. If some-
one becomes trapped, immediately press
the 0062 switch in the door to stop the move-
ment of the side windows. To continue closing the side window, pull on the 0062switch.
X Convenience closing feature: press and
hold the 008Abutton until the side windows
start to close automatically.
The indicator lamp in the 008Abutton lights
up. Air-recirculation mode is activated.
If parts of the body are in the closing area during convenience closing, proceed as follows:
X Press the 0062button to stop the side win-
dows.
The side window stops.
X To then open the side window, press the 0062
button again.
or X Press and hold the 008Abutton again for at
least two seconds.
The side windows move in the opposite direc- tion.
X Convenience opening feature: press and
hold the 008Abutton until the side windows
start to open automatically.
The indicator lamp in the 008Abutton goes
out. Air-recirculation mode is deactivated. 104
Operating the climate control systemsClimate control
Page 107 of 290
Notes on the automatic reversing feature for the
side windows (Y page 75).
i If you open the side windows manually after
closing them with the convenience closing
feature, they will remain in this position when
opened using the convenience opening fea-
ture. Pre-entry climate control via Smart-
Key
General notes Before getting in, the vehicle interior can be
briefly warmed or ventilated in advance. In addi-
tion, the air from the air vent can be pre-cooled.
The high-voltage battery must be sufficiently
charged before the "Pre-entry climate control
via key" function can be activated.
Activating/deactivating When the vehicle is unlocked using the Smart-
Key or KEYLESS-GO, the climate control func-
tions are activated.
The pre-cooling and pre-heating climate control functions last 5 minutes.
When the vehicle is pre-cooled, the following
functions are activated as necessary:
R Climate control system
R Cooling with air dehumidification
R Blower
When the vehicle is pre-heated, the following
functions are activated as necessary:
R Climate control system
R Blower
R Seat heating
R Windshield heating
R Rear window defroster
Pre-entry climate control is automatically
switched off when operational readiness mode
is requested.
Activating or deactivating You can activate and deactivate the pre-entry
climate control (via SmartKey) function using
the on-board computer in the E-CELL
E-CELL submenu
(Y page 164). i
If the condition of charge of the high-voltage
battery is below the specified minimum con-
dition of charge, pre-entry climate control will not be activated even if it has been set. Pre-entry climate control at departure
time and immediate pre-entry climate
control
Important safety notes G
WARNING
If persons, particularly children are subjected to prolonged exposure to extreme heat or
cold, there is a risk of injury, possibly even
fatal. Never leave children unattended in the
vehicle.
General notes Using the "Pre-entry climate control at depar-
ture time" function, you can cool or heat the
vehicle interior prior to the desired departure
time.
When using the "Pre-entry climate control at
departure time" function, the condition of
charge of the high-voltage battery must be
higher than the specified minimum condition of charge.
The running time of the climate control may be
reduced if:
R the vehicle is not connected to an electric
power supply
R the high-voltage battery is not fully charged
With active "Pre-entry climate control at depar-
ture time" the condition of charge of the high-
voltage battery can be reduced, even if the
charge cable connector is connected.
In certain situations, the desired interior tem-
perature cannot be reached.
When the vehicle is cooled, the following func-
tions are activated as necessary:
R Climate control system
R Cooling with air dehumidification
R Blower
When the vehicle is heated, the following func-
tions are activated as necessary:
R Climate control system
R Blower Operating the climate control systems
105Climate control Z
Page 108 of 290
R
Seat heating
R Windshield heating
R Rear window defroster
"Immediate pre-entry climate control" is auto-
matically switched off when operational readi-
ness mode is requested.
Setting the departure time You can set a departure time for the "Pre-entry
climate control at departure time". Your vehicle
will then be cooled or heated until the desired
temperature is reached in time for the set depar-
ture time. "Pre-entry climate control at depar-
ture time" will be activated a maximum of
35 minutes before departure. If the departure is delayed, the vehicle will be heated or cooled fora further five minutes.
You can set the desired departure time in the E-
E-
CELL
CELL submenu on the on-board computer
(Y page 163).
Activating immediate pre-entry climate
control You can activate "Immediate pre-entry climate
control" even if the vehicle interior is already at
the desired temperature. This means that the
vehicle interior continues to be cooled or
heated, e.g. if the journey is interrupted for up to
50 minutes, and the interior temperature is kept constant. You can only set the desired temper-
ature using the climate control unit. If you do not
pre-select a temperature, the last temperature
set will be automatically adopted. To activate/deactivate "Immediate pre-
entry climate control"
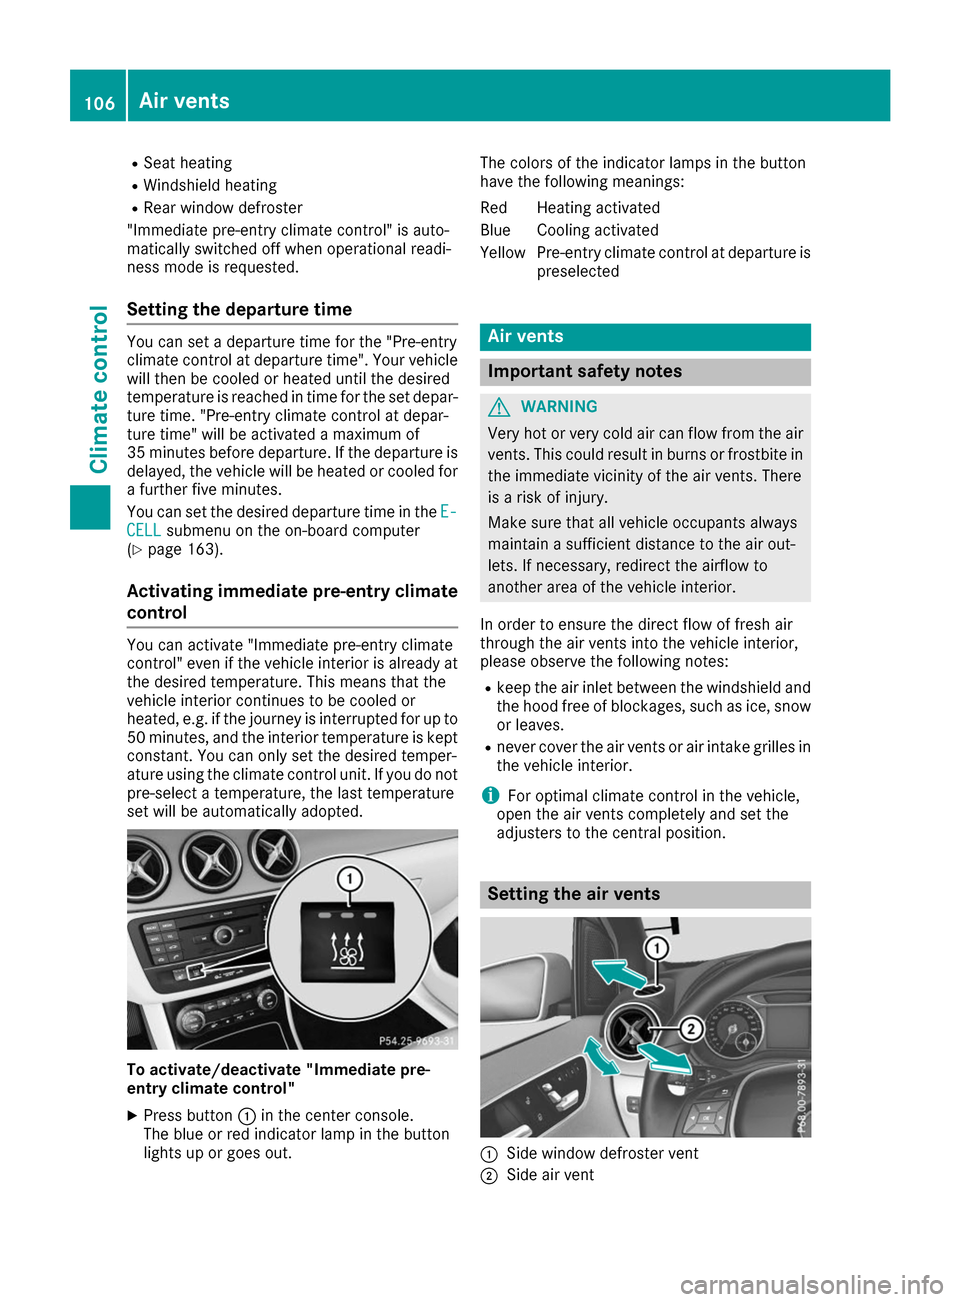
X Press button 0043in the center console.
The blue or red indicator lamp in the button
lights up or goes out. The colors of the indicator lamps in the button
have the following meanings:
Re
dH eating activated
Blue Cooling activated
Yellow Pre-entry climate control at departure is preselected Air vents
Important safety notes
G
WARNING
Very hot or very cold air can flow from the air vents. This could result in burns or frostbite in the immediate vicinity of the air vents. There
is a risk of injury.
Make sure that all vehicle occupants always
maintain a sufficient distance to the air out-
lets. If necessary, redirect the airflow to
another area of the vehicle interior.
In order to ensure the direct flow of fresh air
through the air vents into the vehicle interior,
please observe the following notes:
R keep the air inlet between the windshield and
the hood free of blockages, such as ice, snow or leaves.
R never cover the air vents or air intake grilles in
the vehicle interior.
i For optimal climate control in the vehicle,
open the air vents completely and set the
adjusters to the central position. Setting the air vents
0043
Side window defroster vent
0044 Side air vent 106
Air ventsClimate control
Page 109 of 290

X
To open a side air vent: turn the adjuster in
side air vent 0044to the left.
X To close a side air vent: turn the adjuster in
side air vent 0044clockwise as far as it will go.
i The center and rear air vents are adjusted in
the same way. Air vents
107Climate control Z
Page 112 of 290
please refer to "Warning and indicator lamps in
the instrument cluster" (Y page 192).
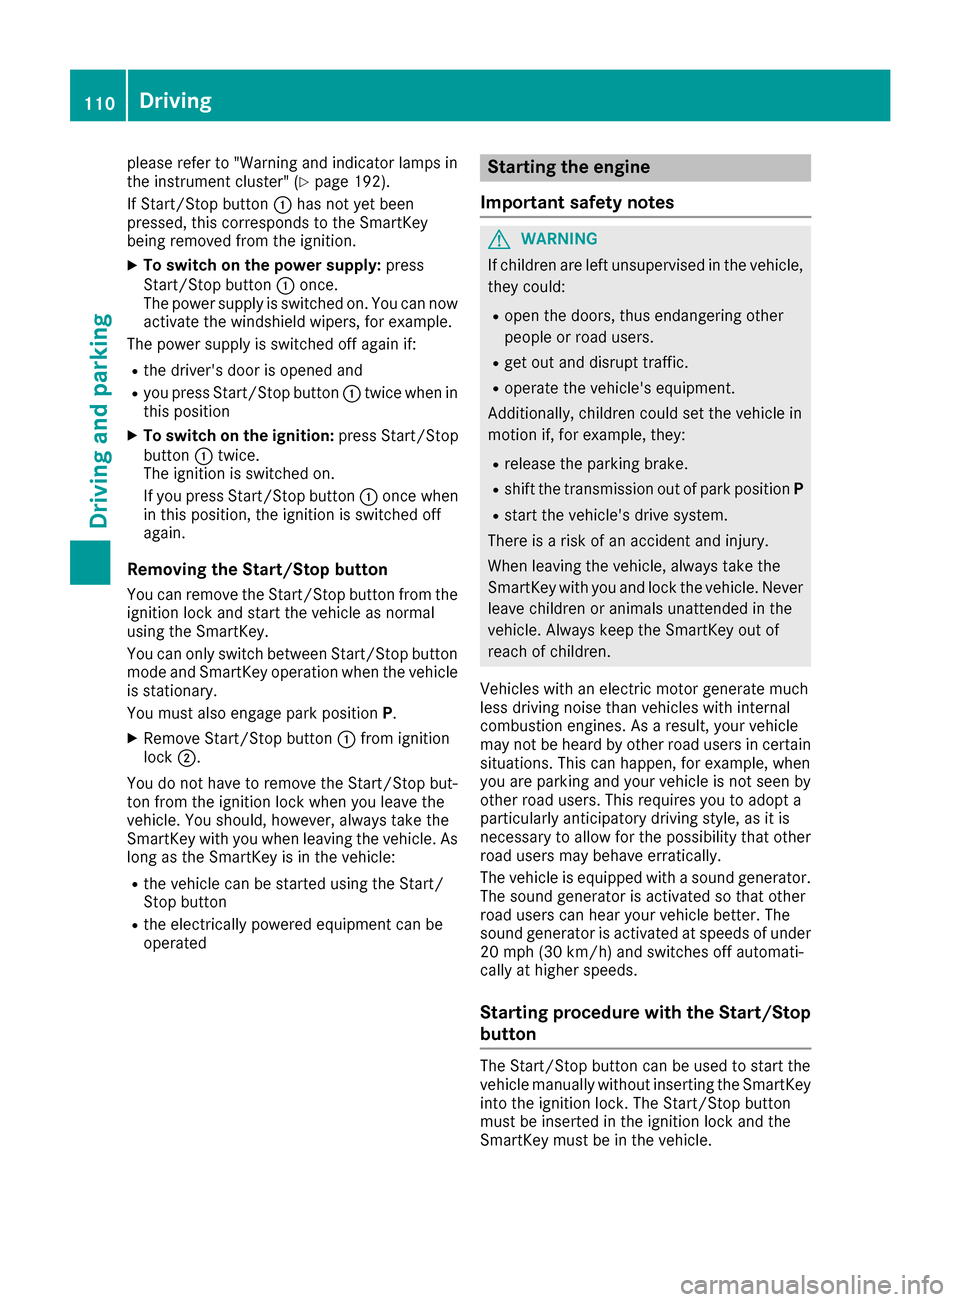
If Start/Stop button 0043has not yet been
pressed, this corresponds to the SmartKey
being removed from the ignition.
X To switch on the power supply: press
Start/Stop button 0043once.
The power supply is switched on. You can now
activate the windshield wipers, for example.
The power supply is switched off again if:
R the driver's door is opened and
R you press Start/Stop button 0043twice when in
this position
X To switch on the ignition: press Start/Stop
button 0043twice.
The ignition is switched on.
If you press Start/Stop button 0043once when
in this position, the ignition is switched off
again.
Removing the Start/Stop button
You can remove the Start/Stop button from the
ignition lock and start the vehicle as normal
using the SmartKey.
You can only switch between Start/Stop button
mode and SmartKey operation when the vehicle is stationary.
You must also engage park position P.
X Remove Start/Stop button 0043from ignition
lock 0044.
You do not have to remove the Start/Stop but-
ton from the ignition lock when you leave the
vehicle. You should, however, always take the
SmartKey with you when leaving the vehicle. As
long as the SmartKey is in the vehicle:
R the vehicle can be started using the Start/
Stop button
R the electrically powered equipment can be
operated Starting the engine
Important safety notes G
WARNING
If children are left unsupervised in the vehicle, they could:
R open the doors, thus endangering other
people or road users.
R get out and disrupt traffic.
R operate the vehicle's equipment.
Additionally, children could set the vehicle in
motion if, for example, they:
R release the parking brake.
R shift the transmission out of park position P
R start the vehicle's drive system.
There is a risk of an accident and injury.
When leaving the vehicle, always take the
SmartKey with you and lock the vehicle. Never leave children or animals unattended in the
vehicle. Always keep the SmartKey out of
reach of children.
Vehicles with an electric motor generate much
less driving noise than vehicles with internal
combustion engines. As a result, your vehicle
may not be heard by other road users in certain
situations. This can happen, for example, when
you are parking and your vehicle is not seen by
other road users. This requires you to adopt a
particularly anticipatory driving style, as it is
necessary to allow for the possibility that other
road users may behave erratically.
The vehicle is equipped with a sound generator.
The sound generator is activated so that other
road users can hear your vehicle better. The
sound generator is activated at speeds of under
20 mph (30 km/h) and switches off automati-
cally at higher speeds.
Starting procedure with the Start/Stop
button The Start/Stop button can be used to start the
vehicle manually without inserting the SmartKey
into the ignition lock. The Start/Stop button
must be inserted in the ignition lock and the
SmartKey must be in the vehicle. 110
DrivingDriving and parking
Page 113 of 290
You can start the drive system if a valid key is in
the vehicle. Switch off the drive system and
always take the key with you when leaving the
vehicle, even if you only leave it for a short time. Pay attention to the important safety notes.
X Depress the brake pedal and keep it
depressed.
X Press the Start/Stop button once
(Y page 109).
The drive system is started. Once the vehicle
is ready to be driven, the Ready
Ready display
(Y page 152) appears in the lower part of the
multifunction display.
Starting procedure with the SmartKey To start the drive system using the key instead
of the Start/Stop button, pull the Start/Stop
button out of the ignition lock.
X Turn the SmartKey to position 3(Y page 109)
in the ignition lock and release it.
The drive system is started. Once the vehicle
is ready to be driven, the Ready Readydisplay
(Y page 152) appears in the lower part of the
multifunction display. Pulling away
The vehicle is equipped with a sound generator.
At low speeds, an electric vehicle makes less
noise than a vehicle with a combustion engine.
The sound generator is activated so that other
road users can hear your vehicle better. The
sound generator is activated at speeds of under
20 mph (30 km/h) and switches off automati-
cally at higher speeds.
X Depress the brake pedal and keep it
depressed.
X Move the DIRECT SELECT lever to position D
or R.
X Release the brake pedal.
X Carefully depress the accelerator pedal.
The electric parking brake is automatically
released (Y page 131).
The red 0049(USA only) or 0024(Canada
only) indicator lamp in the instrument cluster goes out.
The vehicle locks centrally once you have pulled
away. The locking knobs in the doors drop down. You can open the doors from the inside at any
time. It is only possible to move the DIRECT SELECT
selector lever from position
Pto the desired
selector lever position if you depress the brake
pedal. The parking lock is then deactivated and
the electrical parking brake is released auto-
matically. If the brake pedal is not depressed,
the DIRECT SELECT lever can still be moved but
the parking lock remains engaged.
Make sure that no charging cable is plugged in. The parking lock cannot be released if a charg-
ing cable is plugged in. Hill start assist
Hill start assist will aid you when pulling away on
a hill. It holds the vehicle for a short time after
you have removed your foot from the brake
pedal. This gives you enough time to move your foot from the brake pedal to the accelerator
pedal and depress it before the vehicle begins to
roll. G
WARNING
After a short time, hill start assist will no lon-
ger brake your vehicle and it could roll away.
There is a risk of an accident and injury.
Therefore, quickly move your foot from the
brake pedal to the accelerator pedal. Never
leave the vehicle when it is held by hill start
assist.
Hill start assist is not active if:
R you are pulling away on a level road or on a
downhill gradient.
R the DIRECT SELECT lever is in position N.
R the electric parking brake is applied.
R ESP ®
is malfunctioning.
Further information on holding the vehicle sta-
tionary on uphill gradients (Y page 114). Transmission
Important safety notes
Shift the DIRECT SELECT lever to position P
when the drive system is switched off and the
vehicle is stationary. Park position Pis engaged
and the electric parking brake is applied auto-
matically: Transmission
111Driving and parking Z
Page 114 of 290
If the DIRECT SELECT lever cannot be engaged
in park position P, the parking brake is engaged
automatically.
Observe the important safety notes on switch-
ing ESP ®
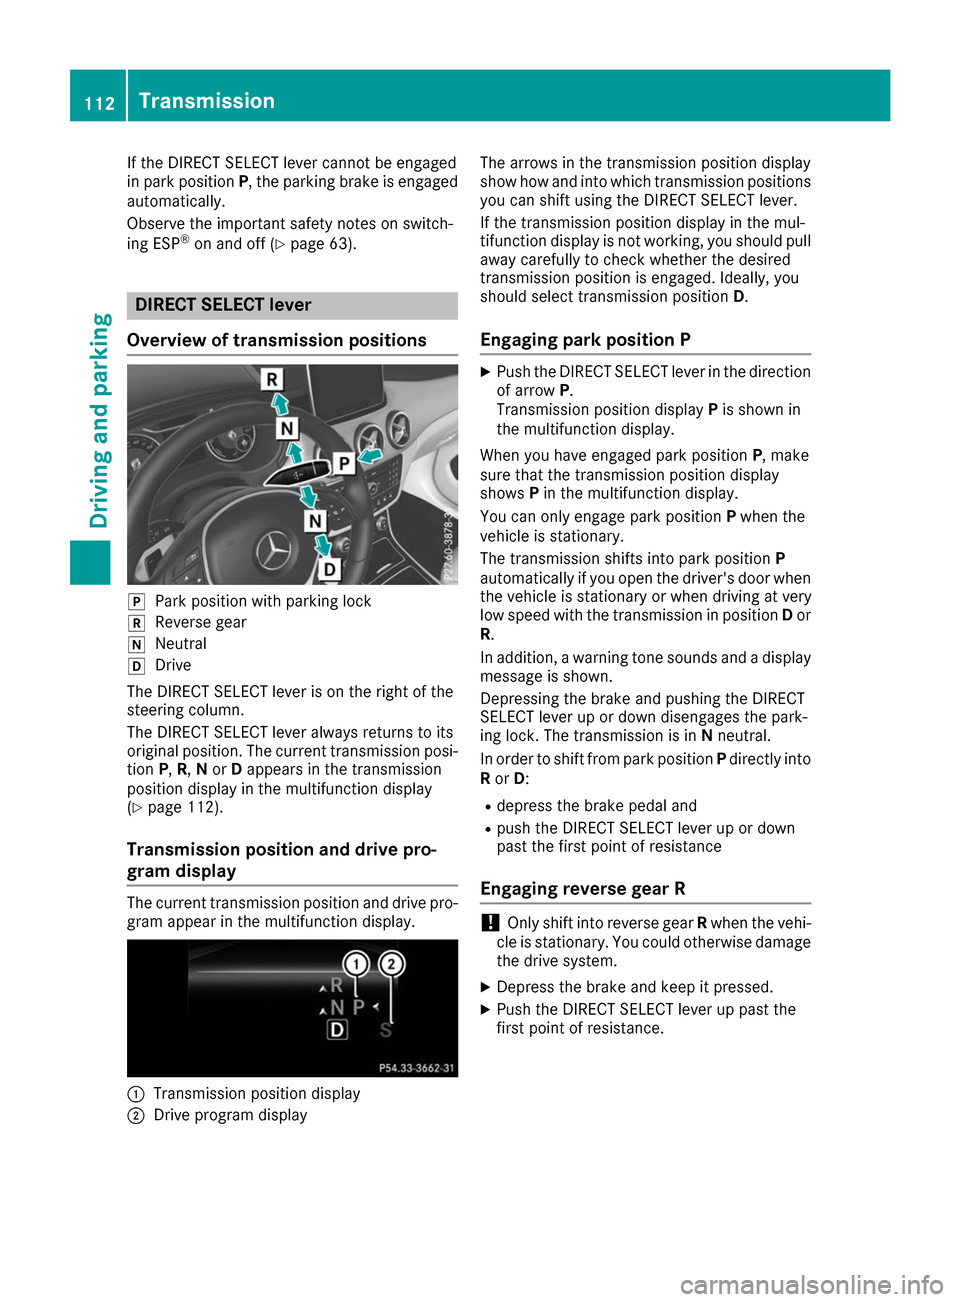
on and off (Y page 63). DIRECT SELECT lever
Overview of transmission positions 005D
Park position with parking lock
005E Reverse gear
005C Neutral
005B Drive
The DIRECT SELECT lever is on the right of the
steering column.
The DIRECT SELECT lever always returns to its
original position. The current transmission posi- tion P,R, Nor Dappears in the transmission
position display in the multifunction display
(Y page 112).
Transmission position and drive pro-
gram display The current transmission position and drive pro-
gram appear in the multifunction display. 0043
Transmission position display
0044 Drive program display The arrows in the transmission position display
show how and into which transmission positions
you can shift using the DIRECT SELECT lever.
If the transmission position display in the mul-
tifunction display is not working, you should pull
away carefully to check whether the desired
transmission position is engaged. Ideally, you
should select transmission position D.
Engaging park position P X
Push the DIRECT SELECT lever in the direction
of arrow P.
Transmission position display Pis shown in
the multifunction display.
When you have engaged park position P, make
sure that the transmission position display
shows Pin the multifunction display.
You can only engage park position Pwhen the
vehicle is stationary.
The transmission shifts into park position P
automatically if you open the driver's door when
the vehicle is stationary or when driving at very
low speed with the transmission in position Dor
R.
In addition, a warning tone sounds and a display
message is shown.
Depressing the brake and pushing the DIRECT
SELECT lever up or down disengages the park-
ing lock. The transmission is in Nneutral.
In order to shift from park position Pdirectly into
R or D:
R depress the brake pedal and
R push the DIRECT SELECT lever up or down
past the first point of resistance
Engaging reverse gear R !
Only shift into reverse gear
Rwhen the vehi-
cle is stationary. You could otherwise damage the drive system.
X Depress the brake and keep it pressed.
X Push the DIRECT SELECT lever up past the
first point of resistance. 112
TransmissionDriving and parking