relè MERCEDES-BENZ B-Class 2017 W246 Workshop Manual
[x] Cancel search | Manufacturer: MERCEDES-BENZ, Model Year: 2017, Model line: B-Class, Model: MERCEDES-BENZ B-Class 2017 W246Pages: 290, PDF Size: 19.81 MB
Page 154 of 290
Important safety notes
G
WARNING
If you operate information systems and com-
munication equipment integrated in the vehi- cle while driving, you will be distracted from
traffic conditions. You could also lose control of the vehicle. There is a risk of an accident.
Only operate the equipment when the traffic
situation permits. If you are not sure that this
is possible, park the vehicle paying attention
to traffic conditions and operate the equip-
ment when the vehicle is stationary.
You must observe the legal requirements for the country in which you are currently driving whenoperating the on-board computer. G
WARNING
If the instrument cluster has failed or mal-
functioned, you may not recognize function
restrictions in systems relevant to safety. The operating safety of your vehicle may be
impaired. There is a risk of an accident.
Drive on carefully. Have the vehicle checked
at a qualified specialist workshop immedi-
ately.
The on-board computer only shows messages or
warnings from certain systems in the multifunc- tion display. You should therefore make sure
your vehicle is operating safely at all times.
If the operating safety of your vehicle is
impaired, pull over as soon as it is safe to do so. Contact a qualified specialist workshop.
For an overview, see the instrument panel illus-
tration (Y page 32). Displays and operation
Instrument cluster lighting
The light sensor in the instrument cluster auto-
matically controls the brightness of the multi-
function display. In daylight, the displays in the
instrument cluster are not illuminated.
The lighting in the instrument cluster, in the dis-
plays and the controls in the vehicle interior can be adjusted using the brightness control knob. The brightness control knob is located on the
bottom left of the instrument cluster
(Y
page 32).
X Turn the brightness control knob clockwise or
counter-clockwise.
If the light switch is set to the 0058,0060or
0058 position, the brightness is dependent
upon the brightness of the ambient light. READY indicator
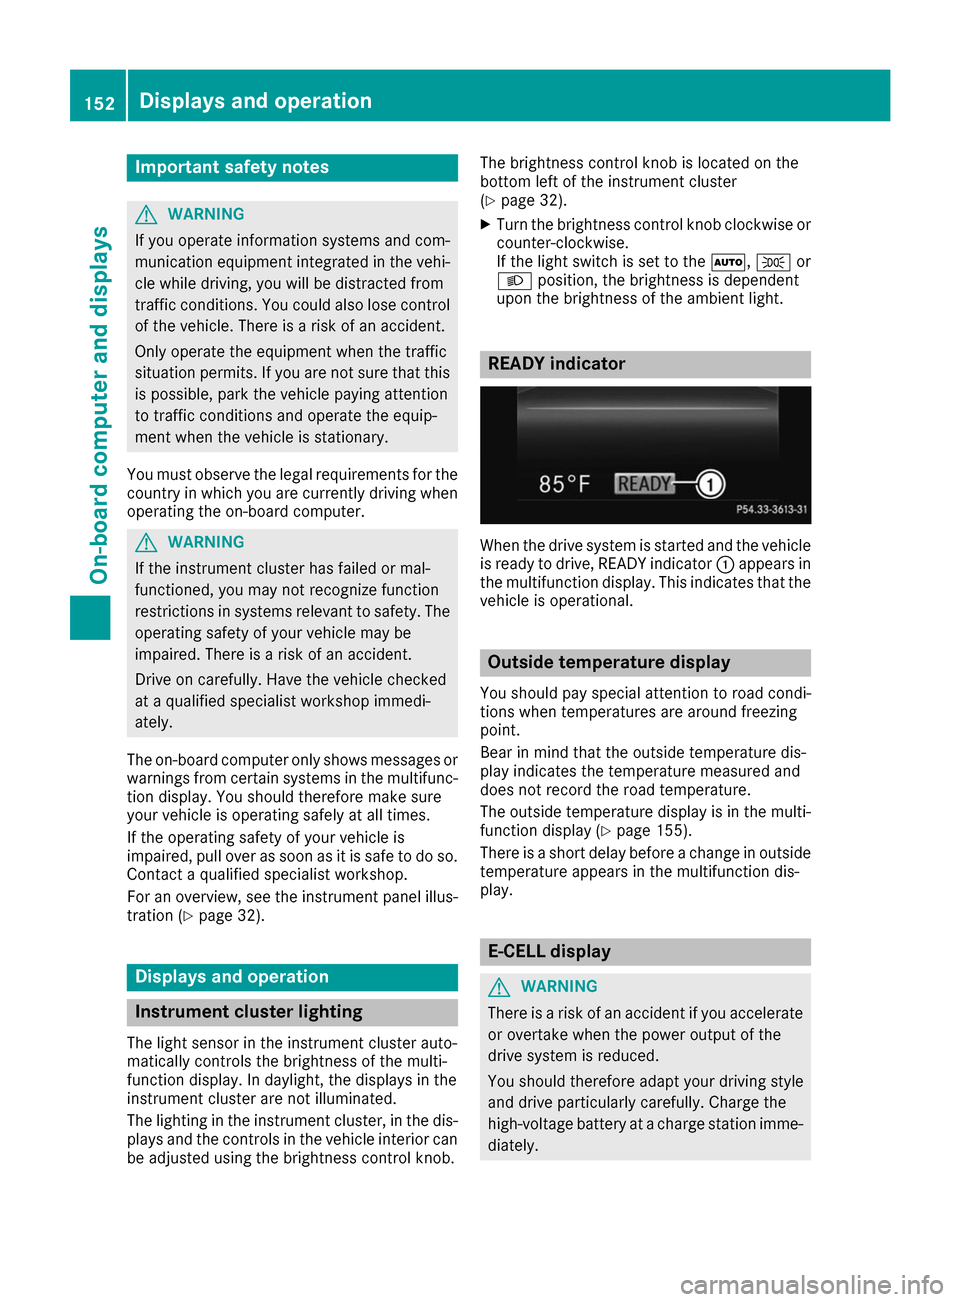
When the drive system is started and the vehicle
is ready to drive, READY indicator 0043appears in
the multifunction display. This indicates that the vehicle is operational. Outside temperature display
You should pay special attention to road condi-
tions when temperatures are around freezing
point.
Bear in mind that the outside temperature dis-
play indicates the temperature measured and
does not record the road temperature.
The outside temperature display is in the multi-
function display (Y page 155).
There is a short delay before a change in outside
temperature appears in the multifunction dis-
play. E-CELL display
G
WARNING
There is a risk of an accident if you accelerate or overtake when the power output of the
drive system is reduced.
You should therefore adapt your driving style
and drive particularly carefully. Charge the
high-voltage battery at a charge station imme- diately. 152
Displays and operationOn-board computer and displays
Page 163 of 290
cle while driving, you will be distracted from
traffic conditions. You could also lose control of the vehicle. There is a risk of an accident.
Only operate the equipment when the traffic
situation permits. If you are not sure that this is possible, park the vehicle paying attention
to traffic conditions and operate the equip-
ment when the vehicle is stationary.
When telephoning, you must observe the legal
requirements for the country in which you are
currently driving. X Switch on the mobile phone (see the manu-
facturer’s operating instructions).
X Switch on the multimedia system (see sepa-
rate operating instructions).
X Establish a Bluetooth ®
connection to the mul-
timedia system; see the separate operating
instructions.
X Press the 0059or0065 button on the steering
wheel to select the Tel
Tel menu.
You will see one of the following display mes-
sages in the multifunction display:
R Telephone READY Telephone READY or the name of the net-
work provider: the mobile phone has found a network and is ready to receive.
R Telephone
Telephone No
Noservice
service : there is no network
available or the mobile phone is searching for
a network.
Accepting a call If someone calls you when you are in the
Tel
Tel
menu, a display message appears in the multi-
function display.
You can accept a call at any time, even if you are
not in the Tel Telmenu.
X Press the 0061button on the steering wheel
to accept an incoming call.
Rejecting or ending a call You can end or reject a call anytime, even if you
are not in the Tel
Telmenu.
X Press the 0076button on the steering wheel
to reject or end a call. Selecting an entry in the phone book X
Press the 0059or0065 button on the steering
wheel to select the Tel
Telmenu.
X Press the 0063,0064or0076 button to
switch to the phone book.
X Authorize access to the phone book on the
phone.
X Press the 0063or0064 button to select the
desired name.
or
X To begin rapid scrolling: press and hold the
0063 or0064 button for longer than one sec-
ond.
Rapid scrolling stops when you release the
button or reach the end of the list.
X If only one telephone number is stored for
a name: press the 0061or0076 button to
start dialing.
or
X If there is more than one number for a
particular name:
press the0061or0076
button to display the numbers.
X Press the 0063or0064 button to select the
number you want to dial.
X Press the 0061or0076 button to start dialing.
or
X If you do not want to make a call: press the
0076 or0038 button.
Redialing The on-board computer saves the last names or
numbers dialed in the redial memory.
X Press the 0059or0065 button on the steering
wheel to select the Tel
Tel menu.
X Press the 0061button to switch to the redial
memory.
X Press the 0063or0064 button to select the
desired name or number.
X Press the 0061or0076 button to start dialing.
or
X If you do not want to make the call: press
the 0076 or0038 button. Menus and submenus
161On-board computer and displays Z
Page 167 of 290
Setting the maximum charge current
Before charging the high-voltage battery, check
the maximum permissible charge current for the relevant power socket.
You can set a maximum charge current in the E- E-
CELL CELL menu.
It is only necessary to select the maximum
charge current if there are no charge current
settings on the charging cable.
i The maximum charge current values in the
on-board computer may deviate from the
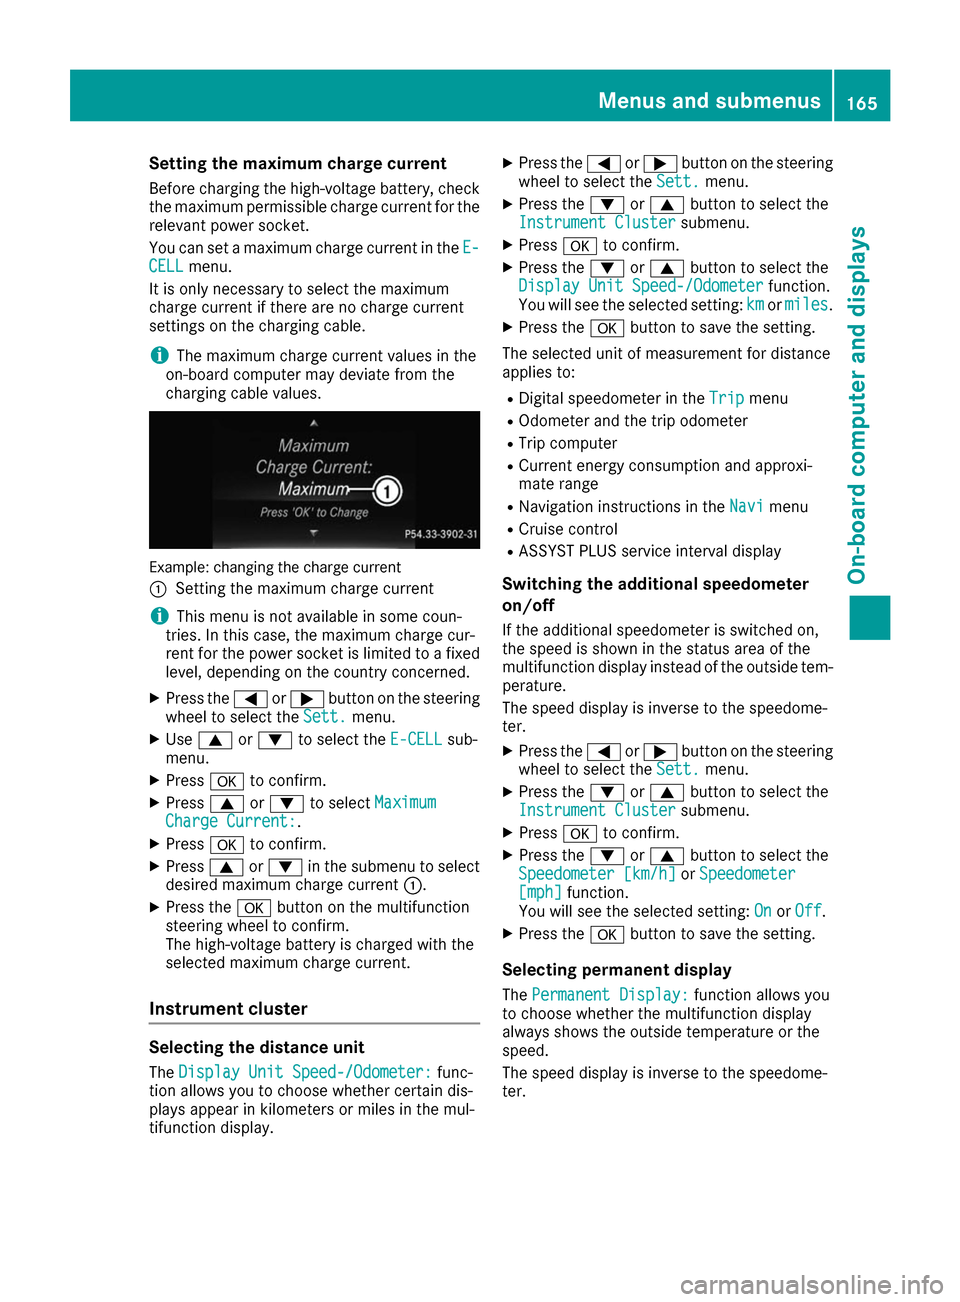
charging cable values. Example: changing the charge current
0043
Setting the maximum charge current
i This menu is not available in some coun-
tries. In this case, the maximum charge cur-
rent for the power socket is limited to a fixed
level, depending on the country concerned.
X Press the 0059or0065 button on the steering
wheel to select the Sett. Sett.menu.
X Use 0063 or0064 to select the E-CELL
E-CELLsub-
menu.
X Press 0076to confirm.
X Press 0063or0064 to select Maximum
Maximum
Charge Current:
Charge Current:.
X Press 0076to confirm.
X Press 0063or0064 in the submenu to select
desired maximum charge current 0043.
X Press the 0076button on the multifunction
steering wheel to confirm.
The high-voltage battery is charged with the
selected maximum charge current.
Instrument cluster Selecting the distance unit
The Display Unit Speed-/Odometer: Display Unit Speed-/Odometer: func-
tion allows you to choose whether certain dis-
plays appear in kilometers or miles in the mul-
tifunction display. X
Press the 0059or0065 button on the steering
wheel to select the Sett. Sett.menu.
X Press the 0064or0063 button to select the
Instrument Cluster
Instrument Cluster submenu.
X Press 0076to confirm.
X Press the 0064or0063 button to select the
Display Unit Speed-/Odometer
Display Unit Speed-/Odometer function.
You will see the selected setting: km kmormiles miles.
X Press the 0076button to save the setting.
The selected unit of measurement for distance
applies to: R Digital speedometer in the Trip
Trip menu
R Odometer and the trip odometer
R Trip computer
R Current energy consumption and approxi-
mate range
R Navigation instructions in the Navi
Navi menu
R Cruise control
R ASSYST PLUS service interval display
Switching the additional speedometer
on/off
If the additional speedometer is switched on,
the speed is shown in the status area of the
multifunction display instead of the outside tem-
perature.
The speed display is inverse to the speedome-
ter.
X Press the 0059or0065 button on the steering
wheel to select the Sett. Sett.menu.
X Press the 0064or0063 button to select the
Instrument Cluster
Instrument Cluster submenu.
X Press 0076to confirm.
X Press the 0064or0063 button to select the
Speedometer [km/h]
Speedometer [km/h] orSpeedometer
Speedometer
[mph]
[mph] function.
You will see the selected setting: On
OnorOff
Off.
X Press the 0076button to save the setting.
Selecting permanent display
The Permanent Display:
Permanent Display: function allows you
to choose whether the multifunction display
always shows the outside temperature or the
speed.
The speed display is inverse to the speedome-
ter. Menus and submenus
165On-board computer and displays Z
Page 173 of 290
Display messages
Possible causes/consequences and
0050
0050Solutions 0049(USA
only)0024(Canada only)
Turn On the Igni‐ Turn On the Igni‐
tion tion to
toRelease
Release the
the
Parking Brake
Parking Brake The red
0049(USA only) or 0024(Canada only) indicator lamp lights
up.
You attempted to release the electric parking brake while the ignition
was switched off.
X SmartKey: turn the SmartKey to position 1in the ignition lock.
X KEYLESS-GO: switch on the ignition. 0049(USA
only)0024(Canada only)
Please Please Release
Release Park‐
Park‐
ing Brake
ing Brake The red
0049(USA only) or 0024(Canada only) indicator lamp flashes
and a warning tone sounds. A condition for automatic release of the
electric parking brake is not fulfilled (Y page 130).
You are driving with the electric parking brake applied.
X Release the electric parking brake manually. The red
0049(USA only) or 0024(Canada only) indicator lamp flashes
and a warning tone sounds.
You are using the electric parking brake for emergency braking
(Y page 130). 0049(USA
only)0024(Canada only)
Parking Brake See Parking Brake See
Operator's Manual Operator's Manual The yellow
0024warning lamp lights up.
The electric parking brake is malfunctioning.
To apply:
X Switch the ignition off.
X Press the electric parking brake handle for at least ten seconds.
X Shift the transmission to position P.
X Consult a qualified specialist workshop. The yellow
0024warning lamp and the red 0049(USA only) or 0024
(Canada only) indicator lamp light up.
The electric parking brake is malfunctioning.
To release:
X Switch off the ignition and turn it back on.
X Release the electric parking brake manually.
or X Release the electric parking brake automatically (Y page 130).
If the electric parking brake still cannot be released:
X Do not drive on.
X Consult a qualified specialist workshop. Display
messages
171On-board computer and displays Z
Page 174 of 290
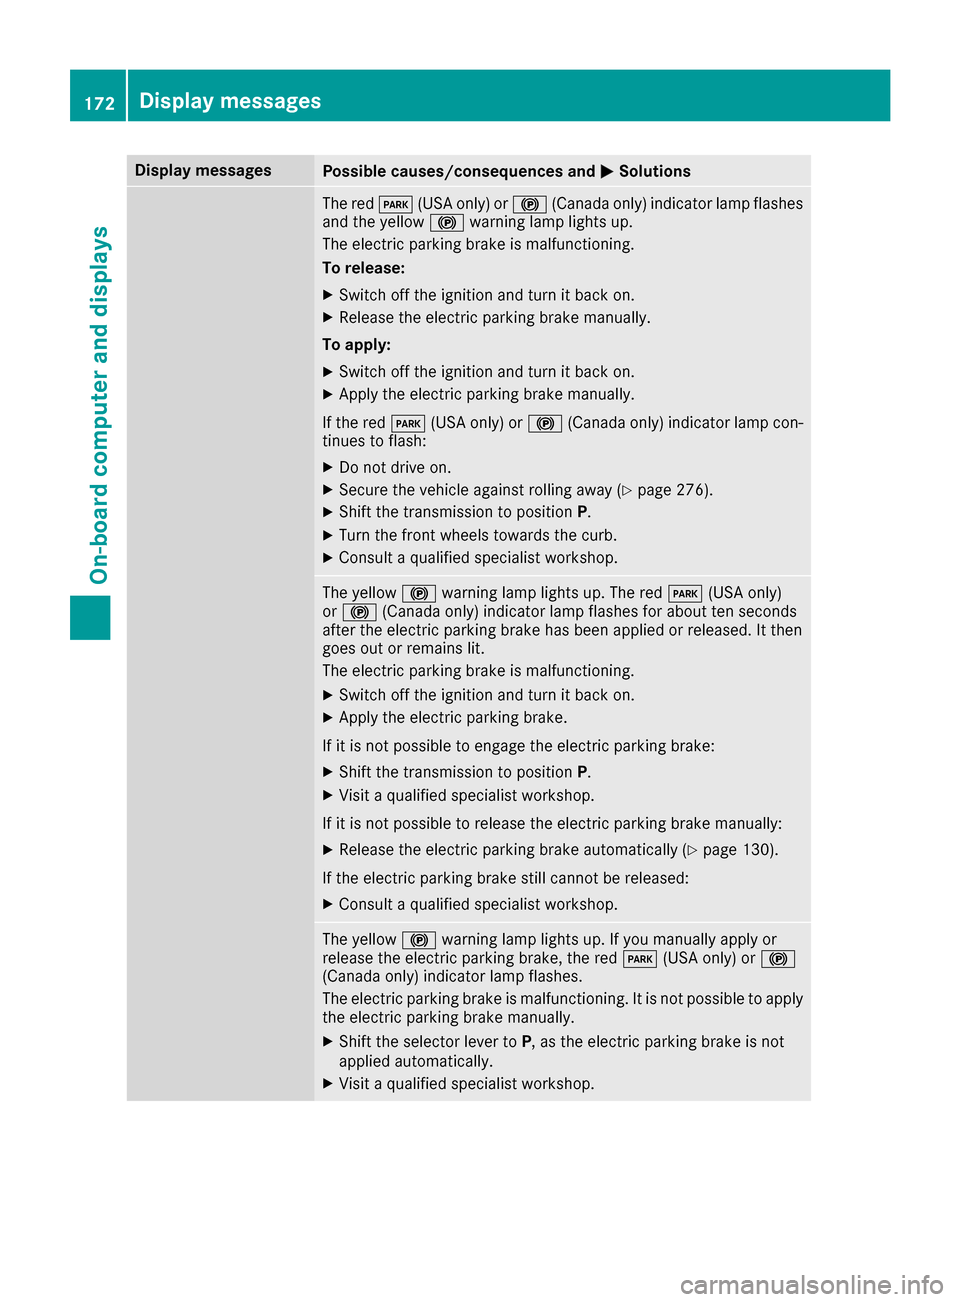
Display messages
Possible causes/consequences and
0050
0050Solutions The red
0049(USA only) or 0024(Canada only) indicator lamp flashes
and the yellow 0024warning lamp lights up.
The electric parking brake is malfunctioning.
To release:
X Switch off the ignition and turn it back on.
X Release the electric parking brake manually.
To apply: X Switch off the ignition and turn it back on.
X Apply the electric parking brake manually.
If the red 0049(USA only) or 0024(Canada only) indicator lamp con-
tinues to flash:
X Do not drive on.
X Secure the vehicle against rolling away (Y page 276).
X Shift the transmission to position P.
X Turn the front wheels towards the curb.
X Consult a qualified specialist workshop. The yellow
0024warning lamp lights up. The red 0049(USA only)
or 0024 (Canada only) indicator lamp flashes for about ten seconds
after the electric parking brake has been applied or released. It then
goes out or remains lit.
The electric parking brake is malfunctioning.
X Switch off the ignition and turn it back on.
X Apply the electric parking brake.
If it is not possible to engage the electric parking brake:
X Shift the transmission to position P.
X Visit a qualified specialist workshop.
If it is not possible to release the electric parking brake manually: X Release the electric parking brake automatically (Y page 130).
If the electric parking brake still cannot be released:
X Consult a qualified specialist workshop. The yellow
0024warning lamp lights up. If you manually apply or
release the electric parking brake, the red 0049(USA only) or 0024
(Canada only) indicator lamp flashes.
The electric parking brake is malfunctioning. It is not possible to apply
the electric parking brake manually.
X Shift the selector lever to P, as the electric parking brake is not
applied automatically.
X Visit a qualified specialist workshop. 172
Display
messagesOn-board computer and displays
Page 175 of 290
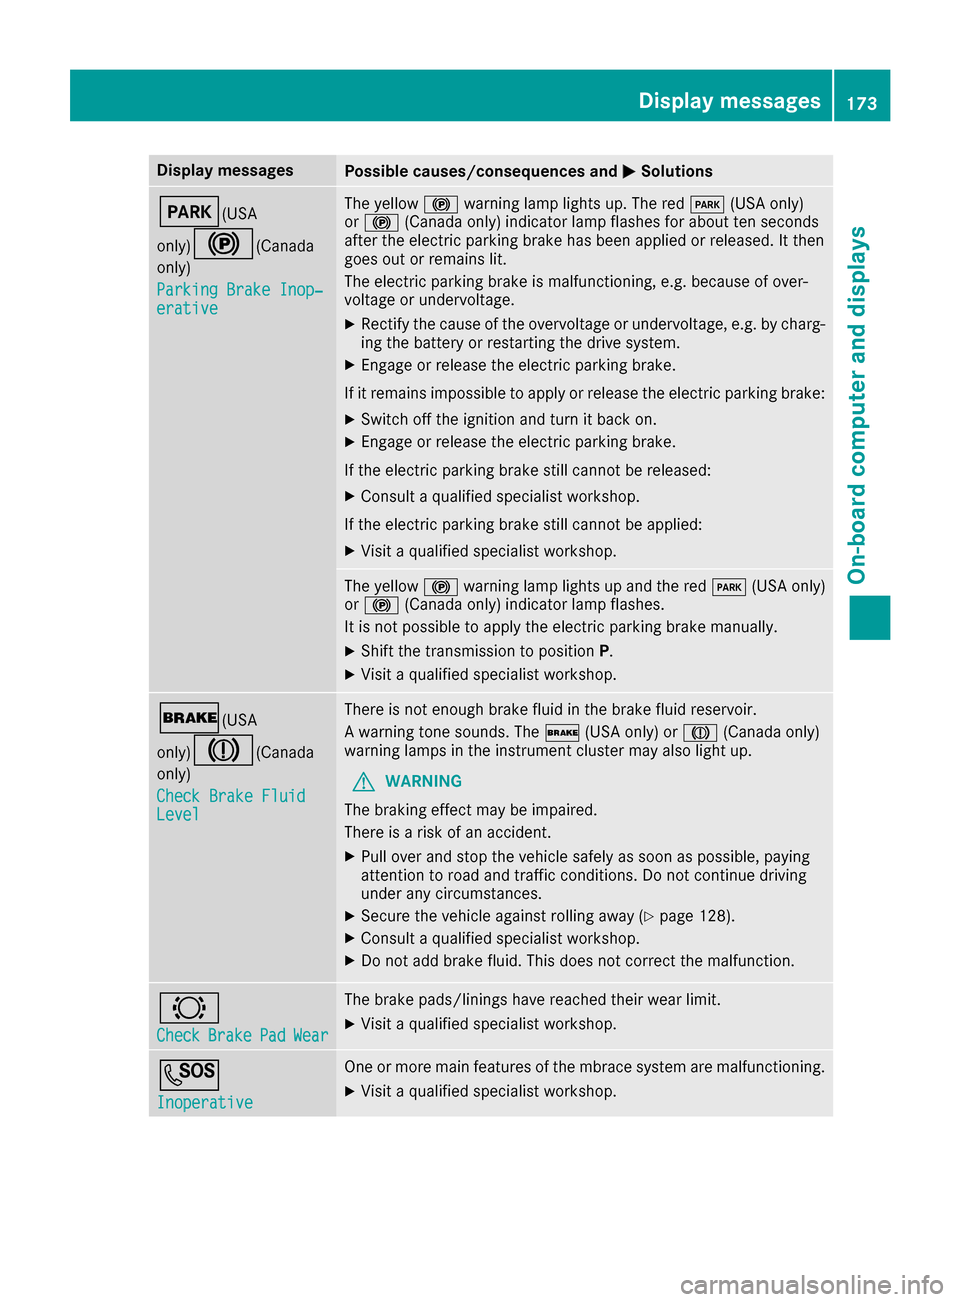
Display messages
Possible causes/consequences and
0050
0050Solutions 0049(USA
only)0024(Canada only)
Parking Brake Inop‐ Parking Brake Inop‐
erative erative The yellow
0024warning lamp lights up. The red 0049(USA only)
or 0024 (Canada only) indicator lamp flashes for about ten seconds
after the electric parking brake has been applied or released. It then
goes out or remains lit.
The electric parking brake is malfunctioning, e.g. because of over-
voltage or undervoltage.
X Rectify the cause of the overvoltage or undervoltage, e.g. by charg-
ing the battery or restarting the drive system.
X Engage or release the electric parking brake.
If it remains impossible to apply or release the electric parking brake:
X Switch off the ignition and turn it back on.
X Engage or release the electric parking brake.
If the electric parking brake still cannot be released:
X Consult a qualified specialist workshop.
If the electric parking brake still cannot be applied: X Visit a qualified specialist workshop. The yellow
0024warning lamp lights up and the red 0049(USA only)
or 0024 (Canada only) indicator lamp flashes.
It is not possible to apply the electric parking brake manually.
X Shift the transmission to position P.
X Visit a qualified specialist workshop. 0027(USA
only)004D(Canada only)
Check Brake Fluid Check Brake Fluid
Level Level There is not enough brake fluid in the brake fluid reservoir.
A warning tone sounds. The
0027(USA only) or 004D(Canada only)
warning lamps in the instrument cluster may also light up.
G WARNING
The braking effect may be impaired.
There is a risk of an accident.
X Pull over and stop the vehicle safely as soon as possible, paying
attention to road and traffic conditions. Do not continue driving
under any circumstances.
X Secure the vehicle against rolling away (Y page 128).
X Consult a qualified specialist workshop.
X Do not add brake fluid. This does not correct the malfunction. 0026
Check Check
Brake
BrakePad
PadWear
Wear The brake pads/linings have reached their wear limit.
X Visit a qualified specialist workshop. 0053
Inoperative Inoperative One or more main features of the mbrace system are malfunctioning.
X Visit a qualified specialist workshop. Display
messages
173On-board computer and displays Z
Page 203 of 290
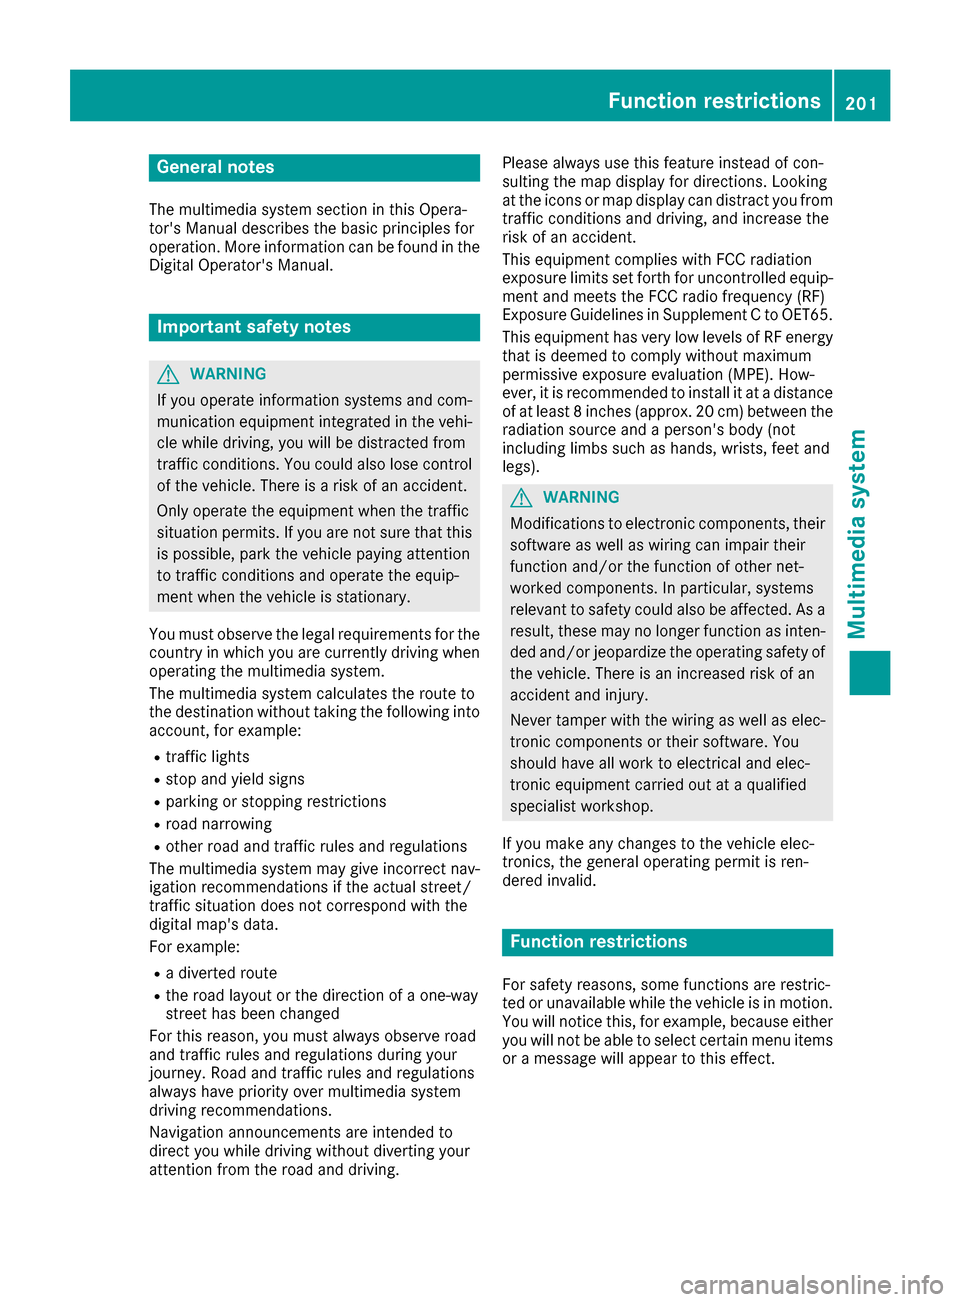
General notes
The multimedia system section in this Opera-
tor's Manual describes the basic principles for
operation. More information can be found in the Digital Operator's Manual. Important safety notes
G
WARNING
If you operate information systems and com-
munication equipment integrated in the vehi- cle while driving, you will be distracted from
traffic conditions. You could also lose control of the vehicle. There is a risk of an accident.
Only operate the equipment when the traffic
situation permits. If you are not sure that this
is possible, park the vehicle paying attention
to traffic conditions and operate the equip-
ment when the vehicle is stationary.
You must observe the legal requirements for the country in which you are currently driving whenoperating the multimedia system.
The multimedia system calculates the route to
the destination without taking the following into
account, for example:
R traffic lights
R stop and yield signs
R parking or stopping restrictions
R road narrowing
R other road and traffic rules and regulations
The multimedia system may give incorrect nav-
igation recommendations if the actual street/
traffic situation does not correspond with the
digital map's data.
For example:
R a diverted route
R the road layout or the direction of a one-way
street has been changed
For this reason, you must always observe road
and traffic rules and regulations during your
journey. Road and traffic rules and regulations
always have priority over multimedia system
driving recommendations.
Navigation announcements are intended to
direct you while driving without diverting your
attention from the road and driving. Please always use this feature instead of con-
sulting the map display for directions. Looking
at the icons or map display can distract you from traffic conditions and driving, and increase the
risk of an accident.
This equipment complies with FCC radiation
exposure limits set forth for uncontrolled equip-
ment and meets the FCC radio frequency (RF)
Exposure Guidelines in Supplement C to OET65.
This equipment has very low levels of RF energy that is deemed to comply without maximum
permissive exposure evaluation (MPE). How-
ever, it is recommended to install it at a distance
of at least 8 inches (approx. 20 cm) between the
radiation source and a person's body (not
including limbs such as hands, wrists, feet and
legs). G
WARNING
Modifications to electronic components, their software as well as wiring can impair their
function and/or the function of other net-
worked components. In particular, systems
relevant to safety could also be affected. As a
result, these may no longer function as inten-
ded and/or jeopardize the operating safety of
the vehicle. There is an increased risk of an
accident and injury.
Never tamper with the wiring as well as elec-
tronic components or their software. You
should have all work to electrical and elec-
tronic equipment carried out at a qualified
specialist workshop.
If you make any changes to the vehicle elec-
tronics, the general operating permit is ren-
dered invalid. Function restrictions
For safety reasons, some functions are restric-
ted or unavailable while the vehicle is in motion. You will notice this, for example, because either
you will not be able to select certain menu items or a message will appear to this effect. Function restrictions
201Multimedia system Z
Page 207 of 290
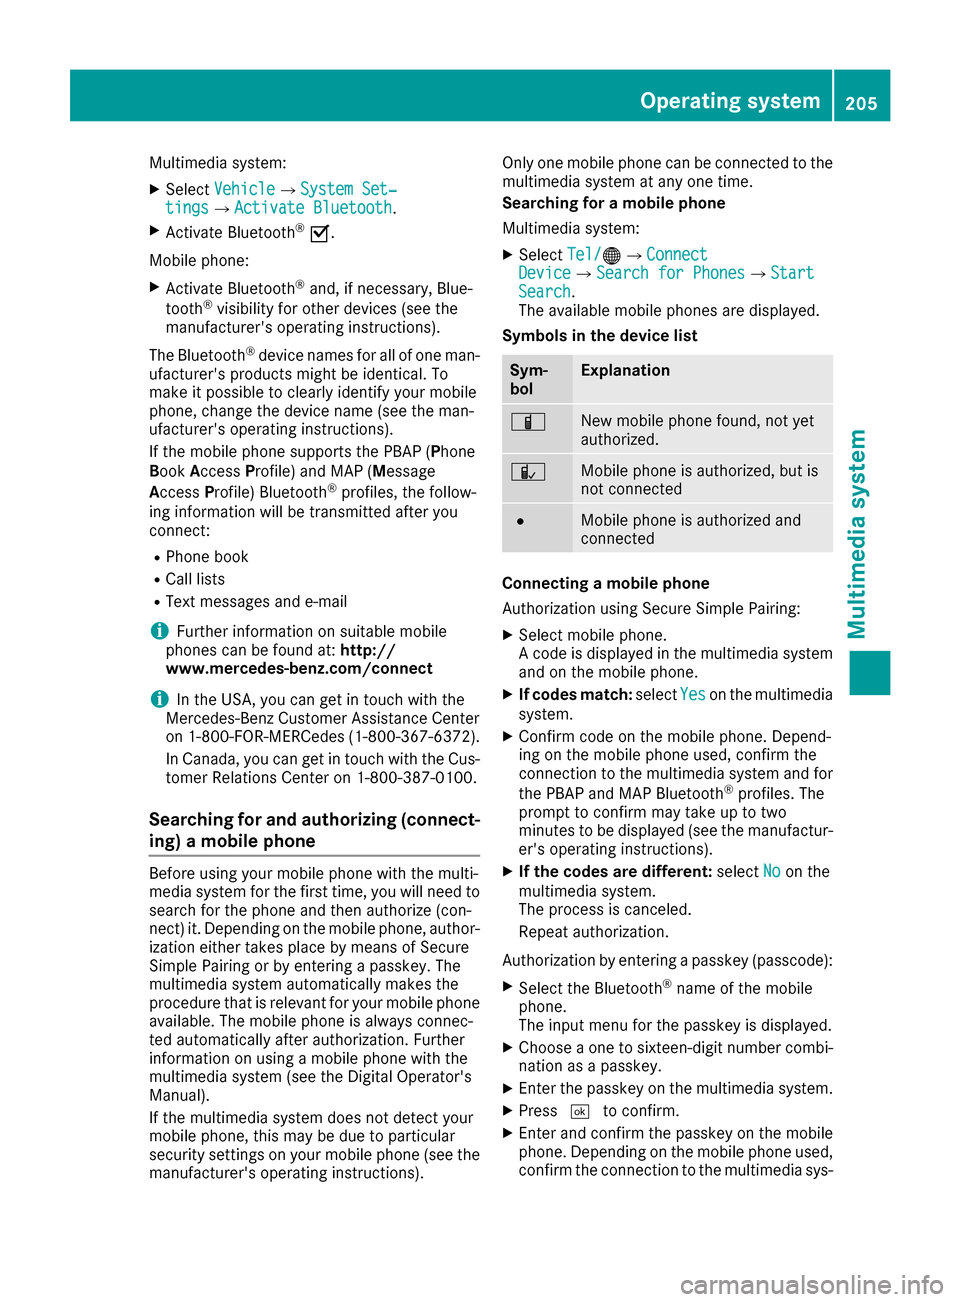
Multimedia system:
X Select Vehicle
Vehicle007BSystem Set‐ System Set‐
tings
tings007BActivate Bluetooth Activate Bluetooth.
X Activate Bluetooth ®
0073.
Mobile phone:
X Activate Bluetooth ®
and, if necessary, Blue-
tooth ®
visibility for other devices (see the
manufacturer's operating instructions).
The Bluetooth ®
device names for all of one man-
ufacturer's products might be identical. To
make it possible to clearly identify your mobile
phone, change the device name (see the man-
ufacturer's operating instructions).
If the mobile phone supports the PBAP (Phone
Book Access Profile) and MAP (Message
Access Profile) Bluetooth ®
profiles, the follow-
ing information will be transmitted after you
connect:
R Phone book
R Call lists
R Text messages and e-mail
i Further information on suitable mobile
phones can be found at: http://
www.mercedes-benz.com/connect
i In the USA, you can get in touch with the
Mercedes-Benz Customer Assistance Center
on 1-800-FOR-MERCedes (1-800-367-6372).
In Canada, you can get in touch with the Cus-
tomer Relations Center on 1-800-387-0100.
Searching for and authorizing (connect-
ing) a mobile phone Before using your mobile phone with the multi-
media system for the first time, you will need to
search for the phone and then authorize (con-
nect) it. Depending on the mobile phone, author- ization either takes place by means of Secure
Simple Pairing or by entering a passkey. The
multimedia system automatically makes the
procedure that is relevant for your mobile phone
available. The mobile phone is always connec-
ted automatically after authorization. Further
information on using a mobile phone with the
multimedia system (see the Digital Operator's
Manual).
If the multimedia system does not detect your
mobile phone, this may be due to particular
security settings on your mobile phone (see the manufacturer's operating instructions). Only one mobile phone can be connected to the
multimedia system at any one time.
Searching for a mobile phone
Multimedia system:
X Select Tel/ Tel/00A7007BConnect Connect
Device
Device007BSearch for Phones Search for Phones007BStart Start
Search
Search.
The available mobile phones are displayed.
Symbols in the device list Sym-
bol Explanation
00D3
New mobile phone found, not yet
authorized.
00DC
Mobile phone is authorized, but is
not connected
0036
Mobile phone is authorized and
connected
Connecting a mobile phone
Authorization using Secure Simple Pairing:
X Select mobile phone.
A code is displayed in the multimedia system
and on the mobile phone.
X If codes match: selectYes Yeson the multimedia
system.
X Confirm code on the mobile phone. Depend-
ing on the mobile phone used, confirm the
connection to the multimedia system and for
the PBAP and MAP Bluetooth ®
profiles. The
prompt to confirm may take up to two
minutes to be displayed (see the manufactur-
er's operating instructions).
X If the codes are different: selectNo Noon the
multimedia system.
The process is canceled.
Repeat authorization.
Authorization by entering a passkey (passcode):
X Select the Bluetooth ®
name of the mobile
phone.
The input menu for the passkey is displayed.
X Choose a one to sixteen-digit number combi-
nation as a passkey.
X Enter the passkey on the multimedia system.
X Press 0054to confirm.
X Enter and confirm the passkey on the mobile
phone. Depending on the mobile phone used,
confirm the connection to the multimedia sys- Operating system
205Multimedia system Z
Page 212 of 290
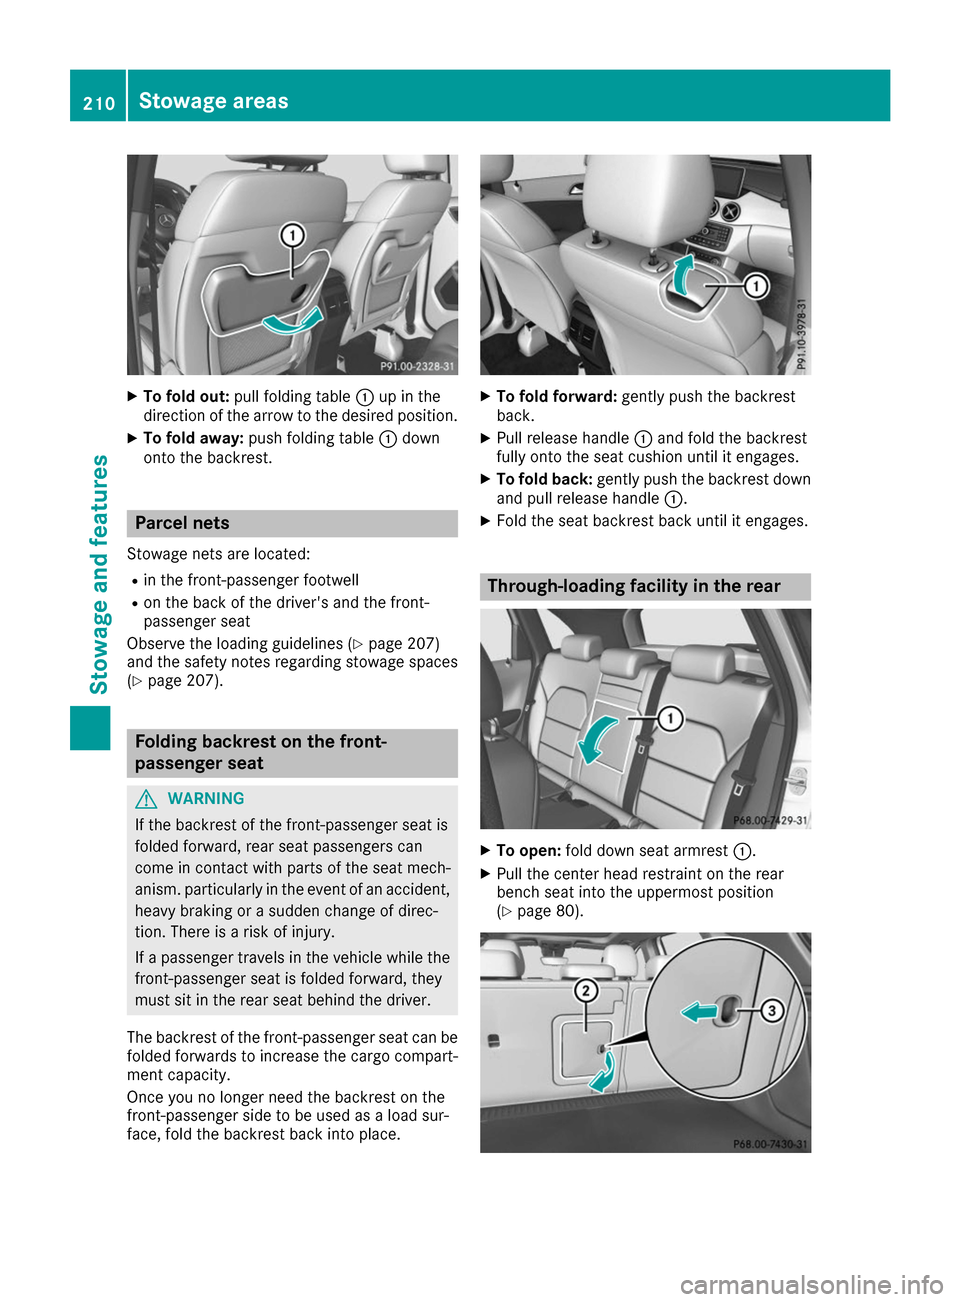
X
To fold out: pull folding table 0043up in the
direction of the arrow to the desired position.
X To fold away: push folding table 0043down
onto the backrest. Parcel nets
Stowage nets are located: R in the front-passenger footwell
R on the back of the driver's and the front-
passenger seat
Observe the loading guidelines (Y page 207)
and the safety notes regarding stowage spaces
(Y page 207). Folding backrest on the front-
passenger seat
G
WARNING
If the backrest of the front-passenger seat is
folded forward, rear seat passengers can
come in contact with parts of the seat mech-
anism. particularly in the event of an accident, heavy braking or a sudden change of direc-
tion. There is a risk of injury.
If a passenger travels in the vehicle while the
front-passenger seat is folded forward, they
must sit in the rear seat behind the driver.
The backrest of the front-passenger seat can be
folded forwards to increase the cargo compart-
ment capacity.
Once you no longer need the backrest on the
front-passenger side to be used as a load sur-
face, fold the backrest back into place. X
To fold forward: gently push the backrest
back.
X Pull release handle 0043and fold the backrest
fully onto the seat cushion until it engages.
X To fold back: gently push the backrest down
and pull release handle 0043.
X Fold the seat backrest back until it engages. Through-loading facility in the rear
X
To open: fold down seat armrest 0043.
X Pull the center head restraint on the rear
bench seat into the uppermost position
(Y page 80). 210
Stowage areasSto
wage an d features
Page 213 of 290
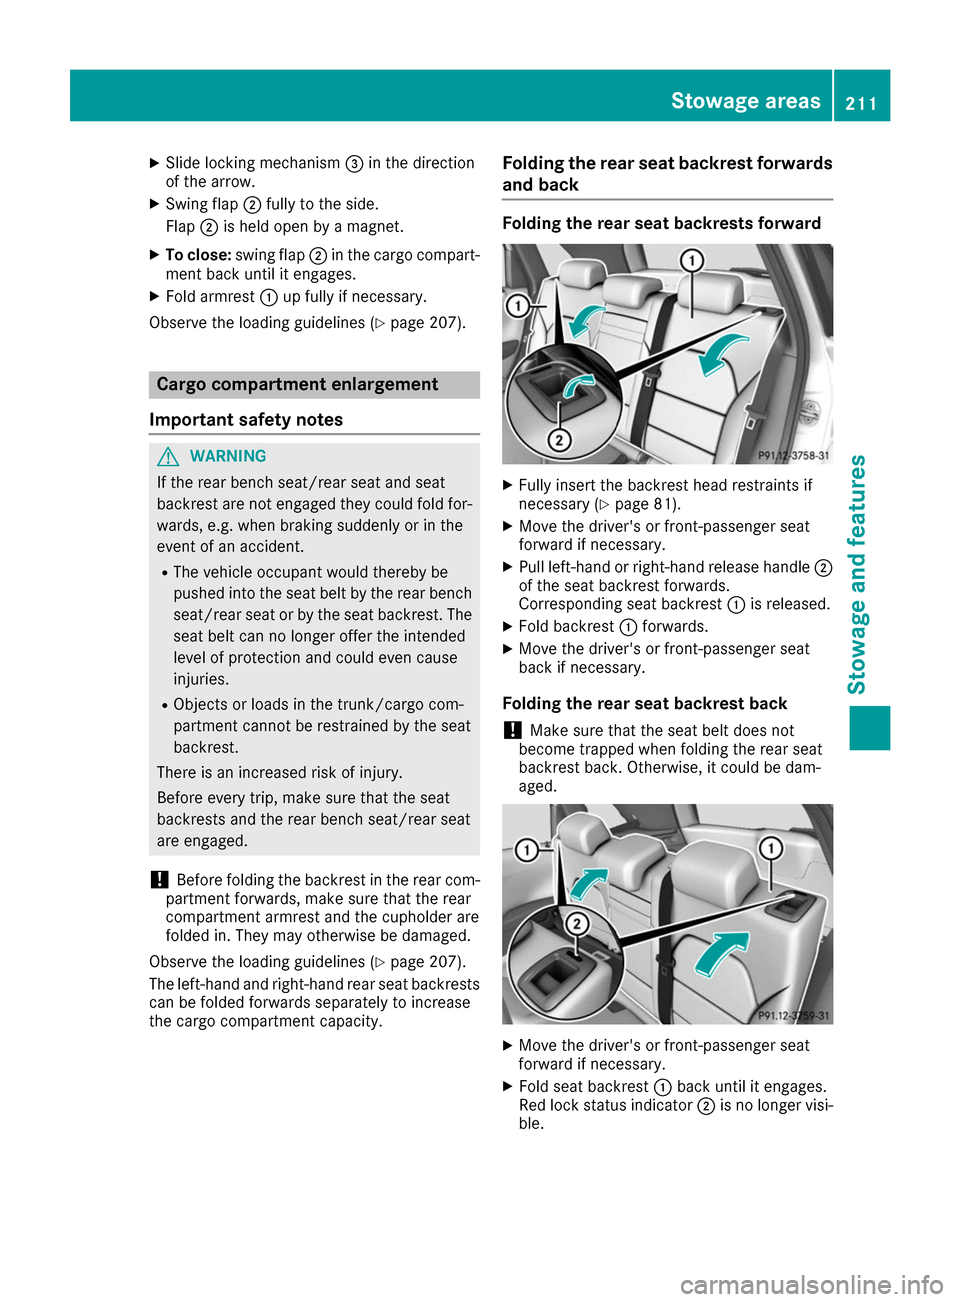
X
Slide locking mechanism 0087in the direction
of the arrow.
X Swing flap 0044fully to the side.
Flap 0044is held open by a magnet.
X To close: swing flap 0044in the cargo compart-
ment back until it engages.
X Fold armrest 0043up fully if necessary.
Observe the loading guidelines (Y page 207).Cargo compartment enlargement
Important safety notes G
WARNING
If the rear bench seat/rear seat and seat
backrest are not engaged they could fold for- wards, e.g. when braking suddenly or in the
event of an accident.
R The vehicle occupant would thereby be
pushed into the seat belt by the rear bench
seat/rear seat or by the seat backrest. The
seat belt can no longer offer the intended
level of protection and could even cause
injuries.
R Objects or loads in the trunk/cargo com-
partment cannot be restrained by the seat
backrest.
There is an increased risk of injury.
Before every trip, make sure that the seat
backrests and the rear bench seat/rear seat
are engaged.
! Before folding the backrest in the rear com-
partment forwards, make sure that the rear
compartment armrest and the cupholder are
folded in. They may otherwise be damaged.
Observe the loading guidelines (Y page 207).
The left-hand and right-hand rear seat backrests can be folded forwards separately to increase
the cargo compartment capacity. Folding the rear seat backrest forwards
and back Folding the rear seat backrests forward
X
Fully insert the backrest head restraints if
necessary (Y page 81).
X Move the driver's or front-passenger seat
forward if necessary.
X Pull left-hand or right-hand release handle 0044
of the seat backrest forwards.
Corresponding seat backrest 0043is released.
X Fold backrest 0043forwards.
X Move the driver's or front-passenger seat
back if necessary.
Folding the rear seat backrest back
! Make sure that the seat belt does not
become trapped when folding the rear seat
backrest back. Otherwise, it could be dam-
aged. X
Move the driver's or front-passenger seat
forward if necessary.
X Fold seat backrest 0043back until it engages.
Red lock status indicator 0044is no longer visi-
ble. Stowage areas
211Stowage and features Z