relè MERCEDES-BENZ B-Class 2017 W246 User Guide
[x] Cancel search | Manufacturer: MERCEDES-BENZ, Model Year: 2017, Model line: B-Class, Model: MERCEDES-BENZ B-Class 2017 W246Pages: 290, PDF Size: 19.81 MB
Page 54 of 290
sive role in the deployment of an air bag. Nor do
they provide an indication of air bag deploy-
ment.
The vehicle can be deformed considerably, with-
out an air bag being deployed. This is the case if only parts which are relatively easily deformed
are affected and the rate of deceleration is not
high. Conversely, air bags may be deployed even
though the vehicle suffers only minor deforma-
tion. This is the case if, for example, very rigid
vehicle parts such as longitudinal body mem-
bers are hit, and sufficient deceleration occurs
as a result.
If the restraint system control unit detects a side
impact, the relevant restraint system compo-
nents are deployed independently of each other.
R Side impact air bags on the side where the
impact takes place, independently of the
Emergency Tensioning Device and the use of the seat belt on the driver's seat and outer
seats in the second row
The side impact air bag on the front-
passenger side deploys under the following
conditions:
- the OCS system detects that the front-
passenger seat is occupied or
- the seat belt buckle tongue is engaged in
the belt buckle of the front-passenger seat
R Window curtain air bag on the side of impact,
independently of the use of the seat belt and
independently of whether the front-
passenger seat is occupied
R Emergency Tensioning Devices, if the system
determines that deployment can offer addi-
tional protection in this situation
i Not all air bags are deployed in an accident.
The different air bag systems work independ- ently of each other.
How the air bag system works is determined
by the severity of the accident detected,
especially the vehicle deceleration or accel-
eration and the apparent type of accident:
R Frontal collision
R Side impact Automatic measures after an acci-
dent
Immediately after an accident, the following
measures are implemented, depending on the
type and severity of the impact:
R the hazard warning lamps are activated
R the emergency lighting is activated
R the vehicle doors are unlocked
R the front side windows are lowered
R the drive system and the high-voltage electri-
cal system are switched off
R vehicles with mbrace: automatic emergency
call Children in the vehicle
Important safety notes
Accident statistics show that children secured
in the rear seats are safer than children secured
in the front-passenger seat. For this reason,
Mercedes-Benz strongly advises that you install a child restraint system on a rear seat. Children
are generally better protected there.
If a child younger than twelve years old and
under 5 ft (1.50 m)in height is traveling in the
vehicle:
R always secure the child in a child restraint
system suitable for Mercedes-Benz vehicles.
The child restraint system must be appropri-
ate to the age, weight and size of the child
R be sure to observe the instructions and safety
notes in this section in addition to the child
restraint system manufacturer's installation
instructions
R be sure to observe the instructions and safety
notes on the "Occupant classification system
(OCS)" (Y page 45) G
WARNING
If children are left unsupervised in the vehicle, they could:
R open the doors, thus endangering other
people or road users.
R get out and disrupt traffic.
R operate the vehicle's equipment. 52
Children in the vehicleSafety
Page 55 of 290
Additionally, children could set the vehicle in
motion if, for example, they:
R release the parking brake.
R shift the transmission out of park position P
R start the vehicle's drive system.
There is a risk of an accident and injury.
When leaving the vehicle, always take the
SmartKey with you and lock the vehicle. Never leave children or animals unattended in the
vehicle. Always keep the SmartKey out of
reach of children. G
WARNING
If persons, particularly children are subjected to prolonged exposure to extreme heat or
cold, there is a risk of injury, possibly even
fatal. Never leave children unattended in the
vehicle. G
WARNING
If the child restraint system is subjected to
direct sunlight, parts may get very hot. Chil-
dren may burn themselves on these parts,
particularly on the metal parts of the child
restraint system. There is a risk of injury.
If you leave the vehicle, taking the child with
you, always ensure that the child restraint
system is not exposed to direct sunlight. Pro- tect it with a blanket, for example. If the childrestraint system has been exposed to direct
sunlight, let it cool down before securing the
child in it. Never leave children unattended in the vehicle.
Always ensure that all vehicle occupants have
their seat belts fastened correctly and are sitting properly. Particular attention must be paid to
children.
Observe the safety notes on the seat belt
(Y page 40) and the notes on correct use of seat
belts (Y page 41).
A booster seat may be necessary to achieve
proper seat belt positioning for children over
41 lb s(18 kg) until they reach a height where a
three-point seat belt can be properly fastened
without a booster seat. Special seat belt retractor
G
WARNING
If the seat belt is released while driving, the
child restraint system will no longer be
secured properly. The special seat belt retrac- tor is disabled and the inertia real draws in a
portion of the seat belt. The seat belt cannot
be immediately refastened. There is an
increased risk of injury, possibly even fatal.
Stop the vehicle immediately, paying atten-
tion to road and traffic conditions. Reactivate
the special seat belt retractor and secure the
child restraint system properly.
All seat belts except the driver's seat belt are
equipped with a special seat belt retractor.
When activated, the special seat belt retractor
ensures that the seat belt will not slacken once
the child restraint system has been secured.
Installing a child restraint system:
X Always comply with the child restraint system
manufacturer's installation instructions.
X Pull the seat belt smoothly from the belt out-
let.
X Engage the seat belt tongue in the belt buckle.
Activating the special seat belt retractor: X Pull the seat belt out fully and let the inertia
reel retract it again.
While the seat belt is retracting, you should
hear a ratcheting sound. The special seat belt
retractor is activated.
X Push the child seat restraint system down so
that the seat belt is tight and does not loosen.
Removing a child restraint system and deacti-
vating the special seat belt retractor:
X Always comply with the child restraint system
manufacturer's installation instructions.
X Press the release button of the belt buckle,
hold the belt tongue firmly and guide it back
towards the belt outlet.
The special seat belt retractor is deactivated. Children in the vehicle
53Safety Z
Page 58 of 290
Top Tether anchorages
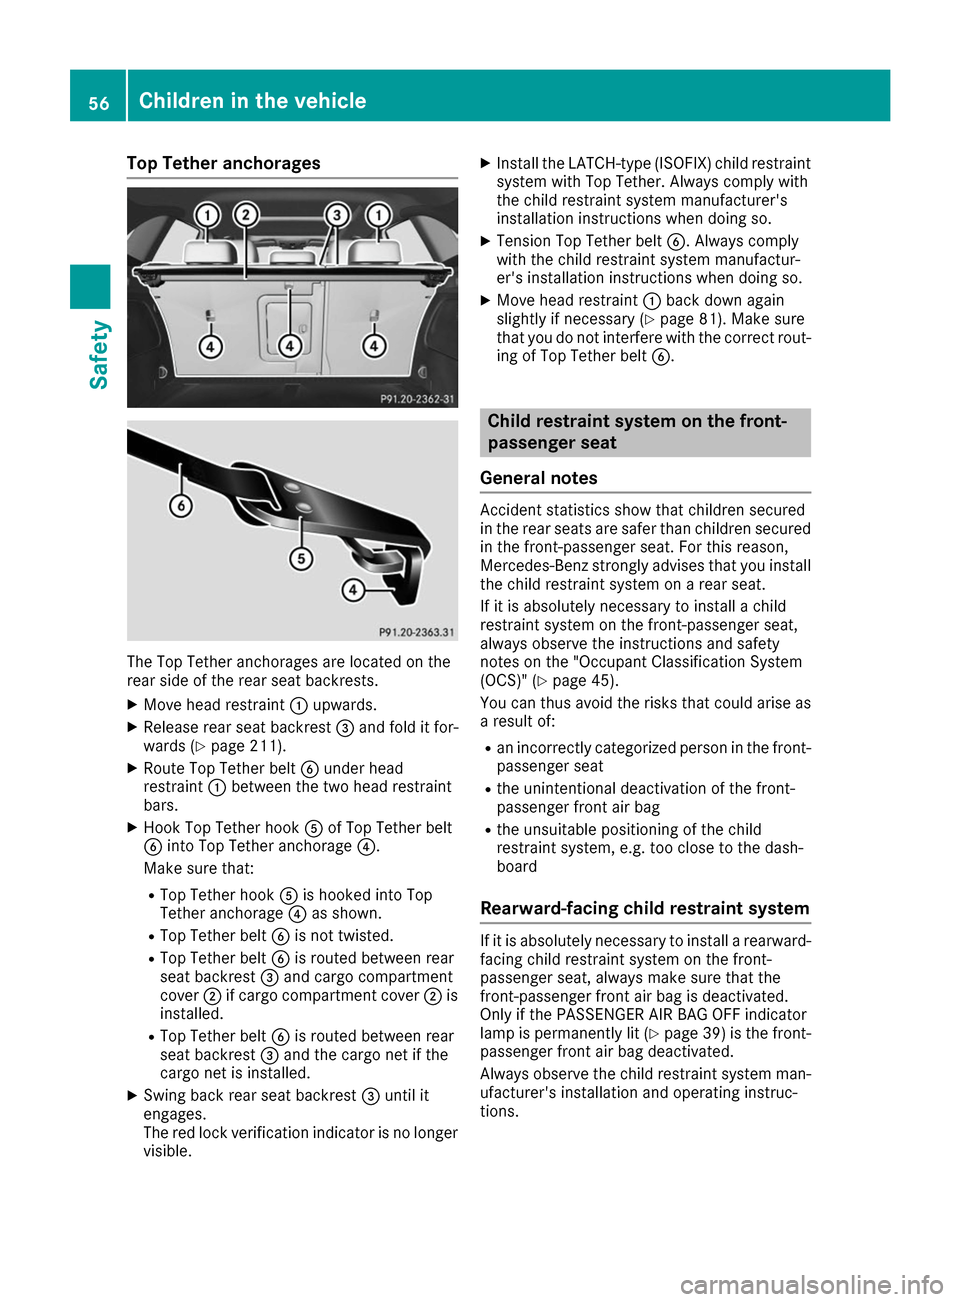
The Top Tether anchorages are located on the
rear side of the rear seat backrests.
X Move head restraint 0043upwards.
X Release rear seat backrest 0087and fold it for-
wards (Y page 211).
X Route Top Tether belt 0084under head
restraint 0043between the two head restraint
bars.
X Hook Top Tether hook 0083of Top Tether belt
0084 into Top Tether anchorage 0085.
Make sure that:
R Top Tether hook 0083is hooked into Top
Tether anchorage 0085as shown.
R Top Tether belt 0084is not twisted.
R Top Tether belt 0084is routed between rear
seat backrest 0087and cargo compartment
cover 0044if cargo compartment cover 0044is
installed.
R Top Tether belt 0084is routed between rear
seat backrest 0087and the cargo net if the
cargo net is installed.
X Swing back rear seat backrest 0087until it
engages.
The red lock verification indicator is no longer
visible. X
Install the LATCH-type (ISOFIX) child restraint
system with Top Tether. Always comply with
the child restraint system manufacturer's
installation instructions when doing so.
X Tension Top Tether belt 0084. Always comply
with the child restraint system manufactur-
er's installation instructions when doing so.
X Move head restraint 0043back down again
slightly if necessary (Y page 81). Make sure
that you do not interfere with the correct rout- ing of Top Tether belt 0084. Child restraint system on the front-
passenger seat
General notes Accident statistics show that children secured
in the rear seats are safer than children secured
in the front-passenger seat. For this reason,
Mercedes-Benz strongly advises that you install the child restraint system on a rear seat.
If it is absolutely necessary to install a child
restraint system on the front-passenger seat,
always observe the instructions and safety
notes on the "Occupant Classification System
(OCS)" (Y page 45).
You can thus avoid the risks that could arise as a result of:
R an incorrectly categorized person in the front-
passenger seat
R the unintentional deactivation of the front-
passenger front air bag
R the unsuitable positioning of the child
restraint system, e.g. too close to the dash-
board
Rearward-facing child restraint system If it is absolutely necessary to install a rearward-
facing child restraint system on the front-
passenger seat, always make sure that the
front-passenger front air bag is deactivated.
Only if the PASSENGER AIR BAG OFF indicator
lamp is permanently lit (Y page 39)is the front-
passenger front air bag deactivated.
Always observe the child restraint system man- ufacturer's installation and operating instruc-
tions. 56
Children in the vehicleSafety
Page 59 of 290
Forward-facing child restraint system
If it is absolutely necessary to install a forward-
facing child restraint system on the front-
passenger seat, always move the front-
passenger seat as far back as possible. Fully
retract the seat cushion length. The entire base of the child restraint system must always rest on
the seat cushion of the front-passenger seat.
The backrest of the child restraint system must lie as flat as possible against the backrest of the
front-passenger seat. The child restraint system must not touch the roof or be subjected to a loadby the head restraint. Adjust the angle of the
seat backrest and the head restraint position
accordingly. Always make sure that the shoul-
der belt strap is correctly routed from the vehi-
cle belt outlet to the shoulder belt guide on the
child restraint system. The shoulder belt strap
must be routed forwards and downwards from
the vehicle belt outlet. If necessary, adjust the
vehicle belt outlet and the front-passenger seat
accordingly.
Always observe the child restraint system man- ufacturer's installation and operating instruc-
tions. Child-proof locks
Important safety notes G
WARNING
If children are traveling in the vehicle, they
could:
R open doors, thus endangering other people
or road users
R exit the vehicle and be caught by oncoming
traffic
R operate vehicle equipment and become
trapped
There is a risk of an accident and injury.
Always activate the child-proof locks and
override feature if children are traveling in the vehicle. When leaving the vehicle, always take
the key with you and lock the vehicle. Never
leave children unattended in the vehicle.
Override feature for:
R the rear doors (Y page 58)
R the rear side windows (Y page 58) G
WARNING
If you leave children unsupervised in the vehi- cle, they could set it in motion by, for example:
R release the parking brake.
R shift the transmission out of park position
P.
R start the vehicle's drive system.
They could also operate the vehicle's equip-
ment. There is a risk of an accident and injury.
When leaving the vehicle, always take the
SmartKey with you and lock the vehicle. Never leave children unsupervised in the vehicle. G
WARNING
If persons, particularly children are subjected to prolonged exposure to extreme heat or
cold, there is a risk of injury, possibly even
fatal. Never leave children unattended in the
vehicle. G
WARNING
If the child restraint system is subjected to
direct sunlight, parts may get very hot. Chil-
dren may burn themselves on these parts,
particularly on the metal parts of the child
restraint system. There is a risk of injury.
If you leave the vehicle, taking the child with
you, always ensure that the child restraint
system is not exposed to direct sunlight. Pro- tect it with a blanket, for example. If the child
restraint system has been exposed to direct
sunlight, let it cool down before securing the
child in it. Never leave children unattended in the vehicle. Children in the vehicle
57Safety Z
Page 61 of 290
vehicle in front, for vehicle speed, for braking in
good time, and for staying in lane. Always adapt your driving style to suit the prevailing road and
weather conditions and maintain a safe distance from the vehicle in front. Drive carefully.
The driving safety systems described only work
as effectively as possible when there is ade-
quate contact between the tires and the road
surface. Please pay special attention to the
notes on tires, recommended minimum tire
tread depths, etc. (Y page 257).
In wintry driving conditions, always use winter
tires (M+S tires) and if necessary, snow chains.
Only in this way will the driving safety systems
described in this section work as effectively as
possible. ABS (Anti-lock Braking System)
General information ABS regulates brake pressure in such a way that
the wheels do not lock when you brake. This
allows you to continue steering the vehicle when braking.
The 0025 ABS warning lamp in the instrument
cluster lights up when the ignition is switched
on. It goes out when the engine is running.
ABS works from a speed of about 5 mph
(8 km/h), regardless of road-surface conditions. ABS works on slippery surfaces, even when you
only brake gently.
Important safety notes i
Observe the "Important safety notes" sec-
tion (Y page 58). G
WARNING
If ABS is faulty, the wheels could lock when
braking. The steerability and braking charac-
teristics may be severely impaired. Addition-
ally, further driving safety systems are deac-
tivated. There is an increased danger of skid- ding and accidents.
Drive on carefully. Have ABS checked imme-
diately at a qualified specialist workshop.
When ABS is malfunctioning, other systems,
including driving safety systems, will also
become inoperative. Observe the information
on the ABS warning lamp (Y page 193) and dis-play messages which may be shown in the
instrument cluster (Y
page 168).
Braking X
If ABS intervenes: continue to depress the
brake pedal vigorously until the braking sit-
uation is over.
X To make a full brake application: depress
the brake pedal with full force.
If ABS intervenes when braking, you will feel a
pulsing in the brake pedal.
The pulsating brake pedal can be an indication
of hazardous road conditions, and functions as a reminder to take extra care while driving. BAS (Brake Assist System)
General information BAS operates in emergency braking situations.
If you depress the brake pedal quickly, BAS
automatically boosts the braking force, thus
shortening the stopping distance.
Important safety notes i
Observe the "Important safety notes" sec-
tion (Y page 58). G
WARNING
If BAS is malfunctioning, the braking distance
in an emergency braking situation is
increased. There is a risk of an accident.
In an emergency braking situation, depress
the brake pedal with full force. ABS prevents
the wheels from locking.
Braking X
Keep the brake pedal firmly depressed until
the emergency braking situation is over.
ABS prevents the wheels from locking.
The brakes will function as usual once you
release the brake pedal. BAS is deactivated. Driving safety systems
59Safety Z
Page 63 of 290
Function
Starting at a speed of approximately 4 mph
(7 km/h), the distance warning function warns
you if you rapidly approach a vehicle in front. An
intermittent warning tone will then sound, and
the 00BA distance warning lamp will light up in
the instrument cluster.
X Brake immediately in order to increase the
distance from the vehicle in front.
or X Take evasive action, provided it is safe to do
so.
Due to the nature of the system, particularly
complicated but non-critical driving conditions
may also cause the system to display a warning.
With the help of the radar sensor system, the
distance warning function can detect obstacles
that are in the path of your vehicle for an exten-
ded period of time.
Up to a speed of approximately 44 mph
(70 km/ h), the distance warning function can
also react to stationary obstacles, such as stop-
ped or parked vehicles.
Autonomous braking function If the driver does not react to the distance warn-
ing signal in a critical situation, Active Brake
Assist can assist the driver with the autonomous braking function.
The autonomous braking function:
R gives the driver more time to react to critical
driving situations
R can help the driver to avoid an accident or
R reduces the effects of an accident
The autonomous braking function is available in
the following speed ranges:
R 4 - 65 mph (7 - 105 km/ h)for moving objects
R 4 - 31 mph (7 - 50 km/h) for stationary
objects
Due to the nature of the system, particularly
complicated but non-critical driving conditions
may also cause the Autonomous Braking Func-
tion to intervene. Braking assistance appropriate to the
situation General information
i Observe the "Important safety notes" sec-
tion (Y page 58).
With the help of the radar sensor system, Adap- tive Brake Assist can detect obstacles that are in
the path of your vehicle for an extended period
of time.
If Adaptive Brake Assist detects a risk of colli-
sion with the vehicle in front, it calculates the
brake pressure necessary to avoid a collision. If
you apply the brakes forcefully, the braking
assistance adapts to the situation and automat-
ically increases the brake pressure to a degree
appropriate to the traffic situation.
Braking assistance appropriate to the situation
provides braking assistance in hazardous situa- tions at speeds above 4 mph (7 km/h). It uses
radar sensor technology to assess the traffic
situation.
Situation-dependent braking assistance is capa-
ble of reacting to moving objects that have
already been recognized as such at least once
over the period of observation, up to vehicle
speeds of around 155 mph (250 km/h).
Braking assistance appropriate to the situation
can also detect stationary objects, up to vehicle speeds of around 44 mph 70 km/h.
X Keep the brake pedal depressed until the
emergency braking situation is over.
ABS prevents the wheels from locking.
The brakes will work normally again if: R you release the brake pedal.
R there is no longer any danger of a collision.
R no obstacle is detected in front of your vehi-
cle.
Braking assistance appropriate to the situation
is then deactivated.
Important safety notes i Observe the "Important safety notes" sec-
tion for driving safety systems (Y page 58). G
WARNING
Adaptive Brake Assist does not react:
R to people or animals
R to oncoming vehicles Driving safety systems
61Safety
Z
Page 68 of 290
SmartKey
Important safety notes
G
WARNING
If children are left unsupervised in the vehicle, they could:
R open the doors, thus endangering other
people or road users.
R get out and disrupt traffic.
R operate the vehicle's equipment.
Additionally, children could set the vehicle in
motion if, for example, they:
R release the parking brake.
R shift the transmission out of park position P
R start the vehicle's drive system.
There is a risk of an accident and injury.
When leaving the vehicle, always take the
SmartKey with you and lock the vehicle. Never leave children or animals unattended in the
vehicle. Always keep the SmartKey out of
reach of children. G
WARNING
If you attach heavy or large objects to the
SmartKey, the SmartKey could be uninten-
tionally turned in the ignition lock. This could
cause the engine to be switched off. There is a risk of an accident.
Do not attach any heavy or large objects to the
SmartKey. Remove any bulky key rings before
inserting the SmartKey into the ignition lock.
! Keep the SmartKey away from strong mag-
netic fields. Otherwise, the remote control
function could be affected.
Strong magnetic fields can occur in the vicin- ity of powerful electrical installations.
Do not keep the SmartKey: R with electronic devices, e.g. a mobile phone
or another SmartKey.
R with metallic objects, e.g. coins or metal foil.
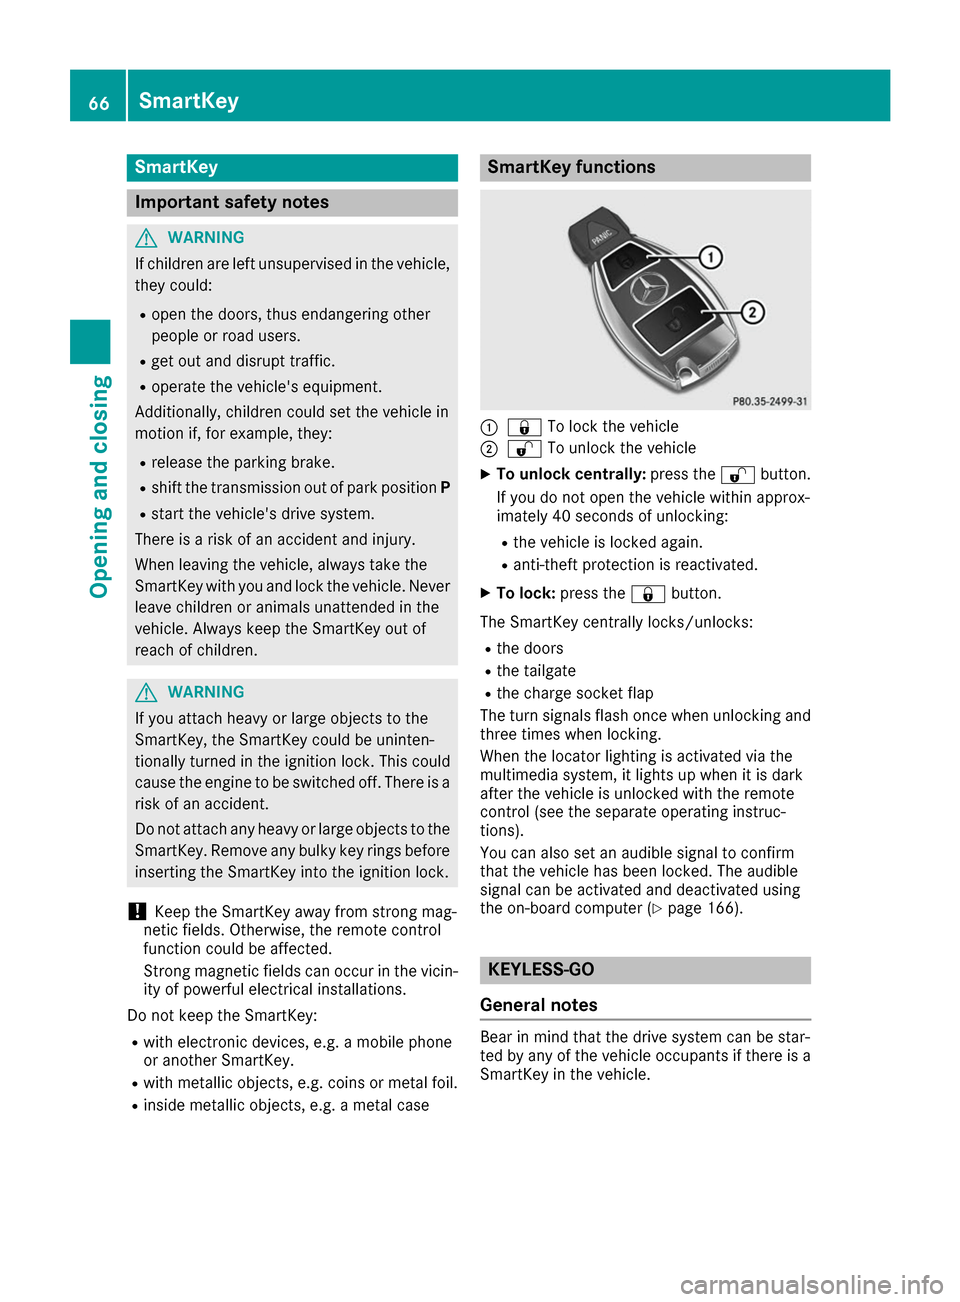
R inside metallic objects, e.g. a metal case SmartKey functions
0043
0037 To lock the vehicle
0044 0036 To unlock the vehicle
X To unlock centrally: press the0036button.
If you do not open the vehicle within approx-
imately 40 seconds of unlocking:
R the vehicle is locked again.
R anti-theft protection is reactivated.
X To lock: press the 0037button.
The SmartKey centrally locks/unlocks: R the doors
R the tailgate
R the charge socket flap
The turn signals flash once when unlocking and
three times when locking.
When the locator lighting is activated via the
multimedia system, it lights up when it is dark
after the vehicle is unlocked with the remote
control (see the separate operating instruc-
tions).
You can also set an audible signal to confirm
that the vehicle has been locked. The audible
signal can be activated and deactivated using
the on-board computer (Y page 166). KEYLESS-GO
General notes Bear in mind that the drive system can be star-
ted by any of the vehicle occupants if there is a
SmartKey in the vehicle. 66
SmartKeyOpening and closing
Page 70 of 290
approximately six seconds until the battery
check lamp flashes twice (Y page 69).
If the setting of the locking system is changed
within the signal range of the vehicle, pressing
the 0037 or0036 button:
R locks or
R unlocks the vehicle
The SmartKey now functions as follows:
X To unlock: press the0036button once.
X To unlock centrally: press the0036button
twice.
X To lock centrally: press the0037button.
The KEYLESS-GO function is changed as fol-
lows: X To unlock the driver's door: touch the inner
surface of the door handle on the driver's
door.
X To unlock centrally: touch the inner surface
of the door handle on the front-passenger
door or the rear door.
X To lock centrally: touch the outer sensor
surface on one of the door handles.
X To restore the factory settings: press and
hold the 0036and0037 buttons simultane-
ously for approximately six seconds until the
battery check lamp flashes twice
(Y page 69). Mechanical key
General notes If the vehicle can no longer be locked or
unlocked with the SmartKey or KEYLESS-GO,
use the mechanical key.
If you use the mechanical key to unlock and
open the driver's door or the trunk lid, the anti-
theft alarm system will be triggered (Y page 65).
There are several ways to turn off the alarm:
X To deactivate the alarm with the key: press
the 0036 or0037 button on the key.
or X Insert the SmartKey into the ignition lock.
or X To deactivate the alarm with KEYLESS-GO:
press the Start/Stop button in the ignition
lock. The SmartKey must be in the vehicle. or
X Lock or unlock the vehicle using KEYLESS-
GO. The SmartKey must be outside the vehi-
cle.
If you unlock the vehicle using the mechanical
key, the charge socket flap will not be unlocked automatically.
X To unlock the charge socket flap: insert the
SmartKey into the ignition lock.
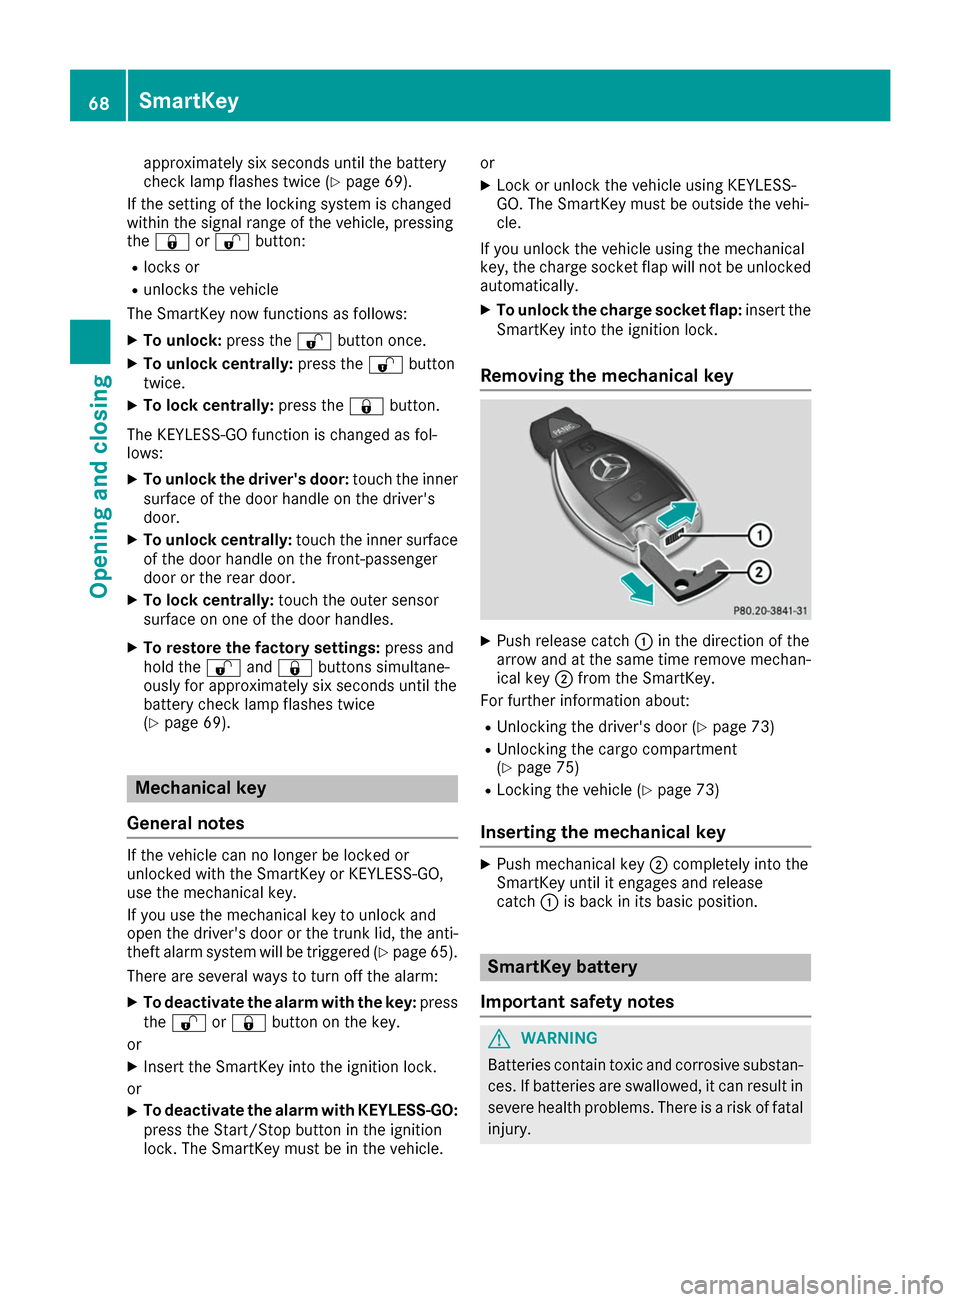
Removing the mechanical key X
Push release catch 0043in the direction of the
arrow and at the same time remove mechan- ical key 0044from the SmartKey.
For further information about:
R Unlocking the driver's door (Y page 73)
R Unlocking the cargo compartment
(Y page 75)
R Locking the vehicle (Y page 73)
Inserting the mechanical key X
Push mechanical key 0044completely into the
SmartKey until it engages and release
catch 0043is back in its basic position. SmartKey battery
Important safety notes G
WARNING
Batteries contain toxic and corrosive substan- ces. If batteries are swallowed, it can result in
severe health problems. There is a risk of fatal injury. 68
SmartKeyOpening and closing
Page 74 of 290
Doors
Important safety notes
G
WARNING
If children are left unsupervised in the vehicle, they could:
R open the doors, thus endangering other
people or road users.
R get out and disrupt traffic.
R operate the vehicle's equipment.
Additionally, children could set the vehicle in
motion if, for example, they:
R release the parking brake.
R shift the transmission out of park position P
R start the vehicle's drive system.
There is a risk of an accident and injury.
When leaving the vehicle, always take the
SmartKey with you and lock the vehicle. Never leave children or animals unattended in the
vehicle. Always keep the SmartKey out of
reach of children.
You should preferably place luggage or loads in
the cargo compartment. Observe the loading
guidelines (Y page 207). Unlocking and opening doors from
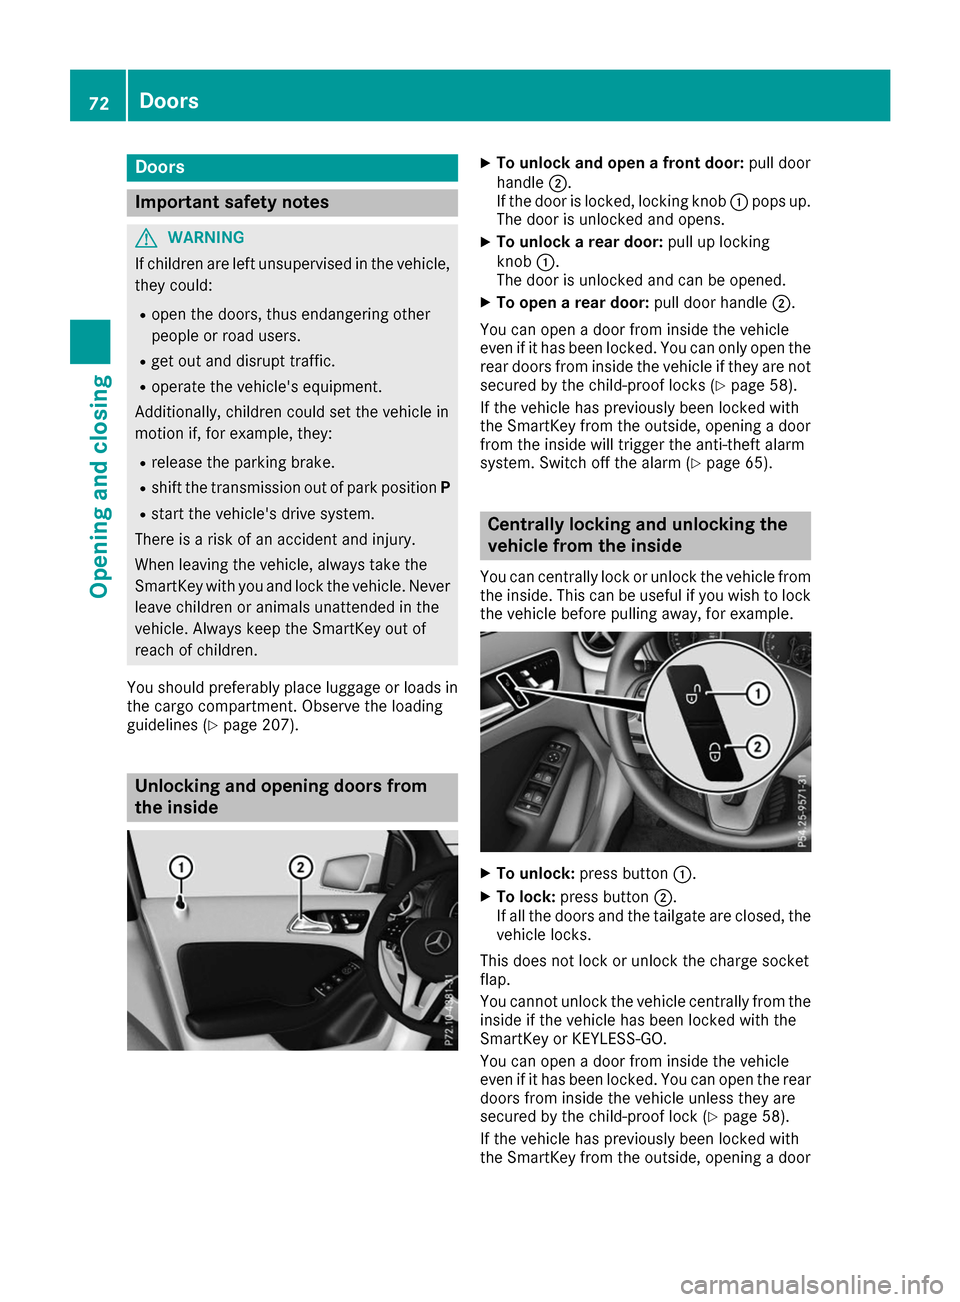
the inside X
To unlock and open a front door: pull door
handle 0044.
If the door is locked, locking knob 0043pops up.
The door is unlocked and opens.
X To unlock a rear door: pull up locking
knob 0043.
The door is unlocked and can be opened.
X To open a rear door: pull door handle0044.
You can open a door from inside the vehicle
even if it has been locked. You can only open the rear doors from inside the vehicle if they are not
secured by the child-proof locks (Y page 58).
If the vehicle has previously been locked with
the SmartKey from the outside, opening a door
from the inside will trigger the anti-theft alarm
system. Switch off the alarm (Y page 65). Centrally locking and unlocking the
vehicle from the inside
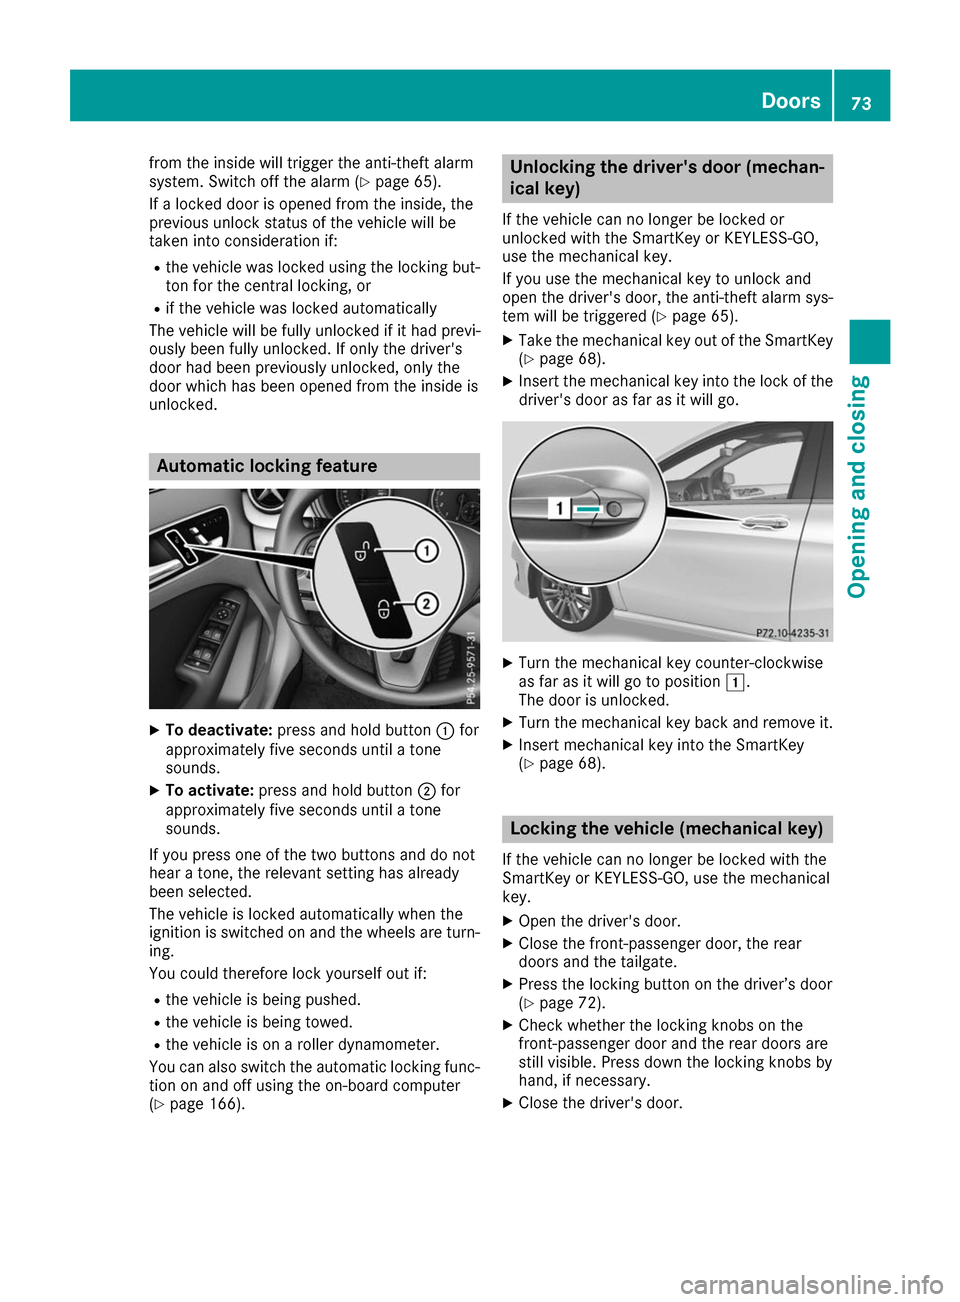
You can centrally lock or unlock the vehicle from
the inside. This can be useful if you wish to lock the vehicle before pulling away, for example. X
To unlock: press button 0043.
X To lock: press button 0044.
If all the doors and the tailgate are closed, the
vehicle locks.
This does not lock or unlock the charge socket
flap.
You cannot unlock the vehicle centrally from the
inside if the vehicle has been locked with the
SmartKey or KEYLESS-GO.
You can open a door from inside the vehicle
even if it has been locked. You can open the rear
doors from inside the vehicle unless they are
secured by the child-proof lock (Y page 58).
If the vehicle has previously been locked with
the SmartKey from the outside, opening a door 72
DoorsOpening and closing
Page 75 of 290
from the inside will trigger the anti-theft alarm
system. Switch off the alarm (Y page 65).
If a locked door is opened from the inside, the
previous unlock status of the vehicle will be
taken into consideration if:
R the vehicle was locked using the locking but-
ton for the central locking, or
R if the vehicle was locked automatically
The vehicle will be fully unlocked if it had previ-
ously been fully unlocked. If only the driver's
door had been previously unlocked, only the
door which has been opened from the inside is
unlocked. Automatic locking feature
X
To deactivate: press and hold button 0043for
approximately five seconds until a tone
sounds.
X To activate: press and hold button 0044for
approximately five seconds until a tone
sounds.
If you press one of the two buttons and do not
hear a tone, the relevant setting has already
been selected.
The vehicle is locked automatically when the
ignition is switched on and the wheels are turn-
ing.
You could therefore lock yourself out if:
R the vehicle is being pushed.
R the vehicle is being towed.
R the vehicle is on a roller dynamometer.
You can also switch the automatic locking func-
tion on and off using the on-board computer
(Y page 166). Unlocking the driver's door (mechan-
ical key)
If the vehicle can no longer be locked or
unlocked with the SmartKey or KEYLESS-GO,
use the mechanical key.
If you use the mechanical key to unlock and
open the driver's door, the anti-theft alarm sys- tem will be triggered (Y page 65).
X Take the mechanical key out of the SmartKey
(Y page 68).
X Insert the mechanical key into the lock of the
driver's door as far as it will go. X
Turn the mechanical key counter-clockwise
as far as it will go to position 0047.
The door is unlocked.
X Turn the mechanical key back and remove it.
X Insert mechanical key into the SmartKey
(Y page 68). Locking the vehicle (mechanical key)
If the vehicle can no longer be locked with the
SmartKey or KEYLESS-GO, use the mechanical
key.
X Open the driver's door.
X Close the front-passenger door, the rear
doors and the tailgate.
X Press the locking button on the driver’s door
(Y page 72).
X Check whether the locking knobs on the
front-passenger door and the rear doors are
still visible. Press down the locking knobs by
hand, if necessary.
X Close the driver's door. Doors
73Opening and closing Z