steering wheel adjustment MERCEDES-BENZ B-Class 2017 W246 Owner's Manual
[x] Cancel search | Manufacturer: MERCEDES-BENZ, Model Year: 2017, Model line: B-Class, Model: MERCEDES-BENZ B-Class 2017 W246Pages: 290, PDF Size: 19.81 MB
Page 8 of 290
Power washer ................................ 235
Rear view camera .......................... 238
Roof lining ...................................... 240
Seat belt ........................................2 39
Seat cover ..................................... 239
Sensors ......................................... 237
Steering wheel ............................... 239
Trim pieces ................................... .239
Washing by hand ........................... 235
Wheels .......................................... .236
Windows ........................................ 236
Wiper blades .................................. 237
Wooden trim .................................. 239
Cargo compartment cover
Important safety notes .................. 212
Installing/removing ....................... 213
Notes/how to use ......................... 212
Cargo compartment enlargement ... 211
Cargo compartment floor
Height adjustment ......................... 215
Important safety notes .................. 214
Opening/closing ............................ 214
Stowage well (under) ..................... 214
Cargo net
Attaching ....................................... 213
Important safety information ......... 213
Cargo tie down rings ......................... 212
CD
see also Digital Operator's Man-
ual ................................................. .201
CD player (on-board computer) ........160
Center console
Lower section .................................. 35
Upper section .................................. 34
Central locking
Automatic locking (on-board com-
puter) ............................................. 166
Locking/unlocking (SmartKey) ....... .66
Change of address .............................. 24
Change of ownership .......................... 24
Changing the bulb
Cornering light function .................. .93
Charge level display .......................... 153
Charging
with RANGE PLUS .......................... 164
see Charging the high-voltage battery Charging cable
Connecting .................................... 124
Controls ........................................ .123
Important safety notes .................. 122
Removing ....................................... 125
Storing .......................................... .122
Warming up ................................... 118
Charging the high-voltage battery
(important safety notes) ................... 117
Child
Restraint system .............................. 54
Child seat
Forward-facing restraint system ...... 57
LATCH-type (ISOFIX) child seat
anchors ............................................ 55
On the front-passenger sea t............ 56
Rearward-facing restraint system .... 56
Top Tether ....................................... 55
Child-proof locks
Important safety notes .................... 57
Rear doors ....................................... 58
Children
Special seat belt retractor ............... 53
Cigarette lighter ................................ 218
Cleaning
Mirror turn signal ........................... 237
Climate control
Automatic climate control (dual-
zone) ................................................ 99
Auxiliary climate control (on-
board computer) ............................ 164
Controlling automaticall y............... 101
Convenience opening/closing
(air-recirculation mode) ................. 104
Cooling with air dehumidification .. 100
Defrosting the window s................. 103
Defrosting the windshield .............. 102
General notes .................................. 99
Immediate pre-entry climate con-
trol ................................................. 105
Indicator lamp ................................ 101
Information about using auto-
matic climate control ..................... 100
Maximum cooling .......................... 103
Overview of systems ........................ 99
Pre-entry climate control at
departure time ............................... 105 6
Index
Page 82 of 290
motion. This could cause you to lose control of
the vehicle. There is a risk of an accident.
Always make sure that the driver's seat is
engaged before starting the vehicle. G
WARNING
You could lose control of your vehicle if you do the following while driving:
R adjust the driver's seat, head restraint,
steering wheel or mirrors
R fasten the seat belt
There is a risk of an accident.
Adjust the driver's seat, head restraint, steer-
ing wheel and mirror and fasten your seat belt before starting the vehicle's drive system. G
WARNING
If you adjust the seat height carelessly, you or other vehicle occupants could be trapped andthereby injured. Children in particular could
accidentally press the electrical seat adjust-
ment buttons and become trapped. There is a
risk of injury.
While moving the seats, make sure that your
hands or other body parts do not get under the
lever assembly of the seat adjustment sys-
tem.
! To avoid damage to the seats and the seat
heating, observe the following information:
R keep liquids from spilling on the seats. If
liquid is spilled on the seats, dry them as
soon as possible.
R if the seat covers are damp or wet, do not
switch on the seat heating. The seat heat-
ing should also not be used to dry the seats.
R clean the seat covers as recommended;
see the "Interior care" section.
R do not transport heavy loads on the seats.
Do not place sharp objects on the seat
cushions, e.g. knives, nails or tools. The
seats should only be occupied by passen-
gers, if possible.
R when the seat heating is in operation, do
not cover the seats with insulating materi-
als, e.g. blankets, coats, bags, seat covers,
child seats or booster seats. !
Make sure that there are no objects in the
footwell under or behind the seats when mov-
ing the seats back. There is a risk that the
seats and/or the objects could be damaged.
i Further related subjects:
R cargo compartment enlargement (folding
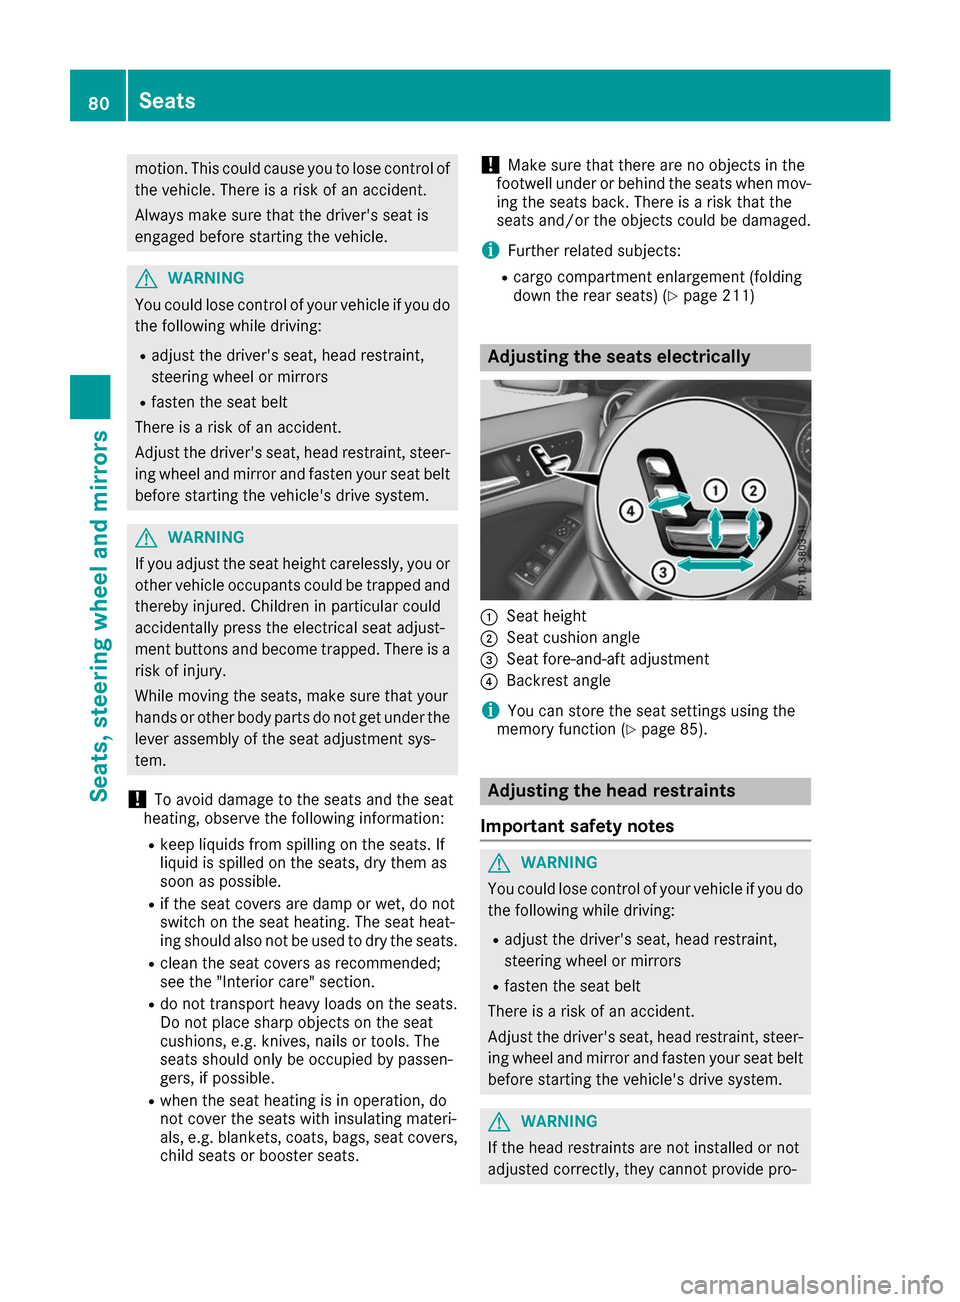
down the rear seats) (Y page 211) Adjusting the seats electrically
0043
Seat height
0044 Seat cushion angle
0087 Seat fore-and-aft adjustment
0085 Backrest angle
i You can store the seat settings using the
memory function (Y page 85). Adjusting the head restraints
Important safety notes G
WARNING
You could lose control of your vehicle if you do the following while driving:
R adjust the driver's seat, head restraint,
steering wheel or mirrors
R fasten the seat belt
There is a risk of an accident.
Adjust the driver's seat, head restraint, steer-
ing wheel and mirror and fasten your seat belt before starting the vehicle's drive system. G
WARNING
If the head restraints are not installed or not
adjusted correctly, they cannot provide pro- 80
SeatsSeats, steering wheel and mirrors
Page 83 of 290
tection as intended. There is an increased risk
of injury in the head and neck area, e.g. in the event of an accident or when braking.
Always drive with the head restraints instal-
led. Before driving off, make sure for every
vehicle occupant that the center of the head
restraint supports the back of the head at
about eye level.
Using the fore-and-aft adjustment, adjust the
head restraint so that it is as close as possible to your head.
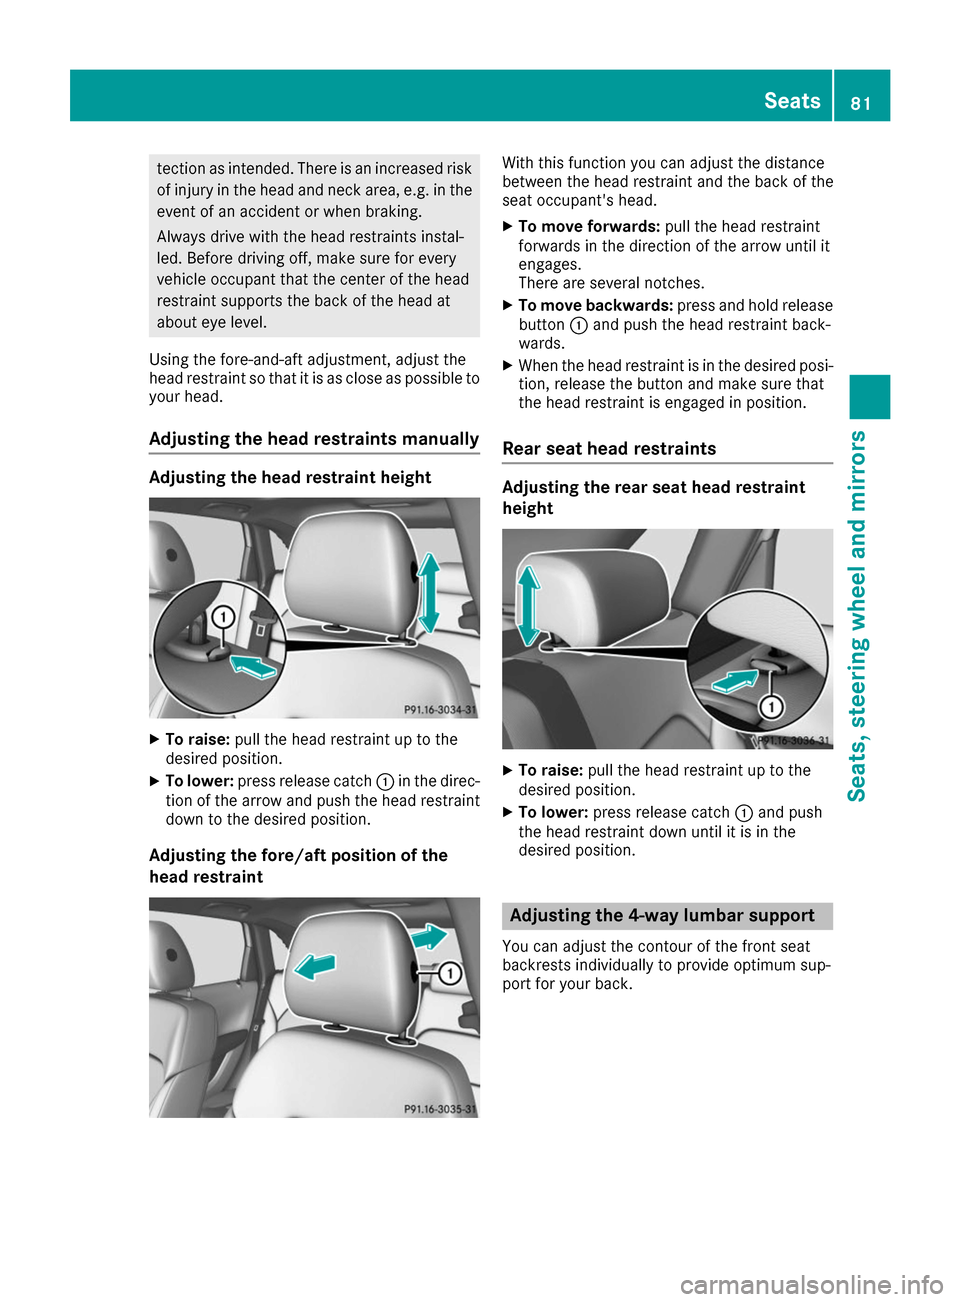
Adjusting the head restraints manually Adjusting the head restraint height
X
To raise: pull the head restraint up to the
desired position.
X To lower: press release catch 0043in the direc-
tion of the arrow and push the head restraint down to the desired position.
Adjusting the fore/aft position of the
head restraint With this function you can adjust the distance
between the head restraint and the back of the
seat occupant's head.
X To move forwards: pull the head restraint
forwards in the direction of the arrow until it
engages.
There are several notches.
X To move backwards: press and hold release
button 0043and push the head restraint back-
wards.
X When the head restraint is in the desired posi-
tion, release the button and make sure that
the head restraint is engaged in position.
Rear seat head restraints Adjusting the rear seat head restraint
height
X
To raise: pull the head restraint up to the
desired position.
X To lower: press release catch 0043and push
the head restraint down until it is in the
desired position. Adjusting the 4-way lumbar support
You can adjust the contour of the front seat
backrests individually to provide optimum sup-
port for your back. Seats
81Seats, steering wheel and mirrors Z
Page 85 of 290
Steering wheel
Important safety notes
G
WARNING
You could lose control of your vehicle if you do the following while driving:
R adjust the driver's seat, head restraint,
steering wheel or mirrors
R fasten the seat belt
There is a risk of an accident.
Adjust the driver's seat, head restraint, steer-
ing wheel and mirror and fasten your seat belt before starting the vehicle's drive system. G
WARNING
Children could injure themselves if they
adjust the steering wheel. There is a risk of
injury.
When leaving the vehicle, always take the
SmartKey with you and lock the vehicle. Never leave children unsupervised in the vehicle. Adjusting the steering wheel
G
WARNING
If the steering wheel is unlocked while the
vehicle is in motion, it could change position
unexpectedly. This could cause you to lose
control of the vehicle. There is a risk of an
accident.
Before starting off, make sure the steering
wheel is locked. Never unlock the steering
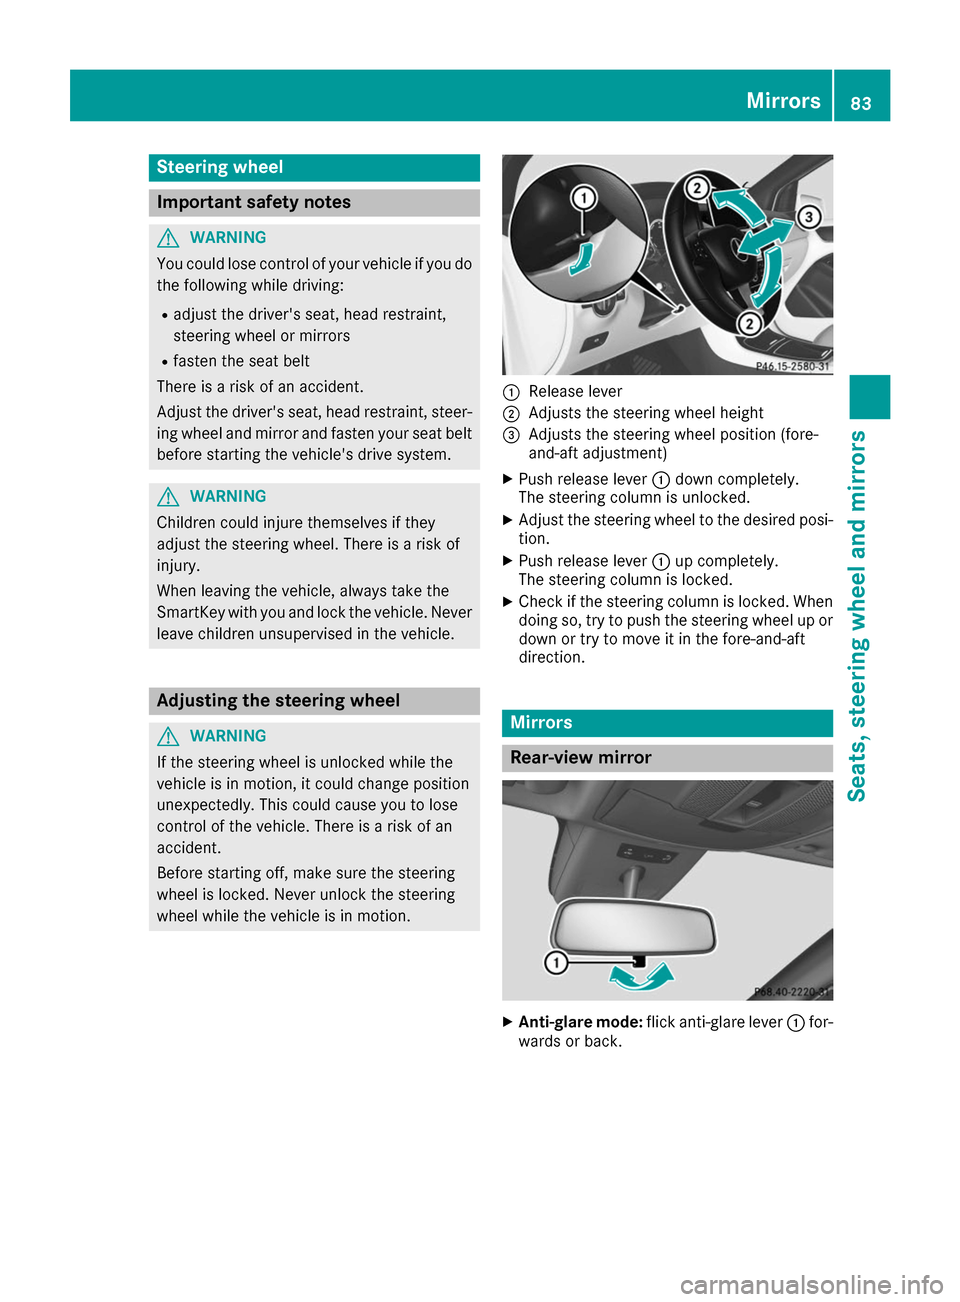
wheel while the vehicle is in motion. 0043
Release lever
0044 Adjusts the steering wheel height
0087 Adjusts the steering wheel position (fore-
and-aft adjustment)
X Push release lever 0043down completely.
The steering column is unlocked.
X Adjust the steering wheel to the desired posi-
tion.
X Push release lever 0043up completely.
The steering column is locked.
X Check if the steering column is locked. When
doing so, try to push the steering wheel up or down or try to move it in the fore-and-aft
direction. Mirrors
Rear-view mirror
X
Anti-glare mode: flick anti-glare lever 0043for-
wards or back. Mirrors
83Seats, steering wheel and mirrors Z
Page 87 of 290
R
Immediately change out of clothing which
has come into contact with electrolyte.
R If an allergic reaction occurs, seek medical
attention immediately.
The "Automatic anti-glare mirrors" function is
only available if the vehicle is equipped with the
"Mirrors package".
The rear-view mirror and the exterior mirror on
the driver's side automatically go into anti-glare mode if:
R the ignition is switched on and
R incident light from headlamps strikes the sen-
sor in the rear-view mirror
The mirrors do not go into anti-glare mode if
reverse gear is engaged or if the interior lighting
is switched on. Parking position for the exterior mir-
ror on the front-passenger side
Setting and storing the parking position You can set the front-passenger side exterior
mirror such that you can see the rear wheel on
that side as soon as you engage reverse gear.
You can store this position.
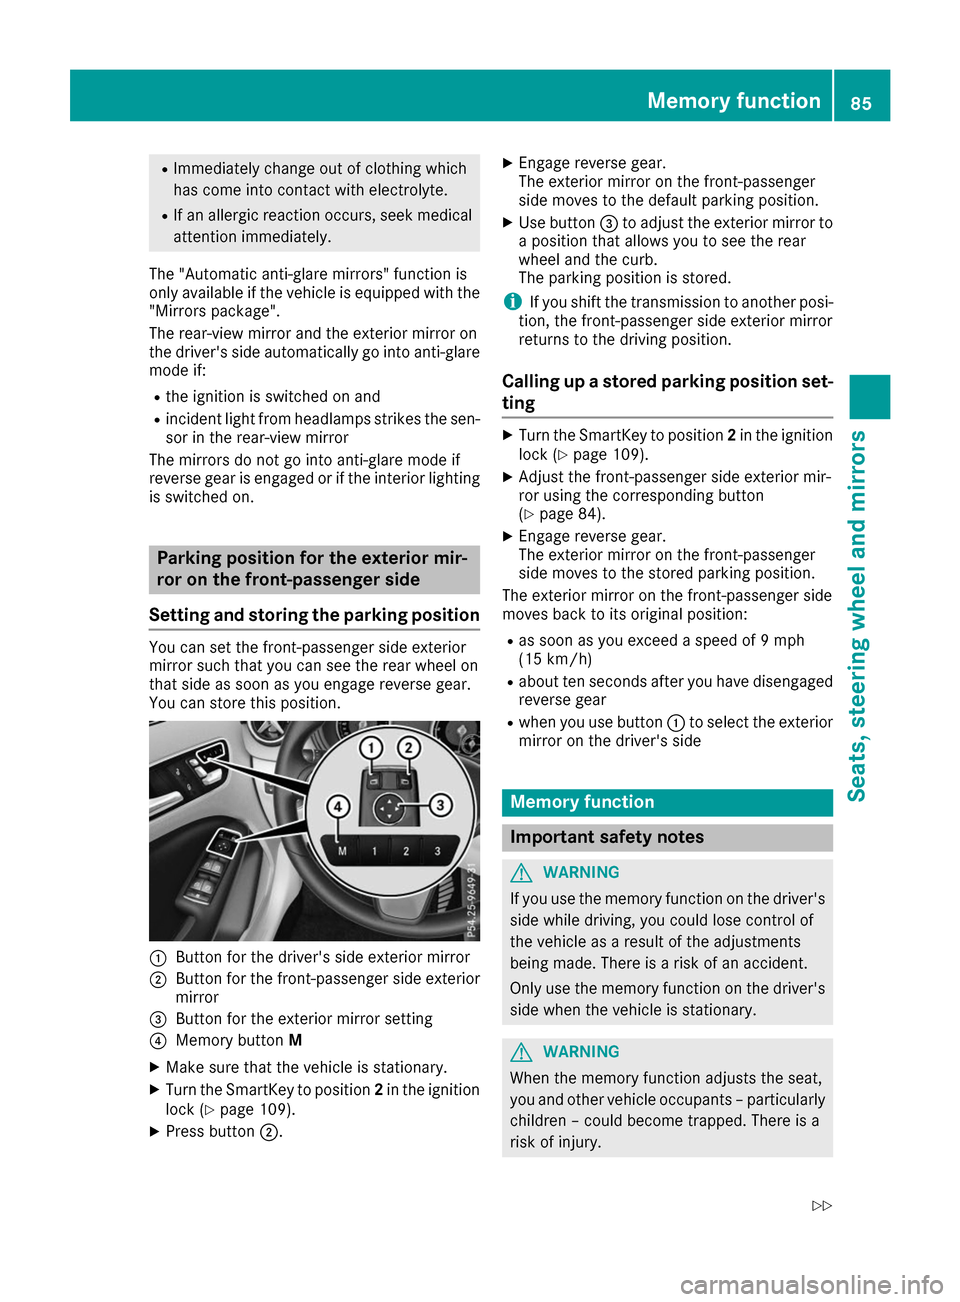
0043
Button for the driver's side exterior mirror
0044 Button for the front-passenger side exterior
mirror
0087 Button for the exterior mirror setting
0085 Memory button M
X Make sure that the vehicle is stationary.
X Turn the SmartKey to position 2in the ignition
lock (Y page 109).
X Press button 0044. X
Engage reverse gear.
The exterior mirror on the front-passenger
side moves to the default parking position.
X Use button 0087to adjust the exterior mirror to
a position that allows you to see the rear
wheel and the curb.
The parking position is stored.
i If you shift the transmission to another posi-
tion, the front-passenger side exterior mirror
returns to the driving position.
Calling up a stored parking position set- ting X
Turn the SmartKey to position 2in the ignition
lock (Y page 109).
X Adjust the front-passenger side exterior mir-
ror using the corresponding button
(Y page 84).
X Engage reverse gear.
The exterior mirror on the front-passenger
side moves to the stored parking position.
The exterior mirror on the front-passenger side
moves back to its original position:
R as soon as you exceed a speed of 9 mph
(15 km/h)
R about ten seconds after you have disengaged
reverse gear
R when you use button 0043to select the exterior
mirror on the driver's side Memory function
Important safety notes
G
WARNING
If you use the memory function on the driver's side while driving, you could lose control of
the vehicle as a result of the adjustments
being made. There is a risk of an accident.
Only use the memory function on the driver's
side when the vehicle is stationary. G
WARNING
When the memory function adjusts the seat,
you and other vehicle occupants – particularly children – could become trapped. There is a
risk of injury. Memory function
85Seats, steering wheel and mirrors
Z
Page 118 of 290
The braking performance of the electric motor
using recuperative braking is, in some operating modes, either reduced or not effective:
R when the condition of charge of the high-volt-
age battery increases
R if the high-voltage battery is not yet at a nor-
mal operating temperature
R when driving close to the vehicle's maximum
design speed
R when the vehicle is almost stationary
R in transmission position N
R during and after ESP stability control
If you do not make an additional effort to apply
the brake yourself, the braking effect may not be sufficient. If necessary, counteract the reduced
regenerative braking effect by applying the
brake yourself.
Radar-based recuperation The vehicle uses the Active Brake Assist sensors
during radar-based recuperation ( DAUTO
). The
sensors detect the distance to the vehicle ahead
and its speed. The intensity of recuperation is
then automatically adjusted to the current traf-
fic situation.
The range can then be increased by storing
energy efficiently. Adjustment is infinitely vari-
able from overrun mode (no recuperation) to
maximum recuperation.
Maintain sufficient distance to the vehicle in
front. Mercedes-Benz recommends that you
activate Active Brake Assist as a visual and
acoustic aid.
Examples of radar-based recuperation:
R Approaching a slower vehicle, a decelerating
vehicle or when following a vehicle downhill.
Your vehicle decelerates slightly and increa-
ses recuperation.
R Driving when no vehicle is detected in front or
when a vehicle is detected in the far distance or an accelerating vehicle is detected. Your
vehicle switches to overrun mode at higher
speeds.
R Driving on a steep downhill slope. Accelera-
tion downhill is reduced and recuperation is
increased. This is comparable with shifting
down when driving downhill. X
To activate radar-based recuperation: pull
steering wheel paddle shifter 0043or0044
towards you and hold for about one second.
X To deactivate radar-based recuperation:
briefly pull steering wheel paddle shifter 0043
or 0044 towards you.
If you change between radar-based and manual
recuperation, the following levels are activated
depending on the selection via the steering
wheel paddle shifters: 0043
Steering wheel
paddle shifter - selects
D-
(maximum
recuperation) 0044
Steering wheel
paddle shifter + selects
D+
(overrun) In particular, the function of the radar sensors
can be impaired in the case of:
R there is dirt on the sensors or anything else
covering the sensors
R there is snow or heavy rain
R there is interference by other radar sources
R there are strong radar reflections, for exam-
ple in parking garages
R a narrow vehicle is traveling in front, e.g. a
motorbike
R a vehicle is traveling in front on a different line
relative to the center of your vehicle
Following damage to the front end of the vehicle,
have the radar sensor settings and operation
checked at a qualified specialist workshop
immediately. This also applies to collisions at
slow speeds where there is no visible damage to the front of the vehicle.
If the radar sensors are not available, the system switches automatically to level Dwith moderate
recuperation. Have the radar sensors checked
at a qualified specialist workshop immediately.
Automatic adjustment of recuperation
on downhill gradients The vehicle can detect steep downhill gradients.
To reduce acceleration downhill and to charge
the high-voltage battery, recuperation is
increased steplessly. This is comparable to the
engine brake in a combustion engine when you
downshift a gear on a downhill gradient.
Automatic adjustment of recuperation on down-
hill gradients is available in level DAUTO
or on 116
TransmissionDriving and parking