change key battery MERCEDES-BENZ B-CLASS HATCHBACK 2008 Owners Manual
[x] Cancel search | Manufacturer: MERCEDES-BENZ, Model Year: 2008, Model line: B-CLASS HATCHBACK, Model: MERCEDES-BENZ B-CLASS HATCHBACK 2008Pages: 305, PDF Size: 5.1 MB
Page 7 of 305
4One-touch gearshifting.
....................93
Program selector button ...................94
Trailer towing. ................................... 95
Working on the vehicle .....................95
AUTOTRONIC
Releasing the parking lock man-
ually. ............................................... 243
Axle load, maximum permissible
..................................................... 287, 288B
Backrest Removing/fitting. ........................... 151
Bag hook............................................. 157
Ball coupling Fitting ............................................. 186
Removing....................................... .190
BAS (Brake Assist)............................... 55
Battery Changing (key).. .............................. 244
Charging. ........................................ 265
Checking (key). ............................... 244
Check lamp (key). ........................... 244
Disconnecting ................................. 264
Display message ............................. 213
Jump-starting. ................................. 266
Maintenance (vehicle)..................... 263
Reconnecting.................................. 266
Removing/fitting. ........................... 265
Vehicle battery. .............................. 263Belt force limiters
Activation.......................................... 37
Belt height adjustment ........................74
Belt tensioners Activation.......................................... 37
Belt warning.......................................... 74
Bonnet Bonnet catch .................................. 172
Opening/closing ............................ 171
Bonnet release lever
Release leve r.................................. 171
Brake Assist
see BAS
Brake fluid .......................................... 299
Display message ............................. 214
Brake lamps
Adaptive............................................ 56
Display message ............................. 217
Brakes
Parking brake................................... .89
Warning lamp..................................2 26
Brake system
Display message ............................. 213
Bulb
see Lamp
Bulbs
Brake lamp. .................................... 249
Cornering light. ............................... 247
Dipped-beam headlamps ................247
Licence plate lamp.......................... 250 Main-beam headlamps
...................247
Overview. ........................................ 245
Parking lamp.................................. .247
Replacing............................... .246, 248
Side lamp....................................... .247
Tail lamp ......................................... 249
Turn signal lamp. ....................248, 249 C
Calling up a malfunction see Message memory menu
Care..................................................... 192
Automatic car wash. .......................193
Exhaust tail pipes............................ 196
Headlamps. .................................... 194
High-pressure cleaners. ..................193
Parktronic. ...................................... 196
Plastic trim. .................................... 195
Rear window. .................................. 194
Side windows.................................. 194
Trailer tow hitch. ............................. 196
CD player/CD changer
Operating (on-board computer)
....................................................... 103
Central locking
Automatic locking (on-board com-
puter). ............................................. 110
Key. .................................................. 60
Central locking/unlocking button ......61 Index
245_AKB; 2; 7, en-GB
wdomann,
Version: 2.11.4 2008-10-17T11:22:31+02:00 - Seite 4Dateiname: 6515_1640_02_buchblock.pdf; preflight
Page 63 of 305
Opening and closing
60 Opening and closing
Key
The key centrally locks/unlocks:
R the doors
R the tailgate
R the fuel filler flap G
Risk of accident
If children are left unsupervised in the vehi-
cle, they could:
R open a door from the inside at any time,
even if it has been locked
R start the vehicle using a key which has
been left in the vehicle
R release the parking brake
They could, thereby, endanger themselves
and others. Never leave children unsuper-
vised in the vehicle. Always take the key
with you when leaving the vehicle, even if
you are only leaving it for a short time. 1
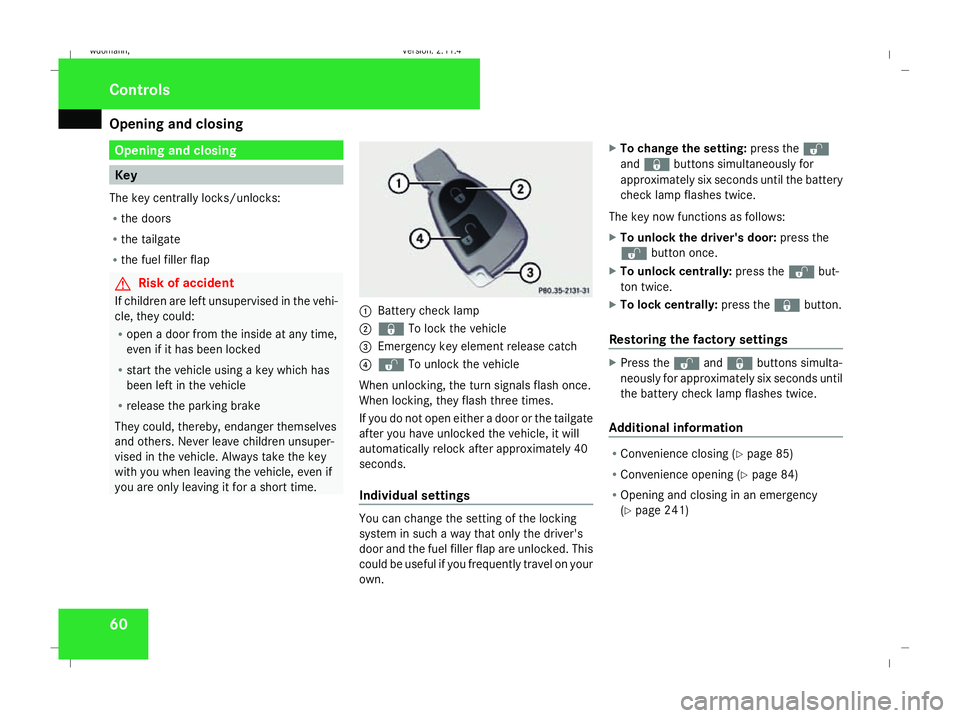
Battery check lamp
2 j To lock the vehicle
3 Emergency key element release catch
4 k To unlock the vehicle
When unlocking, the turn signals flash once.
When locking, they flash three times.
If you do not open either a door or the tailgate
after you have unlocked the vehicle, it will
automatically relock after approximately 40
seconds.
Individual settings You can change the setting of the locking
system in such a way that only the driver's
door and the fuel filler flap are unlocked. This
could be useful if you frequently travel on your
own.X
To change the setting: press thek
and j buttons simultaneously for
approximately six seconds until the battery
check lamp flashes twice.
The key now functions as follows:
X To unlock the driver's door: press the
k button once.
X To unlock centrally: press thekbut-
ton twice.
X To lock centrally: press thejbutton.
Restoring the factory settings X
Press the kandj buttons simulta-
neously for approximately six seconds until
the battery check lamp flashes twice.
Additional information R
Convenience closing (Y page 85)
R Convenience opening (Y page 84)
R Opening and closing in an emergency
(Y page 241) Controls
245_AKB; 2; 7, en-GB
wdomann,
Version: 2.11.4 2008-10-17T11:22:31+02:00 - Seite 60Dateiname: 6515_1640_02_buchblock.pdf; preflight
Page 193 of 305
Trailer towing*
190note that the power output of the engine,
and consequently the vehicle's gradient-
climbing capability, decrease with increas-
ing altitude.
If the trailer swings from side to side:
X Do not accelerate.
X Do not counter-steer.
X Brake if necessary. G
Risk of accident
On no account should you attempt to draw
the vehicle/trailer combination out by
increasing speed. Removing the ball coupling
X Pull the protective cap off the lock in the
handwheel.
X Insert the key into the lock in the hand-
wheel.
X Turn the key clockwise.
The lock is unlocked.
X Hold the ball coupling. Pull the handwheel
away from the ball coupling and turn it
clockwise until it engages.
The green area on the ball coupling is
aligned with the red mark on the hand-
wheel. X
Pull out the ball coupling downwards.
X Clean the ball coupling if it is dirty.
X Vehicles without ECO start/stop func-
tion*: open the stowage compartment on
the right of the luggage compartment.
X Fold the trim downwards.
X Vehicles with start/stop function*:
open the luggage compartment floor.
X Remove the protective cap from the ball
coupling recess.
X Press the protective cap into the ball cou-
pling recess until it engages.
Storing the ball coupling X
Store the ball coupling with the key inser-
ted in the ball coupling recess.
X Vehicle without ECO start/stop func-
tion: Secure the ball coupling in place using
the retainer strap. G
Risk of accident
Do not carry the ball coupling in the vehicle
interior if it is not secured.
Otherwise, you and others could be injured
by the ball coupling being thrown around if
you: R
brake sharply
R change direction suddenly
R are involved in an accident Trailer power supply
When it leaves the factory, your vehicle's
trailer socket outlet is equipped with a per-
manent power supply and a power supply that
is switched on via the ignition lock.
The permanent power supply is supplied via
trailer socket pin 9.
The power supply that is switched on via the
ignition lock is supplied via trailer socket pin
10.
! You can connect consumers with a power
rating of up to 240 W to the permanent
power supply and up to 180 W to the power
supply that is switched on via the ignition
lock.
You must not charge a trailer battery using
the power supply.
The trailer's turn signal lamps are only guar-
anteed to function when bulbs are used.
You can obtain further information about
installing the trailer electrics from a qualified Operation
* optional
245_AKB; 2; 7, en-GB
wdomann,
Version: 2.11.4 2008-10-17T11:22:31+02:00 - Seite 190Dateiname: 6515_1640_02_buchblock.pdf; preflight
Page 242 of 305
Troubleshooting
239Key
Problem Possible cause/consequence Suggested solutions
You cannot lock or unlock the
vehicle using the key. The key batteries are discharged
or nearly discharged. X
Point the tip of the key at the driver's door handle from close range
and try to unlock or lock the vehicle again.
If this does not work:
X Unlock the vehicle using the emergency key element
(Y page 241).
X Check the key batteries (Y page 244) and replace them if neces-
sary (Y page 244). The key is faulty. X
Unlock the vehicle using the emergency key element
(Y page 241).
X Have the key checked at a qualified specialist workshop. The battery charge indicator lamp
of the key does not go on during
the test. The key batteries are discharged. X
Change the batteries (Y page 244).You have lost a key. X
Have the key cancelled at a Mercedes-Benz Service Centre.
X Report the loss immediately to the vehicle insurers.
X If necessary, have the manual locks changed too. You have lost the emergency key
element. X
Report the loss immediately to the vehicle insurers.
X If necessary, have the manual locks changed too. The engine cannot be started
using the key. The steering lock is mechanically
blocked. X
Remove the key and reinsert it into the ignition lock. While doing
this, turn the steering wheel in both directions. Practical advice
245_AKB; 2; 7, en-GB
wdomann,
Version: 2.11.4
2008-10-17T11:22:31+02:00 - Seite 239 ZDateiname: 6515_1640_02_buchblock.pdf; preflight
Page 247 of 305
Changing bulbs
244 Key
Checking the batteries X
Press the jork button.
The batteries are in order if the battery
charge indicator lamp lights up briefly.
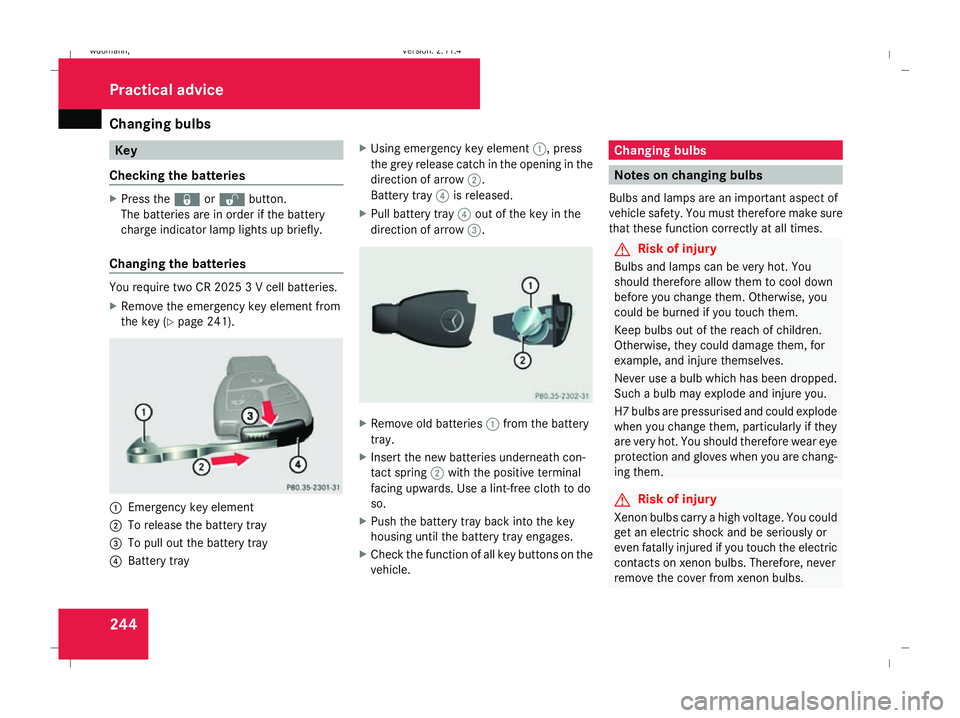
Changing the batteries You require two CR 2025 3 V cell batteries.
X Remove the emergency key element from
the key (Y page 241). 1
Emergency key element
2 To release the battery tray
3 To pull out the battery tray
4 Battery tray X
Using emergency key element 1, press
the grey release catch in the opening in the
direction of arrow 2.
Battery tray 4is released.
X Pull battery tray 4out of the key in the
direction of arrow 3. X
Remove old batteries 1from the battery
tray.
X Insert the new batteries underneath con-
tact spring 2with the positive terminal
facing upwards. Use a lint-free cloth to do
so.
X Push the battery tray back into the key
housing until the battery tray engages.
X Check the function of all key buttons on the
vehicle. Changing bulbs
Notes on changing bulbs
Bulbs and lamps are an important aspect of
vehicle safety. You must therefore make sure
that these function correctly at all times. G
Risk of injury
Bulbs and lamps can be very hot. You
should therefore allow them to cool down
before you change them. Otherwise, you
could be burned if you touch them.
Keep bulbs out of the reach of children.
Otherwise, they could damage them, for
example, and injure themselves.
Never use a bulb which has been dropped.
Such a bulb may explode and injure you.
H7 bulbs are pressurised and could explode
when you change them, particularly if they
are very hot. You should therefore wear eye
protection and gloves when you are chang-
ing them. G
Risk of injury
Xenon bulbs carry a high voltage. You could
get an electric shock and be seriously or
even fatally injured if you touch the electric
contacts on xenon bulbs. Therefore, never
remove the cover from xenon bulbs. Practical advice
245_AKB; 2; 7, en-GB
wdomann
,V ersion: 2.11.4
2008-10-17T11:22:31+02:00 - Seite 244 Dateiname: 6515_1640_02_buchblock.pdf; preflight