dimensions MERCEDES-BENZ B-CLASS HATCHBACK 2008 Owners Manual
[x] Cancel search | Manufacturer: MERCEDES-BENZ, Model Year: 2008, Model line: B-CLASS HATCHBACK, Model: MERCEDES-BENZ B-CLASS HATCHBACK 2008Pages: 305, PDF Size: 5.1 MB
Page 15 of 305

12Boxes under the driver's seat/
front-passenger seat....................... 159
Centre console. .............................. 159
Glove compartment. .......................158
Luggage compartment. ...................160
Stowage compartments
Cup holder ...................................... 143
Rear. ............................................... 160
Submenu (on-board computer)......... 106
Convenience ................................... 107
Instrument cluster .......................... 106
Lighting........................................... 107
Time/date. ..................................... 106
Vehicle............................................ 107
Summer opening
see Convenience opening
Sun visor............................................. 161
Supplemental Restraint System see SRS
Surround lighting
Switching on/off (on-board com-
puter). ............................................. 109
Switching off the alarm
ATA. .................................................. 57 T
Tailgate Display message ............................. 212
Opening/closing. .............................. 62
Tail lamp
Display message ............................. 219
Tail lamps
changing. ........................................ 249
Display message ............................. 219
Tank
see Fuel tank
Tank capacity ..................................... 291
Technical data Acceleration. .................................. 280
Engine............................................ .278
Speed. ............................................ 280
Trailer loads .................................... 290
Tyres. .............................................. 283
Vehicle dimensions. ........................286
Vehicle weights............................... 286
Wheels. ........................................... 283
Telephone
see Mobile phone
Telephone compartment ...................159
Temperature Coolant. ............................................ 97
Outside temperature......................... 98
Thermotronic
Malfunction indicator lamp. ............222Third brake lamp
Display message ............................. 218
Through-loading ................................. 147
Tightening torque............................... 261
Time Setting (on-board computer).......... .108
Setting the time (on-board com-
puter). ............................................. 108
TIREFIT kit
Using. ............................................. 253
TopTether .............................................. 49
Total distance recorder................. 26, 99
Tow-away protection........................... 58
Towing................................................. 269
Towing eye Fitting ............................................. 268
Removing....................................... .270
Tow-starting ........................................ 269
Trailer 7-pin connector .............................. 191
Display message..................... 216, 217
Power supply. ................................. 190
Trailer loads
Technical data. ............................... 290
Trailer tow hitch
Notes on care ................................. 196
Trailer towing
Active parking assist .......................126
Driving tips ..................................... 188
Malfunction..................................... 240 Index
245_AKB; 2; 7, en-GB
wdomann,
Version: 2.11.4 2008-10-17T11:22:31+02:00 - Seite 12Dateiname: 6515_1640_02_buchblock.pdf; preflight
Page 16 of 305

13
Mounting dimensions.
....................289
Parktronic. ...................................... 122
Transmission
Display message ............................. 209
Transmission output (maximum)
Telephone/two-way radio ...............275
Transport (vehicle)............................. 270
Trip computer Menu (on-board computer). ............111
Trip meter ............................... 26, 99, 101
Resetting. ......................................... 97
Turn signal lamps
Display message ............................. 217
Two-way radio
Installation. ..................................... 275
Tyre grip .............................................. 184
Tyre pressure ..................................... 178
Display message ............................. 211
Tyre pressure loss warning system.1 79
Tyres Direction of rotatio n....................... 177
General notes. ................................ 176
Technical data. ............................... 283
Tyre tread ............................................ 178 U
Unladen weight.................................. 287
Unlocking Emergency unlocking...................... 241
From the inside (central unlocking
button) .............................................. 61 V
Variable Speedtronic .........................117
Vehicle Emergency unlocking .............241, 242
Individual settings (on-board com-
puter). ............................................. 105
Leaving parked up. .........................240
Towing. ........................................... 269
Tow-starting .................................... 269
Transporting ................................... 270
Vehicle battery................................... 263
Vehicle dimensions ............................286
Vehicle electronics ............................275
Vehicle identification number (VIN).2 77
Vehicle identification plates............. 276
Vehicle tool kit................................... 200
Vehicle weights.................................. 286
Video DVD Operating (on-board computer). .....104 W
Warning and indicator lamp ABS (yellow).................................... 224
LIM (cruise control)......................... 115
LIM (variable Speedtronic). .............117
Warning and indicator lamps
ESP ®
......................................... 56, 226
Warning signal
Audible. .......................................... 230
Warning triangle................................. 201
Washer fluid
Display message ............................. 221
Washer fluid reservoir .......................299
Filling capacity. ............................... 299
Wearing seat belts............................... 72
Wheel bolts Tightening torque............................ 261
Wheel chock
Use. ................................................ 200
Wheels
General notes. ................................ 176
Interchanging.................................. 181
Technical data. ............................... 283
Windowbags......................................... 42
Windows Cleaning. ........................................ 194
Cleaning the windscreen ...............194
see Side windows Index
245_AKB; 2; 7, en-GB
wdomann,
Version: 2.11.4
2008-10-17T11:22:31+02:00 - Seite 13 Dateiname: 6515_1640_02_buchblock.pdf; preflight
Page 184 of 305

Winter driving
181Interchanging the wheels
G
Risk of accident
Interchange the front and rear wheels only
if they have the same dimensions: for exam-
ple size, offset, etc.
After every wheel interchange/change,
have the tightening torque checked at a
qualified specialist workshop that has the
necessary specialist knowledge and tools
to carry out the work required. Mercedes-
Benz recommends that you use a
Mercedes-Benz Service Centre for this pur-
pose. In particular, work relevant to safety
or on safety-related systems must be car-
ried out at a qualified specialist workshop.
The wheels could work loose if they are not
tightened to a torque of 130 Nm.
For safety reasons, Mercedes-Benz recom-
mends that you only use wheel bolts of the
correct size which have been approved for
Mercedes-Benz vehicles.
The wear patterns on the front and rear tyres
differ, depending on the operating conditions.
Interchange the wheels before a clear wear
pattern has formed on the tyres. Front tyres
typically wear more on the shoulders and the
rear tyres in the centre. Interchange the wheels every 5,000 km to
10,000 km depending on the degree of tyre
wear, provided that the vehicle has the same
size front and rear tyres. Do not reverse the
direction of tyre rotation.
Clean the contact surfaces of the wheel and
the brake disc thoroughly every time a wheel
is changed. Check the tyre pressure and, if
necessary, restart the tyre pressure loss
warning system. Winter driving
Points to remember
Have your vehicle winterproofed at a qualified
specialist workshop, e.g. at a Mercedes-Benz
Service Centre, at the onset of winter. Winter tyres
Use winter tyres at temperatures below +7 °C
and on snow or ice-covered roads. Only then
can the effect of the ABS and ESP ®
driving
systems be ensured in winter too.
Use winter tyres of the same make and tread
on all wheels to maintain safe handling char-
acteristics. G
Risk of accident
Winter tyres with a tread depth of less than
4 mm must be replaced immediately. They
are no longer suitable for winter use and
can no longer provide sufficient grip. This
could cause you to lose control of your
vehicle and cause an accident.
Always observe the maximum permitted
speed specified for the winter tyres you have
fitted. If you fit winter tyres which have a
lower maximum permitted speed than that of
the vehicle, affix an appropriate warning sign Operation
245_AKB; 2; 7, en-GB
wdomann,
Version: 2.11.4
2008-10-17T11:22:31+02:00 - Seite 181 ZDateiname: 6515_1640_02_buchblock.pdf; preflight
Page 191 of 305

Trailer towing*
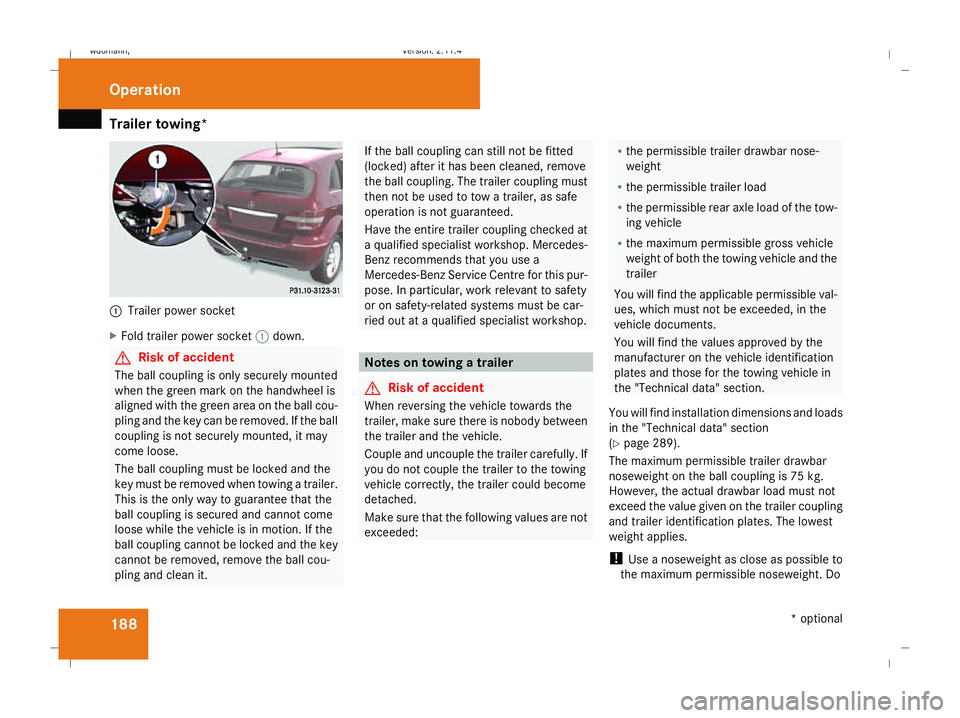
1881
Trailer power socket
X Fold trailer power socket 1down. G
Risk of accident
The ball coupling is only securely mounted
when the green mark on the handwheel is
aligned with the green area on the ball cou-
pling and the key can be removed. If the ball
coupling is not securely mounted, it may
come loose.
The ball coupling must be locked and the
key must be removed when towing a trailer.
This is the only way to guarantee that the
ball coupling is secured and cannot come
loose while the vehicle is in motion. If the
ball coupling cannot be locked and the key
cannot be removed, remove the ball cou-
pling and clean it. If the ball coupling can still not be fitted
(locked) after it has been cleaned, remove
the ball coupling. The trailer coupling must
then not be used to tow a trailer, as safe
operation is not guaranteed.
Have the entire trailer coupling checked at
a qualified specialist workshop. Mercedes-
Benz recommends that you use a
Mercedes-Benz Service Centre for this pur-
pose. In particular, work relevant to safety
or on safety-related systems must be car-
ried out at a qualified specialist workshop. Notes on towing a trailer
G
Risk of accident
When reversing the vehicle towards the
trailer, make sure there is nobody between
the trailer and the vehicle.
Couple and uncouple the trailer carefully. If
you do not couple the trailer to the towing
vehicle correctly, the trailer could become
detached.
Make sure that the following values are not
exceeded: R
the permissible trailer drawbar nose-
weight
R the permissible trailer load
R the permissible rear axle load of the tow-
ing vehicle
R the maximum permissible gross vehicle
weight of both the towing vehicle and the
trailer
You will find the applicable permissible val-
ues, which must not be exceeded, in the
vehicle documents.
You will find the values approved by the
manufacturer on the vehicle identification
plates and those for the towing vehicle in
the "Technical data" section.
You will find installation dimensions and loads
in the "Technical data" section
(Y page 289).
The maximum permissible trailer drawbar
noseweight on the ball coupling is 75 kg.
However, the actual drawbar load must not
exceed the value given on the trailer coupling
and trailer identification plates. The lowest
weight applies.
! Use a noseweight as close as possible to
the maximum permissible noseweight. Do Operation
* optional
245_AKB; 2; 7, en-GB
wdomann,
Version: 2.11.4 2008-10-17T11:22:31+02:00 - Seite 188Dateiname: 6515_1640_02_buchblock.pdf; preflight
Page 261 of 305

Flat tyre
258 G
Risk of accident
Do not exceed the maximum speed of
80 km/h.
The "max. 80 km/h" sticker must be affixed
within the driver's field of vision.
The vehicle's handling characteristics may
be affected. H
Environmental note
Have the used TIREFIT kit disposed of pro-
fessionally, e.g. at a Mercedes-Benz
Service Centre.
X Have the TIREFIT kit replaced every four
years at a qualified specialist workshop,
e.g. a Mercedes-Benz Service Centre. Changing a wheel/fitting the spare
wheel*
G
Risk of accident
The wheel dimensions and tyre size of the
"Minispare" emergency spare wheel* may
differ from those of the standard wheels.
Your vehicle's handling characteristics will
change when a "Minispare" emergency
spare wheel* is fitted. Adapt your style of
driving accordingly.
The "Minispare" emergency spare wheel*
may only be used for a short time. Do not
exceed the maximum speed of 80 km/h
and do not deactivate ESP ®
.
Never drive the vehicle with more than one
"Minispare" emergency spare wheel* fit-
ted. G
Risk of accident
Have the "Minispare" emergency spare
wheel* or the spare wheel* replaced with
a new wheel as soon as possible at a quali-
fied specialist workshop which has the nec-
essary specialist knowledge and tools to
carry out the work required. Mercedes-
Benz recommends that you use a
Mercedes-Benz Service Centre for this pur- pose. In particular, work relevant to safety
or on safety-related systems must be car-
ried out at a qualified specialist workshop.
Preparing the vehicle X
Prepare the vehicle as described
(Y page 252).
X If a trailer is coupled, uncouple it.
X Place the wheels in the straight-ahead posi-
tion.
X Take the "Minispare" emergency spare
wheel* or the spare wheel* out of the stow-
age well under the luggage compartment
floor.
X Take the following out of the stowage com-
partment behind the rear seat backrest:
R
the vehicle tool kit
R the wheel chock
R the jack
X Secure the vehicle to prevent it from rolling
away.
On level ground: place chocks or similar
items under the front and rear of the wheel
that is diagonally opposite the wheel you
wish to change. Practical advice
* optional
245_AKB; 2; 7, en-GB
wdomann
,V ersion: 2.11.4
2008-10-17T11:22:31+02:00 - Seite 258 Dateiname: 6515_1640_02_buchblock.pdf; preflight
Page 276 of 305

273
Introduction to technical data
.........274
Genuine Mercedes-Benz parts .........274
Vehicle electronics ...........................275
Vehicle identification plates ............276
Engine ................................................ 278
Performance ...................................... 280
Tyres and wheels .............................. 282
Vehicle dimensions ..........................286
Vehicle weights ................................. 286
Trailer coupling* ............................... 289
Service products and capacities .....291 Technical data
245_AKB; 2; 7, en-GB
wdomann
, Version: 2.11.4 2008-10-17T11:22:31+02:00 - Seite 273Dateiname: 6515_1640_02_buchblock.pdf; preflight
Page 289 of 305

Vehicle weights
286 Vehicle dimensions
B 150
B 150
BlueEFFICIENCY B 170
B 170
BlueEFFICIENCY B 200 B 200 Turbo B 180 CDI B 200 CDI
Vehicle length
(ECE)
4,273 mm 4,273 mm 4,273 mm 4,273 mm 4,273 mm 4,273 mm
Vehicle width
including exterior
mirrors
2,040 mm 2,040 mm 2,040 mm 2,040 mm 2,040 mm 2,040 mm
Vehicle height
1,603 mm 1,603 mm 1,604 mm 1,604 mm 1,604 mm 1,604 mm
Wheelbase
2,778 mm 2,778 mm 2,778 mm 2,778 mm 2,778 mm 2,778 mm
Vehicle weights
The unladen weight includes the driver (68 kg), luggage (7 kg) and all fluids (fuel tank 90% full). Items of optional equipment increase the
unladen weight and reduce the maximum payload. You will find more specific weight information on the vehicle identification plate
(Y page 276). Technical data
245_AKB; 2; 7, en-GB
wdomann,
Version: 2.11.4 2008-10-17T11:22:31+02:00 - Seite 286Dateiname: 6515_1640_02_buchblock.pdf; preflight
Page 292 of 305

Trailer coupling*
289Trailer coupling*
Mounting dimensions
G
Risk of accident
Only have a trailer tow hitch retrofitted at a
qualified specialist workshop which has the
necessary specialist knowledge and tools
to carry out the work required. Mercedes-
Benz recommends that you use a
Mercedes-Benz Service Centre for this pur-
pose. In particular, work relevant to safety
or on safety-related systems must be car-
ried out at a qualified specialist workshop.
! If you have a trailer tow hitch retrofitted,
changes to the cooling system may be nec-
essary, depending on the vehicle type. If you have a trailer tow hitch retrofitted,
observe the anchorage points on the chas-
sis frame. Anchorage points for the trailer coupling
1 Anchorage points
2 Overhang dimension
3 Rear axle centre line For trailer tow hitches fitted at the factory, the
overhang dimension is 749 mm. Technical data
* optional
245_AKB; 2; 7, en-GB
wdomann,
Version: 2.11.4 2008-10-17T11:22:31+02:00 - Seite 289 ZDateiname: 6515_1640_02_buchblock.pdf; preflight