reset MERCEDES-BENZ B-CLASS HATCHBACK 2011 User Guide
[x] Cancel search | Manufacturer: MERCEDES-BENZ, Model Year: 2011, Model line: B-CLASS HATCHBACK, Model: MERCEDES-BENZ B-CLASS HATCHBACK 2011Pages: 329, PDF Size: 7.91 MB
Page 101 of 329
Rear foglamp
X To switch on the rear foglamp: turn the
key in the ignition lock to position 2or start
the engine.
X Turn the light switch to LorÃ.
X Press the Rbutton.
The yellow Rindicator lamp in the
instrument cluster lights up.
X To switch off the rear foglamp: press the
R button.
The yellow Rindicator lamp in the
instrument cluster goes out.
Vehicles with front foglamps: when the light
switch is in the Tposition, the rea rfog-
lamp can only be switched on if the foglamps
(without dipped-beam headlamps) are
switched on.
Adjusting the headlam prange (halogen
headlamps) The headlamp range control allows you to
adjust the cone of light from the headlamps
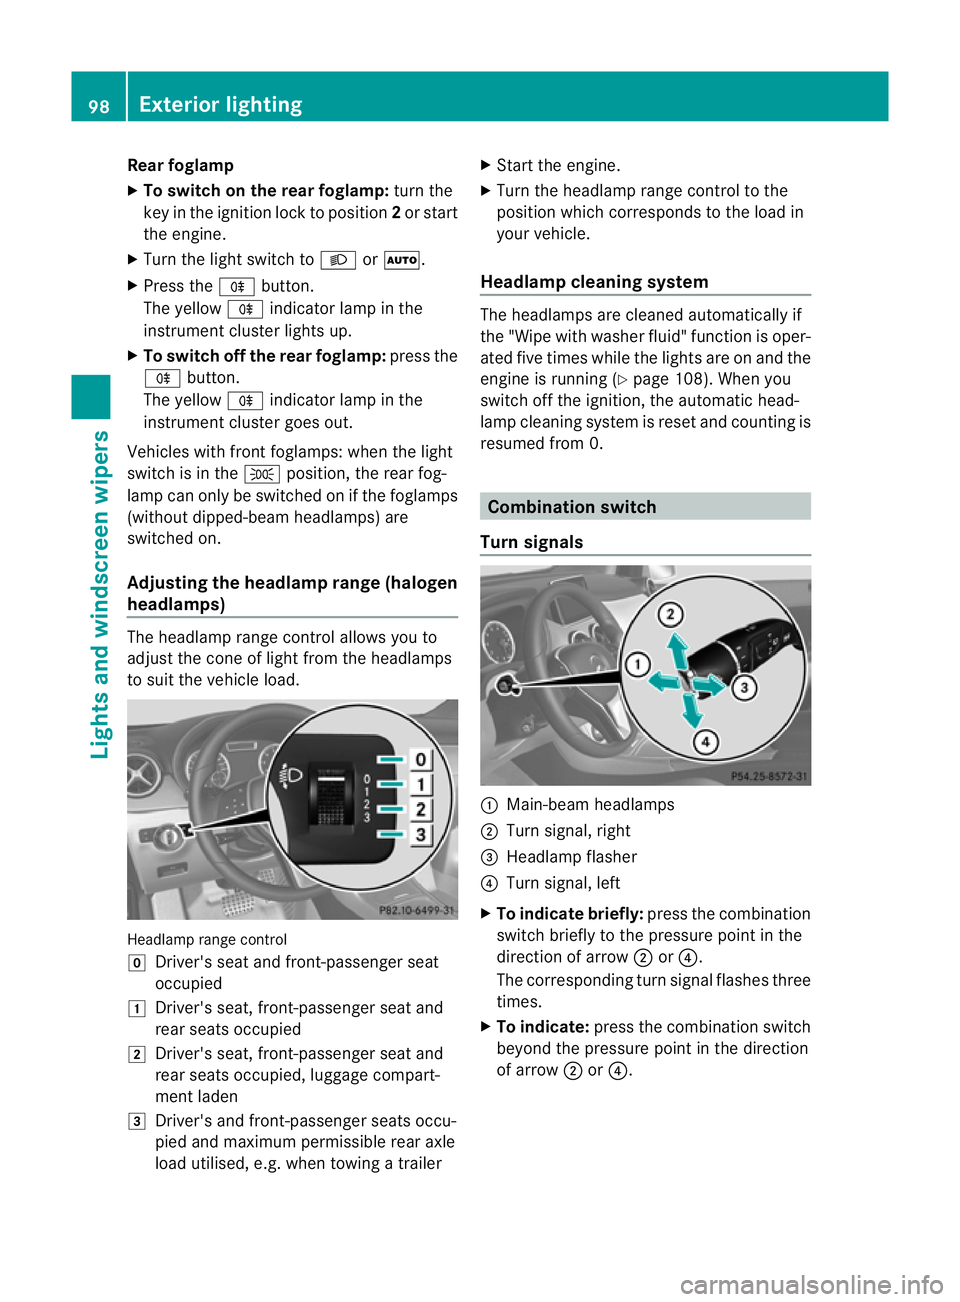
to sui tthe vehicle load. Headlamp range control
g
Driver's seat and front-passenger seat
occupied
1 Driver's seat, front-passenger seat and
rear seats occupied
2 Driver's seat, front-passenger seat and
rear seats occupied, luggage compart-
ment laden
3 Driver's and front-passenger seats occu-
pied and maximum permissible rear axle
load utilised, e.g. when towing a trailer X
Start the engine.
X Turn the headlamp range control to the
position which corresponds to the load in
your vehicle.
Headlampc leaning system The headlamps are cleaned automatically if
the "Wipe with washer fluid" function is oper-
ated five times while the lights are on and the
engine is running (Y
page 108). When you
switch off the ignition, the automatic head-
lamp cleaning syste mis reset and counting is
resumed from 0. Combination switch
Turn signals :
Main-beam headlamps
; Turn signal, right
= Headlamp flasher
? Turn signal, left
X To indicate briefly: press the combination
switch briefly to the pressure point in the
direction of arrow ;or?.
The corresponding turn signal flashes three
times.
X To indicate: press the combination switch
beyond the pressure point in the direction
of arrow ;or?. 98
Exterior lightingLights and windscreen wipers
Page 158 of 329
G
WARNING
The vehicle can be braked when DISTRONIC
PLUS is activated. For this reason, deactivate
DISTRONIC PLUS if the vehicle is to be set in
motion by other means (e.g. in a car wash or
by towing).
General notes DISTRONIC PLUS regulates the speed and
automatically helps you maintai nthe dis-
tance to the vehicle detected in front. DIS-
TRONIC PLUS brakes automatically so that
the set speed is not exceeded.
You must select a lower gear in good time on
long and steep downhill gradients, especially
if the vehicle is laden or towing a trailer. For
this, you need to have selected manual drive
program M(Ypage 147). By doing so, you will
make use of the braking effect of the engine.
This relieves the load on the brake system and
prevents the brakes from overheating and
wearing too quickly.
If DISTRONIC PLUS detects a slower-moving
vehicle in front, your vehicle is braked in order
to maintain the preset distance to the vehicle
in front.
If there is no vehicle in front, DISTRONIC
PLUS operates in the same way as cruise
control in the speed range between
30 km/h and 200 km/h. If avehicle is driving
in front of you, DISTRONIC operates in the
speed range between 0km/h and
200 km/h.
Do not use DISTRONIC PLUS on roads with
steep gradients.
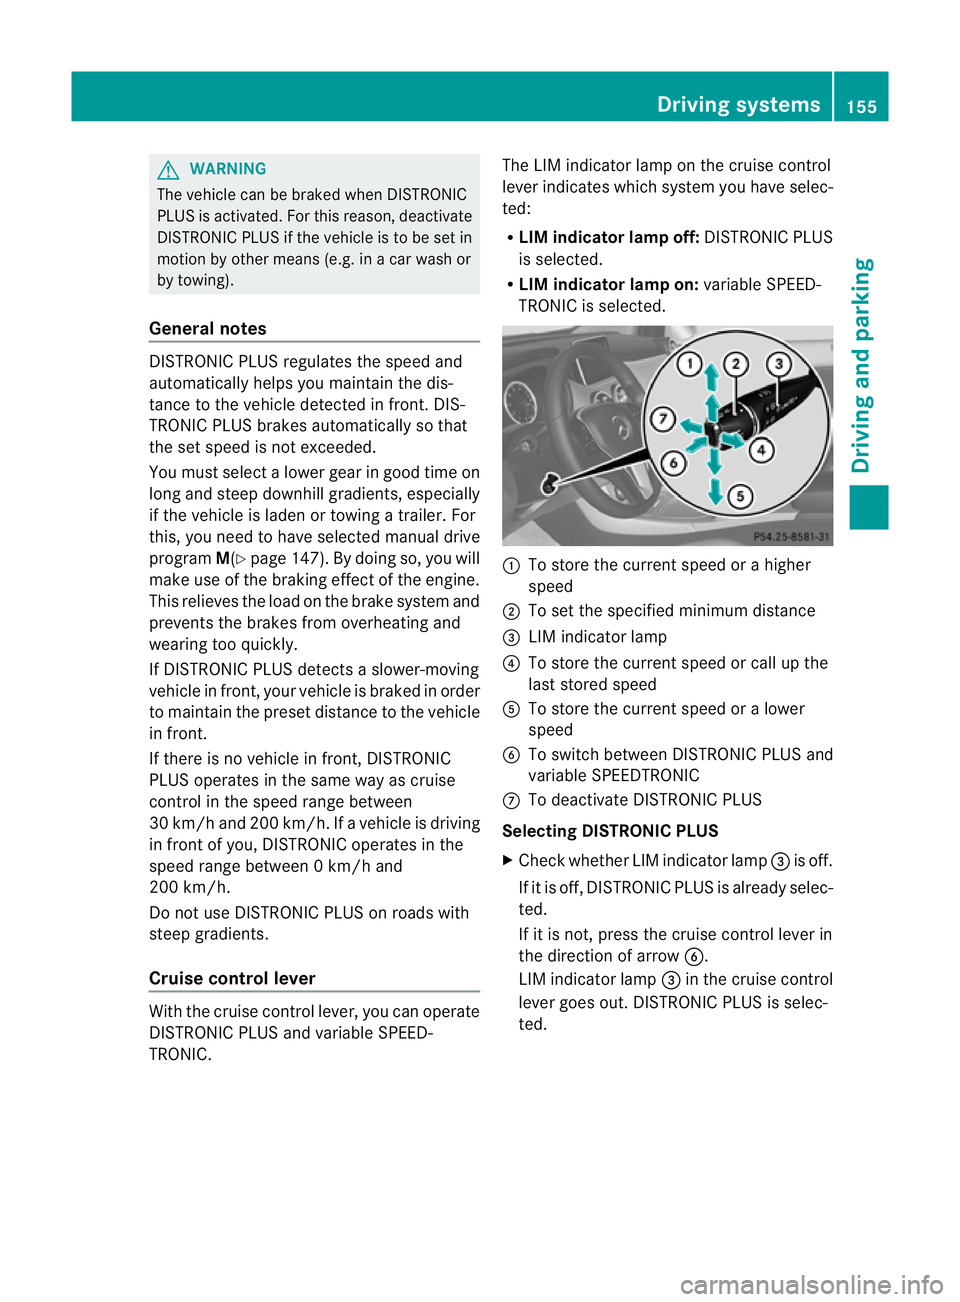
Cruise control lever With the cruise control lever, you can operate
DISTRONIC PLUS and variable SPEED-
TRONIC. The LIM indicator lamp on the cruise control
lever indicates which system you have selec-
ted:
R
LIM indicator lamp off: DISTRONIC PLUS
is selected.
R LIM indicator lamp on: variable SPEED-
TRONIC is selected. :
To store the current spee dorahigher
speed
; To set the specified minimum distance
= LIM indicator lamp
? To store the current speed or call up the
last stored speed
A To store the current speed or a lower
speed
B To switch between DISTRONIC PLUS and
variable SPEEDTRONIC
C To deactivate DISTRONIC PLUS
Selecting DISTRONIC PLUS
X Check whether LIM indicator lamp =is off.
If it is off, DISTRONIC PLUS is already selec-
ted.
If it is not, press the cruise control lever in
the direction of arrow B.
LIM indicator lamp =in the cruise control
lever goes out. DISTRONIC PLUS is selec-
ted. Driving systems
155Driving and parking Z
Page 179 of 329
detected message appears in the multi-
function display.
X If necessary, take a break.
X Press the abutton to confirm the mes-
sage.
On long journeys, take regularb reaks in good
time to allow yourself to rest properly.Ify ou
do not take a break, you will be warned again
after 15 minutes at the earliest. The precon-
dition for this is that ATTENTION ASSIST still
detects typical indicators of fatigue or
increasing lapses in concentration.
ATTENTION ASSIST is reset and starts
assessing your tiredness again when you con-
tinue your journey if:
R you switch off the engine.
R you take off your seat belt and open the
driver's door, e.g. for a change of drivers or
to take a break. Speed Limit Assist
General notes Speed Limit Assist shows you detected speed
limits in the multifunction display .Data from
the navigation system is also used for this
purpose. If a traffic sign indicating a speed
limit or the end of a speed limit is detected,
it is shown in the multifunction display. If
Speed Limit Assist does no tdetec tany traffic
signs, the speed limit from the digital road
map is take nand shown in the display.
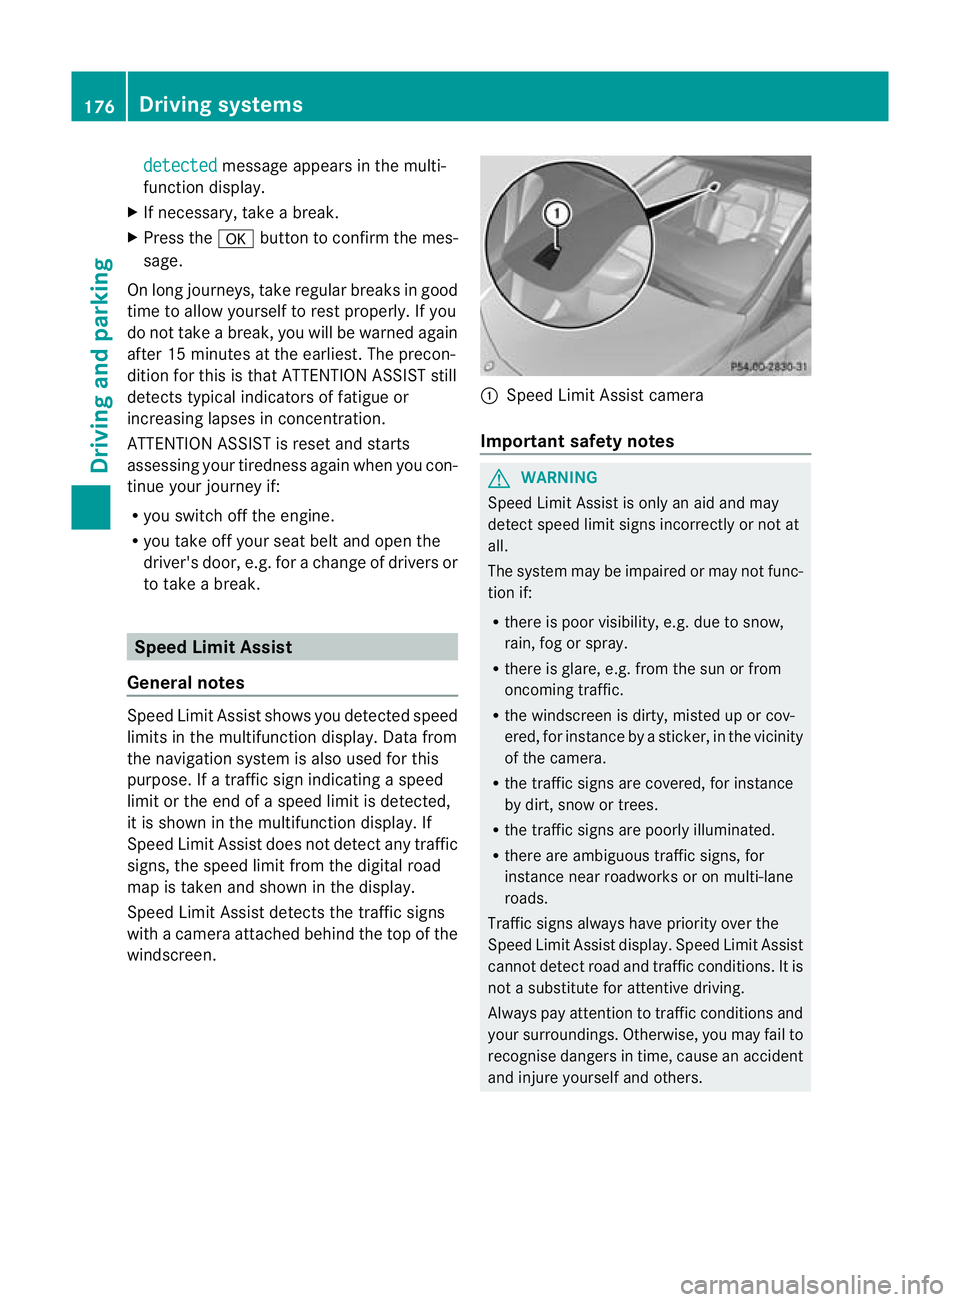
Speed Limit Assist detects the traffic signs
with a camera attached behind the top of the
windscreen. :
Speed Limit Assist camera
Important safety notes G
WARNING
Speed Limit Assist is onl yanaid and may
detect speed limit signs incorrectly or not at
all.
The system may be impaired or may not func-
tion if:
R there is poor visibility, e.g. due to snow,
rain, fog or spray.
R there is glare, e.g. from the sun or from
oncoming traffic.
R the windscreen is dirty, misted up or cov-
ered, for instance by a sticker, in the vicinity
of the camera.
R the traffic signs are covered, for instance
by dirt, snow or trees.
R the traffic signs are poorly illuminated.
R there are ambiguous traffic signs, for
instance near roadworks or on multi-lane
roads.
Traffic signs always have priority over the
Speed Limit Assist display. Speed Limit Assist
cannot detect road and traffic conditions. It is
not a substitute for attentive driving.
Always pay attention to traffic conditions and
your surroundings. Otherwise, you may fail to
recognise dangers in time, cause an accident
and injure yourself and others. 176
Driving systemsDriving and parking
Page 196 of 329
Trip menu
Standard display X
Press and hold the %button on the
steering wheel until the Trip menu with
trip meter :and total distance
recorder ;is shown.
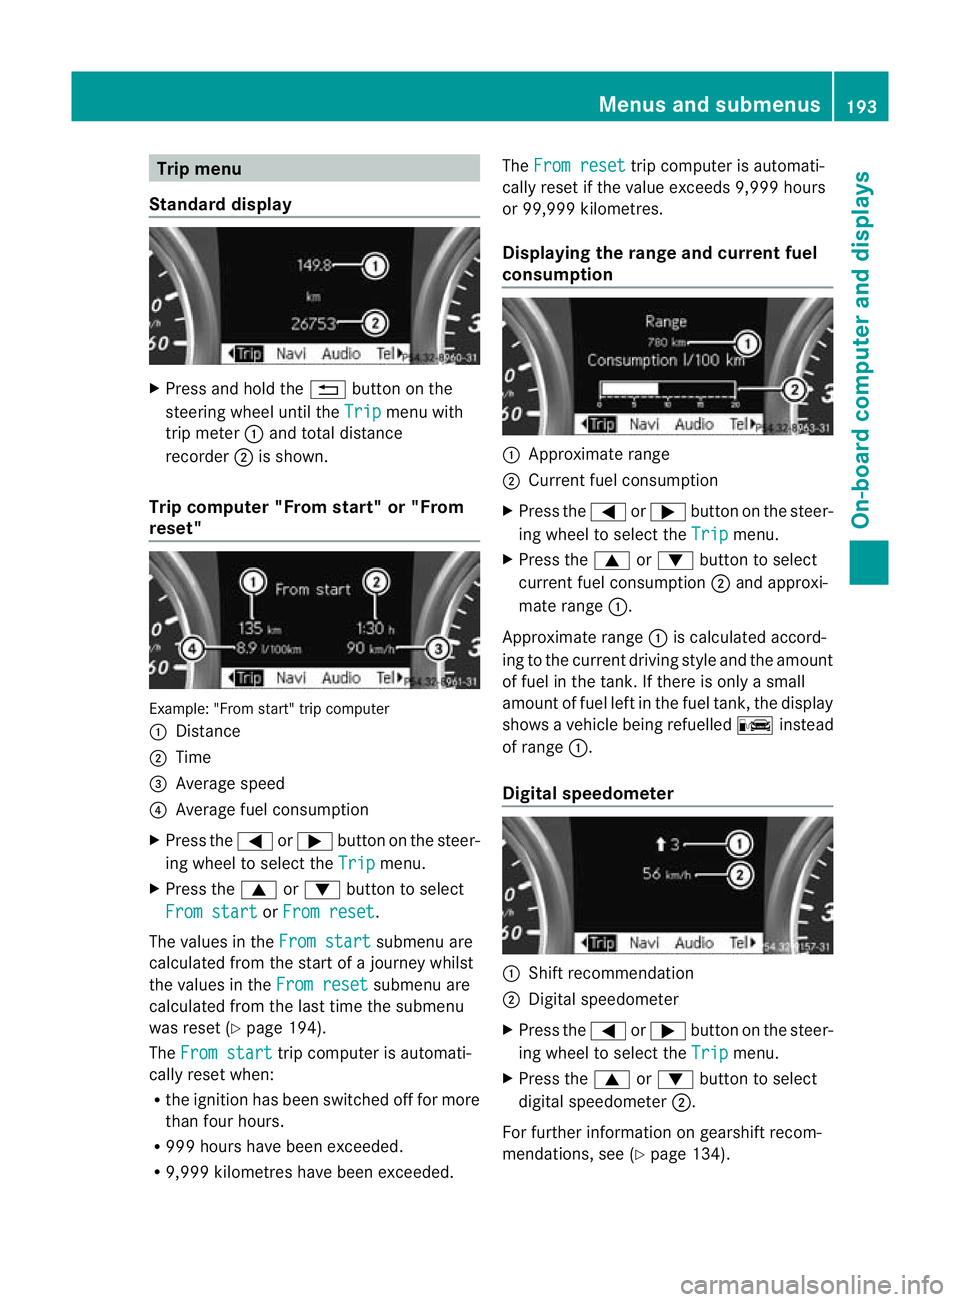
Trip computer "From start" or "From
reset" Example: "From start" trip computer
:
Distance
; Time
= Average speed
? Average fuel consumption
X Press the =or; button on the steer-
ing wheel to select the Trip menu.
X Press the 9or: button to select
From start or
From reset .
The values in the From start submenu are
calculated fro mthe start of a journey whilst
the values in the From reset submenu are
calculated from the last time the submenu
was reset (Y page 194).
The From start trip computer is automati-
cally reset when:
R the ignition has been switched off for more
than four hours.
R 999 hours have been exceeded.
R 9,999 kilometres have been exceeded. The
From reset trip computer is automati-
cally reset if the value exceeds 9,999 hours
or 99,999 kilometres.
Displaying the range and current fuel
consumption :
Approximate range
; Current fuel consumption
X Press the =or; button on the steer-
ing wheel to select the Trip menu.
X Press the 9or: button to select
current fuel consumption ;and approxi-
mate range :.
Approximate range :is calculated accord-
ing to the current driving style and the amount
of fuel in the tank. If there is only a small
amount of fuel left in the fuel tank, the display
shows a vehicle being refuelled Cinstead
of range :.
Digital speedometer :
Shift recommendation
; Digital speedometer
X Press the =or; button on the steer-
ing wheel to select the Trip menu.
X Press the 9or: button to select
digital speedometer ;.
For further information on gearshift recom-
mendations, see (Y page 134). Menus and submenus
193On-board computer and displays Z
Page 197 of 329
i
If the gearshift recommendation is shown
in the multifunction display, it is not shown
in the status bar.
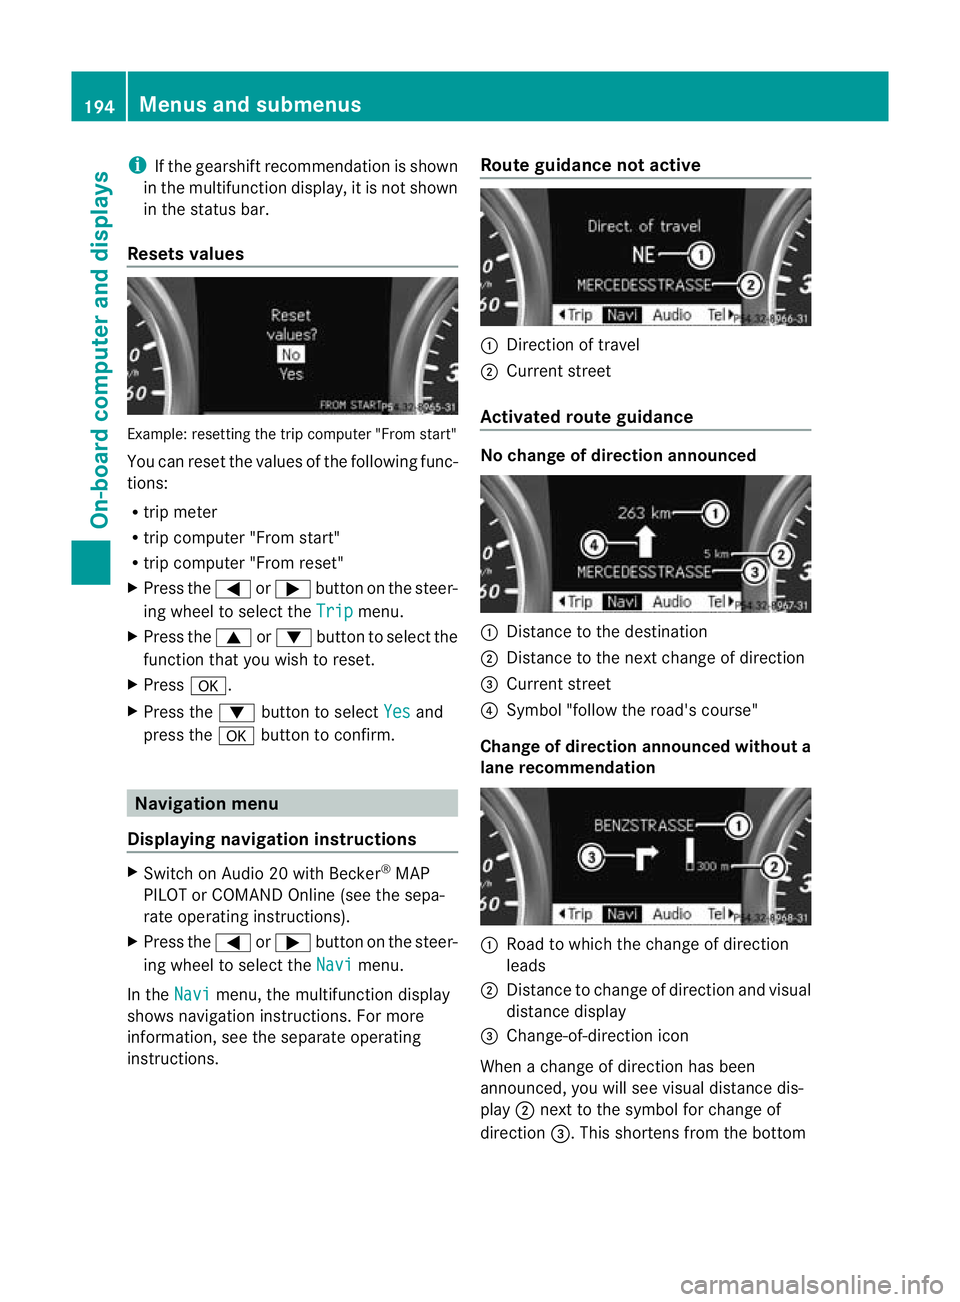
Resets values Example: resetting the trip computer "From start"
You can reset the values of the following func-
tions:
R
trip meter
R trip computer "From start"
R trip computer "From reset"
X Press the =or; button on the steer-
ing wheel to select the Trip menu.
X Press the 9or: button to select the
function that you wish to reset.
X Press a.
X Press the :button to select Yes and
press the abutton to confirm. Navigation menu
Displaying navigation instructions X
Switch on Audio 20 with Becker ®
MAP
PILOT or COMAND Online (see the sepa-
rate operating instructions).
X Press the =or; button on the steer-
ing wheel to select the Navi menu.
In the Navi menu, the multifunction display
shows navigation instructions. For more
information, see the separate operating
instructions. Route guidance not active :
Direction of travel
; Current street
Activated route guidance No change of direction announced
:
Distance to the destination
; Distance to the next change of direction
= Current street
? Symbol "follow the road's course"
Change of direction announced without a
lane recommendation :
Road to which the change of direction
leads
; Distance to change of direction and visual
distance display
= Change-of-direction icon
When a change of direction has been
announced, you will see visuald istance dis-
play ;next to the symbol for change of
direction =.This shortens from the bottom 194
Menus and submenusOn-board computer and displays
Page 207 of 329
If the radars
ensor system is switched off,
Blind Spot Assist is deactivated
(Y page 177).
Convenience Switching the belt adjustment on/off
X
Press the =or; button on the steer-
ing wheel to select the Settings menu.
X Press the :or9 button to select the
Convenience submenu.
X Press the abutton to confirm.
X Press the :or9 button to select the
Belt adjustment: function.
You will see the selected setting: Activa‐ted or
Deactivated .
X Press the abutton to save the setting.
For further information on belt adjustment,
see (Y page 45).
Switching on/off the fold in mirrors when
locking function
X Press the =or; button on the steer-
ing wheel to select the Settings menu.
X Press the :or9 button to select the
Convenience submenu.
X Press the abutton to confirm.
X Press the :or9 button to select the
Fold mirrors in when locking: func-
tion.
You will see the selected setting: on or
off .
X Press the abutton to save the setting.
If you switch on the Fold mirrors in when
locking: function, the exterior mirrors fold
in when you lock the vehicle. When you
unlock the vehicle and then open the driver's
or front-passenger door, the exterior mirrors
fold out again.
If you have switched the function on and you
fold the exterior mirror sinusing the button
on the door (Y page 92), they will not fold out
automatically. The exterior mirrors can then
only be folded out using the button on the
door. Resetting to factory settings X
Press the =or; button on the steer-
ing wheel to select the Settings menu.
X Press the :or9 button to select the
Factory setting submenu.
X Press the abutton to confirm.
The Reset all settings? message
appears.
X Press the :or9 button to select
No or
Yes .
X Press the abutton to confirm the selec-
tion.
If you have selected Yes , the multifunction
display shows a confirmation message.
For safety reasons, not all functions are reset:
the Limit speed (winter tyres): func-
tion in permanent SPEEDTRONIC can only be
set in the Vehicle submenu. If you want to
reset the Daytime driving lights: in the
Light submenu, you must turn the key in the
ignition lock to position 1.204
Menus and submenusOn-board computer and displays
Page 269 of 329
X
To open: pull cap:upwards by the tab.
X Top up with the premixed washe rfluid.
X To close: press cap :onto the filler neck
until it engages.
The washer fluid reservoir is used for both the
windscreen washer system and the headlamp
cleaning system.
For further information on windscreen
washer fluid/antifreeze (Y page 316).Maintenance
ASSYST PLUS service interval display
Service messages The ASSYST PLUS service interval display
informs you of the nex
tservice due date.
The multifunction display shows a service
message for a few seconds, e.g.:
Next service A due in .. days Service A due
Service A overdue by .. days
The letter indicates which service is due.
Astands for a minor service and
B for a major
service. A number or another letter may be
displayed after the letter. This figure indicates
any necessary additional maintenance work
to be performed.
If you report this displayed information to a
qualified specialist workshop, for example a
Mercedes-Benz Service Centre, they can
infor myou of the costs the service will incur.
Information on the type of service and service
intervals (see separate Service Booklet).
The ASSYST PLUS service interval display
does not take into account any periods of
time during which the battery is disconnec-
ted. Maintaining the time-dependent service
schedule:
X
Note down the service due date displayed
in the multifunction display before discon-
necting the battery.
or
X After reconnecting the battery, subtract
the battery disconnection periods from the
service date shown on the display.
i The ASSYST PLUS service interval display
does not show any information on the
engine oil level. Observe the notes on the
engine oil level (Y page 263).
Hiding aservice message X
Press %ora.
Displaying service messages X
Switch the ignitio non.
X Press the =or; button to select the
Serv. menu.
X Press the 9or: button to select the
ASSYST PLUS submenu and confirm by
pressing the abutton.
The service due date appears in the multi-
functio ndisplay.
Points to remember Resetting the ASSYST PLUS service inter-
val display
!
If the ASSYST PLUS service interval dis-
play has been inadvertently reset, this set-
ting can be corrected at a qualified special-
ist workshop.
Have service work carried out as described
in the Service Booklet. This may otherwise
lead to increased wear and damage to the
major assemblies or the vehicle.
Aq ualified specialist workshop, e.g. a
Mercedes-Ben zService Centre, will reset the
ASSYST PLUS service interval display after
the service work has been carried out. 266
MaintenanceMaintenance and care
Page 285 of 329
Otherwise, the vehicle's electronic sys-
tem may be damaged.
R in vehicles with automatic transmission,
the transmission is locked in position P
after disconnecting the battery. The vehi-
cle is secured against rolling away. You
can then no longer move the vehicle.
The battery and the cover of the positive
terminal clamp must be fitted securely dur-
ing operation.
In order for the battery to achieve the maxi-
mum possible service life, it must always be
sufficiently charged.
Like other batteries, the vehicle battery may
discharge over time if you do not use the
vehicle. In such cases, have the battery dis-
connected at a qualified specialist workshop.
You can also charge the battery with a
charger recommended by Mercedes-Benz.
For more information, please contact a quali-
fied specialist workshop.
Have the battery charge checked more fre-
quently if you use the vehicle mainly for short
trips or if you leave it standing idle for a
lengthy period. Consult a qualified specialist
workshop if you wish to leave your vehicle
parked up for a long period of time.
i When you park the vehicle, remove the
key if you do not require any electrical con-
sumers. The vehicle will then use very little
energy, thus conserving battery power.
i If the power supply has been interrupted,
e.g. if the battery was discharged, you must
carry out the following tasks:
R set the clock (audio system/COMAND
Online, see the separate operating
instructions).
R reset the function for automatically fold-
ing the exterior mirrors in/out by folding
the mirrors out once (Y page 92). Charging the battery
G
WARNING
Only charge the battery in a well-ventilated
area. As the battery is being charged, gases
can escape and generate minor explosions.
This could injure you and other persons or
cause damage to the paintwork or acid cor-
rosion on the vehicle.
You can obtain information on battery charg-
ers which allow the battery to be charged
while still installed from a qualified specialist
workshop. G
WARNING
There is a risk of acid burns during the charg-
ing process due to the gases which escape
from the battery. Do not lean over the battery
during the charging process. G
WARNING
Battery acid is caustic. Avoid contact with the
skin, eyes or clothing.
! Only charge the installed battery with a
battery charger which has been tested and
approved by Mercedes-Benz.T hese battery
chargers allow the battery to be charged
while still installed in the vehicle.
! Only use battery chargers with a maxi-
mum charging voltage of 14.8 V.
! Only charge the battery using the jump-
start connection point.
The jump-starting connection point is in the
engine compartment (Y page 283).
Read the battery charger's operating instruc-
tions before charging the battery.
X Open the bonnet (Y page 262).
X Connect the battery charger to the positive
terminal and earth point in the same order
as when connecting the donor battery in
the jump-starting procedure
(Y page 283). 282
BatteryBreakdown assistance
Page 289 of 329
Vehicles with a trailer tow hitch: if you intend
to use the vehicle for towing, fold out the ball
coupling (Y
page 183) and connect the tow-
bar to it.
Removing the towing eye X
Loosen the towing eye and unscrew it.
X Attach cover :to the bumper and press
until it engages.
X Place the towing eye and the tyre inflation
compressor in the stowage space in the
luggage compartment under the luggage
compartment floor (Y page 274).Towing the vehicle with the front axle
raised
! The ignition must be switched off if you
are towing the vehicle with the front axle
raised. Intervention by ESP ®
could other-
wise damage the brake system.
X Turn the key to position 2in the ignition
lock.
X When the vehicle is stationary, depress the
brake pedal and keep it depressed.
X Vehicles with manual transmission:
shift to neutral.
or
X Vehicles with automatic transmission:
shift the automatic transmission to posi-
tion P.
X Release the brake pedal.
X Release the electric parking brake.
X Deactivate automatic locking
(Y page 203).
X Switch on the hazard warning lamps
(Y page 99).
X Turn the key in the ignition lock to position
0and leave the key in the ignition lock.
When towing yourv ehicle with the frontaxle
raised, it is important tha tyou observe the
safety instructions (Y page 284). Towing the vehicle with both axles on
the ground
G
WARNING
The power assistance for the steering and the
brake force booster do not work when the
engine is not running. You will then need
much more effort to brake and steer the vehi-
cle. Adapt your style of driving accordingly.
i In order to signal a change of direction
when towing with the hazard warning lamps
switched on, use the combination switch as
usual.Int his case, only the turn signals for
the desired direction flash. When the com-
bination switch is reset, the hazard warning
lamps start flashing again.
Vehicles with automatic transmission: the
automatic transmission automatically shifts
to position Pwhen you open the driver's or
front-passenger door or when you remove the
key from the ignition lock. In order to ensure
that the automatic transmission stays in posi-
tion Nwhen towing the vehicle, you must
observe the following points:
X Make sure that the vehicle is stationary.
X Turn the key to position 2in the ignition
lock.
X Depress and hold the brake pedal.
X Shift the automatic transmission to posi-
tion N.
Vehicles with manual transmission:
X Turn the key to position 2in the ignition
lock.
X Depress and hold the brake pedal.
X Engage neutral.
Vehicles with manualo r automatic trans-
mission:
X Leave the key in position 2in the ignition
lock.
X Release the brake pedal.
X Release the electric parking brake.
X Switch on the hazard warning lamps
(Y page 99). 286
Towing and tow-startingBreakdown assistance