tow MERCEDES-BENZ B-CLASS HATCHBACK 2011 User Guide
[x] Cancel search | Manufacturer: MERCEDES-BENZ, Model Year: 2011, Model line: B-CLASS HATCHBACK, Model: MERCEDES-BENZ B-CLASS HATCHBACK 2011Pages: 329, PDF Size: 7.91 MB
Page 36 of 329
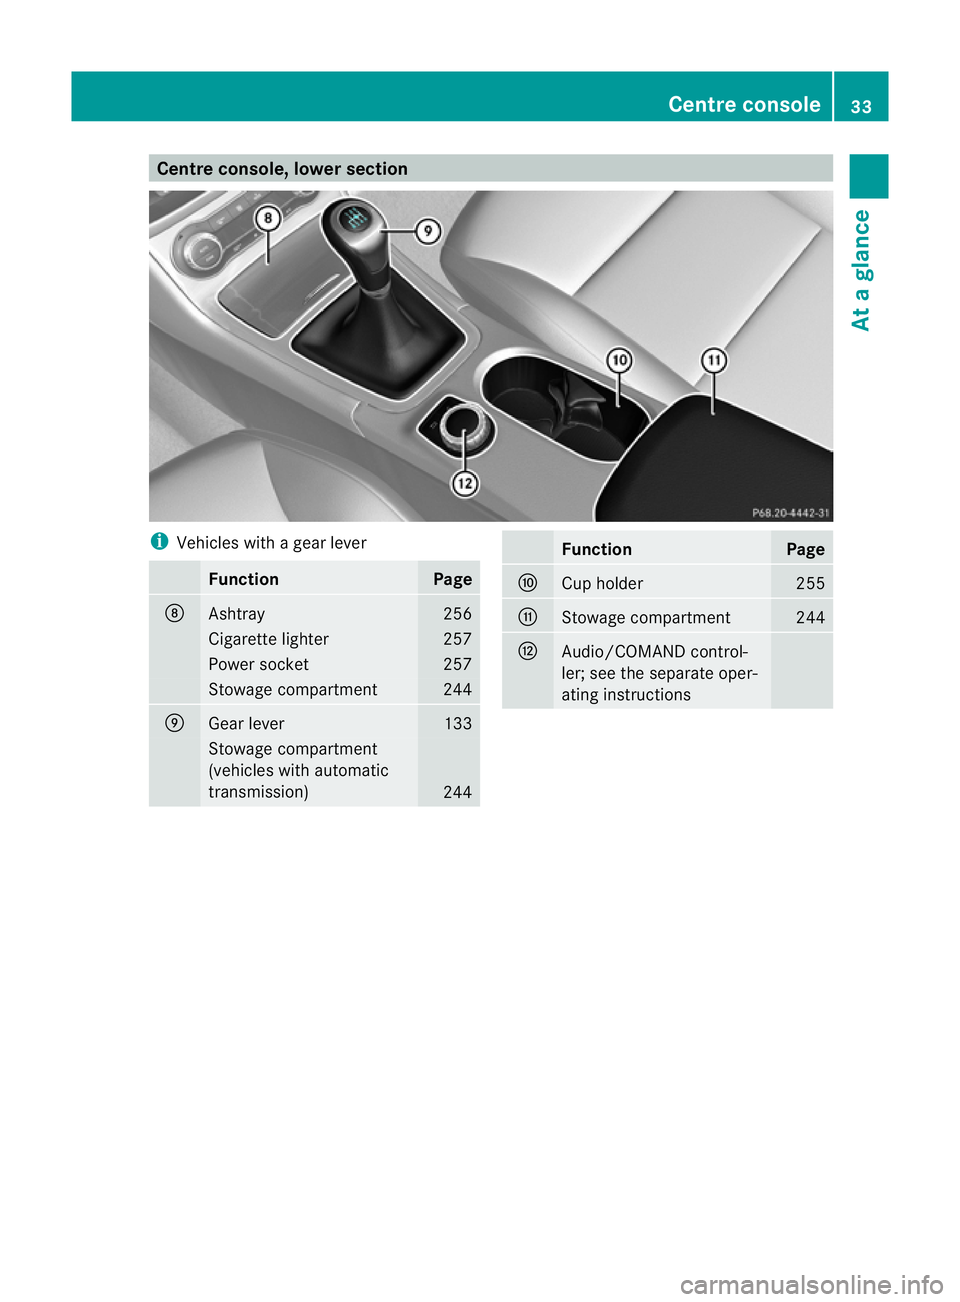
Centre console, lower section
i
Vehicles with a gear lever Function Page
D
Ashtray 256
Cigarette lighter 257
Power socket 257
Stowage compartment 244
E
Gear lever 133
Stowage compartment
(vehicles with automatic
transmission)
244 Function Page
F
Cup holder 255
G
Stowage compartment 244
H
Audio/COMAND control-
ler; see the separate oper-
ating instructions Centre console
33At a glance
Page 37 of 329
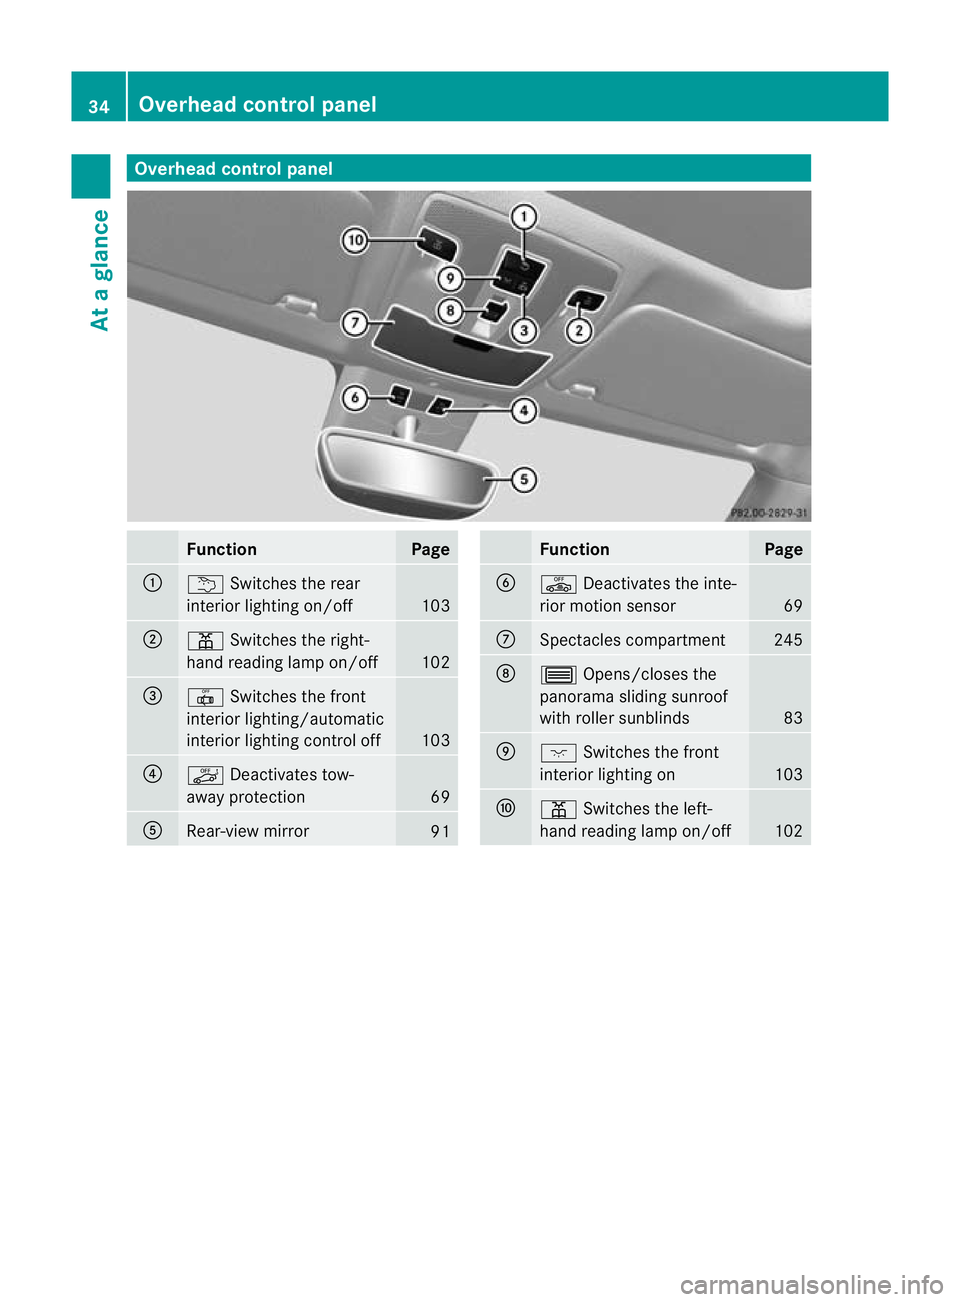
Overhea
dcontrol panel Function Page
:
u
Switches the rear
interio rlighting on/off 103
;
p
Switches the right-
hand reading lamp on/off 102
=
|
Switches the front
interior lighting/automatic
interior lighting control off 103
?
ë
Deactivates tow-
away protection 69
A
Rear-view mirror
91 Function Page
B
ê
Deactivates the inte-
rior motion sensor 69
C
Spectacles compartment 245
D
3
Opens/closes the
panorama sliding sunroof
with roller sunblinds 83
E
c
Switches the front
interior lighting on 103
F
p
Switches the left-
hand reading lamp on/off 10234
Overhead control panelAt a glance
Page 49 of 329
X
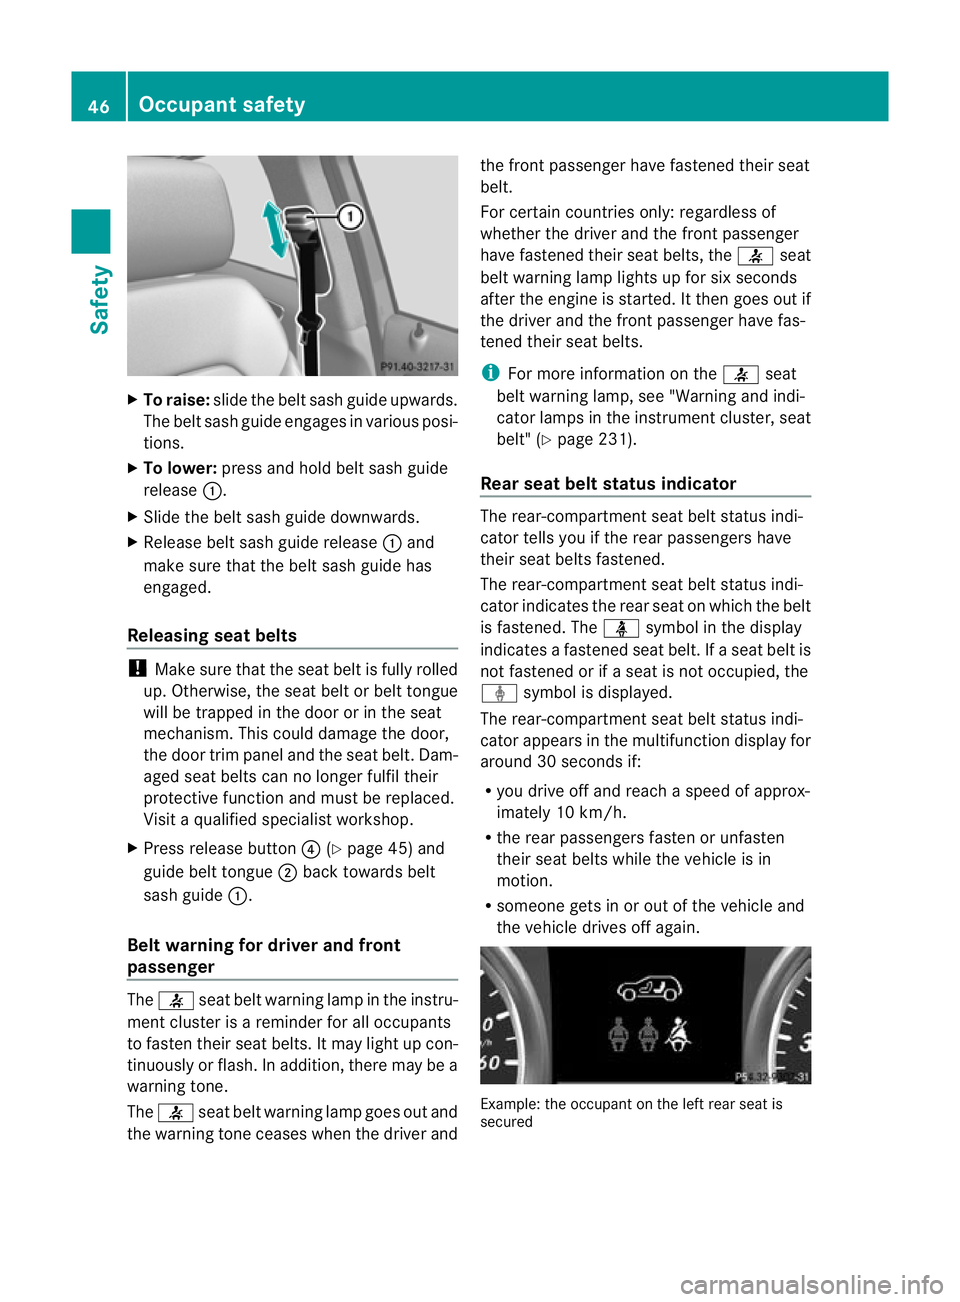
To raise: slide the belt sash guide upwards.
The belt sash guide engages in various posi-
tions.
X To lower: press and hold belt sash guide
release :.
X Slide the belt sash guide downwards.
X Release belt sash guide release :and
make sure tha tthe belt sash guide has
engaged.
Releasing seat belts !
Make sure that the seat belt is fully rolled
up. Otherwise, the seat belt or belt tongue
will be trapped in the door or in the seat
mechanism. This could damage the door,
the door trim panel and the seat belt. Dam-
aged seat belts can no longer fulfil their
protective function and must be replaced.
Visit a qualified specialist workshop.
X Press release button ?(Ypage 45) and
guide belt tongue ;back towards belt
sash guide :.
Belt warning for driver and front
passenger The
7 seat belt warning lamp in the instru-
ment cluster is a reminder for all occupants
to fasten their seat belts. It may light up con-
tinuously or flash. In addition, there may be a
warning tone.
The 7 seat belt warning lamp goes out and
the warning tone ceases when the driver and the front passenger have fastened their seat
belt.
For certain countries only: regardless of
whether the driver and the front passenger
have fastened their seat belts, the
7seat
belt warning lamp lights up for six seconds
after the engine is started. It then goes out if
the driver and the front passenger have fas-
tened their seat belts.
i For more information on the 7seat
belt warning lamp, see "Warning and indi-
cator lamps in the instrumentc luster, seat
belt" (Y page 231).
Rear seat belt status indicator The rear-compartmen
tseat belt status indi-
cator tells you if the rear passengers have
their seat belts fastened.
The rear-compartment seat belt status indi-
cator indicates the rear seat on which the belt
is fastened. The üsymbol in the display
indicates a fastened seat belt. If a seat belt is
not fastened or if a seat is not occupied, the
ý symbol is displayed.
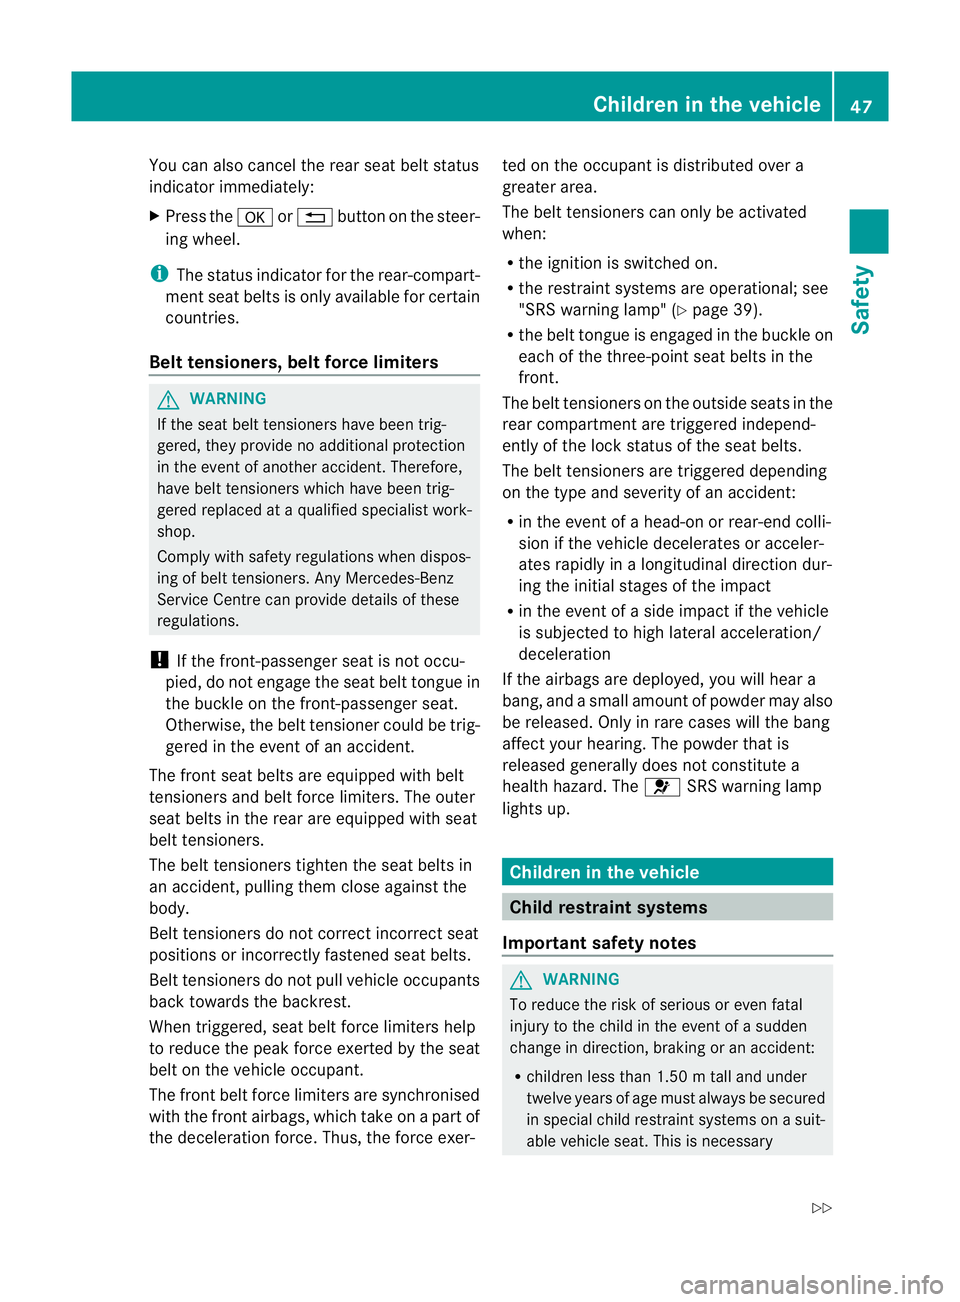
The rear-compartment seat belt status indi-
cator appears in the multifunction display for
around 30 seconds if:
R you drive off and reach a speed of approx-
imately 10 km/h.
R the rear passengers fasten or unfasten
their seat belts while the vehicle is in
motion.
R someone gets in or out of the vehicle and
the vehicle drives off again. Example: the occupant on the left rear seat is
secured46
Occupant safetySafety
Page 50 of 329
You can also cancel the rear seat belt status
indicator immediately:
X
Press the aor% button on the steer-
ing wheel.
i The status indicator for the rear-compart-
men tseat belts is only available for certain
countries.
Belt tensioners, belt force limiters G
WARNING
If the seat belt tensioners have been trig-
gered, they provide no additional protection
in the event of another accident. Therefore,
have belt tensioners which have been trig-
gered replaced at a qualified specialist work-
shop.
Comply with safety regulations when dispos-
ing of belt tensioners. Any Mercedes-Benz
Service Centre can provide details of these
regulations.
! If the front-passenger seat is not occu-
pied, do not engage the seat belt tongue in
the buckle on the front-passenger seat.
Otherwise, the belt tensioner could be trig-
gered in the event of an accident.
The fron tseat belts are equipped with belt
tensioners and belt force limiters. The outer
seat belts in the rear are equipped with seat
belt tensioners.
The belt tensioners tighten the seat belts in
an accident, pulling them close against the
body.
Belt tensioners do not correct incorrect seat
positions or incorrectly fastened seat belts.
Belt tensioners do not pull vehicle occupants
back towards the backrest.
When triggered, seat belt force limiters help
to reduce the peak forc eexerted by the seat
belt on the vehicle occupant.
The front belt force limiters are synchronised
with the front airbags, which take on a part of
the deceleratio nforce. Thus, the force exer- ted on the occupant is distributed over a
greater area.
The belt tensioners can only be activated
when:
R the ignition is switched on.
R the restraint systems are operational; see
"SRS warning lamp" (Y page 39).
R the belt tongue is engaged in the buckle on
each of the three-point seat belts in the
front.
The belt tensioners on the outside seats in the
rear compartment are triggered independ-
ently of the lock status of the seat belts.
The belt tensioners are triggered depending
on the type and severity of an accident:
R in the event of a head-on or rear-end colli-
sion if the vehicle decelerates or acceler-
ates rapidly in a longitudinal direction dur-
ing the initial stages of the impact
R in the event of a side impact if the vehicle
is subjected to high lateral acceleration/
deceleration
If the airbags are deployed, you will hear a
bang, and a small amount of powder may also
be released. Only in rare cases will the bang
affect your hearing. The powder that is
released generally does not constitute a
health hazard. The 6SRS warning lamp
lights up. Children in the vehicle
Child restraint systems
Important safety notes G
WARNING
To reduce the risk of serious or even fatal
injury to the child in the event of a sudden
change in direction, braking or an accident:
R children less than 1.50 m tall and under
twelve years of age must always be secured
in special child restraint systems on a suit-
able vehicle seat. This is necessary Children in the vehicle
47Safety
Z
Page 59 of 329
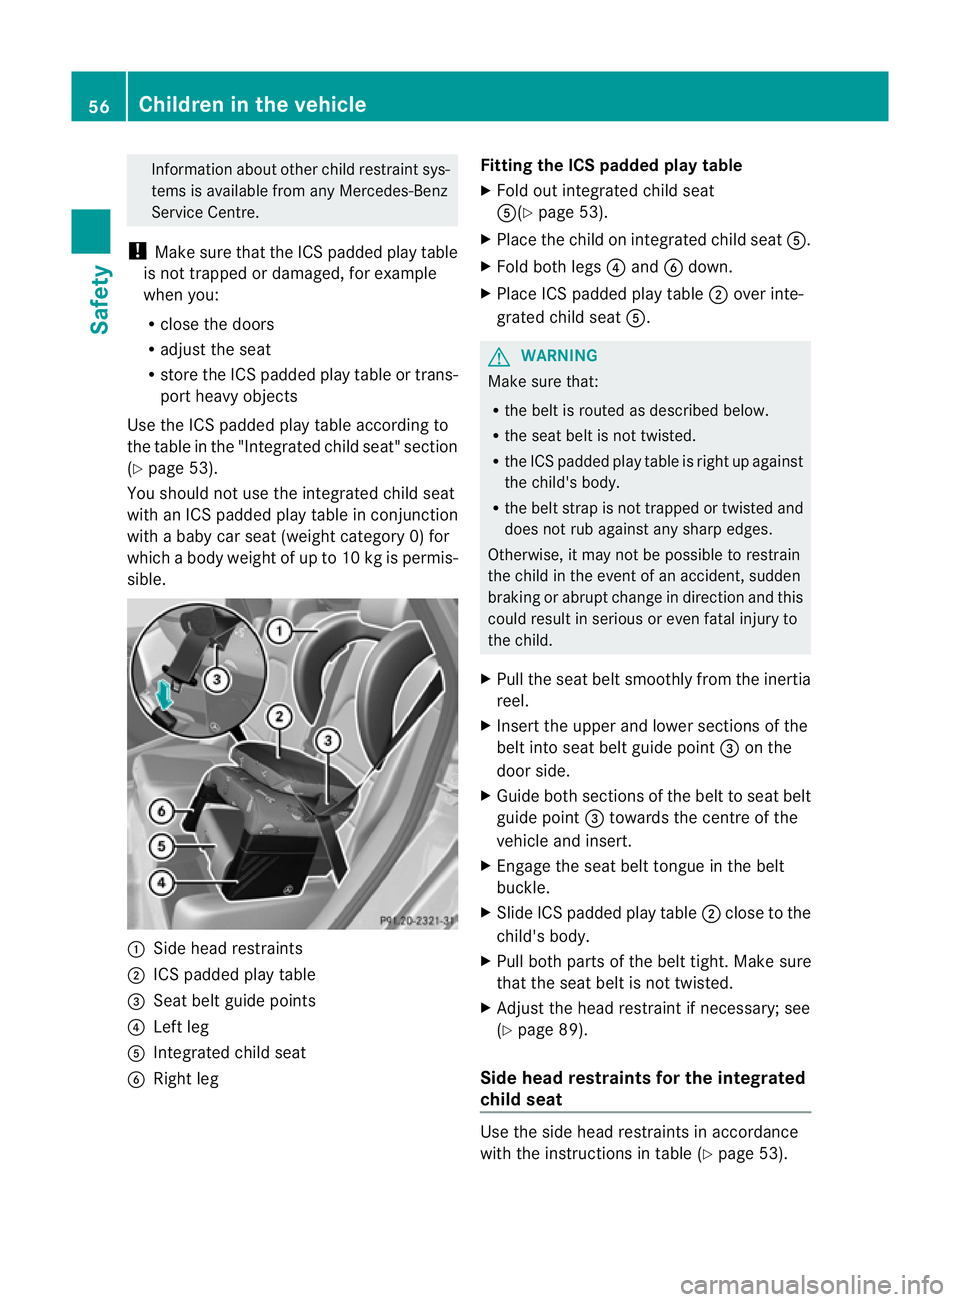
Information abouto
therchild restraint sys-
tems is available from any Mercedes-Benz
Service Centre.
! Make sure that the ICS padded play table
is not trapped or damaged, for example
when you:
R close the doors
R adjust the seat
R store the ICS padded play table or trans-
port heavy objects
Use the ICS padded play table according to
the table in the "Integrated child seat" section
(Y page 53).
You should not use the integrated child seat
with an ICS padded play table in conjunction
with a baby car seat (weight category 0) for
which a body weight of up to 10 kg is permis-
sible. :
Side head restraints
; ICS padded play table
= Seat belt guide points
? Left leg
A Integrated child seat
B Right leg Fitting the ICS padded play table
X
Fold out integrated child seat
A(Y page 53).
X Place the child on integrated child seat A.
X Fold both legs ?and Bdown.
X Place ICS padded play table ;over inte-
grated child seat A. G
WARNING
Make sure that:
R the belt is routed as described below.
R the seat belt is not twisted.
R the ICS padded play table is right up against
the child's body.
R the belt strap is not trapped or twisted and
does not rub against any sharp edges.
Otherwise, it may not be possible to restrain
the child in the event of an accident, sudden
braking or abrupt change in direction and this
could result in serious or even fatal injury to
the child.
X Pull the seat belt smoothly from the inertia
reel.
X Insert the upper and lower sections of the
belt into seat belt guide point =on the
door side.
X Guide both sections of the belt to seat belt
guide point =towards the centre of the
vehicle and insert.
X Engage the seat belt tongue in the belt
buckle.
X Slide ICS padded play table ;close to the
child's body.
X Pull both parts of the belt tight. Make sure
that the seat belt is not twisted.
X Adjust the head restraint if necessary; see
(Y page 89).
Side head restraints for the integrated
child seat Use the side head restraintsina
ccordance
with the instructions in table (Y page 53).56
Children in the vehicleSafety
Page 60 of 329

i
Should a side head restraint be required
for the second integrated child seat, this
can be ordered at any Mercedes-Benz
Service Centre. G
WARNING
If you do not secure the side head restraint at
the anchor points intended, it canno tprovide
the intended level of protection. It would then
not be possible to protect the child in the
event of an accident, sudden braking or
abrupt change in directio nand this could
result in serious or even fatal injury to the
child.
Only attach the side head restraint to the
intended anchor points on the rea rhead
restraint.
For safety reasons, Mercedes-Benz recom-
mends that you only use side head restraints
which have been approved by Mercedes-Benz
for your vehicle.
Fitting side head restraints
X Slide head restraint ;upwards and posi-
tion it upright.
X Slide side head restraints Bfrom the front
to the centre of both head restraint bars
until they engage.
Right lock verification indicator :and left
lock verification indicator =must be fol-
ded in. The red surfaces are no longer visi-
ble.
X Make sure that side head restraint Bis
engaged in both head restraint bars. X
Slide head restraint ;downwards
(Y page 89) until it rests on the upper
edge of side head restraints B.
X Guide the seat belt through seat belt guide
A on the door side on side head restraint
B.
X Secure the child (Y page 54).
i When using the integrated child seat with
the ICS padded play table, the seat belt is
not guided through the seat belt guide on
the side head restraint.
Removing the side head restraints
X Take the seat belt out of seat belt guide
A.
X Move head restraint ;upwards.
X Press left or right release button ?and pull
side head restraint Bforward to remove
it.
Right lock verification indicator :and left
lock verification indicator =fold out
briefly.
X Adjust head restraint ;(Ypage 89).
Storing the padded table and the side
head restraints G
WARNING
Secure the ICS padded play table and the side
head restraints in the vehicle as specified;
otherwise, they may come loose. In the event
of an accident, sudden braking or abrupt
change in direction, they could injure vehicle
occupants or cause damage to the vehicle.
When you are not using the ICS padded play
table and the side head restraints, store these
in a suitable place, such as the boot.
On vehicles with a TIREFIT kit, for example,
you can store the side head restraints in the
stowage compartment under the luggage
compartment floor (Y page 253). Children in the vehicle
57Safety Z
Page 69 of 329
Adaptive brake lamps
If you brake sharply from a speed of more
than 50 km/h or if braking is assisted by BAS
or BA SPLUS, the brake lamps flash rapidly.
In this way, traffic travelling behind you is
warned in an even more noticeable manner.
If you brake sharply from a speed of more
than 70 km/h to a standstill, the hazard warn-
ing lamps are activated automatically. If the
brakes are applied again, the brake lamps
lightu p continuously. The hazard warning
lamps switch off automatically if you travel
faster than 10 km/ h.You can also switch off
the hazard warning lamps using the hazard
warning switch button (Y page 99).
i Adaptive brake lamps are only available in
certain countries. ESP
®
(Electronic Stability Program)
Important safety notes G
WARNING
If the ÷ warning lamp in the instrument
cluster flashes, proceed as follows:
R do not deactivate ESP ®
under any circum-
stances.
R only depress the accelerator pedal as far as
necessary when pulling away.
R adapt your driving style to suit the prevail-
ing road and weathe rconditions.
Otherwise, the vehicle could go into a skid.
ESP ®
cannot reduce the risk of an accident if
you drive too fast. ESP ®
cannot override the
laws of physics.
! Switch the ignition off when:
R the electric parking brake is being tested
using a brake dynamometer.
R the vehicle is being towed with the front/
rear axle raised.
Application of the brakes by ESP ®
may oth-
erwise destroy the brake system. If ESP
®
detects that the vehicle is deviating
from the direction desired by the driver, one
or more wheels are braked to stabilise the
vehicle. If necessary, the engine output is also
modified to keep the vehicle on the desired
course within physical limits. ESP ®
assists
the driver when pulling away on wet or slip-
pery roads. ESP ®
can also stabilise the vehi-
cle during braking.
If ESP ®
intervenes, the ÷ESP®
warning
lamp flashes in the instrument cluster.
i Observe the "Important safety notes" sec-
tion (Y page 62).
i Only use wheels with the recommended
tyre sizes. Only then will ESP ®
function
properly.
Traction control Traction control is part of ESP
®
.
Traction control brakes the drive wheels indi-
vidually if they spin. This enables you to pull
away and accelerate on slippery surfaces, for
example if the road surface is slippery on one
side.
Traction control remains active if you deacti-
vate ESP ®
.
i Observe the "Important safety notes" sec-
tion (Y page 62).
Deactivating/activating ESP ® G
WARNING
ESP ®
is deactivated if the åwarning lamp
in the instrument cluster lights up continu-
ously when the engine is running.
If the ÷ warning lamp and åwarning
lamp are lit continuously, ESP ®
is not availa-
ble due to a malfunction.
There is an increased risk of your vehicle skid-
ding in certain situations.
You should always adapt your driving style to
suit the prevailing road and weather condi-
tions. 66
Driving safety systemsSafety
Page 72 of 329
Tow-away protection
An audible and visual alar mis triggered if your
vehicle's angle of inclination is altered while
tow-away protection is primed. This occurs if
the vehicle is jacked up on one side, for exam-
ple.
To activate:
X Lock the vehicle with the key.
Tow-away protection is primed after
approximately 30 seconds.
To deactivate:
X Unlock the vehicle with the key.
Tow-away protection is switched off auto-
matically. Deactivating:
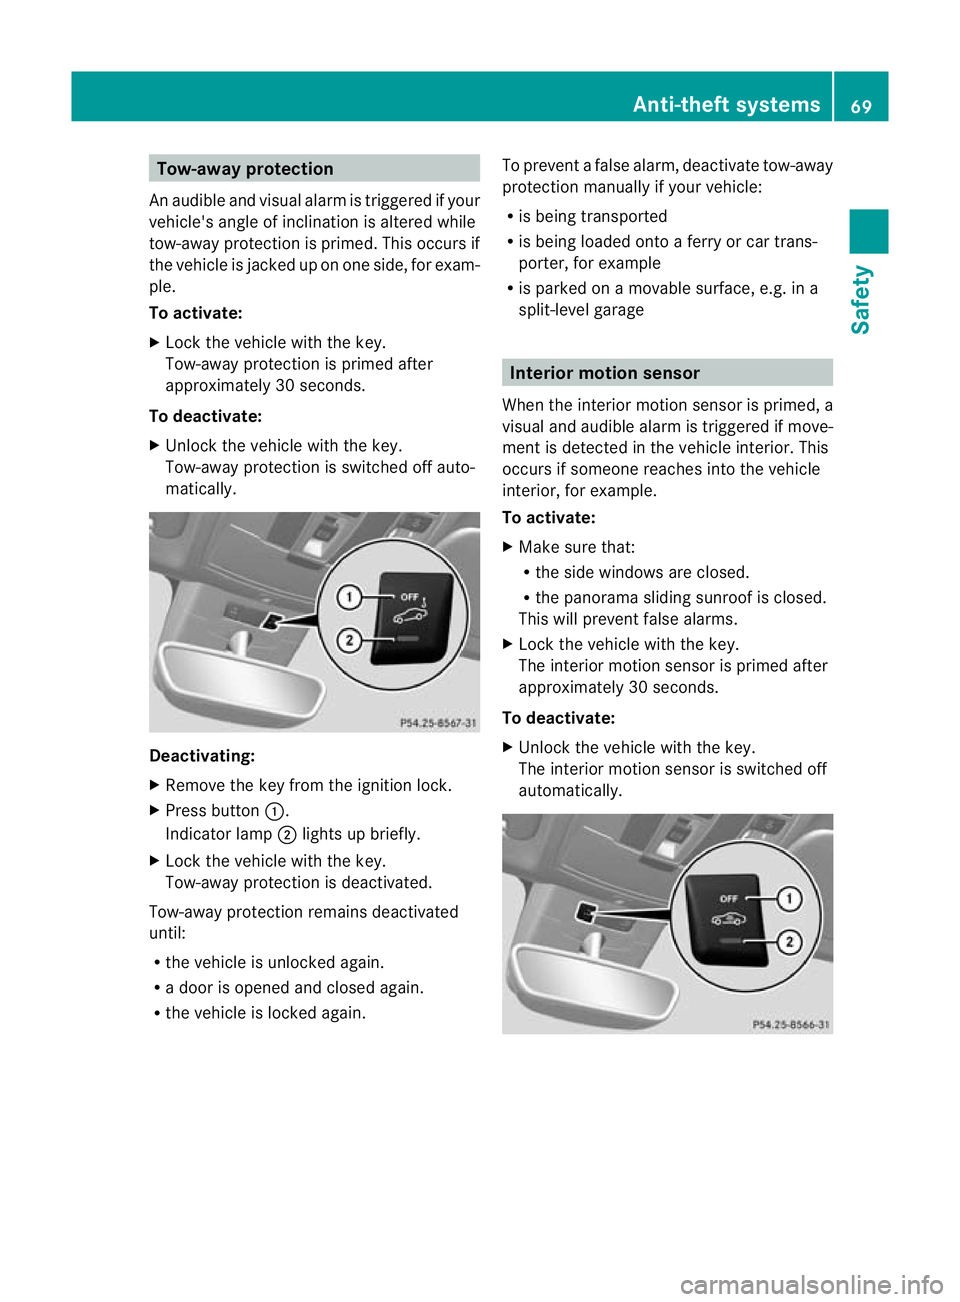
X
Remove the key from the ignition lock.
X Press button :.
Indicator lamp ;lights up briefly.
X Lock the vehicle with the key.
Tow-away protection is deactivated.
Tow-away protection remains deactivated
until:
R the vehicle is unlocked again.
R a door is opened and closed again.
R the vehicle is locked again. To prevent a false alarm, deactivate tow-away
protection manually if your vehicle:
R
is being transported
R is being loaded onto a ferry or car trans-
porter, for example
R is parked on a movable surface, e.g. in a
split-level garage Interior motion sensor
When the interior motion sensor is primed, a
visual and audible alarm is triggered if move-
ment is detected in the vehicle interior. This
occurs if someone reaches into the vehicle
interior, for example.
To activate:
X Make sure that:
R
the side windows are closed.
R the panorama sliding sunroof is closed.
This will prevent false alarms.
X Lock the vehicle with the key.
The interior motion sensor is primed after
approximately 30 seconds.
To deactivate:
X Unlock the vehicle with the key.
The interior motion sensor is switched off
automatically. Anti-theft systems
69Safety Z
Page 80 of 329
Centrally locking and unlocking the
vehicle from the inside
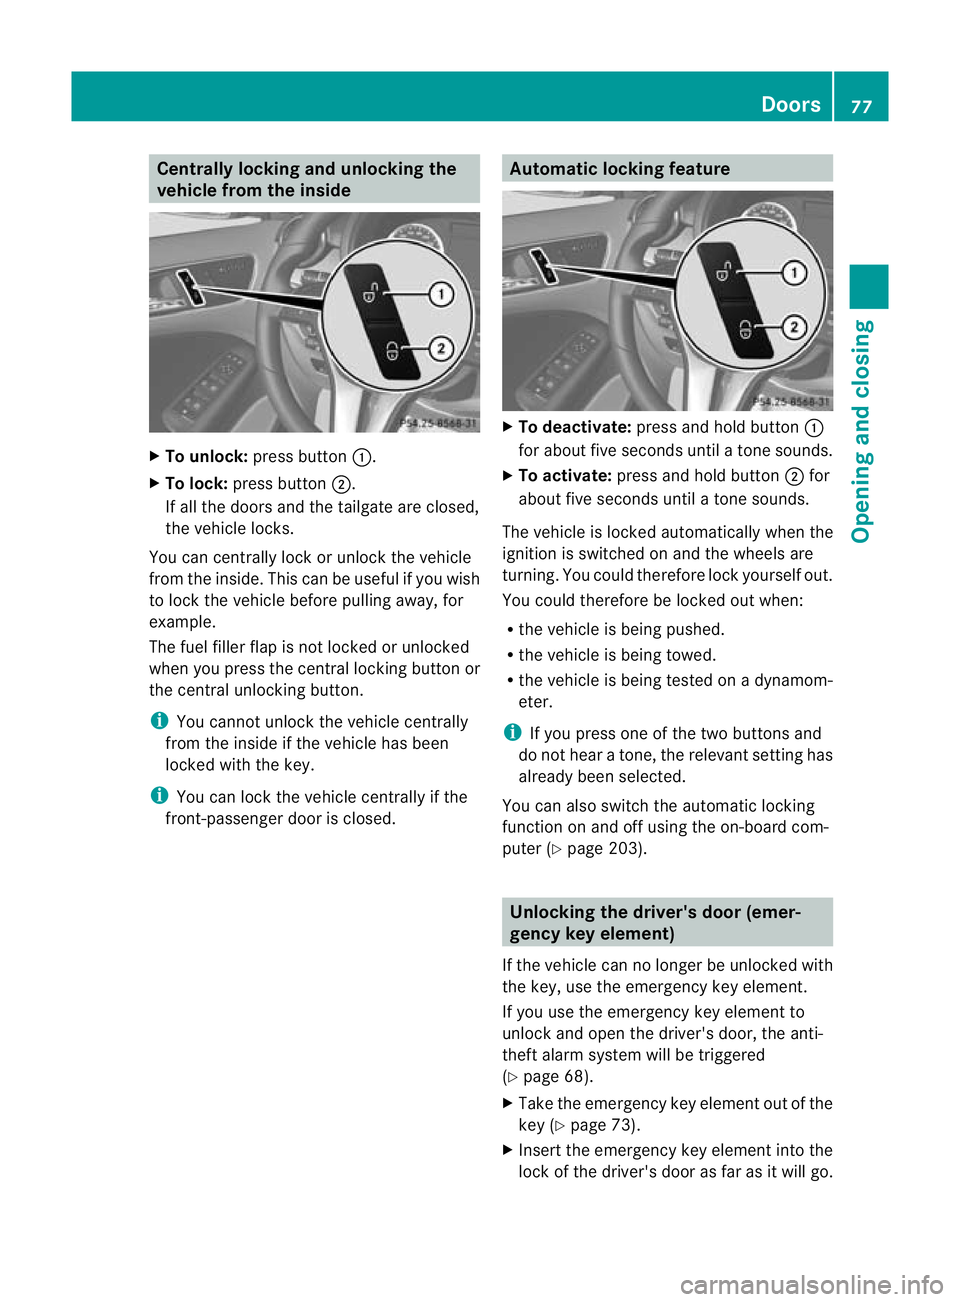
X
To unlock: press button :.
X To lock: press button ;.
If all the doors and th etailgate are closed,
the vehicle locks.
You can centrally lock or unlock the vehicle
from the inside. This can be useful if you wish
to loc kthe vehicle before pulling away, for
example.
The fuel filler flap is not locked or unlocked
when you press the central locking button or
the central unlocking button.
i You cannot unlock the vehicle centrally
from the inside if the vehicle has been
locked with the key.
i You can lock the vehicle centrally if the
front-passenger door is closed. Automatic locking feature
X
To deactivate: press and hold button :
for about five seconds until a tone sounds.
X To activate: press and hold button ;for
about five seconds until a tone sounds.
The vehicle is locked automatically when the
ignition is switched on and the wheels are
turning. You could therefore lock yourself out.
You could therefore be locked out when:
R the vehicle is being pushed.
R the vehicle is being towed.
R the vehicle is being tested on a dynamom-
eter.
i If you press one of the two buttons and
do not hear a tone, the relevant setting has
already been selected.
You can also switch the automatic locking
function on and off using the on-board com-
puter (Y page 203). Unlocking the driver's door (emer-
gency key element)
If the vehicle can no longer be unlocked with
the key, use the emergency key element.
If you use the emergency key element to
unlock and open the driver's door, the anti-
theft alarm system will be triggered
(Y page 68).
X Take the emergency key element out of the
key (Y page 73).
X Insert the emergency key element into the
lock of the driver's door as far as it will go. Doors
77Opening and closing Z
Page 101 of 329
Rear foglamp
X To switch on the rear foglamp: turn the
key in the ignition lock to position 2or start
the engine.
X Turn the light switch to LorÃ.
X Press the Rbutton.
The yellow Rindicator lamp in the
instrument cluster lights up.
X To switch off the rear foglamp: press the
R button.
The yellow Rindicator lamp in the
instrument cluster goes out.
Vehicles with front foglamps: when the light
switch is in the Tposition, the rea rfog-
lamp can only be switched on if the foglamps
(without dipped-beam headlamps) are
switched on.
Adjusting the headlam prange (halogen
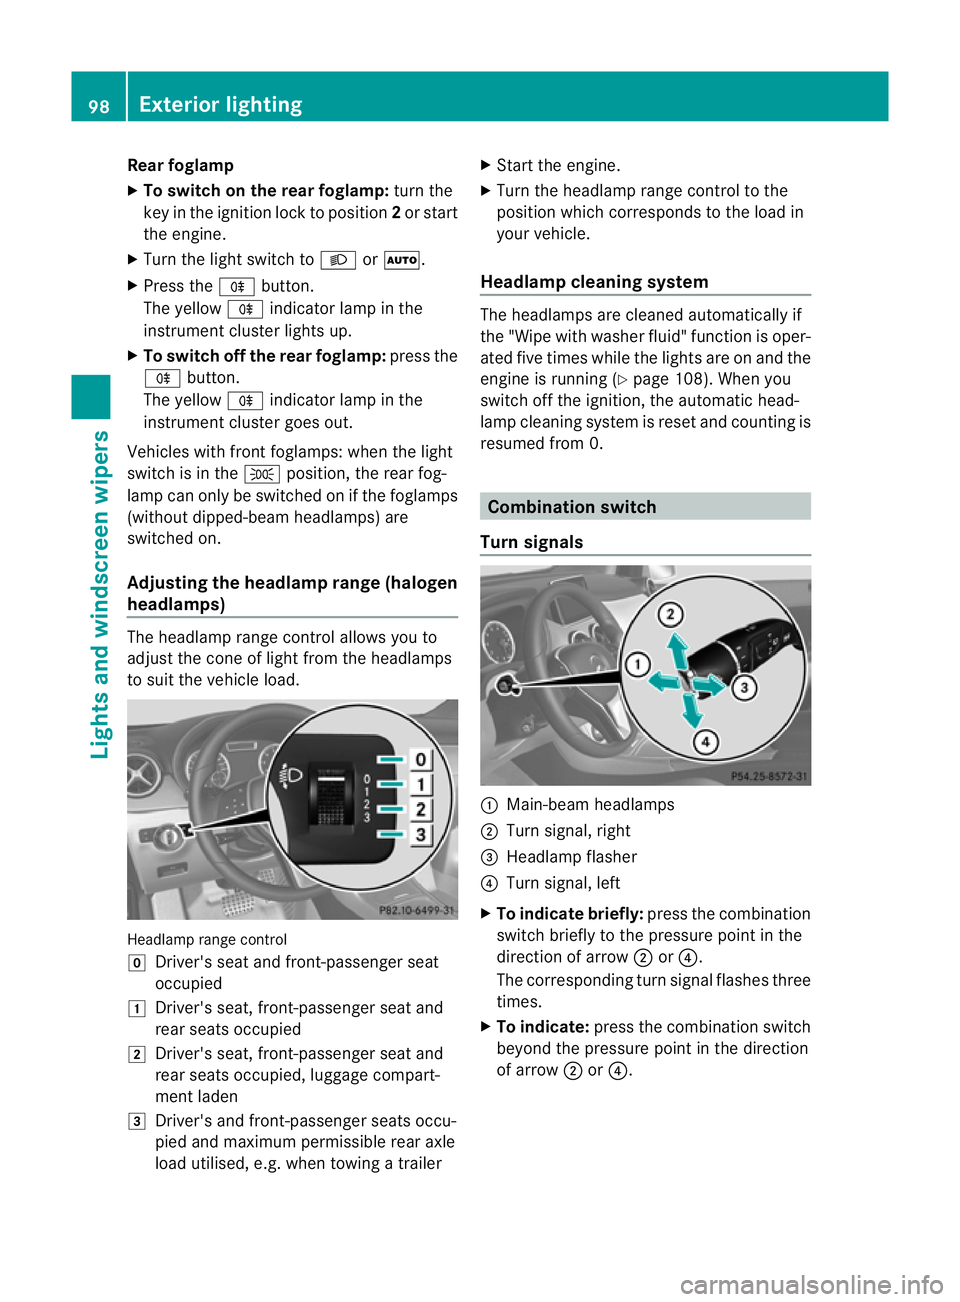
headlamps) The headlamp range control allows you to
adjust the cone of light from the headlamps
to sui tthe vehicle load. Headlamp range control
g
Driver's seat and front-passenger seat
occupied
1 Driver's seat, front-passenger seat and
rear seats occupied
2 Driver's seat, front-passenger seat and
rear seats occupied, luggage compart-
ment laden
3 Driver's and front-passenger seats occu-
pied and maximum permissible rear axle
load utilised, e.g. when towing a trailer X
Start the engine.
X Turn the headlamp range control to the
position which corresponds to the load in
your vehicle.
Headlampc leaning system The headlamps are cleaned automatically if
the "Wipe with washer fluid" function is oper-
ated five times while the lights are on and the
engine is running (Y
page 108). When you
switch off the ignition, the automatic head-
lamp cleaning syste mis reset and counting is
resumed from 0. Combination switch
Turn signals :
Main-beam headlamps
; Turn signal, right
= Headlamp flasher
? Turn signal, left
X To indicate briefly: press the combination
switch briefly to the pressure point in the
direction of arrow ;or?.
The corresponding turn signal flashes three
times.
X To indicate: press the combination switch
beyond the pressure point in the direction
of arrow ;or?. 98
Exterior lightingLights and windscreen wipers