weight MERCEDES-BENZ B-CLASS HATCHBACK 2011 User Guide
[x] Cancel search | Manufacturer: MERCEDES-BENZ, Model Year: 2011, Model line: B-CLASS HATCHBACK, Model: MERCEDES-BENZ B-CLASS HATCHBACK 2011Pages: 329, PDF Size: 7.91 MB
Page 75 of 329
Useful information
i This Owner's Manual describes all models
and all standard and optional equipment
available to your vehicle at the time of pub-
lication of the Owner's Manual. Country-
specific deviations are possible. Please
note that your vehicle may not be equipped
with all features described. This also
applies to safety-relevan tsystems and
functions.
i Please read the information on qualified
specialist workshops (Y page 22).Key
Important safety notes
G
WARNING
If children are lef tunsupervised in the vehicle,
they could:
R open a door from inside the vehicle at any
time, eve nifithas been locked
R start the vehicle using akey which has been
left in the vehicle
R release the parking brake
They could thereby endanger themselves and
others. Never leave children unsupervised in
the vehicle. Always take the key with you
when leaving the vehicle, even if you are only
leaving it for a short time. G
WARNING
Do not attach any heavy or large key rings to
the key that is inserted in the ignition .Ifakey
ring is too heavy or too large, the weight acting
on the key could cause it to tur ninthe ignition
lock or catch on the steering wheel. This could
cause the engine to be switched off suddenly.
You could lose control of the vehicle and
cause an accident.
Do not use the key in the vicinity of strong
magnetic fields. Otherwise, the remote con-
trol function could be affected. Do not keep the key together with:
R
electronic devices, e.g. a mobile phone or
another key
R metallic objects, e.g. coins or metal foil Key functions
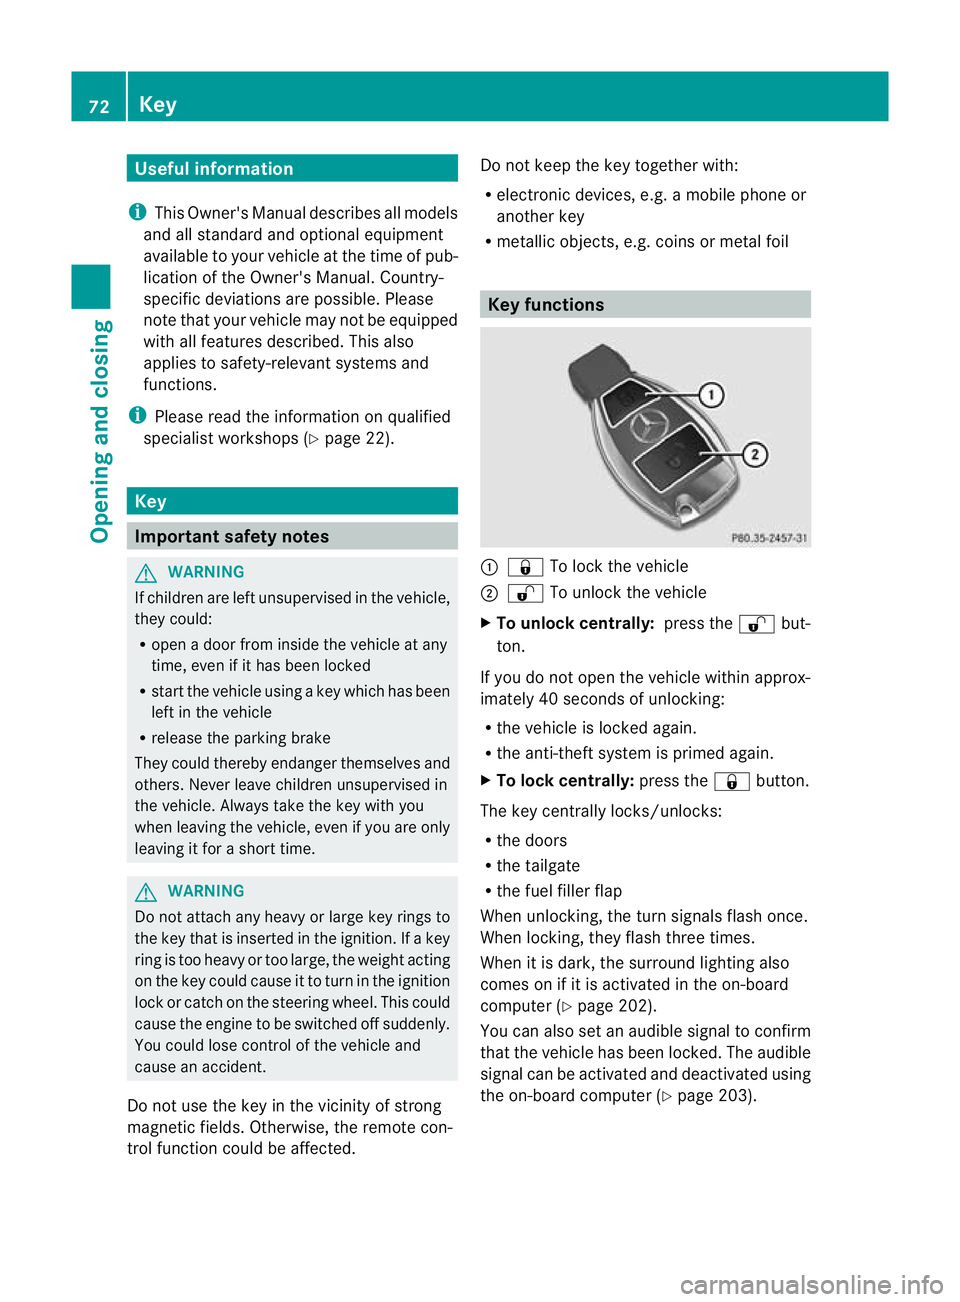
:
& To lock the vehicle
; % To unlock the vehicle
X To unlock centrally: press the%but-
ton.
If you do not open the vehicle within approx-
imately 40 seconds of unlocking:
R the vehicle is locked again.
R the anti-theft system is primed again.
X To lock centrally: press the&button.
The key centrally locks/unlocks:
R the doors
R the tailgate
R the fuel filler flap
When unlocking, the turn signals flash once.
When locking, they flash three times.
When it is dark, the surround lighting also
comes on if it is activated in the on-board
computer (Y page 202).
You can also set an audible signal to confirm
that the vehicle has been locked. The audible
signal can be activated and deactivated using
the on-board computer (Y page 203).72
KeyOpening and closing
Page 184 of 329
When
Standard is selected, no warning vibra-
tion occurs if:
R you have switched on the turn signals. In
this event, the warnings are suppressed for
a certain period of time.
R a driving safety system intervenes, such as
ABS, BAS or ESP ®
.
When Adaptive is selected, no warning vibra-
tion occurs if:
R you have switched on the turn signals. In
this case, the warnings are suppressed for
a certain period of time.
R a driving safety system intervenes, such as
ABS, BAS or ESP ®
.
R you accelerate hard, e.g. kickdown.
R you brake hard.
R you steer actively, e.g. swerve to avoid an
obstacle or change lane quickly.
R you cut the corner on a sharp bend.
In order that you are warned only when nec-
essary and in good time if you cross the lane
marking, the system recognises certain con-
ditions and warns you accordingly.
The warning vibration occurs earlier if:
R you approach the outer lane marking on a
bend.
R the road has very wide lanes, e.g. a motor-
way.
R the system recognises solid lane markings.
The warning vibration occurs later if:
R the road has narrow lanes.
R you cut the corner on a bend. Towing
atrailer Notes on towing
atrailer
Important safety notes G
WARNING
When reversing the vehicle towards the
trailer, make sure there is nobody between
the trailer and the vehicle. Couple and uncouple the trailer carefully
.If
you do no tcouple the trailer to the towing
vehicle correctly, the trailer could become
detached.
Make sure that the following values are not
exceeded:
R the permissible trailer drawbar noseweight
R the permissible trailer load
R the permissible rear axle load of the towing
vehicle
R the maximum permissible gross vehicle
weight of both the towing vehicle and the
trailer
You will find the applicable permissible val-
ues, which must not be exceeded, in the vehi-
cle documents.
You will find the values approved by the man-
ufacturer on the vehicle identification plates
and those for the towing vehicle in the "Tech-
nical data" section. G
WARNING
If the Check trailer hitch locking mechanism message appears in the multi-
function display while the vehicle is in motion,
pull over immediately and check whether the
ball coupling is correctly engaged. G
WARNING
When towing a trailer, your vehicle's handling
characteristics will be different in comparison
to when driving without a trailer.
The vehicle/trailer combination:
R is heavier
R is restricted in its acceleration and gradi-
ent-climbing capability
R has an increased braking distance
R is affected more by strong crosswinds
R demands more sensitive steering
R has a larger turning circle
As a result, the handling characteristics may
be impaired and you may lose control of the
vehicle. This could lead to an accident with
serious or even fatal injuries. Towing
atrailer
181Driving an d parking
Z
Page 185 of 329
When towing a trailer, always adjust your
speed to the curren
troad and weather con-
ditions. Do not exceed the maximum permis-
sible speed for your vehicle/trailer combina-
tion. G
WARNING
Never depress the brake pedal continuously
while the vehicle is in motion, e.g. never cause
the brakes to rub by applying constant slight
pedal pressure. This causes the brake system
to overheat, increases the braking distance
and can lead to the brakes failing completely. G
WARNING
On no account should you attempt to draw the
vehicle/trailer combination out by increasing
speed. G
WARNING
If you exceed the maximum noseweight when
using a carrier system on the ball coupling:
R the carrier system may be thrown around.
R the ball coupling and the carrier system
may become detached from the vehicle.
As a result, you may injure others or cause an
accident.
Do not exceed the maximum noseweight.
When driving with a loaded carrier system,
always adjust your driving style to the prevail-
ing road, traffic and weather conditions and
drive particularly carefully.
You can use carrier systems, e.g. bicycle
racks or load-bearing implements, on the ball
coupling. The maximum noseweight of 75kg
applies when using carrier systems on the ball
coupling.
General notes !
Use a drawbar noseweight as close as
possible to the maximum permissible nose-
weight. Do not use a noseweight of less
than 50kg, otherwise the trailer may come
loose. Note that the payload and the rear axle load
are reduced by the actual payload.
X When towing a trailer, set the tyre pressure
on the rear axle of the towing vehicle for a
maximum load; see the tyre pressure table
in the fuel filler flap (Y page 295).
You will find installation dimensions and loads
in the "Technical data" section
(Y page 318).
The maximum noseweight of the trailer draw-
bar on the ball coupling is 75 kg. The actual
noseweight may however not be higher than
the value which is given on the trailer tow
hitch or trailer identification plates. The low-
est weight applies.
Please note that when towing a trailer, PARK-
TRONIC (Y page 163) and Blind Spot Assist
(Y page 177) are only available with limita-
tions, or not at all.
i The height of the ball coupling changes
with the load of the vehicle. If necessary,
use a trailer with a height-adjustable draw-
bar.
Driving tips i
Observe the notes on ESP ®
trailer stabi-
lisation (Y page 67).
The maximum permissible speed for vehicle/
trailer combinations depends on the type of
trailer. Before beginning the journey, check
the trailer's documents to see what the max-
imum permitted speed is. Observe the legally
prescribed maximum speed in the relevant
country.
For certain Mercedes-Benz vehicles, the max-
imum permissible rear axle load is increased
when towing a trailer. Refer to the "Technical
data" section to find out whether this applies
to your vehicle. If you utilise any of the added
maximum rear axle load when towing a trailer,
the vehicle/trailer combination may not
exceed a maximum speed of 100 km/h for
reasons concerning the operating permit.
This also applies in countries in which the 182
Towing
atrailerDriving an d parking
Page 247 of 329
Useful information
i This Owner's Manual describes all models
and all standard and optional equipment
available to your vehicle at the time of pub-
lication of the Owner's Manual. Country-
specific deviations are possible. Please
note that your vehicle may not be equipped
with all features described. This also
applies to safety-relevan tsystems and
functions.
i Please read the information on qualified
specialist workshops (Y page 22).Loading guidelines
G
WARNING
Secure and position the load as described in
the loading guidelines.
Otherwise, vehicle occupants could
be injured by the load being throw naround in
the event of sharp braking, a sudden change
in direction or an accident.
You will find further informatio ninthe "Secur-
ing a load" section.
Even if you follow all the loading guidelines,
the load will increase the risk of injury in the
event of an accident. G
WARNING
Keep the tailgate closed when the engine is
running. Otherwise, you could be poisoned by
exhaust fumes entering the vehicle.
The handling characteristics of a laden vehi-
cle are dependent on the distribution of the
load within the vehicle. For this reason, you
should observe the following notes when
transporting a load:
R when transporting a load, never exceed the
maximum permissible gross vehicle weight or the permissible axle loads for the vehicle
(including occupants).
R position heavy loads as far forwards as pos-
sible and as low down in the load compart-
ment as possible.
R the load must not protrude above the upper
edge of the seat backrests.
R always place the load against the rear or
front seat backrests. Make sure that the
seat backrests are securely locked into
place.
R hook in the safety net when loading.
R the maximum load capacity of the stowage
well under the luggage compartmentf loor
is 25 kg.
R always place the load behind unoccupied
seats if possible.
R secure the load with sufficiently strong and
wear-resistan tlashing material. Pad sharp
edges for protection.
i Lashing material is available at any quali-
fied specialist workshop.
! Do no tposition the load on one part of the
folding luggage compartment floor only.
The maximum load capacity of the folding
luggage compartment floor is 100 kg.
Spread the weight evenly to avoid damag-
ing the luggage compartment floor. Place a
solid board under the load if necessary.
Please note that the load on the luggage
compartment floor will be increased when
the load is lashed down. Stowage areas
Stowage compartments
Important safety notes G
WARNING
The stowage compartments must be closed
when items are stored in them. Luggage nets
are not designed to secure heavy items of
luggage. 244
Stowage areasStowing and features
Page 250 of 329
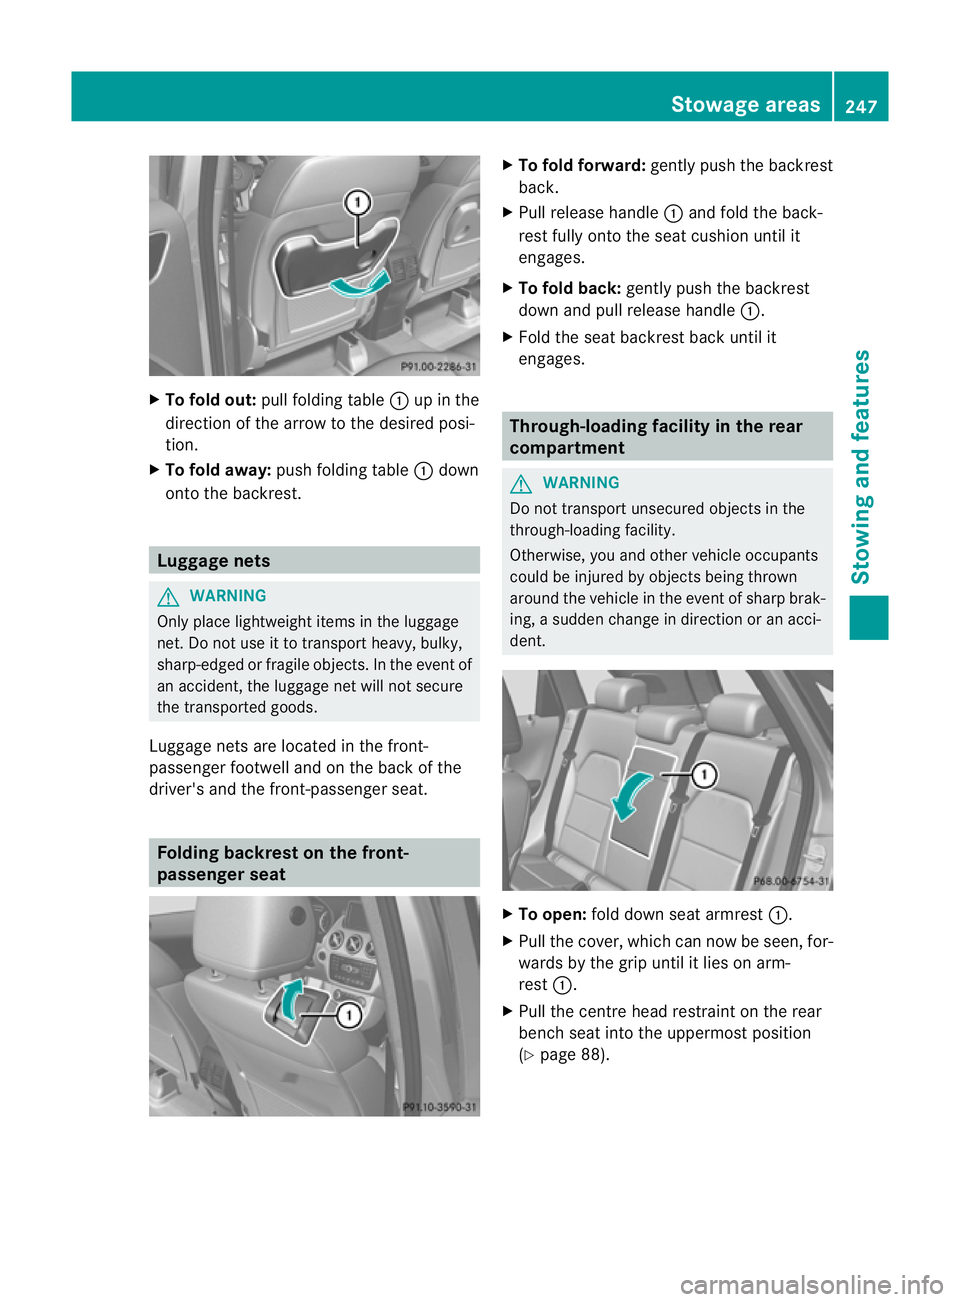
X
To fold out: pull folding table :up in the
direction of the arrow to the desired posi-
tion.
X To fold away: push folding table :down
onto the backrest. Luggage nets
G
WARNING
Only place lightweight items in the luggage
net. Do not use it to transport heavy, bulky,
sharp-edged or fragile objects. In the event of
an accident, the luggage net will not secure
the transported goods.
Luggage nets are located in the front-
passenge rfootwell and on the back of the
driver's and the front-passenger seat. Folding backrest on the front-
passenger seat X
To fold forward: gently push the backrest
back.
X Pull release handle :and fold the back-
rest fully onto the seat cushion until it
engages.
X To fold back: gently push the backrest
down and pull release handle :.
X Fold the seat backrest back until it
engages. Through-loading facility in the rear
compartment
G
WARNING
Do not transport unsecured objects in the
through-loading facility.
Otherwise, you and other vehicle occupants
could be injured by object sbeing thrown
around the vehicle in the event of sharp brak-
ing, a sudden change in direction or an acci-
dent. X
To open: fold down seat armrest :.
X Pull the cover, which can now be seen, for-
wards by the grip until it lies on arm-
rest :.
X Pull the centre head restraint on the rear
bench seat into the uppermost position
(Y page 88). Stowage areas
247Stowing and features Z
Page 259 of 329
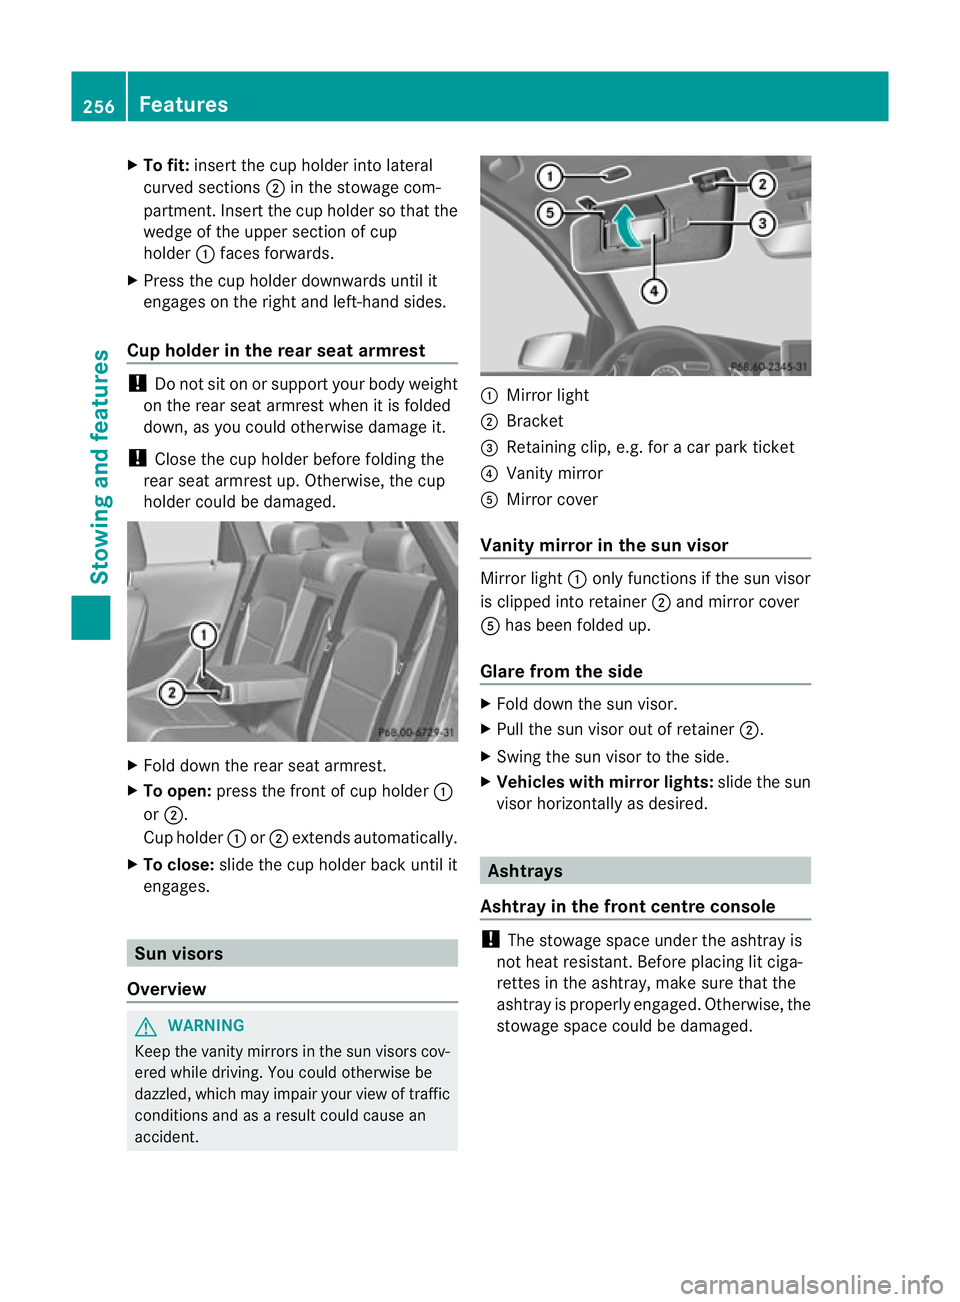
X
To fit: insert the cup holde rinto lateral
curved sections ;in the stowage com-
partment. Insert the cup holde rso that the
wedge of the upper section of cup
holder :faces forwards.
X Press the cup holder downwards until it
engages on the right and left-hand sides.
Cup holder in the rear seat armrest !
Do not sit on or support your body weight
on the rear seat armrest when it is folded
down, as you could otherwise damage it.
! Close the cup holder before folding the
rear seat armrest up. Otherwise, the cup
holder could be damaged. X
Fold down the rear seat armrest.
X To open: press the front of cup holder :
or ;.
Cup holder :or; extends automatically.
X To close: slide the cup holder back until it
engages. Sun visors
Overview G
WARNING
Keep the vanity mirrors in the sun visors cov-
ered while driving. You could otherwise be
dazzled, which may impair your view of traffic
conditions and as a result could cause an
accident. :
Mirror light
; Bracket
= Retaining clip, e.g. for a car park ticket
? Vanity mirror
A Mirror cover
Vanity mirror in the sun visor Mirror light
:only functions if the sun visor
is clipped into retainer ;and mirror cover
A has been folded up.
Glare from the side X
Fold down the sun visor.
X Pull the sun visor out of retainer ;.
X Swing the sun visor to the side.
X Vehicles with mirror lights: slide the sun
visor horizontally as desired. Ashtrays
Ashtra yin the front centre console !
The stowage space under the ashtray is
not heat resistant. Before placing lit ciga-
rettes in the ashtray, make sure that the
ashtray is properly engaged. Otherwise, the
stowage space could be damaged. 256
FeaturesStowing and features
Page 288 of 329
engine is not running. You will need more
force to steer and brake, you may have to
depress the brake pedal with maximum force.
Before towing away, make sure that the steer-
ing can be moved and is not locked.
If you tow or tow-start another vehicle, its
weight must not exceed the maximum per-
missible gross vehicle weight of your vehicle. G
WARNING
The vehicle is braked when the HOLD function
or DISTRONIC PLUS is activated. Therefore,
deactivat eHOLD and DISTRONIC PLUS if the
vehicle is to be towed.
! You may tow the vehicle for a maximum
of 50km. A towing speed of 50 km/h must
not be exceeded.
For towing distances over 50 km, the front
axle or the entire vehicle must be raised
and transported.
! Only secure the tow rope or towing bar to
the towing eyes. The vehicle may otherwise
be damaged.
! Do not use the towing eye for recovery,
as this could damage the vehicle. If in
doubt, recover the vehicle with a crane.
! Pull away smoothly when towing away or
tow-starting a vehicle. If the tractive power
is too high, the vehicles could be damaged.
! Vehicles with automatic transmission
must not be tow-started. The transmission
may otherwise be damaged.
Observe the legal requirements for the rele-
vant countries when towing and tow-starting.
It is better to have the vehicle transported
than to have it towed.
Vehicles with automatic transmission:
when towing a vehicle, the transmission must
be in position N. The battery must be connected and charged.
Otherwise, you:
R
cannot turn the key in the ignition lock to
position 2
R vehicles with automatic transmission:
cannot shift the transmission to position N
i Deactivate the automatic locking feature
(Y page 203). You could otherwise be
locked out when pushing or towing the
vehicle.
Deactivate tow-away protection
(Y page 69) before the vehicle is towed. Fitting/removing the towing eye
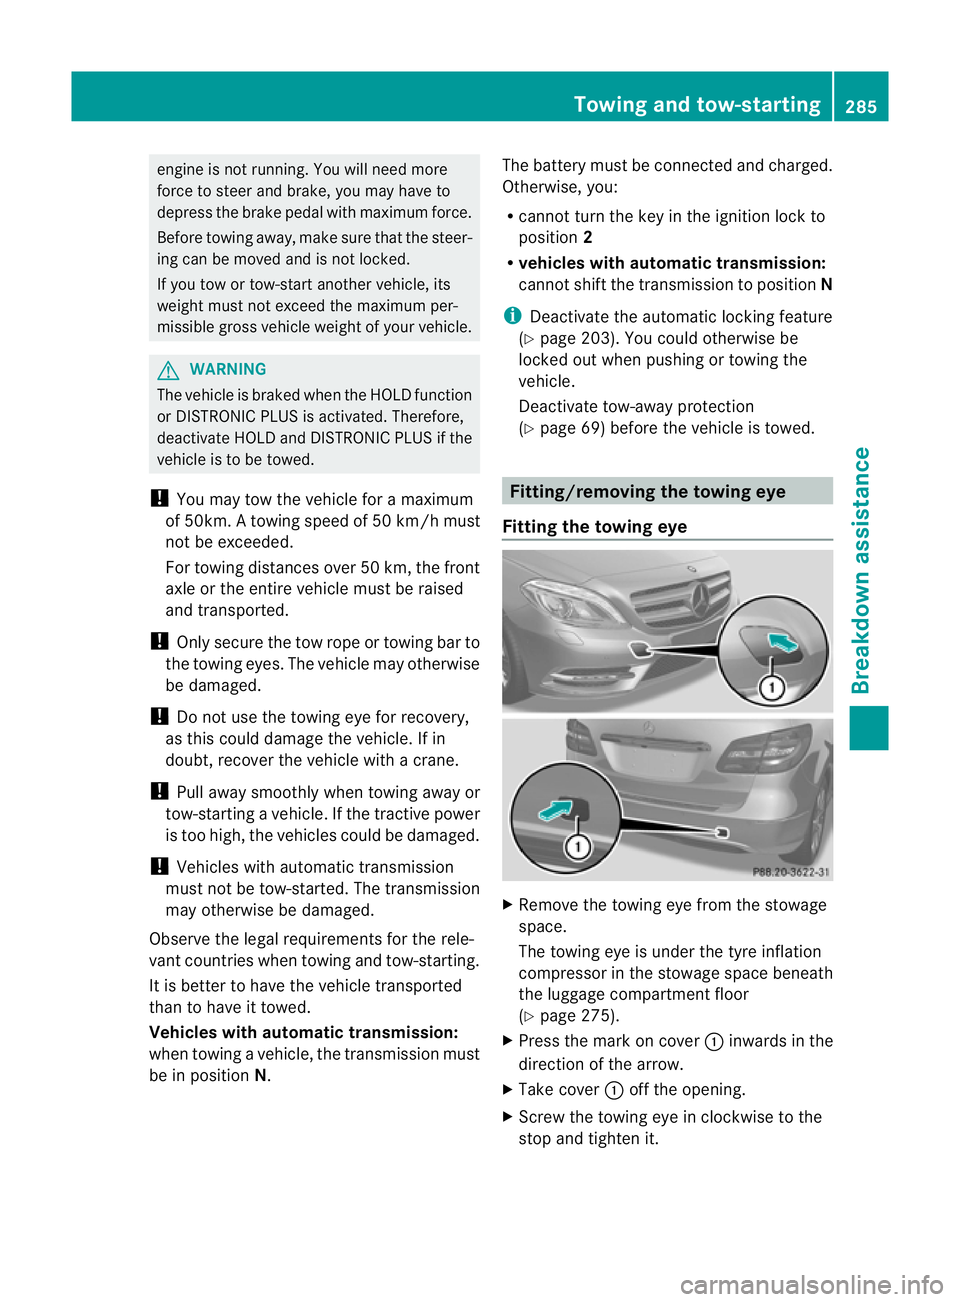
Fitting the towing eye X
Remove the towing eye from the stowage
space.
The towing eye is under the tyre inflation
compressor in the stowage space beneath
the luggage compartment floor
(Y page 275).
X Press the mark on cover :inwards in the
direction of the arrow.
X Take cover :off the opening.
X Screw the towing eye in clockwise to the
stop and tighten it. Towing and tow-starting
285Breakdown assistance Z
Page 313 of 329
Use the Technical Specification
ISO/TS 21609
20
when retrofitting RF (radio
frequency) transmitters. Legal provisions for
fittings must be observed.
If your vehicle has fittings for two-way radio
equipment, use the power supply or aerial
connections intended for use with the basic
wiring. Be sure to observe the manufacturer's
additional instructions when installing.
Deviations with respect to wavebands, maxi-
mum transmission outputs or aerial positions
must be approved by Mercedes-Benz.
The maximum transmission output (PEAK) at
the base of the aerial must not exceed the
following values: Waveband Maximum
transmission
output
Short wave (f < 54 MHz) 100 W
4 m waveband 30 W
2 m waveband 50 W
Trunked radio/Tetra 35 W
70 cm waveband 35 W
GSM/DCS/PCS
850/900/1800/1900 10 W
UMTS/LTE 10 W
The following can be used in the vehicle with-
out restrictions:
R
RF transmitters with amaximum transmis-
sion output of up to 100 mW
R mobile phones (GSM/DCS/PCS/UMTS/
LTE)
There is no restriction for aerial positions in
the outer area of the vehicle for the following
wavebands:
R trunked radio/Tetra
R 70 cm waveband R
GSM/DCS/PCS
R UMTS/LTE Vehicle identification plates
Vehicle identification plate with vehi-
cle identification number (VIN) and
paint code number
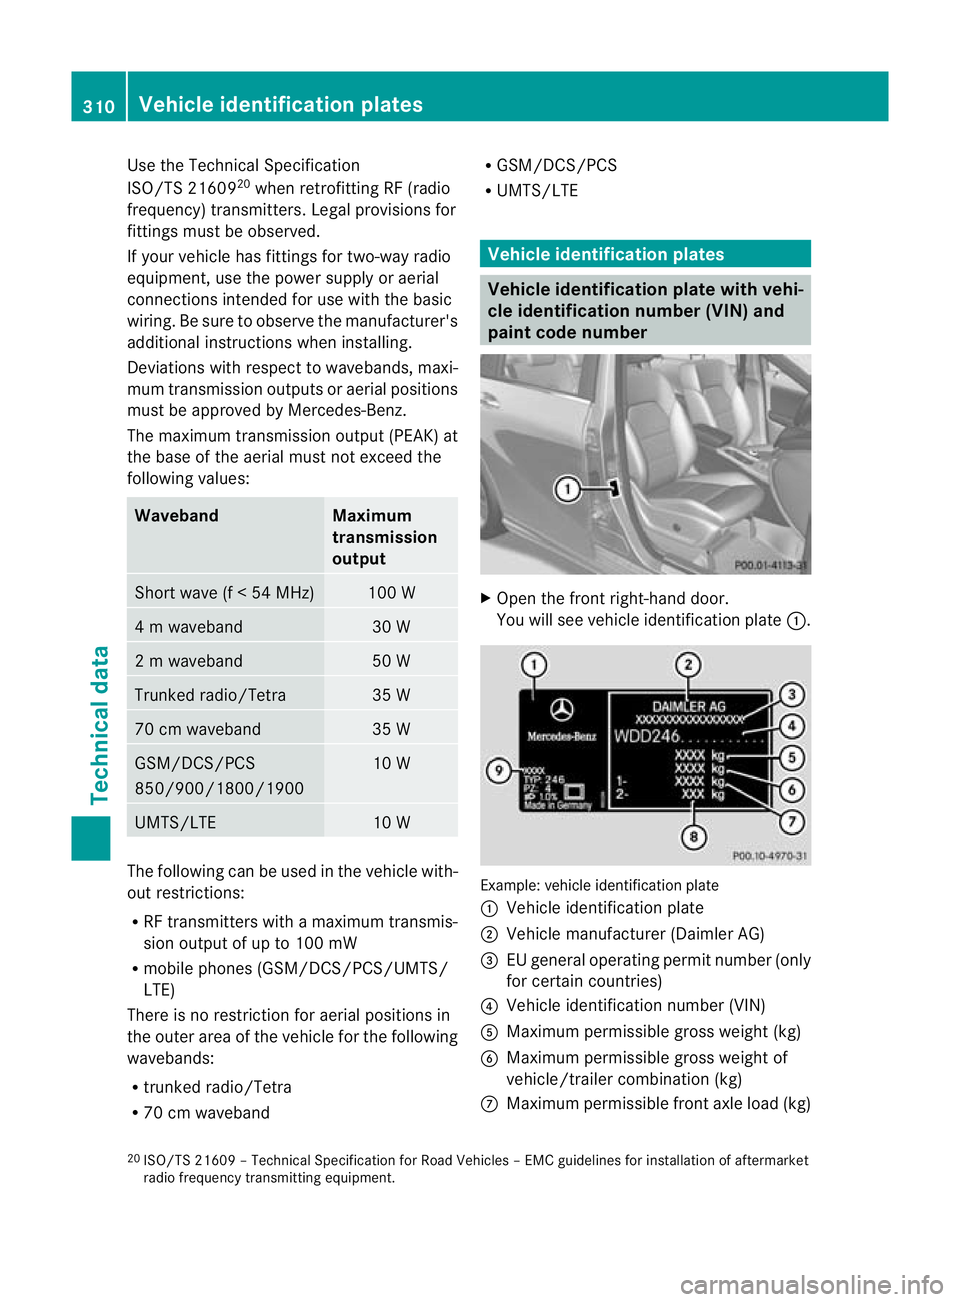
X
Open the fron tright-hand door.
You will see vehicle identification plate :. Example: vehicle identification plate
:
Vehicle identification plate
; Vehicle manufacturer (Daimler AG)
= EU general operating permit number (only
for certain countries)
? Vehicle identification number (VIN)
A Maximum permissible gross weight (kg)
B Maximum permissible gross weight of
vehicle/trailer combination (kg)
C Maximum permissible front axle load (kg)
20 ISO/TS 21609 – Technical Specification for Road Vehicles – EMC guidelines for installation of aftermarket
radio frequency transmitting equipment. 310
Vehicle identification platesTechnical data
Page 320 of 329
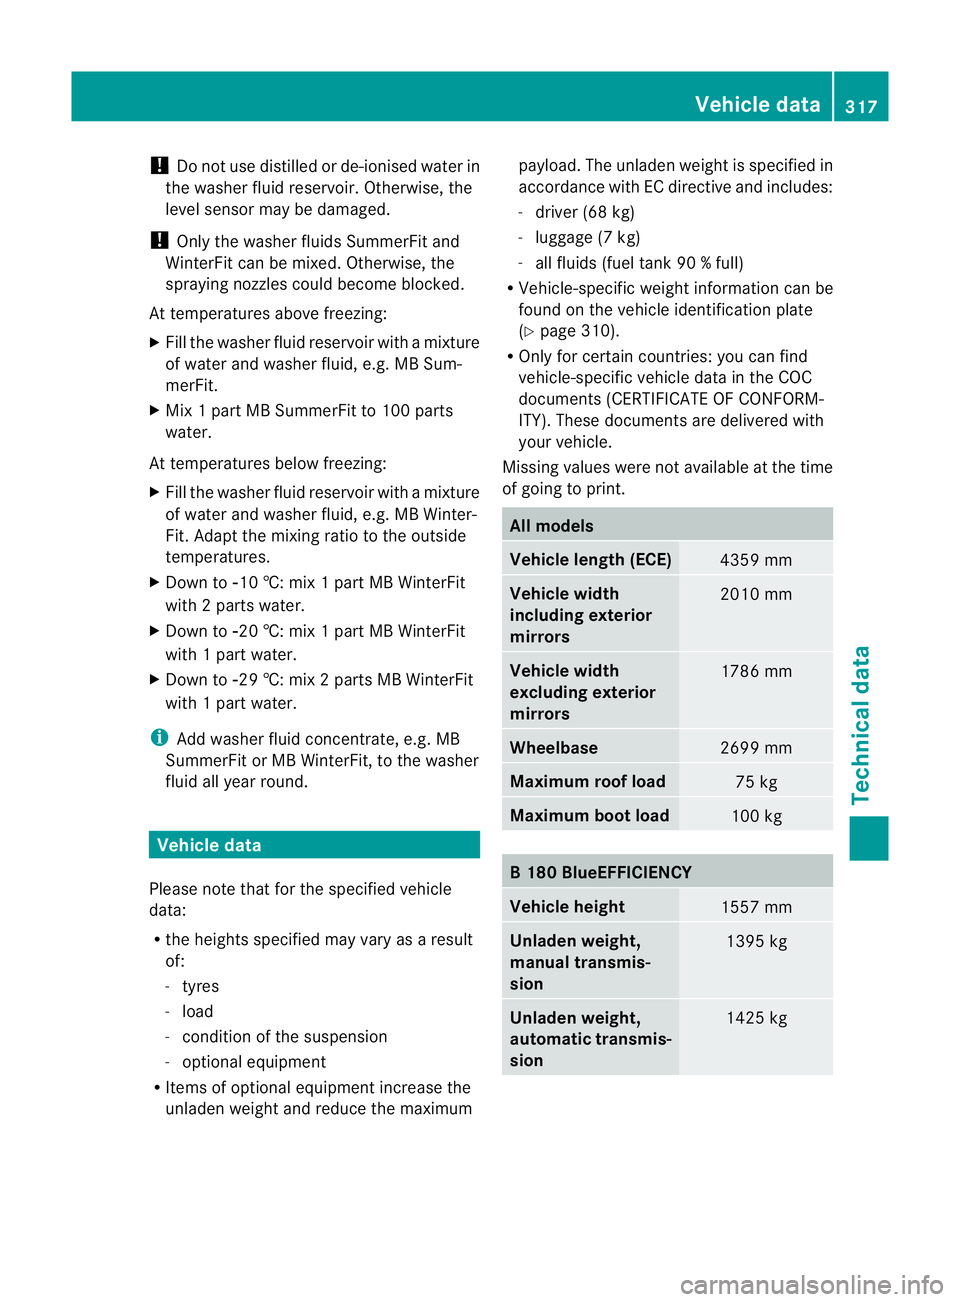
!
Do not use distilled or de-ionised water in
the washer fluid reservoir. Otherwise, the
level sensor may be damaged.
! Only the washer fluids SummerFit and
WinterFit can be mixed. Otherwise, the
spraying nozzles could become blocked.
At temperatures above freezing:
X Fill the washer fluid reservoir with a mixture
of water and washer fluid, e.g. MB Sum-
merFit.
X Mix 1 part MB SummerFit to 100 parts
water.
At temperatures below freezing:
X Fill the washer fluid reservoir with a mixture
of water and washer fluid, e.g. MB Winter-
Fit. Adapt the mixing ratio to the outside
temperatures.
X Down to Ò10 †: mix 1 part MB WinterFit
with 2parts water.
X Down to Ò20 †: mix 1 part MB WinterFit
with 1 part water.
X Down to Ò29 †: mix 2 parts MB WinterFit
with 1 part water.
i Add washe rfluid concentrate, e.g. MB
SummerFit or MB WinterFit, to the washer
fluid all year round. Vehicle data
Please note that for the specified vehicle
data:
R the heights specified may vary as a result
of:
- tyres
- load
- conditio nofthe suspension
- optional equipment
R Items of optional equipment increase the
unladen weight and reduce the maximum payload. The unladen weight is specified in
accordance with EC directive and includes:
-
driver (68 kg)
- luggage (7 kg)
- all fluids (fuel tank 90 % full)
R Vehicle-specific weight information can be
found on the vehicle identification plate
(Y page 310).
R Only for certain countries: you can find
vehicle-specific vehicle data in the COC
documents (CERTIFICATE OF CONFORM-
ITY). These documents are delivered with
your vehicle.
Missing values were not available at the time
of going to print. All models
Vehicle length (ECE)
4359 mm
Vehicle width
including exterior
mirrors
2010 mm
Vehicle width
excluding exterior
mirrors
1786 mm
Wheelbase
2699 mm
Maximum roof load
75 kg
Maximum boot load
100 kg
B1
80 BlueEFFICIENCY Vehicle height
1557 mm
Unladen weight,
manual transmis-
sion
1395 kg
Unladen weight,
automatic transmis-
sion
1425 kgVehicle data
317Technical data Z
Page 321 of 329
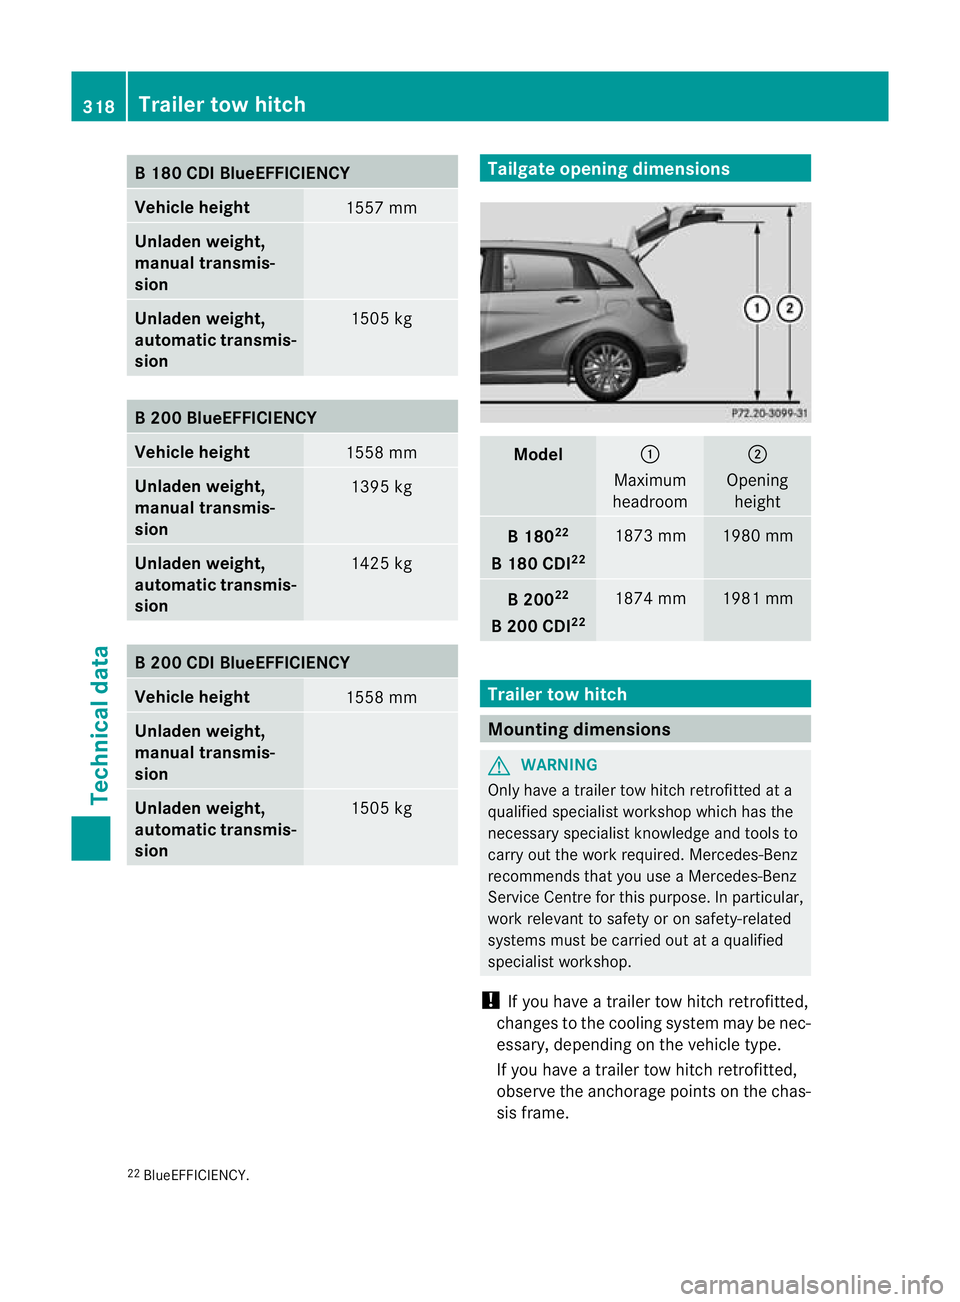
B1
80 CDI BlueEFFICIENCY Vehicle height
1557 mm
Unladen weight,
manual transmis-
sion
Unladen weight,
automatic transmis-
sion
1505 kg
B2
00 BlueEFFICIENCY Vehicle height
1558 mm
Unladen weight,
manual transmis-
sion
1395 kg
Unladen weight,
automatic transmis-
sion
1425 kg
B2
00 CDI BlueEFFICIENCY Vehicle height
1558 mm
Unladen weight,
manual transmis-
sion
Unladen weight,
automatic transmis-
sion
1505 kg Tailgate opening dimensions
Model :
Maximum
headroom ;
Opening height B1
8022
B1 80 CDI 22 1873 mm 1980 mm
B2
0022
B2 00 CDI 22 1874 mm 1981 mm
Trailer tow hitch
Mounting dimensions
G
WARNING
Only have a trailer tow hitch retrofitted at a
qualified specialist workshop which has the
necessary specialist knowledge and tools to
carry out the work required. Mercedes-Benz
recommends that you use aMercedes-Benz
Service Centre for this purpose. In particular,
work relevant to safety or on safety-related
systems must be carried out at a qualified
specialist workshop.
! If you have a trailer tow hitch retrofitted,
changes to the cooling system may be nec-
essary, depending on the vehicle type.
If you have a trailer tow hitch retrofitted,
observe the anchorage point sonthe chas-
sis frame.
22 BlueEFFICIENCY. 318
Trailer tow hitchTechnical data