belt MERCEDES-BENZ B-CLASS HATCHBACK 2011 Service Manual
[x] Cancel search | Manufacturer: MERCEDES-BENZ, Model Year: 2011, Model line: B-CLASS HATCHBACK, Model: MERCEDES-BENZ B-CLASS HATCHBACK 2011Pages: 329, PDF Size: 7.91 MB
Page 223 of 329

Display messages Possible causes/consequences and
M Solutions
?
Coolant Stop vehi‐
cle Switch engine
off The coolan
tis too hot.
Aw arning tone also sounds.
G WARNING
Do no tdrive when youre ngine is overheated. Thi scan cause some
fluids which may have leaked into the engine compartmen tto
catch fire.
Stea mfrom the overheated engine can also cause serious burns
which can occur just by opening the bonnet.
There is a risk of injury.
X Stop the vehicle immediately, paying attention to road and traf-
fic conditions, and switch off the engine.
X Engage the electric parking brake.
X Leave the vehicle and keep a safe distance from the vehicle until
the engine has cooled down.
X Make sure that the air supply to the engine radiator is not
blocked, e.g. by frozen slush.
X Do not start the engine again until the display message goes out
and the coolant temperature is under 120 †. The engine may
otherwise be damaged.
X Pay attention to the coolant temperature display.
X If the temperature increases again, visit a qualified specialist
workshop immediately.
The reading may rise up to 120 †undernormal driving conditions
if the coolant has been filled correctly. # The battery is not being charged.
Possible causes:
R
faulty alternator
R torn poly-V-belt
R a malfunction in the electronics
X Stop the vehicle immediately, paying attention to road and traf-
fic conditions, and switch off the engine.
X Open the bonnet.
X Check whether the poly-V-belt is torn.
If the poly-V-belt is torn:
! Do not continue driving. The engine could otherwise overheat.
X Consult a qualified specialist workshop.
If the poly-V-belt is OK:
X Visit a qualified specialist workshop immediately. 220
Display messagesOn-board computer and displays
Page 227 of 329

Display messages Possible causes/consequences and
M Solutions
Blind Spot Assist
currently unavail‐
able See Owner's
Manual Blind Spot Assis
tis temporarily inoperative. Possible causes:
R you have established the electrical connection between the
trailer and your vehicle.
R the sensors are dirty.
R function is impaired due to heavy rain or snow.
R the radar sensor system is outside the operating temperature
range.
R the radar sensor system is temporarily inoperative, e.g. due to
electromagnetic radiation emitted by nearby TV or radio sta-
tions or other sources of electromagnetic radiation.
The yellow 9indicator lamps also light up in the exterior mir-
rors.
X When towing a trailer, confirm the display message with a.
If you are driving without a trailer and the displaym essage does
not disappear:
X Pull over and stop the vehicle safely as soon as possible, paying
attention to road and traffic conditions.
X Engage the electric parking brake.
X Clean the sensors (Y page 270).
X Restart the engine.
If the system detects that the sensors are fully operational, the
display message disappears.
Blind Spot Assist is operational again. Blind Spot Assist
inoperative Blind Spot Assist is faulty.
The yellow
9indicator lamps also light up in the exterior mir-
rors.
X Visit a qualified specialist workshop. Park Assist
cancelled The driver's door is open and the driver's seat belt has not been
fastened.
X
Repeat the parking process with the seat belt fastened and the
driver's door closed. You have inadvertently touched the multifunction steering wheel
while steering intervention was active.
X
While steering intervention is active, make sure that the multi-
function steering wheel is not touched. The vehicle has started to skid and ESP
®
has intervened.
X Use Active Parking Assist again later (Y page 166).224
Display messagesOn-board computer and displays
Page 234 of 329
Display messages Possible causes/consequences and
M Solutions
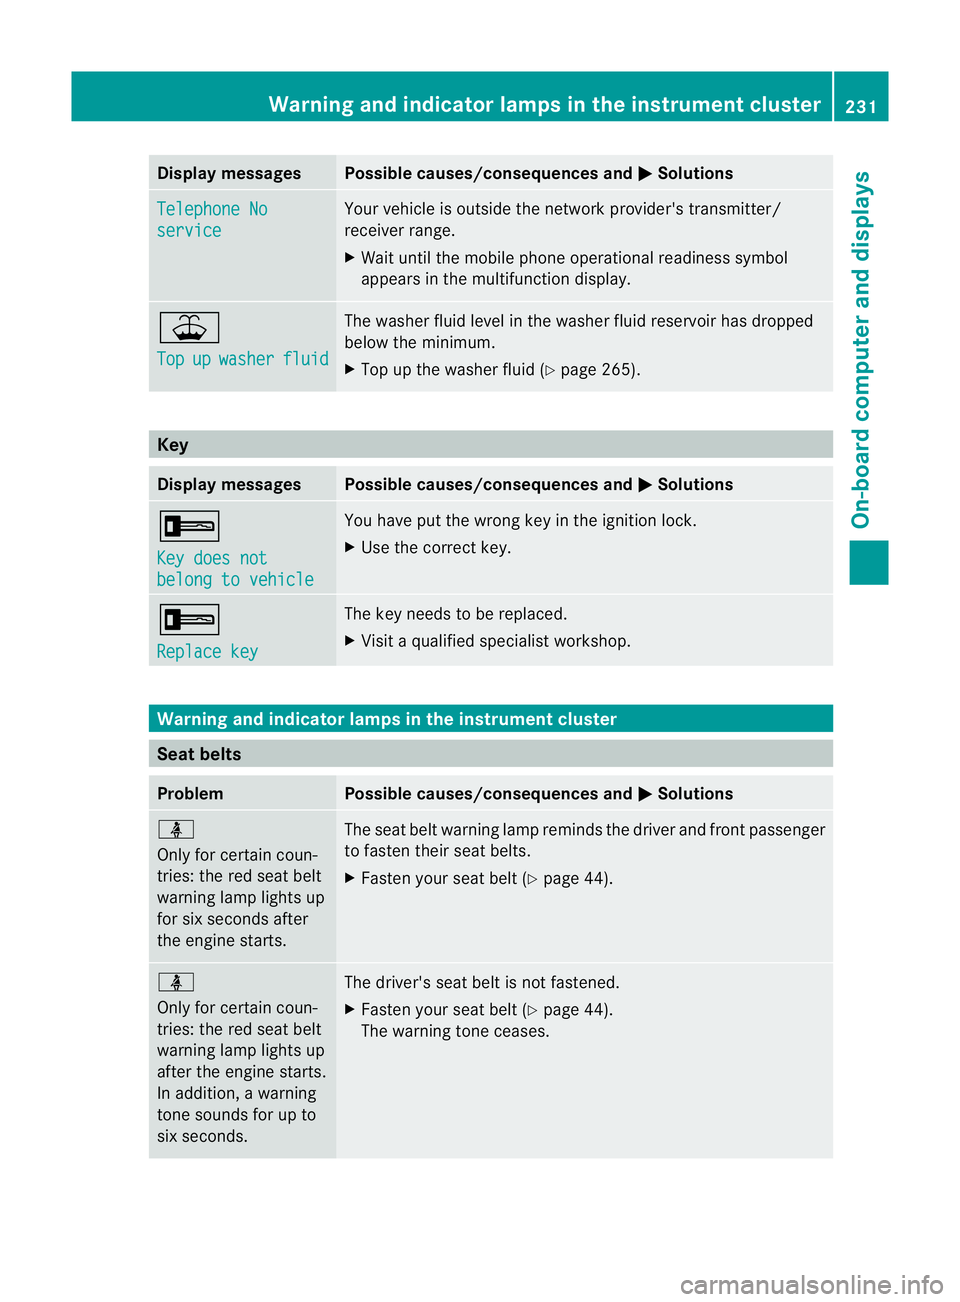
Telephone No
service Your vehicle is outside the network provider's transmitter/
receiver range.
X
Wait until the mobile phone operational readiness symbol
appears in the multifunction display. ¥
Top
up washer fluid The washer fluid level in th
ewasher fluid reservoir has dropped
below the minimum.
X Top up the washe rfluid (Y page 265). Key
Displa
ymessages Possible causes/consequences and
M Solutions
+
Key does not
belong to vehicle You have put the wrong key in the ignitio
nlock.
X Use the correct key. +
Replace key The key needs to be replaced.
X Visit a qualified specialist workshop. Warning and indicator lamps in the instrument cluster
Seat belts
Problem Possible causes/consequences and
M Solutions
ü
Only for certain coun-
tries: the red seat belt
warning lamp lights up
for six seconds after
the engine starts. The seat belt warning lamp reminds the driver and front passenger
to fasten their seat belts.
X Fasten your seat belt (Y page 44).ü
Only for certain coun-
tries: the red seat belt
warning lamp lights up
after the engine starts.
In addition, a warning
tone sounds for up to
six seconds.
The driver's seat belt is not fastened.
X
Fasten your seat belt (Y page 44).
The warning tone ceases. Warning and indicator lamps in the instrument cluster
231On-board computer and displays Z
Page 235 of 329
Problem Possible causes/consequences and
M Solutions
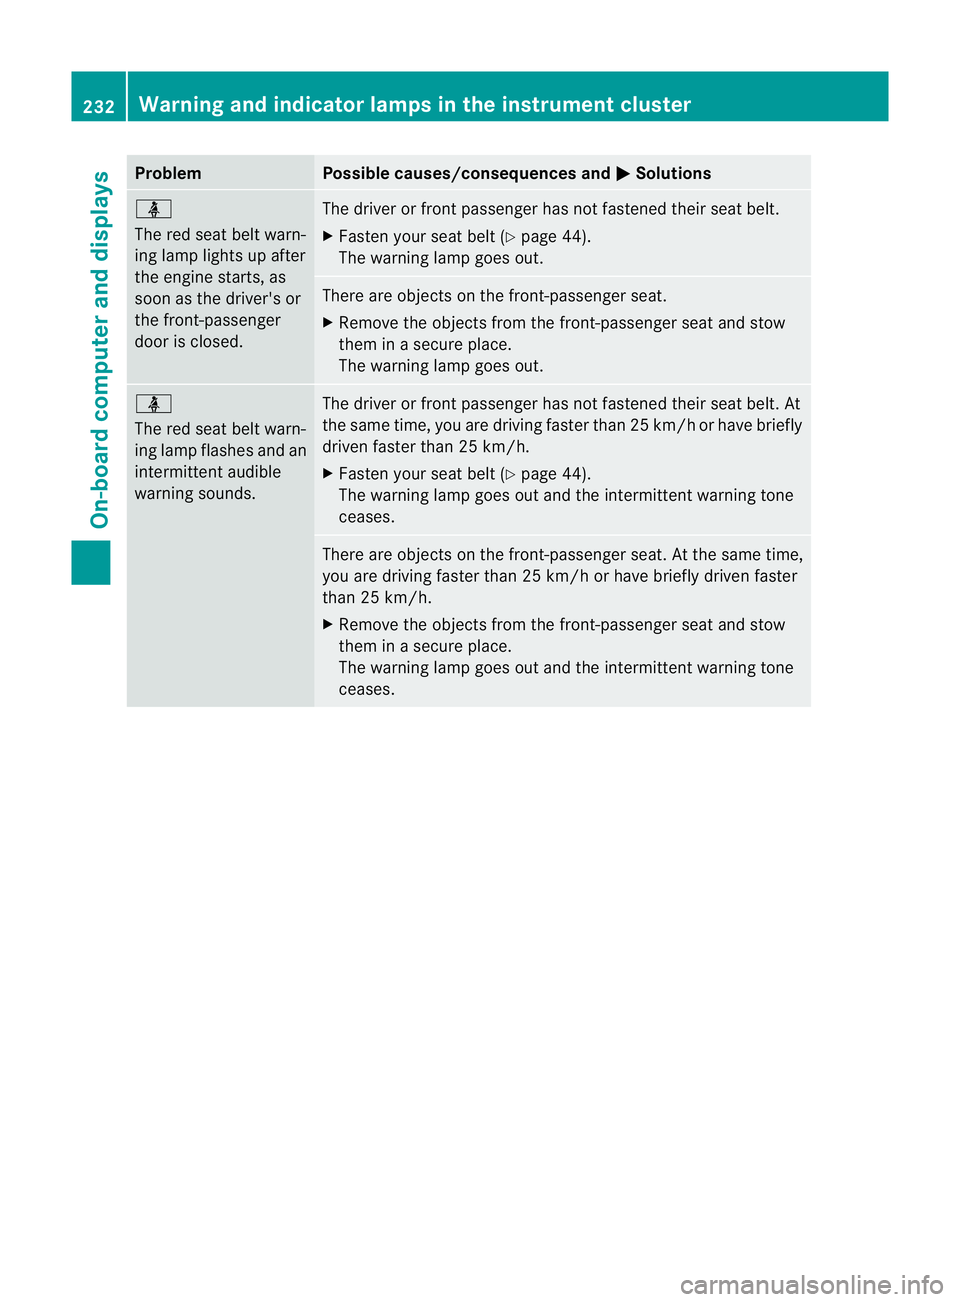
ü
The red seat belt warn-
ing lamp lights up after
the engine starts, as
soon as the driver's or
the front-passenger
door is closed. The driver or front passenger has not fastened their seat belt.
X
Fasten your seat belt (Y page 44).
The warning lamp goes out. There are objects on the front-passenger seat.
X
Remove the objects from the front-passenger seat and stow
them in a secure place.
The warning lamp goes out. ü
The red seat belt warn-
ing lamp flashes and an
intermittenta udible
warning sounds. The driver or fron
tpassenger has no tfastened their seat belt .At
the same time, you are driving faste rthan 25 km/h or have briefly
driven faster than 25 km/h.
X Fasten your seat belt (Y page 44).
The warning lamp goes out and the intermittent warning tone
ceases. There are objects on the front-passenger seat. At the same time,
you are driving faster than 25 km/h or have briefly driven faster
than 25 km/h.
X
Remove the objects from the front-passenger seat and stow
them in a secure place.
The warning lamp goes out and the intermittent warning tone
ceases. 232
Warning and indicator lamps in the instrument clusterOn-board computer and displays
Page 241 of 329
Problem Possible causes/consequences and
M Solutions
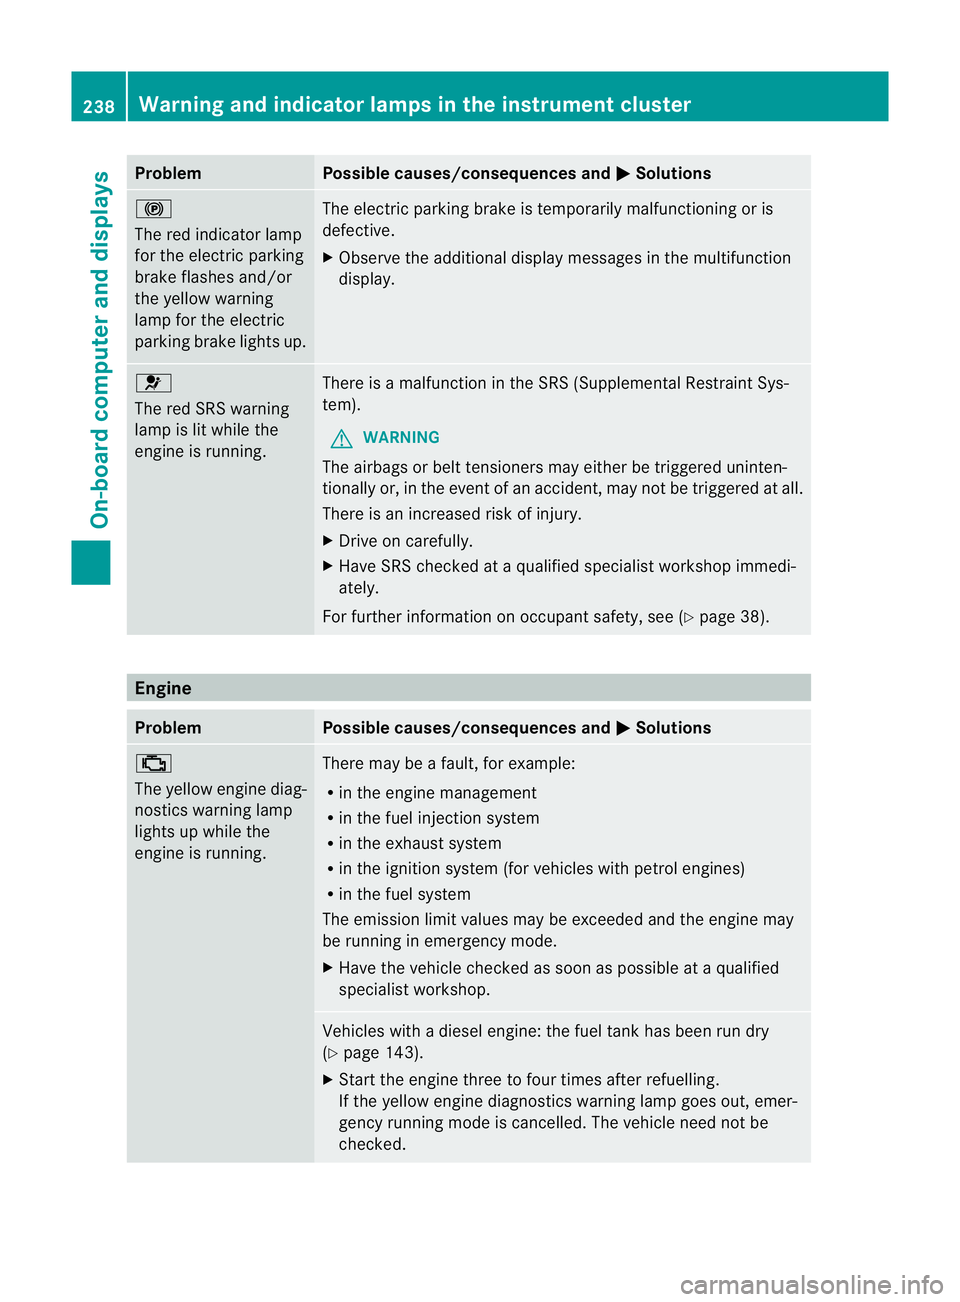
!
The red indicator lamp
for the electric parking
brake flashes and/or
the yellow warning
lamp for the electric
parking brake lights up.
The electric parking brake is temporarily malfunctioning or is
defective.
X
Observe the additional display messages in the multifunction
display. 6
The red SRS warning
lamp is lit while the
engine is running.
There is a malfunction in the SRS (Supplemental Restraint Sys-
tem).
G WARNING
The airbags or belt tensioners may either be triggered uninten-
tionally or, in the event of an accident, may not be triggered at all.
There is an increased risk of injury.
X Drive on carefully.
X Have SRS checked at a qualified specialist workshop immedi-
ately.
For further information on occupant safety, see (Y page 38).Engine
Problem Possible causes/consequences and
M Solutions
;
The yellow engine diag-
nostics warning lamp
lights up while the
engine is running. There may be a fault, for example:
R
in the engine management
R in the fuel injection system
R in the exhaust system
R in the ignition system (for vehicles with petrol engines)
R in the fuel system
The emission limit values may be exceeded and the engine may
be running in emergency mode.
X Have the vehicle checked as soon as possible at a qualified
specialist workshop. Vehicles with a diesel engine: the fuel tank has been run dry
(Y
page 143).
X Start the engine three to four times after refuelling.
If the yellow engine diagnostics warning lamp goes out, emer-
gency running mode is cancelled. The vehicle need not be
checked. 238
Warning and indicator lamps in the instrument clusterOn-board computer and displays
Page 252 of 329
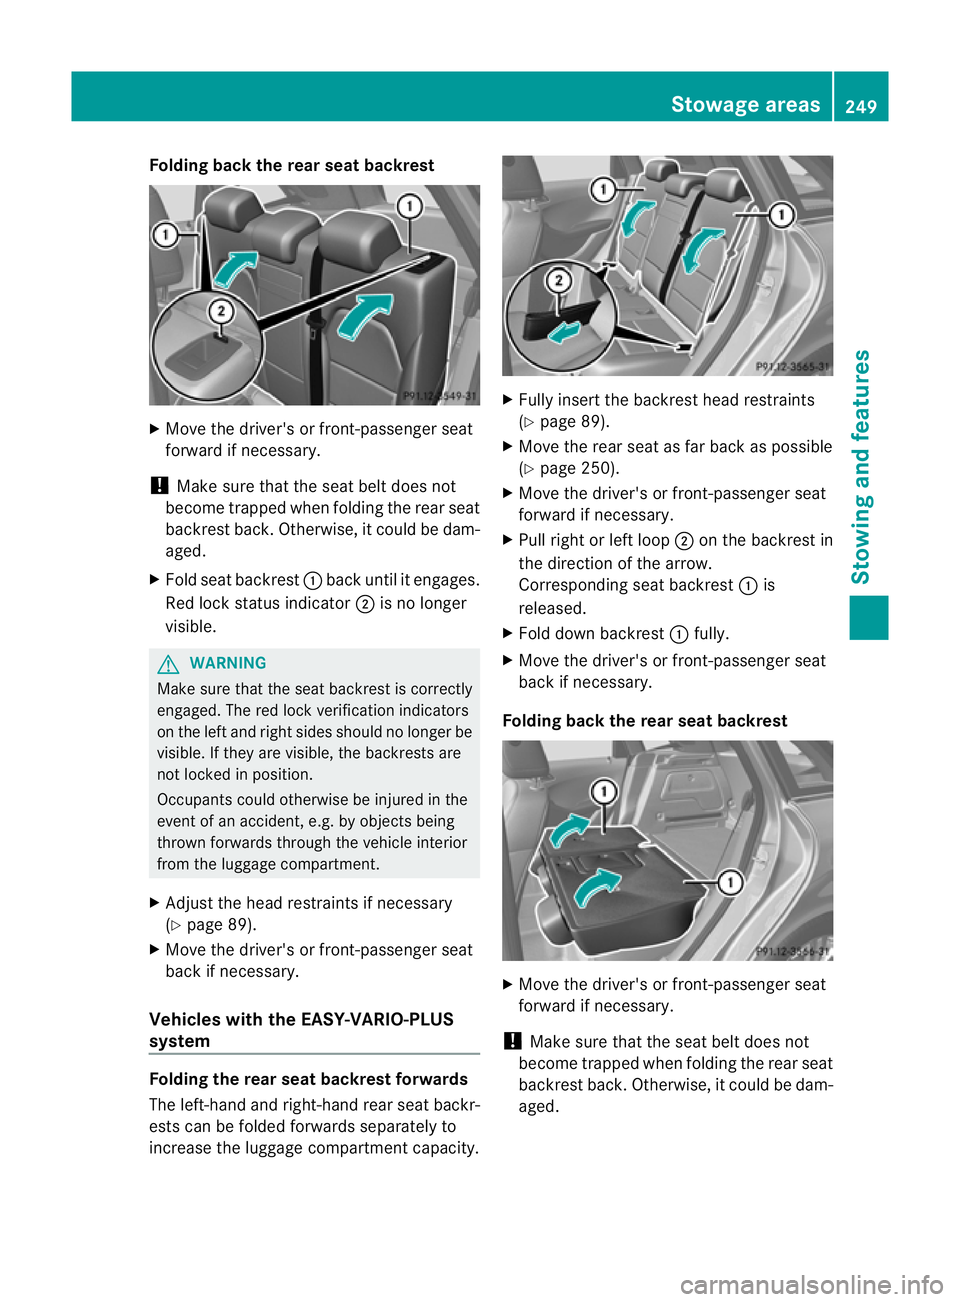
Folding back the rear seat backrest
X
Move the driver's or front-passenger seat
forward if necessary.
! Make sure that the seat belt does not
become trapped when folding the rear seat
backres tback .Otherwise, it could be dam-
aged.
X Fold seat backrest :back until it engages.
Red lock status indicator ;is no longer
visible. G
WARNING
Make sure that the seat backrest is correctly
engaged .The red lock verification indicators
on the left and right sides should no longer be
visible. If they are visible, the backrests are
not locked in position.
Occupants could otherwise be injured in the
event of an accident, e.g. by objects being
thrown forwards through the vehicle interior
from the luggage compartment.
X Adjust the head restraints if necessary
(Y page 89).
X Move the driver's or front-passenger seat
back if necessary.
Vehicles with the EASY-VARIO-PLUS
system Folding the rear seat backrest forwards
The left-hand and right-hand rear seat backr-
ests can be folded forwards separately to
increase the luggage compartmentc apacity. X
Fully insert the backres thead restraints
(Y page 89).
X Move the rear seat as far back as possible
(Y page 250).
X Move the driver's or front-passenger seat
forward if necessary.
X Pull right or left loop ;on the backrest in
the direction of the arrow.
Corresponding seat backrest :is
released.
X Fold down backrest :fully.
X Move the driver's or front-passenger seat
back if necessary.
Folding back the rear seat backrest X
Move the driver's or front-passenger seat
forward if necessary.
! Make sure that the seat belt does not
become trapped when folding the rear seat
backrest back. Otherwise, it could be dam-
aged. Stowage areas
249Stowing and features Z
Page 256 of 329
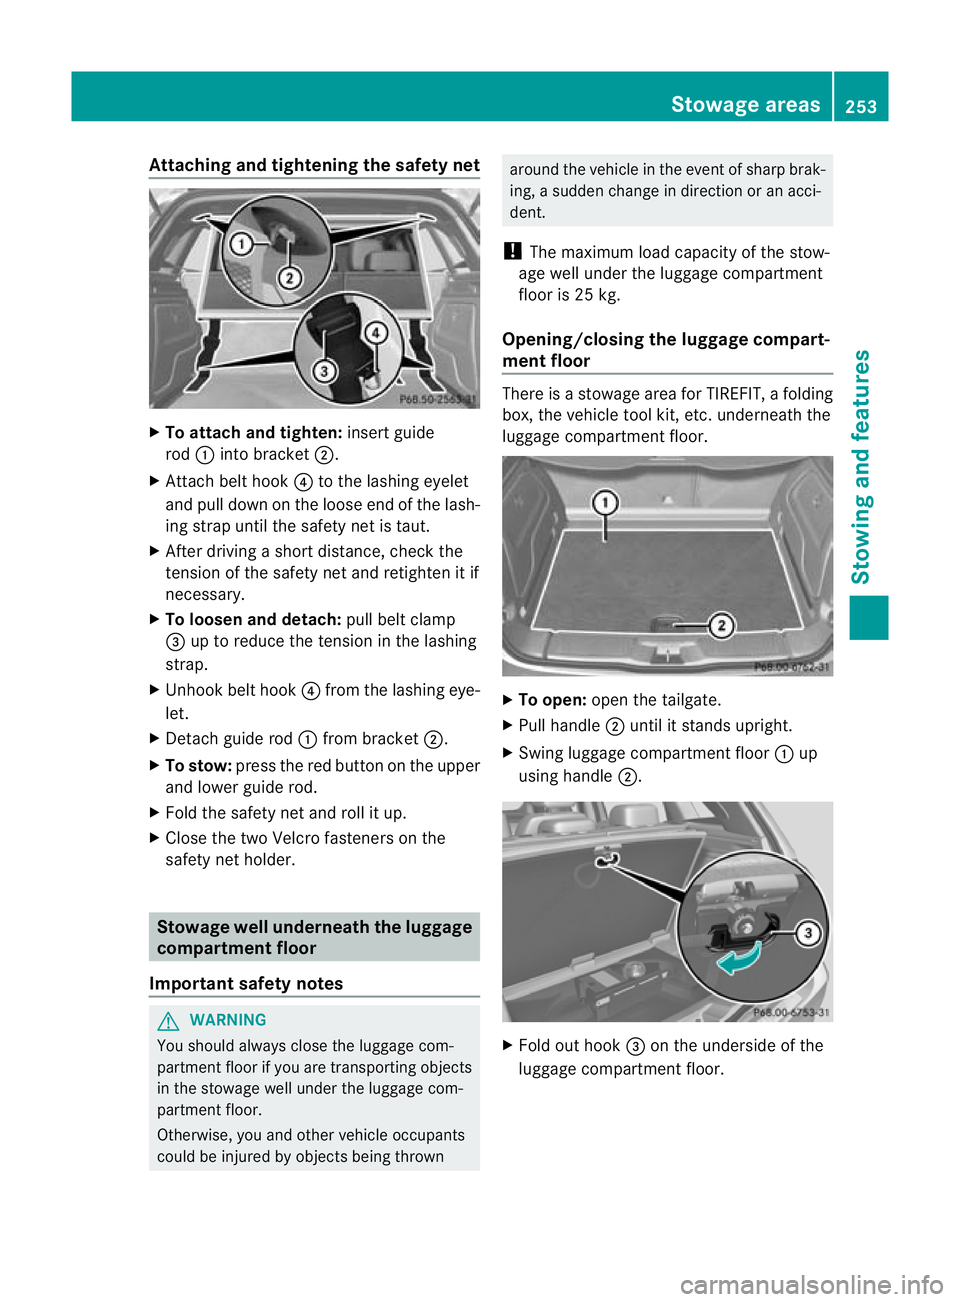
Attaching and tightening the safety net
X
To attach and tighten: insert guide
rod :into bracket ;.
X Attach belt hook ?to the lashing eyelet
and pull down on the loos eend of the lash-
ing strap until the safety net is taut.
X After driving a short distance, check the
tension of the safety net and retighten it if
necessary.
X To loosen and detach: pull belt clamp
= up to reduce the tension in the lashing
strap.
X Unhook belt hook ?from the lashing eye-
let.
X Detach guide rod :from bracket ;.
X To stow: press the red button on the upper
and lowe rguide rod.
X Fold the safety ne tand roll it up.
X Close the two Velcro fasteners on the
safety net holder. Stowage well underneath the luggage
compartment floor
Important safety notes G
WARNING
You should always close the luggage com-
partment floor if you are transporting objects
in the stowage well under the luggage com-
partment floor.
Otherwise, you and othe rvehicle occupants
could be injured by objects being thrown around the vehicle in the event of sharp brak-
ing, a sudden change in direction or an acci-
dent.
! The maximum load capacity of the stow-
age well under the luggage compartment
floor is 25 kg.
Opening/closing the luggage compart-
ment floor There is a stowage area for TIREFIT, a folding
box, the vehicle tool kit, etc.u
nderneath the
luggage compartment floor. X
To open: open the tailgate.
X Pull handle ;until it stands upright.
X Swing luggage compartment floor :up
using handle ;. X
Fold ou thook =on the underside of the
luggage compartment floor. Stowage areas
253Stowing and features Z
Page 275 of 329
!
Do not allow cosmetics, insect repellent
or sunscreen to come in contact with the
plastic trim. This maintains the high-quality
look of the surfaces.
X Wipe the plastic trim with a damp, lint-free
cloth, e.g. a microfibre cloth.
X Heavy soiling: use car care and cleaning
products recommended and approved by
Mercedes-Benz.
The surface may change colour tempora-
rily. Wait until the surface is dry again.
Cleaning the steering wheel and gear or
selector lever X
Thoroughly wipe with a damp cloth or use
leather care agents that have been recom-
mended and approved by Mercedes-Benz.
Cleaning wooden trim and trim ele-
ments !
Do not use solvent-based cleaning agents
such as tar remover, wheel cleaners, pol-
ishes or waxes. There is otherwise a risk of
damaging the surface.
X Wipe the wooden trim and trim elements
with a damp, lint-free cloth, e.g. a microfi-
bre cloth.
X Heavy soiling: use car care and cleaning
products recommended and approved by
Mercedes-Benz.
Cleaning the seat covers !
Observe the following when cleaning:
R clean genuine leather covers carefully
with a damp cloth and then wipe the cov-
ers down with a dry cloth. Make sure that
the leather does not become soaked. It
may otherwise become rough and
cracked. Only use leather care agents
that have been tested and approved by Mercedes-Benz.Y
ou can obtain these
from a qualified specialist workshop.
R clean artificial leather covers with a cloth
moistened with a solution containing 1%
detergent (e.g. washing-up liquid).
R clean cloth covers with a microfibre cloth
moistened with a solution containing 1%
detergent (e.g. washing-up liquid). Rub
carefully and always wipe entire seat sec-
tions to avoid leaving visible lines. Leave
the seat to dry afterwards. Cleaning
results depend on the type of dirt and
how long it has been there.
R clean Alcantara® covers with a damp
cloth. Make sure that you wipe entire
seat sections to avoid leaving visible
lines.
! Do not use microfibre cloths to clean gen-
uine leather, artificial leather or
Alcantara® covers. If used often, these can
damage the cover.
i Note that regular care is essential to
make sure that the appearance and com-
fort of the covers are retained over time.
Cleaning the seat belts !
Do not clean the seat belts using chemical
cleaning agents. Do not dry the seat belts
at temperatures above 80 † or in direct
sunlight.
X Use clean, lukewarm water and soap solu-
tion.
Cleaning the roof lining and carpets X
Roof lining: if it is very dirty, use a soft
brush or a cleaning agent recommended
and approved by Mercedes-Benz.
X Carpets: use the carpet and textile clean-
ing agents recommended and approved by
Mercedes-Benz. 272
CareMaintenance and care
Page 286 of 329
Jump-starting
G
WARNING
There is a risk of acid burns when jump-starting a vehicle due to the gases which escape from
the battery. Do not lean over the battery while the engine is being jump-started. G
WARNING
Gases escaping from the battery during jump-starting may cause minor explosions. Avoid cre-
ating sparks. Keep naked flames away from the battery, and do not smoke.
Comply with safety precautions when handling batteries. You will find these under "Battery (vehi-
cle)" in the index. G
WARNING
Non-combusted fuel can collect in the exhaust system and ignite. There is a risk of fire. Avoid
repeated and lengthy starting attempts.
! Avoid repeated and lengthy starting attempts. Otherwise, the catalytic converter could be
damaged by the non-combusted fuel.
Do not use a rapid charging device to start the vehicle. If your vehicle's battery is discharged,
the engine can be jump-started from another vehicle or from a second battery using jump
leads. Observe the following points:
R The battery is not accessible in all vehicles. If the other vehicle's battery is not accessible,
jump-start the vehicle using a second battery or ajump-starting device.
R You may only jump-start the vehicle when the engine and catalyti cconverter are cold.
R Do not start the engine if the battery is frozen. Let the battery thaw first.
R Jump-starting may only be performed from batteries with a nominal voltage of 12 V.
R Only use jump leads that have a sufficient cross-section and insulated terminal clamps.
R If the battery is fully discharged, leave the battery that is being used to jump-start connected
for a few minutes before attempting to start.T his charges the empty battery a little.
R Make sure that the two vehicles do not touch.
Make sure that:
R the jump leads are not damaged.
R bare parts of the terminal clamp do not come into contact with other metal parts while the
jump leads are connected to the battery.
R the jump leads cannot come into contact with parts such as the V-belt pulley or the fan.
These parts move when the engine is started and while it is running.
X Secure the vehicle by applying the electric parking brake.
X Manual transmission: engage neutral.
X Automatic transmission: shift the transmission to position P.
X Turn the key to position 0in the ignition lock and remove it.
X Switch off all electrical consumers (e.g. radio, blower, etc.).
X Open the bonnet (Y page 262). Jump-starting
283Breakdown assistance Z
Page 311 of 329
Useful information
i This Owner's Manual describes all models
and all standard and optional equipment
available to your vehicle at the time of pub-
lication of the Owner's Manual. Country-
specific deviations are possible. Please
note that your vehicle may not be equipped
with all features described. This also
applies to safety-relevan tsystems and
functions.
i Please read the information on qualified
specialist workshops (Y page 22).Notes on the technical data
You can find technical data on the Internet at:
http://www.mercedes-benz.com
i The technical data was determined in
accordance with EC Directives. All data
applies to the vehicle's standard equip-
ment. It may therefore differ for vehicles
with optional equipment. You can obtain
further information from a Mercedes-Benz
Service Centre. Genuine Mercedes-Benz parts
G
WARNING
Driving safety may be impaired if non-
approved parts, tyres and wheels or safety-
relevant accessories are used.
This could lead to malfunctions in safety-rel-
evant systems, e.g. the brake system. This
could cause you to lose control of your vehicle
and cause an accident.
Fo rthis reason, Mercedes-Ben zrecommends
that you use genuine Mercedes-Benz parts or
parts of equal quality. Only use tyres, wheels
and accessories that have been specifically
approved for your vehicle. H
Environmental note
Daimler AG also supplies reconditioned
assemblies and parts which are of the same
quality as new parts. For these, the same war-
ranty applies as for new parts.
! Airbags and seat belt tensioners, as well
as control units and sensors for these
restraint systems, may be installed in the
following areas of your vehicle:
R doors
R door pillars
R door sills
R seats
R dashboard
R instrument cluster
R centre console
Do not install accessories such as audio
systems in these areas. Do not carry out
repairs or welding. You could impair the
operating efficiency of the restraint sys-
tems.
Have accessories retrofitted at a qualified
specialist workshop. Mercedes-Benz rec-
ommends that you use a Mercedes-Benz
Service Centre for this purpose.
Mercedes-Benz tests genuine parts and con-
version parts and accessories that have been
specifically approved for your vehicle for their
reliability, safety and suitability. Despite
ongoing market research, Mercedes-Benz is
unable to evaluate other parts. Mercedes-
Benz accepts no responsibility for the use of
parts that have been independently or offi-
cially approved.
In Germany, certain parts are only officially
approved for installation or modification if
they comply with legal requirements. This
also applies to some other countries. All gen-
uine Mercedes-Benz parts meet the approval
requirements. The use of non-approved parts
may invalidate the vehicle's general operating
permit. 308
Genuine Mercedes-Benz partsTechnical data