lights MERCEDES-BENZ B-CLASS HATCHBACK 2011 Workshop Manual
[x] Cancel search | Manufacturer: MERCEDES-BENZ, Model Year: 2011, Model line: B-CLASS HATCHBACK, Model: MERCEDES-BENZ B-CLASS HATCHBACK 2011Pages: 329, PDF Size: 7.91 MB
Page 163 of 329
Deactivating DISTRONIC PLUS
There are several ways to deactivate DIS-
TRONIC PLUS:
X
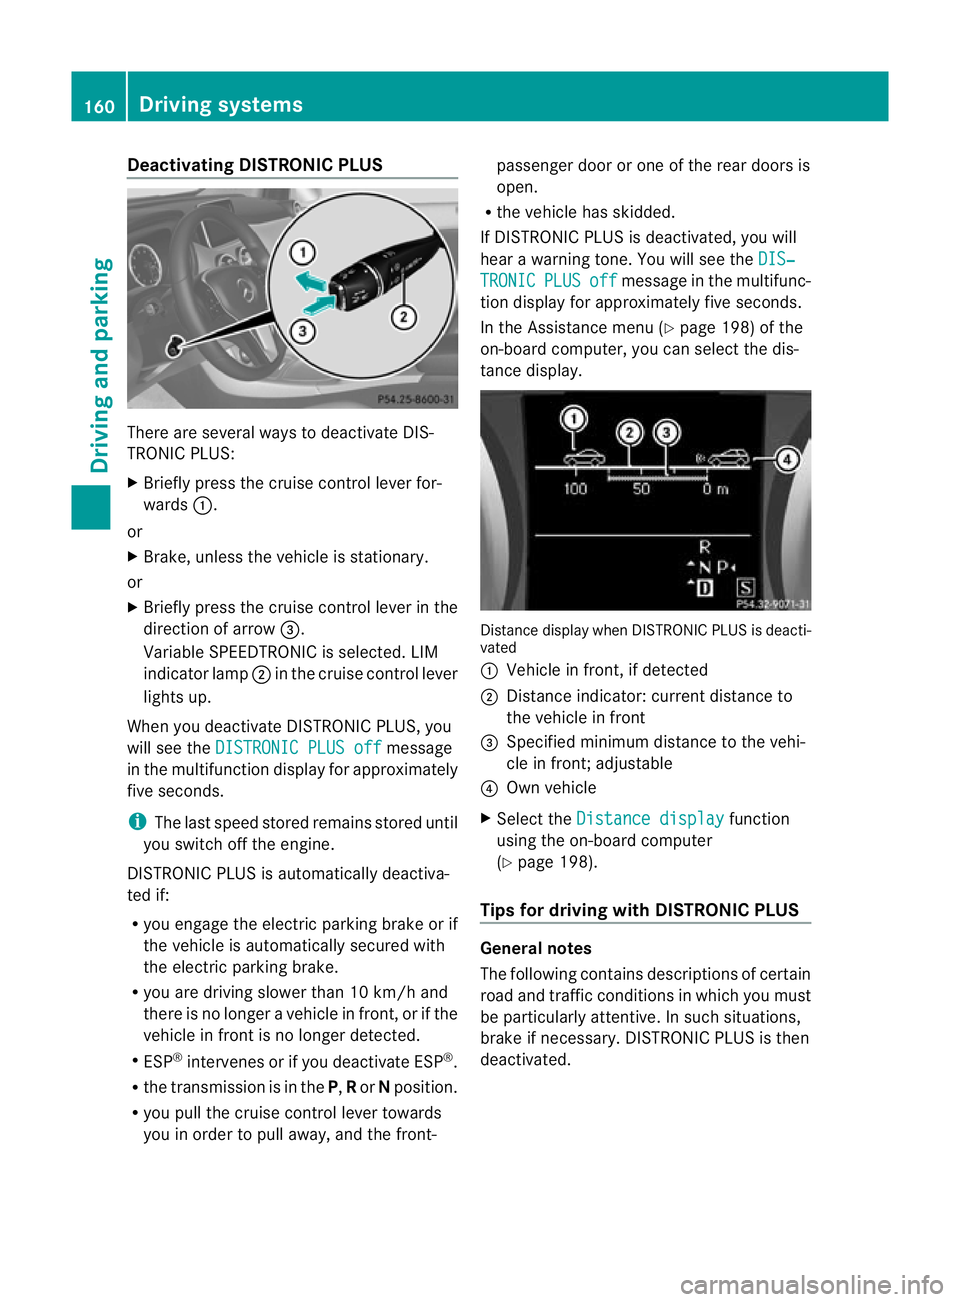
Briefly press the cruise control lever for-
wards :.
or
X Brake, unless the vehicle is stationary.
or
X Briefly press the cruise control lever in the
direction of arrow =.
Variable SPEEDTRONIC is selected. LIM
indicator lamp ;in the cruise contro llever
lights up.
When you deactivate DISTRONIC PLUS, you
will see the DISTRONIC PLUS off message
in the multifunction display for approximately
five seconds.
i The last speed stored remains stored until
you switch off the engine.
DISTRONIC PLUS is automatically deactiva-
ted if:
R you engage the electric parking brake or if
the vehicle is automatically secured with
the electric parking brake.
R you are driving slower than 10 km/h and
there is no longer a vehicle in front, or if the
vehicle in fron tis no longer detected.
R ESP ®
intervenes or if you deactivate ESP ®
.
R the transmission is in the P,Ror Nposition.
R you pull the cruise control lever towards
you in order to pull away, and the front- passenger door or one of the rear doors is
open.
R the vehicle has skidded.
If DISTRONIC PLUS is deactivated, you will
hear a warning tone. You will see the DIS‐ TRONIC PLUS off message in the multifunc-
tion display for approximately five seconds.
In the Assistance menu (Y page 198) of the
on-board computer, you can select the dis-
tance display. Distance display when DISTRONIC PLUS is deacti-
vated
:
Vehicle in front, if detected
; Distance indicator: current distance to
the vehicle in front
= Specified minimum distance to the vehi-
cle in front; adjustable
? Own vehicle
X Select the Distance display function
using the on-board computer
(Y page 198).
Tips for driving with DISTRONIC PLUS General notes
The following contains descriptions of certain
road and traffic conditions in which you must
be particularly attentive. In such situations,
brake if necessary. DISTRONIC PLUS is then
deactivated.160
Driving systemsDriving and parking
Page 165 of 329
Crossing vehicles
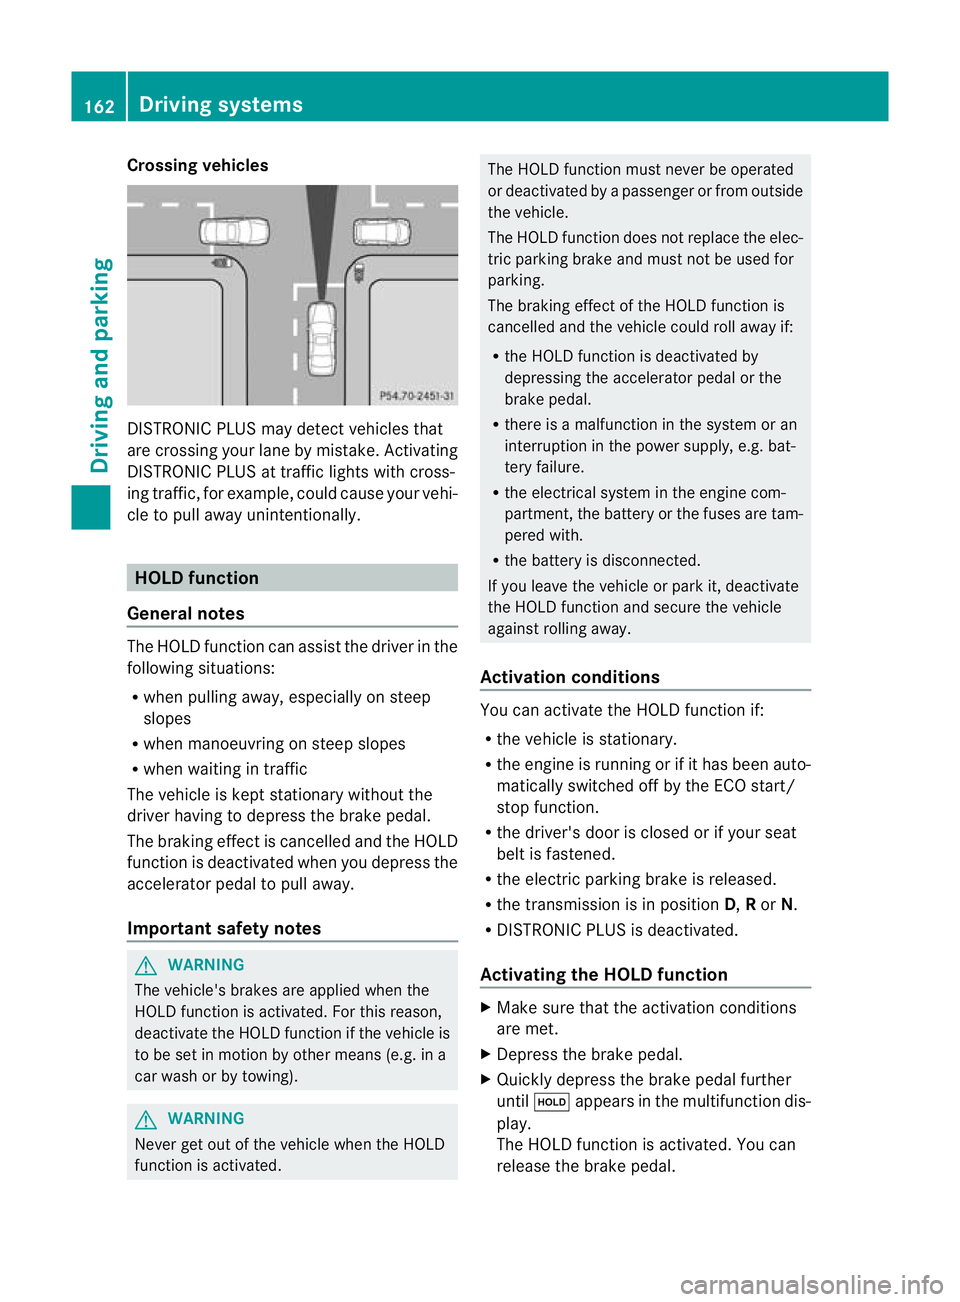
DISTRONIC PLUS may detect vehicles that
are crossing your lane by mistake. Activating
DISTRONIC PLUS at traffic lights with cross-
ing traffic, for example, could cause your vehi-
cle to pull away unintentionally. HOLD function
General notes The HOLD function can assis
tthe driver in the
following situations:
R when pulling away, especially on steep
slopes
R when manoeuvring on steep slopes
R when waiting in traffic
The vehicle is kept stationary without the
driver having to depress the brake pedal.
The braking effect is cancelled and the HOLD
function is deactivated when you depress the
accelerator pedal to pull away.
Important safety notes G
WARNING
The vehicle's brakes are applied when the
HOLD function is activated. For this reason,
deactivate the HOLD function if the vehicle is
to be set in motion by other means (e.g. in a
car wash or by towing). G
WARNING
Never get out of the vehicle when the HOLD
function is activated. The HOLD function must never be operated
or deactivated by a passenger or from outside
the vehicle.
The HOLD function does not replace the elec-
tric parking brake and must not be used for
parking.
The braking effect of the HOLD function is
cancelled and the vehicle could roll away if:
R the HOLD function is deactivated by
depressing the accelerator pedal or the
brake pedal.
R there is a malfunction in the system or an
interruption in the power supply, e.g. bat-
tery failure.
R the electrical system in the engine com-
partment, the battery or the fuses are tam-
pered with.
R the battery is disconnected.
If you leave the vehicle or park it, deactivate
the HOLD function and secure the vehicle
against rolling away.
Activation conditions You can activate the HOLD function if:
R
the vehicle is stationary.
R the engine is running or if it has been auto-
matically switched off by the ECO start/
stop function.
R the driver's door is closed or if your seat
belt is fastened.
R the electric parking brake is released.
R the transmission is in position D,Ror N.
R DISTRONIC PLUS is deactivated.
Activating the HOLD function X
Make sure that the activation conditions
are met.
X Depress the brake pedal.
X Quickly depress the brake pedal further
until ë appears in the multifunction dis-
play.
The HOLD function is activated. You can
release the brake pedal. 162
Driving systemsDriving and parking
Page 168 of 329
The gear lever position or the transmission
position of the automatic transmission and
the direction in which the vehicle is rolling
determine which warning display is active
when the engine is running.
Manual transmission: Gear lever posi-
tion Warning display
Forwards gear
or
Neutral
Front area activated
Reverse gear, or
the vehicle is rolling
backwards Rear and front areas
activated
Automatic transmission:
Transmission
position Warning display
D
Front area activated
R,
Nor the vehicle
is rolling back-
wards Rear and front areas
activated
P
No areas activated
One or more segments light up as the vehicle
approaches an obstacle, depending on the
vehicle's distance from the obstacle.
From the:
R sixth segment onwards, you will hear an
intermittent warning tonef or approx-
imately two seconds.
R seventh segment onwards, you will hear a
warning tone for approximately two sec-
onds. This indicates that you have now
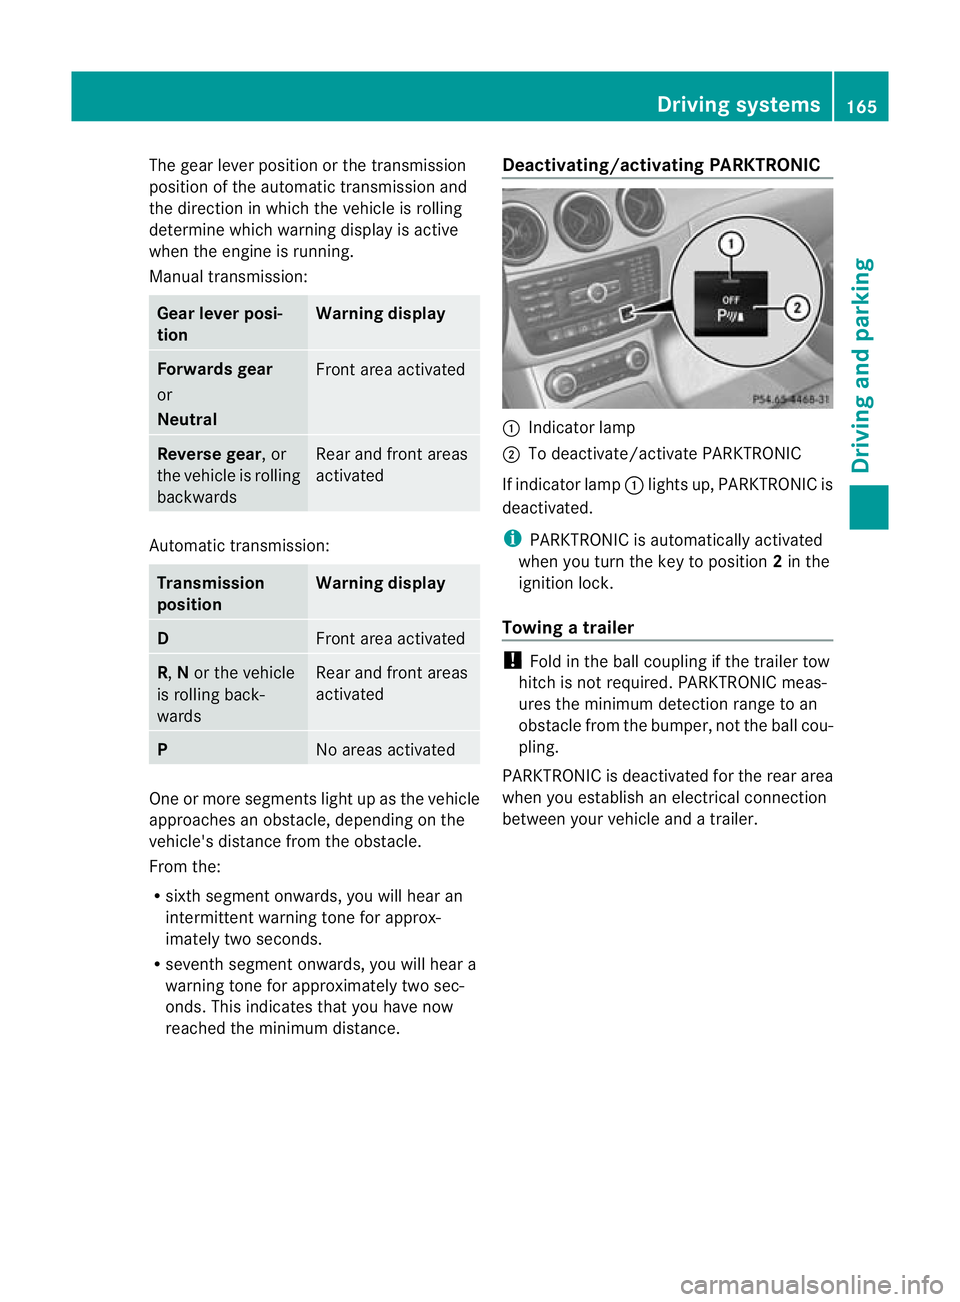
reached the minimum distance. Deactivating/activating PARKTRONIC :
Indicator lamp
; To deactivate/activate PARKTRONIC
If indicator lamp :lights up, PARKTRONIC is
deactivated.
i PARKTRONIC is automatically activated
when you turn the key to position 2in the
ignition lock.
Towing atrailer !
Fold in the ball coupling if the trailer tow
hitch is not required .PARKTRONIC meas-
ures the minimum detection range to an
obstacle fro mthe bumper, not the ball cou-
pling.
PARKTRONIC is deactivated for the rear area
when you establish an electrical connection
between your vehicle and a trailer. Driving systems
165Driving and parking Z
Page 169 of 329

Problems with PARKTRONIC
Problem Possible causes/consequences and
M Solutions
Only the red segments
in the PARKTRONIC
warning displays are lit.
You also hear a warning
tone for approximately
two seconds.
PARKTRONIC is deacti-
vated after approx-
imately 20 seconds,
and the indicator lamp
in the PARKTRONIC
button lights up. PARKTRONIC has malfunctioned and has switched off.
X
If problems persist, have PARKTRONIC checked at a qualified
specialist workshop. Only the red segments
in the PARKTRONIC
warning displays are lit.
PARKTRONIC is deacti-
vated after approx-
imately 20 seconds. The PARKTRONIC sensors are dirty or there is interference.
X
Cleant he PARKTRONIC sensors (Y page 270).
X Switch the ignition back on. The problem may be caused by an external source of radio or
ultrasound waves.
X
See if PARKTRONIC functions in a different location. Active Parking Assist
General notes Active Parking Assist is an electronic parking
aid with ultrasound. Ultrasound is used to
measure the road on both sides of the vehicle.
As uitable parking space is indicated by the
parking symbol. Active steering intervention
can assis tyou during parking.
You may also use PARKTRONIC
(Y page 163). When PARKTRONIC is switched
off, Active Parking Assist is also unavailable.
Use Active Parking Assist for parking spaces:
R that are parallel to the direction of travel
R that are on straight roads, not bends
R that are on the same level as the road, e.g.
not on the pavement Important safety notes G
WARNING
Active Parking Assist is merely an aid and may
sometimes recommend parking spaces that
are not suitable for parking. For example,
these might be spaces where parking is pro-
hibited, driveways, unsuitable surfaces, etc.
Active Parking Assist measures the parking
space as you drive past it. Any later changes
to the parking space are not taken into
account. For instance, this may be the case
when the vehicle parked in front of or behind
the space changes its position or when an
obstacle is moved into the parking space.
Active Parking Assist does not relieve you of
the responsibility of paying attention. If you
rely solely on Active Parking Assist, you could
cause an accident and injure yourself and oth-
ers. 166
Driving systemsDriving and parking
Page 172 of 329
far as possible
.When doing so, also
observe the PARKTRONIC messages.
X Stop as soon as PARKTRONIC sounds the
continuous warning tone, if not before.
Manoeuvring may be required in tight park-
ing spaces.
Vehicles with manual transmission: the ParkAssist active Engage forward gear
Observe surroundings message appears in
the multifunction display.
Vehicles with automatic transmission: the
Park Assist active Select D Observe
surroundings message appears in the mul-
tifunction display.
X Vehicles with manual transmission: while
the vehicle is stationary, shift to first gear.
Vehicles with automatic transmission:
select transmission position Dwhile the
vehicle is stationary.
Active Parking Assist immediately steers in
the other direction.
The Park Assist active Accelerate and brake Observe surroundings mes-
sage appears in the multifunction display.
i You will achieve the best results by wait-
ing for the steering procedure to complete
before pulling away.
X Drive forwards and be ready to brake at all
times.
X Stop as soon as PARKTRONIC sounds the
continuous warning tone, if not before.
Vehicles with manual transmission: the ParkAssist active Engage reverse gear
Observe surroundings message appears in
the multifunction display.
Vehicles with automatic transmission: the
Park Assist active Select R Observe
surroundings message appears in the mul-
tifunction display.
X Further transmission shifts may be neces-
sary.
As soon as the parking procedure is com-
plete, the Park Assist switched off message appears in the multifunction dis- play.A
ctive Parking Assist is now deacti-
vated. PARKTRONIC is still available.
X Manoeuvre if necessary.
X Always observe the warning messages dis-
played by PARKTRONIC (Y page 164).
Cancelling Active Parking Assist You can cancel Active Parking Assist at any
time.
X
Stop the movement of the multifunction
steering wheel or stee ryourself.
Active Parking Assist will be cancelled at
once. The Park Assist cancelled mes-
sage appears in the multifunction display.
or
X Press the PARKTRONIC button on the
centre console (Y page 165).
PARKTRONIC is switched off and Active
Parking Assist is immediately cancelled.
The Park Assist cancelled message
appears in the multifunction display.
Active Parking Assist is cancelled automati-
cally if:
R a gear is changed/the transmission is shif-
ted too early.
R parking using Active Parking Assist is no
longer possible.
R you are driving faster than 10 km/h.
R a wheel spins and ESP ®
intervenes or fails.
The ÷ warning lamp lights up in the
instrument cluster.
Aw arning tone sounds. The parking space
symbol disappears and the multifunction dis-
play shows the Park Assist cancelled message.
When Active Parking Assist is cancelled, you
must steer again yourself.
Towing
atrailer For vehicles with a trailer tow hitch, the min-
imum required length for parking spaces is
slightly increased. Driving systems
169Driving and parking Z
Page 182 of 329
Indicator and warning display
G
WARNING
Blind Spo tAssist is not active at speeds below
30 km/h. The indicator lamps in the exterior
mirrors are yellow. Vehicles in the monitoring
range are then not indicated.
Always pay attention to traffic conditions and
your surroundings. Otherwise, you may fail to
recognise dangers in time, cause an accident
and injure yourselfa nd others. :
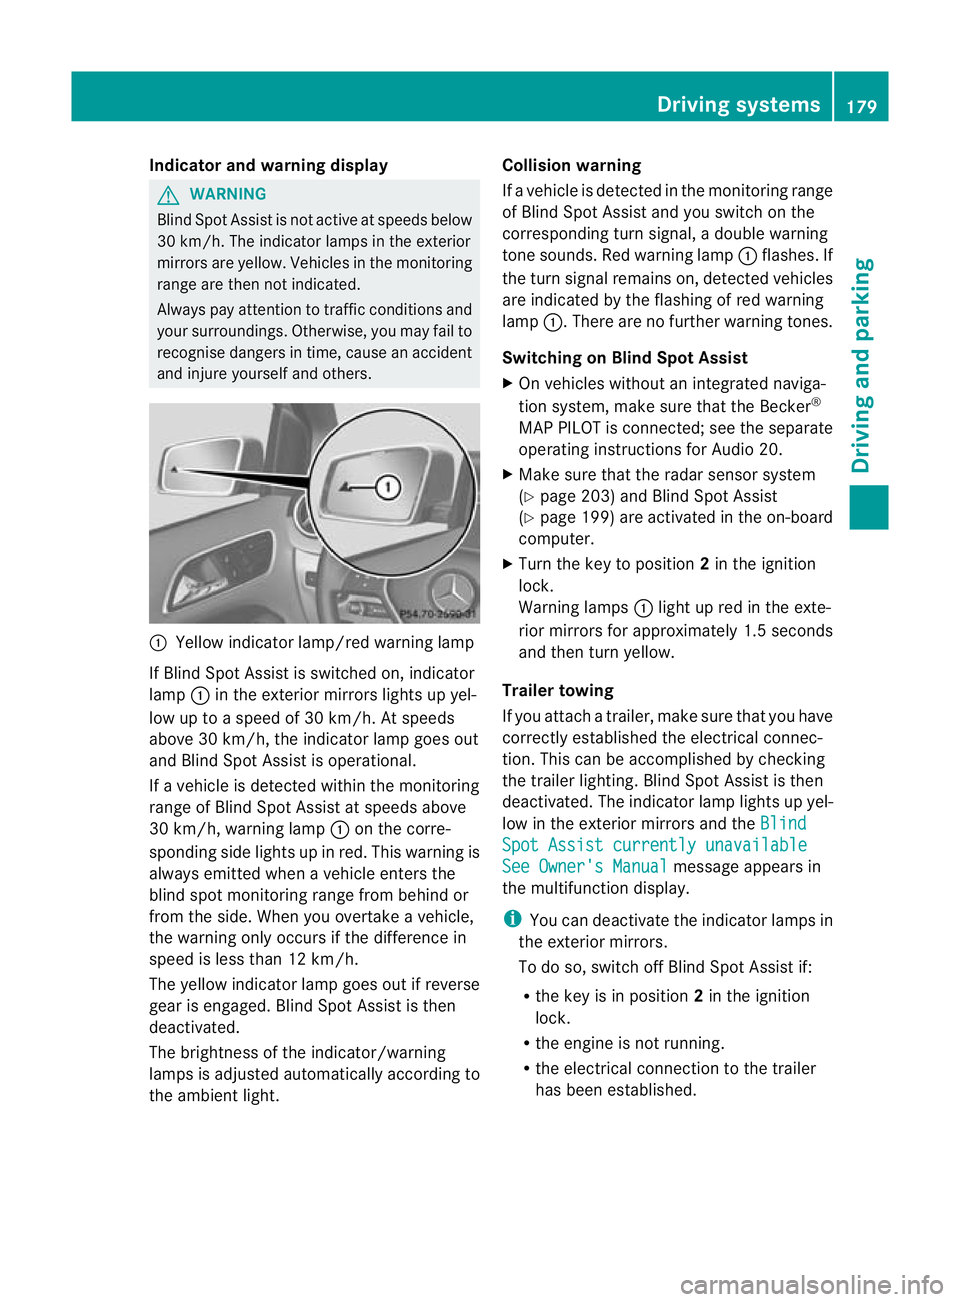
Yellow indicator lamp/red warning lamp
If Blind Spo tAssist is switched on, indicator
lamp :in the exterior mirrors lights up yel-
low up to a speed of 30 km/h. At speeds
above 30 km/h, the indicator lamp goes out
and Blind Spot Assist is operational.
If a vehicle is detected within the monitoring
range of Blind Spot Assist at speeds above
30 km/h, warning lamp :on the corre-
sponding side lights up in red. This warning is
always emitted when a vehicle enters the
blind spot monitoring range from behind or
from the side. When you overtake a vehicle,
the warning only occurs if the difference in
speed is less than 12 km/h.
The yellow indicator lamp goes out if reverse
gear is engaged. Blind Spot Assist is then
deactivated.
The brightness of the indicator/warning
lamps is adjusted automatically according to
the ambient light. Collision warning
If a vehicle is detected in the monitoring range
of Blind Spot Assist and you switch on the
corresponding turn signal, a double warning
tone sounds. Red warning lamp
:flashes. If
the turn signal remains on, detected vehicles
are indicated by the flashing of red warning
lamp :.There are no further warning tones.
Switching on Blind Spot Assist
X On vehicles without an integrated naviga-
tion system, make sure that the Becker ®
MAP PILOT is connected; see the separate
operating instructions for Audio 20.
X Make sure that the radar sensor system
(Y page 203) and Blind Spot Assist
(Y page 199) are activated in the on-board
computer.
X Turn the key to position 2in the ignition
lock.
Warning lamps :light up red in the exte-
rior mirrors for approximately 1.5 seconds
and then turn yellow.
Trailer towing
If you attach a trailer, make sure that you have
correctly established the electrical connec-
tion. This can be accomplished by checking
the trailer lighting. Blind Spot Assist is then
deactivated. The indicator lamp lights up yel-
low in the exterior mirrors and the Blind Spot Assist currently unavailable
See Owner's Manual message appears in
the multifunction display.
i You can deactivate the indicator lamps in
the exterior mirrors.
To do so, switch off Blind Spot Assist if:
R the key is in position 2in the ignition
lock.
R the engine is not running.
R the electrical connection to the trailer
has been established. Driving systems
179Driving and parking Z
Page 202 of 329
The vehicle may otherwise begin to skid.
If you drive too fast, ESP ®
cannot reduce the
risk of an accident. ESP ®
cannot override the
laws of physics. G
WARNING
If the å warning lamp in the instrument
cluster lights up when the engine is running,
ESP ®
is deactivated or is unavailable due to a
malfunction. The risk that your vehicle may
start to skid then increases in certain situa-
tions.
Always adapt your driving style to the prevail-
ing road and weather conditions.
For further information about ESP ®
, see
(Y page 66).
X Start the engine.
X Press =or; on the steering wheel
to select the Assist. menu.
X Press 9or: to select ESP .
X Press the abutton.
X To deactivate: pressaagain.
The å warning lamp in the instrument
cluster comes on.
X To activate: pressaagain.
The å warning lamp in the instrument
cluster goes out.
Activating/deactivating the distance
warning signal X
Press the =or; button on the steer-
ing wheel to select the Assist. menu.
X Press 9or: to select Dist. warn‐
ing .
X Press the abutton.
The curren tselection is displayed.
X To activate/deactivate: pressa
again.
When the distance warning signal is activa-
ted, the multifunction display shows the
Ä symbol if the HOLD function is not acti-
vated (Y page 162). Vehicles with Active Parking Assist:
if
PARKTRONIC is activated and you are driving
at a speed under 35 km/h, the jActive
Parking Assist symbol is shown instead of the
Ä symbol ( Ypage 166).
For further information on the distance warn-
ing signal, see (Y page 63).
Activating/deactivating ATTENTION
ASSIST X
Press the =or; button on the steer-
ing wheel to select the Assist. menu.
X Press the 9or: button to select
Attention Asst. X
Press a.
The curren tselection is displayed.
X To activate/deactivate: pressa
again.
When ATTENTION ASSIST( Ypage 175) is
activated, the Àsymbol appears in the
multifunction display when the ignition is on.
Activating/deactivating Blind Spot
Assist X
Press the =or; button on the steer-
ing wheel to select the Assist. menu.
X Press the 9or: button to select
Blind Spot Asst. .
X Press a.
The curren tselection is displayed.
X To activate/deactivate: pressa
again.
For further information about Blind Spot
Assist, see (Y page 177).
Activating/deactivating Lane Keeping
Assist X
Press the =or; button on the steer-
ing wheel to select the Assist. menu.
X Press the 9or: button to select
Lane Keep. Asst. Menus and submenus
199On-board computer and displays Z
Page 204 of 329
![MERCEDES-BENZ B-CLASS HATCHBACK 2011 Workshop Manual X
Press the abutton to confirm.
X Press the :or9 button to select the
Dig. speedo [mph] function.
You will see the selected setting: on or
off .
X Press the abutton to save the setting.
i Speed is dis MERCEDES-BENZ B-CLASS HATCHBACK 2011 Workshop Manual X
Press the abutton to confirm.
X Press the :or9 button to select the
Dig. speedo [mph] function.
You will see the selected setting: on or
off .
X Press the abutton to save the setting.
i Speed is dis](/img/4/55448/w960_55448-203.png)
X
Press the abutton to confirm.
X Press the :or9 button to select the
Dig. speedo [mph] function.
You will see the selected setting: on or
off .
X Press the abutton to save the setting.
i Speed is displayed in mph.
i Vehicles for the United Kingdom: this
function is not available.
The Dig. speedo [mph] function allows you
to choose whether the status area in the mul-
tifunction display always shows the speed in
mph instead of the outside temperature.
Selecting the permanent display function
You can determine whether the multifunction
display permanently shows your speed or the
outside temperature.
X Press the =or; button on the steer-
ing wheel to select the Settings menu.
X Press the :or9 button to select the
Inst. cluster submenu.
X Press the abutton to confirm.
X Press the :or9 button to select the
Permanent display: function.
You will see the selected setting: outsidetemperature or
Dig. speedom [mph] .
X Press the abutton to save the setting.
i Speed is displayed in mph.
i Vehicles for the United Kingdom: this
function is not available.
Lights Switching the daytime driving lights on/
off
X Switch off the engine.
X Press the =or; button on the steer-
ing wheel to select the Settings menu.
X Press the :or9 button to select the
Light submenu.
X Press the abutton to confirm. X
Press the :or9 button to select the
Daytime driving lights: function.
You will see the selected setting: on or
off .
X Press the abutton to save the setting.
Further information on daytime driving lights
(Y page 97).
Switching the Intelligent Light System
on/off
X Press the =or; button on the steer-
ing wheel to select the Settings menu.
X Press the :or9 button to select the
Light submenu.
X Press the abutton to confirm.
X Press the :or9 button to select the
Intell. Light System: function.
You will see the selected setting: on or
off .
X Press the abutton to save the setting.
When you activate the Intell. Light Sys‐
tem: function, you activat
ethe following:
R motorway mode
R active light function
R cornering light function
R extended range foglamps
If you set the dipped-beamh eadlamps for
driving on the right/left (Y page 201), the
multifunction display shows the Intell. Light System: System inoperative
Inactive for left-side traffic or
Intell. Light System: System inoper‐
ative Inactive for right-side traf‐
fic display message instead of the
Intell. Light System: function in the
Light sub-
menu.
Setting the dipped-beam headlamps for
driving on the left/right
X Press the =or; button on the steer-
ing wheel to select the Settings menu.
X Press the :or9 button to select the
Light submenu.
X Press the abutton to confirm. Menus and submenus
201On-board computer and displays Z
Page 205 of 329
X
Press :or9 to select the Dipped headl. Setting for: function.
You will see the selected setting: Right-side traffic or
Left-side traffic .
X Press the abutton to save the setting.
When you change the setting, conversion
does not take place until the next time the
vehicle is stationary.
This function is only available on vehicles with
the Intelligent Light System.
You can use this function to switch between
symmetrical and asymmetrical dipped beam
(Y page 96).
If you set the dipped-beam headlamps for
driving on the right/left, then motorway
mode and the extended range foglamps are
not available.
You can also have the dipped-beam head-
lamps set for driving on the right/left at a
qualified specialist workshop, e.g. a
Mercedes-Benz Service Centre.
Switching Adaptive Highbeam Assist on/
off
X Press the =or; button on the steer-
ing wheel to select the Settings menu.
X Press the :or9 button to select the
Light submenu.
X Press the abutton to confirm.
X Press the :or9 button to select the
Adaptive Main-beam Assist: function.
You will see the selected setting: Activa‐ted or
Deactivated .
X Press the abutton to save the setting.
Activating/deactivating the surround
lighting and exterior lighting delayed
switch-off
If you have activated the Surround light‐ing: function and the light switch is set to
Ã, the following functions are activated
when it is dark:
R Surround lighting: the exterior lighting
remains lit for 40 seconds after unlocking
with the key. If you start the engine, the surround lighting is switched off and auto-
matic headlamp mode is activated
(Y
page 97).
R Exterior lighting delayed switch-off: the
exterior lighting remains lit for 60seconds
after the engine is switched off. If you close
all the doors and the tailgate, the exterior
lighting goes off after 15 seconds.
X Press the =or; button on the steer-
ing wheel to select the Settings menu.
X Press the :or9 button to select the
Light submenu.
X Press the abutton to confirm.
X Press the :or9 button to select the
Surround lighting: function.
You will see the selected setting: on or
off .
X Press the abutton to save the setting.
Deactivating delayed switch-off of the exte-
rior lighting temporarily:
X Before leaving the vehicle, turn the key to
position 0in the ignition lock.
X Turn the key to position 2in the ignition
lock.
The exterior lighting delayed switch-off is
deactivated.
Delayed switch-off of the exterior lighting is
reactivated the next time you start the
engine.
i Depending on your vehicle's equipment,
when the surround lighting and delayed
switch-off exterior lighting are on, the fol-
lowing light up:
R side lamps
R foglamps
R dipped-beam headlamps
R daytime driving lights
R surround lighting in the exterior mirrors
Activating/deactivating the interior light-
ing delayed switch-off
If you activate the Interior lighting delay sw. off: function, the interior light-202
Menus and submenusOn-board computer and displays
Page 207 of 329
If the radars
ensor system is switched off,
Blind Spot Assist is deactivated
(Y page 177).
Convenience Switching the belt adjustment on/off
X
Press the =or; button on the steer-
ing wheel to select the Settings menu.
X Press the :or9 button to select the
Convenience submenu.
X Press the abutton to confirm.
X Press the :or9 button to select the
Belt adjustment: function.
You will see the selected setting: Activa‐ted or
Deactivated .
X Press the abutton to save the setting.
For further information on belt adjustment,
see (Y page 45).
Switching on/off the fold in mirrors when
locking function
X Press the =or; button on the steer-
ing wheel to select the Settings menu.
X Press the :or9 button to select the
Convenience submenu.
X Press the abutton to confirm.
X Press the :or9 button to select the
Fold mirrors in when locking: func-
tion.
You will see the selected setting: on or
off .
X Press the abutton to save the setting.
If you switch on the Fold mirrors in when
locking: function, the exterior mirrors fold
in when you lock the vehicle. When you
unlock the vehicle and then open the driver's
or front-passenger door, the exterior mirrors
fold out again.
If you have switched the function on and you
fold the exterior mirror sinusing the button
on the door (Y page 92), they will not fold out
automatically. The exterior mirrors can then
only be folded out using the button on the
door. Resetting to factory settings X
Press the =or; button on the steer-
ing wheel to select the Settings menu.
X Press the :or9 button to select the
Factory setting submenu.
X Press the abutton to confirm.
The Reset all settings? message
appears.
X Press the :or9 button to select
No or
Yes .
X Press the abutton to confirm the selec-
tion.
If you have selected Yes , the multifunction
display shows a confirmation message.
For safety reasons, not all functions are reset:
the Limit speed (winter tyres): func-
tion in permanent SPEEDTRONIC can only be
set in the Vehicle submenu. If you want to
reset the Daytime driving lights: in the
Light submenu, you must turn the key in the
ignition lock to position 1.204
Menus and submenusOn-board computer and displays