tire type MERCEDES-BENZ B-CLASS HATCHBACK 2011 Owners Manual
[x] Cancel search | Manufacturer: MERCEDES-BENZ, Model Year: 2011, Model line: B-CLASS HATCHBACK, Model: MERCEDES-BENZ B-CLASS HATCHBACK 2011Pages: 329, PDF Size: 7.91 MB
Page 21 of 329
Important safety notes
..................181
Lights displa ymessage .................. 216
Mounting dimensions ....................318
Parktroni c...................................... 165
Power supply ................................. 185
Shift range ..................................... 137
Trailer loads ................................... 320
Transmission
see Automatic transmission
see Manual transmission
Transmission position display
(DIRECT SELECTl ever)...................... 135
Transporting the vehicle ..................287
Trim pieces (cleaning instructions) .272
Trip computer (on-board com-
puter) ................................................. .193
Trip meter Calling up ....................................... 193
Resetting (on-board computer) ......194
Trip odometer
see Trip meter
Turn signals
Changing bulbs (front) ...................106
Changing bulbs (rear) ....................107
Switching on/off .............................. 98
Two-way radio
Frequencies ................................... 309
Installatio n..................................... 309
Transmission output (maximum) .... 309
Type identification plate
see Vehicle identification plate
Tyre pressure
Display message ............................ 228
Not reached (TIREFIT) ....................279
Reached (TIREFIT) ..........................279
Recommended ............................... 295
Tyre pressure loss warning
Important safety notes ..................296
Restarting ...................................... 297
Tyre pressure loss warning sys-
tem ..................................................... 296
Tyres Changing awheel .......................... 298
Checking ........................................ 293
Direction of rotatio n...................... 298
Display message ............................ 228
Grip ................................................ 148
Important safety notes ..................292M+S tyres
...................................... 294
MOExtended tyres .........................294
Replacing ....................................... 298
Service life ..................................... 293
Storing ........................................... 298
Tyr esize (data) .............................. 302
Tyr etread ...................................... 293
see Flat tyre U
Unladen weight ................................. 317
Unlocking Emergency unlocking .......................77
From inside the vehicle (central
unlocking button) ............................. 77 V
Vanity mirror (in sun visor) ..............256
Variable SPEEDTRONIC see SPEEDTRONIC
Vehicle
Correct use ...................................... 22
Data acquisition ............................... 23
Electronics ..................................... 309
Equipment ....................................... 20
Implied warranty .............................. 23
Individua lsettings .......................... 200
Leaving parked up .........................146
Locking (in an emergency) ...............78
Locking (key )................................... 72
Lowering ........................................ 302
Pulling away ................................... 128
Raising ........................................... 299
Registration ..................................... 22
Securing from rolling away ............299
Towing away .................................. 284
Tow-starting ................................... 284
Transporting .................................. 287
Unlocking (in an emergency) ...........77
Unlocking (key )................................ 72
Vehicle data ................................... 317
Vehicle battery
see Battery (vehicle)
Vehicle data ....................................... 317
Vehicle dimensions ...........................317
Vehicle emergency locking ................7818
Index
Page 275 of 329
!
Do not allow cosmetics, insect repellent
or sunscreen to come in contact with the
plastic trim. This maintains the high-quality
look of the surfaces.
X Wipe the plastic trim with a damp, lint-free
cloth, e.g. a microfibre cloth.
X Heavy soiling: use car care and cleaning
products recommended and approved by
Mercedes-Benz.
The surface may change colour tempora-
rily. Wait until the surface is dry again.
Cleaning the steering wheel and gear or
selector lever X
Thoroughly wipe with a damp cloth or use
leather care agents that have been recom-
mended and approved by Mercedes-Benz.
Cleaning wooden trim and trim ele-
ments !
Do not use solvent-based cleaning agents
such as tar remover, wheel cleaners, pol-
ishes or waxes. There is otherwise a risk of
damaging the surface.
X Wipe the wooden trim and trim elements
with a damp, lint-free cloth, e.g. a microfi-
bre cloth.
X Heavy soiling: use car care and cleaning
products recommended and approved by
Mercedes-Benz.
Cleaning the seat covers !
Observe the following when cleaning:
R clean genuine leather covers carefully
with a damp cloth and then wipe the cov-
ers down with a dry cloth. Make sure that
the leather does not become soaked. It
may otherwise become rough and
cracked. Only use leather care agents
that have been tested and approved by Mercedes-Benz.Y
ou can obtain these
from a qualified specialist workshop.
R clean artificial leather covers with a cloth
moistened with a solution containing 1%
detergent (e.g. washing-up liquid).
R clean cloth covers with a microfibre cloth
moistened with a solution containing 1%
detergent (e.g. washing-up liquid). Rub
carefully and always wipe entire seat sec-
tions to avoid leaving visible lines. Leave
the seat to dry afterwards. Cleaning
results depend on the type of dirt and
how long it has been there.
R clean Alcantara® covers with a damp
cloth. Make sure that you wipe entire
seat sections to avoid leaving visible
lines.
! Do not use microfibre cloths to clean gen-
uine leather, artificial leather or
Alcantara® covers. If used often, these can
damage the cover.
i Note that regular care is essential to
make sure that the appearance and com-
fort of the covers are retained over time.
Cleaning the seat belts !
Do not clean the seat belts using chemical
cleaning agents. Do not dry the seat belts
at temperatures above 80 † or in direct
sunlight.
X Use clean, lukewarm water and soap solu-
tion.
Cleaning the roof lining and carpets X
Roof lining: if it is very dirty, use a soft
brush or a cleaning agent recommended
and approved by Mercedes-Benz.
X Carpets: use the carpet and textile clean-
ing agents recommended and approved by
Mercedes-Benz. 272
CareMaintenance and care
Page 296 of 329
over kerbs, speed humps or similar eleva-
tions, try to do so at an obtuse angle. Oth-
erwise, the tyres, particularly the sidewalls,
can get damaged. Notes on regularly inspecting wheels
and tyres G
WARNING
Damaged tyres can cause tyre inflation pres-
sure loss. As a result, you could lose control
of your vehicle. There is a risk of accident.
Check the tyres regularly for signs of damage
and replace any damaged tyres immediately.
R Regularly check the wheels and tyres of
your vehicle for damage (e.g. cuts, punctu-
res, tears, bulges on tyres and deformation,
cracks or severe corrosion on wheels), at
least every 14 days, as well as after driving
off-road or on rough roads. Damaged
wheels can cause a loss of tyre pressure.
R Regularly check the tyre tread depth and
the condition of the tread across the whole
width of the tyre (Y page 293). If neces-
sary, turn the front wheels to full lock in
order to inspect the inner side of the tyre
surface.
R All wheels must have a valve cap to protect
the valve against dirt and moisture. Do not
fit anything onto the valve (such as tyre
pressure monitoring systems) other than
the standard valve cap or other valve caps
approved by Mercedes-Benz for your vehi-
cle.
R You should therefore regularly check the
pressure of all your tyres, particularly prior
to long trips, and correc tthe pressure as
necessary (Y page 295).
Observe the notes on the emergency spare
wheel (Y page 304). The service life of tyres depends on various
factors, including the following:
R
driving style
R tyre pressure
R mileage Tyre tread
G
WARNING
Insufficient tyre tread will reduce tyre trac-
tion. The tyre is no longer able to dissipate
water. This means that on wet road surfaces,
the risk of aquaplaning increases, in particular
where speed is not adapted to suit the driving
conditions. There is a risk of accident.
If the tyre pressure is too high or too low, tyres
may exhibit different levels of wear at differ-
ent locations on the tyre tread. Thus, you
should regularly check the tread depth and
the condition of the tread across the entire
width of all tyres.
Minimum tyre tread depth for:
R summer tyres: 3 mm
R M+S tyres: 4 mm
For safety reasons, replace the tyres before
the legally prescribed limit for the minimum
tyre tread depth is reached.. Notes on selecting, fitting and replac-
ing tyres
R Only fit tyres and wheels of the same type
and make.
R Only fit tyres of the correct size onto the
wheels.
R After fittingn ew tyres, run them in at mod-
erate speeds for the first 100 km, as they
only reach their full performance after this
distance.
R Do not drive with tyres which have too little
tread depth, as this significantly reduces
the traction on wet roads (aquaplaning).
R Replace the tyres after six years at the lat-
est, regardless of wear. Operation
293Wheels and tyres Z
Page 297 of 329
Observe the notes on the emergency spare
wheel (Y
page 304). MOExtended tyres (tyres with run-flat
characteristics)
With MOExtended tyres (tyres with run-flat
characteristics), you can continue to drive
your vehicle even if there is a total loss of
pressure in one or more tyres.
MOExtended tyres may only be used in con-
junction with an activated tyre pressure loss
warning system and only on wheels specifi-
cally tested by Mercedes-Benz.
Notes on driving with MOExtended tyres in
the event of a flat tyre can be found in the
"Breakdown assistance" section
(Y page 276).
i Vehicles with MOExtended tyres are not
equipped with a TIREFIT kit at the factory.
It is therefore recommended that you addi-
tionally equip your vehicle with the TIREFIT
kit if you fit tyres that do not feature run-
flat characteristics, e.g. winter tyres. A
TIREFIT kit can be obtained from a qualified
specialist workshop. Winter operation
Points to remember
Have your vehicle winterproofed at a qualified
specialist workshop at the onset of winter.
Observe the notes in the "Changing a wheel"
section (Y page 298). Driving with summer tyres
At temperatures below +7 †, summer tyres
lose elasticity and therefore traction and
braking power; change the tyres on your vehi-
cle to M+S tyres. Using summer tyres at very
cold temperatures could cause tears to form,
thereby damaging the tyres permanently.
Mercedes-Benz cannot accept responsibility
for this type of damage. M+S tyres
G
WARNING
M+S tyres with a tyre tread depth of less than
4mma re not suitable for use in winter as they
do not provide sufficient traction. There is a
risk of accident.
M+S tyres with a tread depth of less than
4 mm must be replaced.
When you have fitted the M+S tyres:
X Check the tyre pressures (Y page 295).
X Restart the tyre pressure loss warning sys-
tem (Y page 296).
At temperatures below +7 †, use winter tyres
or all-seaso ntyres .Both types of tyre are
identified by the M+S marking.
Only winter tyres bearing the isnowflake
symbol in addition to the M+S marking pro-
vide the best possible grip in wintry road con-
ditions. Only these tyres will allow driving
safety systems such as ABS and ESP ®
to
function optimally in winter, as these tyres
have been designed specifically for driving on
snow.
Use M+S tyres of the same make and tread
on all wheels to maintain safe handling char-
acteristics.
Always observe the maximum permissible
speed specified for the M+S tyres you have
fitted.
If you fit M+S tyres that have a lower maxi-
mum permissible speed than that of the vehi-
cle, affix an appropriate warning sign in the
driver's field of vision. This can be obtained in
a qualified specialist workshop.
Under these circumstances, you should also
restrict the maximum speed of the vehicle
using permanent SPEEDTRONIC so that it
does not exceed the maximum permissible
speed for the M+S tyres (Y page 154).294
Winter operationWheels and tyres
Page 306 of 329
i
You will find a table of tyre pressures on
the inside of your vehicle's fuel filler flap.
For further information on tyre pressure,
see (Y page 295). Check tyre pressures
regularly, and only when the tyres are cold.
i Notes on the vehicle equipmen t–always
fit the vehicle:
R with tyres of the same size on a given axle
(left/right)
R with the same type of tyres at a given
time (summer tyres, winter tyres,
MOExtended tyres)
i Vehicles with MOExtended tyres are not
equipped with a TIREFIT kit at the factory.
It is therefore recommended that you addi-
tionally equip your vehicle with a TIREFIT kit
if you fit tyres that do not feature run-flat
characteristics, e.g. winter tyres. A TIREFIT
kit can be obtained fro maqualified spe-
cialist workshop.
i Overview of abbreviations used in the fol-
lowing tyre tables:
R BA: both axles
R FA: front axle
R RA: rear axle
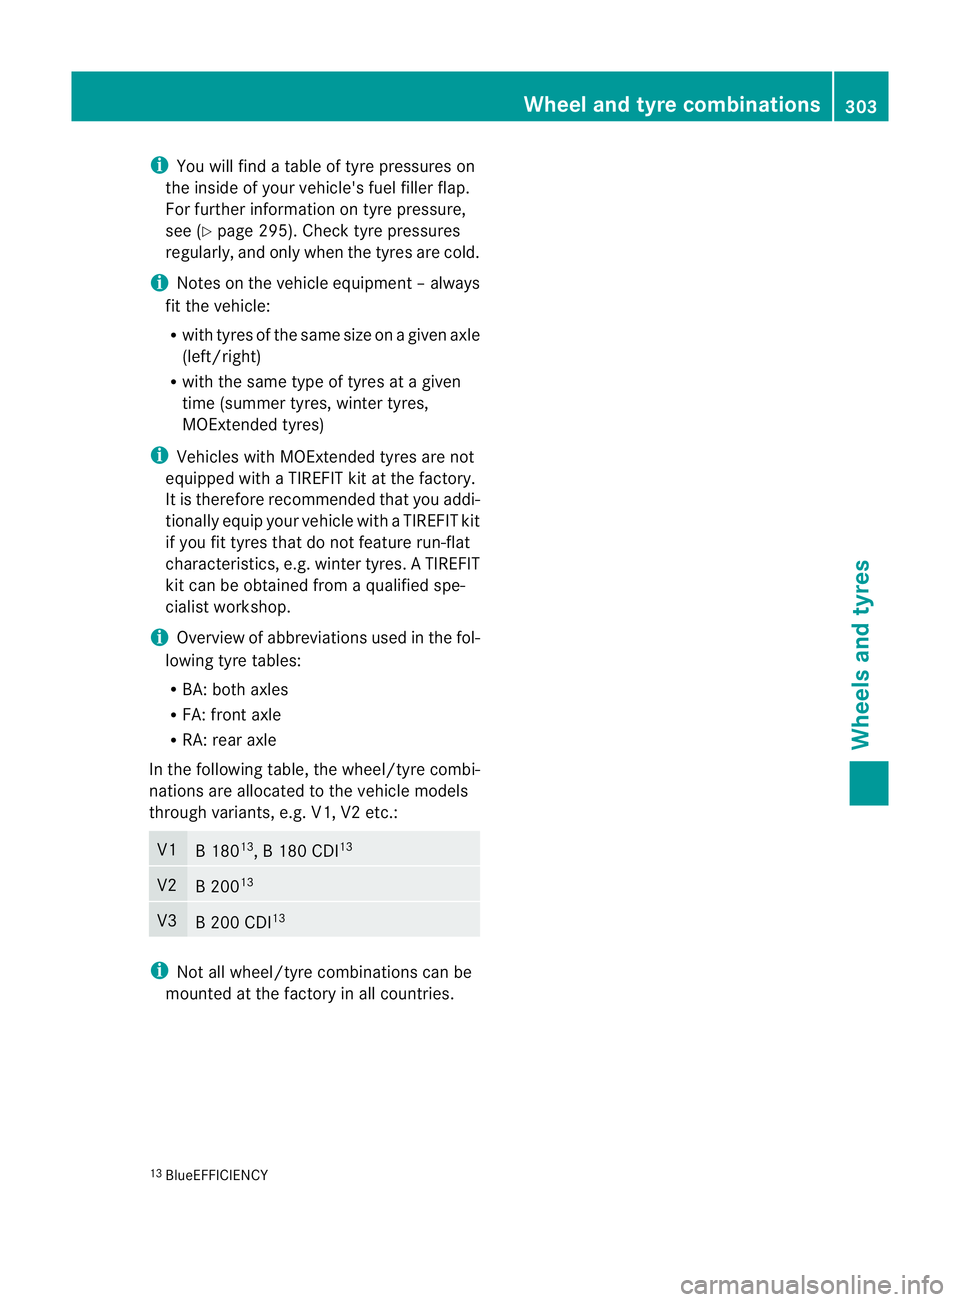
In the following table, the wheel/tyre combi-
nations are allocated to the vehicle models
through variants, e.g. V1, V2 etc.: V1
B 180
13
, B 180 CDI 13 V2
B 200
13 V3
B 200 CDI
13 i
Not all wheel/tyre combinations can be
mounted at the factory in all countries.
13 BlueEFFICIENCY Wheel and tyre combinations
303Wheels and tyres Z