ad blue MERCEDES-BENZ B-CLASS HATCHBACK 2014 Owners Manual
[x] Cancel search | Manufacturer: MERCEDES-BENZ, Model Year: 2014, Model line: B-CLASS HATCHBACK, Model: MERCEDES-BENZ B-CLASS HATCHBACK 2014Pages: 405, PDF Size: 12.24 MB
Page 128 of 405
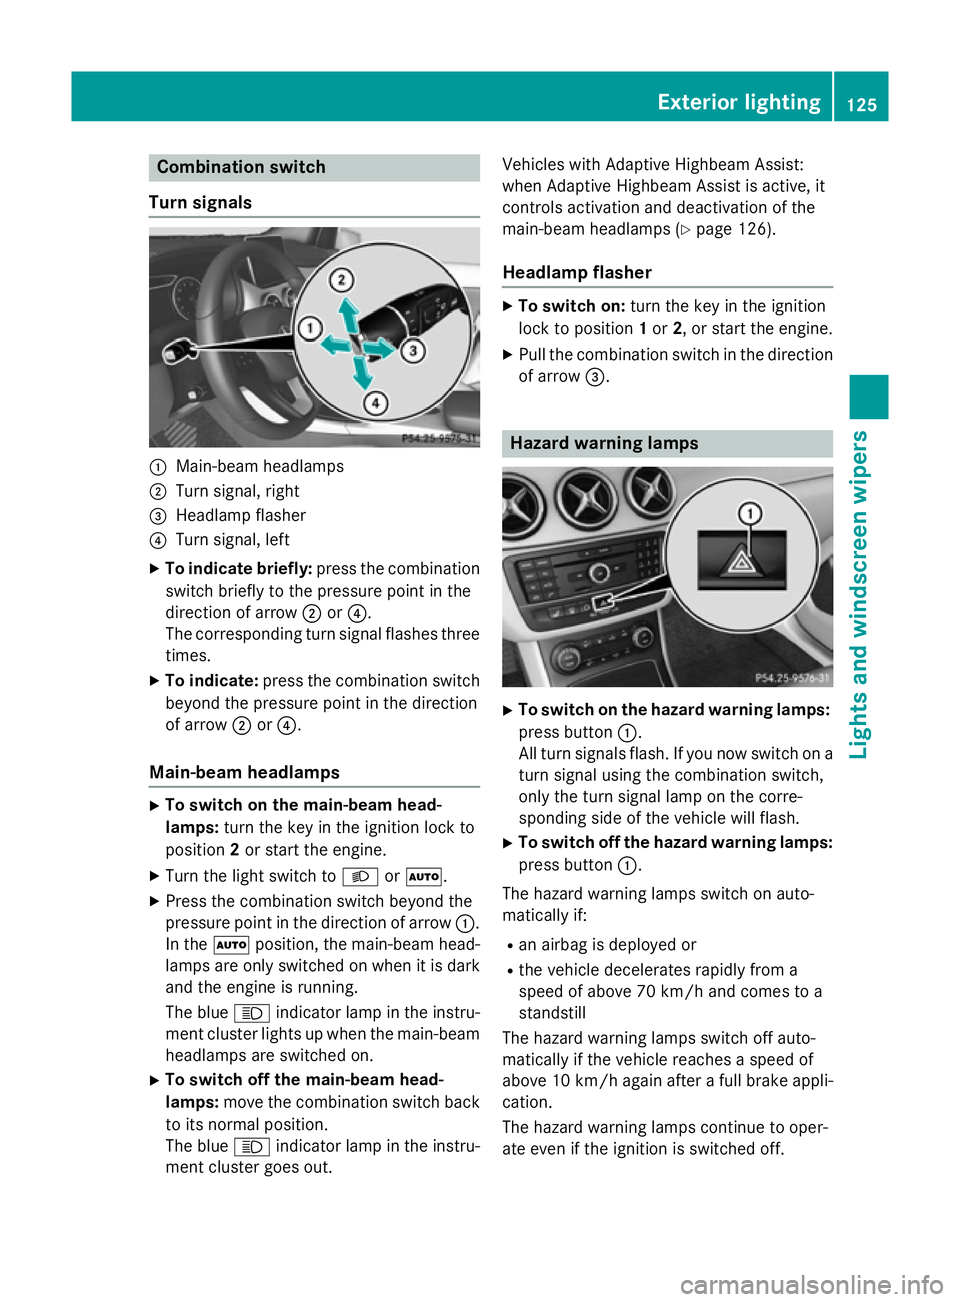
Combination switch
Turn signals :
Main-beam headlamps
; Turn signal, right
= Headlamp flasher
? Turn signal, left
X To indicate briefly: press the combination
switch briefly to the pressure point in the
direction of arrow ;or?.
The corresponding turn signal flashes three
times.
X To indicate: press the combination switch
beyond the pressure point in the direction
of arrow ;or?.
Main-beam headlamps X
To switch on the main-beam head-
lamps: turn the key in the ignition lock to
position 2or start the engine.
X Turn the light switch to LorÃ.
X Press the combination switch beyond the
pressure point in the direction of arrow :.
In the Ãposition, the main-beam head-
lamps are only switched on when it is dark
and the engine is running.
The blue Kindicator lamp in the instru-
ment cluster lights up when the main-beam headlamps are switched on.
X To switch off the main-beam head-
lamps: move the combination switch back
to its normal position.
The blue Kindicator lamp in the instru-
ment cluster goes out. Vehicles with Adaptive Highbeam Assist:
when Adaptive Highbeam Assist is active, it
controls activation and deactivation of the
main-beam headlamps (Y
page 126).
Headlamp flasher X
To switch on: turn the key in the ignition
lock to position 1or 2, or start the engine.
X Pull the combination switch in the direction
of arrow =. Hazard warning lamps
X
To switch on the hazard warning lamps:
press button :.
All turn signals flash. If you now switch on a turn signal using the combination switch,
only the turn signal lamp on the corre-
sponding side of the vehicle will flash.
X To switch off the hazard warning lamps:
press button :.
The hazard warning lamps switch on auto-
matically if:
R an airbag is deployed or
R the vehicle decelerates rapidly from a
speed of above 70 km/h and comes to a
standstill
The hazard warning lamps switch off auto-
matically if the vehicle reaches a speed of
above 10 km/h again after a full brake appli- cation.
The hazard warning lamps continue to oper-
ate even if the ignition is switched off. Exterior lighting
125Lights and windscreen wipers Z
Page 154 of 405
You cannot use the auxiliary ventilation to
cool the vehicle interior to a temperature
lower than the outside temperature.
Before switching on X
Turn the key to position 2in the ignition
lock (Y page 159).
X Set the desired temperature.
Auxiliary heating or ventilation can also be
switched on if the manually set climate con-
trol is activated. Optimum comfort is attained by setting the system to automatic mode. Set
the temperature to 22 †.
The auxiliary heating/ventilation can be acti- vated or deactivated using the remote control or the button on the centre console.
The on-board computer can be used to spec-
ify up to three departure times, one of which
may be preselected (Y page 248).
Switching the auxiliary heating/venti-
lation on/off using the centre console
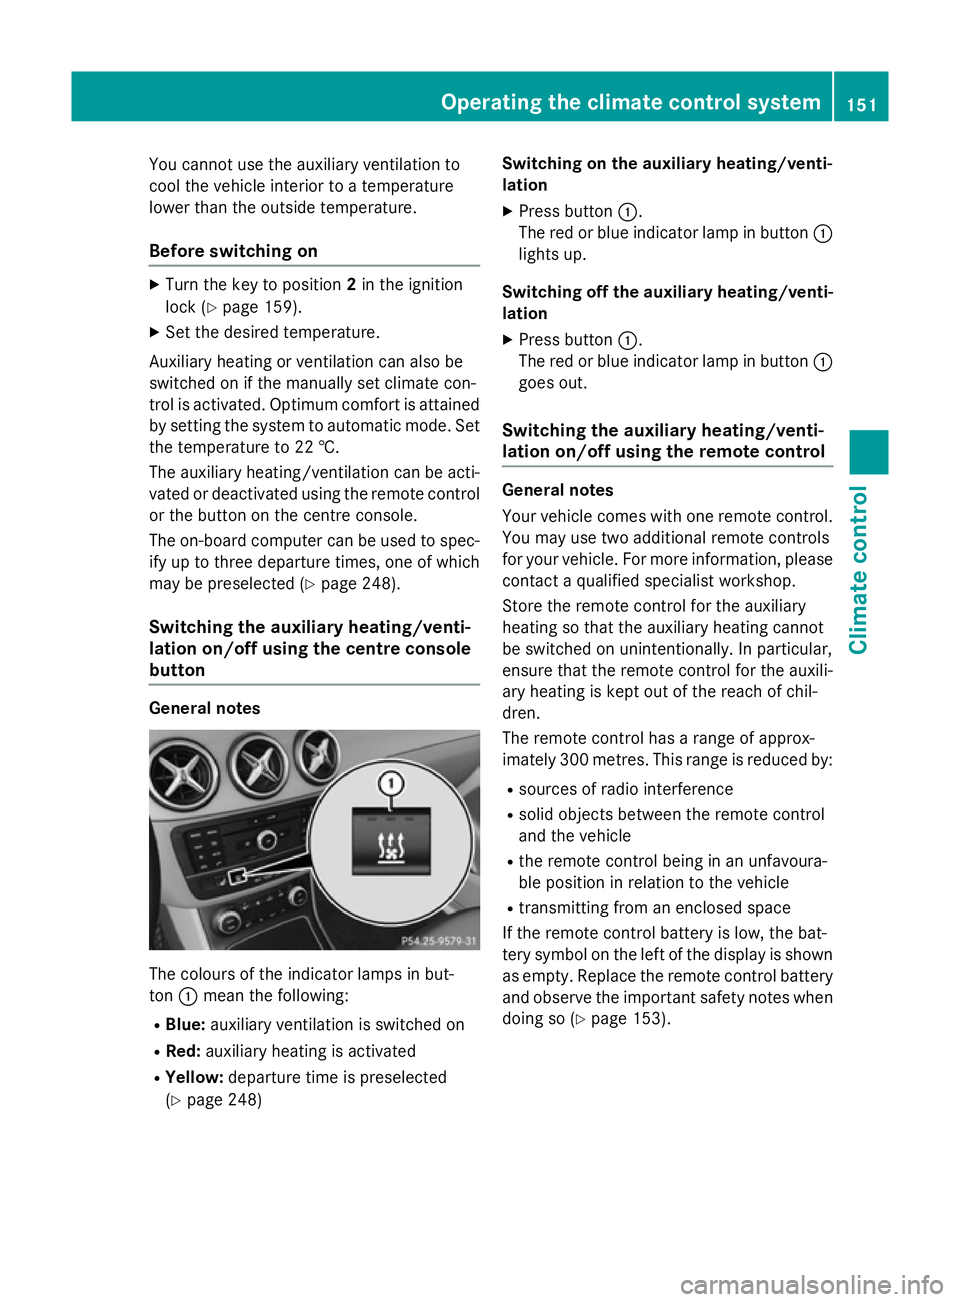
button General notes
The colours of the indicator lamps in but-
ton :mean the following:
R Blue: auxiliary ventilation is switched on
R Red: auxiliary heating is activated
R Yellow: departure time is preselected
(Y page 248) Switching on the auxiliary heating/venti-
lation
X Press button :.
The red or blue indicator lamp in button :
lights up.
Switching off the auxiliary heating/venti- lation
X Press button :.
The red or blue indicator lamp in button :
goes out.
Switching the auxiliary heating/venti-
lation on/off using the remote control General notes
Your vehicle comes with one remote control.
You may use two additional remote controls
for your vehicle. For more information, please contact a qualified specialist workshop.
Store the remote control for the auxiliary
heating so that the auxiliary heating cannot
be switched on unintentionally. In particular,
ensure that the remote control for the auxili-
ary heating is kept out of the reach of chil-
dren.
The remote control has a range of approx-
imately 300 metres. This range is reduced by:
R sources of radio interference
R solid objects between the remote control
and the vehicle
R the remote control being in an unfavoura-
ble position in relation to the vehicle
R transmitting from an enclosed space
If the remote control battery is low, the bat-
tery symbol on the left of the display is shown as empty. Replace the remote control battery and observe the important safety notes when
doing so (Y page 153). Operating the climate control system
151Climate control Z
Page 228 of 405
R
do not exceed the maximum permissible
noseweight
R do not use a noseweight lower than the
minimum noseweight
Make sure that the following values are not
exceeded:
R the permissible trailer drawbar noseweight
R the permissible trailer load
R the permissible rear axle load of the towing
vehicle
R the maximum permissible gross vehicle
weight of both the towing vehicle and the
trailer
The applicable permissible values, which
must not be exceeded, can be found:
R in your vehicle documents
R on the identification plates of the trailer tow
hitch and the trailer
R on the vehicle identification plate
If the values differ, the lowest value applies.
You will find the values approved by the man-
ufacturer on the vehicle identification plates
and those for the towing vehicle under "Tech- nical data" (Y page 396). G
WARNING
If you release the ball coupling or it does not
engage correctly when folding in, it will swing out. Within pivoting range of the ball coupling,
there is an increased risk of an accident and
injury.
Only release the ball coupling if the pivoting
range is unobstructed. Always make sure that the ball coupling engages when folding in.
When reversing the vehicle towards the
trailer, make sure there is nobody between
the trailer and the vehicle.
Couple and uncouple the trailer carefully. If
you do not couple the trailer to the towing
vehicle correctly, the trailer could become
detached.
When towing a trailer, your vehicle's handling
characteristics will be different in comparison to when driving without a trailer. The vehicle/trailer combination:
R is heavier
R is restricted in its acceleration and gradi-
ent-climbing capability
R has an increased braking distance
R is affected more by strong crosswinds
R demands more sensitive steering
R has a larger turning circle
This can impair the vehicle's handling char-
acteristics. Adapt your driving style accord-
ingly. Maintain a safe distance. Drive care-
fully.
When towing a trailer, always adjust your
speed to the current road and weather con-
ditions. Do not exceed the maximum permis-
sible speed for your vehicle/trailer combina-
tion. Notes on towing a trailer
General notes The B 180 CDI BlueEFFICIENCY Edition model
cannot be used to tow a trailer.
When towing a trailer, set the tyre pressure on
the rear axle of the towing vehicle for the
maximum load. Further information on the
tyre pressure table in the fuel filler flap
(Y page 356).
Please note that when towing a trailer, the
following driving systems have limited avail-
ability or are not available at all.
R PARKTRONIC (Y page 203)
R Blind Spot Assist (Y page 221)
The height of the ball coupling changes with
the load of the vehicle. If necessary, use a
trailer with a height-adjustable drawbar.
You will find fitting dimensions and loads
under "Technical data" (Y page 394).
Driving tips Observe the notes on ESP
®
trailer stabilisa-
tion (Y page 79). Towing a trailer
225Driving and parking Z
Page 243 of 405

Audio player or audio media operation
:
Current track
Audio files from various audio players or
media can be played, depending on the equip- ment fitted in the vehicle.
X Switch on Audio 20 or COMAND Online and
select audio CD or MP3 mode; see the sep- arate operating instructions.
X Press the =or; button on the steer-
ing wheel to select the Audio Audiomenu.
X To select the next/previous track:
briefly press the 9or: button.
X To select a track from the track list
(rapid scrolling): press and hold the 9
or : button until the desired track has
been reached.
If you press and hold the 9or:
button, the rapid scrolling speed is
increased. Not all audio players or media
support this function.
If track information is stored on the audio
player or media, the multifunction display will
show the number and title of the track.
Video DVD operation It is only possible to use the
Audio Audiomenu to
operate video DVDs on vehicles with
COMAND Online. X
Switch on COMAND Online and select
video DVD (see the separate operating
instructions).
X Press the =or; button on the steer-
ing wheel to select the Audio Audiomenu.
X To select the next or previous scene:
briefly press the 9or: button.
X To select a scene from the scene list
(rapid scrolling): press and hold the 9
or : button until desired scene :has
been reached. Telephone menu
Introduction G
WARNING
Operating the integrated information systems and communications equipment in the vehicle
while driving will distract you from traffic con-
ditions. You could then lose control of the
vehicle. There is a risk of an accident.
Only operate these devices if road traffic con-
ditions permit. If you are unsure about the
surrounding conditions, pull over to a safe
location and make entries only while the vehi-
cle is stationary.
When telephoning, you must observe the
legal requirements for the country in which
you are currently driving. X Switch on the mobile phone (see the man-
ufacturer's operating instructions).
X Switch on Audio 20 or COMAND Online;
see the separate operating instructions.
X Insert the mobile phone into the bracket
(Y page 314).
or
X Establish a Bluetooth ®
connection to Audio
20 or COMAND Online; see the separate
operating instructions.
X Press the =or; button on the steer-
ing wheel to select the Tel
Tel menu. 240
Menus and sub
menusOn-board computer and displays
Page 244 of 405
You will see one of the following display mes-
sages in the multifunction display:
R Telephone ready
Telephone ready or the name of the net-
work provider: the mobile phone has found a network and is ready to receive.
R Telephone No service
Telephone No service: there is no net-
work available or the mobile phone is
searching for a network.
i You can obtain further information about
suitable mobile phones and connecting
mobile phones via Bluetooth ®
:
R from any Mercedes-Benz Service Centre
R on the Internet at http://
www.mercedes-benz.com/connect
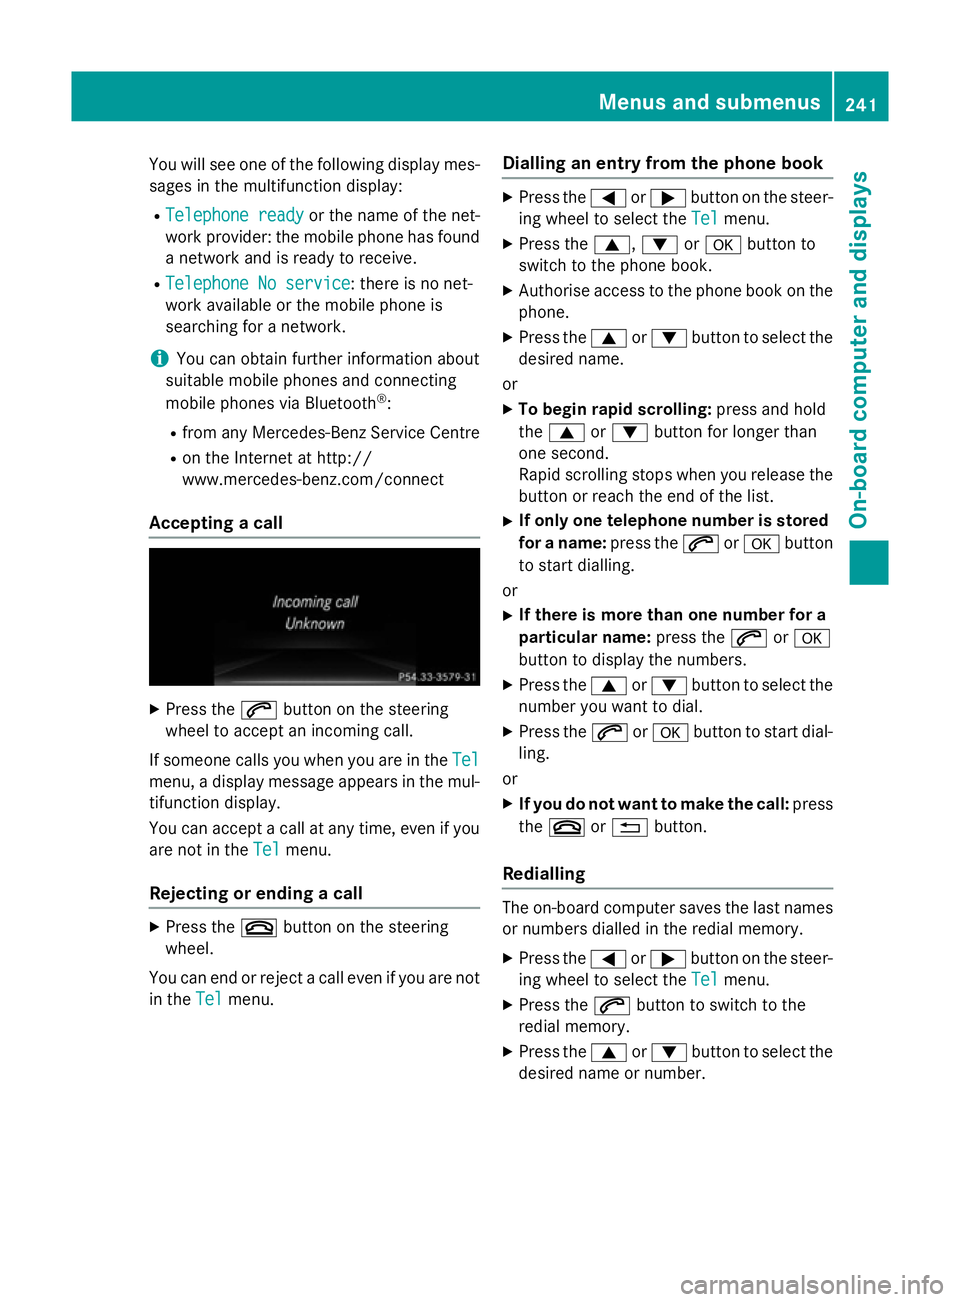
Accepting a call X
Press the 6button on the steering
wheel to accept an incoming call.
If someone calls you when you are in the Tel Tel
menu, a display message appears in the mul- tifunction display.
You can accept a call at any time, even if you
are not in the Tel Telmenu.
Rejecting or ending a call X
Press the ~button on the steering
wheel.
You can end or reject a call even if you are not
in the Tel
Telmenu. Dialling an entry from the phone book X
Press the =or; button on the steer-
ing wheel to select the Tel Telmenu.
X Press the 9,:ora button to
switch to the phone book.
X Authorise access to the phone book on the
phone.
X Press the 9or: button to select the
desired name.
or
X To begin rapid scrolling: press and hold
the 9 or: button for longer than
one second.
Rapid scrolling stops when you release the
button or reach the end of the list.
X If only one telephone number is stored
for a name: press the6ora button
to start dialling.
or
X If there is more than one number for a
particular name: press the6ora
button to display the numbers.
X Press the 9or: button to select the
number you want to dial.
X Press the 6ora button to start dial-
ling.
or
X If you do not want to make the call: press
the ~ or% button.
Redialling The on-board computer saves the last names
or numbers dialled in the redial memory.
X Press the =or; button on the steer-
ing wheel to select the Tel Telmenu.
X Press the 6button to switch to the
redial memory.
X Press the 9or: button to select the
desired name or number. Menus and submenus
241On-board computer and displays Z
Page 317 of 405
Mobile phone
Important safety notes G
WARNING
Operating mobile communications equip-
ment while driving distracts you from paying
attention to traffic conditions. This could also cause you to lose control of the vehicle. There
is a risk of an accident.
Use this device only when the vehicle is sta-
tionary.
You must observe the legal requirements for
the country in which you are currently driving when operating mobile communications
equipment in the vehicle.
If it is permitted by law to operate communi-
cations equipment while the vehicle is in
motion, you may only do so if the traffic sit-
uation permits. You may otherwise be dis-
tracted from the traffic conditions, cause an
accident and injure yourself and others.
Excessive levels of electromagnetic radiation
may cause damage to your health and to the
health of others. The use of an exterior aerial
takes into consideration the scientific discus- sion surrounding the possible health risk
posed by electromagnetic fields.
Mercedes-Benz recommends the use of an
approved exterior aerial. This ensures:
R optimal mobile phone reception quality in
the vehicle
R that mutual interference between the vehi-
cle electronics and mobile phones is mini-
mised
An exterior aerial has the following advan-
tages:
R it conducts the electromagnetic fields gen-
erated by a wireless device to the exterior
R the field strength in the vehicle interior is
lower than in a vehicle that does not have
an exterior aerial
Information on retrofitting two-way radios
and mobile phones (RF transmitters)
(Y page 384). General notes There are various mobile phone brackets that
may be fitted in your vehicle; in some cases,
these are country-specific.
More information on suitable mobile phones, mobile phone brackets and on connecting
Bluetooth ®
-capable mobile phones to
COMAND Online/Audio 20 can be obtained:
R at your Mercedes-Benz Service Centre
R on the Internet at http://www.mercedes-
benz.com/connect
The functions and services available when
you use the phone depend on your mobile
phone model and service provider.
Using a mobile phone To connect a mobile phone to the exterior
aerial and charge it, insert it into the mobile
phone bracket.
X Open the telephone compartment
(Y page 300).
X Place the mobile phone bracket into the
pre-installed fitting; see the separate instal-
lation instructions for the mobile phone fit-
ting.
X Insert the mobile phone into the mobile
phone bracket; see the separate installa-
tion instructions for the mobile phone fit-
ting.
i The mobile phone can also be operated
without being in the bracket. However, the charging function and aerial function are
not available.
In order to use Bluetooth ®
(SAP profile) on
your telephone module, you must first insert
the telephone module into the pre-installed
fitting. This connects it to the exterior aerial.
If you wish to charge the mobile phone, then
you must connect it to a USB port.
Further information on the telephone module
with Bluetooth ®
(SAP profile) can be found in
the Digital Owner's Manual. 314
FeaturesStowing and features
Page 373 of 405
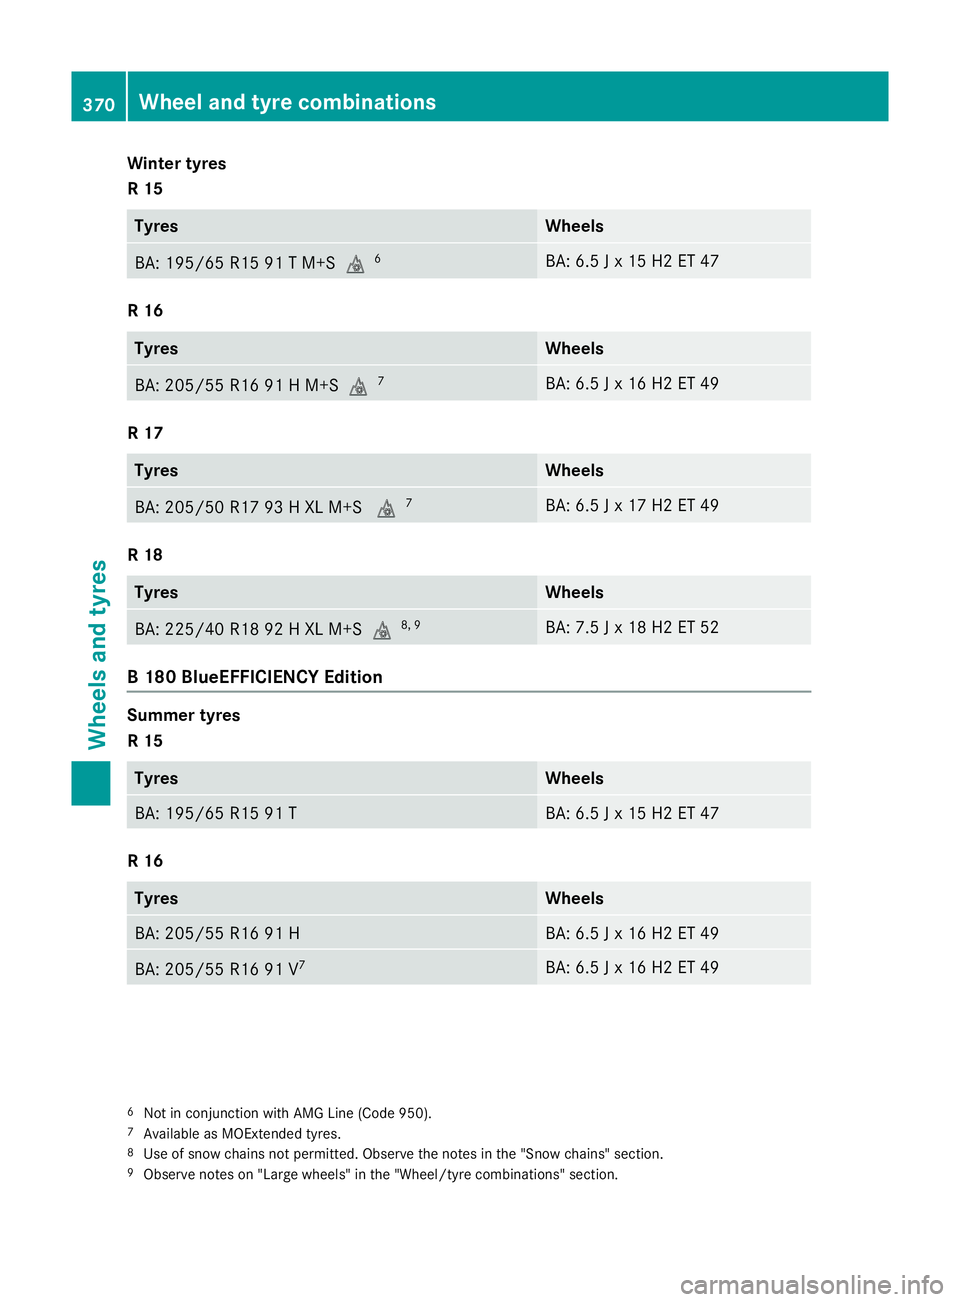
Winter tyres
R 15
Tyres Wheels
BA: 195/65 R15 91 T M+Si
6 BA: 6.5 J x 15 H2 ET 47
R 16
Tyres Wheels
BA: 205/55 R16 91 H M+Si
7 BA: 6.5 J x 16 H2 ET 49
R 17
Tyres Wheels
BA: 205/50 R17 93 H XL M+S
i7 BA: 6.5 J x 17 H2 ET 49
R 18
Tyres Wheels
BA: 225/40 R18 92 H XL M+Si
8, 9 BA: 7.5 J x 18 H2 ET 52
B 180 BlueEFFICIENCY Edition
Summer tyres
R 15
Tyres Wheels
BA: 195/65 R15 91 T BA: 6.5 J x 15 H2 ET 47
R 16
Tyres Wheels
BA: 205/55 R16 91 H BA: 6.5 J x 16 H2 ET 49
BA: 205/55 R16 91 V
7 BA: 6.5 J x 16 H2 ET 49
6
Not in conjunction with AMG Line (Code 950).
7 Available as MOExtended tyres.
8 Use of snow chains not permitted. Observe the notes in the "Snow chains" section.
9 Observe notes on "Large wheels" in the "Wheel/tyre combinations" section. 370
Wheel and tyre combinationsWheels and tyres
Page 375 of 405

R 18
Tyres Wheels
BA: 225/40 R18 92 Y XL
8, 9 BA: 7.5 J x 18 H2 ET 52
BA: 225/40 R18 92 W XL
7, 8, 9 BA: 7.5 J x 18 H2 ET 52
Winter tyres
R 15
Tyres Wheels
BA: 195/65 R15 91 T M+Si
6, 10, 11 BA: 6.5 J x 15 H2 ET 47
R 16
Tyres Wheels
BA: 205/55 R16 91 H M+S
i7 BA: 6.5 J x 16 H2 ET 49
R 17
Tyres Wheels
BA: 205/50 R17 93 H XL M+S
i7 BA: 6.5 J x 17 H2 ET 49
R 18
Tyres Wheels
BA: 225/40 R18 92 H XL M+S
i8, 9 BA: 7.5 J x 18 H2 ET 52
B 180 CDI BlueEFFICIENCY Edition
Summer tyres
R 15
Tyres Wheels
BA: 195/65 R15 91 T BA: 6.5 J x 15 H2 ET 47
8
Use of snow chains not permitted. Observe the notes in the "Snow chains" section.
9 Observe notes on "Large wheels" in the "Wheel/tyre combinations" section.
7 Available as MOExtended tyres.
6 Not in conjunction with AMG Line (Code 950).
10 Only for certain countries.
11 Only for B 180 CDI with Model type 246.212. Not in combination with the Sports package (Code 952). 372
Wheel and tyre combinationsWheels and tyres
Page 390 of 405
H
Environmental note
Dispose of service products in an environ-
mentally-responsible manner.
Service products include the following:
R fuels
R lubricants (e.g. engine oil, transmission oil)
R coolant
R brake fluid
R windscreen washer fluid
R climate control system refrigerant
Components and service products must be
matched. Only use products recommended
by Mercedes-Benz. Damage which is caused
by the use of products which have not been
recommended is not covered by the
Mercedes-Benz warranty or goodwill ges-
tures. They are listed in this Mercedes-Benz
Owner's Manual in the appropriate section.
You can identify service products approved
by Mercedes-Benz by the following inscrip-
tions on the container:
R MB-Freigabe (e.g. MB-Freigabe 229.51)
R MB Approval (e.g. MB Approval 229.51)
Other designations or recommendations indi- cate a level of quality or a specification in
accordance with an MB Sheet Number (e.g.
MB 229.5). They have not necessarily been
approved by Mercedes-Benz.
Other identifications, for example:
R 0 W-30
R 5 W-30
R 5 W-40
i Further information can be obtained from
any Mercedes-Benz Service Centre or on
the Internet at
http://bevo.mercedes-benz.com. Fuel
Important safety notes G
WARNING
Fuel is highly flammable. If you handle fuel
incorrectly, there is a risk of fire and explo-
sion.
You must avoid fire, naked flames, creating
sparks and smoking. Switch off the engine
and, if applicable, the auxiliary heating before refuelling. G
WARNING
Fuels are poisonous and hazardous to health. There is a danger of injury.
Do not swallow fuel or let it come into contact
with skin, eyes or clothing. Do not inhale fuel
vapours. Keep fuels out of the reach of chil-
dren.
If you or others come into contact with fuel,
observe the following:
R Wash the fuel off any affected areas of skin
with water and soap immediately.
R If you get fuel in your eyes, rinse them thor-
oughly with clean water immediately. Seek immediate medical attention.
R If fuel is swallowed, seek immediate medi-
cal attention. Do not induce vomiting.
R Change any clothing that has come into
contact with fuel immediately.
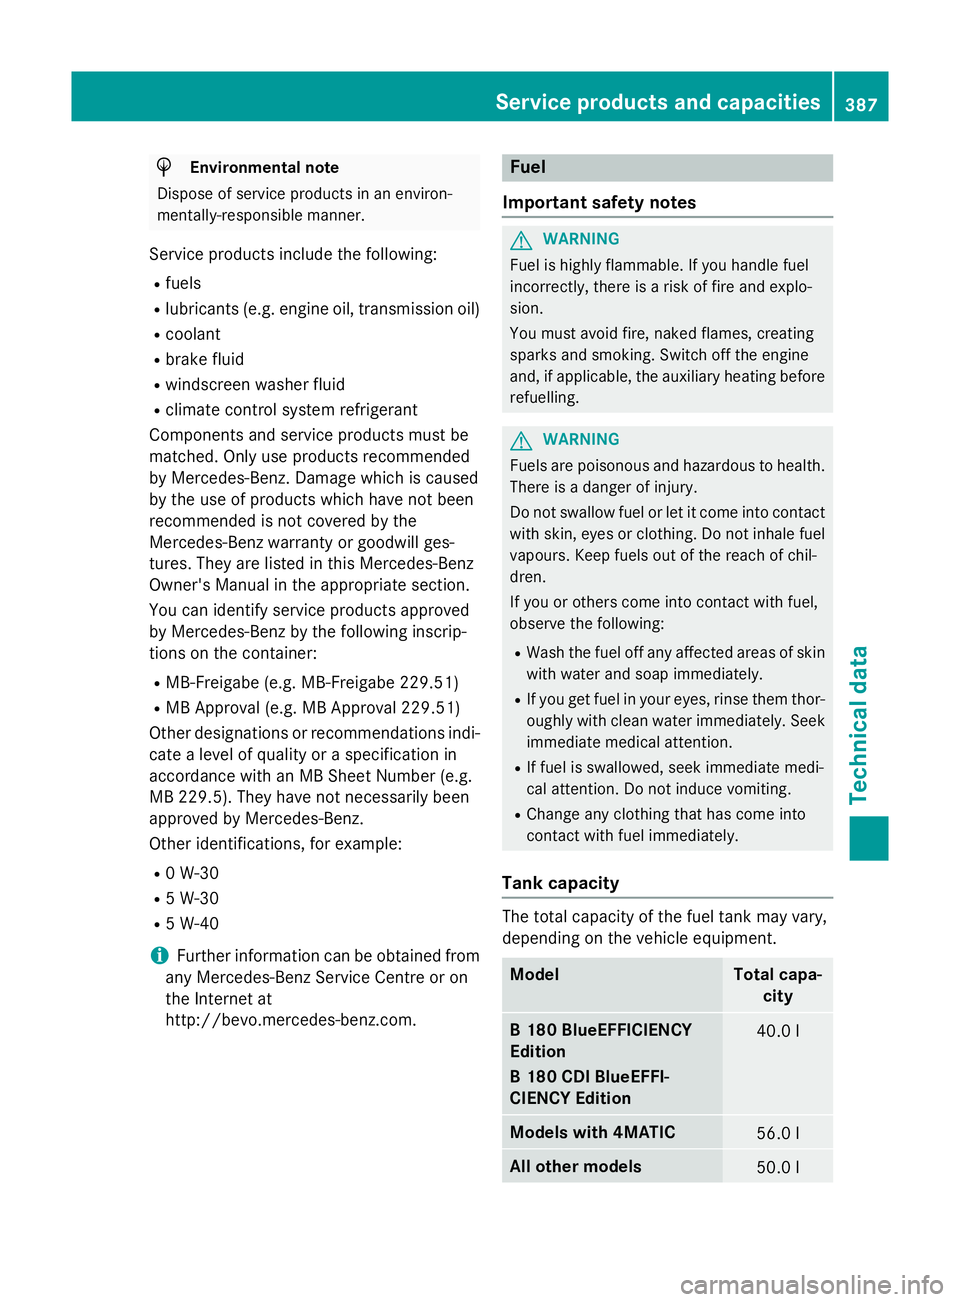
Tank capacity The total capacity of the fuel tank may vary,
depending on the vehicle equipment.
Model Total capa-
city B 180 BlueEFFICIENCY
Edition
B 180 CDI BlueEFFI-
CIENCY Edition
40.0 l
Models with 4MATIC
56.0 l
All other models
50.0 lService products and capacities
387Technical data Z
Page 394 of 405
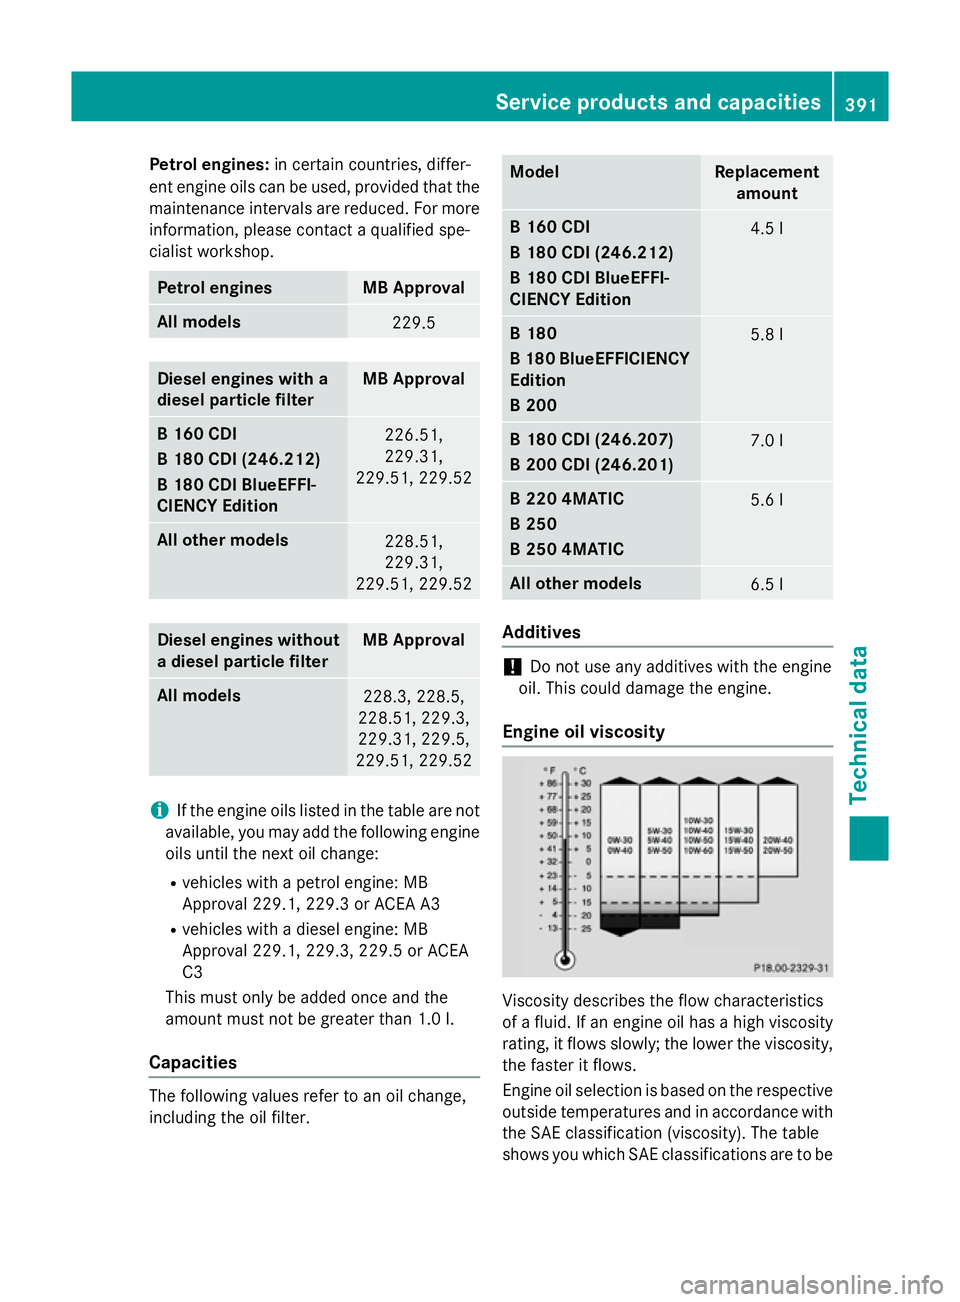
Petrol engines:
in certain countries, differ-
ent engine oils can be used, provided that the
maintenance intervals are reduced. For more
information, please contact a qualified spe-
cialist workshop. Petrol engines MB Approval
All models
229.5
Diesel engines with a
diesel particle filter MB Approval
B 160 CDI
B 180 CDI (246.212)
B 180 CDI BlueEFFI-
CIENCY Edition
226.51,
229.31,
229.51, 229.52 All other models
228.51,
229.31,
229.51, 229.52 Diesel engines without
a diesel particle filter MB Approval
All models
228.3, 228.5,
228.51, 229.3,
229.31, 229.5,
229.51, 229.52 i
If the engine oils listed in the table are not
available, you may add the following engine
oils until the next oil change:
R vehicles with a petrol engine: MB
Approval 229.1, 229.3 or ACEA A3
R vehicles with a diesel engine: MB
Approval 229.1, 229.3, 229.5 or ACEA
C3
This must only be added once and the
amount must not be greater than 1.0 l.
Ca pacities The following values refer to an oil change,
including the oil filter. Model Replacement
amount B 160 CDI
B 180 CDI (246.212)
B 180 CDI BlueEFFI-
CIENCY Edition
4.5 l
B 180
B 180 BlueEFFICIENCY
Edition
B 200 5.8 l
B 180 CDI (246.207)
B 200 CDI (246.201)
7.0 l
B 220 4MATIC
B 250
B 250 4MATIC
5.6 l
All other models
6.5 l
Additives
!
Do not use any additives with the engine
oil. This could damage the engine.
Engine oil viscosity Viscosity describes the flow characteristics
of a fluid. If an engine oil has a high viscosity
rating, it flows slowly; the lower the viscosity,
the faster it flows.
Engine oil selection is based on the respective outside temperatures and in accordance with
the SAE classification (viscosity). The table
shows you which SAE classifications are to be Service products and capacities
391Technical data Z