service indicator MERCEDES-BENZ B-CLASS HATCHBACK 2015 Owners Manual
[x] Cancel search | Manufacturer: MERCEDES-BENZ, Model Year: 2015, Model line: B-CLASS HATCHBACK, Model: MERCEDES-BENZ B-CLASS HATCHBACK 2015Pages: 293, PDF Size: 10.83 MB
Page 6 of 293
1, 2, 3 ...
12 V socket see Sockets A
ABS (Anti-lock Braking System) Display message ............................ 190
Function/notes ................................ 61
Important safety notes .................... 62
Warning lamp .................................2 16
Accident
Automatic measures after an acci-
dent ................................................. 48
Activating/deactivating air-recir-
culation mode ................................... .120
Activating/deactivating cooling
with air dehumidification ................. 116
Active light function ......................... 100
Active Parking Assist
Detecting parking spaces .............. 159
Display message ............................ 206
Exiting a parking space .................. 160
Function/notes ............................ .158
Important safety notes .................. 158
Parking .......................................... 159
ADAPTIVE BRAKE ................................. 67
Adaptive Brake Assist
Function/notes ................................ 64
Adaptive brake lights .......................... 65
Adaptive Highbeam Assist
Display message ............................ 203
Function/notes ............................ .101
Switching on/off ........................... 102
Additional speedometer ................... 186
Adjusting the headlamp range ........... 99
Aerial .................................................... 22
Air conditioning
General notes ................................ 114
Air pressure
see Tyre pressure
Air vents
Important safety notes .................. 123
Rear ............................................... 124
Setting the centre air vents ........... 123
Setting the side air vents .............. .123 Air-conditioning system
see Climate control
Airbag
Automatic front-passenger front
airbag deactivatio n .......................... 42
Introduction ..................................... 39
PASSENGER AIR BAG indicator
lamps ............................................... 35
Airbags
Display message ............................ 199
Front airbag (driver, front
passenger) ....................................... 40
Important safety guidelines ............. 39
Kneebag .......................................... .41
Sidebag ............................................ 41
Triggering ......................................... 46
Windowbag ...................................... 42
Alarm
ATA (Anti-Theft Alarm system) ......... 68
Switching off (ATA) .......................... 68
Switching the function on/off
(ATA) ................................................ 68
Alarm system
see ATA (Anti-Theft Alarm system)
Anti-glare film .................................... 238
Anti-lock braking system
see ABS (Anti-lock Braking System)
Anti-Theft Alarm system
see ATA (Anti-Theft Alarm system)
Aquaplaning ....................................... 150
Ashtray ............................................... 234
Assistance display (on-board com-
puter) .................................................. 182
Assistance menu (on-board com-
puter) .................................................. 182
ASSYST PLUS
Displaying a service message ........ 242
Driving abroad ............................... 242
Hiding a service message .............. 242
Information about Service ............. 242
Resetting the service interval dis-
play ................................................ 242
Service message ............................ 241
Special service requirements ......... 242
ATA (Anti-Theft Alarm system)
Activating/deactivating ................... 68
Function ........................................... 68 Index
3
Page 14 of 293
Motorway mode ............................. 101
Parking lamps ..................................98
Rear foglamp .................................. .98
Setting exterior lighting ................... 97
Side lamps ....................................... 98
Switching the daytime driving
lights on/off (on-board com-
puter) ............................................. 186
Turn signals ..................................... 99
LIM indicator lamp
Cruise control ................................ 151
Variable SPEEDTRONIC ................. 153
Limiting the speed
see SPEEDTRONIC
Loading guidelines ............................ 224
Locking
see Central locking
Locking (doors)
Automatic ........................................ 79
Emergency locking ........................... 80
From inside (central locking but-
ton) .................................................. 79
Locking centrally
see Central locking
Locking verification signal (on-
board computer) ............................... 187
Luggage compartment cover
Fitting/removing ........................... 230
Important safety notes .................. 229
Notes/function .............................. 229
Luggage compartment enlarge-
ment ................................................... 228
Luggage compartment floor
Adjusting the height ....................... 232
Important safety notes .................. 231
opening/closing ............................ 231
stowage well, under ....................... 231
Lumbar support
Adjusting the 4-way lumbar sup-
port .................................................. 90 M
M+S tyres ........................................... 268
Main-beam headlamps
Adaptive Highbeam Assist ............. 101
Changing bulb s.............................. 105
Display message ............................ 202 Switching on/of
f.............................. 99
Map (Navigation)
Switching the range on the map
on/off ............................................ 138
Matt finish (cleaning instructions) .. 244
Maximum charge current
Setting (charging cable) ................. 140
Memory card (audio) ......................... 180
Memory function ................................. 96
Mercedes-Benz emergency call
system
Switch in the overhead control
panel .............................................. 236
Mercedes-Benz Intelligent Drive
Traffic Sign Assist .......................... 166
Mercedes-Benz Service Centre
see Qualified specialist workshop
Message memory (on-board com-
puter) .................................................. 189
Messages
see Display messages
Mirror turn signal
Cleaning ......................................... 245
Mirrors
see Exterior mirrors
see Rear-view mirror
see Vanity mirror (in sun visor)
Mobile phone
Frequencies ................................... 280
Installation ..................................... 280
Menu (on-board computer) ............ 181
Notes/placing in the bracket ......... 236
Transmission output (maximum) .... 280
Mobile telephone
Pre-installed bracket ...................... 238
Modifying the programming (key) ..... 73
MOExtended tyres ............................. 250
Motorway mode ................................ 101
MP3
Operating ....................................... 180
Multifunction display
Function/note s............................. 175
Permanent display ......................... 186
Multifunction steering wheel
Operating the on-board compute r..1 74
Overview .......................................... 29 Index
11
Page 15 of 293
N
Navigation Menu (on-board computer) ............ 178
Notes on running in a new vehicle .. 125O
Occupant safety Automatic front-passenger front
airbag deactivation .......................... 42
Automatic measures after an acci-
dent ................................................. 48
Children in the vehicle ..................... 49
Important safety note s.................... 34
PASSENGER AIRBAG indicator
lamp ................................................. 35
Pets in the vehicle ........................... 61
PRE-SAFE ®
(anticipatory occu-
pant protection) ............................... 48
Restraint system introduction .......... 34
Restraint system warning lamp ........ 34
Seat belts ........................................ 35
Odometer ........................................... 176
On-board computer
Assistance graphic menu ............... 182
Assistance menu ........................... 182
Audio menu ................................... 180
Convenience submenu .................. 188
Display messages .......................... 189
Displaying a service message ........ 242
E‑CELL menu ................................. 184
Factory settings ............................. 188
Important safety notes .................. 172
Instrument cluster submenu .......... 186
Light submenu ............................... 186
Menu overview .............................. 176
Message memory .......................... 189
Navigation menu ............................ 178
Operating video DVD ..................... 180
Operation ....................................... 174
Service menu ................................. 184
Settings menu ............................... 184
Standard display ............................ 176
Telephone menu ............................ 181
Trip menu ...................................... 176
Vehicle submenu ........................... 187 Opening and closing the side trim
panels
................................................. 106
Operating instructions
Vehicle equipment ........................... 20
Operating safety
Declaration of conformity ................ 22
Important safety note ...................... 20
Operating system
see On-board computer
Outside temperature display ........... 172
Overhead control panel ...................... 33
Override feature
Rear side window s........................... 61 P
Paint code .......................................... 281
Paintwork (cleaning instructions) ... 244
Parking
Important safety notes .................. 145
Parking brake ................................ 146
Position of exterior mirror, front-
passenger side ................................. 95
Reversing camera .......................... 162
see Active Parking Assist
see PARKTRONIC
Parking aid
Active Parking Assist ..................... 158
see Exterior mirrors
see PARKTRONIC
Parking assistance
see PARKTRONIC
Parking brake
Display message ............................ 193
Electric parking brake .................... 146
Warning lamp ................................. 222
Parking lamps
Changing bulb s.............................. 106
Display message ............................ 202
Switching on/of f.............................. 98
Parking lamps (changing bulbs) ...... 106
PARKTRONIC
Deactivating/activating ................. 157
Driving system ............................... 155
Function/note s............................. 155
Important safety notes .................. 155
Problem (fault) ............................... 158
Sensor range ................................. 156 12
Index
Page 17 of 293
Displays in the Audio displa
y......... 162
Displays in the COMAND display ... 162
Function/note s............................. 162
Switching on/of f........................... 162
Reversing feature
Side windows ................................... 82
Reversing lamp
Changing bulb s.............................. 107
Reversing lamps
Display message ............................ 202
Roof carrier ........................................ 232
Roof lining and carpets (cleaning
instructions) ...................................... 247
Roof load (maximum) ........................ 284S
Safety Children in the vehicle ..................... 49
Safety net
Attaching ....................................... 230
Important safety information ......... 230
Safety system
see Driving safety systems
Seat
Folding the backrest (rear com-
partment) forwards/back .............. 228
Seat belt
Centre rear-compartment sea t........ 38
Correct usage .................................. 37
Switching belt adjustment on/off
(on-board computer) ...................... 188
Seat belts
Adjusting the driver's and front-
passenger seat belt ......................... 38
Adjusting the height ......................... 37
Cleaning ......................................... 247
Display message ............................ 197
Fastening ......................................... 37
Important safety guidelines ............. 36
Introduction ..................................... 35
Rear seat belt status indicator ......... 39
Releasing ......................................... 38
Warning lamp ................................. 214
Warning lamp (function) ................... 39
Seats
Adjusting (electrically) ..................... 88
Adjusting (manually) ........................ 88 Adjusting the 4-way lumbar sup-
port .................................................. 90
Adjusting the head restraint ............ 89
Cleaning the cover ......................... 247
Correct driver's seat position ........... 86
Important safety notes .................... 87
Seat heating problem ...................... 92
Storing settings (memory func-
tion) ................................................. 96
Switching seat heating on/of
f......... 90
Securing a load .................................. 229
Securing luggage ............................... 229
Selector lever
Cleaning ......................................... 247
see DIRECT SELECT lever
Sensors (cleaning instructions) ....... 245
Service
see ASSYST PLUS
Service Centre
see Qualified specialist workshop
Service menu (on-board com-
puter) .................................................. 184
Service message
see ASSYST PLUS
Service products
Brake fluid ..................................... 283
Coolant (engine) ............................ 283
Important safety notes .................. 282
Washer fluid ................................... 284
Setting the air distribution ............... 117
Setting the airflow ............................ 118
Setting the maximum charge cur-
rent (on-board computer) ................. 185
Settings
Factory (on-board computer) ......... 188
On-board compute r....................... 184
Side lamps
Switching on/of f.............................. 98
Side windows
Convenience closing ........................ 83
Convenience opening ...................... 83
Important safety notes .................... 82
Opening/closing .............................. 83
Problem (malfunction) ..................... 85
Resetting ......................................... 84
Reversing feature ............................. 82
Sidebag ................................................ 41 14
Index
Page 47 of 293
This poses an increased risk of injury or even
fatal injury.
Always move the front-passenger seat as far
back as possible and fully retract the seat
cushion length. Always make sure that the
shoulder belt strap is correctly routed from
the vehicle belt outlet to the shoulder belt
guide on the child restraint system. The shoul-
der belt strap must be routed forwards and
downwards from the vehicle belt outlet. If
necessary, adjust the vehicle belt outlet and
the front-passenger seat accordingly. Always
observe the information about suitable posi-
tioning of the child restraint system in this
Owner's Manual as well as the child restraint system manufacturer's installation instruc-
tions.
If the automatic front-passenger front airbag
deactivation system detects that:
R the front-passenger seat is unoccupied, the
PASSENGER AIR BAG OFF indicator lamp
lights up after the system self-test and
remains lit. This indicates that the front-
passenger front airbag is disabled.
R the front-passenger seat is occupied by a
child in a rearward-facing child restraint sys-
tem, the PASSENGER AIR BAG OFF indicator
lamp lights up after the system self-test and
remains lit. This indicates that the front-
passenger front airbag is disabled.
But in the case of a child in a rearward-facing
child restraint, the PASSENGER AIR BAG ON
indicator lamp can light up after the system
self-test and remain lit. This indicates that the
front-passenger front airbag is enabled. The
result of the classification is dependent on,
among other factors, the child restraint sys-
tem and the child's build. It is recommended
that you fit the child restraint system to a
suitable rear seat.
R the front-passenger seat is occupied by a
child in a forward-facing child restraint sys-
tem, either the PASSENGER AIR BAG ON or
PASSENGER AIR BAG OFF indicator lamp
lights up and remains lit after the system self- test depending on the result of the classifica-tion. The result of the classification is depend-
ent on, among other factors, the child
restraint system and the child's build. Move the front-passenger seat as far back as
possible. Always observe the information in
"Child restraint systems on the front-
passenger seat" (Y page 52) and in "Suita-
ble positioning of the child restraint system"
(Y page 54). Alternatively, you can fit the
child restraint system to a suitable rear seat.
R the front-passenger seat is occupied by a per-
son with a smaller build (e.g. a teenager or
small adult), either the PASSENGER AIR BAG
ON or PASSENGER AIR BAG OFF indicator
lamp lights up and remains lit after the system
self-test depending on the result of the clas-
sification.
- if the PASSENGER AIR BAG ON indicator
lamp lights up, move the front-passenger
seat as far back as possible. Alternatively, a
person with a small build can sit on a rear
seat.
- if the PASSENGER AIR BAG OFF indicator
lamp is lit, a person with a smaller build
should not use the front-passenger seat.
R the front-passenger seat is occupied by an
adult or a person with a build corresponding
to that of an adult, the PASSENGER AIR BAG
ON indicator lamp lights up after the system
self-test and remains lit. This indicates that
the front-passenger front airbag is enabled.
If children are travelling in the vehicle, be sure to
observe the notes on "Children in the vehicle"
(Y page 49).
If the automatic front-passenger front airbag
deactivation system is malfunctioning, the red
6 restraint system warning lamp in the
instrument cluster and the PASSENGER AIR
BAG OFF indicator lamp light up simultaneously.
The front-passenger front airbag is disabled in
this case and does not deploy during an acci-
dent. Have the system checked as soon as pos-
sible by qualified technicians. Consult a
Mercedes-Benz Service Centre. The front-
passenger seat should only be repaired at a
Mercedes-Benz Service Centre.
If the front-passenger seat, the seat cover or the seat cushion is damaged, have the necessary
repair work carried out at a Mercedes-Benz Ser-vice Centre.
For safety reasons, Mercedes-Benz recom-
mends that you only use a child restraint system
which has been tested and approved by
Mercedes-Benz in combination with the auto-
matic front-passenger front airbag deactivation
system. 44
Occupant safetySafety
Page 49 of 293
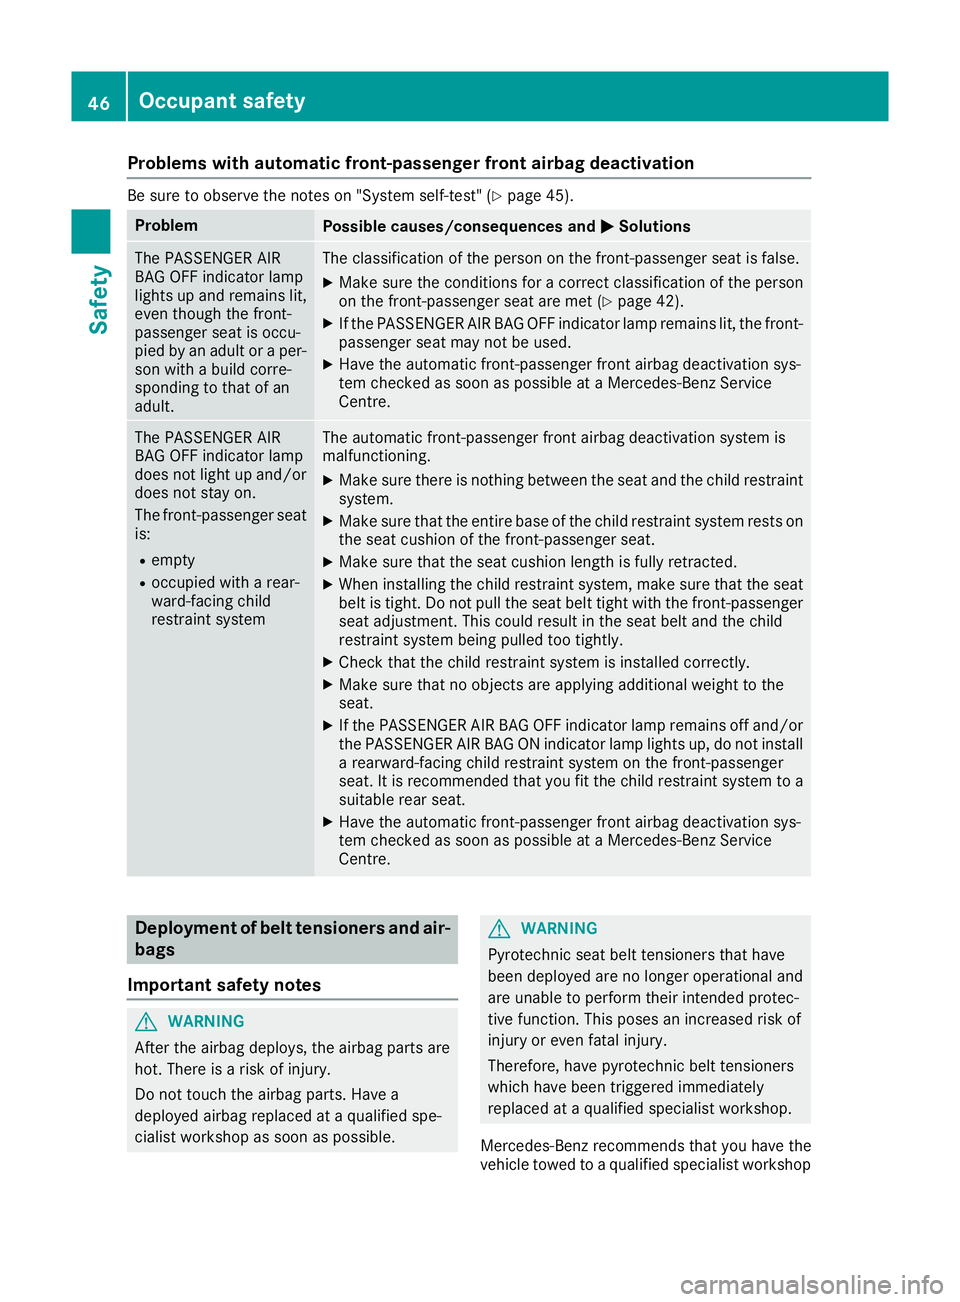
Problems with automatic front-passenger front airbag deactivation
Be sure to observe the notes on "System self-test" (Y
page 45).Problem
Possible causes/consequences and
M
MSolutions The PASSENGER AIR
BAG OFF indicator lamp
lights up and remains lit,
even though the front-
passenger seat is occu-
pied by an adult or a per-
son with a build corre-
sponding to that of an
adult. The classification of the person on the front-passenger seat is false.
X Make sure the conditions for a correct classification of the person
on the front-passenger seat are met (Y page 42).
X If the PASSENGER AIR BAG OFF indicator lamp remains lit, the front-
passenger seat may not be used.
X Have the automatic front-passenger front airbag deactivation sys-
tem checked as soon as possible at a Mercedes-Benz Service
Centre. The PASSENGER AIR
BAG OFF indicator lamp
does not light up and/or
does not stay on.
The front-passenger seatis:
R empty
R occupied with a rear-
ward-facing child
restraint system The automatic front-passenger front airbag deactivation system is
malfunctioning.
X Make sure there is nothing between the seat and the child restraint
system.
X Make sure that the entire base of the child restraint system rests on
the seat cushion of the front-passenger seat.
X Make sure that the seat cushion length is fully retracted.
X When installing the child restraint system, make sure that the seat
belt is tight. Do not pull the seat belt tight with the front-passenger
seat adjustment. This could result in the seat belt and the child
restraint system being pulled too tightly.
X Check that the child restraint system is installed correctly.
X Make sure that no objects are applying additional weight to the
seat.
X If the PASSENGER AIR BAG OFF indicator lamp remains off and/or
the PASSENGER AIR BAG ON indicator lamp lights up, do not install
a rearward-facing child restraint system on the front-passenger
seat. It is recommended that you fit the child restraint system to a suitable rear seat.
X Have the automatic front-passenger front airbag deactivation sys-
tem checked as soon as possible at a Mercedes-Benz Service
Centre. Deployment of belt tensioners and air-
bags
Important safety notes G
WARNING
After the airbag deploys, the airbag parts are
hot. There is a risk of injury.
Do not touch the airbag parts. Have a
deployed airbag replaced at a qualified spe-
cialist workshop as soon as possible. G
WARNING
Pyrotechnic seat belt tensioners that have
been deployed are no longer operational and
are unable to perform their intended protec-
tive function. This poses an increased risk of
injury or even fatal injury.
Therefore, have pyrotechnic belt tensioners
which have been triggered immediately
replaced at a qualified specialist workshop.
Mercedes-Benz recommends that you have the
vehicle towed to a qualified specialist workshop 46
Occupant safetySafety
Page 114 of 293
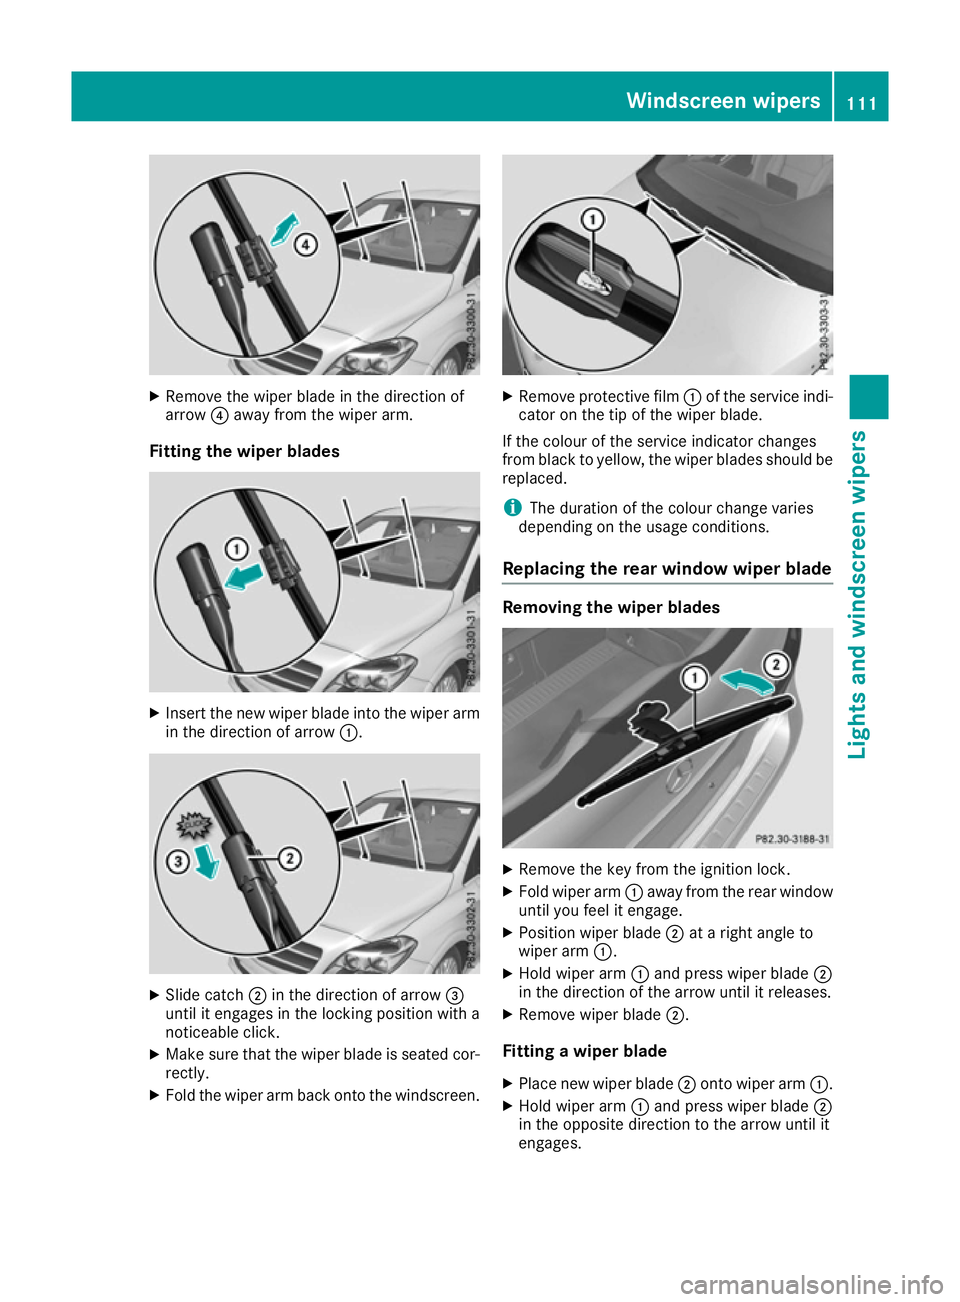
X
Remove the wiper blade in the direction of
arrow ?away from the wiper arm.
Fitting the wiper blades X
Insert the new wiper blade into the wiper arm
in the direction of arrow :.X
Slide catch ;in the direction of arrow =
until it engages in the locking position with a
noticeable click.
X Make sure that the wiper blade is seated cor-
rectly.
X Fold the wiper arm back onto the windscreen. X
Remove protective film :of the service indi-
cator on the tip of the wiper blade.
If the colour of the service indicator changes
from black to yellow, the wiper blades should be replaced.
i The duration of the colour change varies
depending on the usage conditions.
Replacing the rear window wiper blade Removing the wiper blades
X
Remove the key from the ignition lock.
X Fold wiper arm :away from the rear window
until you feel it engage.
X Position wiper blade ;at a right angle to
wiper arm :.
X Hold wiper arm :and press wiper blade ;
in the direction of the arrow until it releases.
X Remove wiper blade ;.
Fitting a wiper blade
X Place new wiper blade ;onto wiper arm :.
X Hold wiper arm :and press wiper blade ;
in the opposite direction to the arrow until it
engages. Windscreen wipers
111Lights and windscreen wipers Z
Page 139 of 293
If other devices are protected by the same pro-
tective device, these are switched off as well
when the protective device is triggered. Ensure
that these other devices are still operational
after reactivating the protection device. Influences on the charging behaviour
and the charge state of the high-volt-
age battery
Terms of use Observe the following notes:
R information on exceptions and limitations in
warranty documentation and in the related
Service Booklet
R maintenance notes for the high-voltage bat-
tery in the Service Booklet
Operation The vehicle is equipped with a high-voltage bat-
tery for driving. The high-voltage battery stores
the energy needed to operate the electric motor and releases it again.
The electric motor uses energy that has been
stored in the high-voltage battery when pulling
away, accelerating and during the journey.
In overrun mode (except D+), kinetic energy is
converted by means of energy recuperation into
electrical energy and stored in the high-voltage
battery.
The high-voltage battery can be charged as fol-
lows:
R through energy recuperation while the vehicle
is in motion
R with the charging cable at a mains socket
while the vehicle is stationary
R with the charging cable at a charging station/
wallbox while the vehicle is stationary
The high-voltage battery can be charged in a
single-phase nominal voltage range from 100 V to 240 V. The corresponding three-phase nom-
inal voltage range enables charging up to 400 V.
If the charge status drops to less than 13%, the
high-voltage battery reserve indicator lamp
lights up in the instrument cluster. Charge the
high-voltage battery as soon as possible.
Below a charge status of 5%, the performance of the vehicle is reduced. The vehicle's high-volt- age electrical system switches off at a charge
status of 0%.
Use of the pre-entry climate control function
may mean that the high-voltage battery is not
fully charged.
High and low outside temperatures Low outside temperatures
The efficiency of the high-voltage battery is sig-
nificantly reduced at very low outside tempera-
tures. The high-voltage battery is then no longer
able to provide the normal electrical power out- put.
High outside temperatures
To prevent damage to the high-voltage battery
due to very high outside temperatures, the max-imum power output of the high-voltage battery
is reduced automatically.
The E-CELL display indicates the maximum
amount of power available (Y page 173).
Notes on battery care Avoid storing or transporting the vehicle in high
temperatures over a long period (e.g. container
transport).
If you park the vehicle and leave it stationary for longer periods, connect it to a power supply.
Temperatures below Ò25 † and over 40 †,
which affect the vehicle for a period of more
than seven days, can cause irreversible damage.
Discharged battery The vehicle's high-voltage electrical system
switches off if the high-voltage battery is com-
pletely discharged. 30 seconds prior to this, you
are informed of the switch-off by the Battery Battery
level
level too
toolow.
low. Stop
Stopand
andcharge
charge immedi‐
immedi‐
ately
ately message. This protects the battery from
exhaustive discharge.
It is not possible to restart the drive system until after charging.
Do not leave the vehicle parked for longer than
14 days with a high-voltage battery charge sta-
tus below 20%.
You can check the charge status in the charge
level display (Y page 174).
Further information on the "Energy flow display" can be found in the "Trip" menu (Y page 177).136
High-voltage batteryDriving and parking
Page 140 of 293
Energy consumption and range
This range is reduced by:
R high and low outside temperatures
R a non-anticipatory driving style
R switching on consumers, e.g. air-conditioning
system or heating.
The battery's physical characteristics are such
that leaving the vehicle parked for an extended
period at low outdoor temperatures without
charging it can lead to:
R a reduction in battery performance
R longer charge times
In extreme cases, this could mean that the vehi- cle cannot be started. For this reason, connect
the charging cable when leaving the vehicle
parked for long periods at low outdoor temper-
atures.
As a result of its basic characteristics, the
amount of energy available from the high-volt-
age battery decreases over the course of its life.
This reduces:
R the maximum range that can be achieved by
the vehicle
R the maximum output (acceleration) of the
vehicle
You can actively reduce the energy consump-
tion of your vehicle in a number of ways, for
example, by:
R an anticipatory driving style
R reducing the use of electrical consumers
R having the vehicle regularly maintained
The charging time of the high-voltage battery
may change over the course of its life.
Observe the displays on energy usage
(Y page 178) and range (Y page 178).
RANGE PLUS If you activate RANGE PLUS, the operating win-
dow of the battery will be extended at the next
charging process. An extended driving range will
be available to you for the next journey.
Using RANGE PLUS shortens the service life of
the battery. Therefore, only use RANGE PLUS if, for example:
R long journeys are planned or
R the availability of charging stations at the des-
tination is limited The more often RANGE PLUS is used, the more
the extended range is reduced.
Therefore always check the range display for
every journey (Y
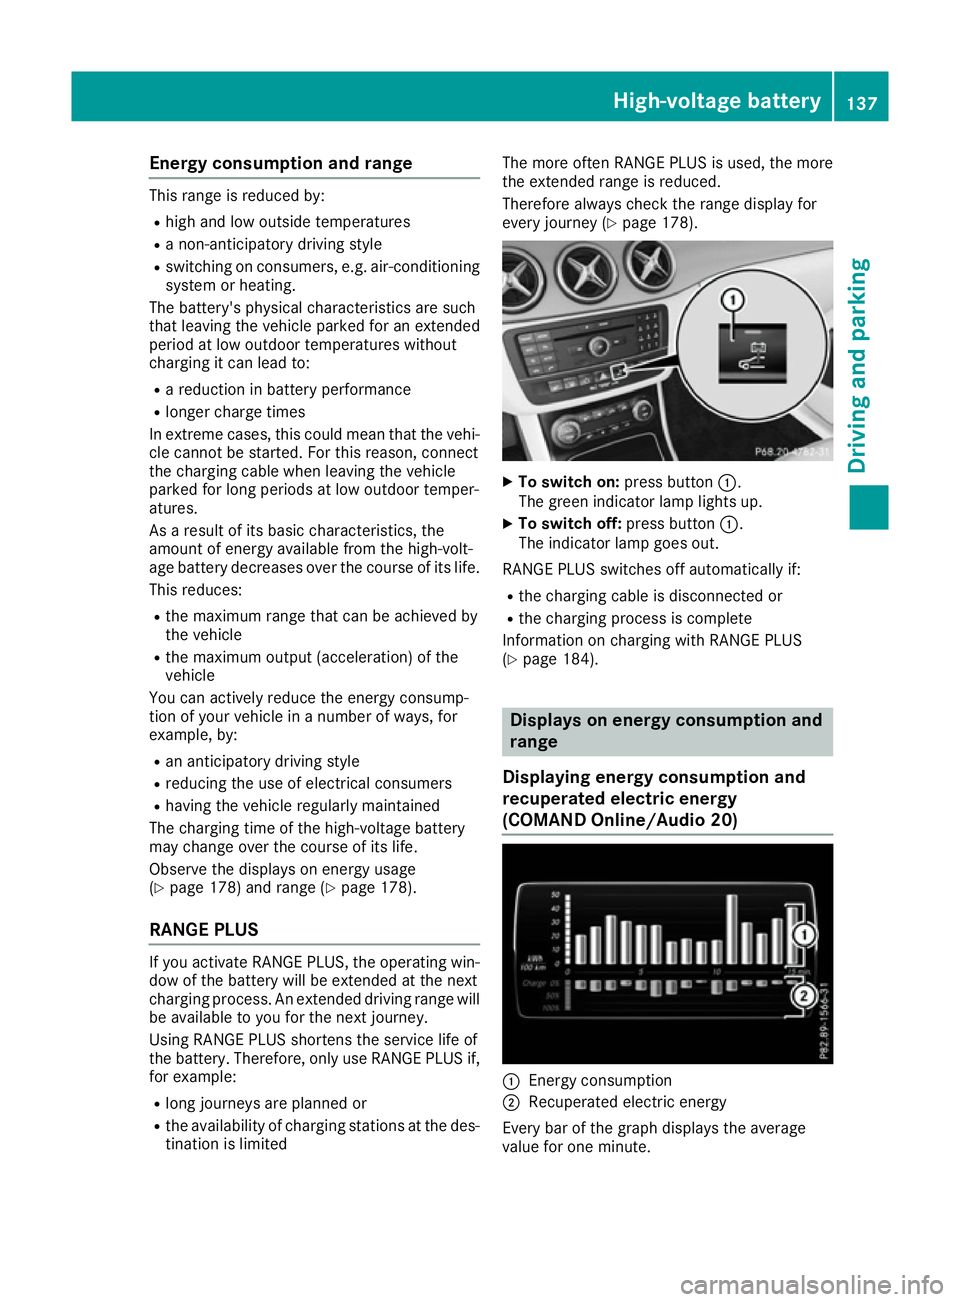
page 178). X
To switch on: press button:.
The green indicator lamp lights up.
X To switch off: press button:.
The indicator lamp goes out.
RANGE PLUS switches off automatically if:
R the charging cable is disconnected or
R the charging process is complete
Information on charging with RANGE PLUS
(Y page 184). Displays on energy consumption and
range
Displaying energy consumption and
recuperated electric energy
(COMAND Online /Audio 20) :
Energ y consumption
; Recuperated electric energy
Every bar of the graph displays the average
value for one minute. High-voltage battery
137Driving and parking Z
Page 169 of 293
X
Select the assistance graphics display for
ATTENTION ASSIST using the on-board com-
puter (Y page 182).
The following information is displayed:
R the length of the journey since the last break
R the attention level determined by ATTENTION
ASSIST ( Attention level
Attention level), displayed in a
bar display in five levels from high to low
R if ATTENTION ASSIST is unable to calculate
the attention level and cannot issue a warn-
ing, the System suspended
System suspended message
appears. The bar display then changes the
display, e.g. if you are driving at a speed below 60 km/h or above 200 km/h.
Activating ATTENTION ASSIST X
Activate ATTENTION ASSIST using the on-
board computer (Y page 183).
The system determines the attention level of
the driver depending on the setting selected:
If Standard
Standard is selected: the sensitivity with
which the system determines the attention level
is set to normal.
If Sensitive Sensitive is selected: the sensitivity is set
higher. The attention level detected by ATTEN-
TION ASSIST is adapted accordingly and the
driver is warned earlier.
When ATTENTION ASSIST is deactivated, the
é symbol appears in the multifunction dis-
play in the assistance graphic display.
When ATTENTION ASSIST has been deactivated, it is automatically reactivated after the engine
has been switched off. The sensitivity selected
corresponds to the last selection activated
(standard/sensitive).
Warning in the multifunction display If fatigue or increasing lapses in concentration
are detected, a warning appears in the multi-
function display:
ATTENTION ASSIST ATTENTION ASSIST Take a
Take a
break!
break!.
In addition to the message shown in the multi-
function display, you will then hear a warning
tone.
X If necessary, take a break.
X Confirm the message by pressing the a
button on the steering wheel.
On long journeys, take regular breaks in good
time that allow for adequate recuperation. If you do not take a break and ATTENTION ASSIST still detects increasing lapses in concentration, you
will be warned again after 15 minutes at the
earliest. This will only happen if ATTEN-
TION ASSIST still detects typical indicators of
fatigue or increasing lapses in concentration.
If a warning is output in the multifunction dis-
play, a service station search is performed in
COMAND Online. You can select a service sta-
tion and navigation to this service station will
then begin. This function can be activated and
deactivated in COMAND Online. Traffic Sign Assist
General notes Traffic Sign Assist displays the maximum speed
permitted and overtaking restrictions to the
driver in the instrument cluster. Driving onto a
section of road in the wrong direction triggers a
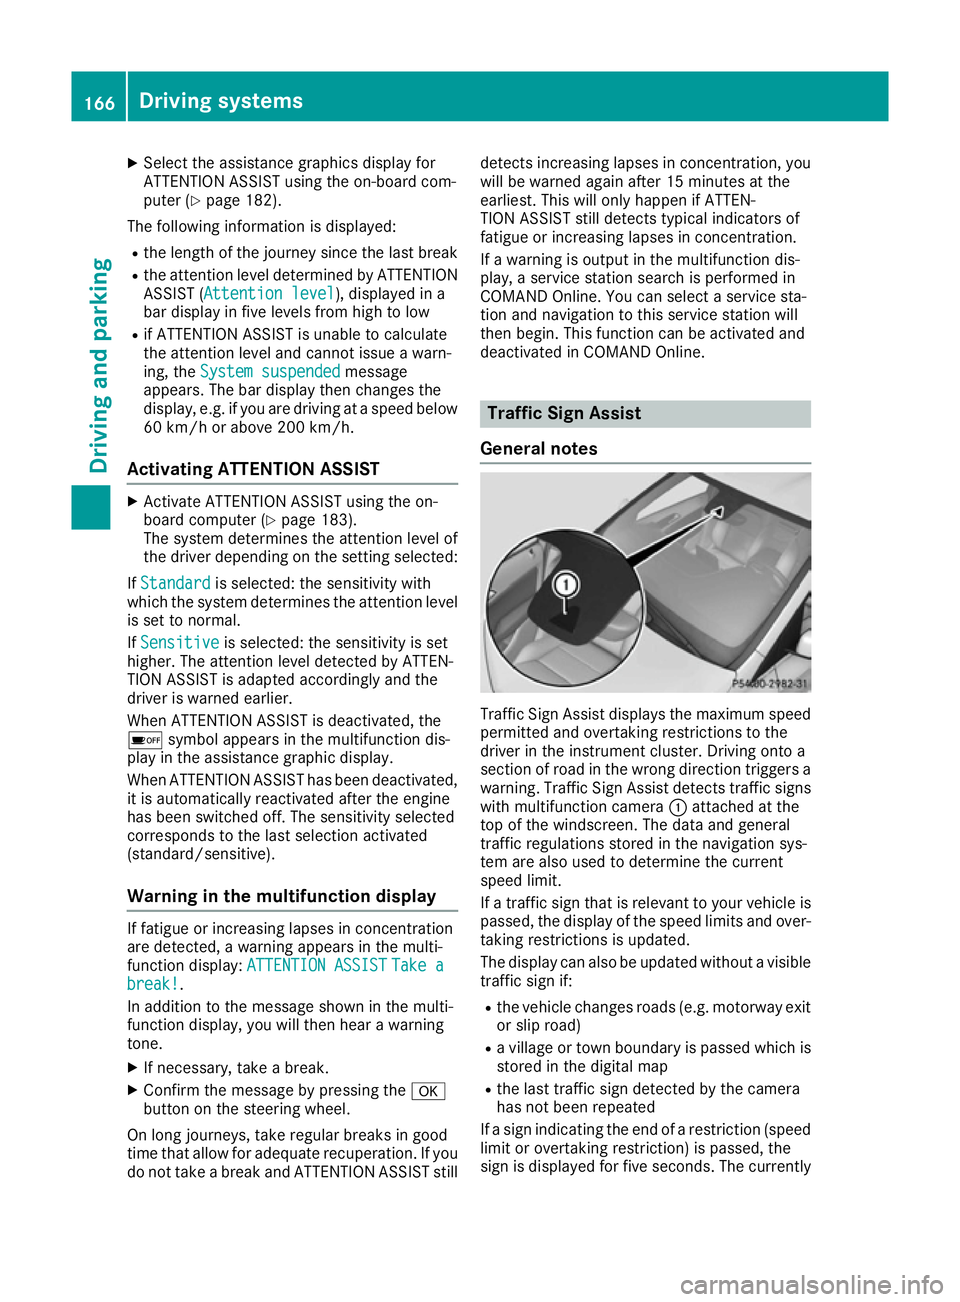
warning. Traffic Sign Assist detects traffic signs with multifunction camera :attached at the
top of the windscreen. The data and general
traffic regulations stored in the navigation sys-
tem are also used to determine the current
speed limit.
If a traffic sign that is relevant to your vehicle is passed, the display of the speed limits and over-
taking restrictions is updated.
The display can also be updated without a visible traffic sign if:
R the vehicle changes roads (e.g. motorway exit
or slip road)
R a village or town boundary is passed which is
stored in the digital map
R the last traffic sign detected by the camera
has not been repeated
If a sign indicating the end of a restriction (speed limit or overtaking restriction) is passed, the
sign is displayed for five seconds. The currently 166
Driving systemsDriving and parking