wheel MERCEDES-BENZ B-CLASS HATCHBACK 2015 Owners Manual
[x] Cancel search | Manufacturer: MERCEDES-BENZ, Model Year: 2015, Model line: B-CLASS HATCHBACK, Model: MERCEDES-BENZ B-CLASS HATCHBACK 2015Pages: 293, PDF Size: 10.83 MB
Page 277 of 293
Storing wheels
Store wheels in a cool, dry and preferably dark
place if they are not being used. Protect the
tyres against oil and grease. Fitting a wheel
Preparing the vehicle X
Stop the vehicle on solid, non-slippery and
level ground.
X Apply the electric parking brake manually.
X Move the front wheels to the straight-ahead
position.
X Shift the transmission to position P.
X Switch off the drive system.
X Vehicles without KEYLESS-GO: remove the
key from the ignition lock.
X Vehicles with KEYLESS-GO start-function
or KEYLESS-GO: open the driver's door.
The on-board electronics now have status 0.
This is the same as the key having been
removed.
X Vehicles with KEYLESS-GO start-function
or KEYLESS-GO: remove the Start/Stop but-
ton from the ignition lock (Y page 126).
X If included in the vehicle equipment, remove
the tyre-change tool kit from the vehicle.
X Safeguard the vehicle against rolling away
(Y page 145).
i Apart from some country-specific variants,
vehicles are not equipped with tyre-changing
tools. Some tools for changing a wheel are
specific to the vehicle. For more information
on which tools are required to perform a
wheel change on your vehicle, consult a quali- fied specialist workshop.
Necessary tyre-changing tools may include,
for example:
R Jack
R Wheel chock
R Wheel wrench Securing the vehicle against rolling
away
If your vehicle is equipped with a wheel chock, it
can be found in the tyre-change tool kit
(Y page 249).
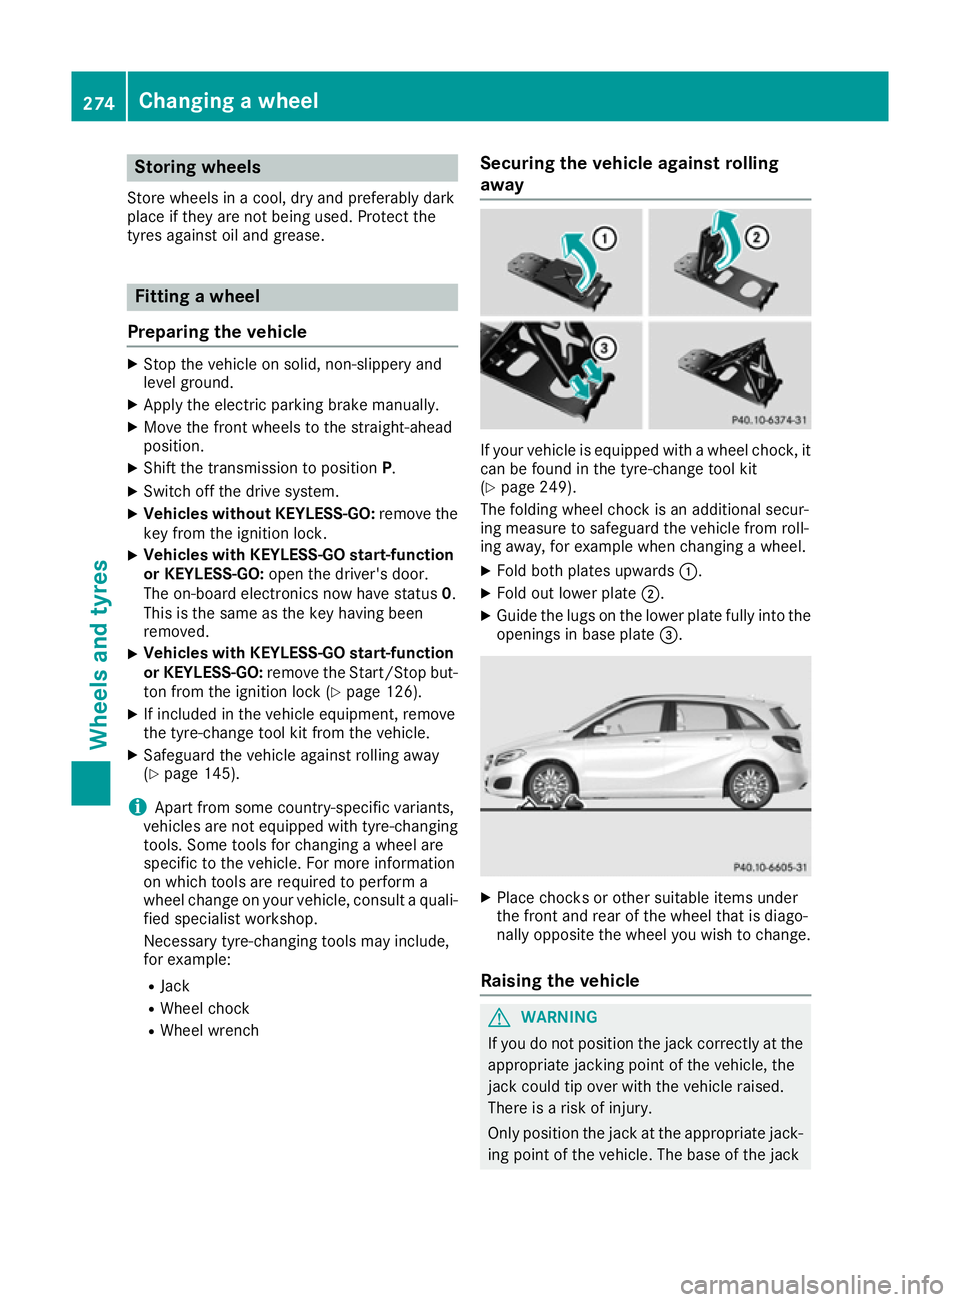
The folding wheel chock is an additional secur-
ing measure to safeguard the vehicle from roll-
ing away, for example when changing a wheel.
X Fold both plates upwards :.
X Fold out lower plate ;.
X Guide the lugs on the lower plate fully into the
openings in base plate =. X
Place chocks or other suitable items under
the front and rear of the wheel that is diago-
nally opposite the wheel you wish to change.
Raising the vehicle G
WARNING
If you do not position the jack correctly at the appropriate jacking point of the vehicle, the
jack could tip over with the vehicle raised.
There is a risk of injury.
Only position the jack at the appropriate jack-
ing point of the vehicle. The base of the jack 274
Changing a wheelWheels and tyres
Page 278 of 293
must be positioned vertically, directly under
the jacking point of the vehicle.
! Position a suitable jack correctly on the
intended jacking points. If you fail to position the jack correctly, the vehicle may be dam-
aged.
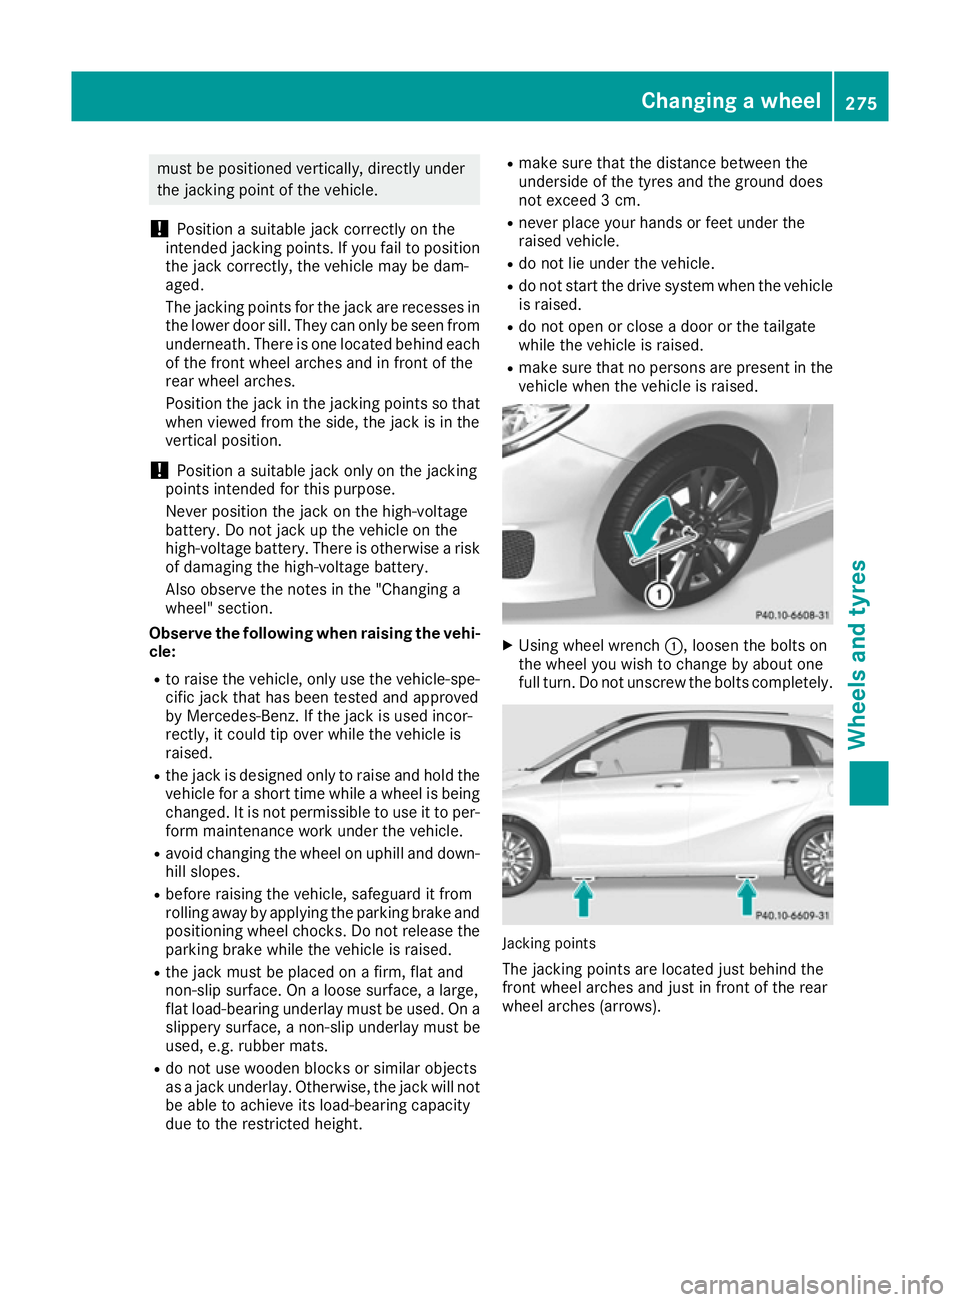
The jacking points for the jack are recesses in
the lower door sill. They can only be seen from
underneath. There is one located behind each
of the front wheel arches and in front of the
rear wheel arches.
Position the jack in the jacking points so that
when viewed from the side, the jack is in the
vertical position.
! Position a suitable jack only on the jacking
points intended for this purpose.
Never position the jack on the high-voltage
battery. Do not jack up the vehicle on the
high-voltage battery. There is otherwise a risk of damaging the high-voltage battery.
Also observe the notes in the "Changing a
wheel" section.
Observe the following when raising the vehi- cle:
R to raise the vehicle, only use the vehicle-spe-
cific jack that has been tested and approved
by Mercedes-Benz. If the jack is used incor-
rectly, it could tip over while the vehicle is
raised.
R the jack is designed only to raise and hold the
vehicle for a short time while a wheel is being
changed. It is not permissible to use it to per- form maintenance work under the vehicle.
R avoid changing the wheel on uphill and down-
hill slopes.
R before raising the vehicle, safeguard it from
rolling away by applying the parking brake and
positioning wheel chocks. Do not release the parking brake while the vehicle is raised.
R the jack must be placed on a firm, flat and
non-slip surface. On a loose surface, a large,
flat load-bearing underlay must be used. On a
slippery surface, a non-slip underlay must be
used, e.g. rubber mats.
R do not use wooden blocks or similar objects
as a jack underlay. Otherwise, the jack will not
be able to achieve its load-bearing capacity
due to the restricted height. R
make sure that the distance between the
underside of the tyres and the ground does
not exceed 3 cm.
R never place your hands or feet under the
raised vehicle.
R do not lie under the vehicle.
R do not start the drive system when the vehicle
is raised.
R do not open or close a door or the tailgate
while the vehicle is raised.
R make sure that no persons are present in the
vehicle when the vehicle is raised. X
Using wheel wrench :, loosen the bolts on
the wheel you wish to change by about one
full turn. Do not unscrew the bolts completely. Jacking points
The jacking points are located just behind the
front wheel arches and just in front of the rear
wheel arches (arrows). Changing a wheel
275Wheels and tyres Z
Page 279 of 293
X
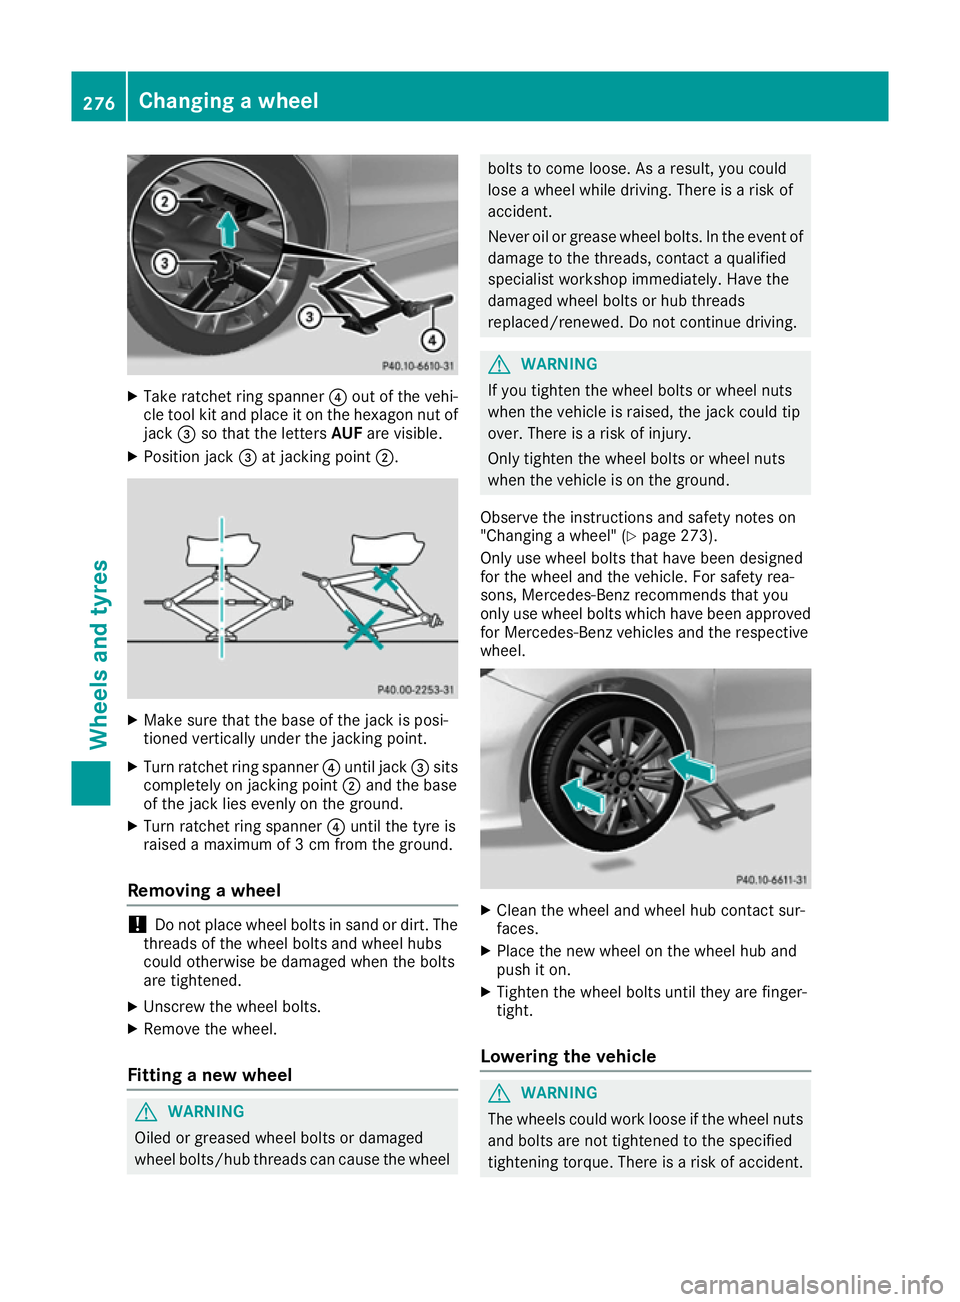
Take ratchet ring spanner ?out of the vehi-
cle tool kit and place it on the hexagon nut of
jack =so that the letters AUFare visible.
X Position jack =at jacking point ;. X
Make sure that the base of the jack is posi-
tioned vertically under the jacking point.
X Turn ratchet ring spanner ?until jack =sits
completely on jacking point ;and the base
of the jack lies evenly on the ground.
X Turn ratchet ring spanner ?until the tyre is
raised a maximum of 3 cm from the ground.
Removing a wheel !
Do not place wheel bolts in sand or dirt. The
threads of the wheel bolts and wheel hubs
could otherwise be damaged when the bolts
are tightened.
X Unscrew the wheel bolts.
X Remove the wheel.
Fitting a new wheel G
WARNING
Oiled or greased wheel bolts or damaged
wheel bolts/hub threads can cause the wheel bolts to come loose. As a result, you could
lose a wheel while driving. There is a risk of
accident.
Never oil or grease wheel bolts. In the event of damage to the threads, contact a qualified
specialist workshop immediately. Have the
damaged wheel bolts or hub threads
replaced/renewed. Do not continue driving. G
WARNING
If you tighten the wheel bolts or wheel nuts
when the vehicle is raised, the jack could tip
over. There is a risk of injury.
Only tighten the wheel bolts or wheel nuts
when the vehicle is on the ground.
Observe the instructions and safety notes on
"Changing a wheel" (Y page 273).
Only use wheel bolts that have been designed
for the wheel and the vehicle. For safety rea-
sons, Mercedes-Benz recommends that you
only use wheel bolts which have been approved for Mercedes-Benz vehicles and the respective
wheel. X
Clean the wheel and wheel hub contact sur-
faces.
X Place the new wheel on the wheel hub and
push it on.
X Tighten the wheel bolts until they are finger-
tight.
Lowering the vehicle G
WARNING
The wheels could work loose if the wheel nuts and bolts are not tightened to the specified
tightening torque. There is a risk of accident. 276
Changing a wheelWheels and tyres
Page 280 of 293
Have the tightening torque immediately
checked at a qualified specialist workshop
after a wheel is changed.
X Place the ratchet ring spanner onto the hex-
agon nut of the jack so that the letters ABare
visible.
X Turn the ratchet ring spanner until the vehicle
is once again standing firmly on the ground.
X Place the jack to one side. X
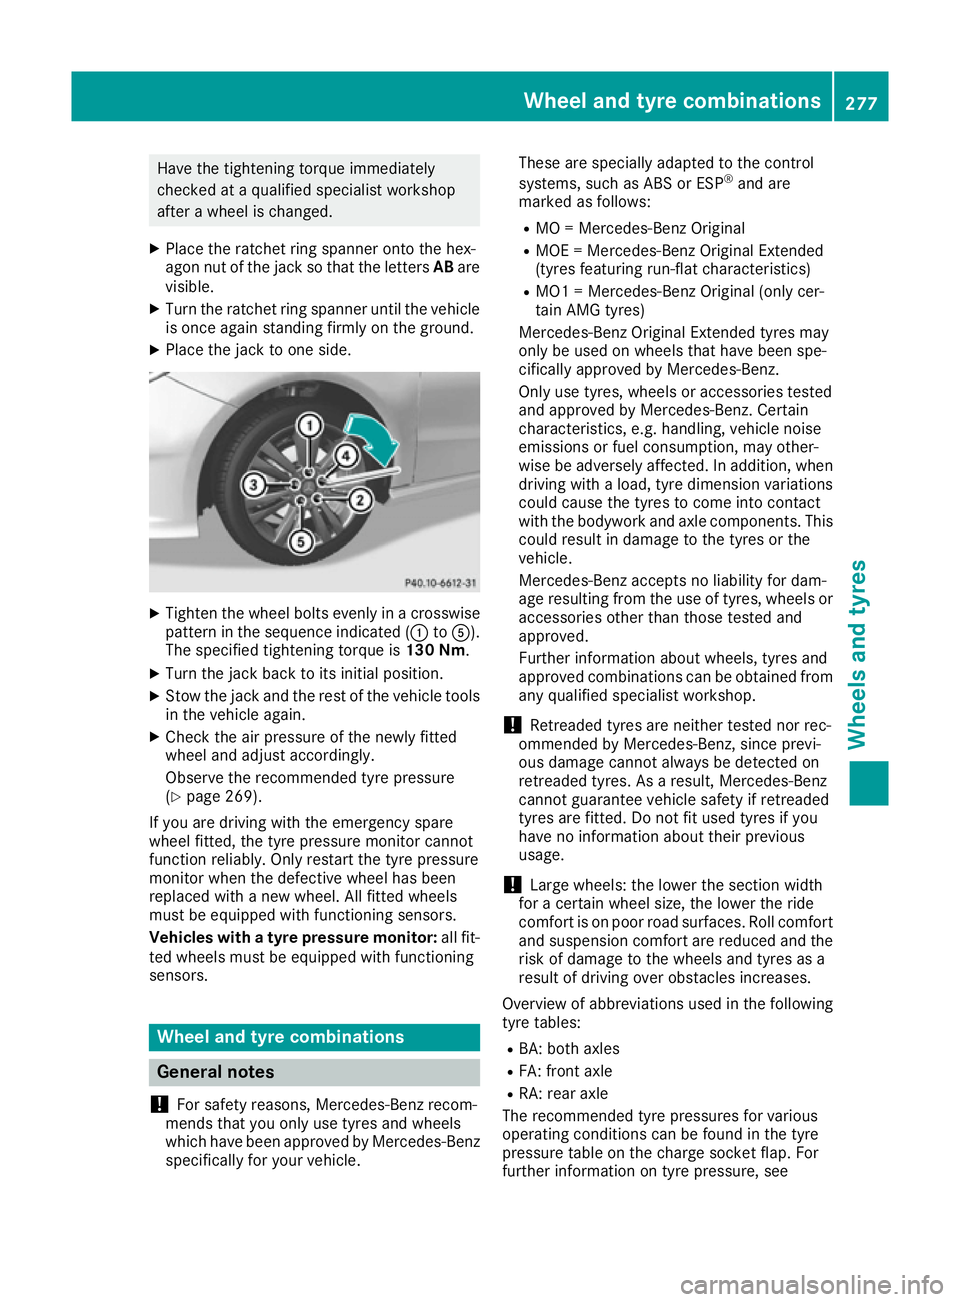
Tighten the wheel bolts evenly in a crosswise
pattern in the sequence indicated (: toA).
The specified tightening torque is 130 Nm.
X Turn the jack back to its initial position.
X Stow the jack and the rest of the vehicle tools
in the vehicle again.
X Check the air pressure of the newly fitted
wheel and adjust accordingly.
Observe the recommended tyre pressure
(Y page 269).
If you are driving with the emergency spare
wheel fitted, the tyre pressure monitor cannot
function reliably. Only restart the tyre pressure
monitor when the defective wheel has been
replaced with a new wheel. All fitted wheels
must be equipped with functioning sensors.
Vehicles with a tyre pressure monitor: all fit-
ted wheels must be equipped with functioning
sensors. Wheel and tyre combinations
General notes
! For safety reasons, Mercedes-Benz recom-
mends that you only use tyres and wheels
which have been approved by Mercedes-Benz specifically for your vehicle. These are specially adapted to the control
systems, such as ABS or ESP
®
and are
marked as follows:
R MO = Mercedes-Benz Original
R MOE = Mercedes-Benz Original Extended
(tyres featuring run-flat characteristics)
R MO1 = Mercedes-Benz Original (only cer-
tain AMG tyres)
Mercedes-Benz Original Extended tyres may
only be used on wheels that have been spe-
cifically approved by Mercedes-Benz.
Only use tyres, wheels or accessories tested
and approved by Mercedes-Benz. Certain
characteristics, e.g. handling, vehicle noise
emissions or fuel consumption, may other-
wise be adversely affected. In addition, when
driving with a load, tyre dimension variations
could cause the tyres to come into contact
with the bodywork and axle components. This
could result in damage to the tyres or the
vehicle.
Mercedes-Benz accepts no liability for dam-
age resulting from the use of tyres, wheels or accessories other than those tested and
approved.
Further information about wheels, tyres and
approved combinations can be obtained from
any qualified specialist workshop.
! Retreaded tyres are neither tested nor rec-
ommended by Mercedes-Benz, since previ-
ous damage cannot always be detected on
retreaded tyres. As a result, Mercedes-Benz
cannot guarantee vehicle safety if retreaded
tyres are fitted. Do not fit used tyres if you
have no information about their previous
usage.
! Large wheels: the lower the section width
for a certain wheel size, the lower the ride
comfort is on poor road surfaces. Roll comfort and suspension comfort are reduced and therisk of damage to the wheels and tyres as a
result of driving over obstacles increases.
Overview of abbreviations used in the following tyre tables:
R BA: both axles
R FA: front axle
R RA: rear axle
The recommended tyre pressures for various
operating conditions can be found in the tyre
pressure table on the charge socket flap. For
further information on tyre pressure, see Wheel and tyre combinations
277Wheels and tyres Z
Page 281 of 293
(Y
page 269). Check tyre pressures regularly
and only when the tyres are cold.
Notes on the vehicle equipment – always fit the
vehicle:
R with tyres of the same size across an axle
(left/right)
R with the same type of tyres at a given time
(summer tyres, winter tyres, MOExtended
tyres)
Exception: it is permissible to fit a different
type or make in the event of a flat tyre.
Observe the "MOExtended tyres (tyres with
run-flat characteristics)" section
(Y page 250).
Vehicles with MOExtended tyres are not equip-
ped with a TIREFIT kit at the factory. It is there-
fore recommended that you additionally equip
your vehicle with a TIREFIT kit if you fit tyres that do not feature run-flat characteristics, e.g. win-
ter tyres. A TIREFIT kit can be obtained from a
qualified specialist workshop.
i Not all wheel/tyre combinations can be fit-
ted at the factory in all countries. 278
Wheel and tyre combinationsWheels and tyres
Page 282 of 293

Tyres
B 250 e Summer tyres
R16 Tyres Wheels
BA: 205/6
0 R16 92 V BA: 6.5 J x 16 H2 ET 44.5
R17
Tyres Wheels
BA: 225/50 R17 94 W
6 BA: 7 J x 17 H2 ET 48
R18
Tyres Wheels
BA: 225/45 R18 95 Y XL
6 BA: 7.5 J x 18 H2 ET 44
Winter tyres
R16 Tyres Wheels
BA: 205/60 R16 92 H M+S
i 6.5 J x 16 H2 ET 44.5
6
Available as MOExtended tyres. Wheel and tyre combinations
279Wheels and tyres Z
Page 288 of 293
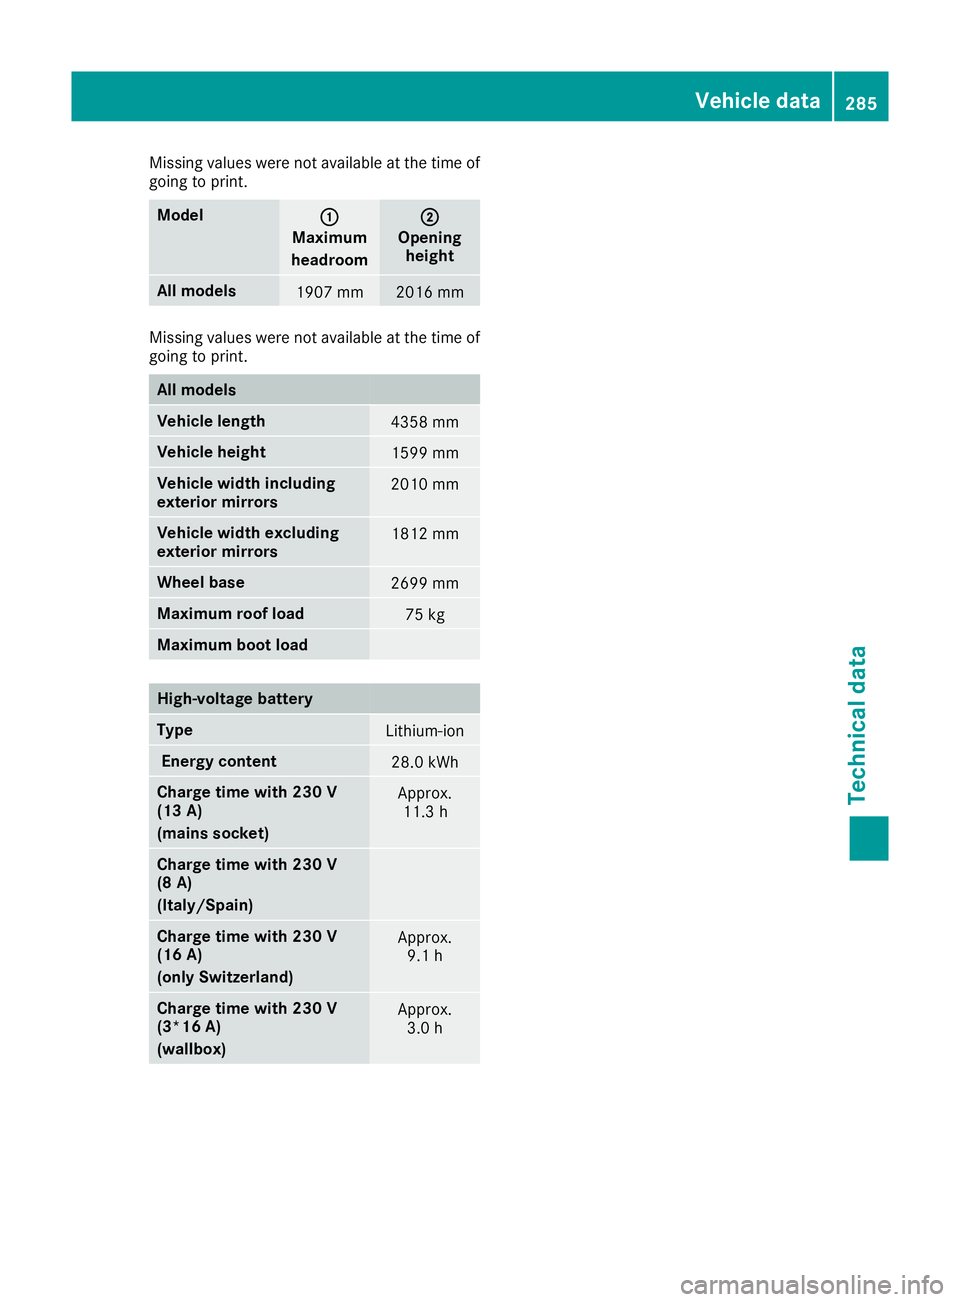
Missing values were not available at the time of
going to print. Model
:
:
Maximum
headroom ;
;
Opening height All models
1907 mm 2016 mm
Missing values were not available at the time of
going to print. All models
Vehicle length
4358 mm
Vehicle height
1599 mm
Vehicle width including
exterior mirrors
2010 mm
Vehicle width excluding
exterior mirrors
1812 mm
Wheel base
2699 mm
Maximum roof load
75 kg
Maximum boot load
High-voltage battery
Type
Lithium-ion
Energy content
28.0 kWh
Charge time with 230 V
(13 A)
(mains socket)
Approx.
11.3 h Charge time with 230 V
(8 A)
(Italy/Spain)
Charge time with 230 V
(16 A)
(only Switzerland)
Approx.
9.1 h Charge time with 230 V
(3*16 A)
(wallbox)
Approx.
3.0 h Vehicle data
285Technical data Z