ECO mode MERCEDES-BENZ B-CLASS HATCHBACK 2015 User Guide
[x] Cancel search | Manufacturer: MERCEDES-BENZ, Model Year: 2015, Model line: B-CLASS HATCHBACK, Model: MERCEDES-BENZ B-CLASS HATCHBACK 2015Pages: 293, PDF Size: 10.83 MB
Page 103 of 293
Headlamp flasher
X
To switch on: turn the key in the ignition lock
to position 1or 2or start the drive system.
X Pull the combination switch in the direction of
arrow =. Headlamp cleaning system
Vehicles with bi-xenon headlamps: the head-
lamps are cleaned automatically if the "Wipe
with washer fluid" function is operated five
times (Y page 108) while the lights are on and
the drive system is running. When you switch off the ignition, the automatic headlamp cleaning
system is reset and counting is resumed from 0. Hazard warning lamps
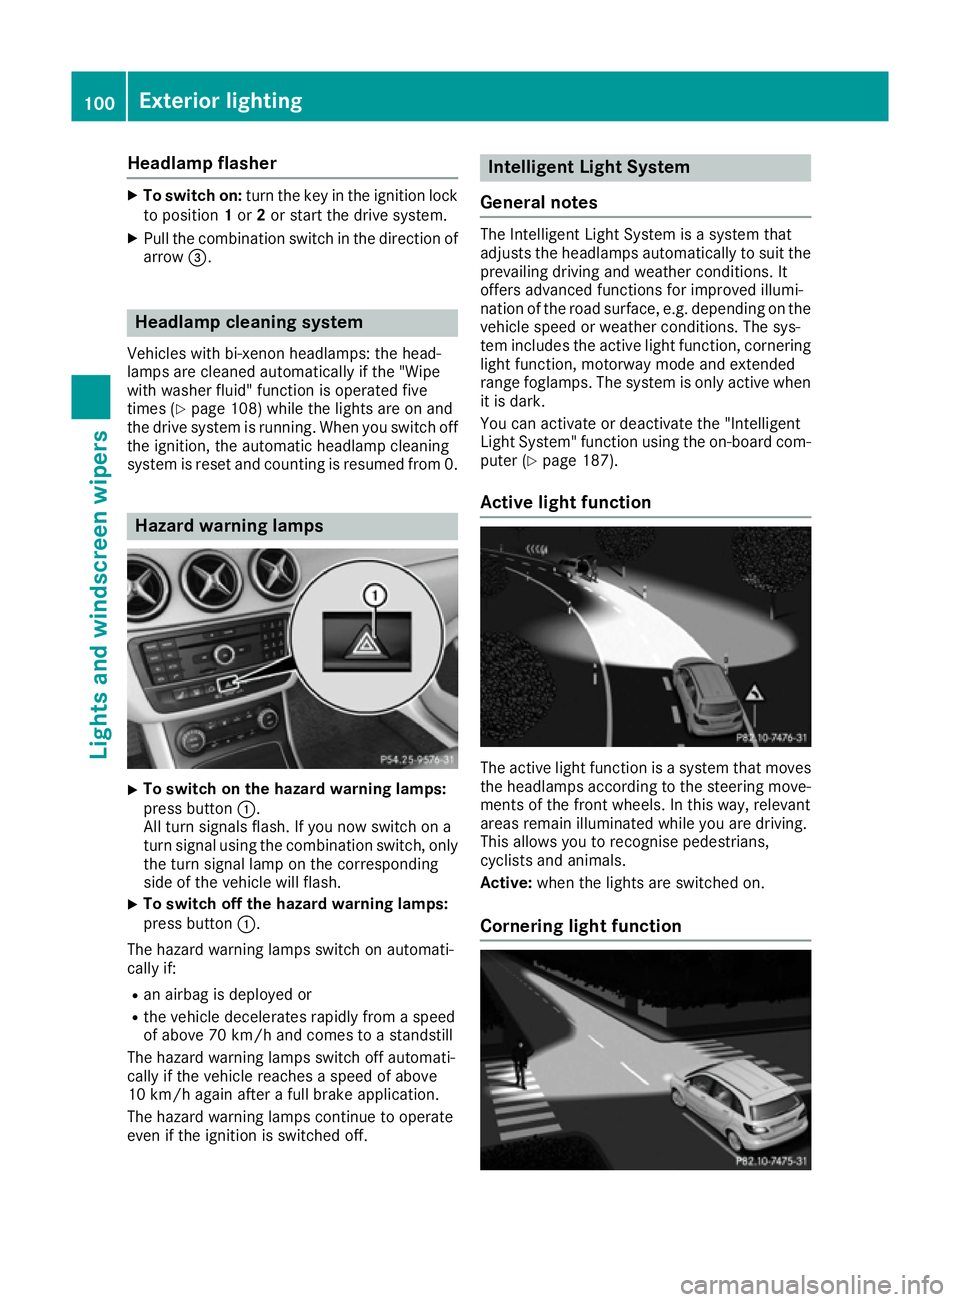
X
To switch on the hazard warning lamps:
press button :.
All turn signals flash. If you now switch on a
turn signal using the combination switch, only the turn signal lamp on the corresponding
side of the vehicle will flash.
X To switch off the hazard warning lamps:
press button
:.
The hazard warning lamps switch on automati-
cally if:
R an airbag is deployed or
R the vehicle decelerates rapidly from a speed
of above 70 km/h and comes to a standstill
The hazard warning lamps switch off automati-
cally if the vehicle reaches a speed of above
10 km/h again after a full brake application.
The hazard warning lamps continue to operate
even if the ignition is switched off. Intelligent Light System
General notes The Intelligent Light System is a system that
adjusts the headlamps automatically to suit the
prevailing driving and weather conditions. It
offers advanced functions for improved illumi-
nation of the road surface, e.g. depending on the vehicle speed or weather conditions. The sys-
tem includes the active light function, corneringlight function, motorway mode and extended
range foglamps. The system is only active when it is dark.
You can activate or deactivate the "Intelligent
Light System" function using the on-board com-
puter (Y page 187).
Active light function The active light function is a system that moves
the headlamps according to the steering move-
ments of the front wheels. In this way, relevant
areas remain illuminated while you are driving.
This allows you to recognise pedestrians,
cyclists and animals.
Active: when the lights are switched on.
Cornering light function 100
Exterior lightingLights and windscreen wipers
Page 104 of 293
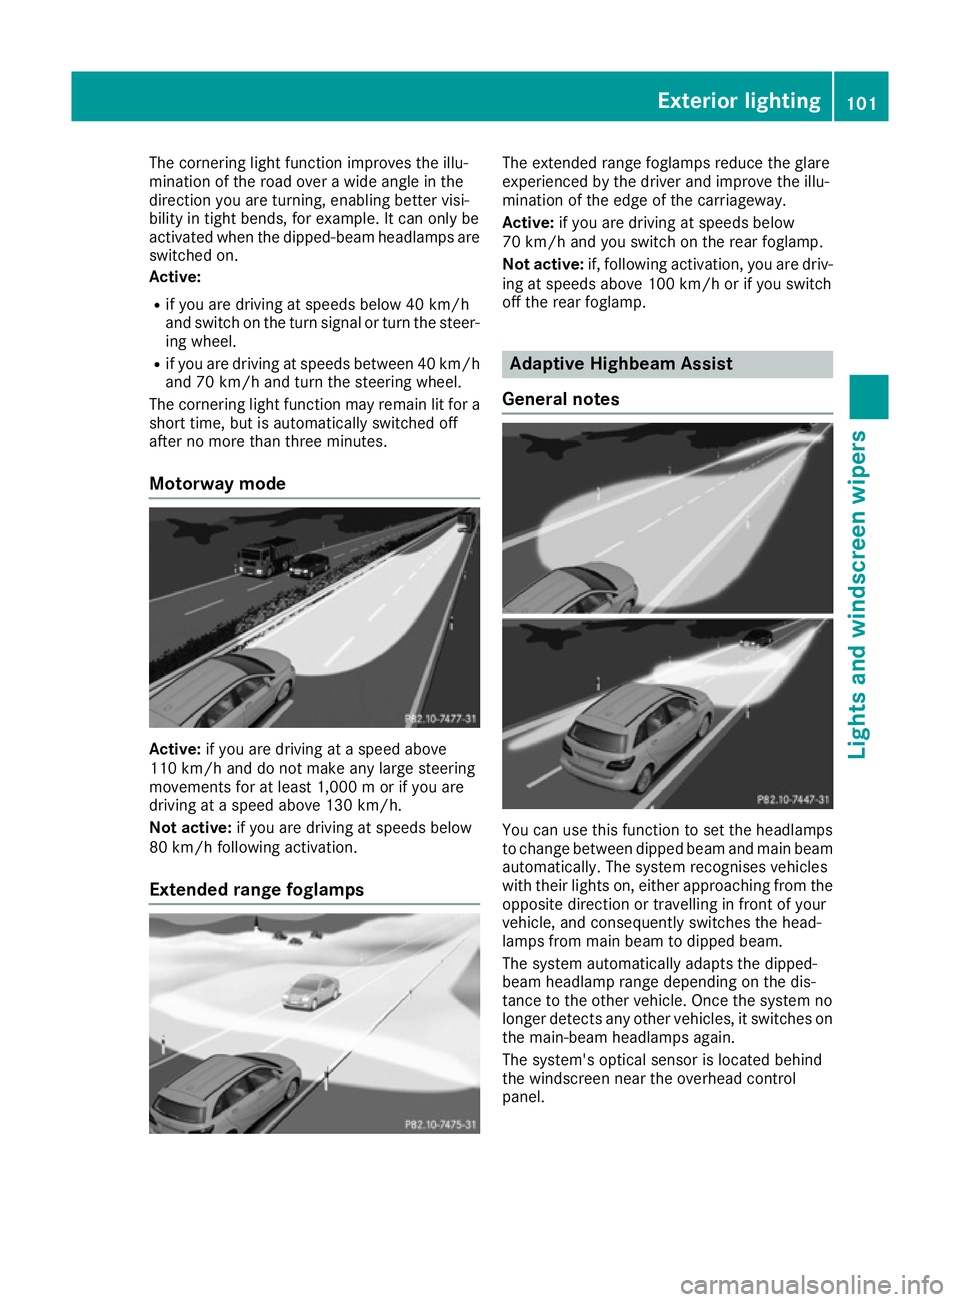
The cornering light function improves the illu-
mination of the road over a wide angle in the
direction you are turning, enabling better visi-
bility in tight bends, for example. It can only be
activated when the dipped-beam headlamps are
switched on.
Active:
R if you are driving at speeds below 40 km/h
and switch on the turn signal or turn the steer- ing wheel.
R if you are driving at speeds between 40 km/h
and 70 km/h and turn the steering wheel.
The cornering light function may remain lit for a
short time, but is automatically switched off
after no more than three minutes.
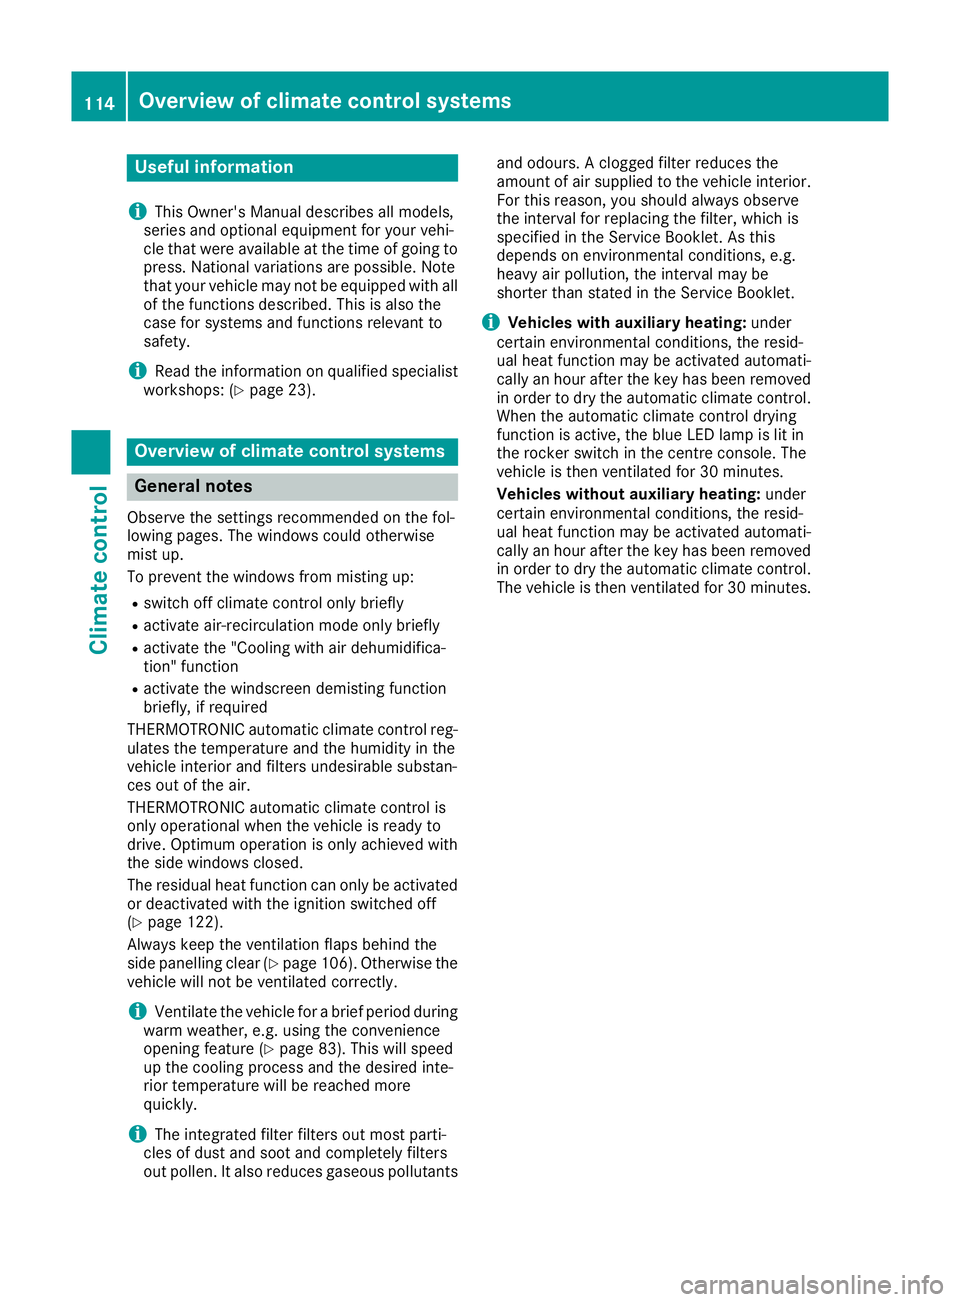
Motorway mode Active:
if you are driving at a speed above
110 km/h and do not make any large steering
movements for at least 1,000 m or if you are
driving at a speed above 130 km/h.
Not active: if you are driving at speeds below
80 km/h following activation.
Extended range foglamps The extended range foglamps reduce the glare
experienced by the driver and improve the illu-
mination of the edge of the carriageway.
Active:
if you are driving at speeds below
70 km/h and you switch on the rear foglamp.
Not active: if, following activation, you are driv-
ing at speeds above 100 km/h or if you switch
off the rear foglamp. Adaptive Highbeam Assist
General notes You can use this function to set the headlamps
to change between dipped beam and main beam automatically. The system recognises vehicles
with their lights on, either approaching from theopposite direction or travelling in front of your
vehicle, and consequently switches the head-
lamps from main beam to dipped beam.
The system automatically adapts the dipped-
beam headlamp range depending on the dis-
tance to the other vehicle. Once the system no
longer detects any other vehicles, it switches on the main-beam headlamps again.
The system's optical sensor is located behind
the windscreen near the overhead control
panel. Exterior lighting
101Lights and windscreen wipers Z
Page 117 of 293
Useful information
i This Owner's Manual describes all models,
series and optional equipment for your vehi-
cle that were available at the time of going to
press. National variations are possible. Note
that your vehicle may not be equipped with all
of the functions described. This is also the
case for systems and functions relevant to
safety.
i Read the information on qualified specialist
workshops: (Y page 23). Overview of climate control systems
General notes
Observe the settings recommended on the fol-
lowing pages. The windows could otherwise
mist up.
To prevent the windows from misting up:
R switch off climate control only briefly
R activate air-recirculation mode only briefly
R activate the "Cooling with air dehumidifica-
tion" function
R activate the windscreen demisting function
briefly, if required
THERMOTRONIC automatic climate control reg-
ulates the temperature and the humidity in the
vehicle interior and filters undesirable substan-
ces out of the air.
THERMOTRONIC automatic climate control is
only operational when the vehicle is ready to
drive. Optimum operation is only achieved with
the side windows closed.
The residual heat function can only be activated or deactivated with the ignition switched off
(Y page 122).
Always keep the ventilation flaps behind the
side panelling clear (Y page 106). Otherwise the
vehicle will not be ventilated correctly.
i Ventilate the vehicle for a brief period during
warm weather, e.g. using the convenience
opening feature (Y page 83). This will speed
up the cooling process and the desired inte-
rior temperature will be reached more
quickly.
i The integrated filter filters out most parti-
cles of dust and soot and completely filters
out pollen. It also reduces gaseous pollutants and odours. A clogged filter reduces the
amount of air supplied to the vehicle interior.
For this reason, you should always observe
the interval for replacing the filter, which is
specified in the Service Booklet. As this
depends on environmental conditions, e.g.
heavy air pollution, the interval may be
shorter than stated in the Service Booklet.
i Vehicles with auxiliary heating:
under
certain environmental conditions, the resid-
ual heat function may be activated automati-
cally an hour after the key has been removed
in order to dry the automatic climate control.
When the automatic climate control drying
function is active, the blue LED lamp is lit in
the rocker switch in the centre console. The
vehicle is then ventilated for 30 minutes.
Vehicles without auxiliary heating: under
certain environmental conditions, the resid-
ual heat function may be activated automati-
cally an hour after the key has been removed in order to dry the automatic climate control.
The vehicle is then ventilated for 30 minutes. 114
Overview of climate control systemsClimate control
Page 118 of 293
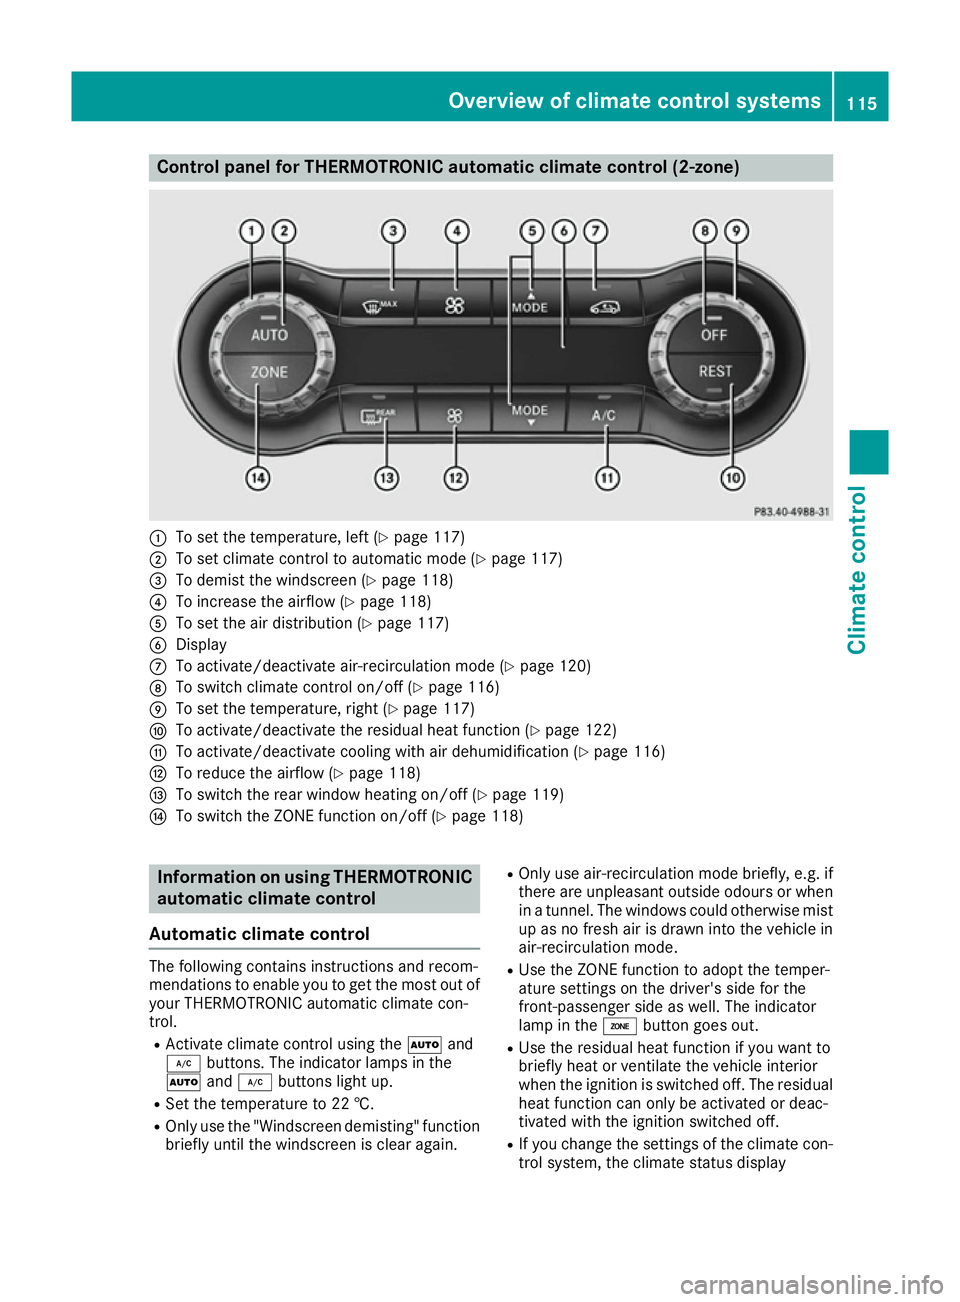
Control panel for THERMOTRONIC automatic climate control (2-zone)
:
To set the temperature, left (Y page 117)
; To set climate control to automatic mode (Y page 117)
= To demist the windscreen (Y page 118)
? To increase the airflow (Y page 118)
A To set the air distribution (Y page 117)
B Display
C To activate/deactivate air-recirculation mode (Y page 120)
D To switch climate control on/off (Y page 116)
E To set the temperature, right (Y page 117)
F To activate/deactivate the residual heat function (Y page 122)
G To activate/deactivate cooling with air dehumidification (Y page 116)
H To reduce the airflow (Y page 118)
I To switch the rear window heating on/off (Y page 119)
J To switch the ZONE function on/off (Y page 118)Information on using THERMOTRONIC
automatic climate control
Automatic climate control The following contains instructions and recom-
mendations to enable you to get the most out of
your THERMOTRONIC automatic climate con-
trol.
R Activate climate control using the Ãand
¿ buttons. The indicator lamps in the
à and¿ buttons light up.
R Set the temperature to 22 †.
R Only use the "Windscreen demisting" function
briefly until the windscreen is clear again. R
Only use air-recirculation mode briefly, e.g. if
there are unpleasant outside odours or when
in a tunnel. The windows could otherwise mist up as no fresh air is drawn into the vehicle inair-recirculation mode.
R Use the ZONE function to adopt the temper-
ature settings on the driver's side for the
front-passenger side as well. The indicator
lamp in the ábutton goes out.
R Use the residual heat function if you want to
briefly heat or ventilate the vehicle interior
when the ignition is switched off. The residual heat function can only be activated or deac-
tivated with the ignition switched off.
R If you change the settings of the climate con-
trol system, the climate status display Overview of climate control systems
115Climate control
Page 119 of 293
appears for approximately three seconds at
the bottom of the screen in the Audio/
COMAND display (see separate operating
instructions). You will see the current settings
of the various climate control functions.
You can choose between various drive programs
with the program selector button (Y page 131).
If you have selected drive program E+:
R the cooling output is reduced when cooling
R the heat output is reduced during heating
R the rear window heating time is reduced
If you have selected drive program Eor S, the
current climate settings are maintained. Operating the climate control system
Switching the climate control on/off
General notes When the climate control is switched off, the air
supply and air circulation are also switched off.
The windows could mist up. Therefore, only
switch off climate control briefly.
THERMOTRONIC automatic climate
control X
Turn the key to position 2in the ignition lock
(Y page 126).
X To activate: press theÃbutton.
The indicator lamp in the Ãbutton lights
up. Airflow and air distribution are set to auto-
matic mode.
or X Press the ^button.
The indicator lamp in the ^button goes
out. The previous settings are reactivated.
X To deactivate: press the^button.
The indicator lamp in the ^button lights
up.
i Activate climate control primarily using the
à button. Activating/deactivating cooling with
air dehumidification
General notes If you deactivate the "Cooling with air dehumid-
ification" function, the air inside the vehicle will
not be cooled. The air inside the vehicle will also
not be dehumidified. The windows can mist up
more quickly. Therefore, only deactivate the
"Cooling with air dehumidification" function
briefly.
The "Cooling with air dehumidification" function
is operational when the vehicle is ready to drive. The air inside the vehicle is cooled and dehu-
midified according to the temperature selected.
Condensation may drip from the underside of
the vehicle when cooling mode is active. This is
normal and not a sign that there is a malfunc-
tion.
Activating/deactivating X
To activate: press the¿button.
The indicator lamp in the ¿button lights
up.
X To deactivate: press the¿button.
The indicator lamp in the ¿button goes
out. The cooling with air dehumidification
function has a delayed switch-off feature. 116
Operating the climate control systemClimate control
Page 123 of 293
Problems with the rear window heating
Problem
Possible causes/consequences and
M
MSolutions The rear window heating
has switched off prema-
turely or cannot be acti-
vated. The battery has not been sufficiently charged.
X Switch off any consumers that are not required, e.g. reading lamps,
interior lighting or the seat heating.
When the battery is sufficiently charged, the rear window heating
can be activated again. Switching air-recirculation mode
on/off
General notes You can deactivate the flow of fresh air if
unpleasant odours are entering the vehicle from
outside. The air already inside the vehicle will
then be recirculated.
If you activate air-recirculation mode, the win-
dows can mist up more quickly, in particular at
low temperatures. Only use air-recirculation
mode briefly to prevent the windows misting up.
Switching on/off X
Turn the key to position 2in the ignition lock
(Y page 126).
X To activate: press theebutton.
The indicator lamp in the ebutton lights
up.
Air-recirculation mode is activated automati-
cally:
R at high outside temperatures
R at high levels of pollution
When air-recirculation mode is activated auto-
matically, the indicator lamp in the ebutton
is not lit. Outside air is added after about
30 minutes.
X To deactivate: press theebutton.
The indicator lamp in the ebutton goes
out. i
Air-recirculation mode is deactivated auto-
matically:
R after approximately five minutes at outside
temperatures below approximately 7 †
R after approximately five minutes if the
"Cooling with air dehumidification" func-
tion is deactivated
R after approximately 30 minutes at outside
temperatures above approximately 7 † if
the cooling with air dehumidification func-
tion is activated Convenience opening or closing using
the air-recirculation button G
WARNING
When using convenience closing, you could
become trapped within the sweep of the clos- ing window. There is a risk of injury.
Monitor the entire closing procedure when
using convenience closing. When closing,
make sure that no one has any parts of the
body within the closing area. G
WARNING
During convenience opening parts of the body could be drawn in or become trapped
between the side window and window frame.
There is a risk of injury.
When opening, make sure that nobody is
touching the side window. If someone
becomes trapped, immediately press
the W switch in the door to stop the move-
ment of the side windows. To continue closing
the side window, pull on the Wswitch. 120
Operating the climate control systemClimate control
Page 124 of 293
X
Convenience closing feature: press and
hold the ebutton until the side windows
are closed.
The indicator lamp in the ebutton lights
up. Air-recirculation mode is activated.
If parts of the body are in the closing area during convenience closing, proceed as follows:
X Press the Wbutton for opening/closing
the side windows.
The side windows stop.
X To then open the side windows, press the
W button again.
or
X Press the ebutton for longer than two
seconds.
The side windows move in the opposite direc- tion.
X Convenience opening feature: press and
hold the ebutton until the side windows
are opened. The side windows move back to
their original positions.
The indicator lamp in the ebutton goes
out. Air-recirculation mode is deactivated.
Notes on the reversing feature for the side win-
dows (Y page 82).
If you open the side windows manually after
closing them using the convenience closing fea- ture, they will remain in this position when
opened using the convenience opening feature. Pre-entry climate control via key
Before getting in, the vehicle interior can be
briefly warmed or ventilated in advance. In addi- tion, the air from the air vent can be pre-cooled.
The high-voltage battery must be sufficiently
charged before the "Pre-entry climate control
via key" function can be activated.
Activating/deactivating the pre-entry cli-
mate control (via key)
When the vehicle is unlocked using the key or
KEYLESS-GO, the climate control functions are
activated.
The pre-cooling and pre-heating climate control functions last up to 5 minutes.
When the vehicle is pre-cooled, the following
functions are activated as necessary:
R Automatic climate control
R Cooling with air dehumidification
R Blower When the vehicle is pre-heated, the following
functions are activated as necessary:
R Automatic climate control
R Blower
R Seat heating
R Windscreen heating
R Rear window heating
Pre-entry climate control is automatically
switched off when operational readiness mode
is requested.
Activating/deactivating pre-entry climate
control (via key)
You can activate and deactivate the pre-entry
climate control (via key) function using the on-
board computer in the E-CELL
E-CELL submenu
(Y page 185).
i If the charge status of the high-voltage bat-
tery is below the specified minimum charge
status, pre-entry climate control will not be
activated even if it has been set. Pre-entry climate control at departure
time and immediate pre-entry climate control
Important safety notes G
WARNING
If persons (particularly children) are exposed
to heat or cold for a prolonged period, there is a risk of serious or even fatal injuries. Never
leave persons (particularly children) unatten-
ded in the vehicle.
General notes Using the "Pre-entry climate control at depar-
ture time" function, you can cool or heat the
vehicle interior prior to the desired departure
time.
When using the "Pre-entry climate control at
departure time" function, the charge status of
the high-voltage battery must be higher than the
specified minimum charge status.
The running time of the climate control may be
reduced if:
R the vehicle is not connected to an electric
power supply
R the high-voltage battery is not fully charged Operating the climate control system
121Climate control Z
Page 130 of 293
Further information on situations where an indi-
cator lamp either fails to go out after starting the drive system or lights up while driving
(Y page 215).
If Start/Stop button :has not yet been
pressed, this corresponds to the key being
removed from the ignition.
X To switch on the power supply: press
Start/Stop button :once.
The power supply is switched on. You can now activate the windscreen wipers, for example.
The power supply is switched off again if:
R the driver's door is opened and
R you press Start/Stop button :twice when in
this position
X To switch on the ignition: press Start/Stop
button :twice.
The ignition is switched on.
If you press Start/Stop button :once when
in this position, the ignition is deactivated
again.
Removing the Start/Stop button
You can remove the Start/Stop button from the
ignition lock and start the vehicle as normal
using the key.
You can only switch between Start/Stop button
mode and key operation when the vehicle is sta- tionary.
You must also engage park position P.
X Remove Start/Stop button :from ignition
lock ;.
You do not have to remove the Start/Stop but-
ton from the ignition lock when you leave the
vehicle. You should, however, always take the
key with you when leaving the vehicle. As long as
the key is in the vehicle:
R the vehicle can be started using the Start/
Stop button
R the electrically powered equipment can be
operated Starting the vehicle
Important safety notes G
WARNING
If children are left unsupervised in the vehicle, they could:
R open doors, thereby endangering other per-
sons or road users
R get out and be struck by oncoming traffic
R operate vehicle equipment and become
trapped, for example
In addition, the children could also set the
vehicle in motion by, for example:
R releasing the parking brake
R shifting the transmission out of park posi-
tion P
R starting the vehicle's drive system
There is a risk of an accident and injury.
When leaving the vehicle, always take the key with you and lock the vehicle. Never leave
children and animals unattended in the vehi-
cle. Keep the keys out of the reach of children.
Vehicles with an electric motor generate signif- icantly less noise than vehicles with internal
combustion engines. As a result, your vehicle
may not be heard by other road users in certain
situations. This can happen, for example, when
you are parking and your vehicle is not seen by
other road users. This requires you to adopt a
particularly anticipatory driving style, as it is
necessary to allow for the possibility that other
road users may behave unpredictably.
The vehicle can be equipped with a sound gen-
erator. The sound generator is activated so that other road users can hear your vehicle better.
The sound generator is activated at speeds
under 30 km/h and switches off automatically
at higher speeds.
Starting procedure using the Start/
Stop button The Start/Stop button can be used to start the
vehicle manually without inserting the key into
the ignition lock. The key must be in the vehicle
and the Start/Stop button must be inserted in
the ignition lock. Driving
127Driving and parking Z
Page 135 of 293
Drive program S (Sport)
Drive program
Sis characterised by the follow-
ing:
R the vehicle exhibits sporty driving character-
istics
R the entire power output can be utilised by
depressing the accelerator pedal.
E+ (Economy Plus) Drive program
E+is characterised by the fol-
lowing:
R reduced torque and significantly reduced
power. This supports an especially efficient
and even driving style and results in a reduc-
tion in speed to approximately 110 km/h.
R the vehicle pulling away more gently in
forward gear unless the accelerator pedal is
depressed fully.
R the wheels are less likely to spin.
R particularly efficient overrun.
R full power output by using kickdown.
R the performance of the air-conditioning and
heating systems is reduced. Steering wheel gearshift paddles
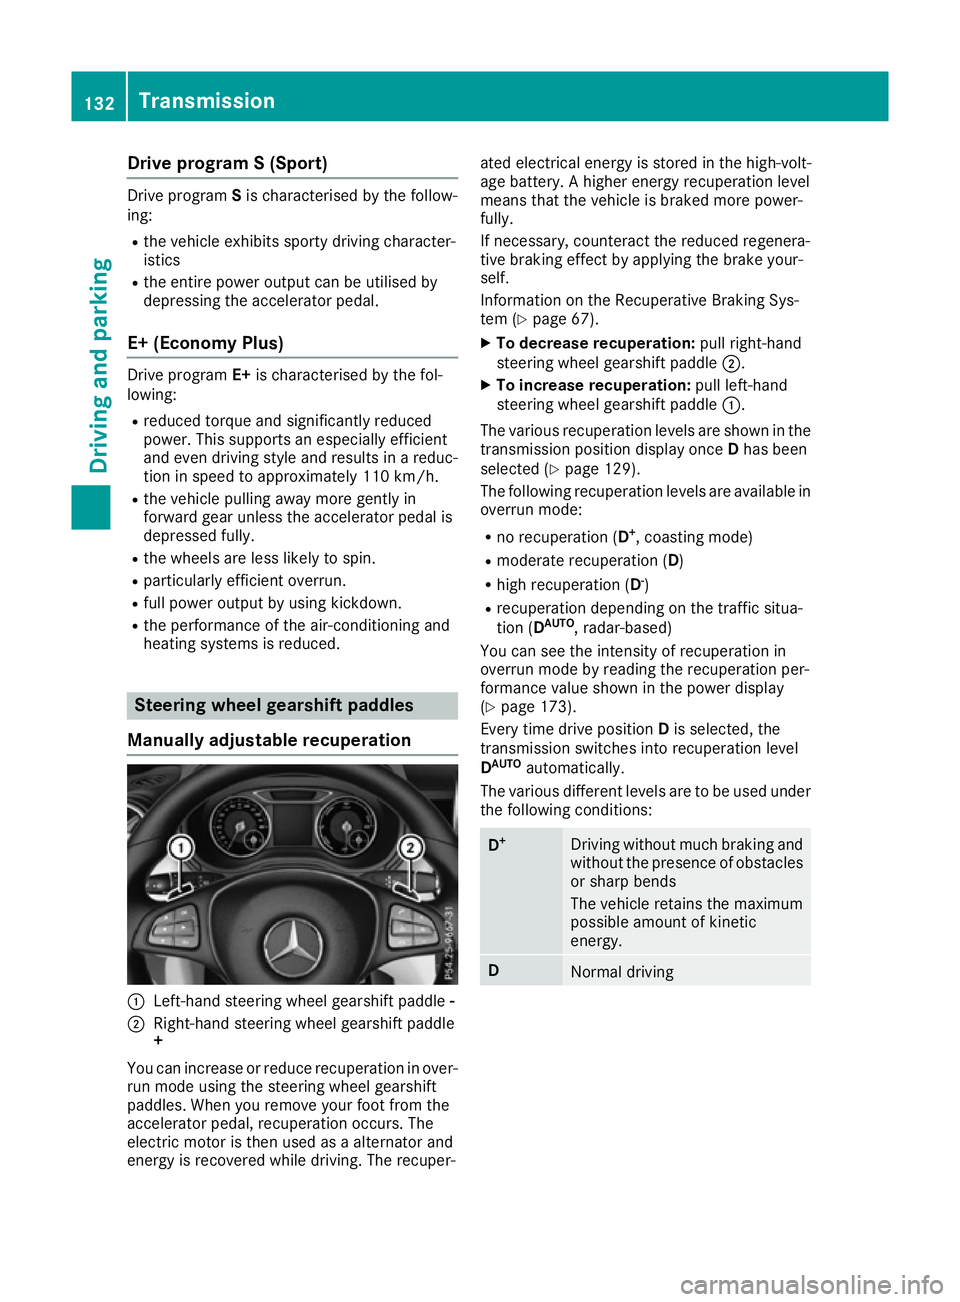
Manually adjustable recuperation :
Left-hand steering wheel gearshift paddle -
; Right-hand steering wheel gearshift paddle
+
You can increase or reduce recuperation in over-
run mode using the steering wheel gearshift
paddles. When you remove your foot from the
accelerator pedal, recuperation occurs. The
electric motor is then used as a alternator and
energy is recovered while driving. The recuper- ated electrical energy is stored in the high-volt-
age battery. A higher energy recuperation level
means that the vehicle is braked more power-
fully.
If necessary, counteract the reduced regenera-
tive braking effect by applying the brake your-
self.
Information on the Recuperative Braking Sys-
tem (Y page 67).
X To decrease recuperation: pull right-hand
steering wheel gearshift paddle ;.
X To increase recuperation: pull left-hand
steering wheel gearshift paddle :.
The various recuperation levels are shown in the
transmission position display once Dhas been
selected (Y page 129).
The following recuperation levels are available in
overrun mode:
R no recuperation (D +
, coasting mode)
R moderate recuperation ( D)
R high recuperation ( D-
)
R recuperation depending on the traffic situa-
tion (D AUTO
, radar-based)
You can see the intensity of recuperation in
overrun mode by reading the recuperation per-
formance value shown in the power display
(Y page 173).
Every time drive position Dis selected, the
transmission switches into recuperation level
D AUTO
automatically.
The various different levels are to be used under the following conditions: D
+ Driving without much braking and
without the presence of obstacles
or sharp bends
The vehicle retains the maximum
possible amount of kinetic
energy. D
Normal driving132
TransmissionDriving and pa
rking
Page 136 of 293

D
- Sporty driving or driving on a
downhill gradient
The brake pedal does not need to
be used as often because the
extent of the deceleration is
greater than in D.
Energy use when decelerating is
considerably higher than when
the vehicle is braked with the
brake pedal. D
AUTO
(radar-
based) The intensity of recuperation is
automatically adjusted to the cur-
rent traffic situation.
Default setting In levels
Dand D-
, deceleration can be control-
led in an infinitely variable manner using the
accelerator pedal.
The braking performance of the electric motor
using recuperative braking is, in some operating modes, either reduced or not effective:
R when the charge status of the high-voltage
battery increases
R if the high-voltage battery is not yet at a nor-
mal operating temperature
R when driving close to the maximum design
speed
R when the vehicle is almost stationary
R in transmission position N
R during and after ESP stability control
If you do not make an additional effort to apply
the brake yourself, the braking effect may not be sufficient. If necessary, counteract the reduced regenerative braking effect by applying the
brake yourself.
Radar-based recuperation The vehicle uses the sensors of COLLISION PRE-
VENTION ASSIST PLUS during radar-based
recuperation (D AUTO
). The sensors detect the
distance to the vehicle ahead and its speed. The intensity of recuperation is then automatically
adjusted to the current traffic situation.
The range can then be increased by storing
energy efficiently. Adjustment is infinitely vari-
able from overrun mode (no recuperation) to
maximum recuperation.
Maintain sufficient distance to the vehicle in
front. Mercedes-Benz recommends that you activate COLLISION PREVENTION ASSIST PLUS
as a visual and acoustic aid.
Examples of radar-based recuperation:
R Approaching a slower vehicle, a decelerating
vehicle or when following a vehicle downhill.
Your vehicle decelerates slightly and increa-
ses recuperation.
R Driving when no vehicle is detected in front or
when a vehicle is detected in the far distance or an accelerating vehicle is detected. Your
vehicle switches to overrun mode at higher
speeds.
R Driving on a steep downhill slope. Accelera-
tion downhill is reduced and recuperation is
increased. This is comparable with shifting
down when driving downhill.
X To activate radar-based recuperation: pull
steering wheel gearshift paddle :or;
towards you and hold for about one second.
X To deactivate radar-based recuperation:
briefly pull steering wheel gearshift paddle
:
or ; towards you.
If you change between radar-based and manual
recuperation, the following levels are activated
depending on the selection via the steering
wheel gearshift paddles: :
Steering wheel
gearshift paddle - selects
D-
(maximum
recuperation) ;
Steering wheel
gearshift paddle + selects
D+
(overrun) In particular, the function of the radar sensors
can be impaired in the case of:
R
dirt on the sensors or obscured sensors
R snow or heavy rain
R interference by other radar sources
R strong radar reflections, for example, in multi-
storey car parks
R a narrow vehicle travelling in front, e.g. a
motorcycle
R a vehicle travelling in front on a different line
Following damage to the front end of the vehicle, have the radar sensor settings and operation
checked at a qualified specialist workshop
immediately. This also applies to collisions at
slow speeds where there is no visible damage to the front of the vehicle.
If the radar sensors are not available, the system
switches automatically to level Dwith moderate Transmission
133Driving and parking Z