MERCEDES-BENZ B-CLASS HATCHBACK 2015 Owners Manual
Manufacturer: MERCEDES-BENZ, Model Year: 2015, Model line: B-CLASS HATCHBACK, Model: MERCEDES-BENZ B-CLASS HATCHBACK 2015Pages: 293, PDF Size: 10.83 MB
Page 231 of 293
X
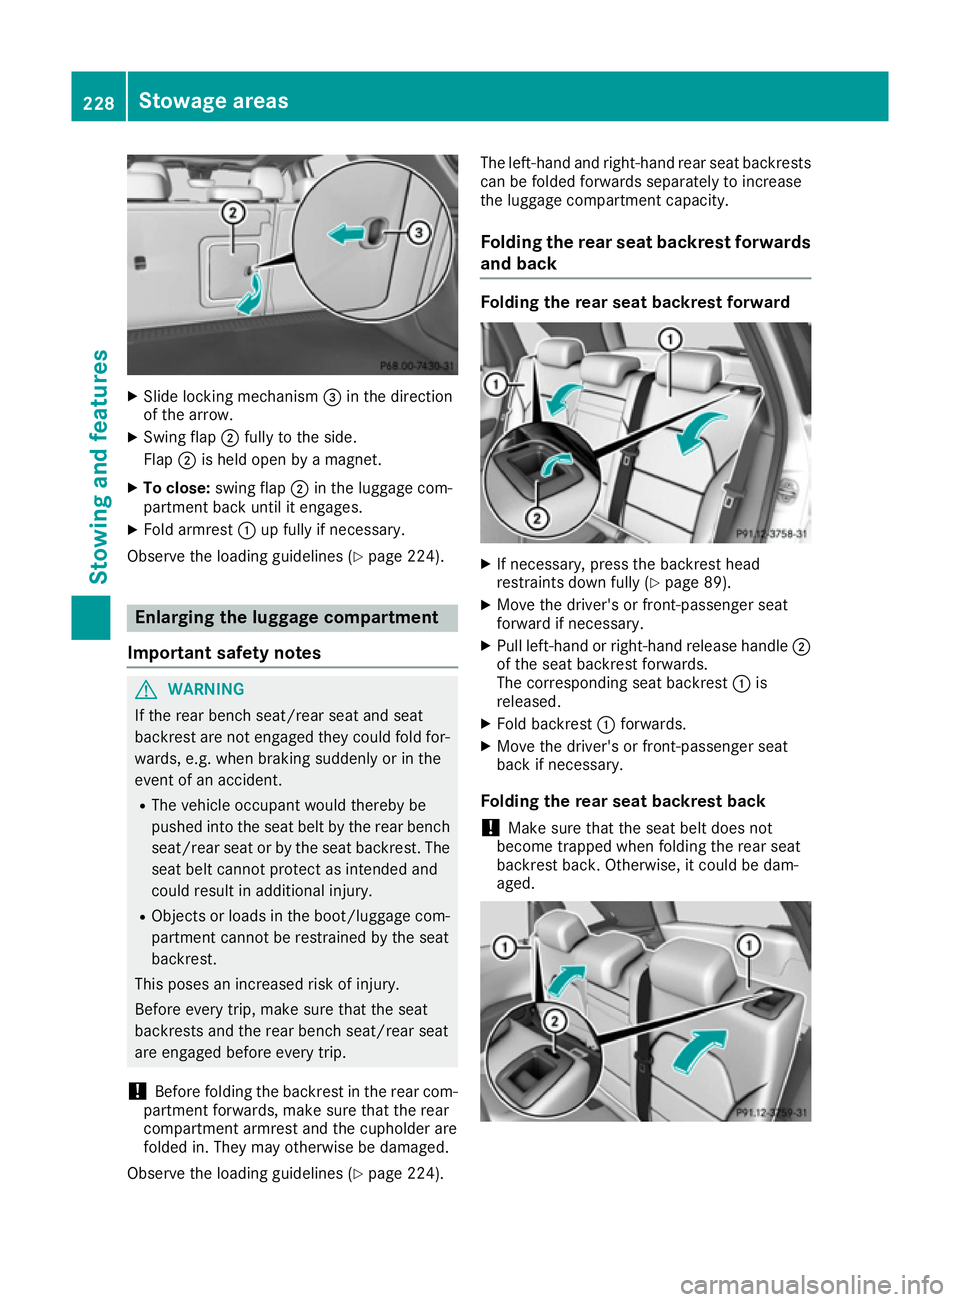
Slide locking mechanism =in the direction
of the arrow.
X Swing flap ;fully to the side.
Flap ;is held open by a magnet.
X To close: swing flap ;in the luggage com-
partment back until it engages.
X Fold armrest :up fully if necessary.
Observe the loading guidelines (Y page 224).Enlarging the luggage compartment
Important safety notes G
WARNING
If the rear bench seat/rear seat and seat
backrest are not engaged they could fold for- wards, e.g. when braking suddenly or in the
event of an accident.
R The vehicle occupant would thereby be
pushed into the seat belt by the rear bench
seat/rear seat or by the seat backrest. The
seat belt cannot protect as intended and
could result in additional injury.
R Objects or loads in the boot/luggage com-
partment cannot be restrained by the seat
backrest.
This poses an increased risk of injury.
Before every trip, make sure that the seat
backrests and the rear bench seat/rear seat
are engaged before every trip.
! Before folding the backrest in the rear com-
partment forwards, make sure that the rear
compartment armrest and the cupholder are
folded in. They may otherwise be damaged.
Observe the loading guidelines (Y page 224).The left-hand and right-hand rear seat backrests
can be folded forwards separately to increase
the luggage compartment capacity.
Folding the rear seat backrest forwards and back Folding the rear seat backrest forward
X
If necessary, press the backrest head
restraints down fully (Y page 89).
X Move the driver's or front-passenger seat
forward if necessary.
X Pull left-hand or right-hand release handle ;
of the seat backrest forwards.
The corresponding seat backrest :is
released.
X Fold backrest :forwards.
X Move the driver's or front-passenger seat
back if necessary.
Folding the rear seat backrest back
! Make sure that the seat belt does not
become trapped when folding the rear seat
backrest back. Otherwise, it could be dam-
aged. 228
Stowage areasStowing and features
Page 232 of 293
X
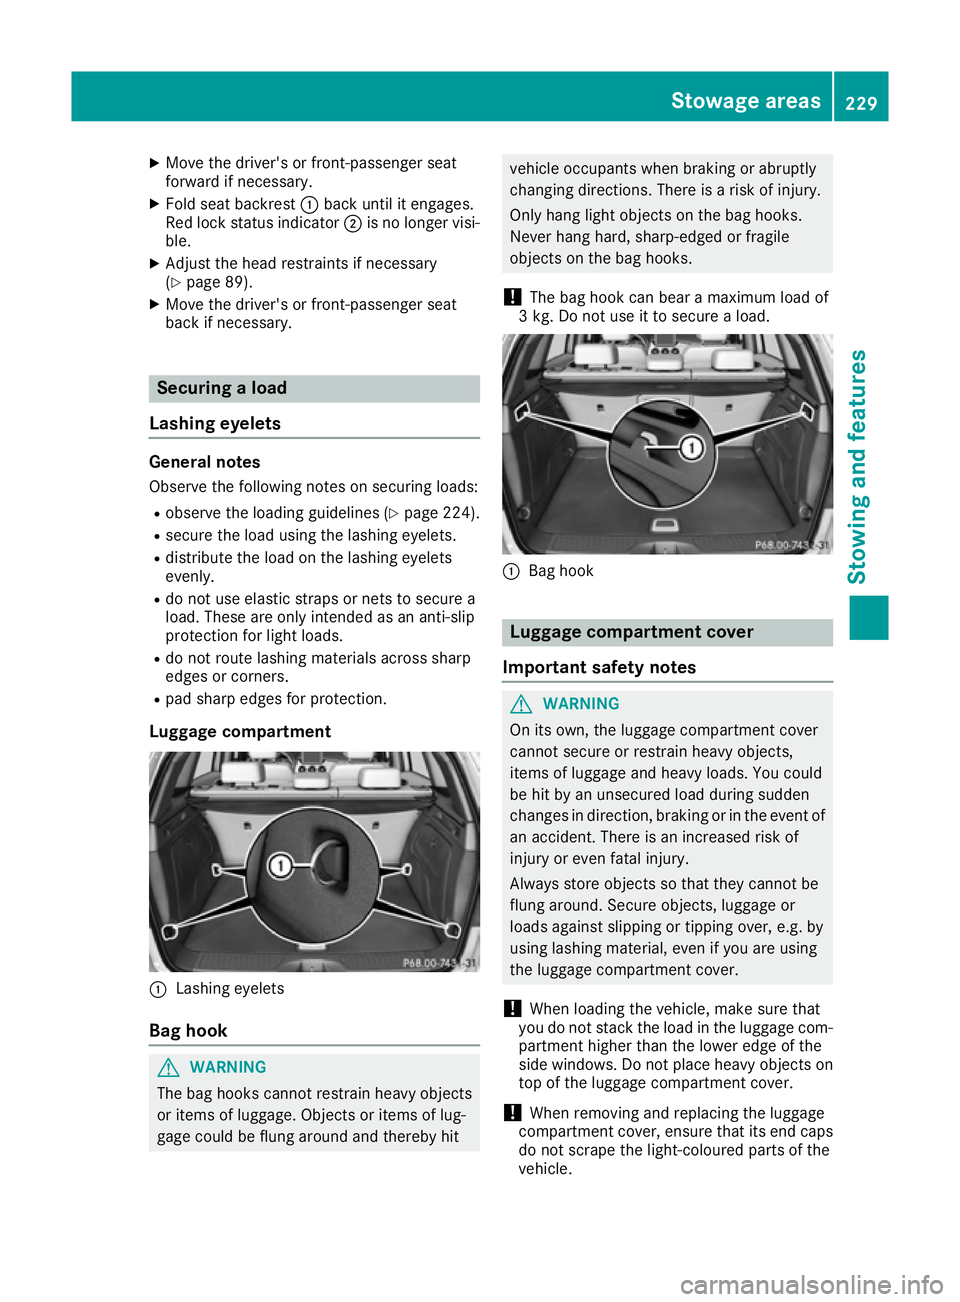
Move the driver's or front-passenger seat
forward if necessary.
X Fold seat backrest :back until it engages.
Red lock status indicator ;is no longer visi-
ble.
X Adjust the head restraints if necessary
(Y page 89).
X Move the driver's or front-passenger seat
back if necessary. Securing a load
Lashing eyelets General notes
Observe the following notes on securing loads:
R observe the loading guidelines (Y page 224).
R secure the load using the lashing eyelets.
R distribute the load on the lashing eyelets
evenly.
R do not use elastic straps or nets to secure a
load. These are only intended as an anti-slip
protection for light loads.
R do not route lashing materials across sharp
edges or corners.
R pad sharp edges for protection.
Luggage compartment :
Lashing eyelets
Bag hook G
WARNING
The bag hooks cannot restrain heavy objects
or items of luggage. Objects or items of lug-
gage could be flung around and thereby hit vehicle occupants when braking or abruptly
changing directions. There is a risk of injury.
Only hang light objects on the bag hooks.
Never hang hard, sharp-edged or fragile
objects on the bag hooks.
! The bag hook can bear a maximum load of
3 kg. Do not use it to secure a load. :
Bag hook Luggage compartment cover
Important safety notes G
WARNING
On its own, the luggage compartment cover
cannot secure or restrain heavy objects,
items of luggage and heavy loads. You could
be hit by an unsecured load during sudden
changes in direction, braking or in the event of an accident. There is an increased risk of
injury or even fatal injury.
Always store objects so that they cannot be
flung around. Secure objects, luggage or
loads against slipping or tipping over, e.g. by
using lashing material, even if you are using
the luggage compartment cover.
! When loading the vehicle, make sure that
you do not stack the load in the luggage com- partment higher than the lower edge of the
side windows. Do not place heavy objects ontop of the luggage compartment cover.
! When removing and replacing the luggage
compartment cover, ensure that its end caps do not scrape the light-coloured parts of the
vehicle. Stowage areas
229Stowing and features Z
Page 233 of 293
The luggage compartment cover is located
behind the rear bench seat backrest.
Extending and retracting the luggage
compartment cover X
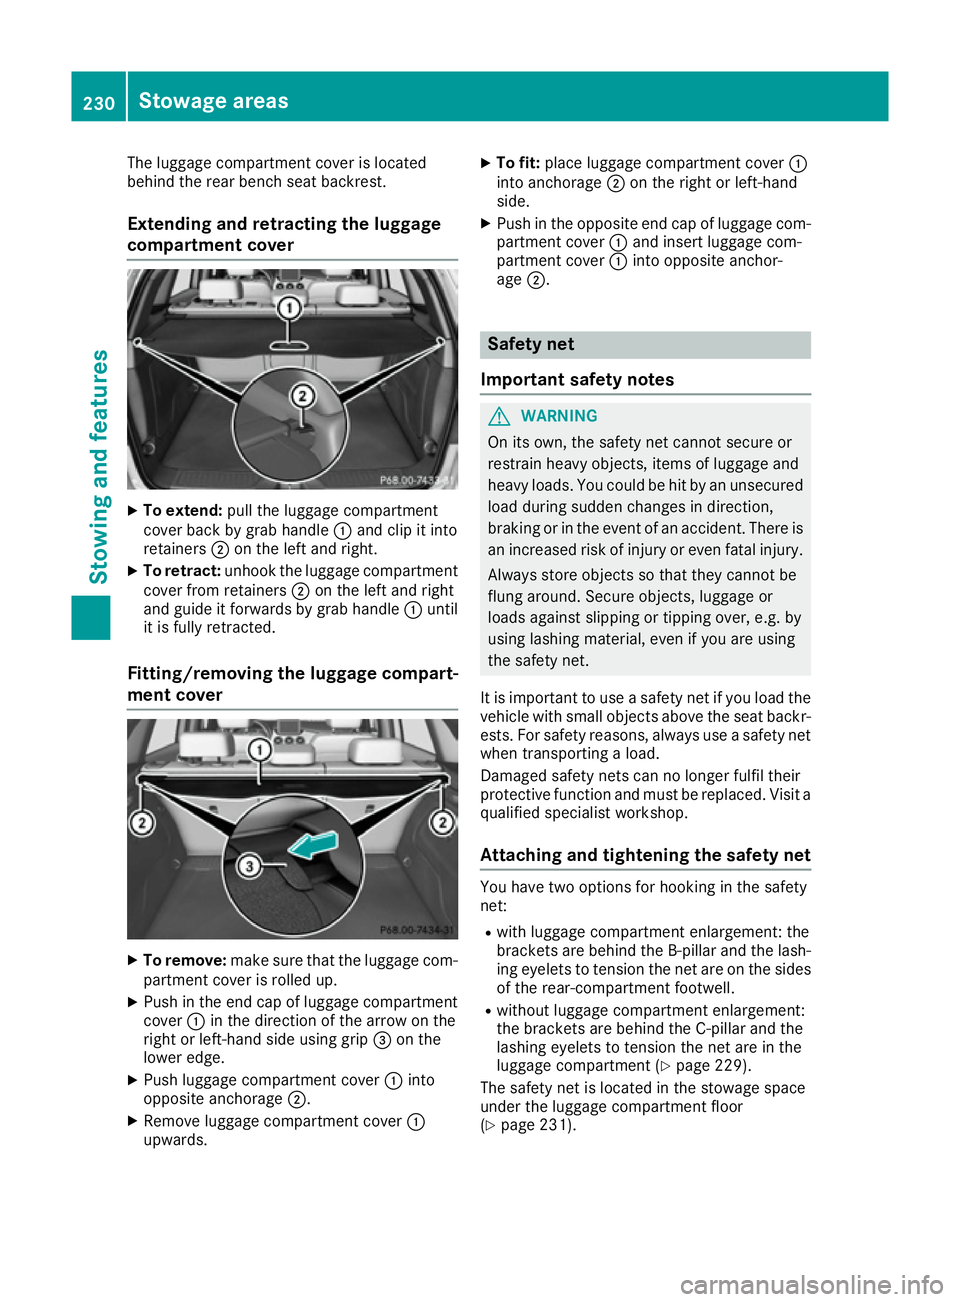
To extend: pull the luggage compartment
cover back by grab handle :and clip it into
retainers ;on the left and right.
X To retract: unhook the luggage compartment
cover from retainers ;on the left and right
and guide it forwards by grab handle :until
it is fully retracted.
Fitting/removing the luggage compart-
ment cover X
To remove: make sure that the luggage com-
partment cover is rolled up.
X Push in the end cap of luggage compartment
cover :in the direction of the arrow on the
right or left-hand side using grip =on the
lower edge.
X Push luggage compartment cover :into
opposite anchorage ;.
X Remove luggage compartment cover :
upwards. X
To fit: place luggage compartment cover :
into anchorage ;on the right or left-hand
side.
X Push in the opposite end cap of luggage com-
partment cover :and insert luggage com-
partment cover :into opposite anchor-
age ;. Safety net
Important safety notes G
WARNING
On its own, the safety net cannot secure or
restrain heavy objects, items of luggage and
heavy loads. You could be hit by an unsecured load during sudden changes in direction,
braking or in the event of an accident. There isan increased risk of injury or even fatal injury.
Always store objects so that they cannot be
flung around. Secure objects, luggage or
loads against slipping or tipping over, e.g. by
using lashing material, even if you are using
the safety net.
It is important to use a safety net if you load the
vehicle with small objects above the seat backr-
ests. For safety reasons, always use a safety net when transporting a load.
Damaged safety nets can no longer fulfil their
protective function and must be replaced. Visit a qualified specialist workshop.
Attaching and tightening the safety net You have two options for hooking in the safety
net:
R with luggage compartment enlargement: the
brackets are behind the B‑pillar and the lash-
ing eyelets to tension the net are on the sides
of the rear-compartment footwell.
R without luggage compartment enlargement:
the brackets are behind the C-pillar and the
lashing eyelets to tension the net are in the
luggage compartment (Y page 229).
The safety net is located in the stowage space
under the luggage compartment floor
(Y page 231). 230
Stowage areasStowing and features
Page 234 of 293
X
Open both Velcro fasteners and remove the
safety net.
X Unroll and unfold the safety net.
The joints on the upper and lower guide rod
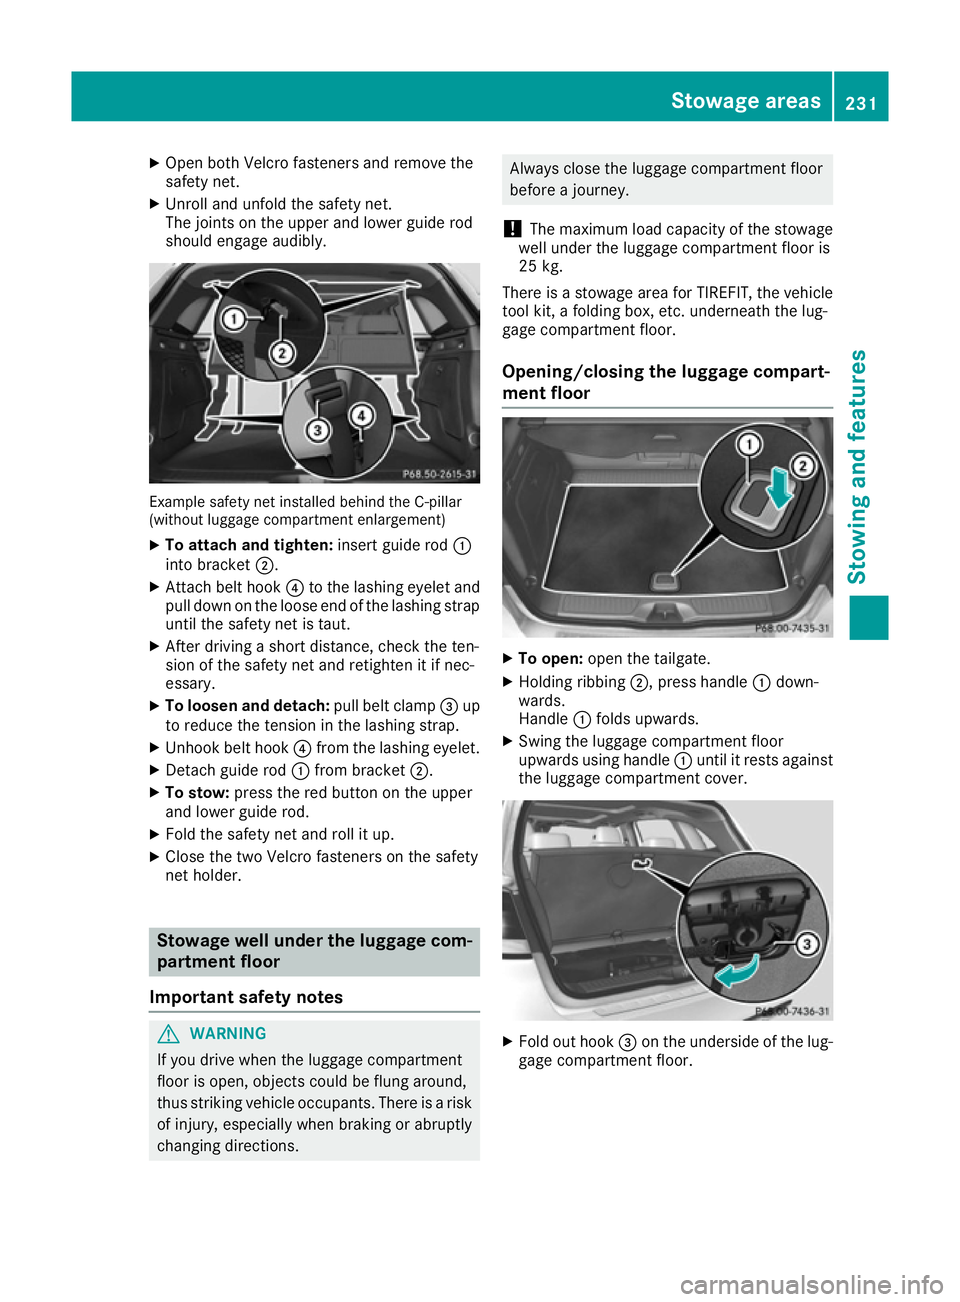
should engage audibly. Example safety net installed behind the C-pillar
(without luggage compartment enlargement)
X To attach and tighten: insert guide rod:
into bracket ;.
X Attach belt hook ?to the lashing eyelet and
pull down on the loose end of the lashing strap until the safety net is taut.
X After driving a short distance, check the ten-
sion of the safety net and retighten it if nec-
essary.
X To loosen and detach: pull belt clamp=up
to reduce the tension in the lashing strap.
X Unhook belt hook ?from the lashing eyelet.
X Detach guide rod :from bracket ;.
X To stow: press the red button on the upper
and lower guide rod.
X Fold the safety net and roll it up.
X Close the two Velcro fasteners on the safety
net holder. Stowage well under the luggage com-
partment floor
Important safety notes G
WARNING
If you drive when the luggage compartment
floor is open, objects could be flung around,
thus striking vehicle occupants. There is a risk of injury, especially when braking or abruptly
changing directions. Always close the luggage compartment floor
before a journey.
! The maximum load capacity of the stowage
well under the luggage compartment floor is
25 kg.
There is a stowage area for TIREFIT, the vehicle tool kit, a folding box, etc. underneath the lug-
gage compartment floor.
Opening/closing the luggage compart-
ment floor X
To open: open the tailgate.
X Holding ribbing ;, press handle :down-
wards.
Handle :folds upwards.
X Swing the luggage compartment floor
upwards using handle :until it rests against
the luggage compartment cover. X
Fold out hook =on the underside of the lug-
gage compartment floor. Stowage areas
231Stowing and features Z
Page 235 of 293

X
Attach hook =to the luggage compart-
ment's upper seal ?.
X To close: detach hook =from upper seal ?.
X Fasten hook =to the bracket on the under-
side of the luggage compartment floor.
X Fold the luggage compartment floor down.
X Press the luggage compartment floor down
until it engages.
Setting the height of the luggage com-
partment floor The stowage well under the luggage compart-
ment floor can be increased or decreased in size
as necessary. To do this, you can lock the floor
at two different heights. The upper catch gives a
flat load surface when the rear bench seat is
folded forward. X
To raise: using handle :, lift up luggage
compartment floor ;in the direction of
arrow =and pull it upwards.
X Lower luggage compartment floor ;again.
To do this, push the luggage compartment
floor away so that it engages in the guide on
the upper level.
Luggage compartment floor ;engages in
the upper position. i
Carry out this step using both hands.
X To lower: raise luggage compartment
floor ;slightly using handle :and pull it
towards you.
X Lower luggage compartment floor ;again
slowly. Whilst doing so, press the luggage
compartment floor into the lower level.
Luggage compartment floor ;engages in
the lower position. Roof carrier
Important safety notes G
WARNING
When a load is transported on the roof, the
vehicle's centre of gravity rises and the han-
dling changes. If you exceed the maximum
roof load, the handling as well as steering and braking characteristics are severely affected.
There is a risk of an accident.
Always observe the maximum roof load and
adapt your driving style.
You will find information on the maximum roof
load in the "Technical data" section
(Y page 284).
An incorrectly secured roof carrier or roof load
may become detached from the vehicle. You
must therefore ensure that you observe the roof
carrier manufacturer's installation instructions.
Attaching the roof carrier X
Open covers :carefully in the direction of
the arrow.
X Fold covers :upwards. 232
Stowage areasSto
wing an d features
Page 236 of 293
X
Only secure the roof carrier to the anchorage
points under covers :.
X Observe the manufacturer's installation
instructions. Features
Cup holders
Important safety notes G
WARNING
The cup holder cannot secure a drinks con-
tainer in place during a journey. If you use a
cup holder during a journey, the drinks con-
tainer could be flung around and liquid could
be spilt. Vehicle occupants could come into
contact with the liquid and, in particular, be
scalded by hot liquid. You could be distracted
from the traffic situation and lose control of
the vehicle. There is a risk of an accident and
injury.
Only use the cup holder when the vehicle is
stationary. Only place containers of a suitable size in the cup holder. Seal the container, in
particular when it contains hot liquid. G
WARNING
If objects in the passenger compartment are
stowed incorrectly, they can slide or be
thrown around and hit vehicle occupants.
There is a risk of injury, particularly in the
event of sudden braking or a sudden change
in direction.
R Always stow objects so that they cannot be
thrown around in such situations.
R Always make sure that objects do not pro-
trude from stowage spaces, parcel nets or
stowage nets.
R Close the lockable stowage spaces before
starting a journey.
R Stow and secure objects that are heavy,
hard, pointed, sharp-edged, fragile or too
large in the luggage compartment. !
Only use the cup holders for containers of
the right size and which have lids. The drinks
could otherwise spill.
Observe the loading guidelines (Y page 224).
The stowage compartments in the doors provide
space for bottles:
R front: capacity up to 1.5 l
R rear: capacity up to 0.5 l
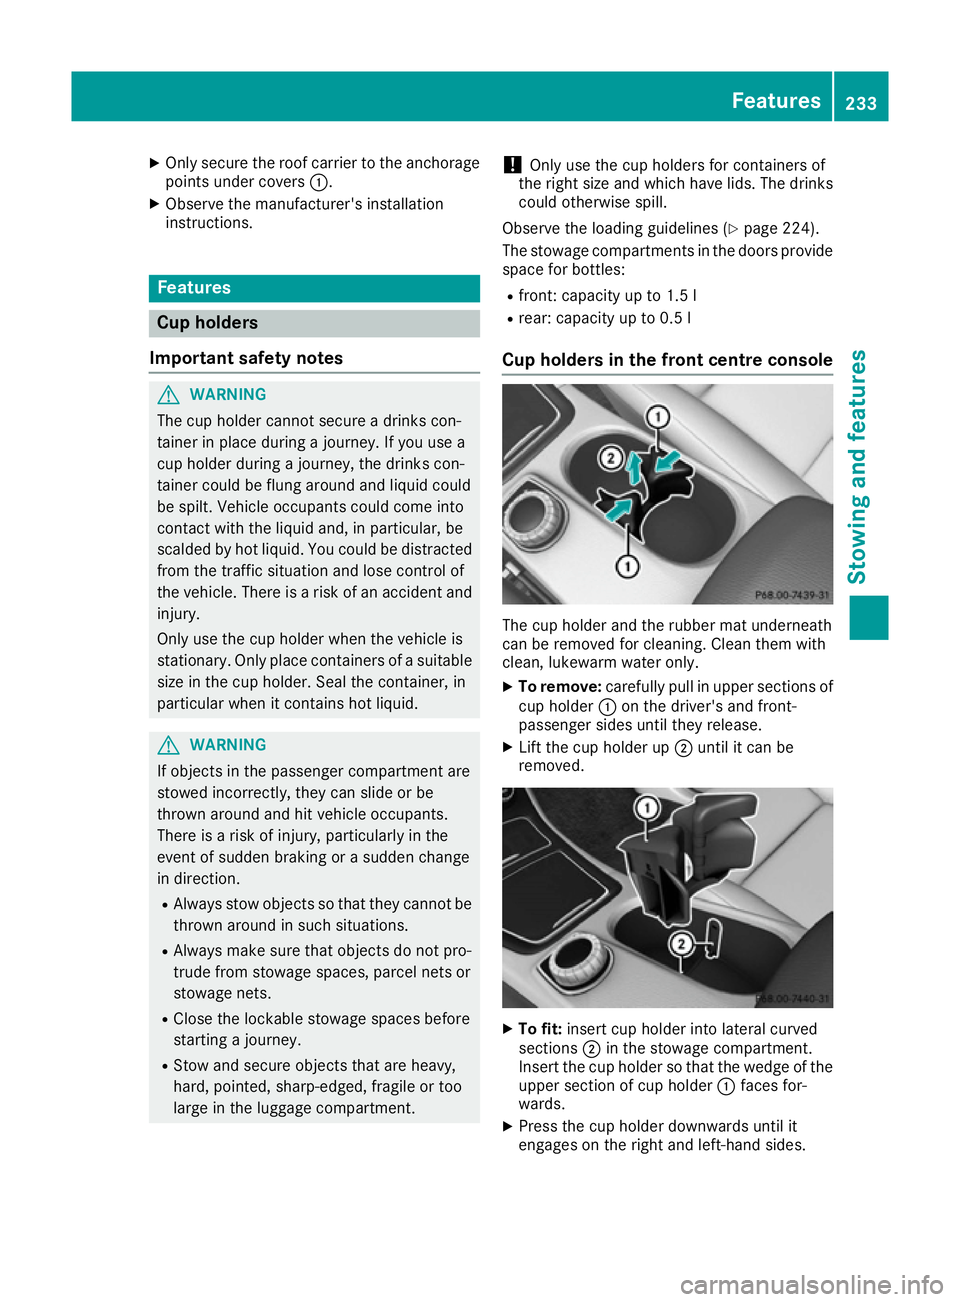
Cup holders in the front centre console The cup holder and the rubber mat underneath
can be removed for cleaning. Clean them with
clean, lukewarm water only.
X To remove: carefully pull in upper sections of
cup holder :on the driver's and front-
passenger sides until they release.
X Lift the cup holder up ;until it can be
removed. X
To fit: insert cup holder into lateral curved
sections ;in the stowage compartment.
Insert the cup holder so that the wedge of the upper section of cup holder :faces for-
wards.
X Press the cup holder downwards until it
engages on the right and left-hand sides. Features
233Stowing and features Z
Page 237 of 293
Cup holder in the rear seat armrest
!
Do not sit on or support your body weight on
the rear seat armrest when it is folded down,
as you could otherwise damage it.
! Close the cup holder before folding the rear
seat armrest up. Otherwise, the cup holder
could be damaged. X
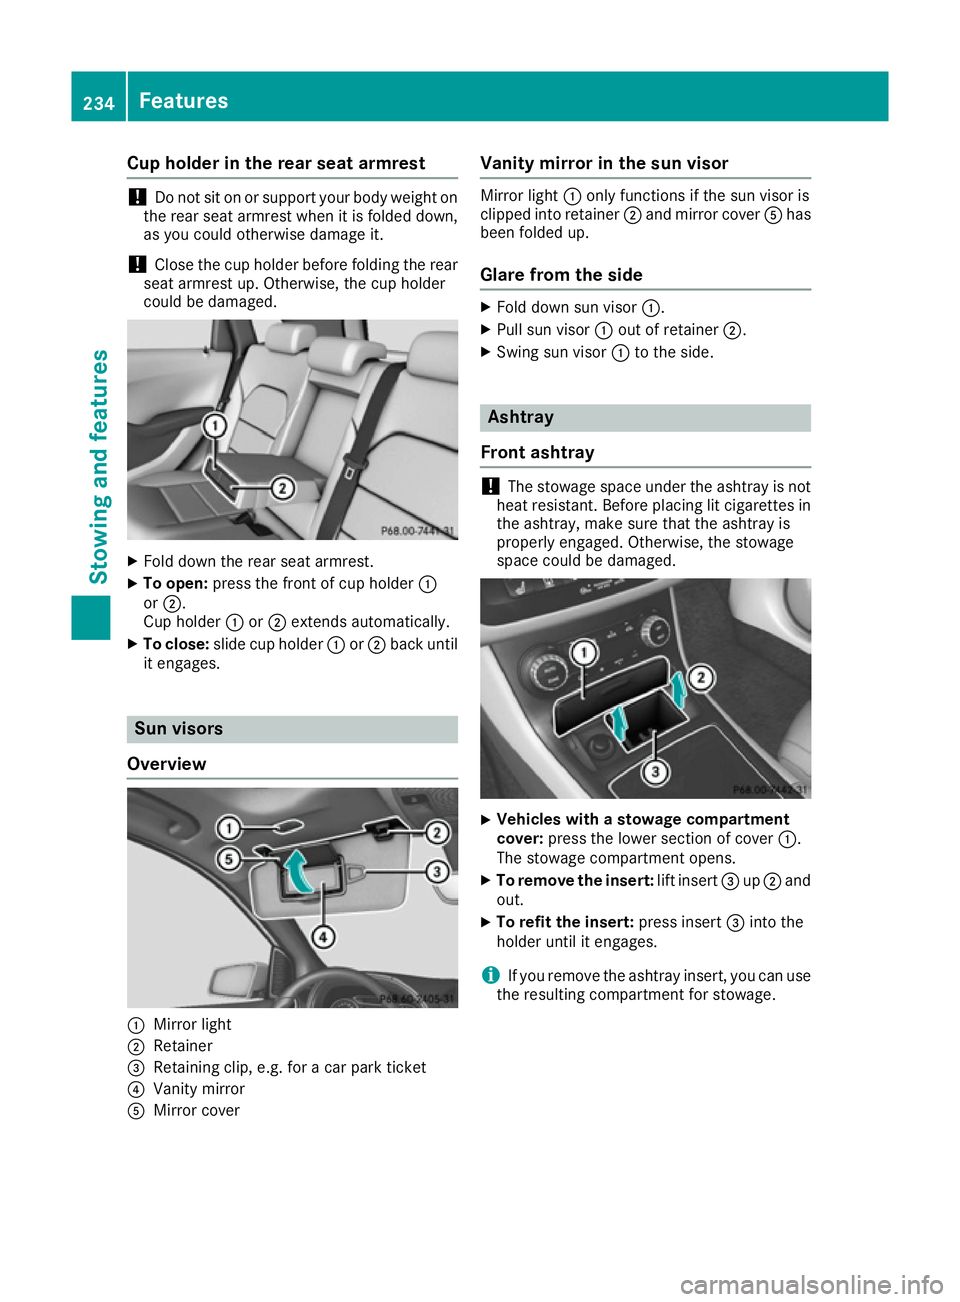
Fold down the rear seat armrest.
X To open: press the front of cup holder :
or ;.
Cup holder :or; extends automatically.
X To close: slide cup holder :or; back until
it engages. Sun visors
Overview :
Mirror light
; Retainer
= Retaining clip, e.g. for a car park ticket
? Vanity mirror
A Mirror cover Vanity mirror in the sun visor Mirror light
:only functions if the sun visor is
clipped into retainer ;and mirror cover Ahas
been folded up.
Glare from the side X
Fold down sun visor :.
X Pull sun visor :out of retainer ;.
X Swing sun visor :to the side. Ashtray
Front ashtray !
The stowage space under the ashtray is not
heat resistant. Before placing lit cigarettes in the ashtray, make sure that the ashtray is
properly engaged. Otherwise, the stowage
space could be damaged. X
Vehicles with a stowage compartment
cover:
press the lower section of cover :.
The stowage compartment opens.
X To remove the insert: lift insert=up; and
out.
X To refit the insert: press insert=into the
holder until it engages.
i If you remove the ashtray insert, you can use
the resulting compartment for stowage. 234
FeaturesStowing and features
Page 238 of 293
Rear-compartment ashtray
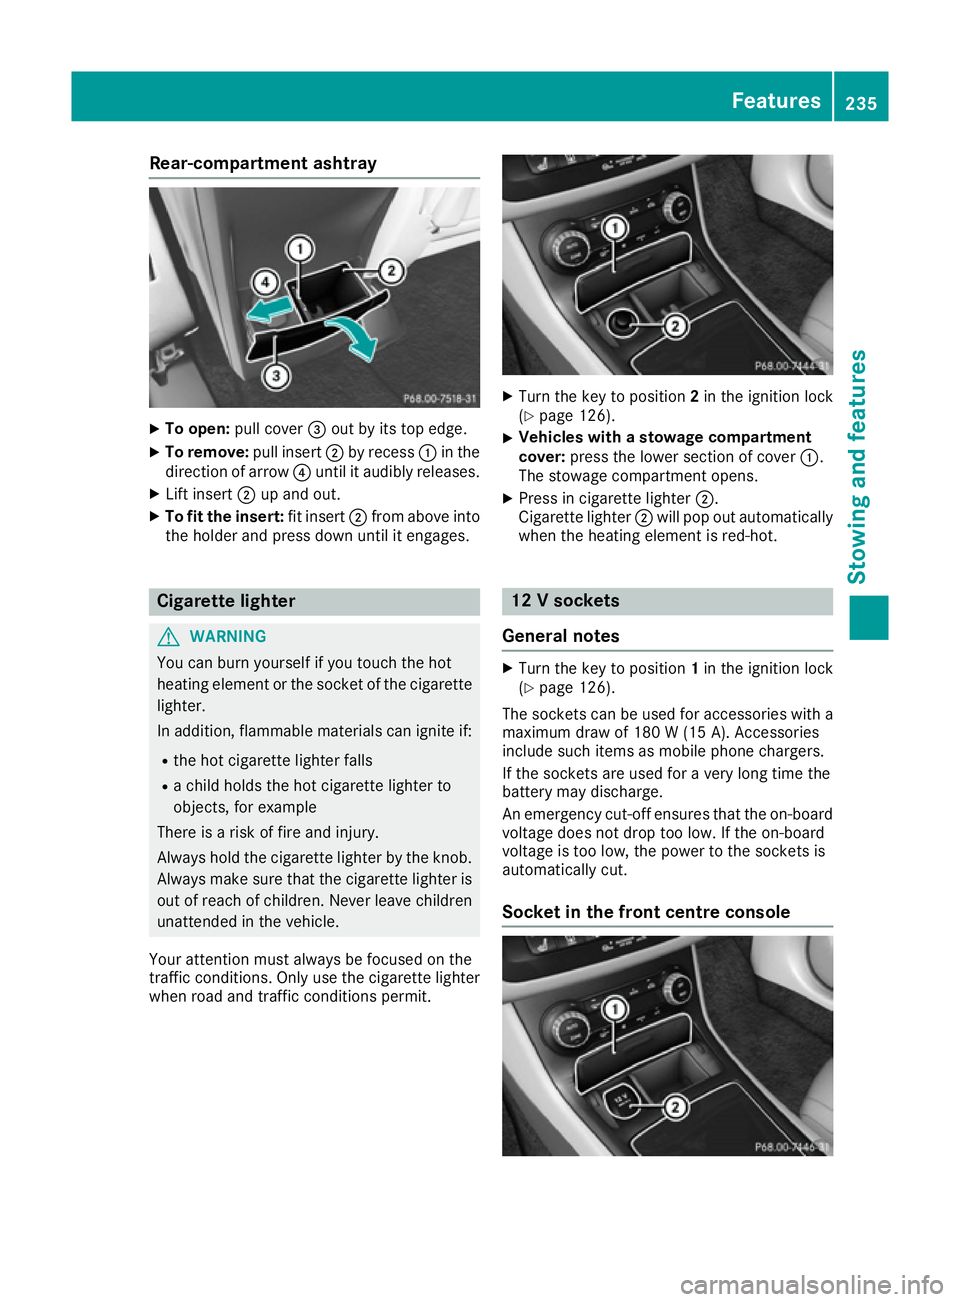
X
To open: pull cover =out by its top edge.
X To remove: pull insert;by recess :in the
direction of arrow ?until it audibly releases.
X Lift insert ;up and out.
X To fit the insert: fit insert;from above into
the holder and press down until it engages. Cigarette lighter
G
WARNING
You can burn yourself if you touch the hot
heating element or the socket of the cigarette lighter.
In addition, flammable materials can ignite if:
R the hot cigarette lighter falls
R a child holds the hot cigarette lighter to
objects, for example
There is a risk of fire and injury.
Always hold the cigarette lighter by the knob.
Always make sure that the cigarette lighter is
out of reach of children. Never leave children unattended in the vehicle.
Your attention must always be focused on the
traffic conditions. Only use the cigarette lighter when road and traffic conditions permit. X
Turn the key to position 2in the ignition lock
(Y page 126).
X Vehicles with a stowage compartment
cover:
press the lower section of cover :.
The stowage compartment opens.
X Press in cigarette lighter ;.
Cigarette lighter ;will pop out automatically
when the heating element is red-hot. 12 V sockets
General notes X
Turn the key to position 1in the ignition lock
(Y page 126).
The sockets can be used for accessories with a
maximum draw of 180 W(15 A). Accessories
include such items as mobile phone chargers.
If the sockets are used for a very long time the
battery may discharge.
An emergency cut-off ensures that the on-board voltage does not drop too low. If the on-board
voltage is too low, the power to the sockets is
automatically cut.
Socket in the front centre console Features
235Stowing and fea tures Z
Page 239 of 293
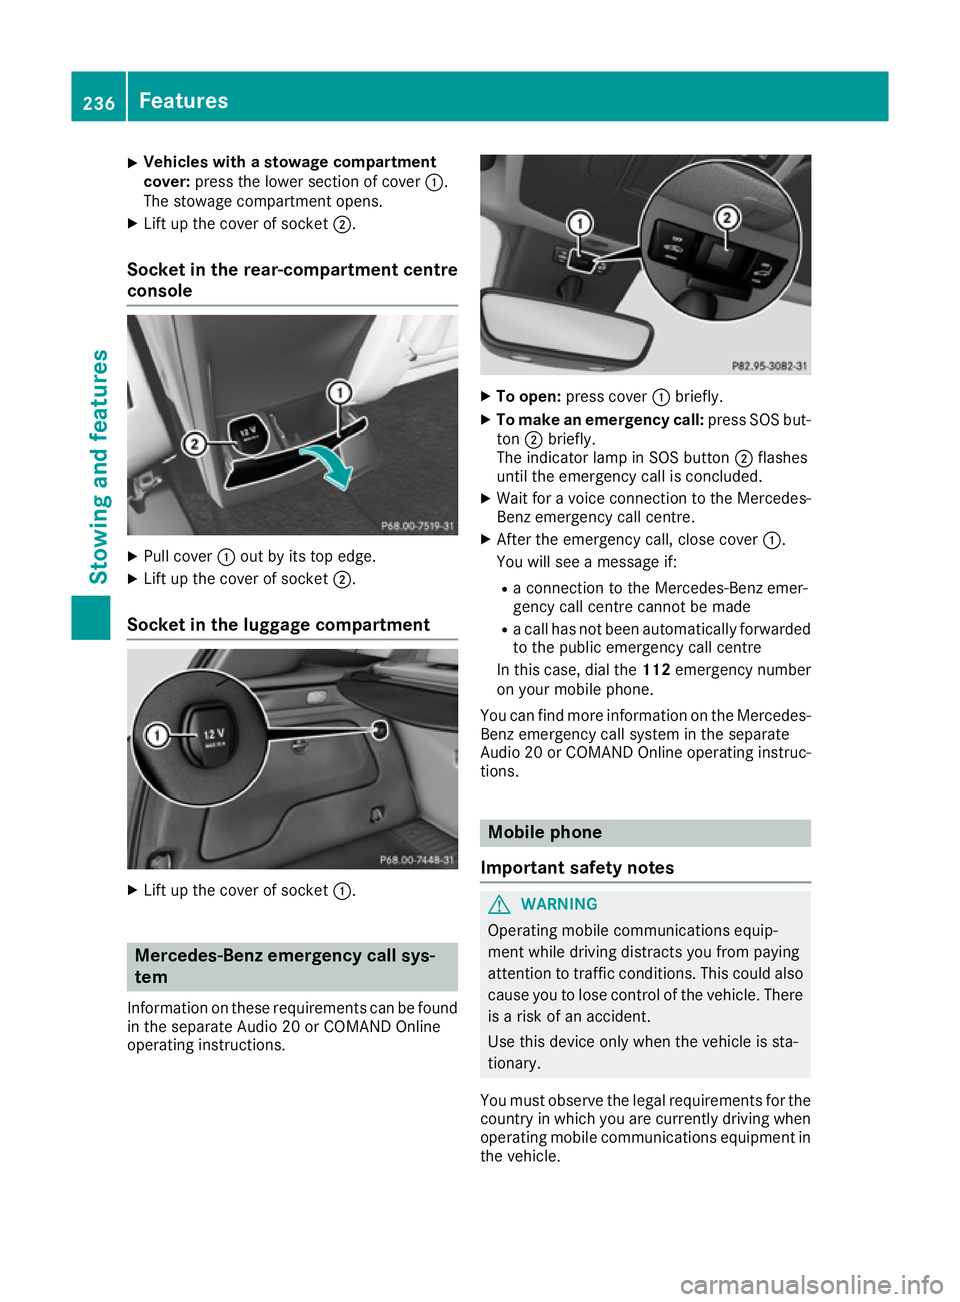
X
Vehicles with a stowage compartment
cover:
press the lower section of cover :.
The stowage compartment opens.
X Lift up the cover of socket ;.
Socket in the rear-compartment centre
console X
Pull cover :out by its top edge.
X Lift up the cover of socket ;.
Socket in the luggage compartment X
Lift up the cover of socket :.Mercedes-Benz emergency call sys-
tem
Information on these requirements can be found in the separate Audio 20 or COMAND Online
operating instructions. X
To open: press cover :briefly.
X To make an emergency call: press SOS but-
ton ;briefly.
The indicator lamp in SOS button ;flashes
until the emergency call is concluded.
X Wait for a voice connection to the Mercedes-
Benz emergency call centre.
X After the emergency call, close cover :.
You will see a message if:
R a connection to the Mercedes-Benz emer-
gency call centre cannot be made
R a call has not been automatically forwarded
to the public emergency call centre
In this case, dial the 112emergency number
on your mobile phone.
You can find more information on the Mercedes- Benz emergency call system in the separate
Audio 20 or COMAND Online operating instruc-
tions. Mobile phone
Important safety notes G
WARNING
Operating mobile communications equip-
ment while driving distracts you from paying
attention to traffic conditions. This could also cause you to lose control of the vehicle. There
is a risk of an accident.
Use this device only when the vehicle is sta-
tionary.
You must observe the legal requirements for the country in which you are currently driving when
operating mobile communications equipment in the vehicle. 236
FeaturesStowing and features
Page 240 of 293
If it is permitted by law to operate communica-
tions equipment while the vehicle is in motion,
you may only do so if the traffic situation per-
mits. You may otherwise be distracted from the
traffic conditions, cause an accident and injure
yourself and others.
Excessive levels of electromagnetic radiation
may cause damage to your health and to the
health of others. The use of an exterior aerial
takes into consideration the scientific discus-
sion surrounding the possible health risk posed by electromagnetic fields.
Mercedes-Benz recommends the use of an
approved exterior aerial. This ensures:
R optimal mobile phone reception quality in the
vehicle
R that mutual interference between the vehicle
electronics and mobile phones is minimised
An exterior aerial has the following advantages:
R it conducts the electromagnetic fields gener-
ated by a wireless device to the exterior
R the field strength in the vehicle interior is
lower than in a vehicle that does not have an
exterior aerial
Information on retrofitting two-way radios and
mobile phones (RF transmitters) (Y page 280).
General notes There are various mobile phone brackets that
may be fitted in your vehicle; in some cases,
these are country-specific.
More information on suitable mobile phones,
mobile phone brackets and on connecting Blue-
tooth ®
-capable mobile phones to
COMAND Online/Audio 20 can be obtained:
R at your Mercedes-Benz Service Centre
R on the Internet at http://www.mercedes-
benz.com/connect
The functions and services available when you
use the phone depend on your mobile phone
model and service provider.
Using a mobile phone To connect a mobile phone to the exterior aerial
and charge it, insert it into the mobile phone
bracket. X
Open the telephone compartment
(Y page 226).
X Place the mobile phone bracket into the pre-
installed fitting; see the separate installation
instructions for the mobile phone fitting.
X Insert the mobile phone into the mobile phone
bracket; see the separate installation instruc- tions for the mobile phone fitting.
i The mobile phone can also be operated
without being in the bracket. However, the
charging function and aerial function are not
available.
In order to use Bluetooth ®
(SAP profile) on your
telephone module, you must first insert the tele-
phone module into the pre-installed fitting. This connects it to the exterior aerial. If you wish to
charge the mobile phone, then you must con-
nect it to a USB port.
Further information on the telephone module
with Bluetooth ®
(SAP profile) can be found in the
Digital Owner's Manual.
Operating the mobile phone You can operate the telephone using the
6
and ~ buttons on the multifunction steering
wheel. You can operate other mobile phone
functions via the on-board computer
(Y page 181).
When you remove the key from the ignition lock, the mobile phone is disconnected from the vehi-cle. You can then no longer make calls using the
hands-free system.
If a call is active and you remove the key from
the ignition lock, the conversation is transferred over to the mobile phone. It is then possible to
continue the conversation on the mobile phone. Features
237Stowing and features Z