battery MERCEDES-BENZ B-CLASS SPORTS 2014 Owners Manual
[x] Cancel search | Manufacturer: MERCEDES-BENZ, Model Year: 2014, Model line: B-CLASS SPORTS, Model: MERCEDES-BENZ B-CLASS SPORTS 2014Pages: 360, PDF Size: 39.45 MB
Page 7 of 360
AUT
Olights
Display message ............................ 223
see Lights
Automatic engine start (ECO start/
stop function) .................................... 140
Automatic engine switch-off (ECO
start/stop function) ..........................139
Automatic headlamp mode ..............105
Automatic transmission Automatic drive program ...............147
Changing gea r............................... 146
DIRECT SELECT leve r..................... 143
Display message ............................ 233
Drive program displa y.................... 144
Driving tips .................................... 146
Emergency running mode ..............150
Engaging drive position .................. 145
Engaging neutra l............................ 144
Engaging revers egear ................... 144
Engaging the par kposition ............ 144
Holding the vehicle stationary on
uphill gradients .............................. 146
Kickdow n....................................... 146
Manual drive program ....................147
Overview ........................................ 143
Problem (malfunction) ...................150
Progra mselecto rbutton ................ 146
Pulling away ................................... 138
Starting the engine ........................137
Steering wheel paddle shifters ......147
Transmission position displa y........ 144
Transmission positions ..................145
Automatic transmission
emergency mode ............................... 150 B
Backup lamp Changing bulbs .............................. 115
Display message ............................ 222
Bag hook ............................................ 257
BAS (Brake Assist System) .................64
Battery (SmartKey) Checking .......................................... 76
Important safety notes ....................76
Replacing ......................................... 76Battery (vehicle)
Charging ........................................ 302
Display message ............................ 225
Important safety notes ..................299
Jump starting ................................. 303
Belt force limiter
Activatio n......................................... 55
Function .......................................... .55
Blind Spo tAssist
Activating/deactivating .................201
Display message ............................ 227
Notes/function .............................. 184
Brake Assist
see BAS (Brake Assist System)
Brake fluid
Display message ............................ 214
Notes ............................................. 350
Brake lamps
Adaptive .......................................... .67
Changin gbulbs .............................. 115
Display message ............................ 221
Brakes
ABS .................................................. 63
Adaptive Brake Assist ......................65
BAS .................................................. 64
Brake fluid (notes) .........................350
Display message ............................ 208
Driving tips .................................... 157
Important safety notes ..................157
Maintenance .................................. 158
Parking brake ................................ 153
Warning lamp ................................. 239
Breakdown
see Flat tire
see Towing away/tow-starting
Bulbs
see Replacing bulbs C
Calling up amalfunction
see Display messages
Car
see Vehicle
Care
Carpets .......................................... 291
Carw ash. ....................................... 286
Display ........................................... 290 Index
5
Page 18 of 360
SmartKey
Changing the battery .......................76
Changing the programming .............75
Checking the battery .......................76
Convenience closing feature ............84
Convenience opening feature ..........84
Display message ............................ 237
Door central locking/unlocking .......74
Important safety notes ....................74
Loss ................................................. 78
Mechanical key ................................ 75
Positions (ignition lock) .................137
Problem (malfunction) .....................78
Starting the engine ........................138
SmartKey position s(ignition lock) ..137
Sno wchains ...................................... 315
Sockets Center console .............................. 264
Luggage compartment ...................265
Points to observe before use .........264
Rea rcompartmen t......................... 265
Specialist workshop ............................ 25
Speed, controlling see Cruise control
Speedometer
Activating/deactivating the
additiona lspeedometer .................202
Digita l............................................ 195
In the Instrument cluster .................31
Segments ...................................... 191
Selecting the unit of measurement 202
see Instrument cluster
SRS
see SRS (Supplemental Restraint
System)
SRS (Supplemental Restraint
System)
Display message ............................ 216
Introduction ..................................... 40
Warning lamp ................................. 244
Warning lamp (function) ................... 41
Standin glamps
Changing bulbs .............................. 113
Display message ............................ 222
Switching on/off ........................... 106
Start/stop function
see ECO start/stop function
Starting (engine) ................................ 137 Status overview (on-board
computer)
.......................................... 199
STEE RCONTROL .................................. 70
Steering (display message) ..............236
Steering wheel Adjusting (manually )........................ 98
Button overview ............................... 33
Buttons (on-board computer) ......... 191
Cleaning ......................................... 290
Important safety notes ....................98
Paddle shifters ............................... 147
Steering wheel paddle shifters ........147
Stowage areas ................................... 251
Stowage compartments Armrest (front) ............................... 252
Armrest (under) ............................. 252
Center console .............................. 251
Cuph olders ................................... 261
Eyeglasses compartment ...............251
Glove box ...................................... .251
Important safety information .........251
Parce lnet ...................................... 253
Under driver's seat/front-
passenger sea t.............................. 252
Stowage space
Center console (rear) .....................252
Summer tires ..................................... 314
Sun visor ............................................ 263
Surround lighting (on-board
computer) .......................................... 204
Switchin gair-recirculation mode
on/off ................................................. 132
Switchin goff the alarm (ATA) ............70 T
Tachometer ........................................ 191
Tailgate Display message ............................ 235
Emergency unlocking .......................82
Important safety notes ....................81
Opening/closing (from outside) .......82
Opening dimensions ......................353
Tail lamps
Display message ............................ 221
see Lights
Tank content
Fuel gauge ....................................... 3116
Index
Page 27 of 360
the operating safety of the vehicl
ecould be
affected. There is ariskofana ccident.
Do not connect any equipment to a
diagnostics connectio ninthe vehicle. G
WARNING
Objectsint he driver's footwell can restrict the
pedal travel or obstruct adepressed pedal.
The operatin gand road safety of the vehicle
is jeopardized. There is arisk of an accident.
Make sure that all objects in the vehicle are
stowed correctly, and that they cannot enter
the driver's footwell. Install the floormats
securely and as specified in order to ensure
sufficien tclearanc efor the pedals. Do not use
loose floormats and do not place floormats on
top of one another.
! If the engin eisswitched off and
equipmen tonthe diagnostics connection
is used, the starter battery may discharge.
Connecting equipment to the diagnostics
connection can lead to emissions monitoring
information being reset, for example. This
may lead to the vehicle failing to meet the
requirements of the next emissions test
during the main inspection. Qualified specialist workshop
An authorized Mercedes-Ben zCenter is a
qualified specialist workshop. It has the
necessary specialist knowledge, tools and
qualifications to correctly carry out the work
required on your vehicle. This is especially the
case for work relevant to safety.
Observe the notes in the Maintenance
Booklet.
Always have the following work carried out at
an authorized Mercedes-Benz Center:
R work relevant to safety
R servic eand maintenanc ework
R repair work R
alterations, installation work and
modifications
R work on electronic components Correct use
If you remove any warning stickers ,you or
other scould fail to recognize certain dangers.
Leave warning stickers in position.
Observe the following information when
driving your vehicle:
R the safety notes in this manual
R the Technical Data section in this manual
R traffic rules and regulations
R laws and safety standards pertaining to
moto rvehicles Problems with your vehicle
If you should experience aproble mwith your
vehicle, particularly one that you believe may
affec tits safe operation, we urge yo uto
contact an authorized Mercedes-Benz Center
immediatel ytohavet he problem diagnosed
and rectified. If the problem is not resolved to
your satisfaction, please discuss the problem
agai nwithaM ercedes-Ben zCenter or
contact us at one of the following addresses.
In the USA
Customer Assistance Center
Mercedes-BenzU SA,LLC
One Mercedes Drive
Montvale, NJ 07645-0350
In Canada
Customer Relations Department
Mercedes-BenzC anada, Inc.
98 Vanderhoof Avenue
Toronto ,Ontario M4G 4C9 Reporting safety defects
US Ao nly: Introduction
25 Z
Page 72 of 360
(Y
page 138). For further information ,see
Driving tips (Y page 157). STEER CONTROL
General information STEER CONTROL helps you by transmitting a
noticeable steering forc etothe steering
wheel in the direction required for vehicle
stabilization.
This steering assistance is provided in
particular if:
R both right wheels or both left wheels are on
aw et or slippery road surface when you
brake.
R the vehicle start stoskid.
Importan tsafet ynotes If ESP
®
is malfunctioning, you will not receive
steering support from STEER CONTROL.
Power steering will, however, continue to
function. Thef
tdeterrent locking system Immobilizer
The immobilizer prevents your vehicle from
being started without the correct SmartKey.
X To activate: removethe SmartKey from
the ignition lock.
X To deactivate: switchont he ignition.
When leaving the vehicle, always tak ethe
SmartKey with you and lock the vehicle. The
engin ecan be started by anyone with avalid
SmartKey that is left inside the vehicle.
i The immobilizer is always deactivated
when you start the engine.
In the event that the engin ecannot be
started when the starter battery is fully
charged, the immobilizer may be faulty.
Contact an authorized Mercedes-Benz
Cente rorcall 1-800-FOR-MERCedes (in the
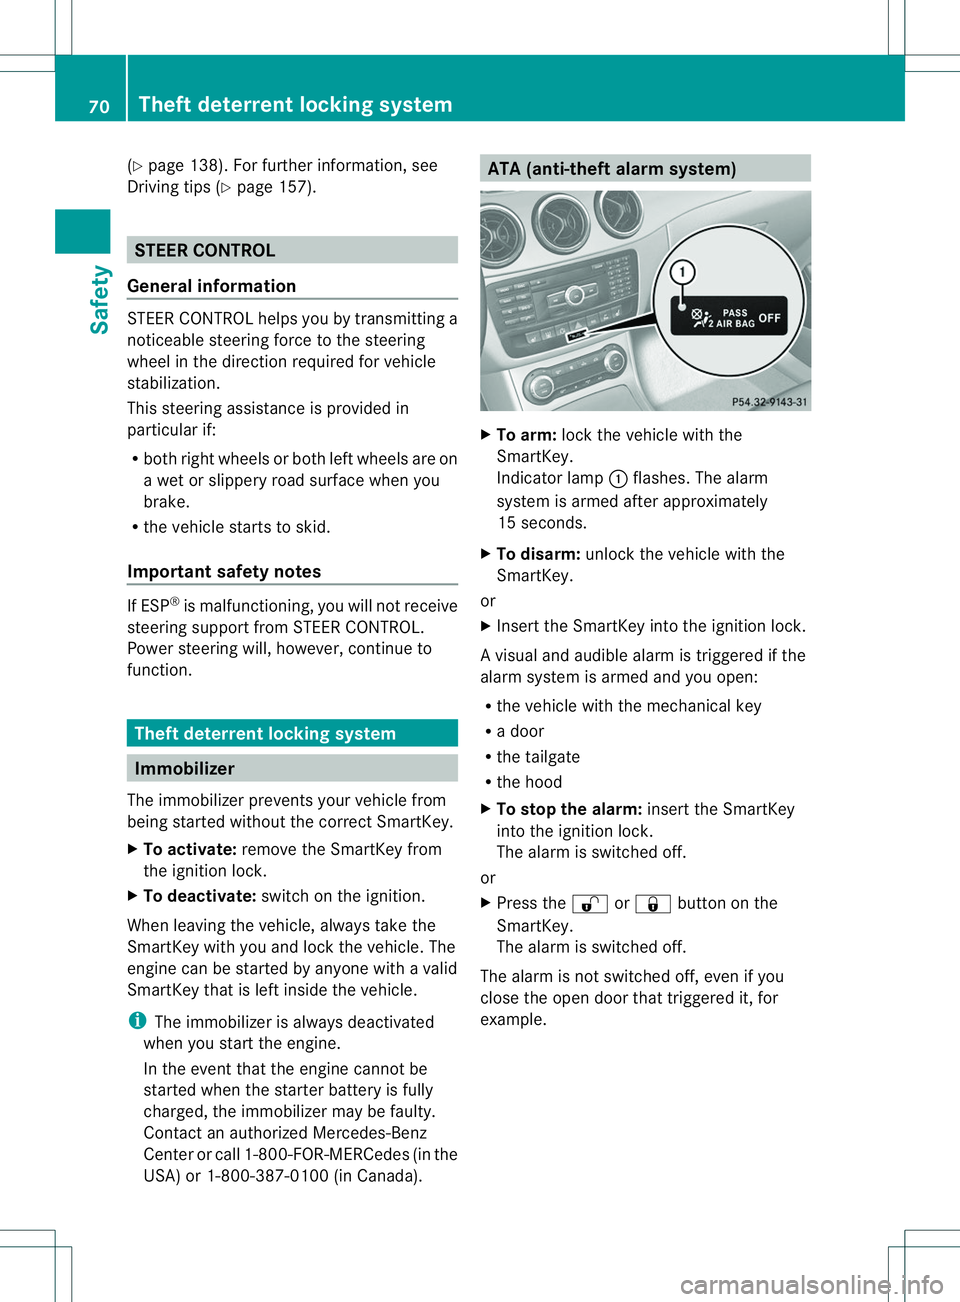
USA) or 1-800-387-0100 (in Canada). ATA (anti-thef
talarm system) X
To arm: lockthe vehicle with the
SmartKey.
Indicator lamp 001Aflashes. The alarm
system is armed after approximately
15 seconds.
X To disarm: unlock the vehicle with the
SmartKey.
or
X Insert the SmartKey into the ignition lock.
Av isual and audible alarm is triggere difthe
alarm system is armed and you open:
R the vehicle with the mechanical key
R ad oor
R the tailgate
R the hood
X To stop th ealarm: insert the SmartKey
int ot he ignition lock.
The alarm is switched off.
or
X Press the 0009or0010 button on the
SmartKey.
The alarm is switched off.
The alarm is not switched off ,even if you
clos ethe open door that triggere dit, for
example. 70
Theft deterrent locking systemSafety
Page 77 of 360
X
To lock centrally: press button001A.
The SmartKe ycentrall yloc ks/unlocks:
R the doors
R the tailgate
R the fuel fille rflap
The tur nsignals flash onc ewhen unlocking
and three times when locking.
i When it is dark, the surround lighting also
comes on if it is activated in the on-board
computer (Y page 204).
i You can also set an audible signal to
confirm that the vehicle has been locked.
The audible signal can be activated and
deactivated using the on-board computer
(Y page 205). Changing the settings of the locking
system
You can change the settings of the locking
system. When you then unlock the vehicle
only the driver's door and the fuel filler flap
are unlocked. This is useful if you frequently
travel on your own.
X To change the setting: press and hold
down the 0009and0010 buttons
simultaneously for approximately six
seconds until the battery check lamp
(Y page 76) flashes twice.
i If the settingoft he locking system is
changed within the signal range of the
vehicle, pressing the 0010or0009 button:
R locks or
R unlocks the vehicle
The SmartKey now functions as follows:
X To unlock the driver's door: press the
0009 button once.
X To unlock centrally: press the0009
button twice.
X To lock centrally: press the0010button.
X To restore the factory settings: press
and hold down the 0009and0010 buttons simultaneously for approximately six
seconds until the battery check lamp
flashes twice (Y
page 76). Mechanical key
General notes If the vehicle can no longer be unlocked with
the SmartKey, use the mechanical key.
If you use the mechanical key to unlock and
open the driver's door, the anti-theft alarm
system will be triggered (Y
page 70).
There are several waystot urn off the alarm:
X Press the 0009or0010 button on the
SmartKey.
or
X Insert the SmartKey into the ignition lock.
If you unlock the vehicle using the mechanical
key, the fuel filler flap will not be unlocked
automatically.
X To unlock the fuel filler flap: insert the
SmartKey into the ignition lock.
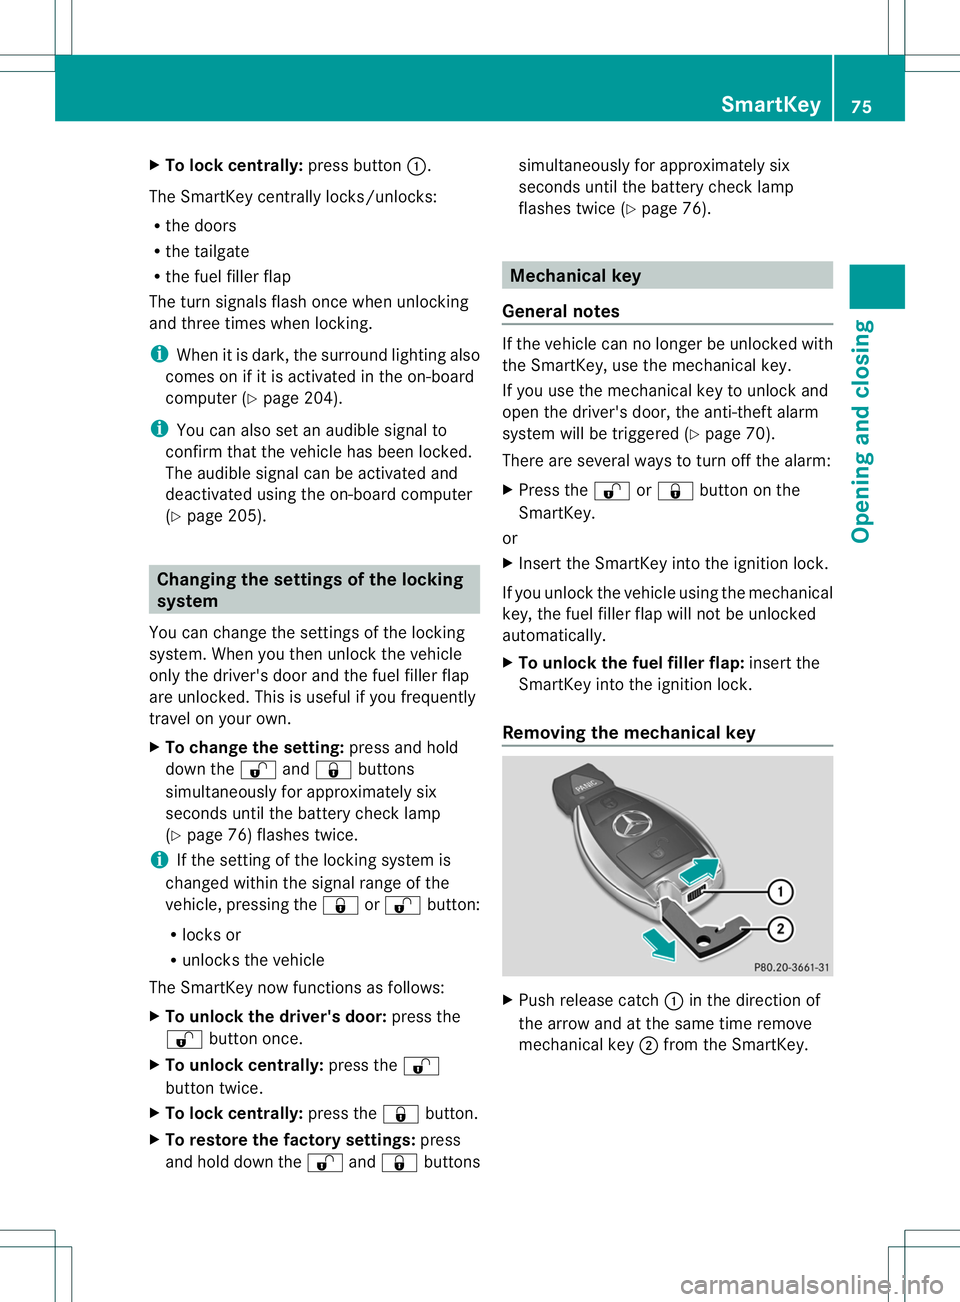
Removing the mechanical key X
Push release catch 001Ain the direction of
the arrow and at the same time remove
mechanical key 0010from the SmartKey. SmartKey
75Opening and closing Z
Page 78 of 360
For further information about:
R
unlocking the driver' sdoor(Ypage 81)
R unlocking the cargo compartment
(Y page 82)
R locking the vehicle (Y page 81)SmartKey battery
Importan tsafet ynotes G
WARNING
Batteries contain toxic and corrosive
substances. If batteries are swallowed, it can
result in severe health problems. There is a
risk of fatal injury.
Keep batteries out of the reach of children .If
ab attery is swallowed, seek medical attention
immediately.
The SmartKey batterie scontain perchlorate
material, whic hmay requir especial handling
and regard for the environment. National
guidelines must be observed during disposal.
In California, see www.dtsc.ca.gov/
HazardousWaste/Perchlorate/
index.cfm.
Mercedes-Benz recommends that you have
the batteries replaced at aqualified specialist
workshop.
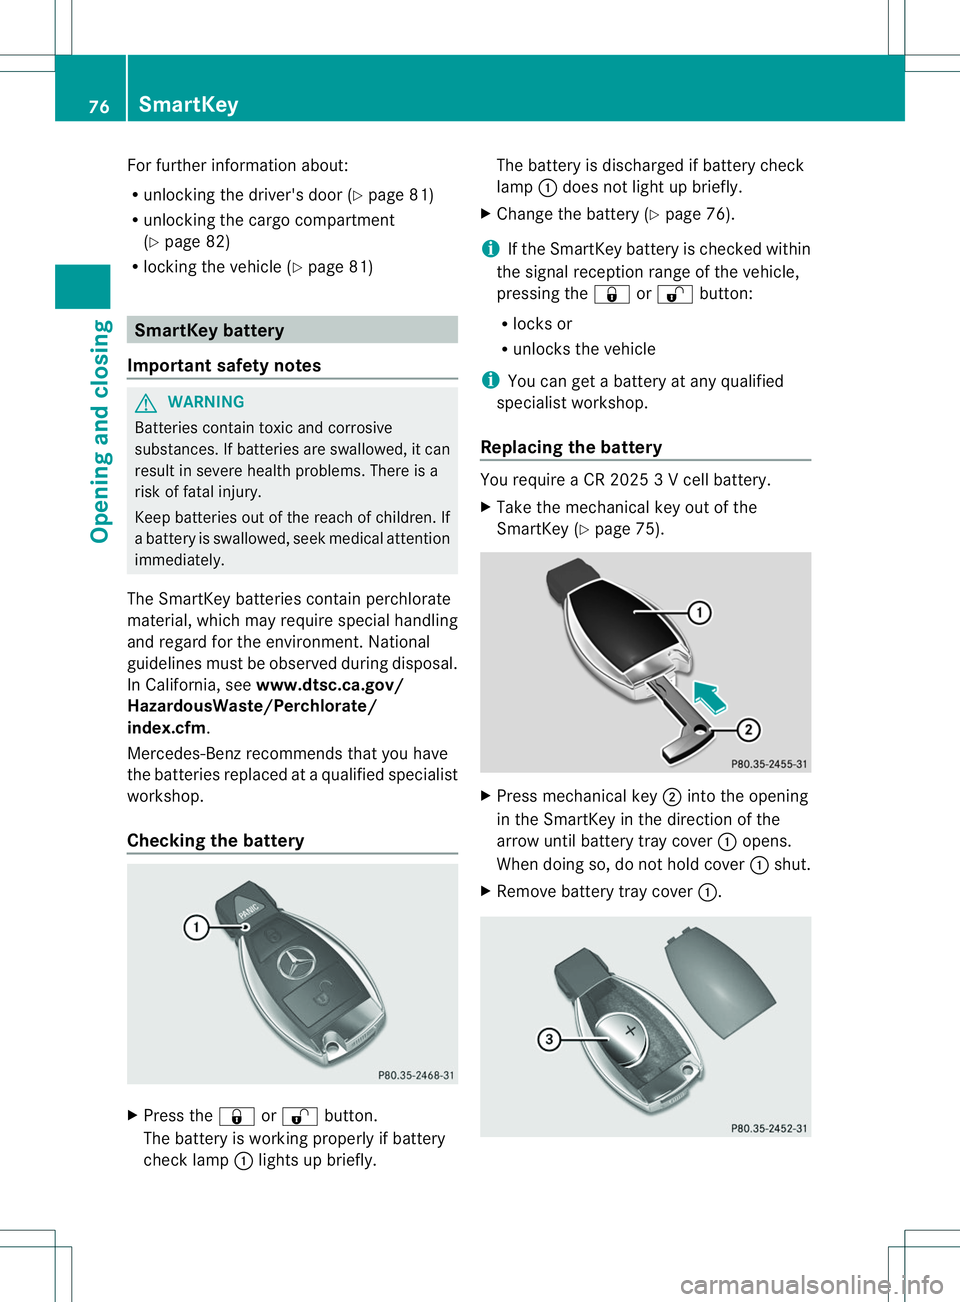
Checking the battery X
Press the 0010or0009 button.
The battery is workin gproperly if battery
chec klamp 001Alight supb riefly. The battery is discharged if battery check
lamp
001Adoes no tlight up briefly.
X Change the battery (Y page 76).
i If the SmartKey battery is checked within
the signal receptio nrang eoft hevehicle,
pressin gthe 0010 or0009 button:
R locks or
R unlock sthe vehicle
i You can get abattery at any qualified
specialist workshop.
Replacin gthe battery You require
aCR20253V cellbattery.
X Tak ethe mechanical ke yout of the
SmartKey (Y page 75). X
Press mechanical key 0010intot he opening
in th eSmartKey in th edirection of the
arrow until battery tray cover 001Aopens.
When doin gso, do no thold cover 001Ashut.
X Remove battery tray cover 001A.76
SmartKeyOpening and closing
Page 79 of 360
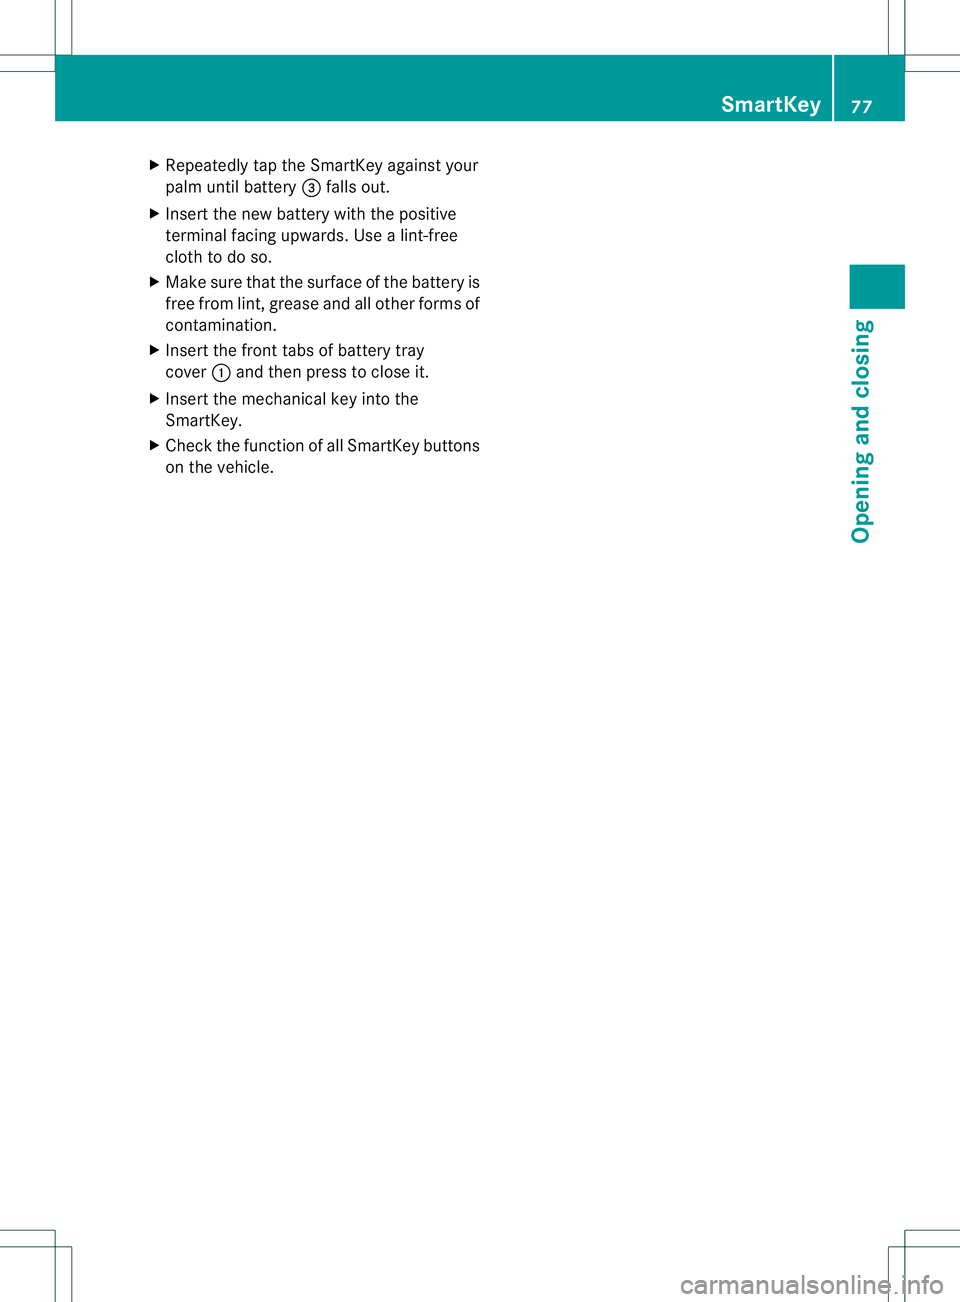
X
Repeatedly tap th eSmartKey against your
palm until battery 0023fallsout.
X Inser tthe new battery with the positive
terminal facing upwards. Use alint-free
cloth to do so.
X Make sure that the surface of the battery is
free from lint, grease and all other forms of
contamination.
X Insert the front tabs of battery tray
cover 001Aand then press to close it.
X Insert the mechanical key into the
SmartKey.
X Check the function of all SmartKey buttons
on the vehicle. SmartKey
77Opening and closing Z
Page 80 of 360
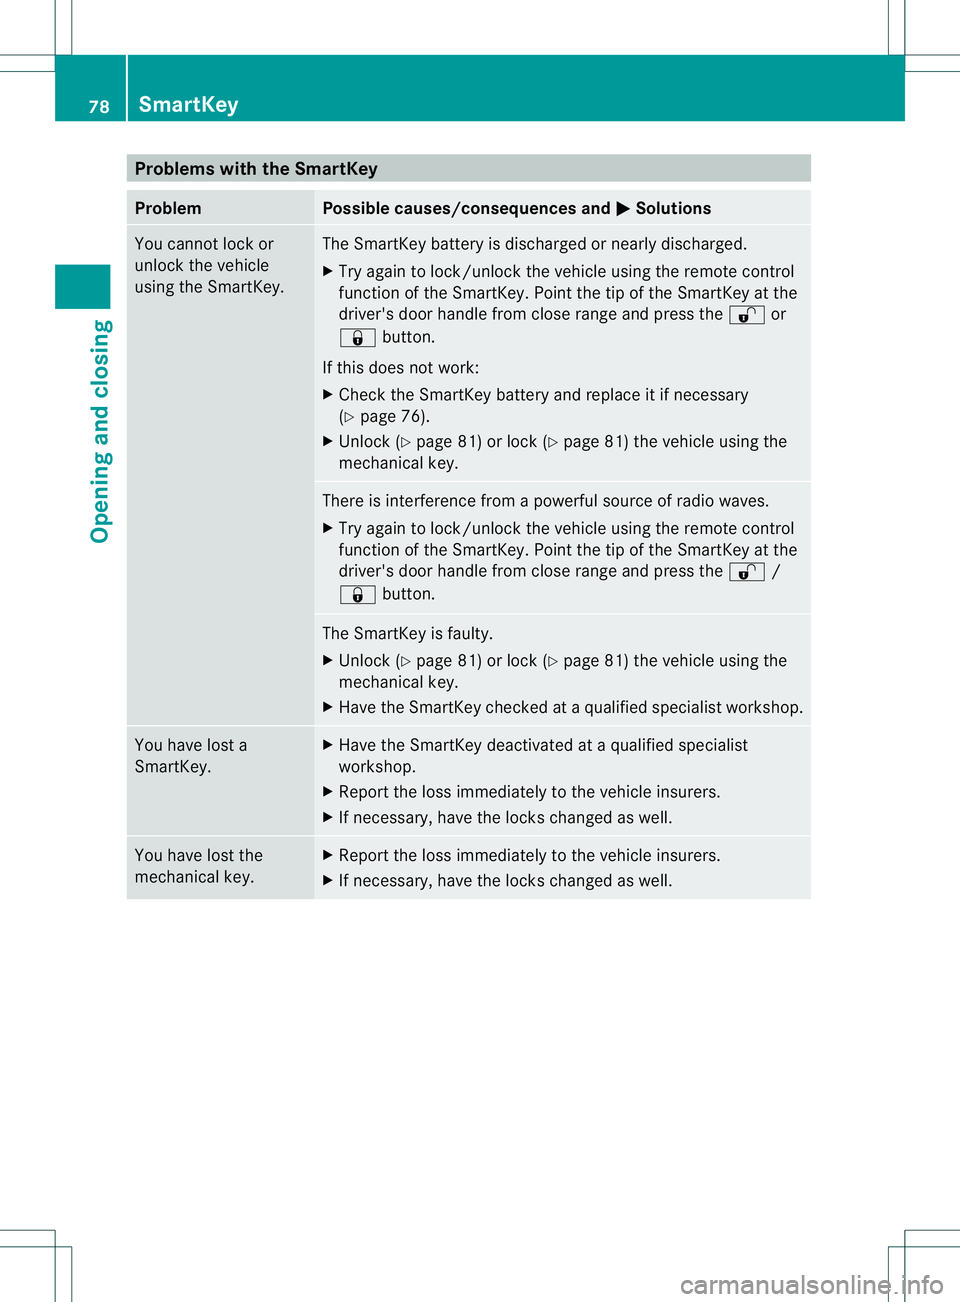
Problems with the SmartKey
Problem Possible causes/consequences and
000B Solutions
You cannot lock or
unlock the vehicle
using the SmartKey. The SmartKey battery is discharged or nearly discharged.
X
Try again to lock/unlock the vehicle using the remote control
function of the SmartKey. Point the tip of the SmartKey at the
driver's door handle from close range and press the 0009or
0010 button.
If this does not work:
X Check the SmartKey battery and replace it if necessary
(Y page 76).
X Unlock (Y page 81) or lock (Y page 81) the vehicle using the
mechanical key. There is interference from
apowerful source of radio waves.
X Try again to lock/unlock the vehicle using the remote control
function of the SmartKey. Point the tip of the SmartKey at the
driver's door handle from close range and press the 0009/
0010 button. The SmartKey is faulty.
X
Unlock (Y page 81) or lock (Y page 81) the vehicle using the
mechanical key.
X Have the SmartKey checked at aqualified specialist workshop. You have lost a
SmartKey. X
Have the SmartKey deactivated at aqualified specialist
workshop.
X Report the loss immediately to the vehicle insurers.
X If necessary, have the locks changed as well. You have lost the
mechanical key. X
Report the loss immediately to the vehicle insurers.
X If necessary, have the locks changed as well. 78
SmartKeyOpening and closing
Page 81 of 360
Problem Possible causes/consequences and
000B Solutions
The engine cannot be
started using the
SmartKey. The on-board voltage is too low.
X
Switch off non-essential consumers, e.g. seat heating or interior
lighting, and try to start the engine again.
If this does not work:
X Check the starter battery and charge it if necessary
(Y page 299).
or
X Jump-start the vehicle (Y page 303).
or
X Consult aqualified specialist workshop. The engine cannot be
started using the
SmartKey. The steering lock is mechanically blocked.
X
Remove the SmartKey and reinsert it into the ignition lock. While
doing this, turn the steering wheel in both directions. Doors
Important safety notes
G
WARNING
If children are left unsupervised in the vehicle,
they could:
R open the doors, thus endangering other
people or road users.
R get out and disrupt traffic.
R operate the vehicle's equipment.
Additionally, children could set the vehicle in
motion if, for example, they:
R release the parking brake.
R shifting the automatic transmission out of
park position P
R Start the engine.
There is arisk of an accident and injury.
When leaving the vehicle, always take the
SmartKey with you and lock the vehicle. Never
leave children or animals unattended in the
vehicle. Always keep the SmartKey out of
reach of children. G
WARNING
If persons, particularly children are subjected
to prolonged exposure to extreme heat or
cold, there is arisk of injury, possibly even
fatal. Never leave children unattended in the
vehicle.
You should preferably place luggageorl oads
in the cargo compartment. Observe the
loading guidelines (Y page 250). Unlocking and opening doors from
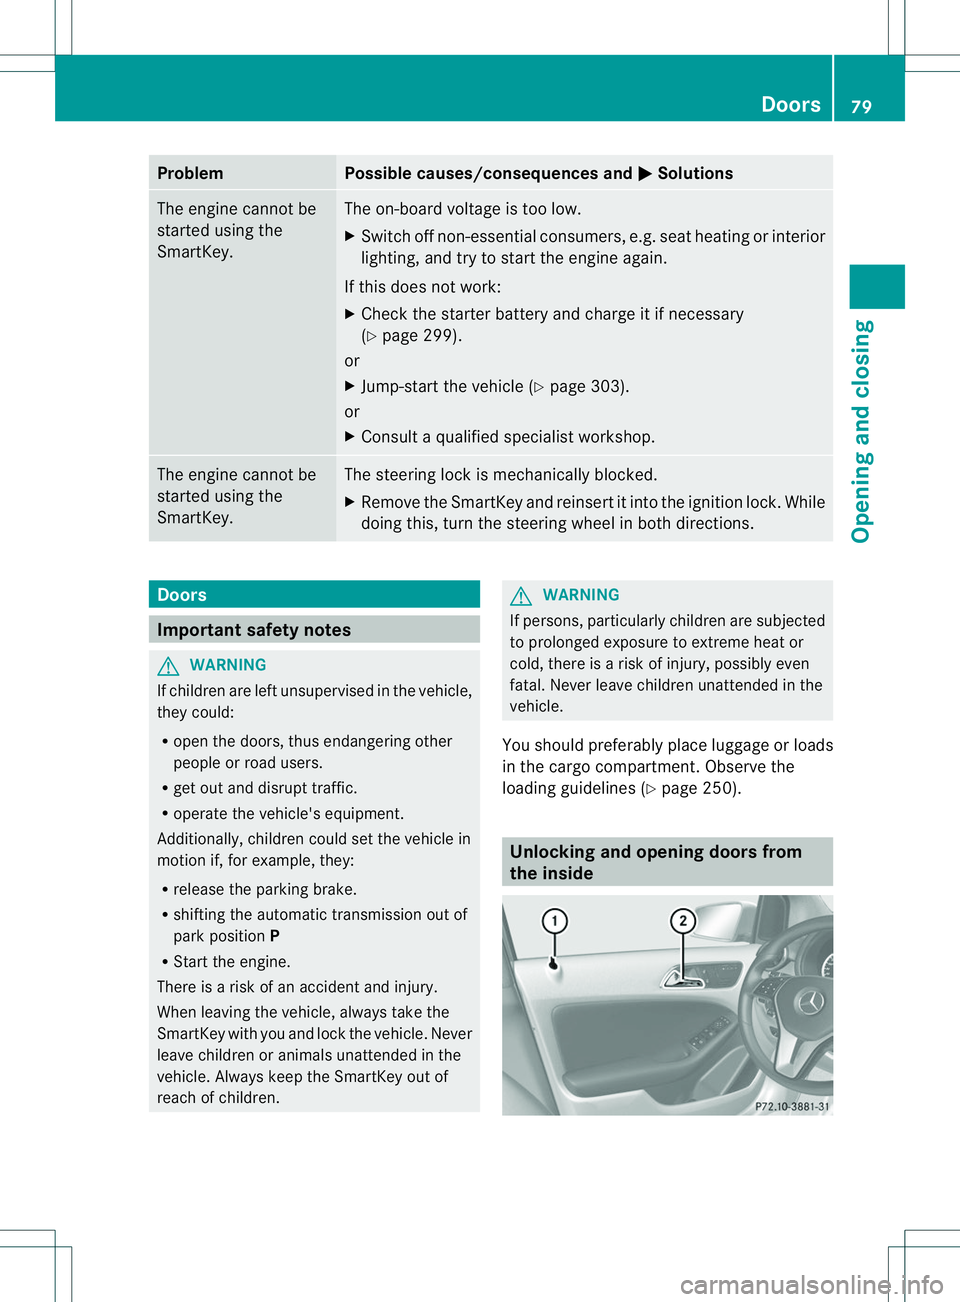
the inside Doors
79Opening and closing Z
Page 99 of 360
001A
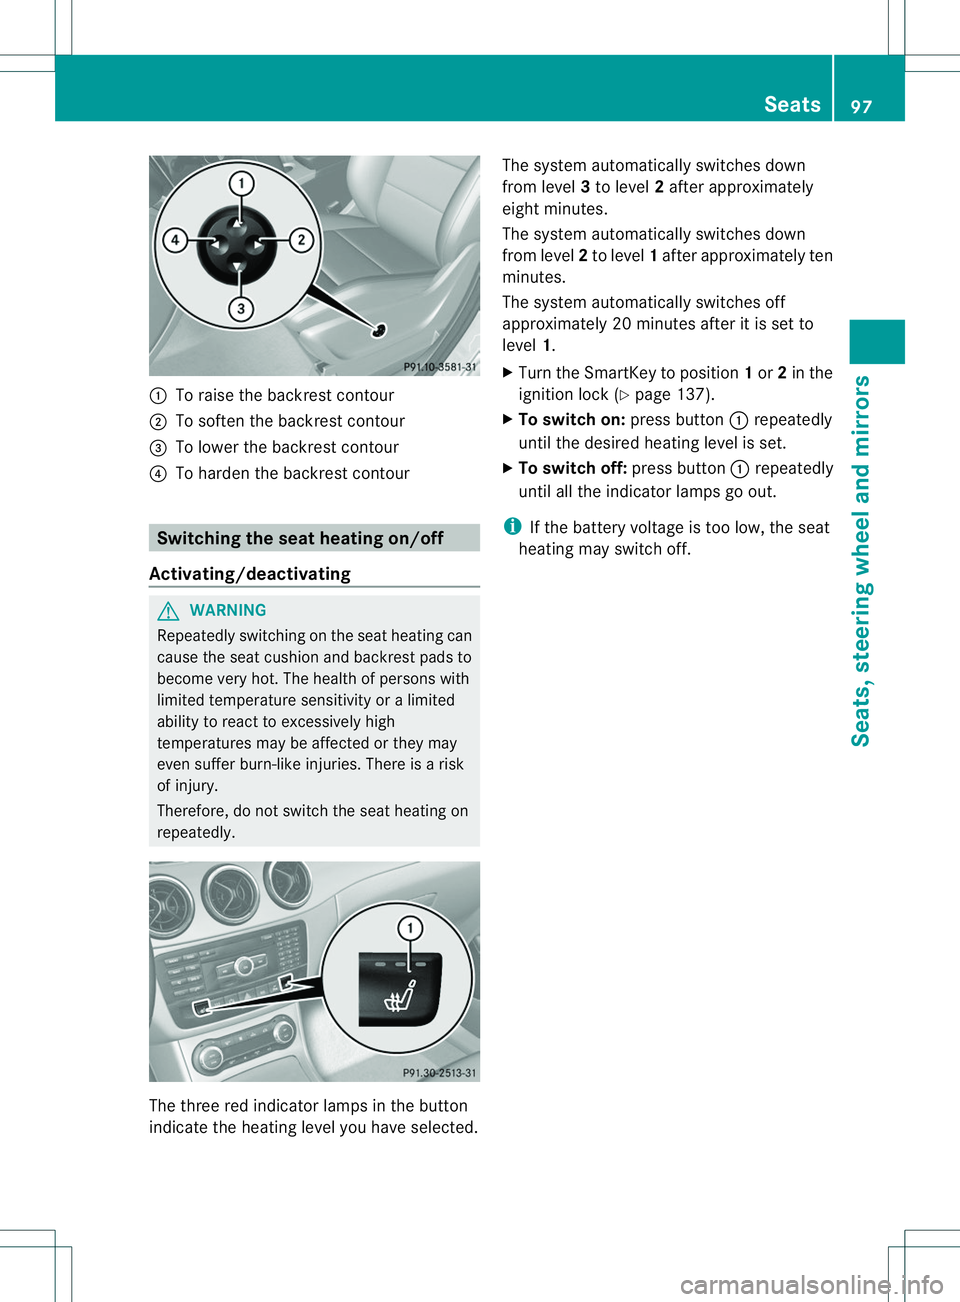
To raise the backrest contour
0010 To soften the backrest contour
0023 To lower the backrest contour
0021 To harden the backrest contour Switching the seat heating on/off
Activating/deactivating G
WARNING
Repeatedly switchin gonthe seat heating can
cause the seat cushion and backrest pads to
become very hot. The health of persons with
limited temperature sensitivity or alimited
ability to react to excessively high
temperatures may be affected or they may
even suffer burn-lik einjuries. There is arisk
of injury.
Therefore, do not switch the seat heating on
repeatedly. The three red indicator lamps in the button
indicate the heating level you have selected. The system automatically switches down
from level
3to level 2after approximately
eight minutes.
The system automatically switches down
from level 2to level 1after approximately ten
minutes.
The system automatically switches off
approximately 20 minutes after it is set to
level 1.
X Turn the SmartKey to position 1or 2in the
ignition lock (Y page 137).
X To switch on: press button001Arepeatedly
until the desired heating level is set.
X To switch off: press button001Arepeatedly
until all the indicator lamps go out.
i If the battery voltage is too low, the seat
heating may switch off. Seats
97Seats, steering wheel and mirrors Z