torque MERCEDES-BENZ B-CLASS SPORTS 2014 Owners Manual
[x] Cancel search | Manufacturer: MERCEDES-BENZ, Model Year: 2014, Model line: B-CLASS SPORTS, Model: MERCEDES-BENZ B-CLASS SPORTS 2014Pages: 360, PDF Size: 39.45 MB
Page 21 of 360
Loading
.......................................... 323
Locking (in an emergency) ...............81
Locking (SmartKey) .......................... 74
Lowering ........................................ 339
Maintenance .................................... 22
Parking for along period ................ 155
Pulling away ................................... 138
Raising ........................................... 337
Reporting problems .........................25
Securing from rolling away ............337
Towing away .................................. 305
Tow-starting ................................... 305
Transporting .................................. 307
Unlocking (in an emergency) ...........81
Unlocking (SmartKey) ......................74
Vehicle data ................................... 353
Vehicle data ....................................... 353
Vehicle dimensions ...........................353
Vehicle emergency locking ................81
Vehicle identification number see VIN
Vehicle identification plate ..............346
Vehicle tool kit .................................. 294
Video (DVD) ........................................ 197
VIN ...................................................... 346W
Warning and indicator lamps ABS ................................................ 239
Brakes ........................................... 239
Check Engine ................................. 245
Coolant .......................................... 245
Distance warning ........................... 247
DISTRONI CPLUS ........................... 247
ESP ®
.............................................. 241
ESP ®
OFF ....................................... 242
Fuel tank ........................................ 245
Overview .......................................... 32
PASSENGER AIR BAG OFF
indicator lamp .................................. 47
Reserve fuel ................................... 245
Seat bel t........................................ 237
SRS ................................................ 244
Tire pressure monitor ....................248
Warranty ............................................ 346
Washer fluid Display message ............................ 236Whee
lboltt ightening torque ...........339
Whee lchock ...................................... 337
Wheels Changing awheel .......................... 336
Checking ........................................ 313
Cleaning ......................................... 287
Cleaning (warning) .........................336
Emergency spare wheel .................342
Important safety notes ..................312
Interchanging/changing ................336
Mounting anew wheel ................... 339
Mounting awheel .......................... 337
Removing awheel .......................... 339
Storing ........................................... 336
Tightening torqu e........................... 339
Whee lsize/tir esize ....................... 340
Windo wcurtain air bag
Display message ............................ 217
Operation ........................................ .47
Windows
see Side windows
Windshield
Defrosting ...................................... 130
Windshiel dwasher system
Adding washer fluid .......................284
Notes ............................................. 352
Windshiel dwipers
Display message ............................ 236
Problem (malfunction) ...................120
Rea rwindow wiper ........................ 118
Replacing the wiper blades ............118
Switching on/off ........................... 117
Winte rdriving
Slippery roa dsurface s................... 160
Snow chains .................................. 315
Winte roperation
General notes ................................ 314
Winte rtires
M+S tires ....................................... 314
Wiper blades
Cleaning ......................................... 288
Important safety notes ..................118
Replacing (rea rwindow) ................ 119
Replacing (windshield )................... 118
Wooden trim (cleaning instructions) 290
Workshops see Qualified specialist workshop Index
19
Page 70 of 360
if the road surface is slipper
yono ne side. In
addition, mor edrive torque is transferre dto
the wheel or wheels with traction.
ETS remain sactive when you deactivate
ESP ®
.
Important safety notes G
WARNING
If ESP ®
is malfunctioning, ESP ®
is unable to
stabilize the vehicle. Additionally, further
drivin gsafet ysystems are deactivated. This
increases the risk of skidding and an accident.
Drive on carefully. Have ESP ®
checked at a
qualified specialist workshop.
! When testin gthe electric parking brake
on abraking dynamometer, switc hoff the
ignition. Application of the brakes by
ESP ®
may otherwise destroy the brake
system.
! Vehicles with 4MATIC: switc hoff the
ignition when the electric parking brak eis
being tested on abrak edynamometer.
Application of the brakes by ESP ®
may
otherwise destroy the brak esystem.
! Vehicles with 4MATIC: function or
performanc etests may only be carried out
on a2 -axle dynamometer. Before you
operat ethe vehicle on such a
dynamometer, please consult aqualified
workshop. You could otherwise damage
the drive train or the brak esystem.
! Do not tow vehicles with 4MATIC with the
front or rear axle raised.
When towin gyour vehicle with the front axle
raised, observe the notes on
ESP ®
(Y page 307).
ESP ®
is deactivated if the 0004ESP®
OFF
warnin glamp in the instrumen tcluste rlights
up continuously when the engine is running.
If the 000A ESP®
warnin glamp and the
0004 ESP®
OFF warnin glamp are lit continuously, ESP
®
is not available due to a
malfunction.
Observe the information on warnin glamps
(Y page 241 )and display messages which
may be shown in the instrumen tcluster
(Y page 208).
i Only use wheels with the recommended
tir es izes. Only the nwill ESP ®
function
properly.
Characteristics of ESP ® General information
If the
000A ESPw arnin glamp goes out before
beginnin gthe journey, ESP ®
is automatically
active.
If ESP ®
intervenes ,the 000A ESP®
warning
lamp flashes in the instrumen tcluster.
If ESP ®
intervenes:
X Do not deactivat eESP®
under any
circumstances.
X Only depres sthe accelerator pedal as far
as necessary when pulling away.
X Adapt your drivin gstyle to suit the
prevailing road and weathe rconditions.
ECO start/stop function
The ECO start/stop function switches the
engine off automatically when the vehicle
stops moving. The engine starts
automatically when the driver wants to pull
away again. ESP ®
remains in its previously
selected status. Example:if ESP®
was
deactivated before the engine was switched
off, ESP ®
remains deactivated when the
engine is switched on again.
Deactivating/activating ESP ® Important safety notes
i
Observe the "Important safety notes"
section (Y page 63). 68
Driving safety systemsSafety
Page 71 of 360
You can selec
tbetween the following states
of ESP ®
:
R ESP ®
is activated.
R ESP ®
is deactivated. G
WARNING
If you deactivat eESP®
,E SP ®
no longer
stabilizes the vehicle. There is an increased
risk of skidding and an accident.
Only deactivat eESP®
in the situations
described in the following.
It may be best to deactivat eESP®
in the
following situations:
R when using snow chains
R in deep snow
R on sand or gravel
i Activat eESP®
as soon as the situations
described above no longer apply. ESP ®
will
otherwise not be able to stabilize the
vehicle if the vehicle start stoskid or a
wheel start stospin.
! Avoid spinning the driven wheels for an
extended period with ESP ®
deactivated.
You could otherwise damage the drivetrain.
Deactivating/activating ESP ®
You can deactivat eoractivateESP®
via the
on-board computer.
X To deactivate:(Y page 200).
The 0004 ESP®
OFF warning lamp in the
instrument cluster lights up.
X To activate:(Y page 200).
The 0004 ESP®
OFF warning lamp in the
instrument cluster goes out.
Characteristics when ESP ®
is deactivated
If ESP ®
is deactivated and one or more wheels
start to spin, the 000AESP®
warning lamp in
the instrument cluster flashes. In such
situations, ESP ®
will not stabilize the vehicle. If you deactivat
eESP®
:
R ESP ®
no longer improves driving stability.
R engin etorque is no longer limited and the
drive wheels are able to spin.
The spinning of the wheels results in a
cutting action for better traction on loose
surfaces.
R traction control is still activated.
R ESP ®
still provides support when you
brake. EBD (electronic brak
eforce
distribution)
General information EBDm
onitors and controls the brake
pressure on the rear wheels to improve
driving stability while braking.
Important safet ynotes i
Observe the "Important safety notes"
section for driving safety systems
(Y page 63). G
WARNING
If EBDh as malfunctioned ,the rear wheels can
still lock, e.g .unde rfull braking .This
increases the risk of skidding and an accident.
You should therefore adapt your driving style
to the different handling characteristics. Have
the brake system checked at aqualified
specialist workshop.
Observe information regarding indicator and
warning lamps (Y page 239) as well as
displaym essages (Y page 210). ADAPTIVE BRAKE
ADAPTIVE BRAKE enhances braking safety
and offers increased braking comfort.In
addition to the braking function, ADAPTIVE
BRAKE also has the HOLD function
(Y page 171) and hill start assist Driving safety systems
69Safety Z
Page 341 of 360
X
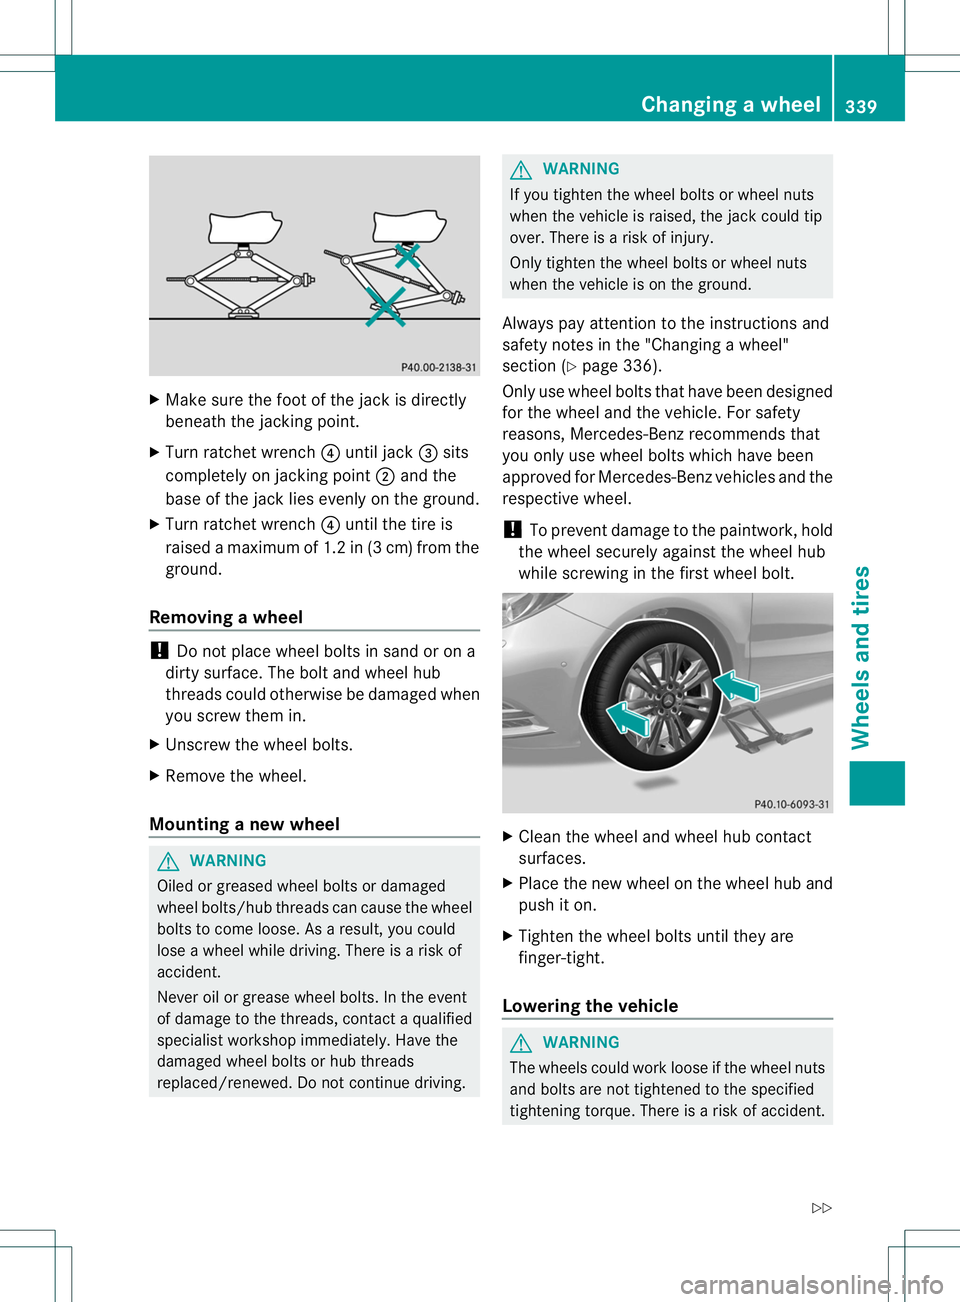
Make sure the foot of the jack is directly
beneath the jackingp oint.
X Turn ratchet wrench 0021until jack 0023sits
completely on jackingp oint0010and the
base of the jack lies evenly on the ground.
X Turn ratchet wrench 0021until the tire is
raised amaximum of 1. 2in(3cm)from the
ground.
Removing awheel !
Do not place wheel bolts in sand or on a
dirty surface. The bol tand whee lhub
thread scould otherwise be damage dwhen
yo us cre wthem in.
X Unscrew the whee lbolts.
X Remov ethe wheel.
Mounting anew wheel G
WARNING
Oiled or greased wheel bolt sordamaged
wheel bolts/hub threads can cause th ewheel
bolt stoc omeloose .Asa result, you could
lose awheel while driving. There is arisk of
accident.
Never oil or grease wheel bolts. In the event
of damage to the threads, contact aqualified
specialist workshop immediately.H ave the
damage dwheel bolt sorhub threads
replaced/renewed. Do no tcontinue driving. G
WARNING
If you tighten the wheel bolts or wheel nuts
when the vehicle is raised, the jack could tip
over. There is arisk of injury.
Only tighten the wheel bolts or wheel nuts
when the vehicle is on the ground.
Always pay attention to the instructions and
safety notes in the "Changing awheel"
section (Y page 336).
Only use wheel bolts that have been designed
for the wheel and the vehicle. For safety
reasons, Mercedes-Benz recommends that
you only use wheel bolts which have been
approved for Mercedes-Benz vehicles and the
respective wheel.
! To prevent damage to the paintwork, hold
the wheel securely against the wheel hub
while screwing in the first wheel bolt. X
Clean the wheel and wheel hub contact
surfaces.
X Place the new wheel on the wheel hub and
push it on.
X Tighten the wheel bolts until they are
finger-tight.
Lowering the vehicle G
WARNING
The wheels could work loose if the wheel nuts
and bolts are not tightened to the specified
tightening torque. There is arisk of accident. Changing
awheel
339Wheels and tires
Z
Page 342 of 360
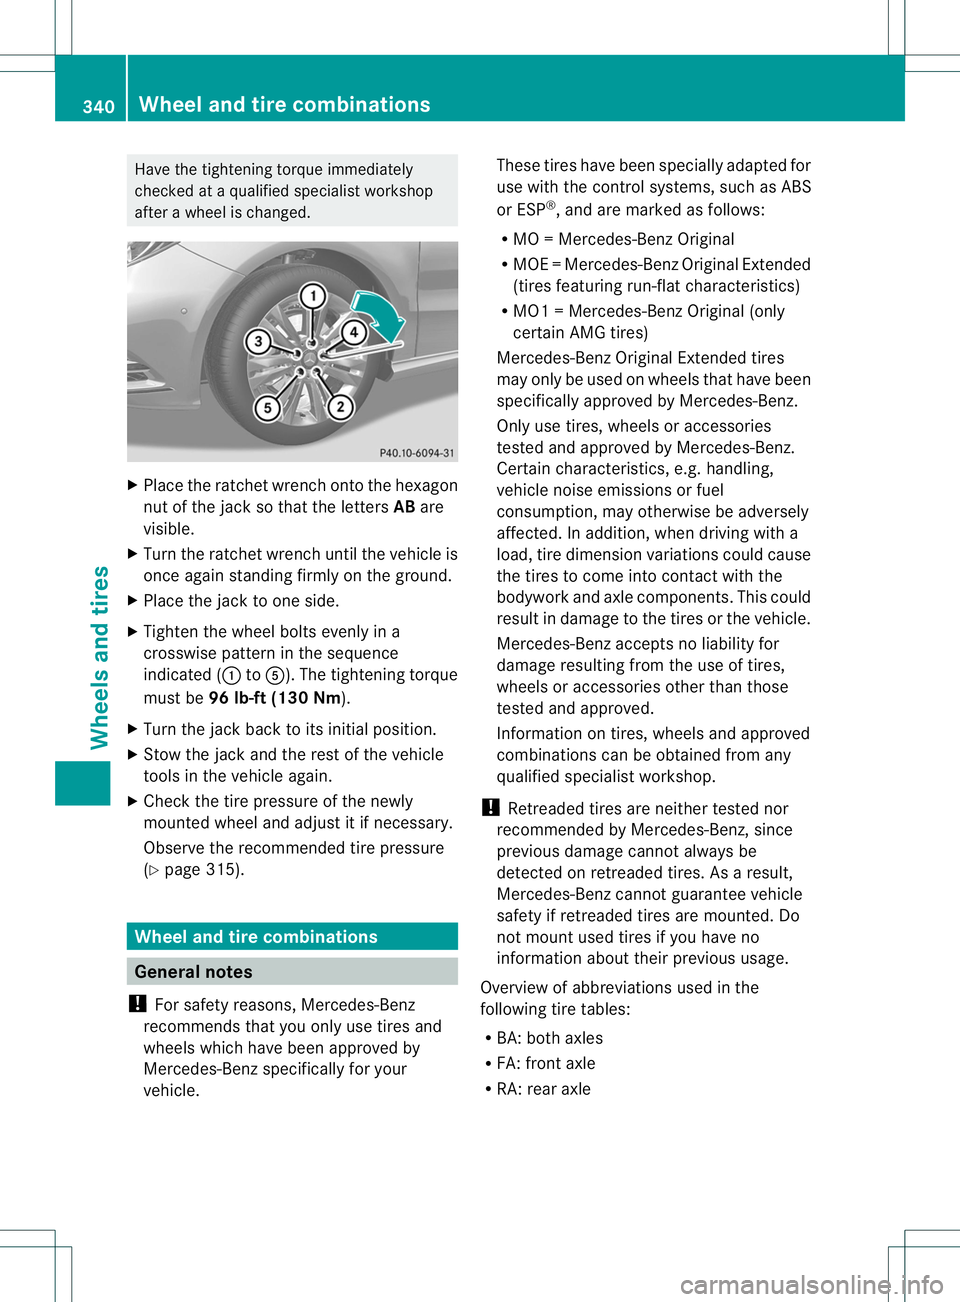
Have the tightening torqu
eimmediately
checked at aqualifie dspecialist workshop
after awheel is changed. X
Place the ratche twrench onto the hexagon
nut of the jack so that the letters ABare
visible.
X Turn the ratchet wrench until the vehicl eis
once again standing firmly on the ground.
X Place the jack to one side.
X Tighten the whee lbolts evenly in a
crosswise pattern in the sequence
indicated ( 001Ato001E). The tightening torque
must be 96 lb-ft (130Nm ).
X Turn the jack back to its initia lposition.
X Stow the jack and the rest of the vehicle
tools in the vehicl eagain.
X Check the tire pressure of the newly
mounted whee land adjust it if necessary.
Observe the recommende dtire pressure
(Y page3 15). Wheel and tire combinations
General notes
! For safety reasons, Mercedes-Benz
recommends that you only use tires and
wheels which have been approved by
Mercedes-Benz specifically for your
vehicle. These tires have been speciallya
dapted for
use with the control systems ,such as ABS
or ESP ®
,a nd are marked as follows:
R MO =Mercedes-BenzO riginal
R MOE =Mercedes-BenzO riginal Extended
(tires featuring run-flat characteristics)
R MO1 =Mercedes-BenzO riginal (only
certain AMG tires)
Mercedes-Benz Original Extended tires
may only be used on wheels that have been
specificall yapproved by Mercedes-Benz.
Only use tires, wheels or accessories
tested and approved by Mercedes-Benz.
Certain characteristics, e.g. handling,
vehicl enoise emissions or fuel
consumption, may otherwise be adversely
affected. In addition, when driving with a
load, tire dimension variations coul dcause
the tires to come into contact with the
bodywork and axle components. This could
resul tind amage to th etires or th evehicle.
Mercedes-Ben zaccepts no liability for
damag eresulting from the us eoftires,
wheel soraccessorie sothe rthan those
tested and approved.
Information on tires, wheels and approved
combinations can be obtained from any
qualified specialist workshop.
! Retreaded tires are neither tested nor
recommended by Mercedes-Benz, since
previous damage cannot always be
detected on retreaded tires. As aresult,
Mercedes-Ben zcannot guarante evehicle
safety if retreade dtires are mounted. Do
no tm ount used tires if you have no
information about their previous usage.
Overview of abbreviations used in the
following tire tables:
R BA: both axles
R FA: front axle
R RA: rear axle 340
Wheel and tirec
ombinationsWheels and tires