change wheel MERCEDES-BENZ B-CLASS SPORTS 2015 Owners Manual
[x] Cancel search | Manufacturer: MERCEDES-BENZ, Model Year: 2015, Model line: B-CLASS SPORTS, Model: MERCEDES-BENZ B-CLASS SPORTS 2015Pages: 346, PDF Size: 45.04 MB
Page 8 of 346
Exterior lights ................................ 279
Gear or selector lever .................... 280
Interior........................................... 280
Matte finish ................................... 277
Notes ............................................. 275
Paint .............................................. 277
Plastic trim .................................... 280
Power washe r................................ 277
Rear view camera .......................... 279
Roof lining ...................................... 282
Seat belt ........................................ 282
Seat cove r..................................... 281
Sensors ......................................... 279
Steering wheel ............................... 280
Trim pieces .................................... 281
Washing by hand ........................... 276
Wheels ........................................... 278
Windows ........................................ 278
Wiper blades .................................. 278
Wooden trim .................................. 281
Cargo compartment cover
Important safety notes .................. 256
Installing/removing ....................... 256
Notes/how to use ......................... 256
Cargo compartment enlargement ... 252
Cargo compartment floor
Height adjustment ......................... 258
Important safety notes .................. 257
Opening/closing ............................ 258
Stowage well (under )..................... 257
Cargo net
Attaching ....................................... 257
Important safety information ......... 256
Cargo tie down rings ......................... 255
CD player/CD changer (on-board
computer) .......................................... 199
Center console
Lower section .................................. 33
Upper section .................................. 32
Central locking
Automatic locking (on-board com-
puter) ............................................. 205
Locking/unlocking (SmartKey )........ 70
Changing bulbs
High-beam headlamp s................... 111
License plate lighting ..................... 113
Low-beam headlamp s.................... 111
Rear fog lamp ................................ 112 Reversing lamps ............................ 112
Turn signals (front) ......................... 112
Child
Restraint system .............................. 55
Child seat
Forward-facing restraint system ...... 58
LATCH-type (ISOFIX) child seat
anchors ............................................ 56
On the front-passenger sea t............ 58
Rearward-facing restraint system .... 58
Top Tether ....................................... 57
Child-proof locks
Important safety notes .................... 59
Rear doors ....................................... 59
Children
Special seat belt retractor ............... 55
Cigarette lighter ................................ 262
Cleaning
Mirror turn signal ........................... 279
Climate control
Air-conditioning system ................. 121
Automatic climate control (dual-
zone) .............................................. 123
Controlling automaticall y............... 126
Cooling with air dehumidification .. 124
Defrosting the window s................. 128
Defrosting the windshield .............. 128
General notes ................................ 120
Indicator lamp ................................ 126
Information about using auto-
matic climate control ..................... 123
Notes on using the air-condition-
ing system ..................................... 121
Overview of systems ...................... 120
Problem with the rear window
defroster ........................................ 130
Problems with cooling with air
dehumidification ............................ 126
Refrigerant ..................................... 340
Refrigerant filling capacity ............. 340
Setting the air distribution ............. 127
Setting the air vents ...................... 131
Setting the airflow ......................... 127
Setting the temperature ................ 126
Switching air-recirculation modeon/of f............................................ 130
Switching on/of f........................... 124
Switching residual heat on/off ...... 130
6Index
Page 25 of 346
GWARNING
Flammable material such as leaves, grass or
twigs may ignite if they come into contact withhot parts of the exhaust system. There is a risk of fire.
When driving off road or on unpaved roads,
check the vehicle's underside regularly. In
particular, remove parts of plants or other
flammable materials which have become
trapped. In the case of damage, contact a
qualified specialist workshop.
GWARNING
Modifications to electronic components, their software as well as wiring can impair their
function and/or the function of other net-
worked components. In particular, systems
relevant to safety could also be affected. As a
result, these may no longer function as inten-
ded and/or jeopardize the operating safety of
the vehicle. There is an increased risk of an
accident and injury.
Never tamper with the wiring as well as elec-
tronic components or their software. You
should have all work to electrical and elec-
tronic equipment carried out at a qualified
specialist workshop.
If you make any changes to the vehicle elec-
tronics, the general operating permit is ren-
dered invalid.
!There is a risk of damage to the vehicle if:
R the vehicle becomes stuck, e.g. on a high
curb or an unpaved road
R you drive too fast over an obstacle, e.g. a
curb or a hole in the road
R a heavy object strikes the undercarriage
or parts of the chassis
In situations like this, the body, the under-
carriage, chassis parts, wheels or tires
could be damaged without the damage
being visible. Components damaged in this way can unexpectedly fail or, in the case of
an accident, no longer withstand the strain
they are designed to. If the underbody paneling is damaged,
combustible materials such as leaves,
grass or twigs can gather between the
underbody and the underbody paneling. If
these materials come in contact with hot
parts of the exhaust system, they can catch
fire.
In such situations, have the vehicle
checked and repaired immediately at a
qualified specialist workshop. If on con-
tinuing your journey you notice that driving
safety is impaired, pull over and stop the
vehicle immediately, paying attention to
road and traffic conditions. In such cases,
consult a qualified specialist workshop.
Declarations of conformity
Vehicle components which receive
and/or transmit radio waves
USA: "The wireless devices of this vehicle
comply with Part 15 of the FCC Rules. Oper-
ation is subject to the following two condi-
tions: 1) These devices may not cause harm-
ful interference, and 2) These devices must
accept any interference received, including
interference that may cause undesired oper-
ation. Changes or modifications not expressly
approved by the party responsible for com-
pliance could void the user’s authority to
operate the equipment." Canada: "The wireless devices of this vehicle
comply with Industry Canada license-exempt RSS standard(s). Operation is subject to the
following two conditions: (1) These devices
may not cause interference, and (2) These
devices must accept any interference, includ-ing interference that may cause undesired
operation of the device."
Diagnostics connection
The diagnostics connection is only intended
for the connection of diagnostic equipment ata qualified specialist workshop.
Introduction23
Z
Page 99 of 346
Problems with the seat heating
ProblemPossible causes/consequences andMSolutions
The seat heating has
switched off prema-
turely or cannot be
switched on.The on-board voltage is too low because too many electrical con-
sumers are switched on.
X Switch off electrical consumers that you do not need, such as
the rear window defroster or interior lighting.
Once the battery is sufficiently charged, the seat heating will
switch back on automatically.
Steering wheel
Important safety notes
GWARNING
You could lose control of your vehicle if you do
the following while driving:
R adjust the driver's seat, head restraint,
steering wheel or mirrors
R fasten the seat belt
There is a risk of an accident.
Adjust the driver's seat, head restraint, steer-
ing wheel and mirror and fasten your seat belt before starting the engine.
GWARNING
Children could injure themselves if they
adjust the steering wheel. There is a risk ofinjury.
When leaving the vehicle, always take the
SmartKey with you and lock the vehicle. Neverleave children unsupervised in the vehicle.
Adjusting the steering wheel
GWARNING
If the steering wheel is unlocked while the
vehicle is in motion, it could change position
unexpectedly. This could cause you to lose
control of the vehicle. There is a risk of anaccident.
Before starting off, make sure the steering
wheel is locked. Never unlock the steering
wheel while the vehicle is in motion.
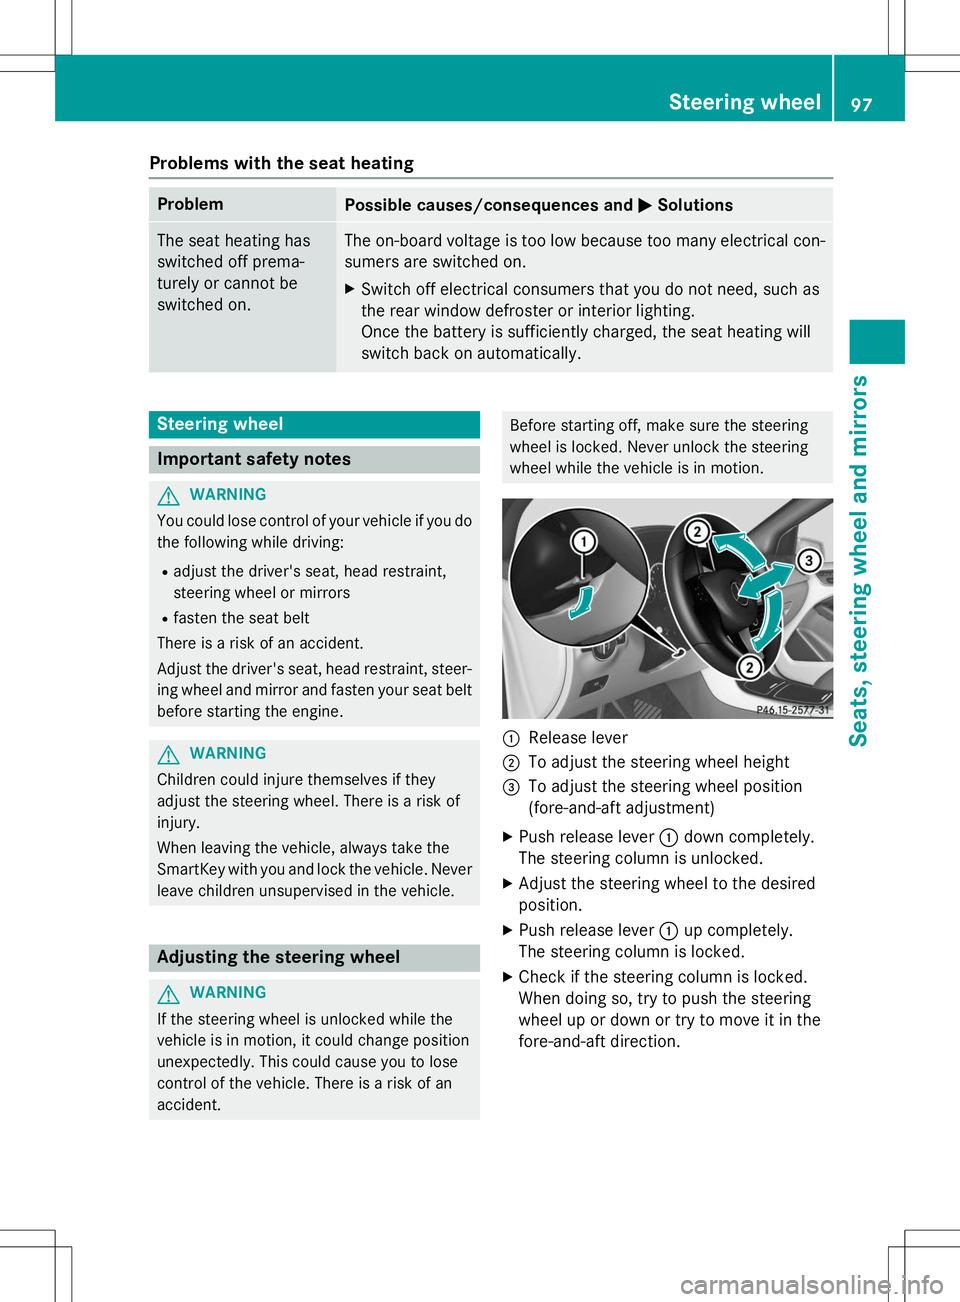
:Release lever
;To adjust the steering wheel height
=To adjust the steering wheel position
(fore-and-aft adjustment)
X Push release lever :down completely.
The steering column is unlocked.
X Adjust the steering wheel to the desiredposition.
X Push release lever :up completely.
The steering column is locked.
X Check if the steering column is locked.
When doing so, try to push the steering
wheel up or down or try to move it in the
fore-and-aft direction.
Steering wheel97
Seats, steering wheel and mirrors
Z
Page 102 of 346
RIf electrolyte comes into contact with your
skin or hair or is swallowed, seek medical
attention immediately.
R Immediately change out of clothing which
has come into contact with electrolyte.
R If an allergic reaction occurs, seek medical
attention immediately.
The "Automatic anti-glare mirrors" function is
only available if the vehicle is equipped with
the "Mirrors package".
The rear-view mirror and the exterior mirror
on the driver's side automatically go into anti- glare mode if:
R the ignition is switched on and
R incident light from headlamps strikes the
sensor in the rear-view mirror
The mirrors do not go into anti-glare mode if
reverse gear is engaged or the interior lighting is switched on.
Parking position for the exterior mir-
ror on the front-passenger side
General notes
The "Parking position of the exterior mirror on
the front-passenger side" function is only
available if the vehicle is equipped with the
"Mirrors package".
Setting and storing the parking position
Using reverse gear
You can position the front-passenger side
exterior mirror in such a way that you can see the rear wheel on that side as soon as you
engage reverse gear. You can store this posi-
tion.
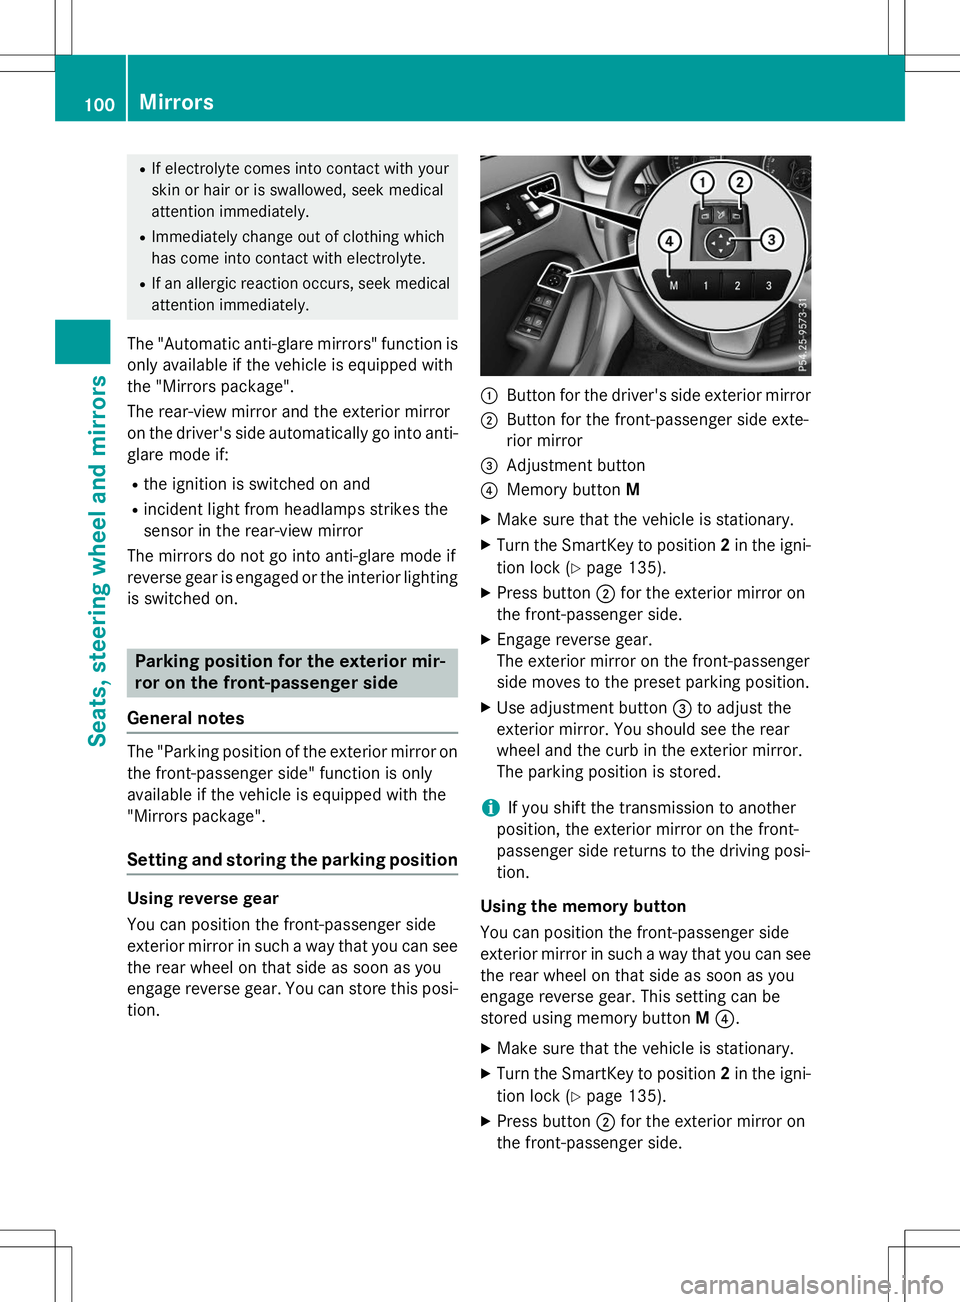
:Button for the driver's side exterior mirror
;Button for the front-passenger side exte-
rior mirror
=Adjustment button
?Memory button M
X Make sure that the vehicle is stationary.
X Turn the SmartKey to position 2in the igni-
tion lock ( Ypage 135).
X Press button ;for the exterior mirror on
the front-passenger side.
X Engage reverse gear.
The exterior mirror on the front-passenger
side moves to the preset parking position.
X Use adjustment button =to adjust the
exterior mirror. You should see the rear
wheel and the curb in the exterior mirror.
The parking position is stored.
iIf you shift the transmission to another
position, the exterior mirror on the front-
passenger side returns to the driving posi-tion.
Using the memory button
You can position the front-passenger side
exterior mirror in such a way that you can see
the rear wheel on that side as soon as you
engage reverse gear. This setting can be
stored using memory button M? .
X Make sure that the vehicle is stationary.
X Turn the SmartKey to position 2in the igni-
tion lock ( Ypage 135).
X Press button ;for the exterior mirror on
the front-passenger side.
100Mirrors
Seats, steering wheel and mirrors
Page 113 of 346
Changing the front bulbs
Removing and installing the cover in the
front wheel housing
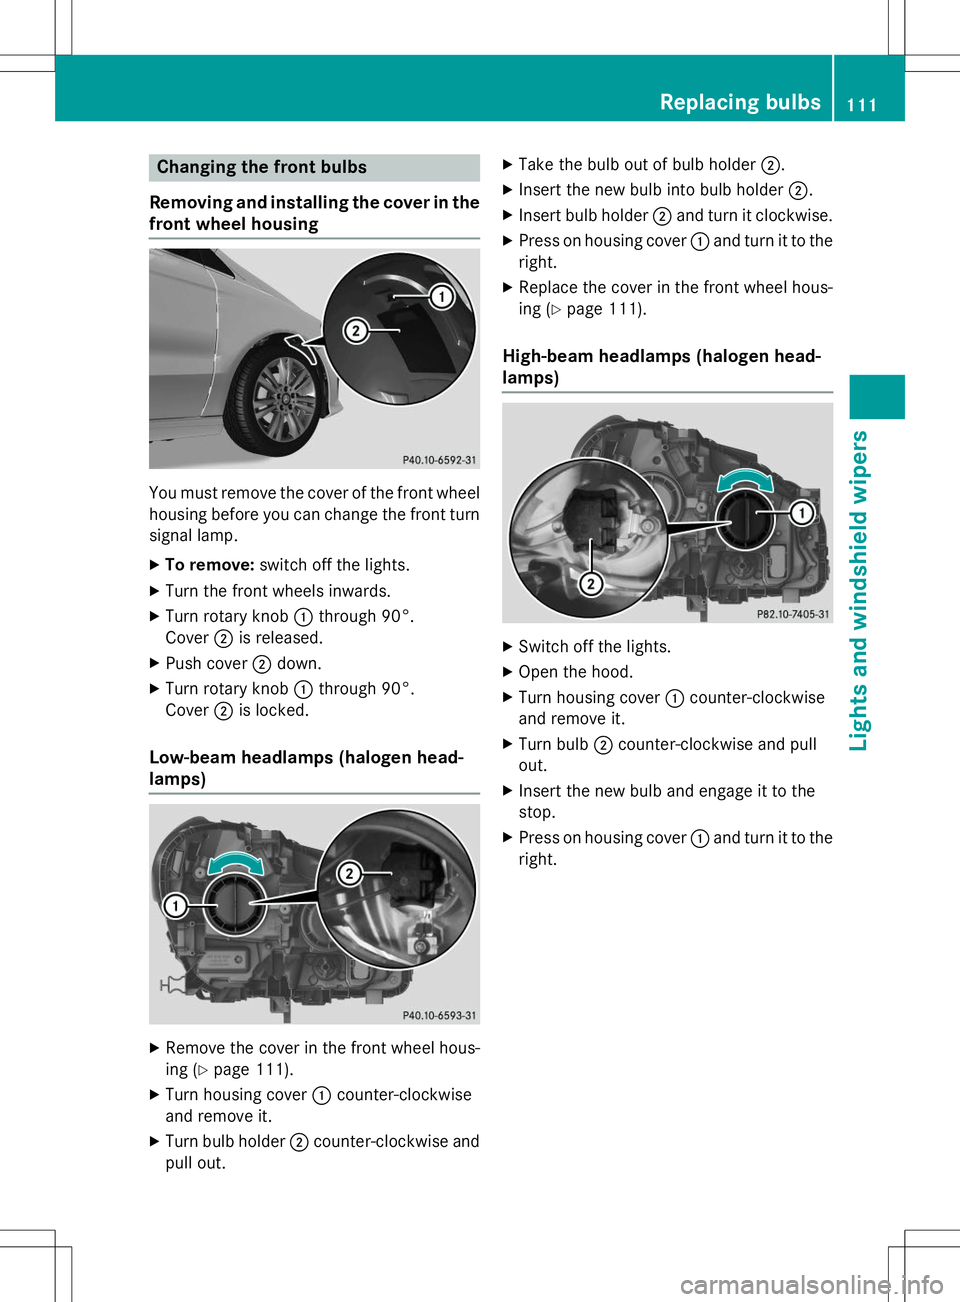
You must remove the cover of the front wheel
housing before you can change the front turn signal lamp.
X To remove: switch off the lights.
X Turn the front wheels inwards.
X Turn rotary knob :through 90°.
Cover ;is released.
X Push cover ;down.
X Turn rotary knob :through 90°.
Cover ;is locked.
Low-beam headlamps (halogen head-
lamps)
X
Remove the cover in the front wheel hous-
ing ( Ypage 111).
X Turn housing cover :counter-clockwise
and remove it.
X Turn bulb holder ;counter-clockwise and
pull out. X
Take the bulb out of bulb holder ;.
X Insert the new bulb into bulb holder ;.
X Insert bulb holder ;and turn it clockwise.
X Press on housing cover :and turn it to the
right.
X Replace the cover in the front wheel hous-
ing ( Ypage 111).
High-beam headlamps (halogen head-
lamps)
X
Switch off the lights.
X Open the hood.
X Turn housing cover :counter-clockwise
and remove it.
X Turn bulb ;counter-clockwise and pull
out.
X Insert the new bulb and engage it to the
stop.
X Press on housing cover :and turn it to the
right.
Replacing bulbs111
Lights and windshield wipers
Z
Page 128 of 346
Problems with the "Cooling with air dehumidification" function
ProblemPossible causes/consequences andMSolutions
The indicator lamp in the¿ button
flashes three times or
remains off. The "Cool-
ing with air dehumidifi-
cation" function cannot
be switched on.Cooling with air dehumidification has been deactivated due to a
malfunction.
X Visit a qualified specialist workshop.
Setting climate control to automatic
General notes
The automatic function is only available in
conjunction with dual-zone automatic climate
control.
In automatic mode, the set temperature is
maintained automatically at a constant level. The system automatically regulates the tem-
perature of the dispensed air, the airflow and
the air distribution.
The automatic mode functions optimally
when the "Cooling with air dehumidification"
function is activated. If necessary, cooling
with air dehumidification can be deactivated.
If you deactivate the "Cooling with air-dehu-
midification" function, the air inside the vehi-
cle will not be cooled. The air inside the vehi- cle will also not be dehumidified. The win-
dows can fog up more quickly. Therefore, only deactivate the "Cooling with air-dehumidifi-
cation" function briefly.
Setting climate control to automatic
X Turn the SmartKey to position 2in the igni-
tion lock ( Ypage 135).
X Set the desired temperature.
X To activate: press theÃbutton.
The indicator lamp in the Ãbutton lights
up. Automatic air distribution and airflow
are activated. X
To switch to manual mode: press the
É orË button.
or X Press the KorI button.
The indicator lamp in the Ãbutton goes
out. Automatic air distribution and airflow
are deactivated.
Setting the temperature
Air-conditioning system
You can set the temperature for the entire
vehicle. The set temperature is automatically maintained at a constant level.
X Turn the SmartKey to position 2in the igni-
tion lock ( Ypage 135).
X To increase/reduce: turn control:
clockwise or counter-clockwise( Y page 121). Only change the temperature
setting in small increments. Start at 22 †.
Dual-zone automatic climate control
Different temperatures can be set for the
driver's and front-passenger sides. The set
temperature is automatically maintained at a
constant level.
X Turn the SmartKey to position 2in the igni-
tion lock ( Ypage 135).
X To increase/reduce: turn thumbwheel:
or E to the left or right ( Ypage 123). Only
126Operating the climate control systems
Climate control
Page 148 of 346
ANeutral
Do not shift the transmission toN
while driving. Otherwise, the auto-
matic transmission could be dam-
aged.
No power is transmitted from the
engine to the drive wheels.
Releasing the brakes will allow you
to move the vehicle freely, e.g. to
push it or tow it.
If ESP ®
is deactivated or faulty:
shift the transmission to position N
if the vehicle is in danger of skid-
ding, e.g. on icy roads.
If you switch the engine off with the transmission in position Ror D, the
automatic transmission shifts to N
automatically.
!Rolling in neutral Ncan damage
the drive train.
7Drive
The automatic transmission
changes gear automatically. All
forward gears are available.
Driving tips
Changing gear
The automatic transmission shifts to the indi- vidual gears automatically when it is in trans-
mission position D. This automatic gear shift-
ing behavior is determined by:
R the selected drive program ( Ypage 147)
R the position of the accelerator pedal (Y page 146)
R the road speed
Accelerator pedal position
Your style of driving influences how the auto-
matic transmission shifts gear:
R little throttle: early upshifts
R more throttle: late upshifts
Holding the vehicle stationary on uphill
gradients
GWARNING
If the clutch overheats, the electronic man-
agement system is automatically deactivated. This interrupts the power transmission. The
vehicle may, for example, roll backwards on
gradients. There is a risk of an accident.
Never hold the vehicle stationary on uphill
gradients by depressing the accelerator.
The clutch may overheat if you hold the vehi- cle stationary on uphill gradients by depress- ing the accelerator pedal. If the clutch over-
heats, a warning tone sounds.
The
Stop Vehicle Shift to P Leave
EngineRunningdisplay message appears in
the multifunction display. You will only be
able to continue your journey once the clutch
has cooled down and the display message in
the multifunction display has disappeared.
Never hold the vehicle stationary on uphill
gradients by depressing the accelerator.
Instead, only ever hold the vehicle stationary
on uphill gradients by:
R depressing the brake pedal
R activating the HOLD function
R engaging the electric parking brake
Kickdown
Use kickdown for maximum acceleration.
X Depress the accelerator pedal beyond the
pressure point.
The automatic transmission shifts to a
lower gear depending on the engine speed.
X Ease off the accelerator pedal once the
desired speed is reached.
The automatic transmission shifts back up.
For further information on kickdown in man-
ual drive program M(Y page 148).
146Automatic transmission
Driving an d parking
Page 149 of 346
Rocking the vehicle free
Shifting the transmission repeatedly between
gears Dand Rmay help to free the vehicle if it
has become stuck in slush or snow. The vehi- cle's engine management system limits the
speed to a maximum of 5 mph (9 km/h) when
shifting back and forth. To shift back and forth between transmission positions Dand R,
move the DIRECT SELECT lever up and down
past the point of resistance.
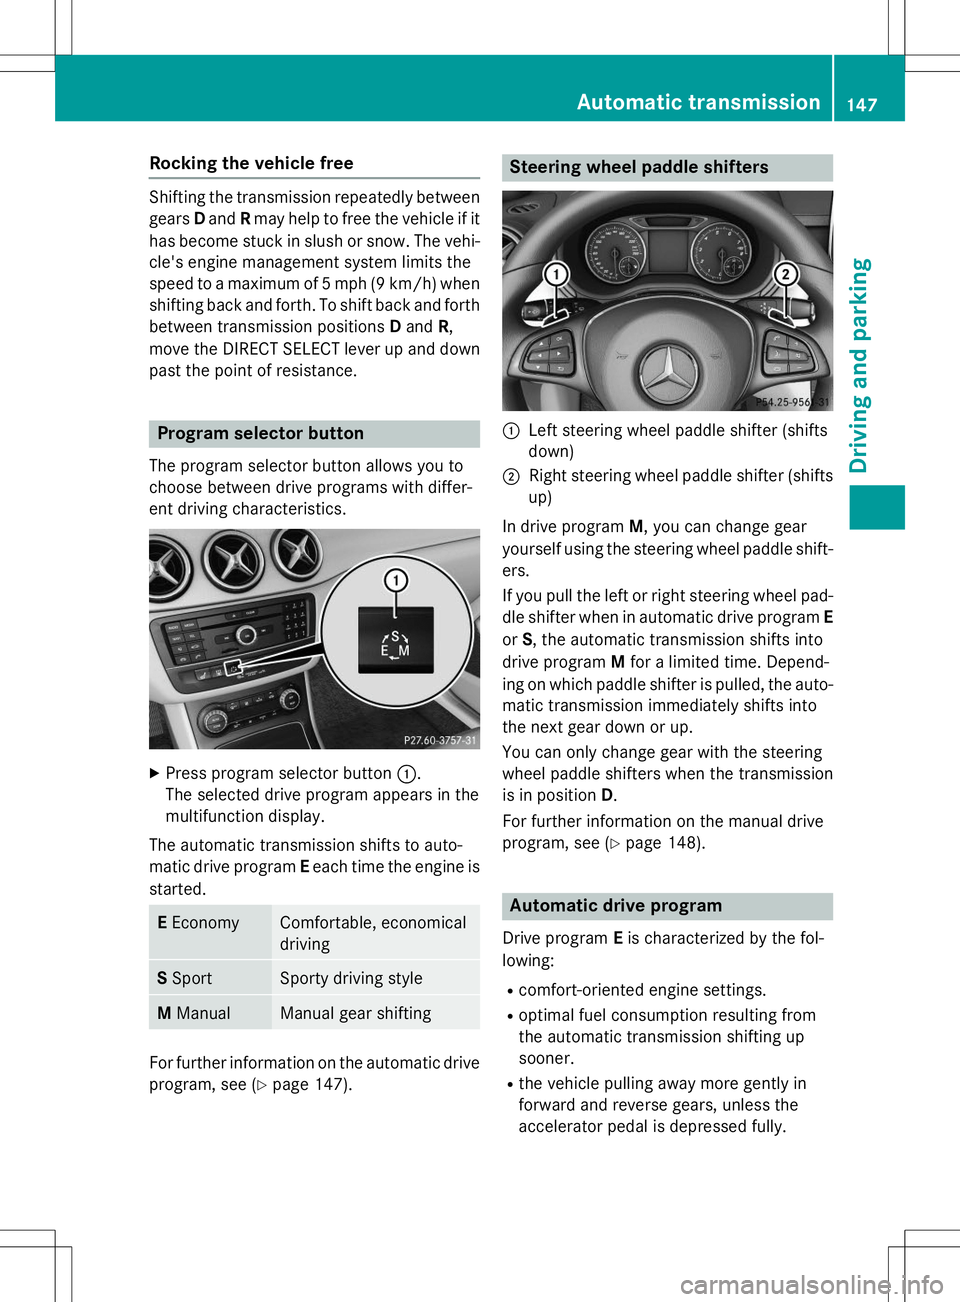
Program selector button
The program selector button allows you to
choose between drive programs with differ-
ent driving characteristics.
X Press program selector button :.
The selected drive program appears in the
multifunction display.
The automatic transmission shifts to auto-
matic drive program Eeach time the engine is
started.
E EconomyComfortable, economical
driving
S SportSporty driving style
M ManualManual gear shifting
For further information on the automatic drive
program, see ( Ypage 147).
Steering wheel paddle shifters
:Left steering wheel paddle shifter (shifts
down)
;Right steering wheel paddle shifter (shifts
up)
In drive program M, you can change gear
yourself using the steering wheel paddle shift-
ers.
If you pull the left or right steering wheel pad- dle shifter when in automatic drive program E
or S, the automatic transmission shifts into
drive program Mfor a limited time. Depend-
ing on which paddle shifter is pulled, the auto- matic transmission immediately shifts into
the next gear down or up.
You can only change gear with the steering
wheel paddle shifters when the transmission
is in position D.
For further information on the manual drive
program, see ( Ypage 148).
Automatic drive program
Drive program Eis characterized by the fol-
lowing:
R comfort-oriented engine settings.
R optimal fuel consumption resulting from
the automatic transmission shifting up
sooner.
R the vehicle pulling away more gently in
forward and reverse gears, unless the
accelerator pedal is depressed fully.
Automatic transmission147
Driving and parking
Z
Page 150 of 346
Rincreased sensitivity. This improves driving
stability on slippery road surfaces, for
example.
R the automatic transmission shifting up
sooner. This results in the vehicle being
driven at lower engine speeds and the
wheels being less likely to spin.
Drive program Sis characterized by the fol-
lowing:
R sporty engine settings.
R the automatic transmission shifting up
later.
R the fuel consumption possibly being higher
as a result of the later automatic transmis- sion shift points.
Manual drive program
General information
In manual drive program M, you can change
gear yourself by using the steering wheel pad- dle shifters. For this, the transmission must
be in position D. The gear currently selected
and engaged is shown in the multifunctiondisplay.
Manual drive program Mdiffers from drive
programs Eand Swith regard to spontaneity,
responsiveness and smoothness of gear
changes.
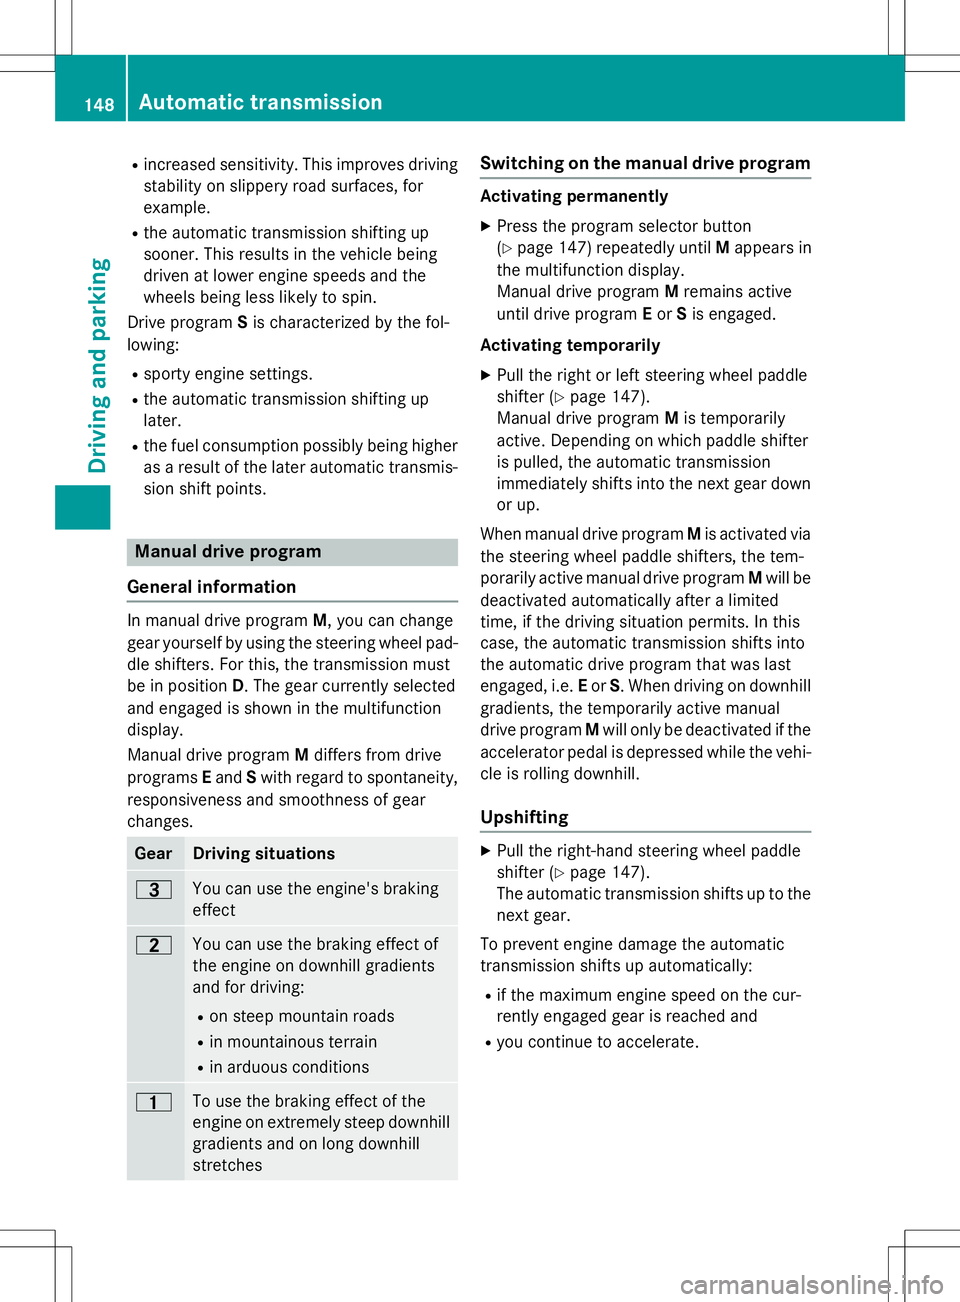
GearDriving situations
=You can use the engine's braking
effect
5You can use the braking effect of
the engine on downhill gradients
and for driving: R on steep mountain roads
R in mountainous terrain
R in arduous conditions
4To use the braking effect of the
engine on extremely steep downhill
gradients and on long downhill
stretches
Switching on the manual drive program
Activating permanently X Press the program selector button (Y page 147) repeatedly until Mappears in
the multifunction display.
Manual drive program Mremains active
until drive program Eor Sis engaged.
Activating temporarily X Pull the right or left steering wheel paddle
shifter ( Ypage 147).
Manual drive program Mis temporarily
active. Depending on which paddle shifter
is pulled, the automatic transmission
immediately shifts into the next gear down
or up.
When manual drive program Mis activated via
the steering wheel paddle shifters, the tem-
porarily active manual drive program Mwill be
deactivated automatically after a limited
time, if the driving situation permits. In this
case, the automatic transmission shifts into
the automatic drive program that was last
engaged, i.e. Eor S. When driving on downhill
gradients, the temporarily active manual
drive program Mwill only be deactivated if the
accelerator pedal is depressed while the vehi- cle is rolling downhill.
Upshifting
X Pull the right-hand steering wheel paddle
shifter ( Ypage 147).
The automatic transmission shifts up to the
next gear.
To prevent engine damage the automatic
transmission shifts up automatically: R if the maximum engine speed on the cur-
rently engaged gear is reached and
R you continue to accelerate.
148Automatic transmission
Driving and parking
Page 159 of 346
Apart from driving style, consumption is
dependent on many factors such as, e.g.: Rload
R tire pressure
R cold start
R choice of route
R electrical consumers switched on
These factors are not included in the ECO dis-
play.
The evaluation of your driving style is carried
out using the following three categories:
R
Acceleration(evaluation of all accelera-
tion processes):
- The bar fills up: moderate acceleration,
especially at higher speeds
- The bar empties: sporty acceleration
R
Constant(assessment of driving behavior
at all times)
- The bar fills up: constant speed and
avoidance of unnecessary acceleration
and deceleration
- The bar empties: fluctuations in speed
R
Coasting(assessment of all deceleration
processes) - The bar fills up: anticipatory driving,
keeping your distance and early release
of the accelerator. The vehicle can coast
without use of the brakes.
- The bar empties: frequent braking
An economical driving style specially requires
driving at moderate engine speeds.
To achieve a higher value in the categories
AccelerationandConstant:
R observe the gearshift recommendations.
R drive in drive program E.
On long journeys at a constant speed, e.g. on
the highway, only the bar for
Constantwill
change.
The ECO display summarizes the driving char- acteristics from the start of the journey to its completion. For this reason, the bars change
dynamically at the beginning of the journey.
On longer journeys, there are fewer changes. For more dynamic changes, carry out a man-
ual reset.
For further information on the ECO display,
see ( Ypage 196).
Braking
Important safety notes
GWARNING
If you shift down on a slippery road surface in an attempt to increase the engine's braking
effect, the drive wheels could lose their grip.
There is an increased danger of skidding and
accidents.
Do not shift down for additional engine brak-
ing on a slippery road surface.
Downhill gradients
!On long and steep gradients, you must
reduce the load on the brakes by shifting to
a lower gear in good time. This allows you to
take advantage of the engine's braking
effect. For this, you need to have selected
manual drive program M. This helps you to
avoid overheating the brakes and wearing
them out excessively.
When you take advantage of the engine's
braking effect, a drive wheel may not turn
for some time, e.g. on a slippery road sur-
face. This could cause damage to the drive train. This type of damage is not covered bythe Mercedes-Benz warranty.
Briefly depressing the accelerator pedal on
downhill gradients while the manual drive
program Mis temporarily activated: the auto-
matic transmission may switch to the last
active automatic drive program Eor S. The
automatic transmission may shift to a higher
gear. This can reduce the engine's braking
effect.
Driving tips157
Driving an d parking
Z