heating MERCEDES-BENZ B-CLASS SPORTS 2015 Owners Manual
[x] Cancel search | Manufacturer: MERCEDES-BENZ, Model Year: 2015, Model line: B-CLASS SPORTS, Model: MERCEDES-BENZ B-CLASS SPORTS 2015Pages: 346, PDF Size: 45.04 MB
Page 12 of 346
Fog lampsSwitching on/off .......................... .105
Folding table ...................................... 251
Front fog lamps
Display message ............................ 220
Switching on/off ........................... 105
Front-passenger seat
Folding the backrest forward/
back ............................................... 251
Fuel
Additives ........................................ 337
Consumption information .............. 337
Consumption statistics .................. 196
Displaying the current consump-
tion ................................................ 196
Displaying the range ..................... .196
Driving tips ................................... .156
E10 ................................................ 336
Fuel gauge ....................................... 29
Grade (gasoline) ............................ 336
Important safety notes .................. 335
Problem (malfunction) ................... 152
Refueling ........................................ 150
Tank content/reserve fuel ............. 336
Fuel filler flap
Opening ......................................... 151
Fuel level
Calling up the range (on-board
computer) ...................................... 196
Fuel tank
Capacity ........................................ 336
Problem (malfunction) ................... 152
Fuses
Allocation chart ............................ .300
Before changing ............................ .299
Fuse box in the engine compart-
ment .............................................. 299
Fuse box in the front-passenger
footwell .......................................... 300
Important safety notes .................. 298
G
Garage door opener
Clearing the memory ..................... 266
General notes ................................ 263
Important safety notes .................. 264
Opening/closing the garage door .. 266 Programming (button in the rear-
view mirror) ................................... 264
Synchronizing the rolling code ....... 264
Gasoline ............................................. 336
Genuine parts ...................................... 20
Glove box .......................................... .249
H
Hazard warning lamps
Display message ............................ 233
Switching on/off ........................... 107
Head restraints
Adjusting ......................................... 94
Adjusting (manually) ........................ 95
Adjusting (rear) ................................ 95
Headlamps
Fogging up ..................................... 108
see Automatic headlamp mode
Heating
see Climate control
High beam flasher .............................107
High-beam headlamps
Adaptive Highbeam Assist ............. 107
Changing bulbs .............................. 111
Display message ............................ 220
Switching on/off ........................... 106
Hill start assist .................................. 138
HOLD function
Activating ....................................... 171
Deactivating ................................... 171
Display message ............................ 225
Function/notes ............................ .170
Hood
Closing .......................................... .271
Display message ............................ 232
Important safety notes .................. 270
Opening ......................................... 270
Horn ...................................................... 28
Hydroplaning ..................................... 160
I
Ignition lock
see Key positions
Immobilizer .......................................... 67
10Index
Page 17 of 346
SeatsAdjusting (electrically) ..................... 94
Adjusting (manually) ........................ 94
Adjusting the 4-way lumbar sup-
port .................................................. 95
Adjusting the head restraint ............ 94
Cleaning the cover ........................ .281
Correct driver's seat position ........... 92
Folding the backrest (rear com-
partment) forwards/back (vehi-
cles with the EASY-VARIO-PLUS
system) .......................................... 253
Folding the backrest (rear com-
partment) forwards/back (vehi-
cles without the EASY-VARIO-
PLUS system) ................................ 252
Important safety notes .................... 93
Seat heating problem ..................... .97
Storing settings (memory func-
tion) ............................................... 101
Switching seat heating on/of f......... 96
Securing cargo .................................. 255
Selector lever
Cleaning ......................................... 280
Sensors (cleaning instructions) ....... 279
Service menu (on-board com- puter) .................................................. 204
Service message
see ASSYST PLUS
Service products
Brake fluid ..................................... 338
Coolant (engine) ............................ 339
Engine oil ....................................... 337
Fuel ................................................ 335
Important safety notes .................. 335
Refrigerant (air-conditioning sys-
tem) ............................................... 340
Washer fluid ................................... 339
Setting the air distribution ............... 127
Setting the airflow ............................ 127
Settings
Factory (on-board computer) ......... 206
On-board computer ....................... 204
Side impact air bag ............................. 46
Side marker lamp (display mes-
sage) ................................................... 221 Side windows
Cleaning ......................................... 278
Convenience closing feature ............ 83
Convenience opening feature .......... 82
Important safety information ........... 81
Opening/closing .............................. 82
Problem (malfunction) ..................... 85
Resetting ......................................... 84
Reversing feature ............................. 81
Sliding sunroof
see Panorama roof with power
tilt/sliding panel
SmartKey
Changing the battery ....................... 74
Changing the programming ............. 72
Checking the battery ....................... 73
Convenience closing feature ............ 83
Convenience opening feature .......... 82
Display message ............................ 234
Door central locking/unlocking ....... 70
Important safety notes .................... 70
KEYLESS-GO start function .............. 72
Loss ................................................. 75
Mechanical key ................................ 72
Positions (ignition lock) ................. 135
Problem (malfunction) ..................... 75
Starting the engine ........................ 137
SmartKey positions (ignition lock) .. 135
Snow chains ...................................... 305
Sockets
Center console .............................. 263
General notes ................................ 262
Luggage compartment ................... 263
Rear compartment ......................... 263
Special seat belt retractor .................. 55
Specialist workshop ............................ 24
Speed, controlling
see Cruise control
Speedometer
Activating/deactivating the addi-
tional speedometer ........................ 204
Digital ............................................ 197
In the Instrument cluster ................. 29
Segments ...................................... 193
Selecting the unit of measure-
ment .............................................. 204
Standing lamps
Display message ............................ 221
Index15
Page 34 of 346
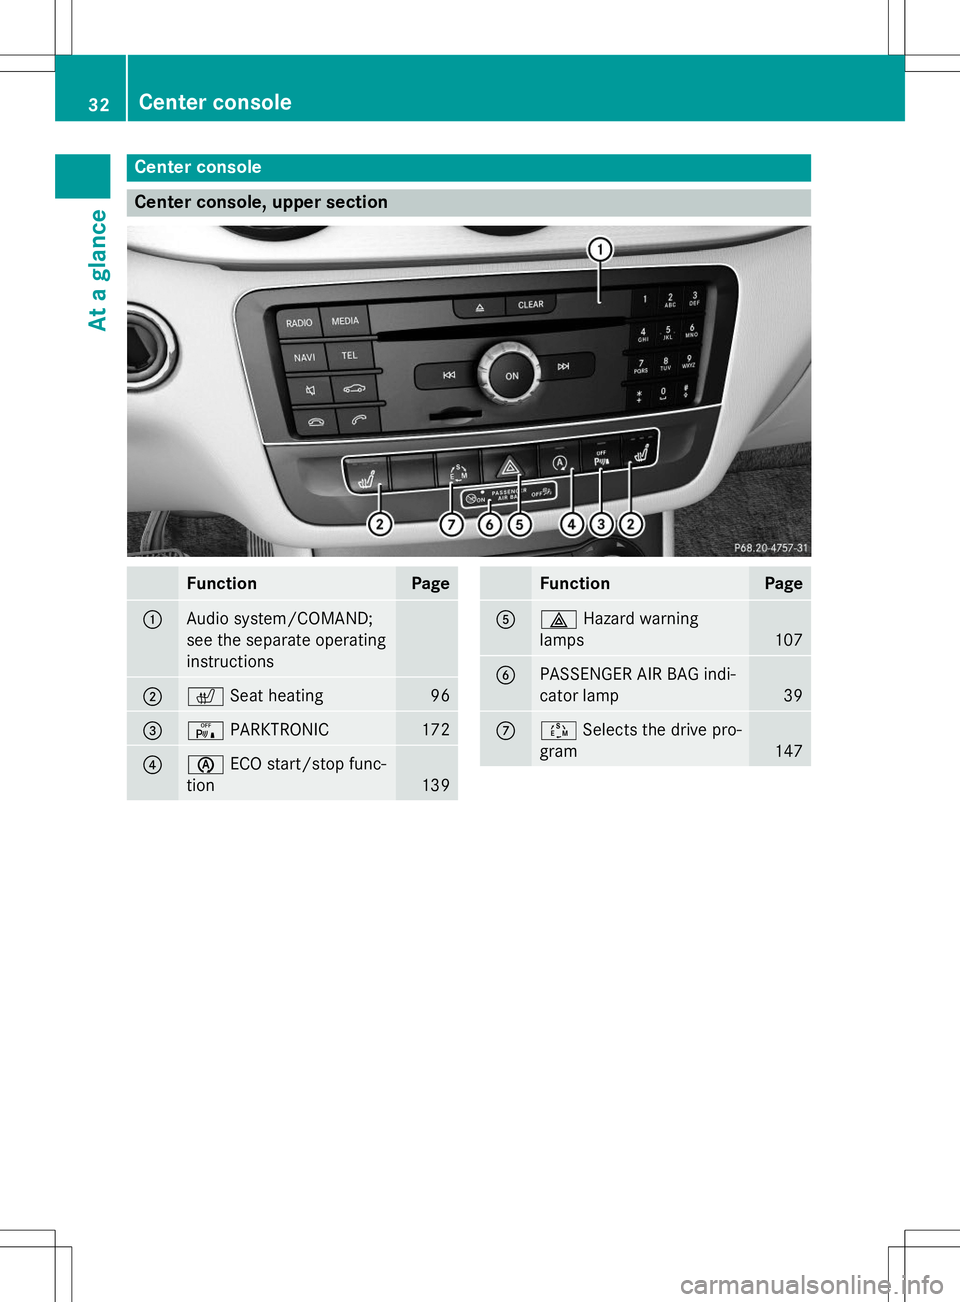
Center console
Center console, upper section
FunctionPage
:Audio system/COMAND;
see the separate operating
instructions
;cSeat heating96
=cPARKTRONIC172
?èECO start/stop func-
tion
139
FunctionPage
A£ Hazard warning
lamps
107
BPASSENGER AIR BAG indi-
cator lamp
39
CÚ Selects the drive pro-
gram
147
32Center console
At a glance
Page 78 of 346
ProblemPossible causes/consequences andMSolutions
KEYLESS-GO is malfunctioning.
X Lock/unlock the vehicle using the remote control function of
the SmartKey.
X Have the vehicle and SmartKey checked at a qualified specialist
workshop.
If the vehicle can also not be locked/unlocked using the remote
control function: X Unlock ( Ypage 78) or lock ( Ypage 79) the vehicle using the
mechanical key.
X Have the vehicle and SmartKey checked at a qualified specialist
workshop.
The engine cannot be
started using the
SmartKey.The on-board voltage is too low.
X Switch off non-essential consumers, e.g. seat heating or interior
lighting, and try to start the engine again.
If this does not work:
X Check the starter battery and charge it if necessary (Y page 291).
or
X Jump-start the vehicle ( Ypage 293).
or
X Consult a qualified specialist workshop.
The engine cannot be
started using the Start/
Stop button. The
SmartKey is in the vehi-
cle.The vehicle is locked.
X Unlock the vehicle and try to start the vehicle again.
The SmartKey battery is discharged or nearly discharged.
X Check the SmartKey battery ( Ypage 73) and replace it if nec-
essary ( Ypage 74).
If this does not work:
X Start your vehicle with the SmartKey in the ignition lock.
There is interference from a powerful source of radio waves.
X Start your vehicle with the SmartKey in the ignition lock.
76SmartKey
Opening and closing
Page 95 of 346
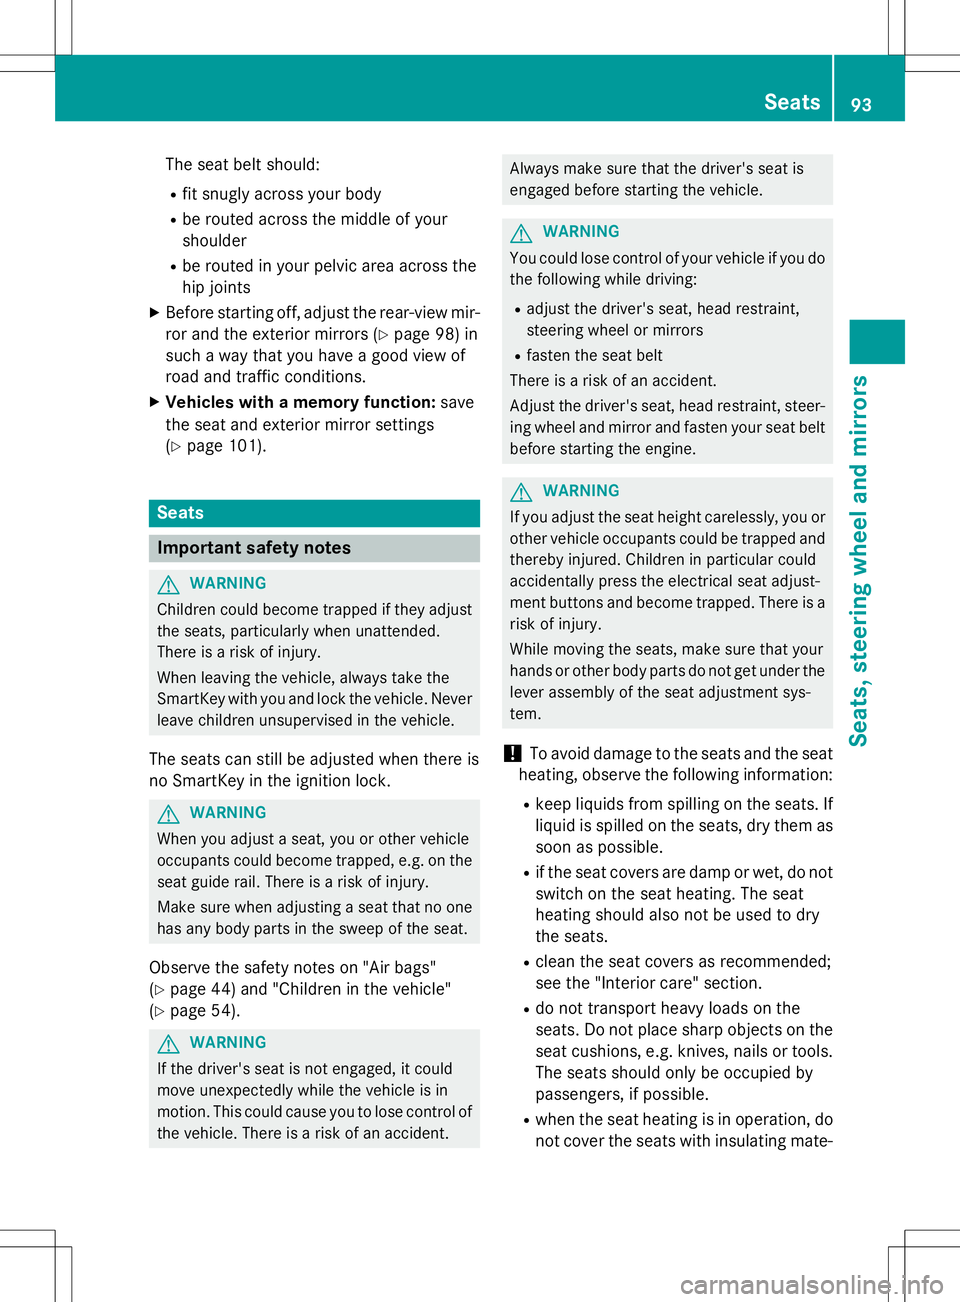
The seat belt should:
R fit snugly across your body
R be routed across the middle of your shoulder
R be routed in your pelvic area across the
hip joints
X Before starting off, adjust the rear-view mir-
ror and the exterior mirrors ( Ypage 98) in
such a way that you have a good view of
road and traffic conditions.
X Vehicles with a memory function: save
the seat and exterior mirror settings( Y page 101).
Seats
Important safety notes
GWARNING
Children could become trapped if they adjust
the seats, particularly when unattended.
There is a risk of injury.
When leaving the vehicle, always take the
SmartKey with you and lock the vehicle. Never leave children unsupervised in the vehicle.
The seats can still be adjusted when there is
no SmartKey in the ignition lock.
GWARNING
When you adjust a seat, you or other vehicle
occupants could become trapped, e.g. on the seat guide rail. There is a risk of injury.
Make sure when adjusting a seat that no one
has any body parts in the sweep of the seat.
Observe the safety notes on "Air bags" ( Y page 44) and "Children in the vehicle"
( Y page 54).
GWARNING
If the driver's seat is not engaged, it could
move unexpectedly while the vehicle is in
motion. This could cause you to lose control of
the vehicle. There is a risk of an accident.
Always make sure that the driver's seat is
engaged before starting the vehicle.
GWARNING
You could lose control of your vehicle if you dothe following while driving:
R adjust the driver's seat, head restraint,
steering wheel or mirrors
R fasten the seat belt
There is a risk of an accident.
Adjust the driver's seat, head restraint, steer-
ing wheel and mirror and fasten your seat belt before starting the engine.
GWARNING
If you adjust the seat height carelessly, you orother vehicle occupants could be trapped andthereby injured. Children in particular could
accidentally press the electrical seat adjust-
ment buttons and become trapped. There is a
risk of injury.
While moving the seats, make sure that your
hands or other body parts do not get under the
lever assembly of the seat adjustment sys-tem.
!To avoid damage to the seats and the seat
heating, observe the following information:
R keep liquids from spilling on the seats. If
liquid is spilled on the seats, dry them as
soon as possible.
R if the seat covers are damp or wet, do not
switch on the seat heating. The seat
heating should also not be used to dry
the seats.
R clean the seat covers as recommended;
see the "Interior care" section.
R do not transport heavy loads on the
seats. Do not place sharp objects on the
seat cushions, e.g. knives, nails or tools.
The seats should only be occupied by
passengers, if possible.
R when the seat heating is in operation, do
not cover the seats with insulating mate-
Seats93
Seats, steering wheel and mirrors
Z
Page 98 of 346
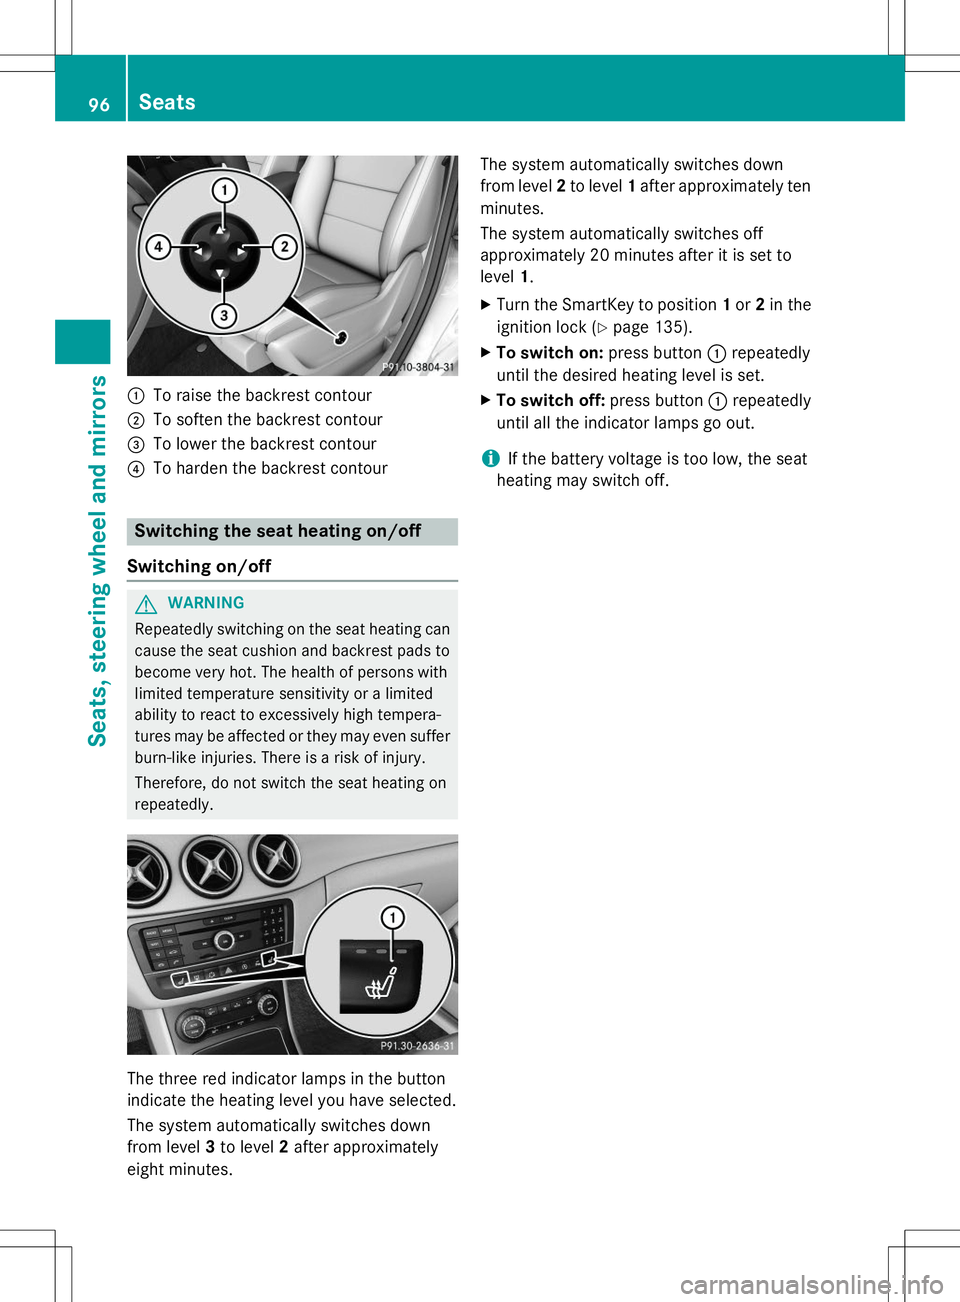
:To raise the backrest contour
;To soften the backrest contour
=To lower the backrest contour
?To harden the backrest contour
Switching the seat heating on/off
Switching on/off
GWARNING
Repeatedly switching on the seat heating can
cause the seat cushion and backrest pads to
become very hot. The health of persons with
limited temperature sensitivity or a limited
ability to react to excessively high tempera-
tures may be affected or they may even suffer burn-like injuries. There is a risk of injury.
Therefore, do not switch the seat heating on repeatedly.
The three red indicator lamps in the button
indicate the heating level you have selected.
The system automatically switches down
from level 3to level 2after approximately
eight minutes. The system automatically switches down
from level
2to level 1after approximately ten
minutes.
The system automatically switches off
approximately 20 minutes after it is set tolevel 1.
X Turn the SmartKey to position 1or 2in the
ignition lock ( Ypage 135).
X To switch on: press button:repeatedly
until the desired heating level is set.
X To switch off: press button:repeatedly
until all the indicator lamps go out.
iIf the battery voltage is too low, the seat
heating may switch off.
96Seats
Seats, steering wheel and mirrors
Page 99 of 346
Problems with the seat heating
ProblemPossible causes/consequences andMSolutions
The seat heating has
switched off prema-
turely or cannot be
switched on.The on-board voltage is too low because too many electrical con-
sumers are switched on.
X Switch off electrical consumers that you do not need, such as
the rear window defroster or interior lighting.
Once the battery is sufficiently charged, the seat heating will
switch back on automatically.
Steering wheel
Important safety notes
GWARNING
You could lose control of your vehicle if you do
the following while driving:
R adjust the driver's seat, head restraint,
steering wheel or mirrors
R fasten the seat belt
There is a risk of an accident.
Adjust the driver's seat, head restraint, steer-
ing wheel and mirror and fasten your seat belt before starting the engine.
GWARNING
Children could injure themselves if they
adjust the steering wheel. There is a risk ofinjury.
When leaving the vehicle, always take the
SmartKey with you and lock the vehicle. Neverleave children unsupervised in the vehicle.
Adjusting the steering wheel
GWARNING
If the steering wheel is unlocked while the
vehicle is in motion, it could change position
unexpectedly. This could cause you to lose
control of the vehicle. There is a risk of anaccident.
Before starting off, make sure the steering
wheel is locked. Never unlock the steering
wheel while the vehicle is in motion.
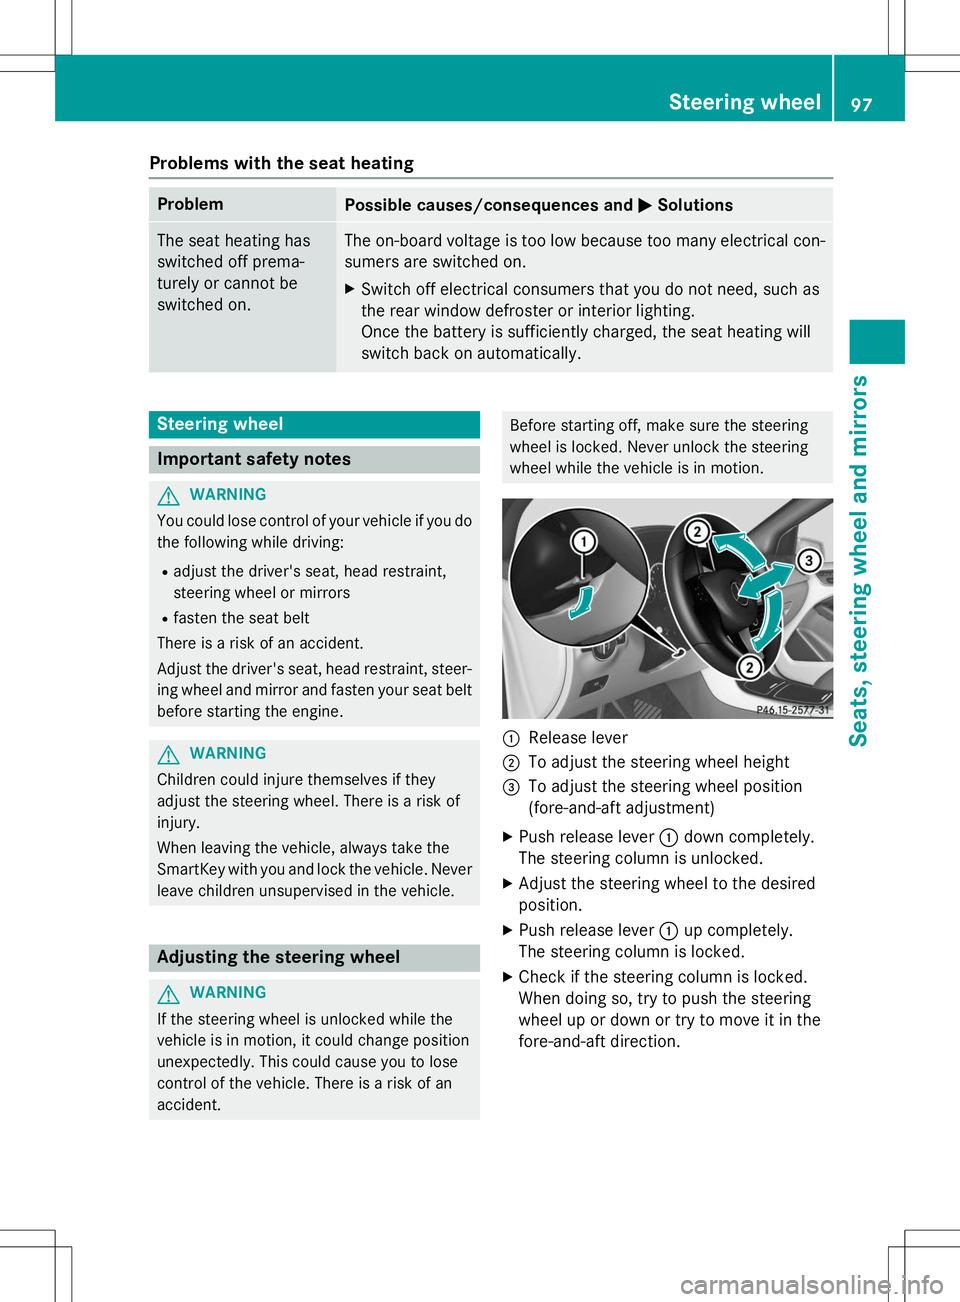
:Release lever
;To adjust the steering wheel height
=To adjust the steering wheel position
(fore-and-aft adjustment)
X Push release lever :down completely.
The steering column is unlocked.
X Adjust the steering wheel to the desiredposition.
X Push release lever :up completely.
The steering column is locked.
X Check if the steering column is locked.
When doing so, try to push the steering
wheel up or down or try to move it in the
fore-and-aft direction.
Steering wheel97
Seats, steering wheel and mirrors
Z
Page 100 of 346
Mirrors
Rear-view mirror
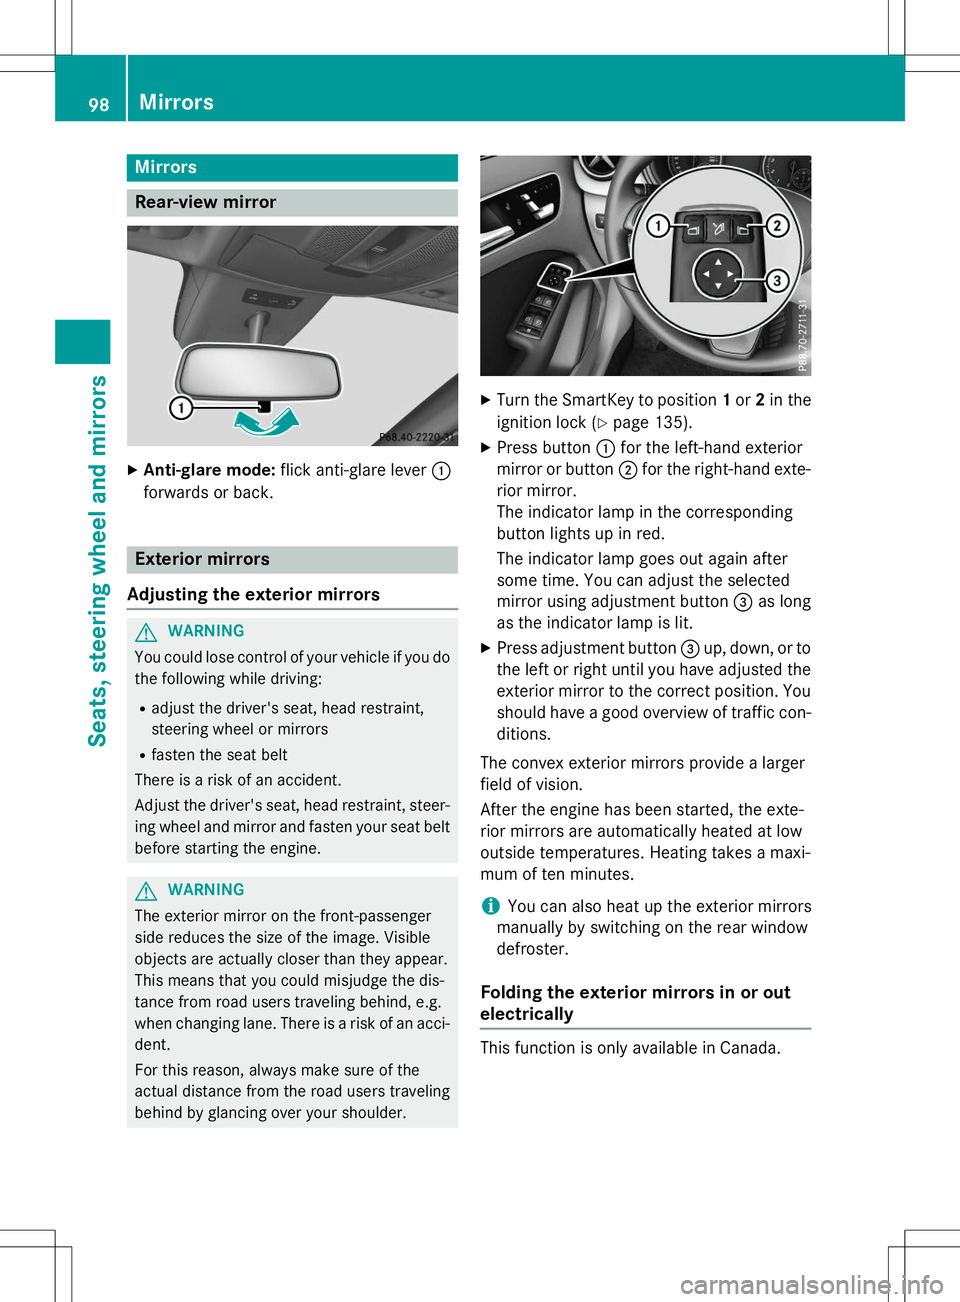
XAnti-glare mode: flick anti-glare lever :
forwards or back.
Exterior mirrors
Adjusting the exterior mirrors
GWARNING
You could lose control of your vehicle if you do the following while driving:
R adjust the driver's seat, head restraint,
steering wheel or mirrors
R fasten the seat belt
There is a risk of an accident.
Adjust the driver's seat, head restraint, steer-
ing wheel and mirror and fasten your seat belt before starting the engine.
GWARNING
The exterior mirror on the front-passenger
side reduces the size of the image. Visible
objects are actually closer than they appear.
This means that you could misjudge the dis-
tance from road users traveling behind, e.g.
when changing lane. There is a risk of an acci-dent.
For this reason, always make sure of the
actual distance from the road users traveling
behind by glancing over your shoulder.
X Turn the SmartKey to position 1or 2in the
ignition lock ( Ypage 135).
X Press button :for the left-hand exterior
mirror or button ;for the right-hand exte-
rior mirror.
The indicator lamp in the corresponding
button lights up in red.
The indicator lamp goes out again after
some time. You can adjust the selected
mirror using adjustment button =as long
as the indicator lamp is lit.
X Press adjustment button =up, down, or to
the left or right until you have adjusted the
exterior mirror to the correct position. You
should have a good overview of traffic con- ditions.
The convex exterior mirrors provide a larger
field of vision.
After the engine has been started, the exte-
rior mirrors are automatically heated at low
outside temperatures. Heating takes a maxi-
mum of ten minutes.
iYou can also heat up the exterior mirrors
manually by switching on the rear window
defroster.
Folding the exterior mirrors in or out
electrically
This function is only available in Canada.
98Mirrors
Seats, steering wheel and mirrors
Page 123 of 346
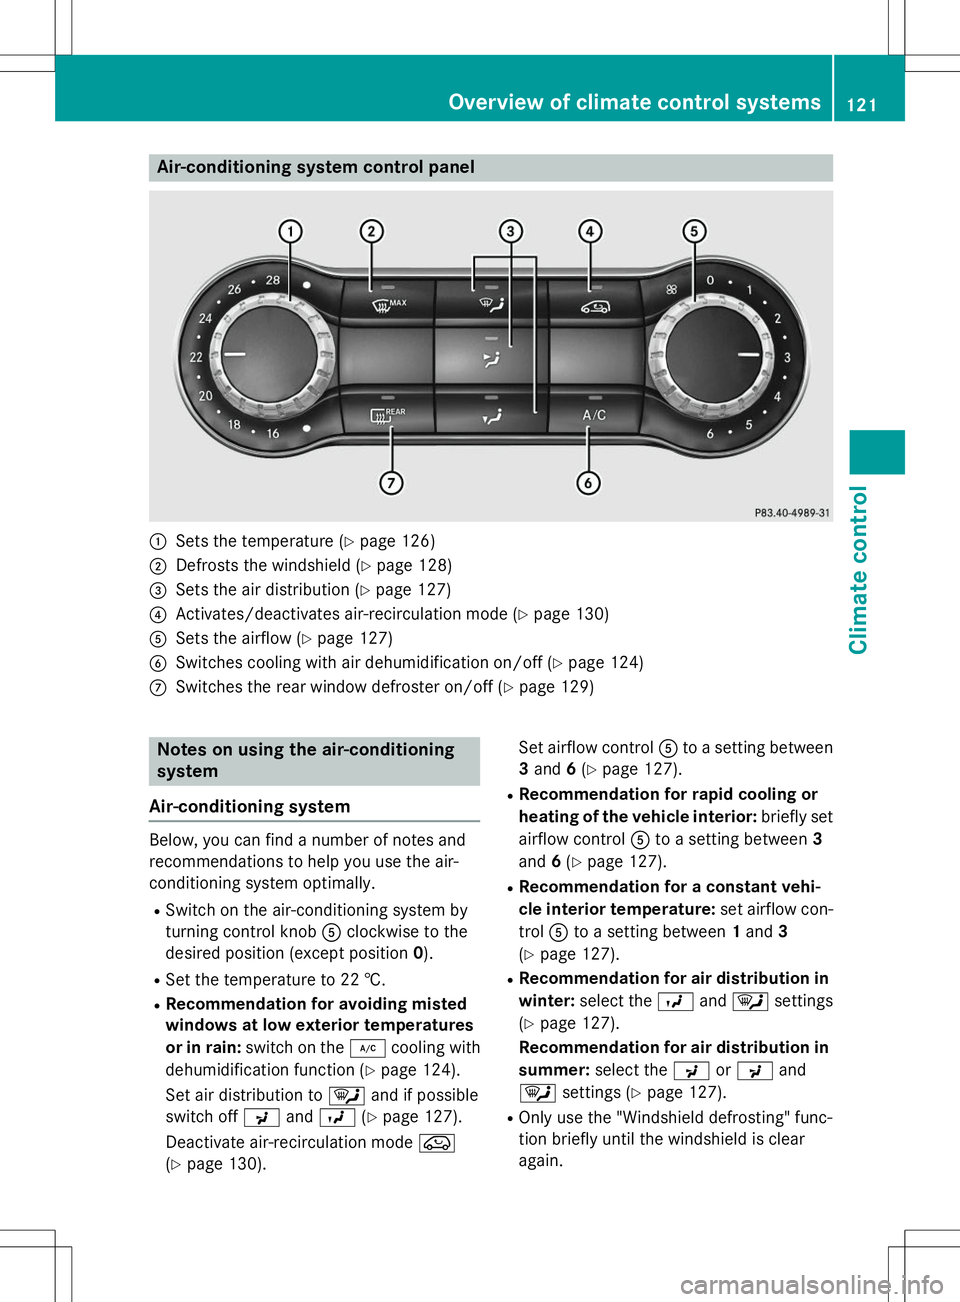
Air-conditioning system control panel
:Sets the temperature (Ypage 126)
;Defrosts the windshield ( Ypage 128)
=Sets the air distribution ( Ypage 127)
?Activates/deactivates air-recirculation mode ( Ypage 130)
ASets the airflow ( Ypage 127)
BSwitches cooling with air dehumidification on/off ( Ypage 124)
CSwitches the rear window defroster on/off ( Ypage 129)
Notes on using the air-conditioning
system
Air-conditioning system
Below, you can find a number of notes and
recommendations to help you use the air-
conditioning system optimally.
R Switch on the air-conditioning system by
turning control knob Aclockwise to the
desired position (except position 0).
R Set the temperature to 22 †.
R Recommendation for avoiding misted
windows at low exterior temperatures
or in rain: switch on the ¿cooling with
dehumidification function ( Ypage 124).
Set air distribution to ¯and if possible
switch off PandO (Y page 127).
Deactivate air-recirculation mode e
( Y page 130). Set airflow control
Ato a setting between
3 and 6(Y page 127).
R Recommendation for rapid cooling or
heating of the vehicle interior: briefly set
airflow control Ato a setting between 3
and 6(Y page 127).
R Recommendation for a constant vehi-
cle interior temperature: set airflow con-
trol Ato a setting between 1and 3
( Y page 127).
R Recommendation for air distribution in
winter: select the Oand¯ settings
( Y page 127).
Recommendation for air distribution in
summer: select the PorP and
¯ settings ( Ypage 127).
R Only use the "Windshield defrosting" func-
tion briefly until the windshield is clear
again.
Overview of climate control systems121
Climate cont rol
Page 132 of 346
Problems with the rear window defroster
ProblemPossible causes/consequences andMSolutions
The rear window
defroster has deactiva-
ted prematurely or can-
not be activated.The battery has not been sufficiently charged.
X Switch off any consumers that are not required, e.g. reading
lamps, interior lighting or the seat heating.
When the battery is sufficiently charged, the rear window
defroster can be activated again.
Activating/deactivating air-recircula-
tion mode
General notes
You can deactivate the flow of fresh air if
unpleasant odors are entering the vehicle
from outside. The air already inside the vehi-
cle will then be recirculated.
If you switch on air-recirculation mode, the
windows can fog up more quickly, in particu-
lar at low temperatures. Only use air-recircu-
lation mode briefly to prevent the windows
from fogging up.
The operation of air-recirculation mode is the same for all control panels.
Switching on/off
X Turn the SmartKey to position 2in the igni-
tion lock ( Ypage 135).
X To activate: press theebutton.
The indicator lamp in the ebutton lights
up.
Air-recirculation mode switches on automat-
ically: R at high outside temperatures
R at high levels of pollution
When air-recirculation mode is activated
automatically, the indicator lamp in the e
button is not lit. Outside air is added after
about 30 minutes.
X To deactivate: press theebutton.
The indicator lamp in the ebutton goes
out.
iAir-recirculation mode deactivates auto-
matically:
R after approximately five minutes at out-
side temperatures below approximately
7 †
R after approximately five minutes if the
"Cooling with air dehumidification" func-
tion is deactivated
R after approximately 30 minutes at out-
side temperatures above approximately
7 † if the cooling with air dehumidifica-
tion function is activated
Activating/deactivating the residual
heat function
General notes
The residual heat function is only available
with dual-zone automatic climate control.
It is possible to make use of the residual heat
of the engine to continue heating the vehicle
for approximately 30 minutes after the engine
has been switched off. The heating time
depends on the set interior temperature.
iThe blower will run at a low speed regard-
less of the airflow setting.
iIf you activate the residual heat function
at high temperatures, only the ventilation
will be activated. The blower runs at
medium speed.
iYou cannot use the ventilation to cool the
vehicle interior to a temperature lower than the outside temperature.
130Operating the climate control systems
Climate control