power steering MERCEDES-BENZ C-280 1999 Owners Manual
[x] Cancel search | Manufacturer: MERCEDES-BENZ, Model Year: 1999, Model line: C-280, Model: MERCEDES-BENZ C-280 1999Pages: 122, PDF Size: 1.69 MB
Page 3 of 122
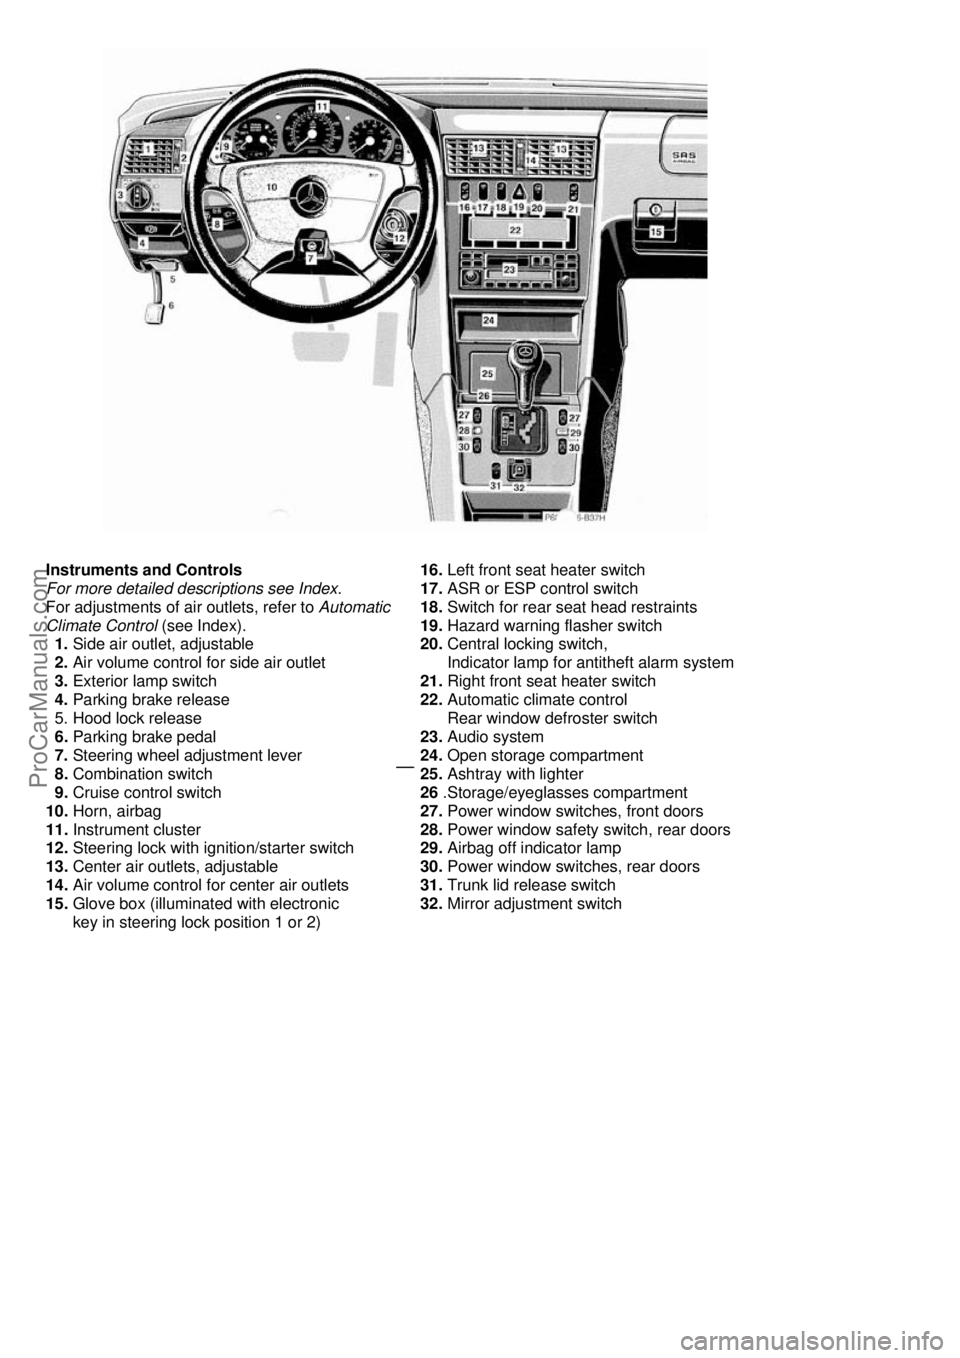
Instruments and Controls
For more detailed descriptions see Index.
For adjustments of air outlets, refer to Automatic
Climate Control (see Index).
1. Side air outlet, adjustable
2. Air volume control for side air outlet
3. Exterior lamp switch
4. Parking brake release
5. Hood lock release
6. Parking brake pedal
7. Steering wheel adjustment lever
8. Combination switch
9. Cruise control switch
10. Horn, airbag
11. Instrument cluster
12. Steering lock with ignition/starter switch
13. Center air outlets, adjustable
14. Air volume control for center air outlets
15. Glove box (illuminated with electronic
key in steering lock position 1 or 2)
16. Left front seat heater switch
17. ASR or ESP control switch
18. Switch for rear seat head restraints
19. Hazard warning flasher switch
20. Central locking switch,
Indicator lamp for antitheft alarm system
21. Right front seat heater switch
22. Automatic climate control
Rear win dow defroster switch
23. Audio system
24. Open storage compartment
25. Ashtray with lighter
26 .Storage/eyeglasses compartment
27. Power window switches, front doors
28. Power window safety switch, rear doors
29. Airbag off indicator lamp
30. Power window switches, rear doors
31. Trunk lid release switch
32. Mirror adjustment switch
ProCarManuals.com
Page 8 of 122

Driving Instructions
Warning !
If you feel a sudden significant vibration or ride disturbance, or you suspect that possible damage
to your vehicle has occurred, you should turn on the hazard flashers, carefully slow down, and drive with
caution to an area which is a safe distance from the roadway.
Inspect the tires and under the vehicle for possible dama ge. If the vehicle or tires appear unsafe, have
it towed to the nearest Mercedes-Benz or tire dealer for repairs.
Power Assistance
Warning !
When the engine is not running, the brake and steering systems are without power assistance.
Under these circumstances, a much greater effo rt is necessary to stop or steer the vehicle.
Brakes
Warning !
After driving in heavy rain for some time without applying the brakes or through water deep enough to
wet brake components, the first braking action may be somewhat reduced and increased pedal
pressure may be necessary. Be sure to maintain a safe distance from vehicles in front.
Resting your foot on the brake pedal will cause excessive and premature wear of the brake pads.
It can also result in the brakes overheating th ereby significantly reducing their effectiveness.
It may not be possible to stop the car in sufficient time to avoid an accident.
The condition of the parking brake system is checked eac h time the car is in the shop for the required service.
If the parking brake is released and the brake warning lamp in the instrument cluster stays on, the brake fluid level in
the reservoir is too low. Brake pad wear or a leak in the system may be the reason for low brake fluid in the reservoir.
Have the brake system inspected at an aut horized Mercedes-Benz dealer immediately.
All checks and maintenance work on the brake system s hould be carried out by an authorized Mercedes-Benz dealer.
Install only brake pads and brake fluid recommended by Mercedes-Benz.
Warning !
If other than recommended brake pads are installed, or other than recommended brake fluid is used, the
braking properties of the vehicle can be degraded to an extent that safe braking is substantially impaired.
This could result in an accident.
Caution !
When driving down long and steep grades, relieve the load on the brakes by shifting into a lower gear. This helps prevent
overheating of the brakes and reduces brak e pad wear. After hard braking, it is advisable to drive on for some time, rather
than immediately parking, so the air stream will cool down the brakes faster.
ProCarManuals.com
Page 13 of 122
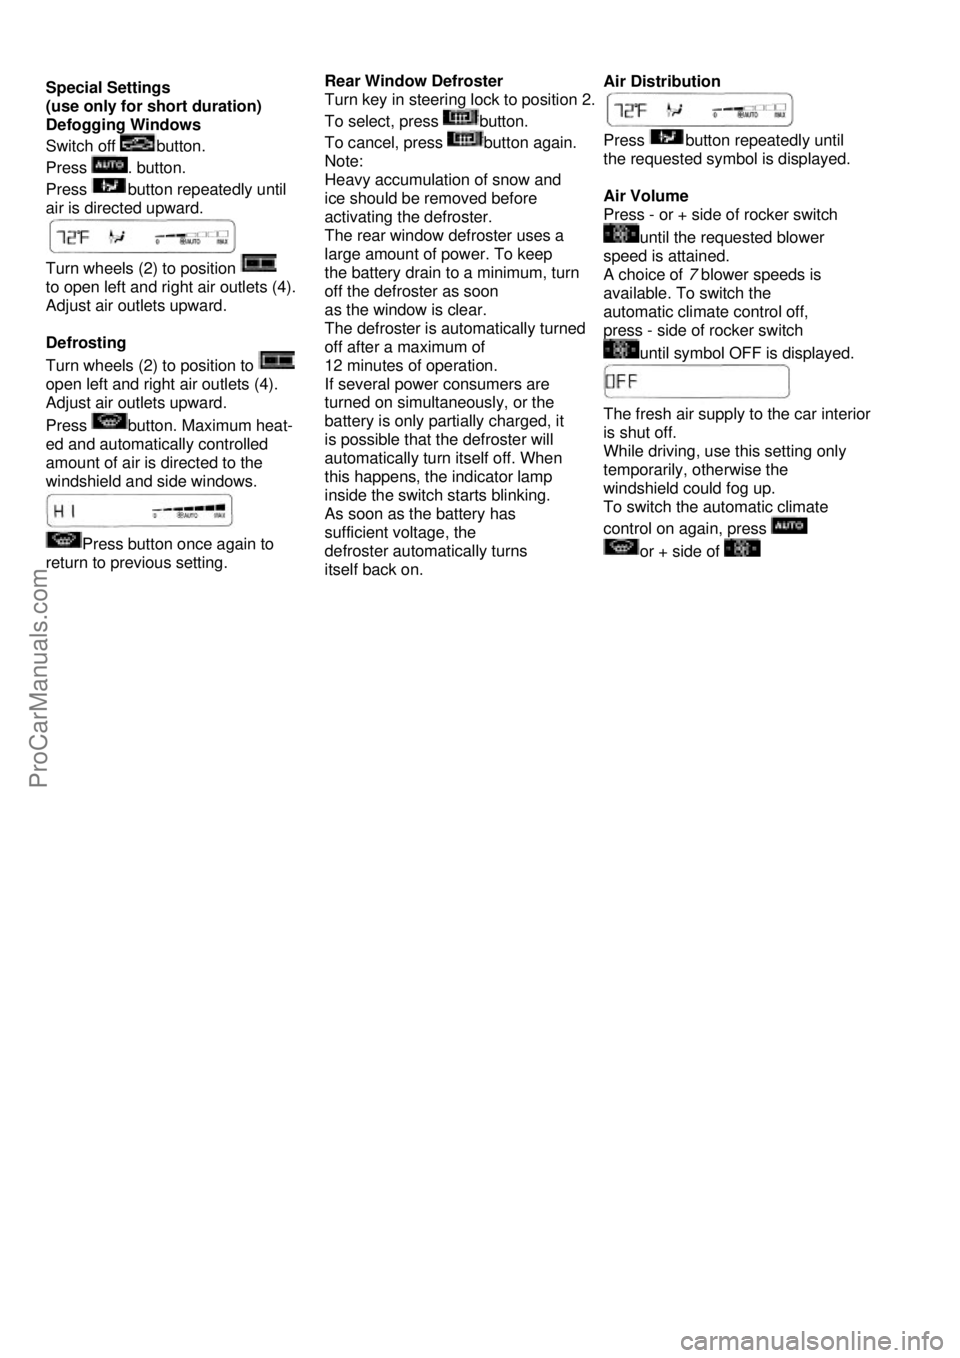
Special Settings
(use only for short duration)
Defogging Windows
Switch off
button.
Press
. button.
Press
button repeatedly until
air is directed upward.
Turn wheels (2) to position
to open left and right air outlets (4).
Adjust air outlets upward.
Defrosting
Turn wheels (2) to position to
open left and right air outlets (4).
Adjust air outlets upward.
Press
button. Maximum heat-
ed and automatically controlled
amount of air is directed to the
windshield and side windows.
Press button once again to
return to previous setting. Rear Window Defroster
Turn key in steering lock to position 2.
To select, press
button.
To cancel, press
button again.
Note:
Heavy accumulation of snow and
ice should be removed before
activating the defroster.
The rear window defroster uses a
large amount of power. To keep
the battery drain to a minimum, turn
off the defroster as soon
as the window is clear.
The defroster is automatically turned
off after a maximum of
12 minutes of operation.
If several power consumers are
turned on simultaneously, or the
battery is only partially charged, it
is possible that the defroster will
automatically turn itself off. When
this happens, the indicator lamp
inside the switch starts blinking.
As soon as the battery has
sufficient voltage, the
defroster automatically turns
itself back on. Air Distribution
Press
button repeatedly until
the requested symbol is displayed.
Air Volume
Press - or + side of rocker switch
until the requested blower
speed is attained.
A choice of 7 blower speeds is
available. To switch the
automatic climate control off,
press - side of rocker switch
until symbol OFF is displayed.
The fresh air supply to the car interior
is shut off.
While driving, use this setting only
temporarily, otherwise the
windshield could fog up.
To switch the automatic climate
control on again, press
or + side of
ProCarManuals.com
Page 26 of 122
Seats, Front
Warning !
Do not adjust the driver's seat while driving. Adjusting the seat while driving could cause the driver to lose
control of the vehicle. Never ride in a moving vehicle with the seat back reclined. Sitting in an excessively
reclined position can be dangerous.
You could slide under the seat belt in a collision. If you slide under it, the belt would apply force at the
abdomen or neck. That could cause serious or even fatal injuries. The seat backrest and seat belt provide
the best restraint when the wearer is in an upright position and the belt is property positioned on the body.
Never place hands under seat or near any moving parts while a seat is being adjusted
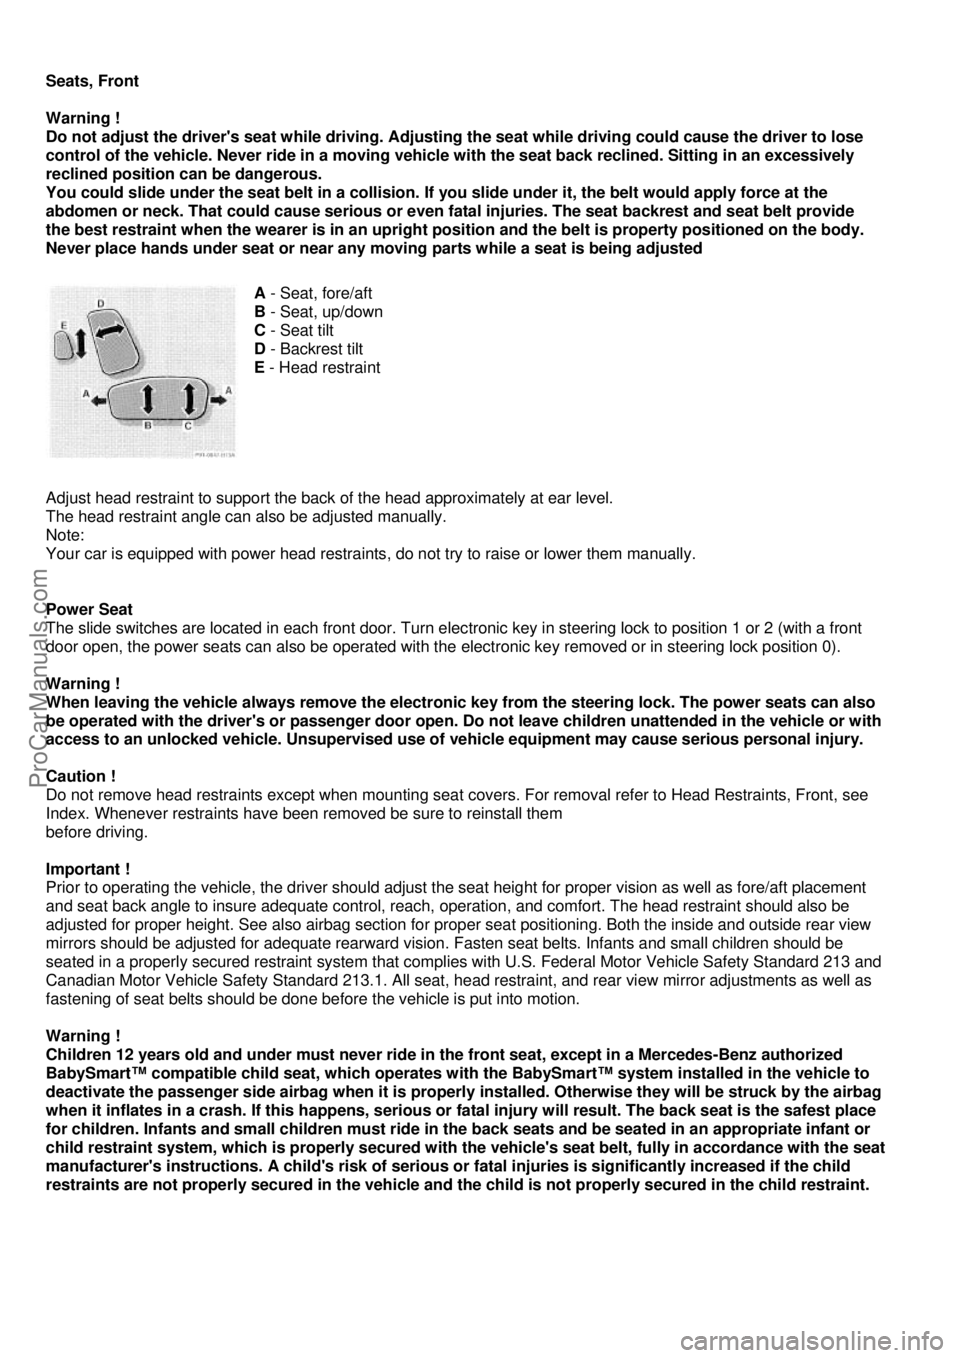
A - Seat, fore/aft
B - Seat, up/down
C - Seat tilt
D - Backrest tilt
E - Head restraint
Adjust head restraint to support the back of the head approximately at ear level.
The head restraint angle can also be adjusted manually.
Note:
Your car is equipped with power head restraints , do not try to raise or lower them manually.
Power Seat
The slide switches are located in each front door. Turn elec tronic key in steering lock to position 1 or 2 (with a front
door open, the power seats can also be operated with the electronic key removed or in steering lock position 0).
Warning !
When leaving the vehicle always remove the electronic key from the steering lock. The power seats can also
be operated with the driver's or passenger door open. Do not leave children unattended in the vehicle or with
access to an unlocked vehicle. Unsupervised use of vehicle equipment may cause serious personal injury.
Caution !
Do not remove head restraints except when mounting seat co vers. For removal refer to Head Restraints, Front, see
Index. Whenever restraints have been removed be sure to reinstall them
before driving.
Important !
Prior to operating the vehicle, the driv er should adjust the seat height for proper vision as well as fore/aft placement
and seat back angle to insure adequate control, reach, operation, and comfort. The head restraint should also be
adjusted for proper height. See also airbag section for prope r seat positioning. Both the inside and outside rear view
mirrors should be adjusted for adequate rearward vision. Fasten seat belts. Infants and small children should be
seated in a properly secured restraint system that complies with U.S. Federal Motor Vehicle Safety Standard 213 and
Canadian Motor Vehicle Safety Standard 213.1. All seat, head restraint, and rear view mirror adjustments as well as
fastening of seat belts should be done before the vehicle is put into motion.
Warning !
Children 12 years old and under must never ride in the front seat, except in a Mercedes-Benz authorized
BabySmart™ compatible child seat, which operates with the BabySmart™ system installed in the vehicle to
deactivate the passenger side airbag when it is properly installed. Otherwise they will be struck by the airbag
when it inflates in a crash. If this happens, serious or fatal injury will result. The back seat is the safest place
for children. Infants and small children must ride in the back seats and be seated in an appropriate infant or
child restraint system, which is properly secured with the vehicle's seat belt, fully in accordance with the seat
manufacturer's instructions. A child's risk of serious or fatal injuries is significantly increased if the child
restraints are not properly secured in the vehicle and the child is not properly secured in the child restraint.
ProCarManuals.com
Page 29 of 122

Heated Seats (optional)
The front seat heater switches are located in the center console. The front seat heaters
can be switched on with the electronic key in steering lock positions 1 or 2.
Press switch to turn on heater:
1. Normal heating mode. One indicator lamp in the switch lights up.
2. Rapid heating mode. Bo indicator lamps in the switch light up. After approximately
5 minutes in the rapid heating mode, the heater automatically witches to normal
operation and only one indicator lamp will stay on.
Turning off heater:
If one indicator lamp is on, press upper half of switch.
If both indicator lamps are on, press lower half of switch.
If left on, the heater automatically turns off after approximately 30 minutes of operation.
Note:
When in operation, the seat heater consumes a large amount of electrical power. It is not advisable to use the seat
heater longer than necessary. The seat heaters may automatically switch off if too many power consumers are
switched on at the same time, or if the battery charge is lo w. When this occurs, the indicator lamp in the switch will
blink (both indicator lamps blink during rapid seat heating) . The seat heaters will switch on again automatically as
soon as sufficient voltage is available. If the blinking of the indicator lamps is distracting to you, the seat heaters can
be switched off.
ProCarManuals.com
Page 44 of 122

Steering Lock
0 - The electronic key can be withdrawn in this position only. The steering is locked with the electronic key removed
from the steering lock. The electronic key an be removed only with the selector lever in position "P" and the foot
off the brake pedal. After removing the electronic key or with the electronic key in steering lock position 0, the
selector lever is locked in position "P".
1 - Steering is unlocked. (If necessary, move steering wheel s lightly to allow the electronic key to be turned clockwise
to position 1.) Most electrical consumers can be operated. For detailed information see respective subjects.
2 - Driving position.
3 - Starting position.
Refer to Index for Starting and turning off the engine.
Warning !
When leaving the vehicle always remove the electroni c key from the steering lock, and lock the vehicle.
Do not leave children unattended in the vehicle, or with access to an unlocked vehicle.
Unsupervised use of vehicle equipment may cause serious personal injury.
Important !
If the electronic key is left in the steering lock position 0 for an extended period of time, it can no longer be turned in
the lock. In this case, remove electron ic key from steering lock and reinsert.
Notes:
A warning sounds when the driver's door is opened with the el ectronic key in steering lock position 1 or 0. With the
engine at idle speed, the charging rate of the alternator (output) is limited. It is therefore recommended to turn off
unnecessary electrical consumers while driving in stop-and-go traffic. This precaution helps to avoid draining of the
battery. Unnecessary strain on the batte ry and charging system may be minimized by turning off the following power
consumers, for example: Heated seats, rear window defroster. In addition, the automatic climate air volume control
should be set to the lowest position. The steering lock can only be unlocked with the vehicle battery properly
connected.
Caution !
To prevent accelerated battery discharge and a possible dead battery, always remove the electronic key from the
steering lock. Do not leave the electronic key in steering lock position 0.
ProCarManuals.com
Page 55 of 122
Power Windows
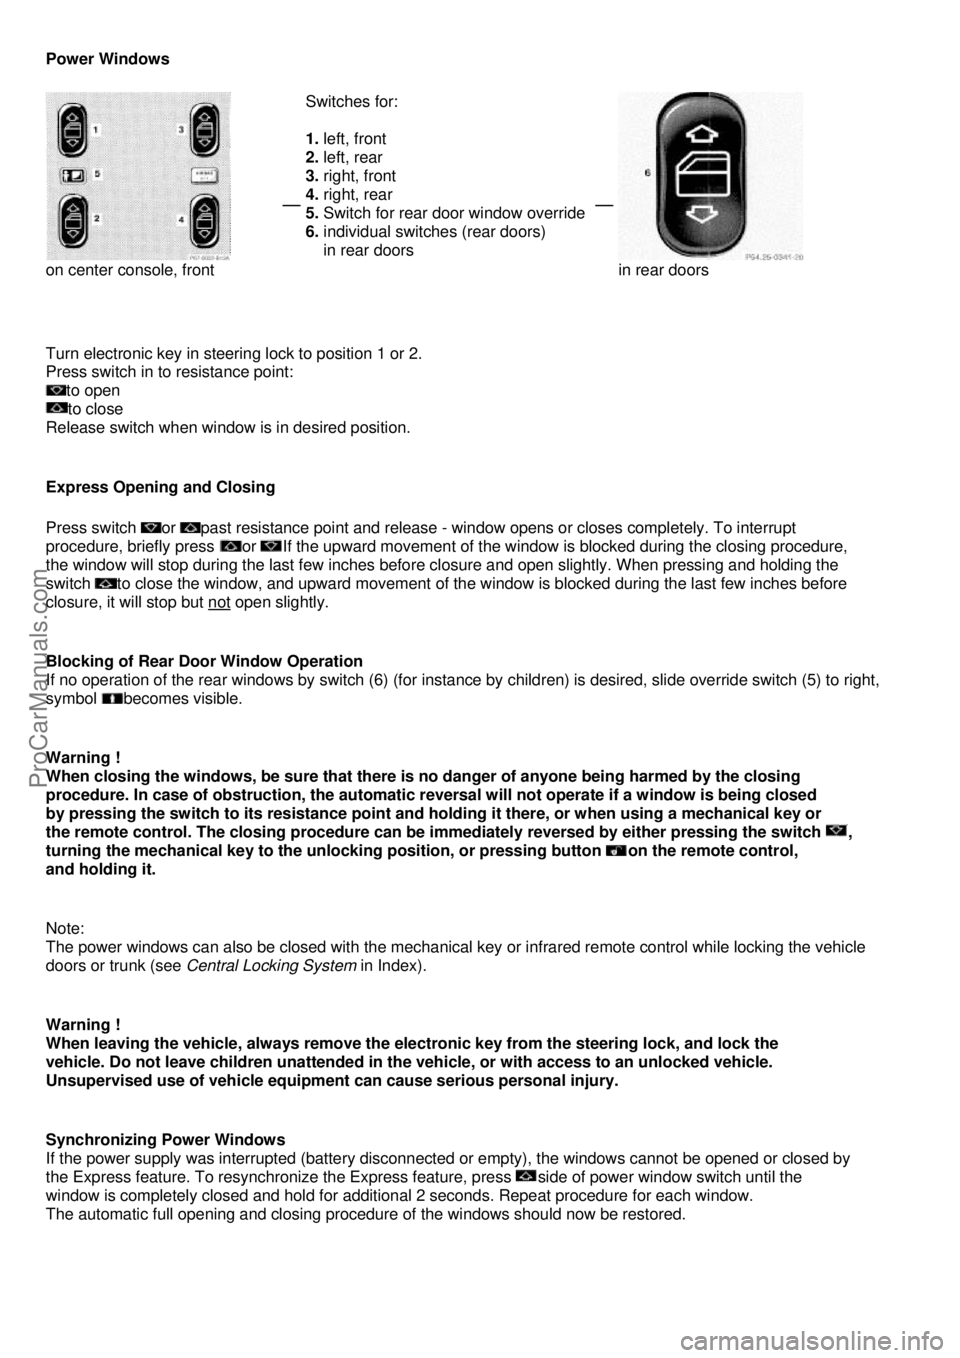
on center console, front
Switches for:
1.
left, front
2. left, rear
3. right, front
4. right, rear
5. Switch for rear door window override
6. individual switches (rear doors)
in rear doors
in rear doors
Turn electronic key in steering lock to position 1 or 2.
Press switch in to resistance point:
to open
to close
Release switch when window is in desired position.
Express Opening and Closing
Press switch or past resistance point and release - window opens or closes completely. To interrupt
procedure, briefly press
or If the upward movement of the window is blocked during the closing procedure,
the window will stop during the last few inches before closure and open slightly. When pressing and holding the
switch
to close the window, and upward movement of the wi ndow is blocked during the last few inches before
closure, it will stop but not
open slightly.
Blocking of Rear Door Window Operation
If no operation of the rear windows by switch (6) (for instance by children) is desired, slide override switch (5) to right,
symbol
becomes visible.
Warning !
When closing the windows, be sure that there is no danger of anyone being harmed by the closing
procedure. In case of obstruction, the automatic rever sal will not operate if a window is being closed
by pressing the switch to its resistance point and holdi ng it there, or when using a mechanical key or
the remote control. The closing procedure can be immediately reversed by either pressing the switch
,
turning the mechanical key to the unlocking position, or pressing button
on the remote control,
and holding it.
Note:
The power windows can also be closed with the mechanical ke y or infrared remote control while locking the vehicle
doors or trunk (see Central Locking System in Index).
Warning !
When leaving the vehicle, always remove the el ectronic key from the steering lock, and lock the
vehicle. Do not leave children unattended in the vehicle, or with access to an unlocked vehicle.
Unsupervised use of vehicle equipment can cause serious personal injury.
Synchronizing Power Windows
If the power supply was interrupted (battery disconnected or empty), the wi ndows cannot be opened or closed by
the Express feature. To resynchronize the Ex press feature, press
side of power window switch until the
window is completely closed and hold for additional 2 seconds. Repeat procedure for each window.
The automatic full opening and closing procedure of the windows should now be restored.
ProCarManuals.com
Page 63 of 122
Automatic Transmission
The automatic transmission selects individual gears automatically, dependent upon
• Selector lever position
• Program mode selector
• Accelerator position
• Vehicle speed
Important !
When parking the car or before working on the vehicle with the engine running, firmly depress the parking brake
pedal and shift the selector lever into "P".
Driving
The selector lever is automatically locked while in position "P". To move the selector lever out of position "P", the
service brake pedal must be firmly depressed before the shift lock will release. Shift selector lever to the desired
position only when the engine is idling normally and the service brake is applied. Do not release the brake until
ready to drive. The vehicle may otherwise start creeping when the selector lever is in drive or reverse position.
Warning !
It is dangerous to shift the selector lever out of "P" or "N" if the engine speed is higher than idle speed. If
your foot is not firmly on the brake pedal, the car could accelerate quickly forward or in reverse. You
could lose control of the car and hit someone or something. Only shift into gear when the engine is idling
normally and when your right foot is firmly on the brake pedal.
Important !
After selecting any driving position from "N" or "P", wait a moment to allow the gear to fully engage before
accelerating, especially when the engine is cold.
Accelerator Position
Partial throttle = early upshifting = normal acceleration
Full throttle = later upshifting = rapid acceleration
Kickdown (depressing the accelerator beyond full throttle) = downshifting to a lower gear = maximum acceleration.
Once the desired speed is attained, ease up on t he accelerator - the transmission shifts up again.
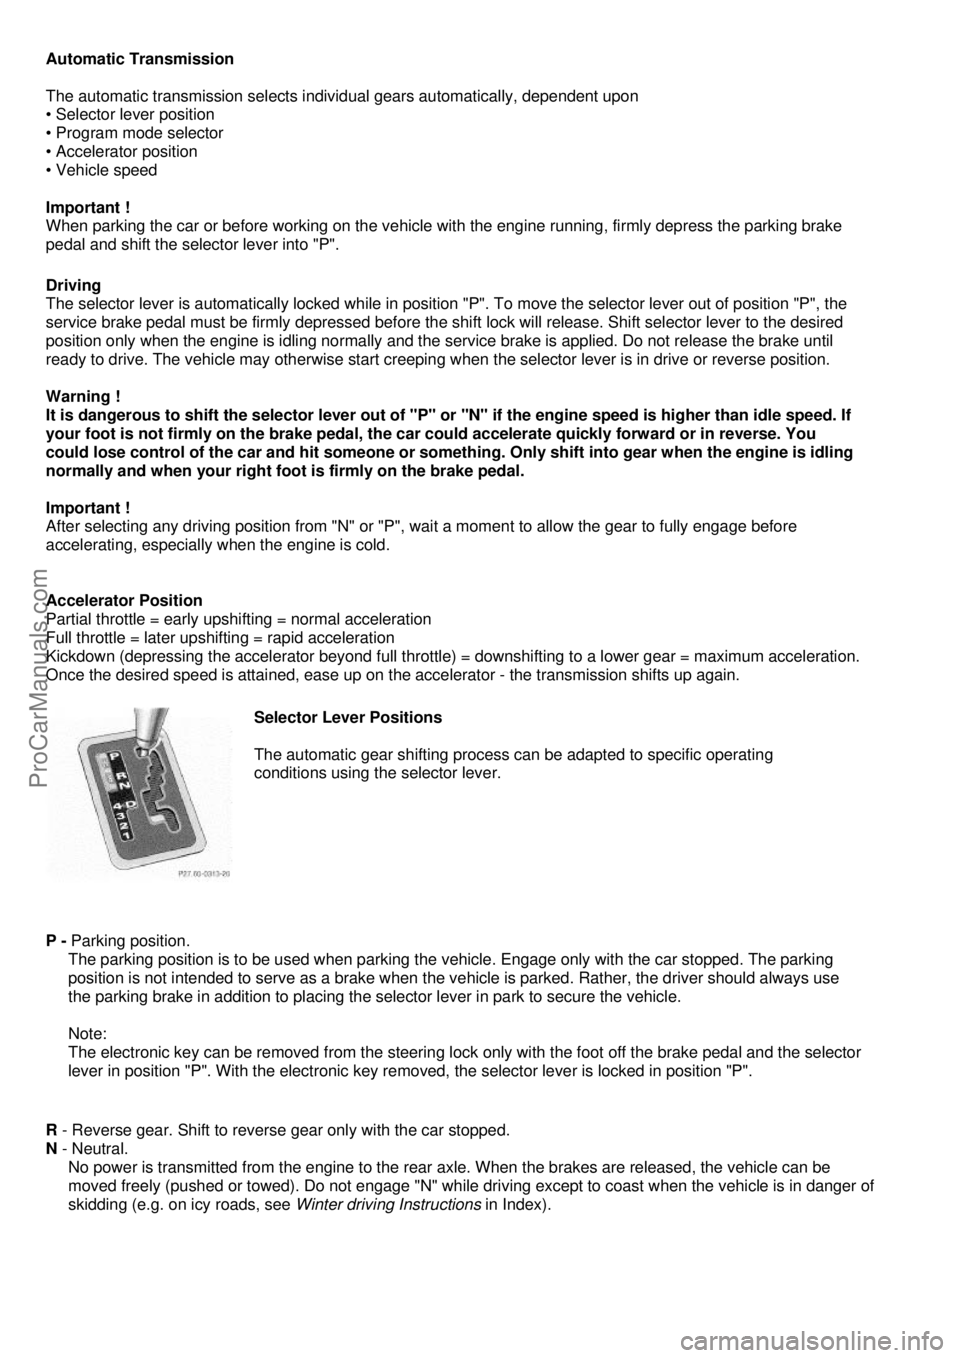
Selector Lever Positions
The automatic gear shifting process can be adapted to specific operating
conditions using the selector lever.
P - Parking position.
The parking position is to be used when parking t he vehicle. Engage only with the car stopped. The parking
position is not intended to serve as a brake when the vehicle is parked. Rather, the driver should always use
the parking brake in addition to placing the selector lever in park to secure the vehicle.
Note:
The electronic key can be removed from the steering lo ck only with the foot off the brake pedal and the selector
lever in position "P". With the electronic key removed, the selector lever is locked in position "P".
R - Reverse gear. Shift to reverse gear only with the car stopped.
N - Neutral.
No power is transmitted from the engine to the rear axle. When the brakes are released, the vehicle can be
moved freely (pushed or towed). Do not engage "N" while driving except to coast when the vehicle is in danger of
skidding (e.g. on icy roads, see Winter driving Instructions in Index).
ProCarManuals.com
Page 74 of 122

Brake Assist System (BAS)
Warning !
BAS cannot prevent the natural laws of physics from acting on the vehicle, nor can it increase braking
efficiency beyond that afforded by the condition of the vehicle brakes and tires or the traction afforded. The
BAS cannot prevent accidents, including those resulting from excessive speed in turns, following another
vehicle too closely, or aquaplaning. Only a safe, at tentive, and skillful driver can prevent accidents. The
capabilities of a BAS equipped car must never be explo ited in a reckless or dangerous manner which could
jeopardize the user's safety or the safety of others.
The Brake Assist System is designed to maximize the vehicle's braking capability during emergency braking
maneuvers by having maximum power boost applied to the br akes more quickly in emergency braking conditions
than might otherwise be afforded solely by the driver's braking style. This can help reduce braking distances over
what ordinary driving and braking style might do. The BAS complements the Antilock Brake System (ABS).
To receive the benefit of the system you must apply continuous full braking power during the stopping sequence. Do
not reduce brake pedal pressure.
Once the brake pedal is released, the BAS is deactivat ed The indicator lamps for the ASR and ESP are combined
with the BAS indicator lamp.
The BAS/ASR or BAS/ESP malfunction indicator lamp in the instrument cluster corne on with the electronic key in
steering lock position 2 and should go out with the engine running.
If the BAS/ASR or BAS/ESP malfunction indicator lamp co mes on permanently while the engine is running, a
malfunction has been detected in either system. As a result, it is possible that now only partial engine output will be
available, and pressing the accelerator pedal will require more effort. If the BAS malfunctions. The brake system
functions in the usual manner, but wi thout BAS. If the charging voltage falls be low 10 volts, the malfunction indicator
lamp comes on and the BAS is switched off. When the volt age is above this value again, the malfunction indicator
lamp should go out and the BAS is operational. With t he ABS malfunctioning, the BAS, ASR or ESP are also
switched off. Both malfunction indicator lamps come on with the engine running. Have the BAS, ASR or ESP checked
at your authorized Mercedes-Benz dealer as soon as possible .
ProCarManuals.com
Page 95 of 122

Battery
Warning !
Failure to follow these instructions can result in severe injury or death. Never lean over batteries while
connecting, you might get injured. Battery fluid contains sulfuric acid. Do not allow this fluid to come in
contact with eyes, skin or clothing. In case it does, immediately flush affected area with water and seek
medical help if necessary. A battery will also produ ce hydrogen gas, which is flammable and explosive.
Keep flames or sparks away from battery, avoid im proper connection of jumper cables, smoking etc..
Important !
Battery maintenance information:
The battery is located in the trunk under the trunk floor. The fluid level must be checked at every A and B service.
Always insure that the fluid level is at the specified maximum level and that only distilled water is used. Failure to
maintain proper fluid level may result in cell deterioration and possible battery rupture. The service life of the battery is
dependent on its condition of charge. The battery should alwa ys be kept sufficiently charged, in order to last an
optimum length of time.
Therefore, we strongly recommend that you have the battery charge checked frequently, and corrected if
necessary, especially if you use the vehicle less than approximately 200 miles (300 km) per month, mostly for
short distance trips, or if it is not used for long periods of time.
Only charge a battery with a battery charger after the battery has been disconnected from the vehicle electrical circuit.
Always disconnect the battery negative lead first and connect last. When removing and connecting the battery,
always make sure that all electrical consumers are off and the electronic key is in steering lock position 0. The battery
and its vent tube must always be securely installed when the car is in operation. While the engine is running the
battery terminal clamps must not be loosened or detached, otherwise the generator and other electronic components
would be damaged.
Note:
After reconnecting the battery al so resynchronize the Express feature of the power windows
(see Power Windows in Index).
Battery Recycling
Batteries contain materials that can harm the environment with improper disposal. Large 12 Volt storage batteries
contain lead. Recycling of batteries is the preferred method of disposal. Many states require sellers of batteries to
accept old batteries for recycling.
ProCarManuals.com