door lock MERCEDES-BENZ C-CLASS 1999 User Guide
[x] Cancel search | Manufacturer: MERCEDES-BENZ, Model Year: 1999, Model line: C-CLASS, Model: MERCEDES-BENZ C-CLASS 1999Pages: 122, PDF Size: 1.66 MB
Page 26 of 122

Seats, Front
Warning !
Do not adjust the driver's seat while driving. Adjusting the seat while driving could cause the driver to lose
control of the vehicle. Never ride in a moving vehicle with the seat back reclined. Sitting in an excessively
reclined position can be dangerous.
You could slide under the seat belt in a collision. If you slide under it, the belt would apply force at the
abdomen or neck. That could cause serious or even fatal injuries. The seat backrest and seat belt provide
the best restraint when the wearer is in an upright position and the belt is property positioned on the body.
Never place hands under seat or near any moving parts while a seat is being adjusted
A - Seat, fore/aft
B - Seat, up/down
C - Seat tilt
D - Backrest tilt
E - Head restraint
Adjust head restraint to support the back of the head approximately at ear level.
The head restraint angle can also be adjusted manually.
Note:
Your car is equipped with power head restraints , do not try to raise or lower them manually.
Power Seat
The slide switches are located in each front door. Turn elec tronic key in steering lock to position 1 or 2 (with a front
door open, the power seats can also be operated with the electronic key removed or in steering lock position 0).
Warning !
When leaving the vehicle always remove the electronic key from the steering lock. The power seats can also
be operated with the driver's or passenger door open. Do not leave children unattended in the vehicle or with
access to an unlocked vehicle. Unsupervised use of vehicle equipment may cause serious personal injury.
Caution !
Do not remove head restraints except when mounting seat co vers. For removal refer to Head Restraints, Front, see
Index. Whenever restraints have been removed be sure to reinstall them
before driving.
Important !
Prior to operating the vehicle, the driv er should adjust the seat height for proper vision as well as fore/aft placement
and seat back angle to insure adequate control, reach, operation, and comfort. The head restraint should also be
adjusted for proper height. See also airbag section for prope r seat positioning. Both the inside and outside rear view
mirrors should be adjusted for adequate rearward vision. Fasten seat belts. Infants and small children should be
seated in a properly secured restraint system that complies with U.S. Federal Motor Vehicle Safety Standard 213 and
Canadian Motor Vehicle Safety Standard 213.1. All seat, head restraint, and rear view mirror adjustments as well as
fastening of seat belts should be done before the vehicle is put into motion.
Warning !
Children 12 years old and under must never ride in the front seat, except in a Mercedes-Benz authorized
BabySmart™ compatible child seat, which operates with the BabySmart™ system installed in the vehicle to
deactivate the passenger side airbag when it is properly installed. Otherwise they will be struck by the airbag
when it inflates in a crash. If this happens, serious or fatal injury will result. The back seat is the safest place
for children. Infants and small children must ride in the back seats and be seated in an appropriate infant or
child restraint system, which is properly secured with the vehicle's seat belt, fully in accordance with the seat
manufacturer's instructions. A child's risk of serious or fatal injuries is significantly increased if the child
restraints are not properly secured in the vehicle and the child is not properly secured in the child restraint.
ProCarManuals.com
Page 35 of 122

BabySmart™ Airbag Deactivation System
Special child seats, designed for use with the Mercedes-Benz system and available at any
authorized Mercedes-Benz dealer are required for use with the BabySmart™ airbag deactivation
system. With the special child seat properly insta lled, the passenger front airbag will not deploy. The
indicator lamp located on the center console will be illuminated, except with electronic key
removed or in steering lock position 0. The system does not deactivate the door mounted side
impact airbag.
Warning !
The BabySmart™ Airbag Deactivation System will ONLY work with a special seat designed to
operate with it. It will not work with seats which are not BabySmart™ compatible. Never place
anything between seat cushion and child seat (e .g. pillow), since it reduces the effectiveness
of the deactivation system. Follow the manufacture r's instructions for installation of special
child seats. The passenger side front airbag will not deploy only if the
indicator lamp
remains illuminated. Please be sure to check the indicator every time you use the special
system child seat. Should the light go out while the restraint is installed, please check
installation. If the light remains out, do not use the BabySmart™ restraint to transport
children, or otherwise do not transport child restraints on the front passenger seat until the
system has been repaired.
Self-Test BabySmart™ Without Special Child Seat Installed
After turning electronic key in steering lock to position 1 or 2, the
indicator lamp located on
center console comes on for approx. 6 seconds.
If the lamp should not come on or is continuously li t, the system is not functioning. You must see an
authorized Mercedes-Benz dealer before using any child seat.
BabySmart is a trademark of Siemens Automotive Corp.
ProCarManuals.com
Page 38 of 122
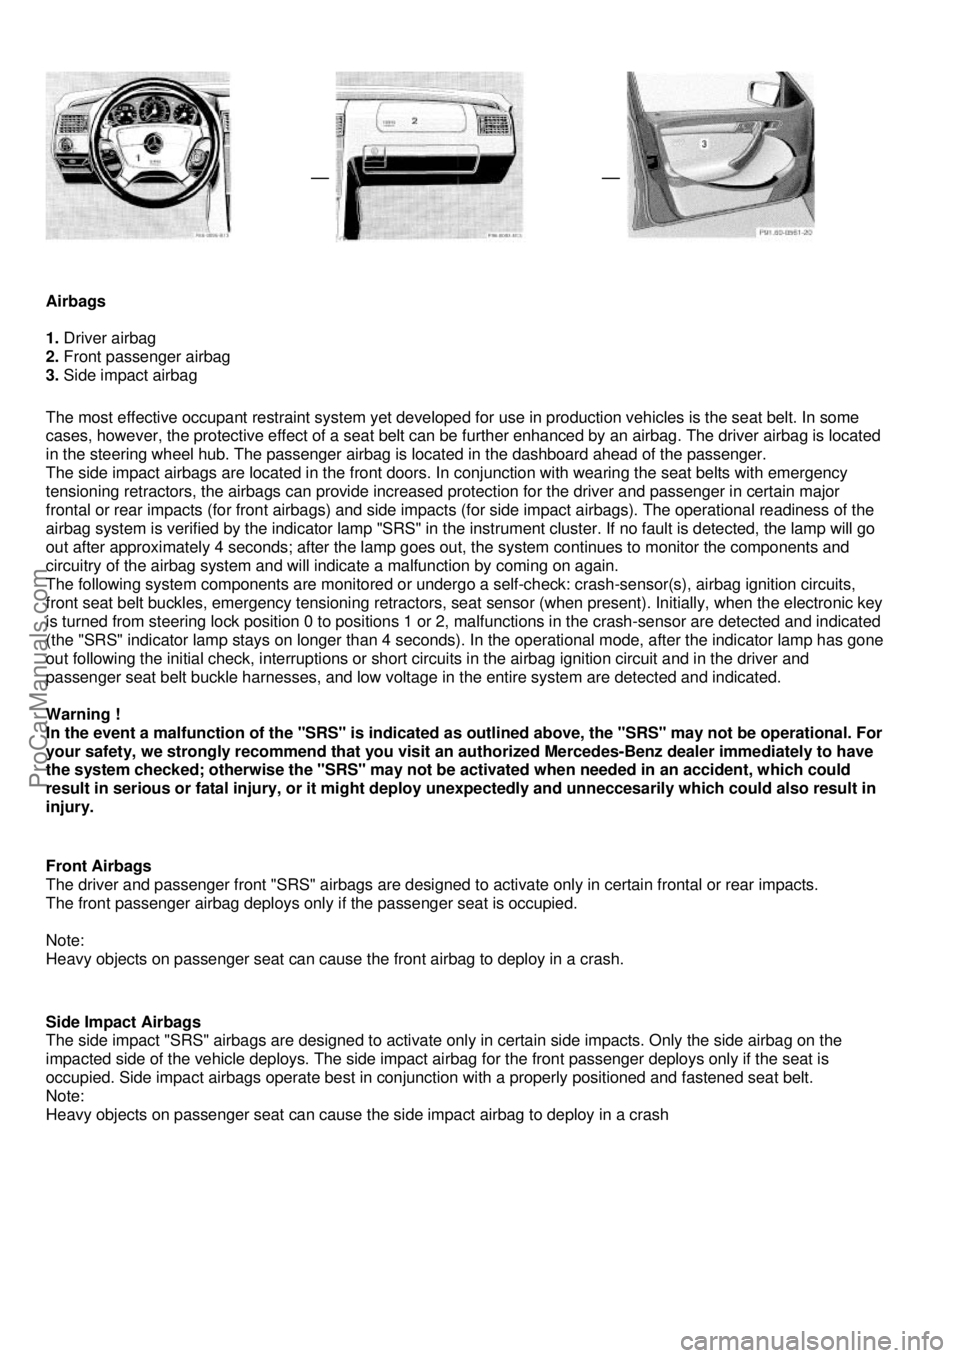
Airbags
1. Driver airbag
2. Front passenger airbag
3. Side impact airbag
The most effective occupant restraint system yet developed fo
r use in production vehicles is the seat belt. In some
cases, however, the protective effect of a seat belt can be further enhanced by an airbag. The driver airbag is located
in the steering wheel hub. The passenger airbag is located in the dashboard ahead of the passenger.
The side impact airbags are located in the front doors. In conjunction with wearing the seat belts with emergency
tensioning retractors, the airbags can provide increased protection for the driver and passenger in certain major
frontal or rear impacts (for front airbags) and side impacts (for side impact airbags). The operational readiness of the
airbag system is verified by the indicator lamp "SRS" in the instrument cluster. If no fault is detected, the lamp will go
out after approximately 4 seconds; after the lamp goes out, the system continues to monitor the components and
circuitry of the airbag system and will indicate a malfunction by coming on again.
The following system components are monitored or undergo a self-check: crash-sensor(s), airbag ignition circuits,
front seat belt buckles, emergency tensioning retractors, seat sensor (when present). Initially, when the electronic key
is turned from steering lock position 0 to positions 1 or 2, malfunctions in the crash-sensor are detected and indicated
(the "SRS" indicator lamp stays on longer than 4 seconds). In the operational mode, after the indicator lamp has gone
out following the initial check, interruptions or short circ uits in the airbag ignition circuit and in the driver and
passenger seat belt buckle harnesses, and low voltage in the entire system are detected and indicated.
Warning !
In the event a malfunction of the "SRS" is indicated as outlined above, the "SRS" may not be operational. For
your safety, we strongly recommend that you visit an authorized Mercedes-Benz dealer immediately to have
the system checked; otherwise the "SRS" may not be activated when needed in an accident, which could
result in serious or fatal injury, or it might deploy unexpectedly and unneccesarily which could also result in
injury.
Front Airbags
The driver and passenger front "SRS" airbags are designed to activate only in certain frontal or rear impacts.
The front passenger airbag deploys only if the passenger seat is occupied.
Note:
Heavy objects on passenger seat can cause the front airbag to deploy in a crash.
Side Impact Airbags
The side impact "SRS" airbags are designed to activate onl y in certain side impacts. Only the side airbag on the
impacted side of the vehicle deploys. The side impact ai rbag for the front passenger deploys only if the seat is
occupied. Side impact airbags operate best in conjunct ion with a properly positioned and fastened seat belt.
Note:
Heavy objects on passenger seat can cause the side impact airbag to deploy in a crash
ProCarManuals.com
Page 42 of 122

Loading instructions
(Vehicles with enlarged cargo area)
The total load weight including vehicle occupants and luggage/ cargo should not exceed the vehicle capacity weight
indicated on the certification tag which can be found on t he left door pillar. The handling characteristics of a fully
loaded vehicle depend greatly on the load distribution. It is therefore recommended to load the vehicle according to
the illustrations shown, with the heavie st items being placed towards the front of the vehicle. Always place items
being carried against front or rear seat backrests, and fast en them as securely as possible. The heaviest portion of
the cargo should always be kept as low as possible since it influences the handling characteristics of the vehicle.
Notes:
The trunk is the preferred place to carry objects. T he enlarged cargo area should only be used for items which
do not fit in the trunk alone.
Warning !
In an accident, during hard braking or sudden maneuvers, loose items will be thrown around inside the
vehicle, and can cause injury to vehicle occupants unless the items are securely fastened in the vehicle.
To help avoid personal injury during a collision or sudden maneuver, exercise care when stowing things.
Put luggage or cargo in the trunk if possible. Do not pile luggage or cargo higher than the seat backs.
Do not place anything on the shelf below the rear window. Never drive vehicle with trunk lid open while
pass-through is not closed and seat backrest not locked in its upright position. Deadly carbon monoxide
(CO) gases may enter vehicle interior resulting in unconsciousness and death.
ProCarManuals.com
Page 44 of 122

Steering Lock
0 - The electronic key can be withdrawn in this position only. The steering is locked with the electronic key removed
from the steering lock. The electronic key an be removed only with the selector lever in position "P" and the foot
off the brake pedal. After removing the electronic key or with the electronic key in steering lock position 0, the
selector lever is locked in position "P".
1 - Steering is unlocked. (If necessary, move steering wheel s lightly to allow the electronic key to be turned clockwise
to position 1.) Most electrical consumers can be operated. For detailed information see respective subjects.
2 - Driving position.
3 - Starting position.
Refer to Index for Starting and turning off the engine.
Warning !
When leaving the vehicle always remove the electroni c key from the steering lock, and lock the vehicle.
Do not leave children unattended in the vehicle, or with access to an unlocked vehicle.
Unsupervised use of vehicle equipment may cause serious personal injury.
Important !
If the electronic key is left in the steering lock position 0 for an extended period of time, it can no longer be turned in
the lock. In this case, remove electron ic key from steering lock and reinsert.
Notes:
A warning sounds when the driver's door is opened with the el ectronic key in steering lock position 1 or 0. With the
engine at idle speed, the charging rate of the alternator (output) is limited. It is therefore recommended to turn off
unnecessary electrical consumers while driving in stop-and-go traffic. This precaution helps to avoid draining of the
battery. Unnecessary strain on the batte ry and charging system may be minimized by turning off the following power
consumers, for example: Heated seats, rear window defroster. In addition, the automatic climate air volume control
should be set to the lowest position. The steering lock can only be unlocked with the vehicle battery properly
connected.
Caution !
To prevent accelerated battery discharge and a possible dead battery, always remove the electronic key from the
steering lock. Do not leave the electronic key in steering lock position 0.
ProCarManuals.com
Page 47 of 122

Exterior Lamp Switch
Off
Parking lamps (also side marker lamps, taillamps, license plate lamps, instrument panel lamps)
Canada only: When the engine is running, the low beam is additionally switched on.
Parking lamps plus low beam or high beam headlamps (combination switch pushed forward).
Standing lamps, right (turn left one stop).
Standing lamps, left (turn left two stops).
Front fog lamps (pull out one stop) with parking and/or head lamps on.
Rear fog lamp (pull out to 2nd detent) in addition to fog lamps Indicator lamp in lamp switch comes on.
Standing Lamps
When the vehicle is parked on the stre et the standing lamps (right or left side parking lamps) can be turned on,
making the vehicle more visible to passing vehicles The standing lamps cannot be operated with the key in
steering lock position 2
Note:
With the key removed and a front door open, a warnin g sounds if the vehicle's exterior lamps (except
standing lamps) are not switched off. Fog lamps will oper ate with the parking lamps and the low or high
beam headlamps Fog lamps should only be used in conjunction with low beam headlamps
Consult your State or Province Motor Vehicle Regulati ons regarding allowable lamp operation. Fog lamps are
automatically switched off when the exte rior lamp switch is turned to position
Daytime Running Lamps
Canada only
When the engine is running and the selector lever is in a driving position, the low beam (includes parking lamps, side
marker lamps, taillamps and licen se plate lamps) are automatically switched on. When shifting from a driving position
to position "N" or "P", the low beam switches off (2 seconds delay)
For nighttime driving the exterior lamp switch should be turned to position
to permit activation of the high beam
headlamps
ProCarManuals.com
Page 48 of 122

Night Security Illumination
(Vehicles with Antitheft AlarmSystem)
When exiting the vehicle after driving with the exterior lamps on, they switch on again for added illumination for
approximately 30 seconds after closing the last door. The lamp-on time period can be changed at your
Mercedes-Benz dealer.
Inside Rear View Mirror
Manually adjust the mirror.
Use your inside mirror to determine the size and distan ce of objects seen in the passenger side convex mirror.
Antiglare Night Position
With the electronic key in steering lock position 2, the mirror reflection brightness responds to changes in light
sensitivity. With gear selector lever in position "R", or wi th the interior lamp switched on, the mirror brightness does
not respond to changes in light sensitivity.
Note:
The automatic antiglare function is restricted, if incoming light is not aimed directly at sensors in the mirror.
ProCarManuals.com
Page 52 of 122

Interior Lighting
1. Door contact switch:
Press once and interior lamps are switched on when opening a door. Interior lamps are switched on,
and off (soft fade) delayed, when unlocking or locking the vehicle, or when opening or closing a door.
However, there will be no (soft fade) delay when the electronic key is in steering lock position 2
Press again and interior lamps remain switc hed off, even when centrally unlocking or opening a door.
2. Press to switch interior and reading lamps on or off.
3. Press to switch rear passenger compartment lamp on or off.
4. Press to switch reading lamp on or off.
ProCarManuals.com
Page 54 of 122

Sliding/Pop-Up Roof (optional)
1. to slide roof open
2. to slide roof closed
3. to raise roof at rear
4. to lower roof at rear
Turn electronic key in steering lock to position 1 or 2. The switch is illuminated when the exterior lamps are
switched on (except standing lamps). With the roof clos ed or tilted open, a screen can be slid into the roof
opening to guard against sun rays. When sliding the roof open, the screen will also retract.
Warning !
When closing the sliding/ pop-up roof, be sure that there is no danger of anyone being harmed by
the closing procedure.
Notes:
The sliding/pop-up roof can be opened or closed manually should an electrical malfunction occur, refer to
Emergency Operation in Index. The sliding/pop-up roof can also be closed with the mechanical key or
infrared remote control while locking the vehicle door s or trunk (see Central Locking System in Index).
ProCarManuals.com
Page 55 of 122
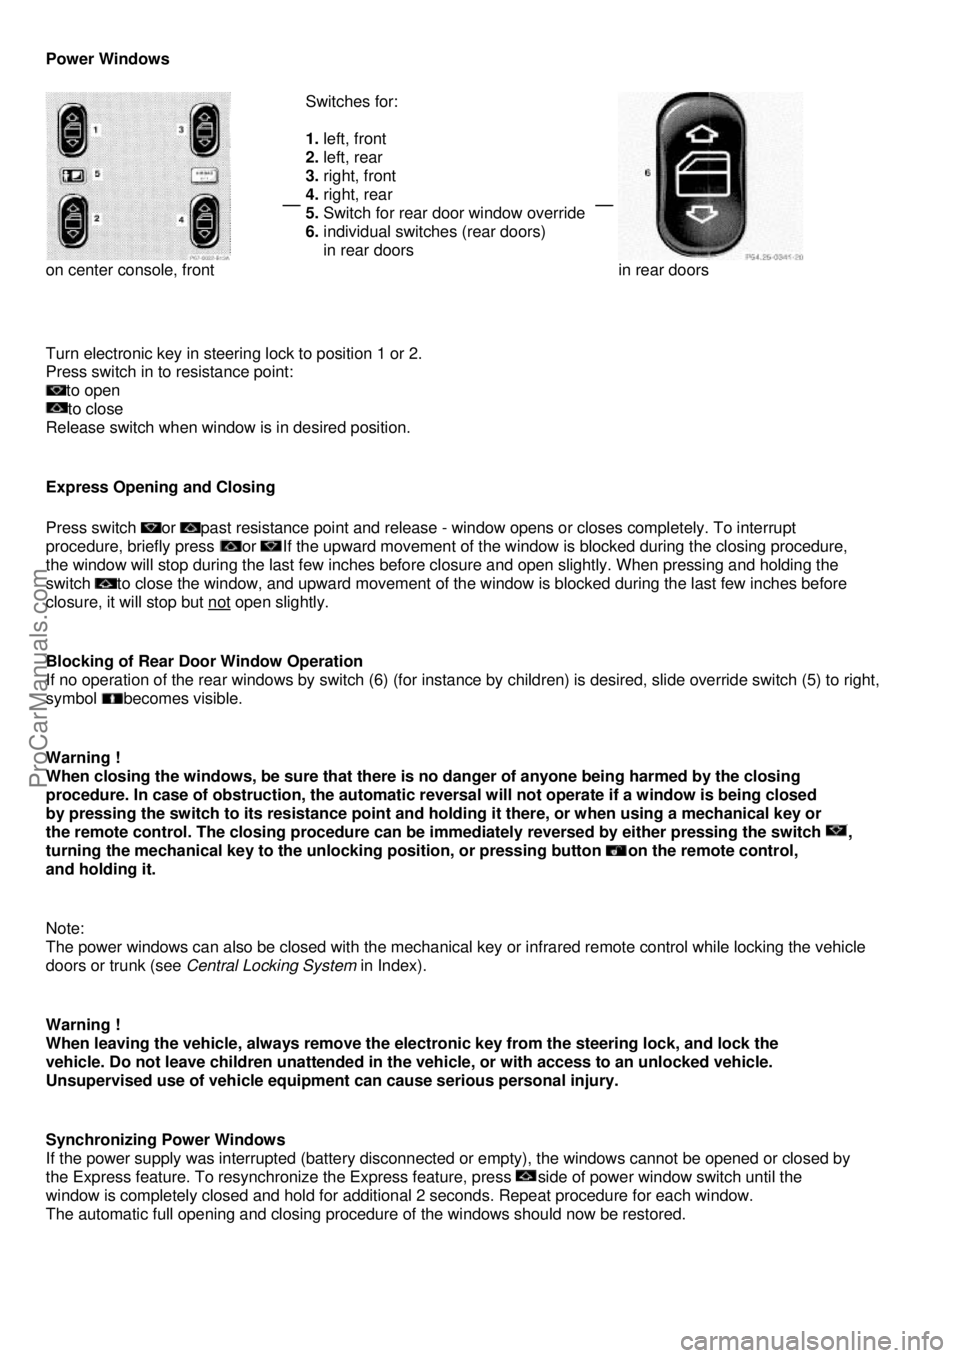
Power Windows
on center console, front
Switches for:
1.
left, front
2. left, rear
3. right, front
4. right, rear
5. Switch for rear door window override
6. individual switches (rear doors)
in rear doors
in rear doors
Turn electronic key in steering lock to position 1 or 2.
Press switch in to resistance point:
to open
to close
Release switch when window is in desired position.
Express Opening and Closing
Press switch or past resistance point and release - window opens or closes completely. To interrupt
procedure, briefly press
or If the upward movement of the window is blocked during the closing procedure,
the window will stop during the last few inches before closure and open slightly. When pressing and holding the
switch
to close the window, and upward movement of the wi ndow is blocked during the last few inches before
closure, it will stop but not
open slightly.
Blocking of Rear Door Window Operation
If no operation of the rear windows by switch (6) (for instance by children) is desired, slide override switch (5) to right,
symbol
becomes visible.
Warning !
When closing the windows, be sure that there is no danger of anyone being harmed by the closing
procedure. In case of obstruction, the automatic rever sal will not operate if a window is being closed
by pressing the switch to its resistance point and holdi ng it there, or when using a mechanical key or
the remote control. The closing procedure can be immediately reversed by either pressing the switch
,
turning the mechanical key to the unlocking position, or pressing button
on the remote control,
and holding it.
Note:
The power windows can also be closed with the mechanical ke y or infrared remote control while locking the vehicle
doors or trunk (see Central Locking System in Index).
Warning !
When leaving the vehicle, always remove the el ectronic key from the steering lock, and lock the
vehicle. Do not leave children unattended in the vehicle, or with access to an unlocked vehicle.
Unsupervised use of vehicle equipment can cause serious personal injury.
Synchronizing Power Windows
If the power supply was interrupted (battery disconnected or empty), the wi ndows cannot be opened or closed by
the Express feature. To resynchronize the Ex press feature, press
side of power window switch until the
window is completely closed and hold for additional 2 seconds. Repeat procedure for each window.
The automatic full opening and closing procedure of the windows should now be restored.
ProCarManuals.com