door MERCEDES-BENZ C-Class 2011 W204 Owner's Guide
[x] Cancel search | Manufacturer: MERCEDES-BENZ, Model Year: 2011, Model line: C-Class, Model: MERCEDES-BENZ C-Class 2011 W204Pages: 320, PDF Size: 13.17 MB
Page 88 of 320
XPull on the corresponding switch on the
door control panel until the side window is
completely closed ( Y page 84).XHold the switch for an additional second.
If the side window opens again slightly:
XPull the corresponding switch again
immediately and hold it for approximately
one second.
Problems with the side windows
Problem: a side window cannot be closed
because objects are trapped between the
side window and the door frame.
XRemove the objects.XClose the side window.
Problem: a side window cannot be closed
because objects in the guide rail are
preventing the window from being raised.
XRemove the objects.XClose the side window.
Problem: a side window cannot be closed,
and you cannot see the cause.
GWarning!
Closing the side windows with increased force
or without the anti-entrapment feature could
lead to serious or even fatal injury. Make sure
that nobody can become trapped when
closing the side windows.
If a side window is obstructed during closing
and reopens again slightly:
XImmediately after the window blocks, pull
on the corresponding switch again until the
side window has closed.
The side window is closed with increased
force.If a side window is obstructed again during
closing and reopens again slightly:XImmediately after the window blocks, pull
on the corresponding switch again until the
side window has closed.
The side window is closed without the anti-
entrapment feature.GWarning!
Pulling and holding the switch to close the
door window immediately after it had been
blocked two times will cause the door window
to close without the anti-entrapment feature
for as long as you hold the switch.
Sliding sunroof
Important safety notes
GWarning!
When leaving the vehicle, always remove the
SmartKey from the starter switch. Always
take the SmartKey with you and lock the
vehicle. Do not leave children unattended in
the vehicle, even if they are secured in a child
restraint system, or with access to an
unlocked vehicle. A child's unsupervised
access to a vehicle could result in an accident
and/or serious personal injury. The children
could
R injure themselves on parts of the vehicle
R be seriously or fatally injured through
excessive exposure to extreme heat or cold
R injure themselves or cause an accident with
vehicle equipment that can be operated
even if the SmartKey is removed from the
starter switch or removed from the vehicle,
such as seat adjustment, steering wheel
adjustment, or the memory function
If children open a door, they could injure other
persons or get out of the vehicle and injure
themselves or be injured by following traffic.
Do not expose the child restraint system to
direct sunlight. The child restraint system's
metal parts, for example, could become very
86Sliding sunroofOpening and closing
BA 204 USA, CA Edition A 2011; 1; 5, en-UShereepeVersion: 3.0.3.62010-05-20T09:17:30+02:00 - Seite 86
Page 90 of 320
qualified specialist workshop, e.g. an
authorized Mercedes-Benz Center.
! Do not forget that the weather can
change abruptly. Make certain that the
sliding sunroof is closed when you leave the
vehicle. The vehicle electronics can be
damaged if water enters the vehicle
interior.
i Resonance noises can occur in addition
to the usual airflow noises when the sliding
sunroof is open. They are caused by minor
pressure fluctuations in the vehicle interior.
Change the position of the sliding sunroof
or open a side window slightly to reduce or
eliminate these noises.
Operating the tilt/sliding sunroof
Opening and closing
i You can still operate the tilt/sliding
sunroof even if you switch off the engine or
remove the SmartKey. This function
remains active for five minutes or until one
of the front doors is opened.
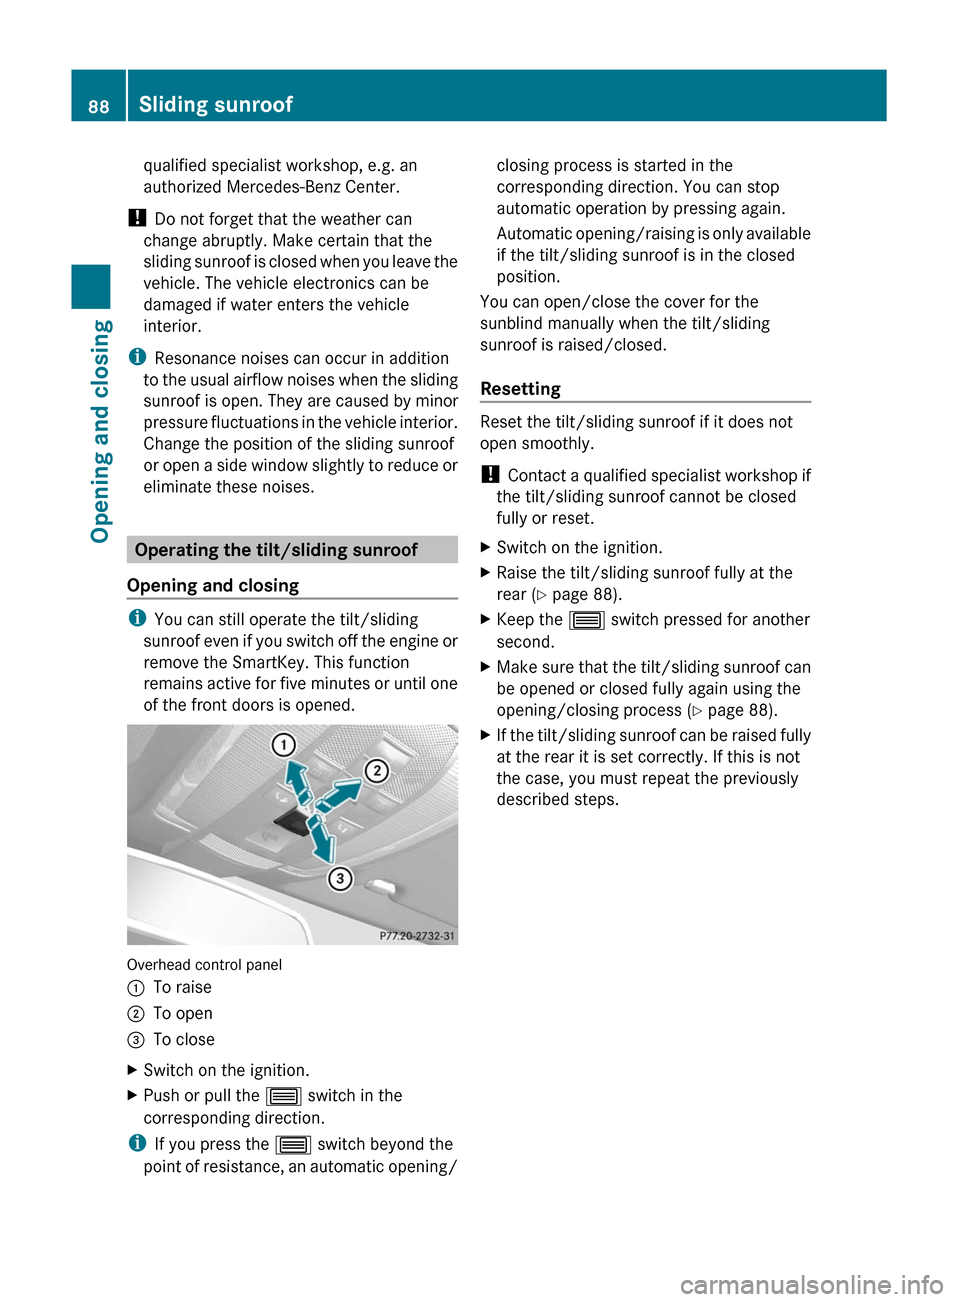
Overhead control panel
:To raise;To open=To closeXSwitch on the ignition.XPush or pull the 3 switch in the
corresponding direction.
i If you press the 3 switch beyond the
point of resistance, an automatic opening/
closing process is started in the
corresponding direction. You can stop
automatic operation by pressing again.
Automatic opening/raising is only available
if the tilt/sliding sunroof is in the closed
position.
You can open/close the cover for the
sunblind manually when the tilt/sliding
sunroof is raised/closed.
Resetting
Reset the tilt/sliding sunroof if it does not
open smoothly.
! Contact a qualified specialist workshop if
the tilt/sliding sunroof cannot be closed
fully or reset.
XSwitch on the ignition.XRaise the tilt/sliding sunroof fully at the
rear ( Y page 88).XKeep the 3 switch pressed for another
second.XMake sure that the tilt/sliding sunroof can
be opened or closed fully again using the
opening/closing process ( Y page 88).XIf the tilt/sliding sunroof can be raised fully
at the rear it is set correctly. If this is not
the case, you must repeat the previously
described steps.88Sliding sunroofOpening and closing
BA 204 USA, CA Edition A 2011; 1; 5, en-UShereepeVersion: 3.0.3.62010-05-20T09:17:30+02:00 - Seite 88
Page 96 of 320
Do not drive the vehicle without the seat head
restraints. Head restraints are intended to
help reduce injuries during an accident.
! To avoid damage to the seats and the seat
heating, observe the following information:
Rdo not spill any liquids on the seats. If
liquid is spilled on the seats, dry them as
soon as possible.
Rif the seat covers are damp or wet, do not
switch on the seat heating. The seat
heating should also not to be used to dry
the seats.
Rclean the seat covers as recommended;
see the " Interior care" section.
Rdo not transport heavy loads on the
seats. Do not place sharp objects on the
seat cushions, e.g. knives, nails or tools.
The seats should only be occupied by
passengers, if possible.
Rwhen the seat heating is in operation, do
not cover the seats with insulating
materials, e.g. covers, bags, seat covers,
child seats or booster seats.
! When you move the seats, make sure that
there are no objects in the footwell or
behind the seats. Otherwise, you could
damage the seats and the objects.
iThe head restraints in the front seats are
installed with the NECK-PRO system
(Y page 49). For this reason, it is not
possible to remove the head restraints
from the front seats.
Vehicles without the through-loading
feature: the head restraints cannot be
removed from the rear compartment seats.
Please contact an authorized Mercedes-
Benz Center for more information.
iRelated topics:
RThrough-loading feature in the rear
bench seat (Y page 218)
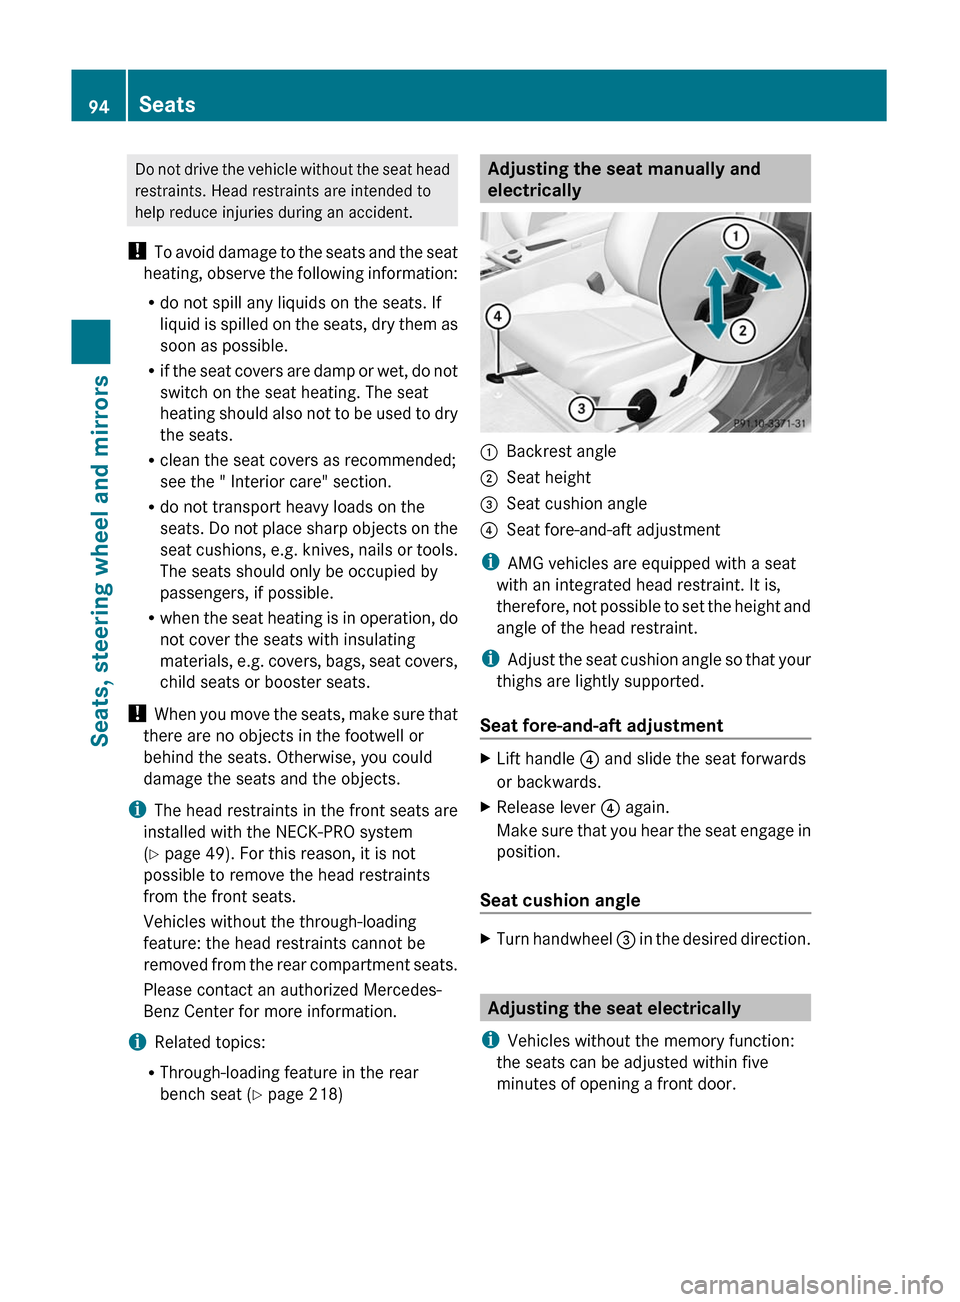
Adjusting the seat manually and
electrically
:Backrest angle;Seat height=Seat cushion angle?Seat fore-and-aft adjustment
iAMG vehicles are equipped with a seat
with an integrated head restraint. It is,
therefore, not possible to set the height and
angle of the head restraint.
iAdjust the seat cushion angle so that your
thighs are lightly supported.
Seat fore-and-aft adjustment
XLift handle ? and slide the seat forwards
or backwards.
XRelease lever ? again.
Make sure that you hear the seat engage in
position.
Seat cushion angle
XTurn handwheel = in the desired direction.
Adjusting the seat electrically
iVehicles without the memory function:
the seats can be adjusted within five
minutes of opening a front door.
94SeatsSeats, steering wheel and mirrors
BA 204 USA, CA Edition A 2011; 1; 5, en-UShereepeVersion: 3.0.3.62010-05-20T09:17:30+02:00 - Seite 94
Page 97 of 320
The time span starts over if, within these
five minutes, you:
Ropen or close a front door
Rinsert the key into or remove the key
from the ignition lock
Rswitch the ignition on or off.
If the key is in position 2 in the ignition, you
can adjust the seats at any time.
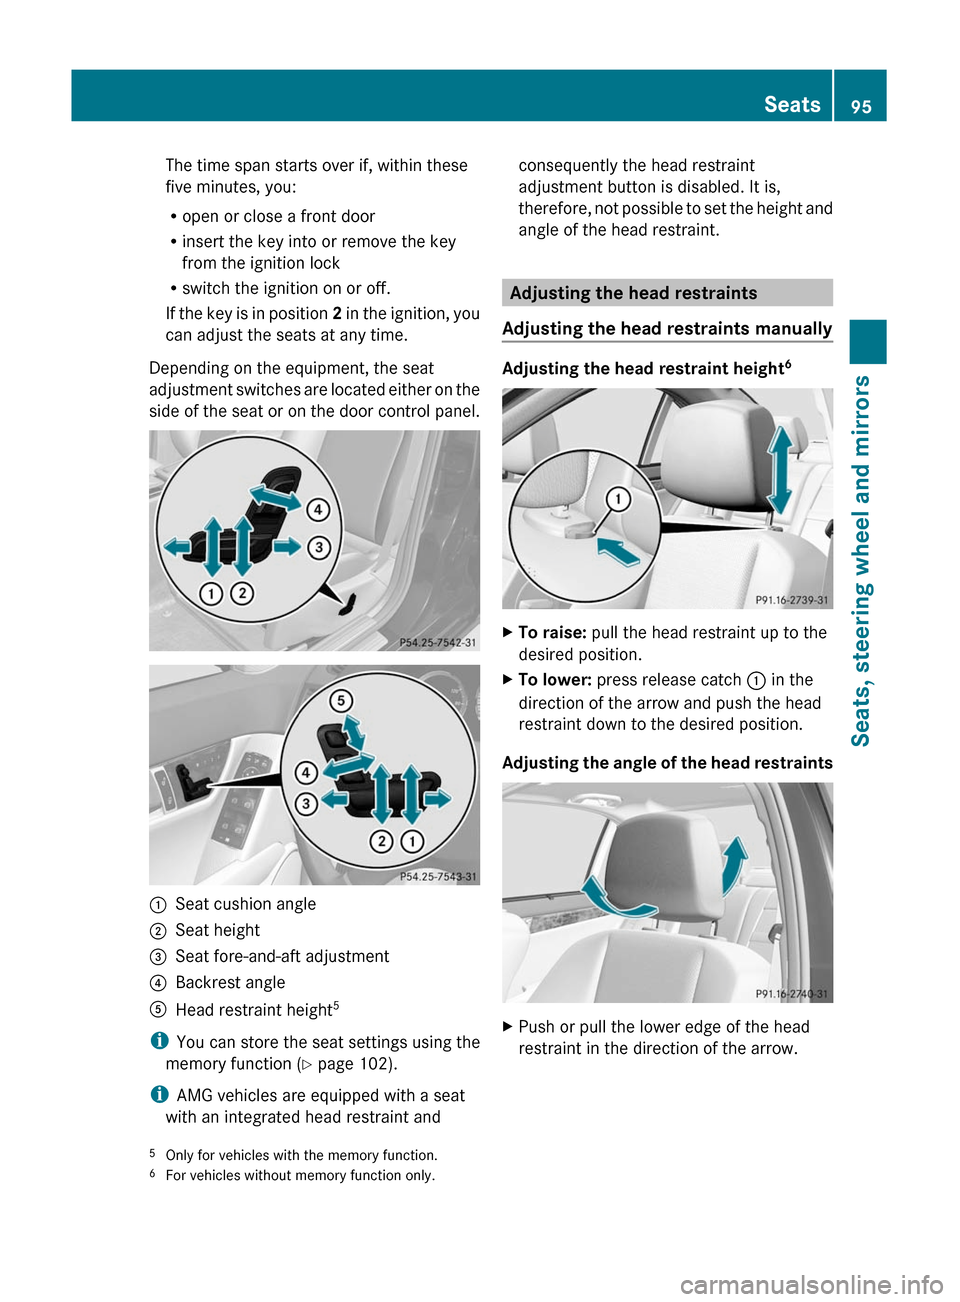
Depending on the equipment, the seat
adjustment switches are located either on the
side of the seat or on the door control panel.
:Seat cushion angle;Seat height=Seat fore-and-aft adjustment?Backrest angleAHead restraint height5
iYou can store the seat settings using the
memory function (Y page 102).
iAMG vehicles are equipped with a seat
with an integrated head restraint and
consequently the head restraint
adjustment button is disabled. It is,
therefore, not possible to set the height and
angle of the head restraint.
Adjusting the head restraints
Adjusting the head restraints manually
Adjusting the head restraint height6
XTo raise: pull the head restraint up to the
desired position.
XTo lower: press release catch : in the
direction of the arrow and push the head
restraint down to the desired position.
Adjusting the angle of the head restraints
XPush or pull the lower edge of the head
restraint in the direction of the arrow.5Only for vehicles with the memory function.6For vehicles without memory function only.
Seats95Seats, steering wheel and mirrorsBA 204 USA, CA Edition A 2011; 1; 5, en-UShereepeVersion: 3.0.3.62010-05-20T09:17:30+02:00 - Seite 95Z
Page 101 of 320
iRelated topics:
R EASY-ENTRY/EXIT feature
( Y page 99)
R storing settings ( Y page 102)
EASY-ENTRY/EXIT
GWarning!
You must make sure no one can become
trapped or injured by the moving steering
wheel when the easy-entry/exit feature is
activated.
To stop steering wheel movement, move
steering wheel adjustment stalk or press the
memory position switch.
Do not leave children unattended in the
vehicle, or with access to an unlocked vehicle.
Children could open the driver's door and
unintentionally activate the easy-entry/exit
feature, which could result in an accident
and/or serious personal injury.
The EASY-ENTRY/EXIT feature makes getting
in and out of your vehicle easier.
The steering wheel swings upwards when
you:
R remove the key from the ignition lock.
R open the driver's door and KEYLESS-GO is
in position 1
R open the driver's door and the key is in
position 0 or 1 in the ignition lock.
i The steering wheel only moves upwards if
it has not already reached the upper end
stop.
The steering wheel is moved to the last
selected position when:
R the driver's door is closed, and
R you insert the key into the ignition lock.
or
R in vehicles with KEYLESS-GO, you press the
Start/Stop button once.
When you close the driver's door with the
ignition switched on, the steering wheel is
also automatically moved to the previously
set position.
The last position of the steering wheel is
stored when you switch off the ignition or
when you store the setting with the memory
function ( Y page 102).
You can activate and deactivate the EASY-
ENTRY/EXIT feature in the on-board
computer ( Y page 181).GWarning
Let the system complete the adjustment
procedure before setting the vehicle in
motion. All steering wheel adjustment must
be completed before setting the vehicle in
motion. Driving off with the steering wheel
still adjusting could cause the driver to lose
control of the vehicle.
i If the crash-responsive EASY-EXIT feature
is triggered in an accident, the steering
column will move upwards when the
driver's door is opened. This occurs
irrespective of the position of the key in the
ignition lock. This makes it easier to exit the
vehicle and rescue the occupants.
The crash-responsive EASY-EXIT feature is
only operational after an accident if the
EASY-EXIT/ENTRY feature is activated in
the on-board computer.
Mirrors
Rear-view mirror
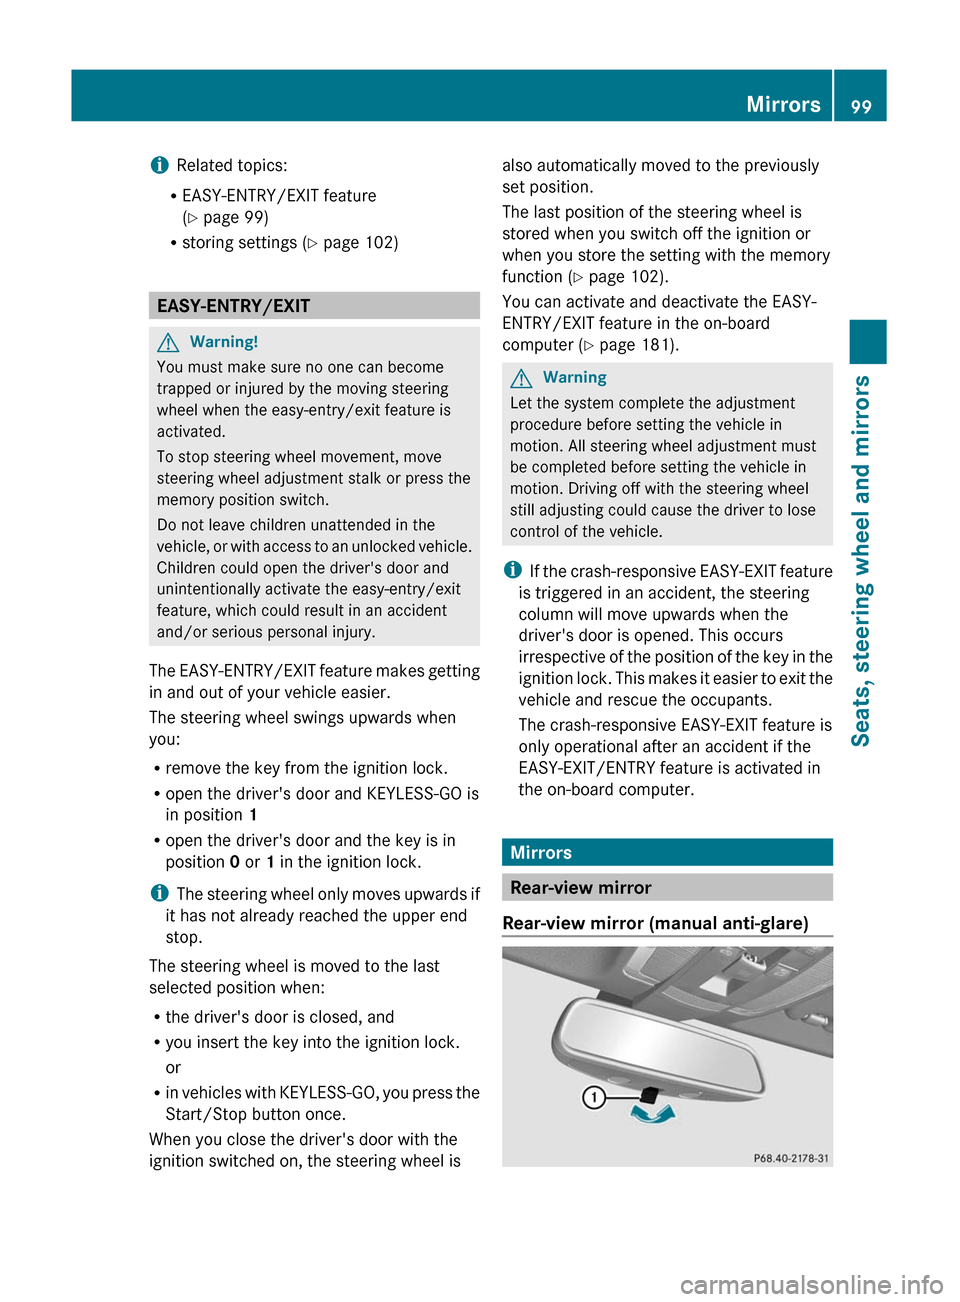
Rear-view mirror (manual anti-glare)
Mirrors99Seats, steering wheel and mirrorsBA 204 USA, CA Edition A 2011; 1; 5, en-UShereepeVersion: 3.0.3.62010-05-20T09:17:30+02:00 - Seite 99Z
Page 103 of 320
Folding the exterior mirrors in or out
automatically
This function is only available in vehicles for
Canada.
If the "Fold in mirrors when locking" function
is activated in the on-board computer
(Y page 182):
Rthe exterior mirrors fold in automatically as
soon as you lock the vehicle from the
outside.
Rthe exterior mirrors fold out again
automatically as soon as you unlock the
vehicle and then open the driver's or front-
passenger door.
iThe mirrors do not fold out if they have
been folded in manually.
Exterior mirror out of position
If an exterior mirror has been pushed out of
position, proceed as follows:
X Vehicles without electrically folding
exterior mirrors: move the exterior mirror
into the correct position manually.
XVehicles with electrically folding
exterior mirrors (only vehicles for
Canada): press the mirror-folding button
(Y page 100) repeatedly until you hear the
mirror engage in position.
The mirror housing is engaged again and
you can adjust the exterior mirrors as usual
(Y page 100).
Automatic anti-glare mirrors
GWarning!
The auto dimming function does not react if
incoming light is not aimed directly at sensors
in the interior rear view mirror.
The interior rear view mirror and the exterior
rear view mirror on the driver's side do not
react, for example, if the rear window
sunshade is in raised position.
Light hitting the mirror(s) at certain angles
(incident light) could blind you. As a result,
you may not be able to observe traffic
conditions and could cause an accident.
The rear-view mirror and the exterior mirror
on the driver's side automatically go into anti-
glare mode if the ignition is switched on and
incident light from headlamps strikes the
sensor in the rear-view mirror.
The mirrors do not go into anti-glare mode if
reverse gear is engaged or the interior lighting
is switched on.
Parking position for the exterior
mirror on the front-passenger side
Setting and storing the parking position
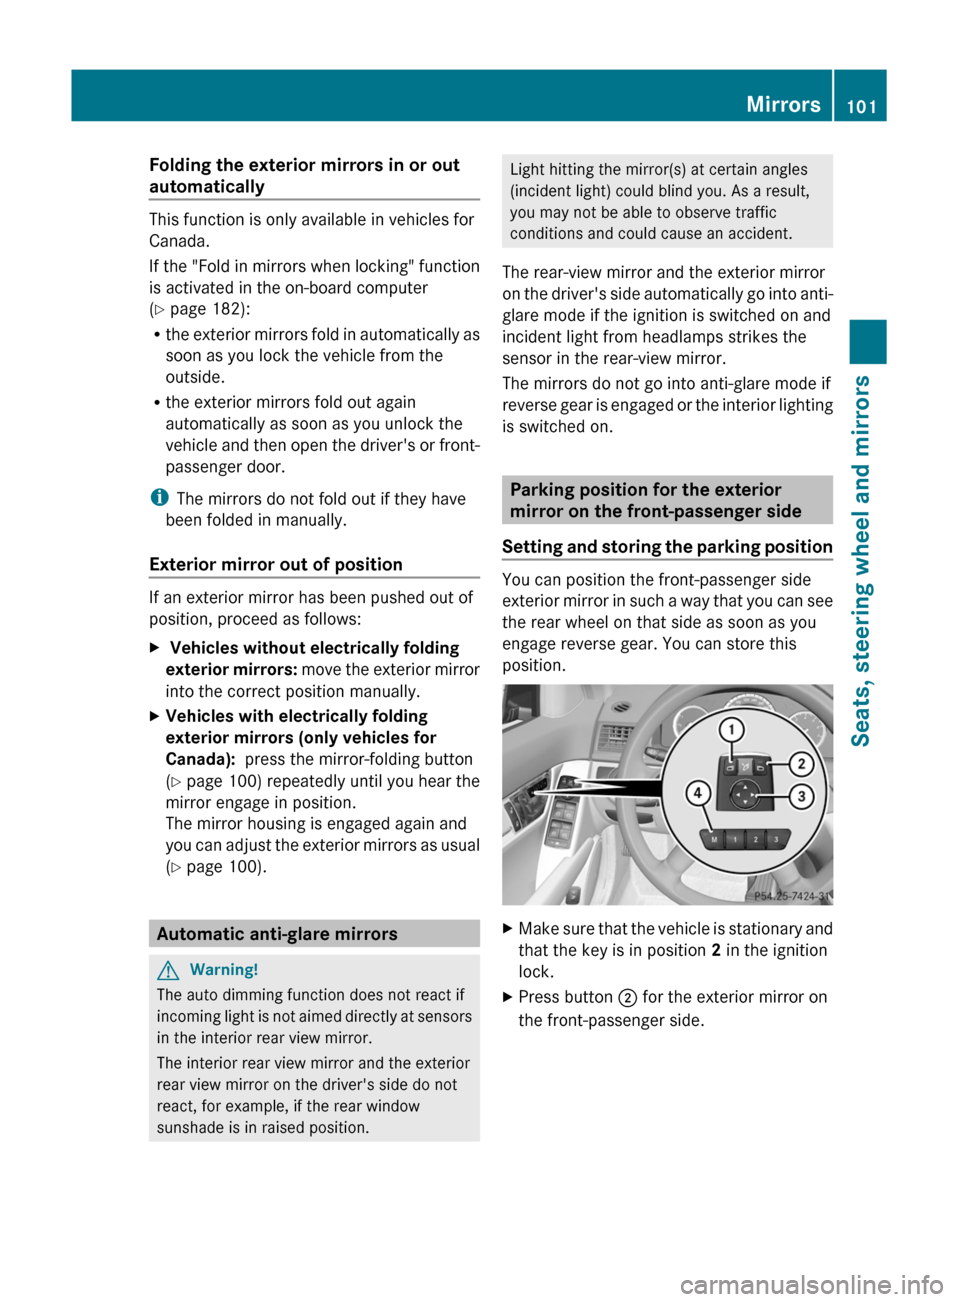
You can position the front-passenger side
exterior mirror in such a way that you can see
the rear wheel on that side as soon as you
engage reverse gear. You can store this
position.
XMake sure that the vehicle is stationary and
that the key is in position 2 in the ignition
lock.
XPress button ; for the exterior mirror on
the front-passenger side.
Mirrors101Seats, steering wheel and mirrorsBA 204 USA, CA Edition A 2011; 1; 5, en-UShereepeVersion: 3.0.3.62010-05-20T09:17:30+02:00 - Seite 101Z
Page 108 of 320
Vehicle equipment
i This manual describes all the standard
and optional equipment of your vehicle
which was available at the time of
purchase. Country-specific differences are
possible. Bear in mind that your vehicle
may not feature all functions described
here. This also refers to safety-related
systems and functions.
Exterior lighting
Important safety notes
For reasons of safety, Mercedes-Benz
recommends that you drive with the lights
switched on even during the daytime. In some
countries, operation of the headlamps varies
due to legal requirements and self-imposed
obligations. In these countries, the daytime
running lamps are automatically switched on
when the engine is started.
Notes on driving abroad
Converting to symmetrical low beam
when driving abroad: switch the headlamps
to symmetrical low beam in countries in
which traffic drives on the opposite side of the
road to the country where the vehicle is
registered. This prevents oncoming traffic
from being dazzled. Symmetrical lights do not
illuminate as large an area of the edge of the
road.
Have the headlamps converted at a qualified
specialist workshop, e.g. an authorized
Mercedes-Benz Center, as close to the border
as possible before driving in these countries.
Converting to asymmetrical low beam
after returning: have the headlamps
converted back to asymmetrical low beam at
a qualified specialist workshop, e.g. an
authorized Mercedes-Benz Center, as soon as
possible after crossing the border when
returning.
Light switch
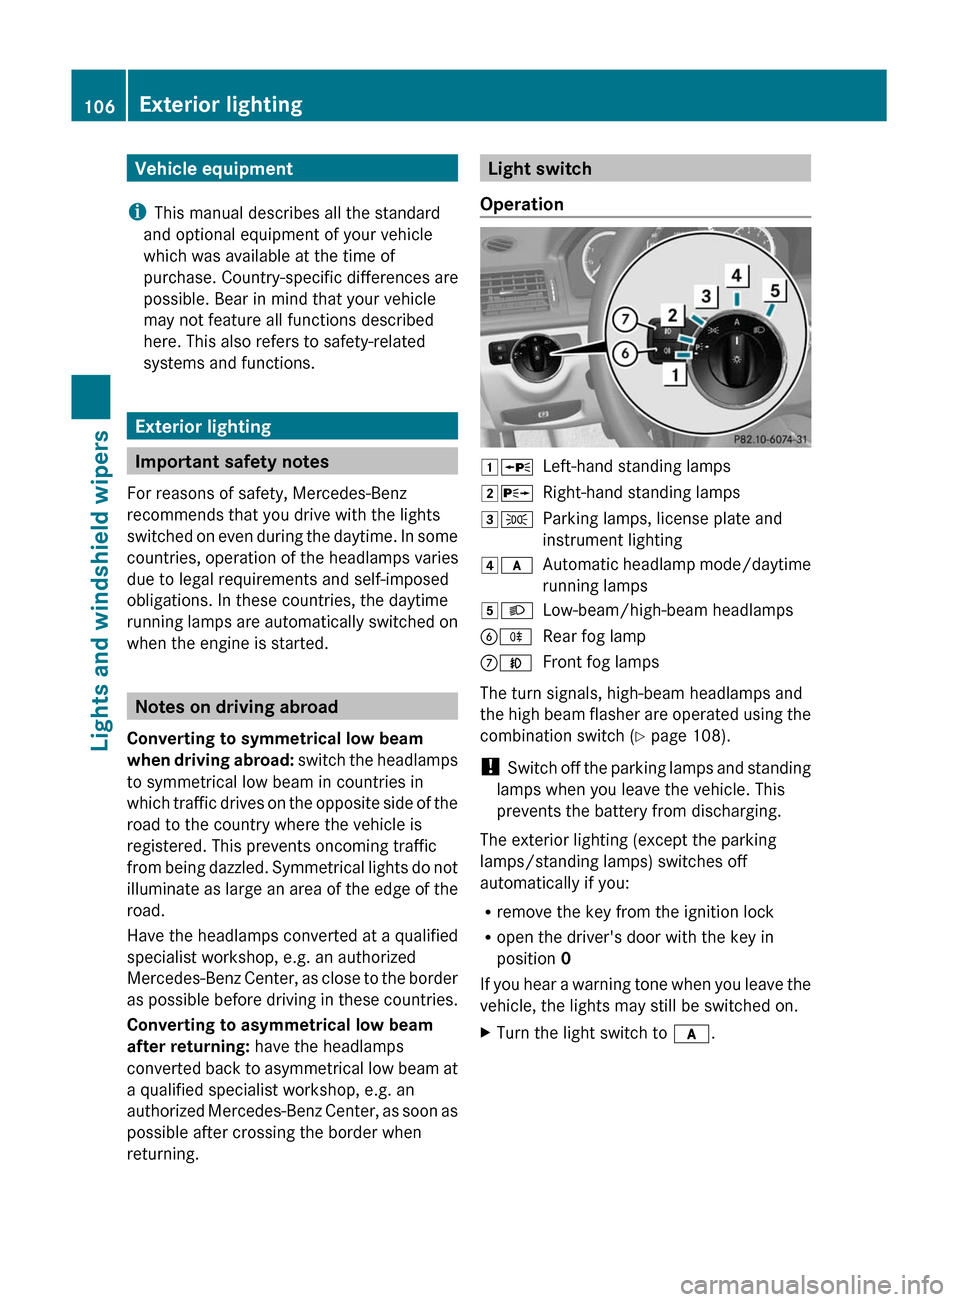
Operation1 WLeft-hand standing lamps2XRight-hand standing lamps3TParking lamps, license plate and
instrument lighting4 cAutomatic headlamp mode/daytime
running lamps5 LLow-beam/high-beam headlampsBRRear fog lampCNFront fog lamps
The turn signals, high-beam headlamps and
the high beam flasher are operated using the
combination switch ( Y page 108).
! Switch off the parking lamps and standing
lamps when you leave the vehicle. This
prevents the battery from discharging.
The exterior lighting (except the parking
lamps/standing lamps) switches off
automatically if you:
R remove the key from the ignition lock
R open the driver's door with the key in
position 0
If you hear a warning tone when you leave the
vehicle, the lights may still be switched on.
XTurn the light switch to c.106Exterior lightingLights and windshield wipers
BA 204 USA, CA Edition A 2011; 1; 5, en-UShereepeVersion: 3.0.3.62010-05-20T09:17:30+02:00 - Seite 106
Page 113 of 320
Rear-compartment overhead control panel
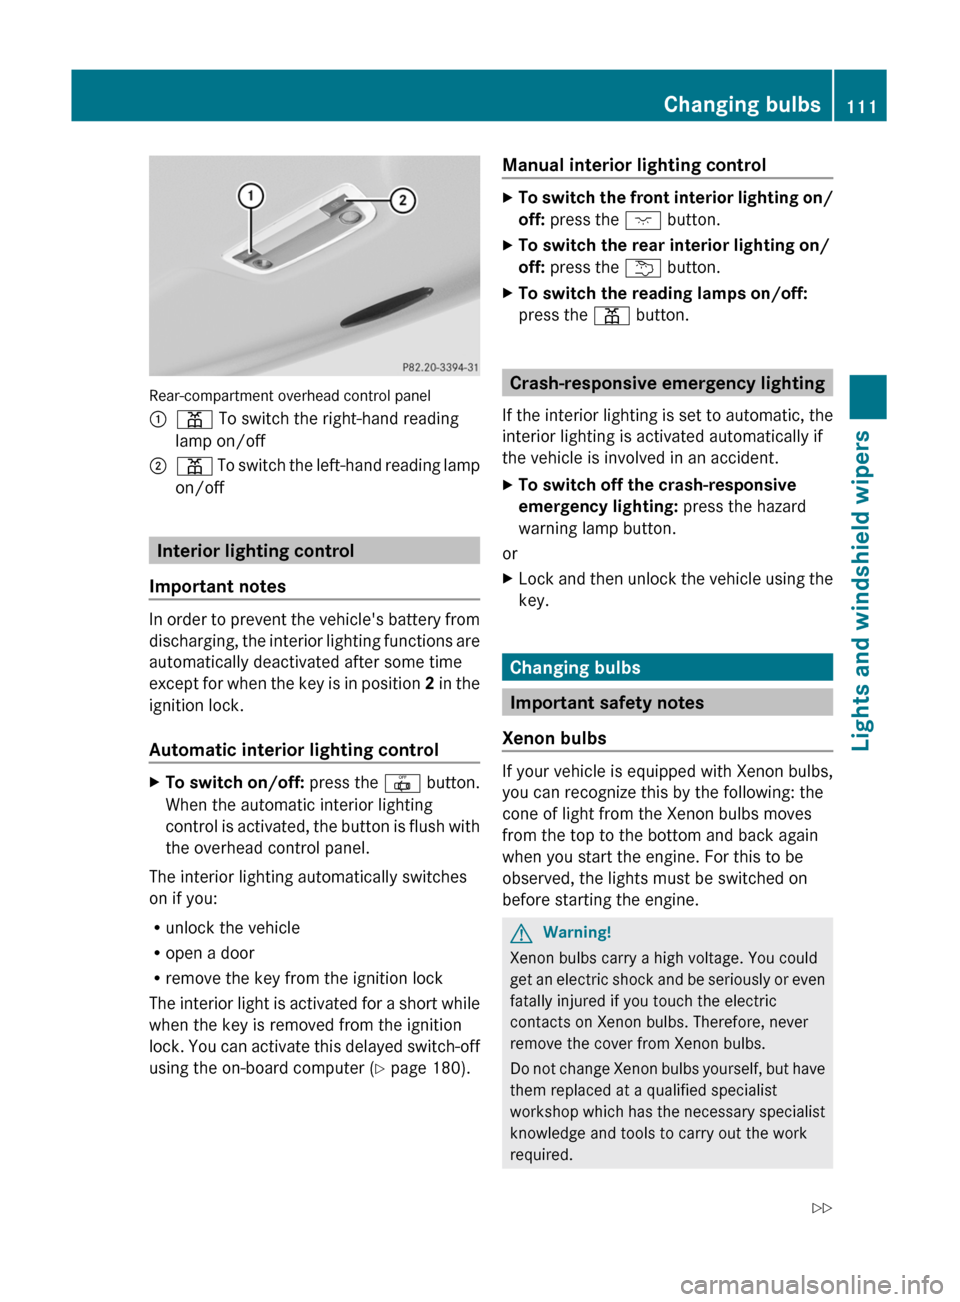
:p To switch the right-hand reading
lamp on/off
;p To switch the left-hand reading lamp
on/off
Interior lighting control
Important notes
In order to prevent the vehicle's battery from
discharging, the interior lighting functions are
automatically deactivated after some time
except for when the key is in position 2 in the
ignition lock.
Automatic interior lighting control
XTo switch on/off: press the | button.
When the automatic interior lighting
control is activated, the button is flush with
the overhead control panel.
The interior lighting automatically switches
on if you:
Runlock the vehicle
Ropen a door
Rremove the key from the ignition lock
The interior light is activated for a short while
when the key is removed from the ignition
lock. You can activate this delayed switch-off
using the on-board computer (Y page 180).
Manual interior lighting controlXTo switch the front interior lighting on/
off: press the c button.
XTo switch the rear interior lighting on/
off: press the u button.
XTo switch the reading lamps on/off:
press the p button.
Crash-responsive emergency lighting
If the interior lighting is set to automatic, the
interior lighting is activated automatically if
the vehicle is involved in an accident.
XTo switch off the crash-responsive
emergency lighting: press the hazard
warning lamp button.
or
XLock and then unlock the vehicle using the
key.
Changing bulbs
Important safety notes
Xenon bulbs
If your vehicle is equipped with Xenon bulbs,
you can recognize this by the following: the
cone of light from the Xenon bulbs moves
from the top to the bottom and back again
when you start the engine. For this to be
observed, the lights must be switched on
before starting the engine.
GWarning!
Xenon bulbs carry a high voltage. You could
get an electric shock and be seriously or even
fatally injured if you touch the electric
contacts on Xenon bulbs. Therefore, never
remove the cover from Xenon bulbs.
Do not change Xenon bulbs yourself, but have
them replaced at a qualified specialist
workshop which has the necessary specialist
knowledge and tools to carry out the work
required.
Changing bulbs111Lights and windshield wipersBA 204 USA, CA Edition A 2011; 1; 5, en-UShereepeVersion: 3.0.3.62010-05-20T09:17:30+02:00 - Seite 111Z
Page 118 of 320
! If the windshield wipers leave smears on
the windscreen after the vehicle has been
washed in an automatic car wash, wax or
other residues may be the reason for this.
Clean the windshield using washer fluid
after washing the vehicle in an automatic
car wash.
Switching the windshield wipers on/
off
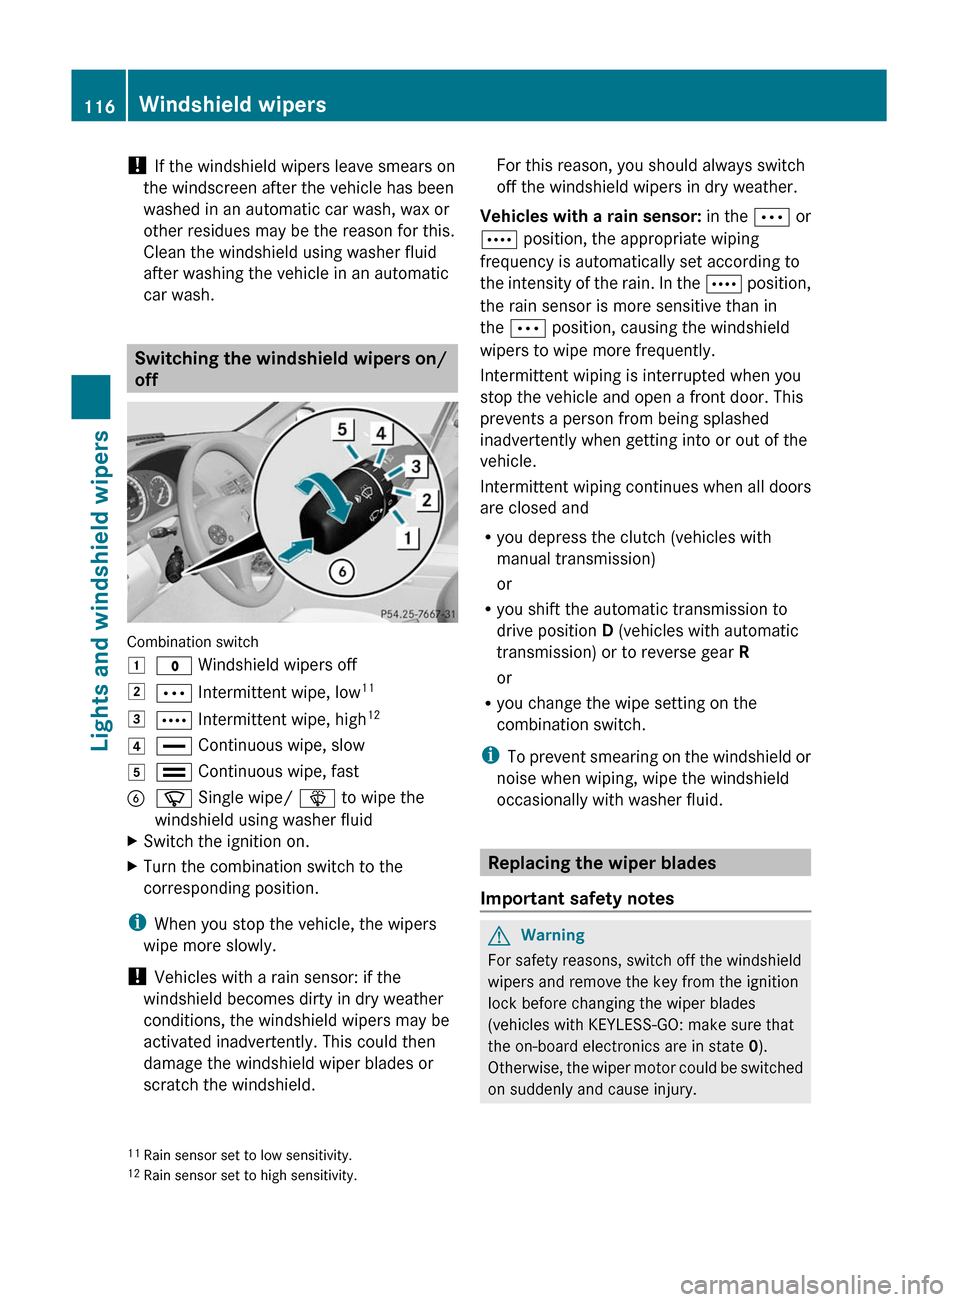
Combination switch
1$ Windshield wipers off2Ä Intermittent wipe, low 113Å
Intermittent wipe, high 124°
Continuous wipe, slow5¯ Continuous wipe, fastBí Single wipe/ î to wipe the
windshield using washer fluidXSwitch the ignition on.XTurn the combination switch to the
corresponding position.
i When you stop the vehicle, the wipers
wipe more slowly.
! Vehicles with a rain sensor: if the
windshield becomes dirty in dry weather
conditions, the windshield wipers may be
activated inadvertently. This could then
damage the windshield wiper blades or
scratch the windshield.
For this reason, you should always switch
off the windshield wipers in dry weather.
Vehicles with a rain sensor: in the Ä or
Å position, the appropriate wiping
frequency is automatically set according to
the intensity of the rain. In the Å position,
the rain sensor is more sensitive than in
the Ä position, causing the windshield
wipers to wipe more frequently.
Intermittent wiping is interrupted when you
stop the vehicle and open a front door. This
prevents a person from being splashed
inadvertently when getting into or out of the
vehicle.
Intermittent wiping continues when all doors
are closed and
R you depress the clutch (vehicles with
manual transmission)
or
R you shift the automatic transmission to
drive position D (vehicles with automatic
transmission) or to reverse gear R
or
R you change the wipe setting on the
combination switch.
i To prevent smearing on the windshield or
noise when wiping, wipe the windshield
occasionally with washer fluid.
Replacing the wiper blades
Important safety notes
GWarning
For safety reasons, switch off the windshield
wipers and remove the key from the ignition
lock before changing the wiper blades
(vehicles with KEYLESS-GO: make sure that
the on-board electronics are in state 0).
Otherwise, the wiper motor could be switched
on suddenly and cause injury.
11 Rain sensor set to low sensitivity.
12 Rain sensor set to high sensitivity.116Windshield wipersLights and windshield wipers
BA 204 USA, CA Edition A 2011; 1; 5, en-UShereepeVersion: 3.0.3.62010-05-20T09:17:30+02:00 - Seite 116
Page 119 of 320
! To avoid damaging the wiper blades,
make sure that you touch only the wiper
arm of the wiper.
Replacing the wiper blades
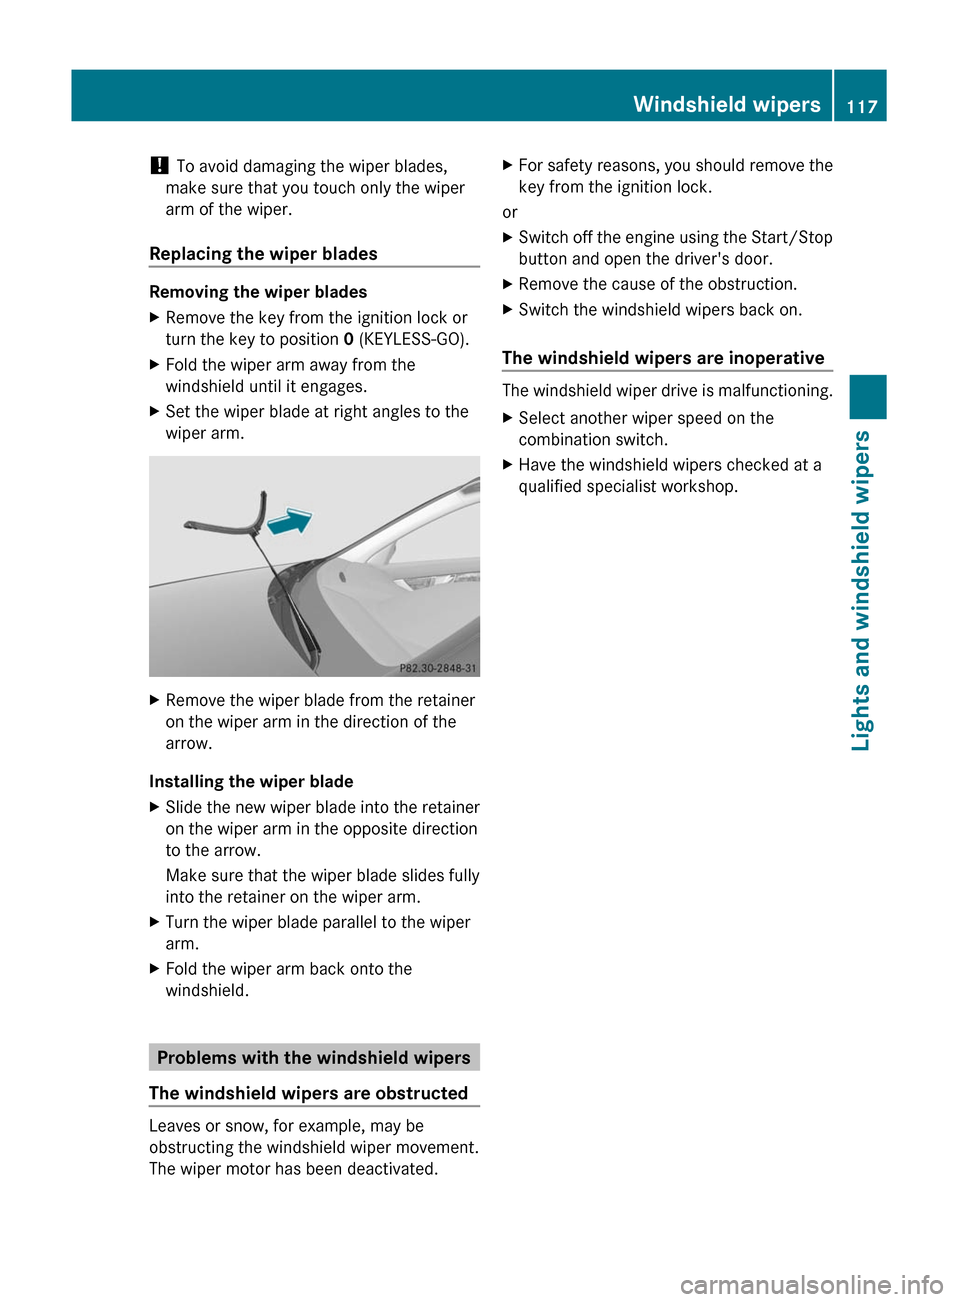
Removing the wiper blades
XRemove the key from the ignition lock or
turn the key to position 0 (KEYLESS-GO).
XFold the wiper arm away from the
windshield until it engages.
XSet the wiper blade at right angles to the
wiper arm.
XRemove the wiper blade from the retainer
on the wiper arm in the direction of the
arrow.
Installing the wiper blade
XSlide the new wiper blade into the retainer
on the wiper arm in the opposite direction
to the arrow.
Make sure that the wiper blade slides fully
into the retainer on the wiper arm.
XTurn the wiper blade parallel to the wiper
arm.
XFold the wiper arm back onto the
windshield.
Problems with the windshield wipers
The windshield wipers are obstructed
Leaves or snow, for example, may be
obstructing the windshield wiper movement.
The wiper motor has been deactivated.
XFor safety reasons, you should remove the
key from the ignition lock.
or
XSwitch off the engine using the Start/Stop
button and open the driver's door.
XRemove the cause of the obstruction.XSwitch the windshield wipers back on.
The windshield wipers are inoperative
The windshield wiper drive is malfunctioning.
XSelect another wiper speed on the
combination switch.
XHave the windshield wipers checked at a
qualified specialist workshop.
Windshield wipers117Lights and windshield wipersBA 204 USA, CA Edition A 2011; 1; 5, en-UShereepeVersion: 3.0.3.62010-05-20T09:17:30+02:00 - Seite 117Z