Light switch MERCEDES-BENZ C-Class 2011 W204 Repair Manual
[x] Cancel search | Manufacturer: MERCEDES-BENZ, Model Year: 2011, Model line: C-Class, Model: MERCEDES-BENZ C-Class 2011 W204Pages: 320, PDF Size: 13.17 MB
Page 196 of 320
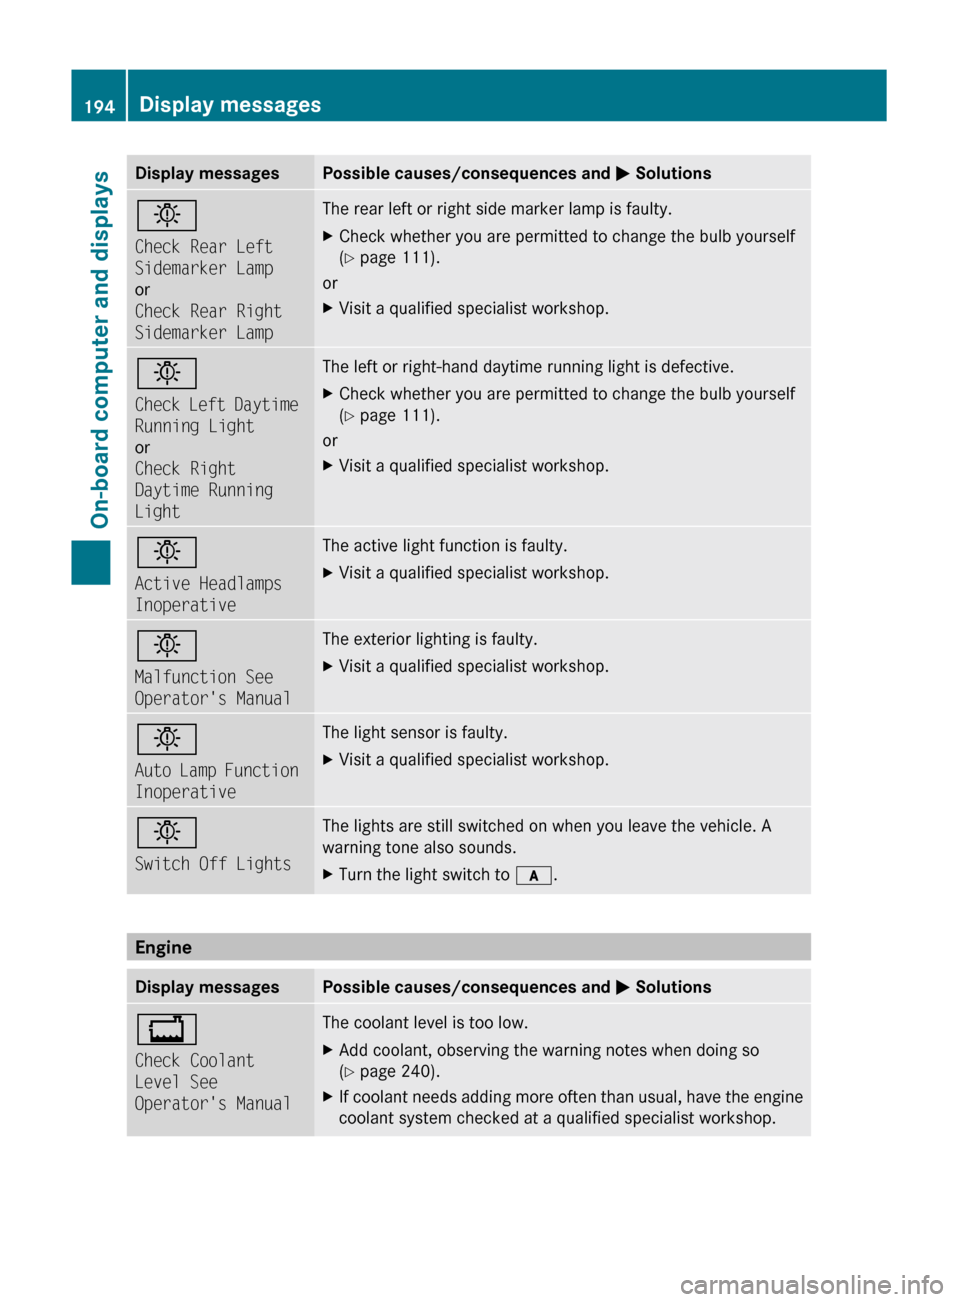
Display messagesPossible causes/consequences and M Solutionsb
Check Rear Left
Sidemarker Lamp
or
Check Rear Right
Sidemarker LampThe rear left or right side marker lamp is faulty.XCheck whether you are permitted to change the bulb yourself
( Y page 111).
or
XVisit a qualified specialist workshop.b
Check Left Daytime
Running Light
or
Check Right
Daytime Running
LightThe left or right-hand daytime running light is defective.XCheck whether you are permitted to change the bulb yourself
( Y page 111).
or
XVisit a qualified specialist workshop.b
Active Headlamps
InoperativeThe active light function is faulty.XVisit a qualified specialist workshop.b
Malfunction See
Operator's ManualThe exterior lighting is faulty.XVisit a qualified specialist workshop.b
Auto Lamp Function
InoperativeThe light sensor is faulty.XVisit a qualified specialist workshop.b
Switch Off LightsThe lights are still switched on when you leave the vehicle. A
warning tone also sounds.XTurn the light switch to c.
Engine
Display messagesPossible causes/consequences and M Solutions+
Check Coolant
Level See
Operator's ManualThe coolant level is too low.XAdd coolant, observing the warning notes when doing so
( Y page 240).XIf coolant needs adding more often than usual, have the engine
coolant system checked at a qualified specialist workshop.194Display messagesOn-board computer and displays
BA 204 USA, CA Edition A 2011; 1; 5, en-UShereepeVersion: 3.0.3.62010-05-20T09:17:30+02:00 - Seite 194
Page 212 of 320
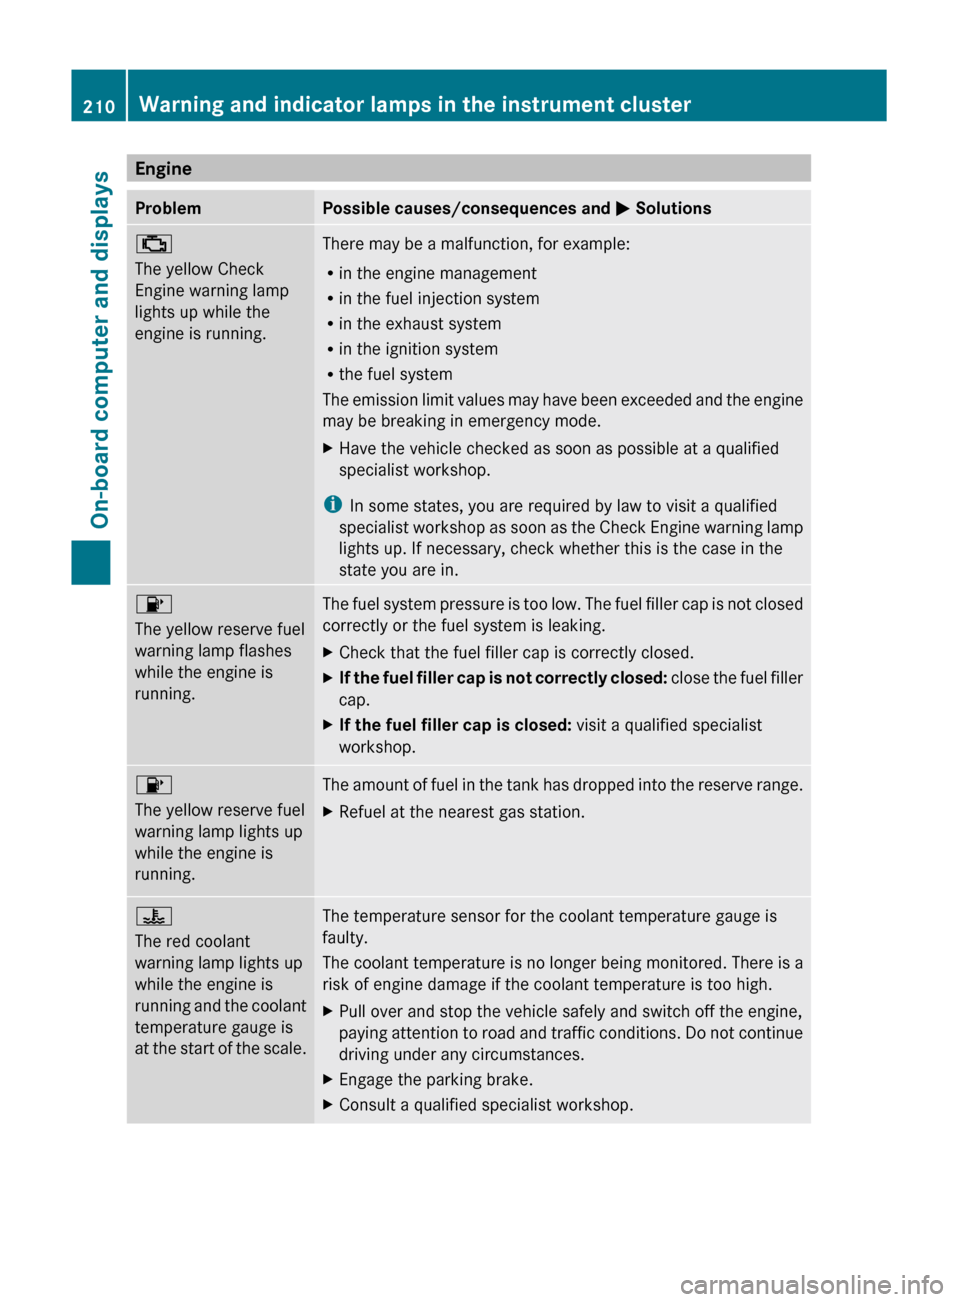
EngineProblemPossible causes/consequences and M Solutions;
The yellow Check
Engine warning lamp
lights up while the
engine is running.There may be a malfunction, for example:
R in the engine management
R in the fuel injection system
R in the exhaust system
R in the ignition system
R the fuel system
The emission limit values may have been exceeded and the engine
may be breaking in emergency mode.XHave the vehicle checked as soon as possible at a qualified
specialist workshop.
i In some states, you are required by law to visit a qualified
specialist workshop as soon as the Check Engine warning lamp
lights up. If necessary, check whether this is the case in the
state you are in.
8
The yellow reserve fuel
warning lamp flashes
while the engine is
running.The fuel system pressure is too low. The fuel filler cap is not closed
correctly or the fuel system is leaking.XCheck that the fuel filler cap is correctly closed.XIf the fuel filler cap is not correctly closed: close the fuel filler
cap.XIf the fuel filler cap is closed: visit a qualified specialist
workshop.8
The yellow reserve fuel
warning lamp lights up
while the engine is
running. The amount of fuel in the tank has dropped into the reserve range.XRefuel at the nearest gas station.?
The red coolant
warning lamp lights up
while the engine is
running and the coolant
temperature gauge is
at the start of the scale.The temperature sensor for the coolant temperature gauge is
faulty.
The coolant temperature is no longer being monitored. There is a
risk of engine damage if the coolant temperature is too high.XPull over and stop the vehicle safely and switch off the engine,
paying attention to road and traffic conditions. Do not continue
driving under any circumstances.XEngage the parking brake.XConsult a qualified specialist workshop.210Warning and indicator lamps in the instrument clusterOn-board computer and displays
BA 204 USA, CA Edition A 2011; 1; 5, en-UShereepeVersion: 3.0.3.62010-05-20T09:17:30+02:00 - Seite 210
Page 226 of 320
Cigarette lighterGWarning
When leaving the vehicle, always remove the
SmartKey from the ignition lock. Always take
the SmartKey with you and lock the vehicle.
Do not leave children unattended in the
vehicle, even if they are secured in a child
restraint system, or with access to an
unlocked vehicle. A child's unsupervised
access to a vehicle could result in an accident
and/or serious personal injury. The children
could:
Rinjure themselves on parts of the vehicle
Rbe seriously or fatally injured through
excessive exposure to extreme heat or cold
Rinjure themselves or cause an accident with
vehicle equipment that can be operated
even if the SmartKey is removed from the
ignition lock or removed from the vehicle,
such as seat adjustment, steering wheel
adjustment, or the memory function
If children open a door, they could injure other
persons or get out of the vehicle and injure
themselves or be injured by following traffic.
Do not expose the child restraint system to
direct sunlight. The child restraint system's
metal parts, for example, could become very
hot, and the child could be burned on these
parts.
GWarning
Never touch the heating element or sides of
the lighter; they are extremely hot. Hold the
knob only.
Make sure any children traveling with you do
not injure themselves or start a fire with the
hot cigarette lighter.
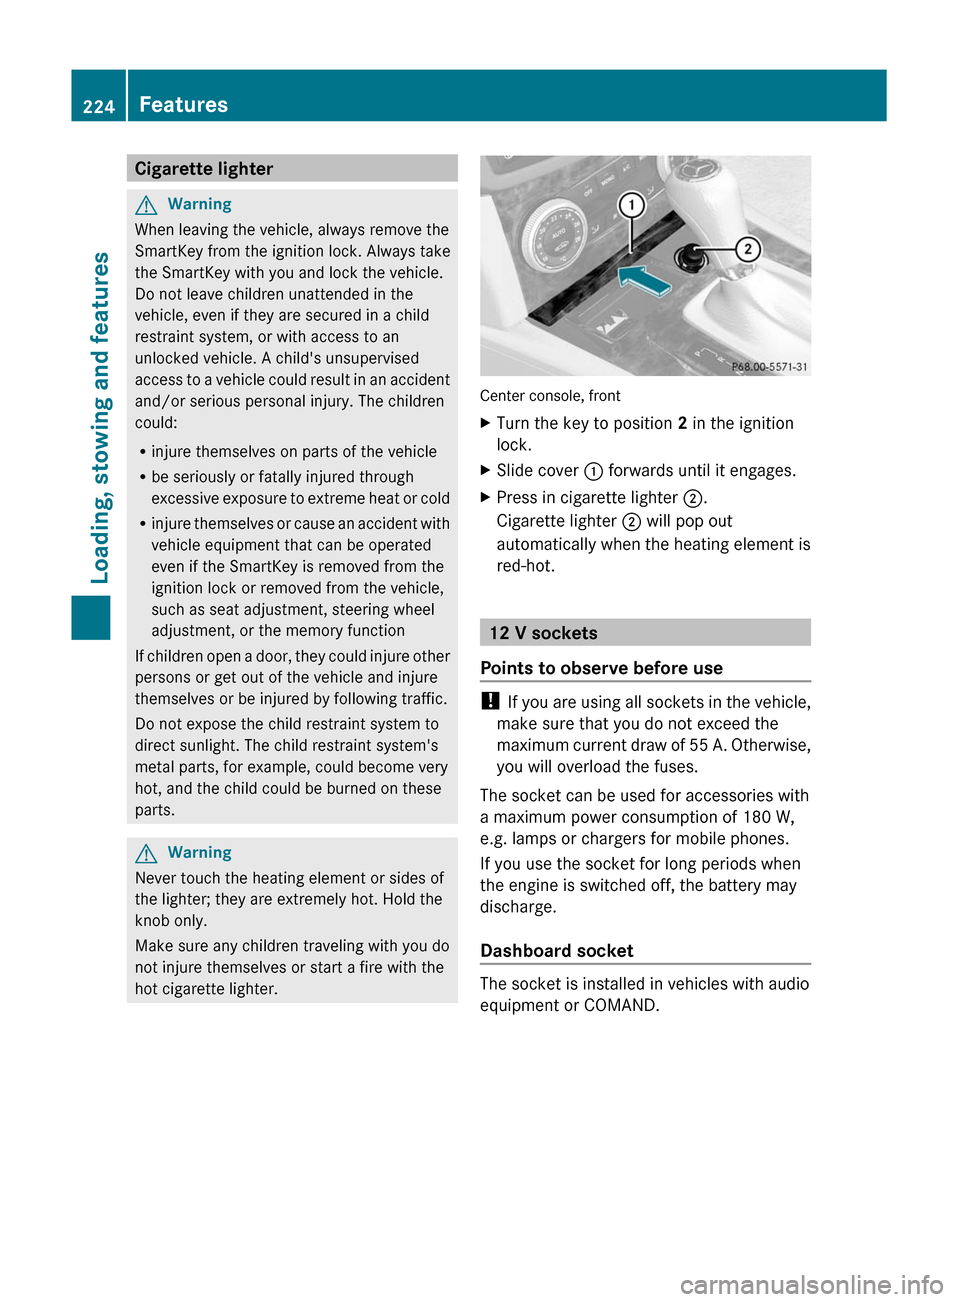
Center console, front
XTurn the key to position 2 in the ignition
lock.
XSlide cover : forwards until it engages.XPress in cigarette lighter ;.
Cigarette lighter ; will pop out
automatically when the heating element is
red-hot.
12 V sockets
Points to observe before use
! If you are using all sockets in the vehicle,
make sure that you do not exceed the
maximum current draw of 55 A. Otherwise,
you will overload the fuses.
The socket can be used for accessories with
a maximum power consumption of 180 W,
e.g. lamps or chargers for mobile phones.
If you use the socket for long periods when
the engine is switched off, the battery may
discharge.
Dashboard socket
The socket is installed in vehicles with audio
equipment or COMAND.
224FeaturesLoading, stowing and features
BA 204 USA, CA Edition A 2011; 1; 5, en-UShereepeVersion: 3.0.3.62010-05-20T09:17:30+02:00 - Seite 224
Page 241 of 320
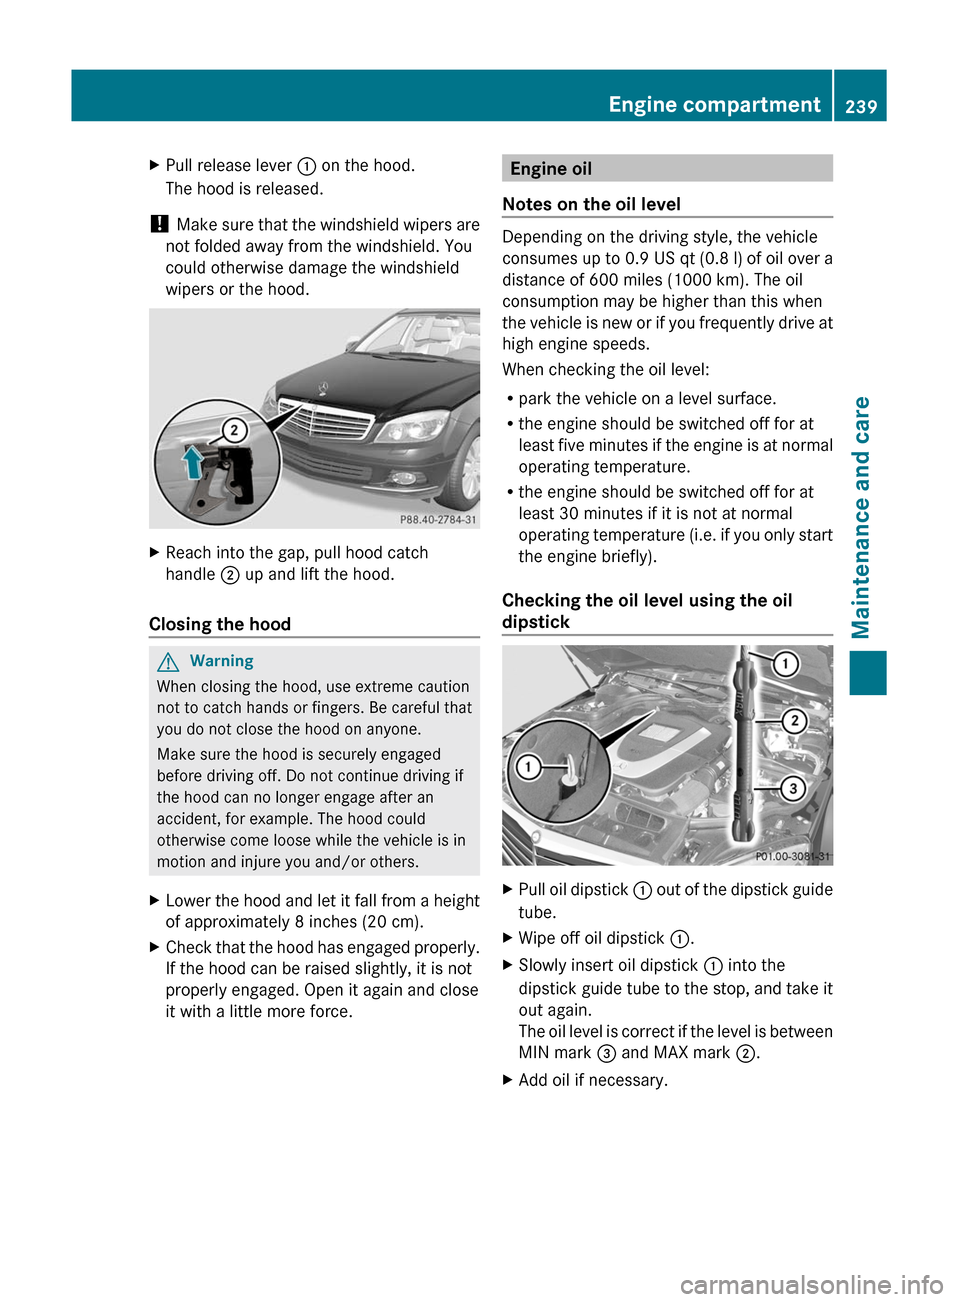
XPull release lever : on the hood.
The hood is released.
! Make sure that the windshield wipers are
not folded away from the windshield. You
could otherwise damage the windshield
wipers or the hood.
XReach into the gap, pull hood catch
handle ; up and lift the hood.
Closing the hood
GWarning
When closing the hood, use extreme caution
not to catch hands or fingers. Be careful that
you do not close the hood on anyone.
Make sure the hood is securely engaged
before driving off. Do not continue driving if
the hood can no longer engage after an
accident, for example. The hood could
otherwise come loose while the vehicle is in
motion and injure you and/or others.
XLower the hood and let it fall from a height
of approximately 8 inches (20 cm).
XCheck that the hood has engaged properly.
If the hood can be raised slightly, it is not
properly engaged. Open it again and close
it with a little more force.
Engine oil
Notes on the oil level
Depending on the driving style, the vehicle
consumes up to 0.9 US qt (0.8 l) of oil over a
distance of 600 miles (1000 km). The oil
consumption may be higher than this when
the vehicle is new or if you frequently drive at
high engine speeds.
When checking the oil level:
Rpark the vehicle on a level surface.
Rthe engine should be switched off for at
least five minutes if the engine is at normal
operating temperature.
Rthe engine should be switched off for at
least 30 minutes if it is not at normal
operating temperature (i.e. if you only start
the engine briefly).
Checking the oil level using the oil
dipstick
XPull oil dipstick : out of the dipstick guide
tube.
XWipe off oil dipstick :.XSlowly insert oil dipstick : into the
dipstick guide tube to the stop, and take it
out again.
The oil level is correct if the level is between
MIN mark = and MAX mark ;.
XAdd oil if necessary.Engine compartment239Maintenance and careBA 204 USA, CA Edition A 2011; 1; 5, en-UShereepeVersion: 3.0.3.62010-05-20T09:17:30+02:00 - Seite 239Z
Page 246 of 320
brake pads/linings. Generally, park the
vehicle at operating temperature after
cleaning.
Exterior care
Automatic car wash
GWarning!
Braking efficiency is reduced after washing
the vehicle. This could cause an accident. For
this reason, you must drive particularly
carefully after washing the vehicle until the
brakes have dried.
You can wash the vehicle in an automatic car
wash from the very start.
! Never clean your vehicle in a Touchless
Automatic Car Wash as these use special
cleaning agents. These cleaning agents can
damage the paintwork or plastic parts.
If the vehicle is very dirty, pre-wash it before
cleaning it in an automatic car wash.
! In car washes with a towing mechanism,
make sure that the automatic transmission
is in transmission position N, otherwise the
vehicle could be damaged.
! Make sure that the side windows are
completely closed, that the ventilation/
heating is switched off and that the
windshield wiper switch is set to 0.
Otherwise, the rain/light sensor could be
activated, triggering unintended wiper
movements. This can cause damage to the
vehicle.
After using an automatic car wash, wipe off
wax from the windshield and the wiper
blades. This will prevent smears and reduce
wiping noises caused by residue on the
windshield.
Washing by hand
Carefully remove all deposits of road salt as
soon as possible when driving in winter.
Also, clean the insides of the wheels when
washing the underbody of the vehicle.XDo not use hot water and do not wash the
vehicle in direct sunlight.XUse a soft car sponge for cleaning.XUse a gentle cleaning agent, e.g. a
Mercedes-Benz approved car shampoo.XWash down the vehicle with a gentle water
jet.XDo not point the water jet directly at the air
inlets.XUse plenty of water and rinse the sponge
frequently.XRinse the vehicle with clean water and dry
it thoroughly with a chamois.XDo not allow the cleaning agent to dry on
the paintwork.
Power washers
GWarning!
Do not use power washers with circular-jet
nozzles (dirt grinders) to clean your vehicle, in
particular the tires. You could otherwise
damage the tires and cause an accident.
! Keep the distance between the vehicle
and the nozzle of the power washer at
11.8 in (30 cm). Information about the
correct distance is available from the
equipment manufacturer.
Move the power washer nozzle around
when cleaning your vehicle.
Do not aim directly at any of the following:
R tires
R door joint
R electrical components
R battery
R connectors
R lights
R seals
R trim elements
R ventilation slots
244CareMaintenance and care
BA 204 USA, CA Edition A 2011; 1; 5, en-UShereepeVersion: 3.0.3.62010-05-20T09:17:30+02:00 - Seite 244
Page 257 of 320
XAll occupants must get out of the vehicle.
Make sure that they are not endangered as
they get out of the vehicle.XMake sure that no one is near the danger
area whilst a wheel is being changed.
Anyone who is not directly assisting in the
wheel change should, for example, stand
behind the barrier.XGet out of the vehicle. Pay attention to
traffic conditions when doing so.XClose the driver's door.
Changing a wheel and mounting the
spare wheel
Preparing the vehicle
GWarning!
The wheel and tire size of the emergency
spare wheel/spare wheel may differ to that of
the damaged wheel. When using an
emergency spare wheel/spare wheel the
handling characteristics of the vehicle may
change.
Adapt your style of driving accordingly.
Never operate the vehicle with more than one
emergency spare wheel/spare wheel that
differs in size.
Only use an emergency spare wheel/spare
wheel of a differing size briefly and do not
switch off ESP ®
.
When using an emergency spare wheel, you
must not exceed a maximum speed of 50 mph
(80 km/h).
GWarning!
Have the emergency spare wheel/spare
wheel replaced with a new wheel as soon as
possible at a qualified specialist workshop
which has the necessary specialist knowledge
and tools to carry out the work required.
Mercedes-Benz recommends that you use an
authorized Mercedes-Benz Center for this
purpose. In particular, work relevant to safety
or on safety-related systems must be carried
out at a qualified specialist workshop.
i Vehicles without an emergency spare
wheel/spare wheel are not equipped with
wheel-changing tools at the factory. For
more information on which tools are
required to perform a wheel change on your
vehicle, e.g. wheel chock, alignment bolt or
lug wrench, consult an authorized
Mercedes-Benz Center.XPrepare the vehicle as described
( Y page 254).XRemove the following items from the
stowage well under the trunk/cargo
compartment floor:
R the emergency spare wheel
R the vehicle tool kit
R the folding wheel chock
R the jackXSecure the vehicle to prevent it from rolling
away.
Securing the vehicle to prevent it from
rolling away
GWarning
Only jack up the vehicle on level ground or on
slight inclines/declines. The vehicle could
otherwise fall off the jack and injure you or
others.
If your vehicle is equipped with a wheel chock,
it can be found in the vehicle tool kit
( Y page 253).
The folding wheel chock is an additional
securing measure to prevent the vehicle from
rolling away, for example when changing a
wheel.
Flat tire255Breakdown assistanceBA 204 USA, CA Edition A 2011; 1; 5, en-UShereepeVersion: 3.0.3.62010-05-20T09:17:30+02:00 - Seite 255Z
Page 269 of 320
Mercedes-Benz Center will be happy to
advise you.
iIf a fuse has blown, visit a breakdown
service or an authorized Mercedes-Benz
Center.
If the newly inserted fuse also blows, have the
cause traced and rectified at a qualified
specialist workshop, e.g. an authorized
Mercedes-Benz Center.
! Only use fuses that have been approved
for Mercedes-Benz vehicles and which
have the correct fuse rating for the system
concerned. Otherwise, components or
systems could be damaged.
Before changing a fuse
XPark the vehicle and apply the parking
brake.
XSwitch off all electrical consumers.XRemove the key from the ignition lock.
The fuses are located in various fuse boxes:
Rfuse box on the driver's side of the
dashboard
Rfuse box in the engine compartment on the
left-hand side of the vehicle, when viewed
in the direction of travel
Rfuse box in the trunk on the right when
viewed in the direction of travel
The fuse allocation chart is located in the
vehicle tool kit (Y page 253) in the stowage
compartment under the trunk floor.
Fuse box in the dashboard
! Do not use a pointed object such as a
screwdriver to open the cover in the
dashboard. You could damage the
dashboard or the cover.
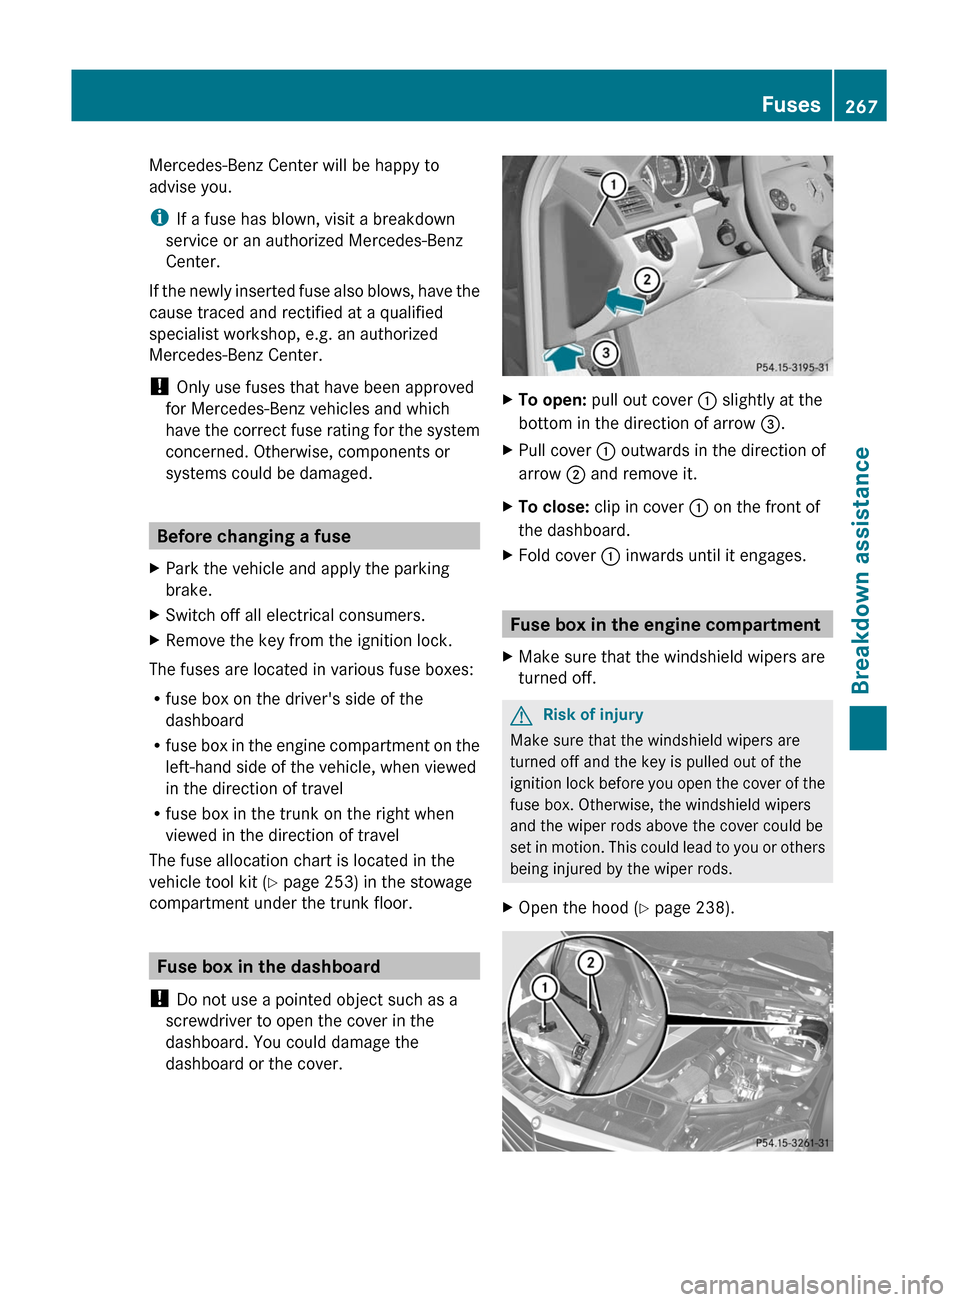
XTo open: pull out cover : slightly at the
bottom in the direction of arrow =.
XPull cover : outwards in the direction of
arrow ; and remove it.
XTo close: clip in cover : on the front of
the dashboard.
XFold cover : inwards until it engages.
Fuse box in the engine compartment
XMake sure that the windshield wipers are
turned off.
GRisk of injury
Make sure that the windshield wipers are
turned off and the key is pulled out of the
ignition lock before you open the cover of the
fuse box. Otherwise, the windshield wipers
and the wiper rods above the cover could be
set in motion. This could lead to you or others
being injured by the wiper rods.
XOpen the hood (Y page 238).Fuses267Breakdown assistanceBA 204 USA, CA Edition A 2011; 1; 5, en-UShereepeVersion: 3.0.3.62010-05-20T09:17:30+02:00 - Seite 267Z