procedure MERCEDES-BENZ C CLASS 2018 Owners Manual
[x] Cancel search | Manufacturer: MERCEDES-BENZ, Model Year: 2018, Model line: C CLASS, Model: MERCEDES-BENZ C CLASS 2018Pages: 370, PDF Size: 6.25 MB
Page 59 of 370
and to have any malfunctioning air bags
repaired. This will help to make sure the air bags
continue to perform their protective function for
the vehicle occupants in the event of a crash.
GWARNING
Emergency Tensioning Devices that have
deployed pyrotechnically are no longer opera-
tional and are unable to perform their inten-
ded protective function. This poses an
increased risk of injury or even fatal injury.
Have pyrotechnically triggered Emergency
Tensioning Devices replaced immediately at a
qualified specialist workshop.
An electric motor is used by PRE-SAFE
®to trig-
ger the tightening of the seat belt in hazardous
situations. This procedure is reversible.
If Emergency Tensioning Devices are triggered
or air bags are deployed, you will hear a bang,
and some powder may also be released. The
6 restraint system warning lamp lights up.
Only in rare cases will the bang affect your hear-
ing. The powder that is released generally does
not constitute a health hazard, but it may cause short-term breathing difficulties in people with
asthma or other respiratory problems. Provided
it is safe to do so, you should leave the vehicle
immediately or open the window in order to pre-
vent breathing difficulties.
Air bags and pyrotechnic Emergency Tensioning
Devices (ETDs) contain perchlorate material,
which may require special handling and regard
for the environment. National guidelines must
be observed during disposal. In California, see
www.dtsc.ca.gov/HazardousWaste/
Perchlorate/index.cfm.
Method of operation
During the first stage of a collision, the restraint
system control unit evaluates important physi-
cal data relating to vehicle deceleration or accel-
eration, such as:
Rduration
Rdirection
Rintensity
Based on the evaluation of this data, the
restraint system control unit triggers the Emer-
gency Tensioning Devices during a frontal or
rear collision. An Emergency Tensioning Device can only be
triggered, if:
Rthe ignition is switched on
Rthe components of the restraint system are
operational. You can find further information
under "Restraint system warning lamp"
(
Ypage 45)
Rthe seat belt buckle tongue has engaged in
the belt buckle of the respective front seat
The Emergency Tensioning Devices in the rear
compartment are triggered independently of the
lock status of the seat belts.
If the restraint system control unit detects a
more severe accident, further components of
the restraint system are activated independ-
ently of each other in certain frontal collision
situations:
RFront air bags and driver's knee bag
RWindow curtain air bag, if the system deter-
mines that deployment can offer additional
protection to that provided by the seat belt
The front-passenger front air bag is activated or
deactivated depending on the person on t
he
front-passenger seat. The front-passenger front
air bag can only deploy in an accident if the
PASSENGER AIR BAG OFF indicator lamp is off.
Observe the information on the PASSENGER AIR
BAG indicator lamps (
Ypage 45).
Your vehicle has two-stage front air bags. In the
first deployment stage, the front air bag is filled
with propellant gas. The front air bag is fully
deployed with the maximum amount of propel-
lant gas if a second deployment threshold is
reached within a few milliseconds.
The activation threshold of the Emergency Ten-
sioning Devices and the air bags is determined
by evaluating the rate of vehicle deceleration or
acceleration which occurs at various points in
the vehicle. This process is pre-emptive in
nature. Deployment should take place in good
time at the start of the collision.
The rate of vehicle deceleration or acceleration
and the direction of the force are essentially
determined by:
Rthe distribution of forces during the collision
Rthe collision angle
Rthe deformation characteristics of the vehicle
Rthe characteristics of the object with which
the vehicle has collided
Factors which can only be seen and measured
after a collision has occurred do not play a deci-
sive role in the deployment of an air bag. Nor do
Occupant safety57
Safety
Z
Page 88 of 370
Trunk
Important safety notes
GWARNING
Combustion engines emit poisonous exhaust
gases such as carbon monoxide. Exhaust
gases can enter the vehicle interior if the
trunk lid is open when the engine is running,
especially if the vehicle is in motion. There is a
risk of poisoning.
Always switch off the engine before opening
the trunk lid. Never drive with the trunk lid
open.
GWARNING
If objects, luggage or loads are not secured or
not secured sufficiently, they could slip, tip
over or be flung around and thereby hit vehicle
occupants. There is a risk of injury, particu-
larly in the event of sudden braking or a sud-
den change in direction.
Always store objects so that they cannot be
flung around. Secure objects, luggage or
loads against slipping or tipping before the
journey.
!The trunk lid swings upwards when opened.
Therefore, make sure that there is sufficient
clearance above the trunk lid.
The opening dimensions of the trunk lid can be
found in the "Vehicle data" section
(
Ypage 367).
You can limit the opening angle of the trunk lid in
the multimedia system; see the Digital Opera-
tor's Manual.
Do not leave the SmartKey in the trunk. You
could otherwise lock yourself out.
You should preferably place luggage or loads in
the trunk. Observe the loading guidelines
(
Ypage 280).
Object detection with trunk lid revers-
ing feature
Vehicles with trunk lid remote closing fea-
ture:
The trunk lid is equipped with automatic object
detection with a reversing feature. If a solid object blocks or restricts the trunk lid when
automatically opening, this procedure is stop-
ped. If a solid object blocks or restricts the trunk
lid when automatically closing, the trunk lid
opens again automatically. Automatic object
detection with reversing function is only an aid.
It is not a substitute for your attentiveness when opening and closing the trunk lid.
GWARNING
The reversing feature does not respond:
Rto soft, light and thin objects, e.g. fingers
Rover the last 1/3 in (8 mm) of the closing
movement
The reversing feature cannot prevent some-
one being trapped in these situations in par-
ticular. There is a risk of injury.
Make sure that no body parts are in close
proximity during the closing procedure.
If somebody becomes trapped:
Rpress the Fbutton on the SmartKey, or
Rpull or press the remote operating switch
on the driver's door or
Rpress the closing or locking button on the
trunk lid, or
Rpull on the trunk lid handle
Vehicles with HANDS-FREE ACCESS:
It is also possible to stop the closing process by
performing a kicking movement under the rear
bumper.
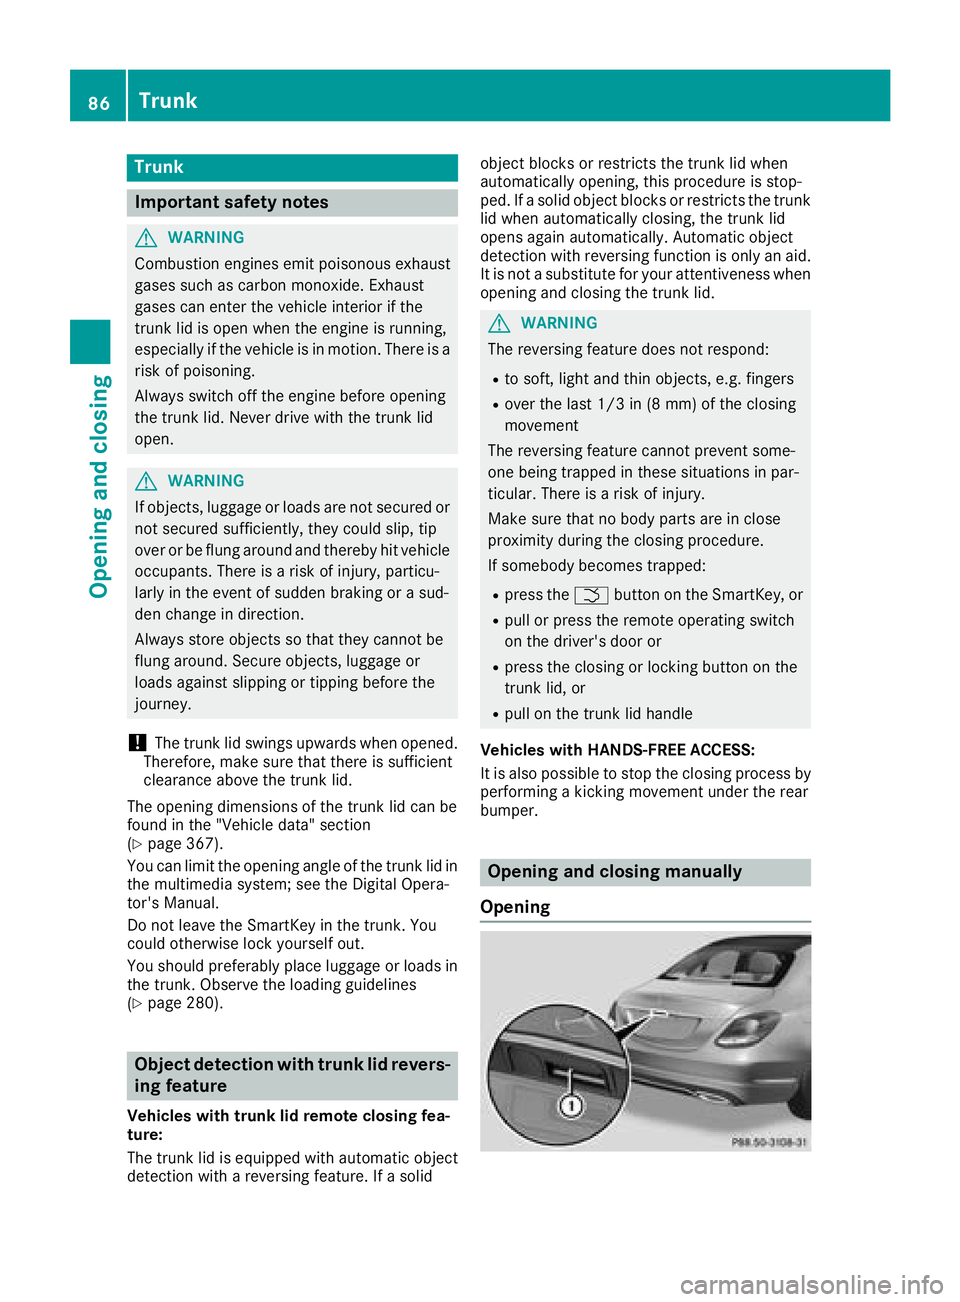
Opening and closing manually
Opening
86Trunk
Opening and closing
Page 90 of 370
Vehicles with trunk lid remote closing fea-
ture and KEYLESS-GO:when the driver's door
is closed you can simultaneously close the trunk
lid and lock the vehicle. To do this, the SmartKey
must be in the KEYLESS-GO detection range to
the rear of the vehicle.
XPress locking button ;in the trunk lid.
If KEYLESS-GO detects a SmartKey outside
the vehicle, the trunk lid closes. The vehicle is
locked.
If KEYLESS-GO detects a SmartKey in the trunk,
the trunk lid opens again after it is closed.
If KEYLESS-GO detects a second SmartKey out- side the vehicle, the trunk lid remains closed.
If KEYLESS-GO detects a SmartKey in the trunk
before the closing procedure starts, the trunk lid
remains open.
HANDS-FREE ACCESS
General notes
With KEYLESS-GO and HANDS-FREE ACCESS,
you can open or close the trunk lid or stop the
procedure without using your hands. This is use- ful if you have your hands full. To do this, make
a kicking movement under the bumper with your
foot.
Observe the following points:
RCarry your KEYLESS-GO key about your per-
son. The SmartKey must be at the rear of the
vehicle in the detection range of KEYLESS-
GO.
RWhen making the kicking movement, make
sure that you are standing firmly on the
ground and that there is sufficient clearance
to the rear of the vehicle. You could otherwise
lose your balance, for example on ice.
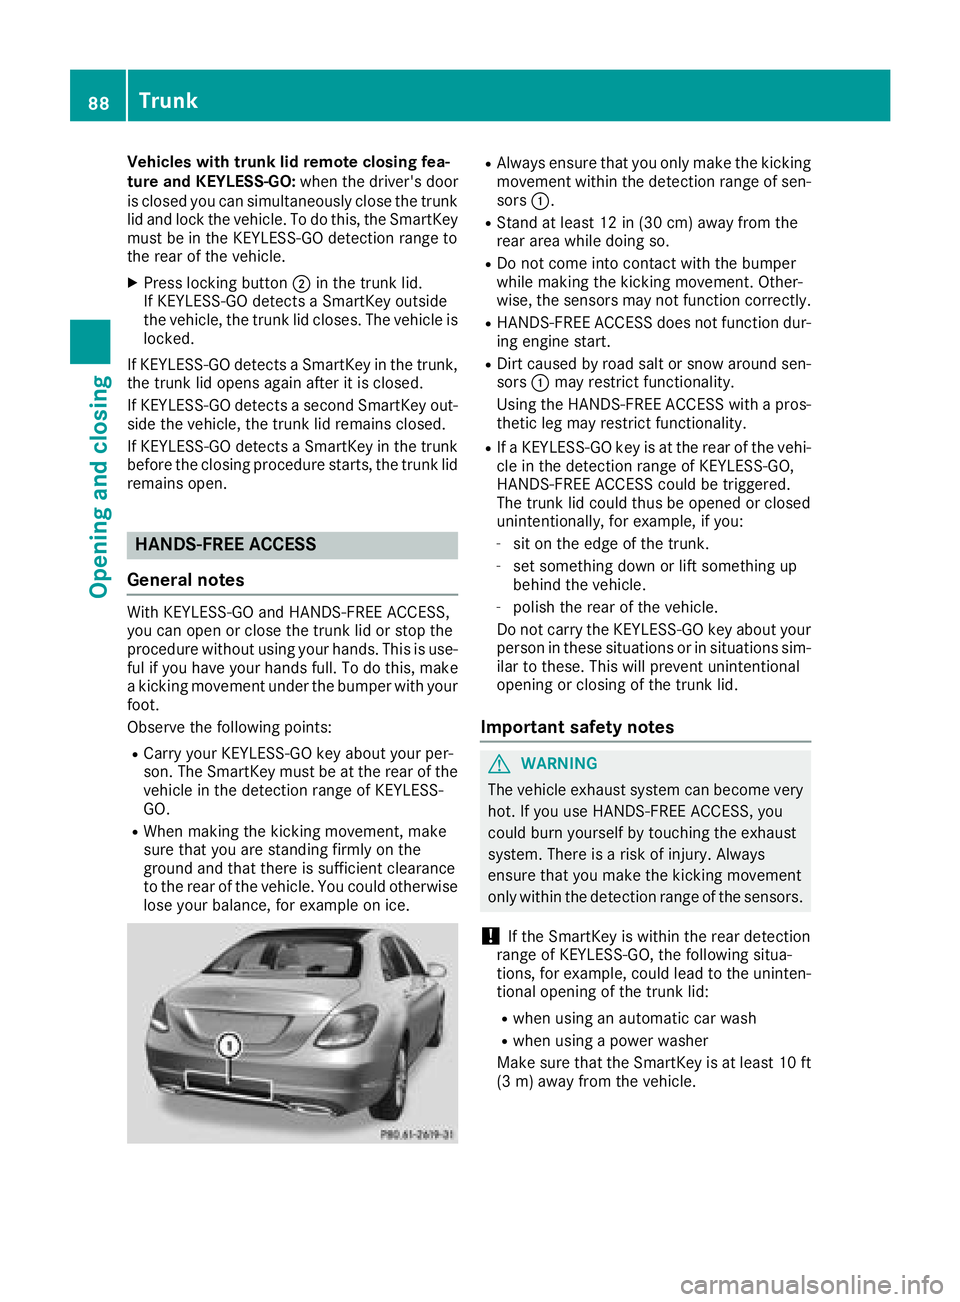
RAlways ensure that you only make the kicking
movement within the detection range of sen-
sors :.
RStand at least 12 in (30 cm) away from the
rear area while doing so.
RDo not come into contact with the bumper
while making the kicking movement. Other-
wise, the sensors may not function correctly.
RHANDS-FREE ACCESS does not function dur-
ing engine start.
RDirt caused by road salt or snow around sen-
sors:may restrict functionality.
Using the HANDS-FREE ACCESS with a pros-
thetic leg may restrict functionality.
RIf a KEYLESS-GO key is at the rear of the vehi-
cle in the detection range of KEYLESS-GO,
HANDS-FREE ACCESS could be triggered.
The trunk lid could thus be opened or closed
unintentionally, for example, if you:
-sit on the edge of the trunk.
-set something down or lift something up
behind the vehicle.
-polish the rear of the vehicle.
Do not carry the KEYLESS-GO key about your
person in these situations or in situations sim-
ilar to these. This will prevent unintentional
opening or closing of the trunk lid.
Important safety notes
GWARNING
The vehicle exhaust system can become very
hot. If you use HANDS-FREE ACCESS, you
could burn yourself by touching the exhaust
system. There is a risk of injury. Always
ensure that you make the kicking movement
only within the detection range of the sensors.
!If the SmartKey is within the rear detection
range of KEYLESS-GO, the following situa-
tions, for example, could lead to the uninten-
tional opening of the trunk lid:
Rwhen using an automatic car wash
Rwhen using a power washer
Make sure that the SmartKey is at least 10 ft
(3 m) away from the vehicle.
88Trunk
Opening and closing
Page 91 of 370
Operation
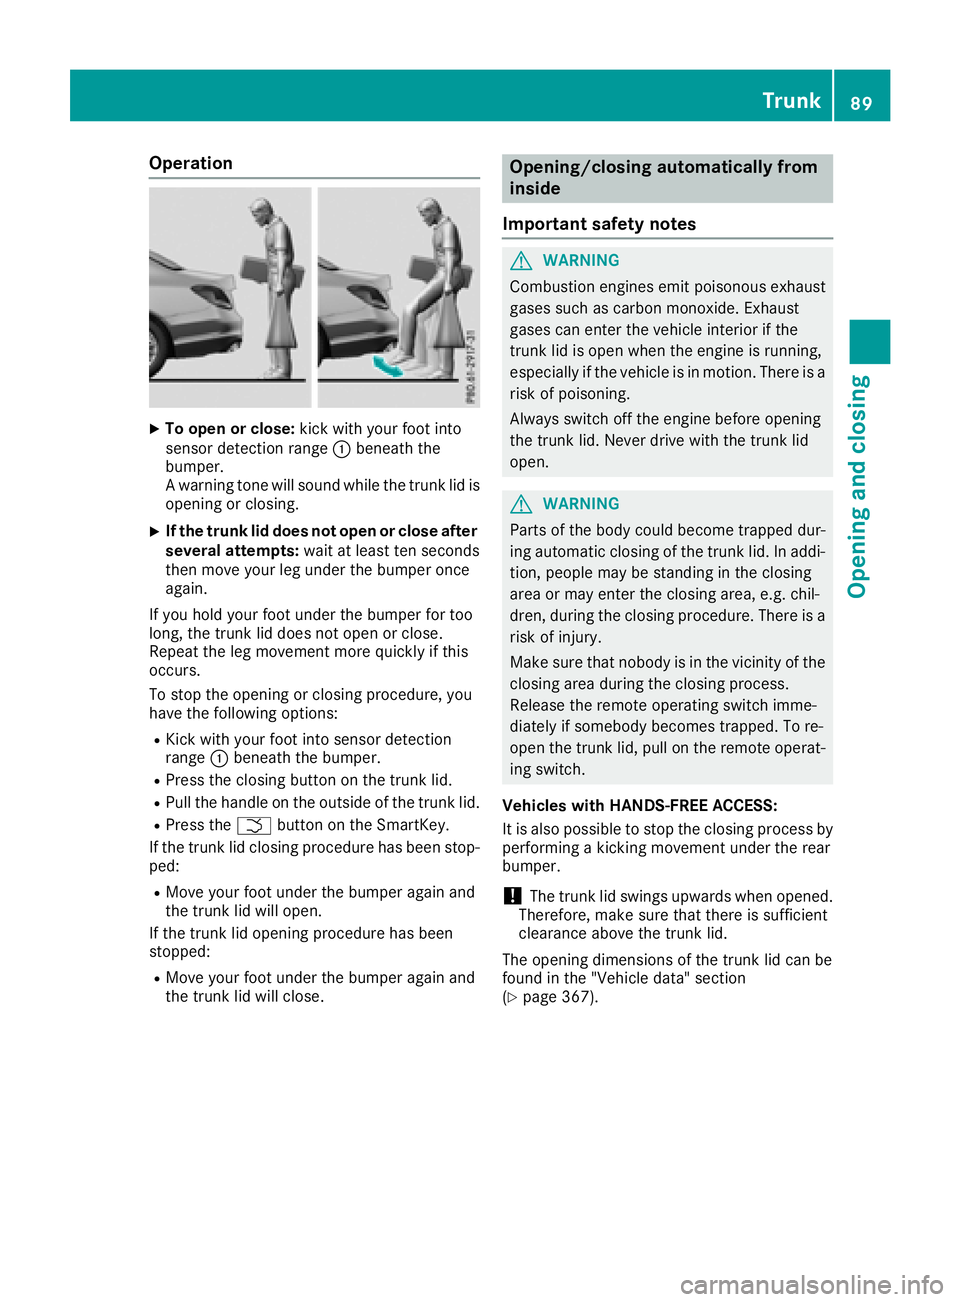
XTo open or close:kick with your foot into
sensor detection range :beneath the
bumper.
A warning tone will sound while the trunk lid is
opening or closing.
XIf the trunk lid does not open or close after
several attempts: wait at least ten seconds
then move your leg under the bumper once
again.
If you hold your foot under the bumper for too
long, the trunk lid does not open or close.
Repeat the leg movement more quickly if this
occurs.
To stop the opening or closing procedure, you
have the following options:
RKick with your foot into sensor detection
range :beneath the bumper.
RPress the closing button on the trunk lid.
RPull the handle on the outside of the trunk lid.
RPress the Fbutton on the SmartKey.
If the trunk lid closing procedure has been stop-
ped:
RMove your foot under the bumper again and
the trunk lid will open.
If the trunk lid opening procedure has been
stopped:
RMove your foot under the bumper again and
the trunk lid will close.
Opening/closing automatically from
inside
Important safety notes
GWARNING
Combustion engines emit poisonous exhaust
gases such as carbon monoxide. Exhaust
gases can enter the vehicle interior if the
trunk lid is open when the engine is running,
especially if the vehicle is in motion. There is a
risk of poisoning.
Always switch off the engine before opening
the trunk lid. Never drive with the trunk lid
open.
GWARNING
Parts of the body could become trapped dur-
ing automatic closing of the trunk lid. In addi-
tion, people may be standing in the closing
area or may enter the closing area, e.g. chil-
dren, during the closing procedure. There is a
risk of injury.
Make sure that nobody is in the vicinity of the
closing area during the closing process.
Release the remote operating switch imme-
diately if somebody becomes trapped. To re-
open the trunk lid, pull on the remote operat-
ing switch.
Vehicles with HANDS-FREE ACCESS:
It is also possible to stop the closing process by
performing a kicking movement under the rear
bumper.
!The trunk lid swings upwards when opened.
Therefore, make sure that there is sufficient
clearance above the trunk lid.
The opening dimensions of the trunk lid can be
found in the "Vehicle data" section
(
Ypage 367).
Trunk89
Opening and closing
Z
Page 92 of 370
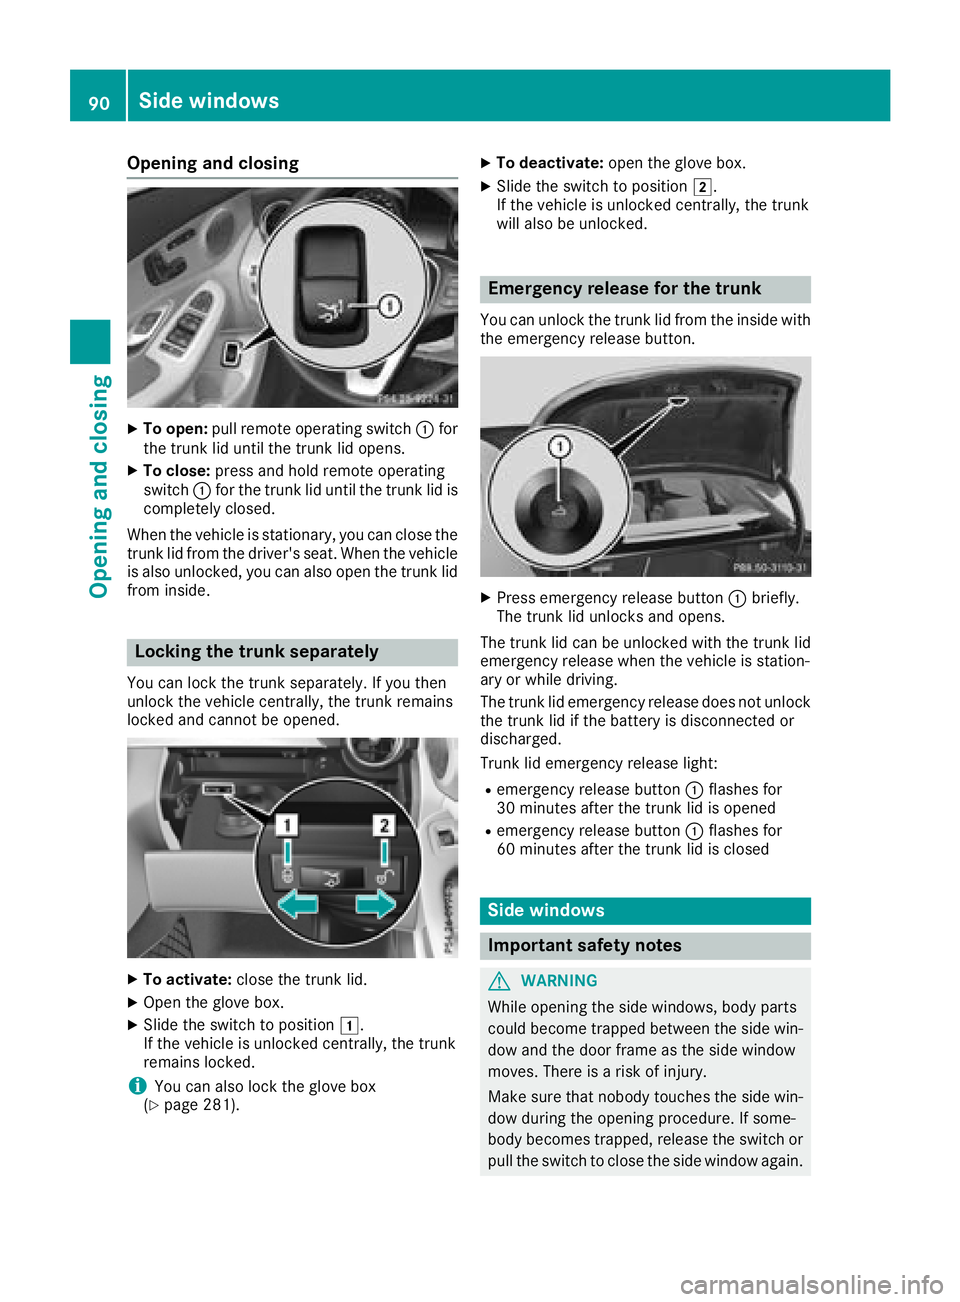
Opening and closing
XTo open:pull remote operating switch :for
the trunk lid until the trunk lid opens.
XTo close: press and hold remote operating
switch :for the trunk lid until the trunk lid is
completely closed.
When the vehicle is stationary, you can close the
trunk lid from the driver's seat. When the vehicle
is also unlocked, you can also open the trunk lid
from inside.
Locking the trunk separately
You can lock the trunk separately. If you then
unlock the vehicle centrally, the trunk remains
locked and cannot be opened.
XTo activate: close the trunk lid.
XOpen the glove box.
XSlide the switch to position 1.
If the vehicle is unlocked centrally, the trunk
remains locked.
iYou can also lock the glove box
(Ypage 281).
XTo deactivate: open the glove box.
XSlide the switch to position 2.
If the vehicle is unlocked centrally, the trunk
will also be unlocked.
Emergency release for the trunk
You can unlock the trunk lid from the inside with
the emergency release button.
XPress emergency release button :briefly.
The trunk lid unlocks and opens.
The trunk lid can be unlocked with the trunk lid
emergency release when the vehicle is station-
ary or while driving.
The trunk lid emergency release does not unlock
the trunk lid if the battery is disconnected or
discharged.
Trunk lid emergency release light:
Remergency release button :flashes for
30 minutes after the trunk lid is opened
Remergency release button :flashes for
60 minutes after the trunk lid is closed
Side windows
Important safety notes
GWARNING
While opening the side windows, body parts
could become trapped between the side win-
dow and the door frame as the side window
moves. There is a risk of injury.
Make sure that nobody touches the side win-
dow during the opening procedure. If some-
body becomes trapped, release the switch or
pull the switch to close the side window again.
90Side windows
Opening and closing
Page 93 of 370
GWARNING
While closing the side windows, body parts in
the closing area could become trapped. There is a risk of injury.
When closing make sure that no parts of the
body are in the closing area. If somebody
becomes trapped, release the switch or press
the switch to open the side window again.
GWARNING
If children operate the side windows they
could become trapped, particularly if they are left unsupervised. There is a risk of injury.
Activate the override feature for the rear side
windows. When leaving the vehicle, always
take the SmartKey with you and lock the vehi-
cle. Never leave children unsupervised in the
vehicle.
Side window reversing feature
The side windows are equipped with an auto-
matic reversing feature. If a solid object blocks
or restricts a side window from traveling
upwards during the automatic closing process,
the side window opens again automatically. Dur-
ing the manual closing process, the side windowonly opens again automatically after the corre-
sponding switch is released. The automatic
reversing feature is only an aid and is no substi-
tute for your attention when closing a side win-
dow.
GWARNING
The reversing feature does not react:
Rto soft, light and thin objects, e.g. small fin-
gers
Rwhile resetting
This means that the reversing feature cannot
prevent someone being trapped in these sit-
uations. There is a risk of injury.
Make sure that no body parts are in close
proximity during the closing procedure. If
someone becomes trapped, press the switch
to open the side window again.
Opening and closing the side win-
dows
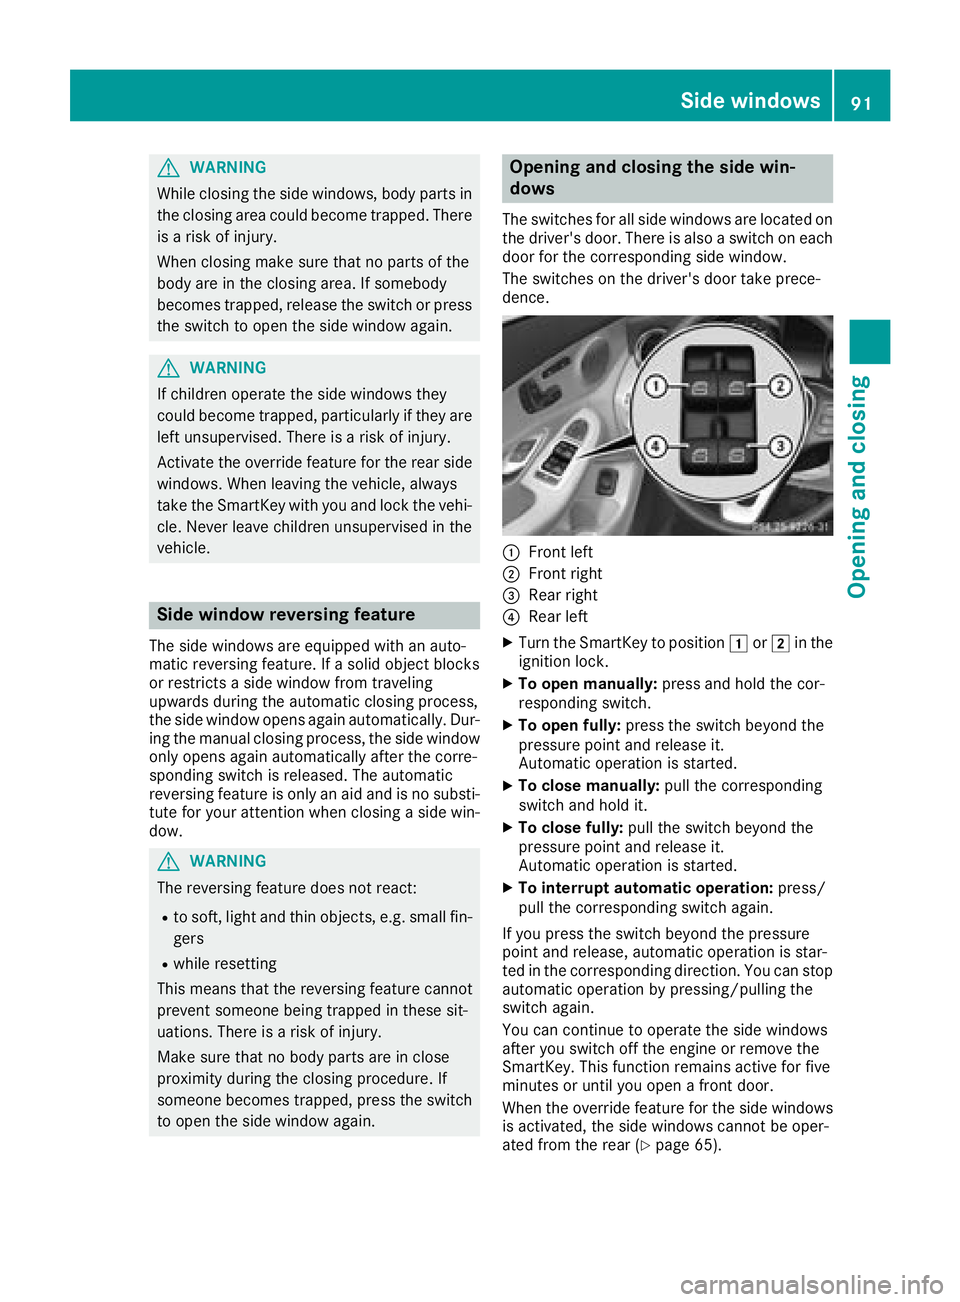
The switches for all side windows are located on
the driver's door. There is also a switch on each
door for the corresponding side window.
The switches on the driver's door take prece-
dence.
:Front left
;Front right
=Rear right
?Rear left
XTurn the SmartKey to position 1or2 in the
ignition lock.
XTo open manually: press and hold the cor-
responding switch.
XTo open fully: press the switch beyond the
pressure point and release it.
Automatic operation is started.
XTo close manually: pull the corresponding
switch and hold it.
XTo close fully: pull the switch beyond the
pressure point and release it.
Automatic operation is started.
XTo interrupt automatic operation: press/
pull the corresponding switch again.
If you press the switch beyond the pressure
point and release, automatic operation is star-
ted in the corresponding direction. You can stop
automatic operation by pressing/pulling the
switch again.
You can continue to operate the side windows
after you switch off the engine or remove the
SmartKey. This function remains active for five
minutes or until you open a front door.
When the override feature for the side windows
is activated, the side windows cannot be oper-
ated from the rear (
Ypage 65).
Side windows91
Opening and closing
Z
Page 94 of 370
Information on opening and closing the roller
sunblinds on the rear side windows
(
Ypage 290).
Convenience opening
General notes
If the SmartKey is in close proximity to the vehi-
cle, the convenience opening function is availa-
ble.
Vehicles with KEYLESS-GO or KEYLESS-GO
start function: you can ventilate the vehicle
before you start driving.
To do this, the SmartKey is used to carry out the
following functions simultaneously:
Runlock the vehicle
Ropen the side windows
Ropen the sliding sunroof or the panorama roof with power tilt/sliding panel and the roller
sunblind
Rswitch on the seat ventilation for the driver's
seat
The "convenience opening" feature is also avail-
able when the vehicle is unlocked.
Convenience opening
XPress and hold the %button on the Smart-
Key until the side windows and the sliding
sunroof or the panorama roof with power tilt/
sliding panel are in the desired position.
If the roller sunblinds of the panorama roof
with power tilt/sliding panel are closed, the
roller sunblinds are opened first.
XPress and hold the %button once more
until the panorama roof with power tilt/slid-
ing panel reaches the desired position.
XTo interrupt convenience opening: release
the % button.
Convenience closing feature
Important safety notes
GWARNING
When the convenience closing feature is oper- ating, parts of the body could become trapped
in the closing area of the side window and the
sliding sunroof. There is a risk of injury.
Observe the complete closing procedure
when the convenience closing feature is oper-
ating. Make sure that no body parts are in
close proximity during the closing procedure.
Vehicles with KEYLESS-GO or KEYLESS-GO
start function: if the SmartKey is in close prox-
imity to the vehicle, the convenience closing
function is available.
When you lock the vehicle, you can simultane-
ously:
Rclose the side windows
Rclose the sliding sunroof or the panorama roof with power tilt/sliding panel
On vehicles with a panorama roof with power
tilt/sliding panel, you can then close the roller
sunblinds.
Notes on the automatic reversing feature for:
Rthe side windows (Ypage 91)
Rthe sliding sunroof or the panorama roof with
power tilt/sliding panel (Ypage 95)
Using the SmartKey
XPress and hold the &button until the side
windows and the sliding sunroof or the pano-
rama roof with power tilt/sliding panel are
fully closed.
XMake sure that all the side windows and the
sliding sunroof or panorama roof with power
tilt/sliding panel are closed.
XVehicles with panorama roof with power
tilt/sliding panel: press and hold the&
button once more until the roller sunblinds of the panorama roof with power tilt/sliding
panel close.
XTo interrupt convenience closing: release
the & button.
Using KEYLESS-GO
The driver's door and the door at which the han-
dle is used, must both be closed. The SmartKey
must be outside the vehicle. The gap between
the SmartKey and the corresponding door han-
dle should not be greater than 3 ft (1 m).
92Side windows
Opening and closing
Page 96 of 370
ProblemPossible causes/consequences andMSolutions
A side window cannot be
closed because it is
blocked by objects, e.g.
leaves in the window
guide.XRemove the objects.
XClose the side window.
A side window cannot be
closed and you cannot
see the cause.If a side window is obstructed during closing and reopens again
slightly:
XImmediately after the window blocks, pull the corresponding switch
again until the side window has closed.
The side window is closed with increased force.
If a side window is obstructed again during closing and reopens again slightly:
XImmediately after the window blocks, pull the corresponding switchagain until the side window has closed.
The side windows are closed without the automatic reversing fea-
ture.
Sliding sunroof
Important safety notes
Your vehicle may be equipped with a sliding
sunroof or a panorama roof with power tilt/slid-
ing panel. In this section, the term "sliding sun-
roof" refers to both types of sliding sunroof.
GWARNING
While opening and closing the sliding sunroof, body parts in close proximity could become
trapped. There is a risk of injury.
Make sure that no body parts are in close
proximity during the opening and closing pro-
cedures.
If somebody becomes trapped:
Rrelease the switch immediately, or
Rduring automatic operation, push the
switch briefly in any direction
The opening or closing procedure will be stop- ped.
GWARNING
If children operate the sliding sunroof they
could become trapped, particularly if they are left unsupervised. There is a risk of injury.
When leaving the vehicle, always take the
SmartKey with you and lock the vehicle. Never
leave children unsupervised in the vehicle.
!Only open the sliding sunroof if it is free of
snow and ice. Otherwise, malfunctions may
occur.
Do not allow anything to protrude from the
sliding sunroof. Otherwise, the seals could be
damaged.
!The weather can change abruptly. It could
start to rain or snow. Make sure that the slid- ing sunroof is closed when you leave the vehi-
cle. The vehicle electronics can be damaged if
water enters the vehicle interior.
Resonance noises can occur in addition to the
usual airflow noises when the sliding sunroof is
open. They are caused by minor pressure fluc-
tuations in the vehicle interior. Change the posi-
tion of the sliding sunroof or open a side window
slightly to reduce or eliminate these noises.
Only for vehicles with panorama roof with
power tilt/sliding panel:
GWARNING
At high speeds the raised sliding sunroof auto-
matically lowers slightly at the rear. This could
trap you or other persons. There is a risk of
injury. Make sure that nobody reaches into
94Sliding sunroof
Opening and closing
Page 97 of 370
the sweep of the sliding sunroof whilst the
vehicle is in motion.
If somebody becomes trapped, immediately
pull back the sliding sunroof switch. The slid-
ing sunroof lifts during opening.
Sliding sunroof reversing feature
Your vehicle may be equipped with a sliding
sunroof or a panorama roof with power tilt/slid-
ing panel. In this section, the term "sliding sun-
roof" refers to both types of sliding sunroof.
The sliding sunroof is equipped with an auto-
matic reversing feature. If a solid object blocks
or restricts the sliding sunroof during the closing
process, the sliding sunroof opens again auto-
matically. The automatic reversing feature is
only an aid and is no substitute for your attention
when closing the sliding roof.
GWARNING
The reversing feature does not react:
Rto soft, light and thin objects, e.g. small fin-
gers
Rover the last 1/6 in (4 mm) of the closing
movement
Rduring resetting
Rwhen closing the sliding sunroof again man- ually immediately after automatic reversing
This means that the reversing feature cannot
prevent someone being trapped in these sit-
uations. There is a risk of injury.
Make sure that no body parts are in close
proximity during the closing procedure.
If somebody becomes trapped:
Rrelease the switch immediately, or
Rpress the switch in any direction during the
automatic closing process
The closing process is stopped.
Operating the sliding sunroof
Opening and closing
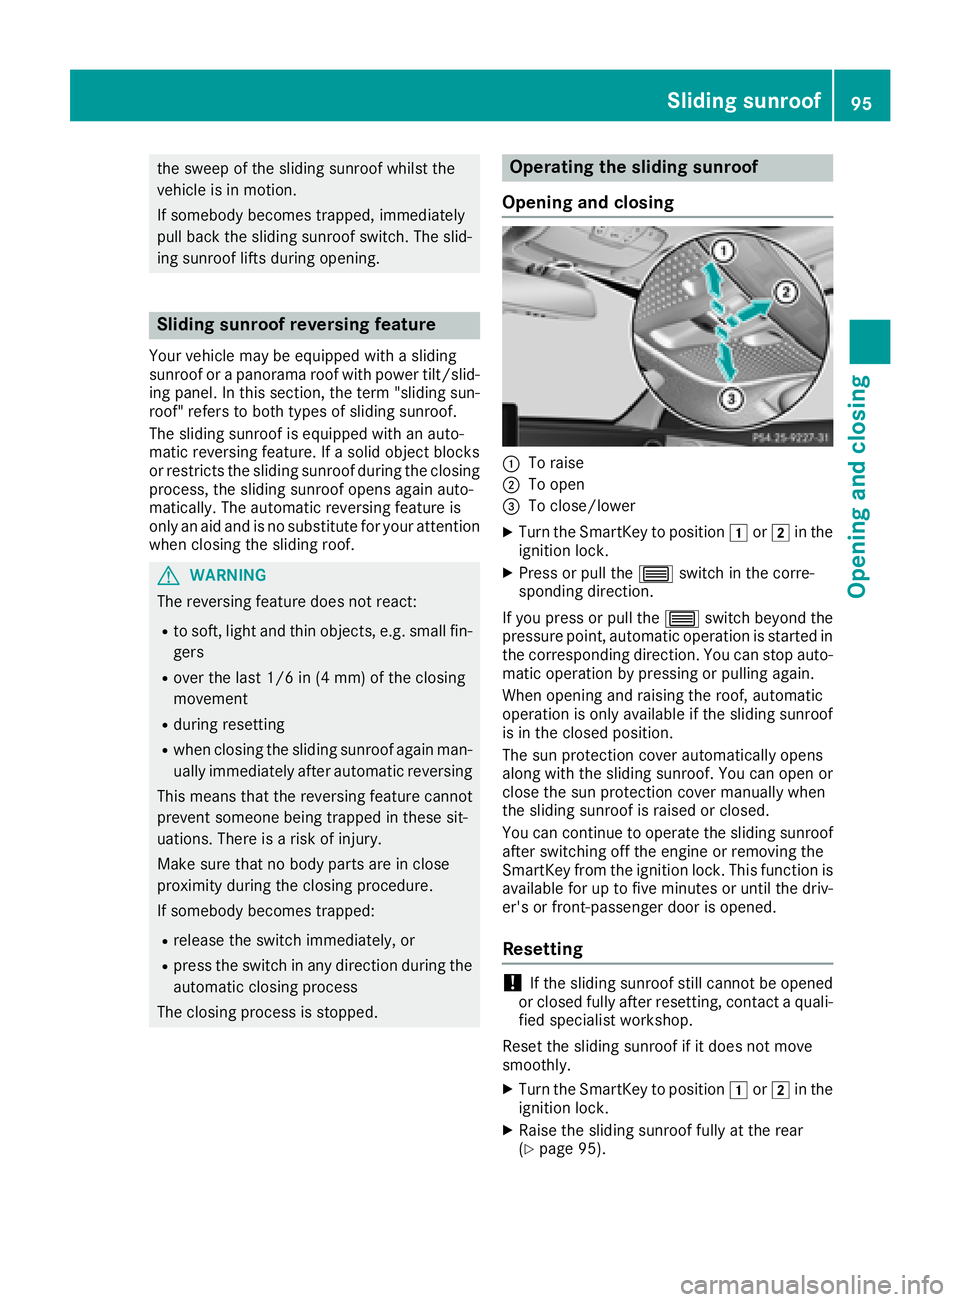
:To raise
;To open
=To close/lower
XTurn the SmartKey to position 1or2 in the
ignition lock.
XPress or pull the 3switch in the corre-
sponding direction.
If you press or pull the 3switch beyond the
pressure point, automatic operation is started in the corresponding direction. You can stop auto-
matic operation by pressing or pulling again.
When opening and raising the roof, automatic
operation is only available if the sliding sunroof
is in the closed position.
The sun protection cover automatically opens
along with the sliding sunroof. You can open or
close the sun protection cover manually when
the sliding sunroof is raised or closed.
You can continue to operate the sliding sunroof
after switching off the engine or removing the
SmartKey from the ignition lock. This function isavailable for up to five minutes or until the driv-
er's or front-passenger door is opened.
Resetting
!If the sliding sunroof still cannot be opened
or closed fully after resetting, contact a quali- fied specialist workshop.
Reset the sliding sunroof if it does not move
smoothly.
XTurn the SmartKey to position 1or2 in the
ignition lock.
XRaise the sliding sunroof fully at the rear
(Ypage 95).
Sliding sunroof95
Opening and closing
Z
Page 98 of 370
XKeep the3switch pressed for another
second.
XMake sure that the sliding sunroof can be fully opened and closed again (Ypage 95).
XIf this is not the case, repeat the steps above.
Operating the panorama roof with
power tilt/sliding panel
Opening and closing
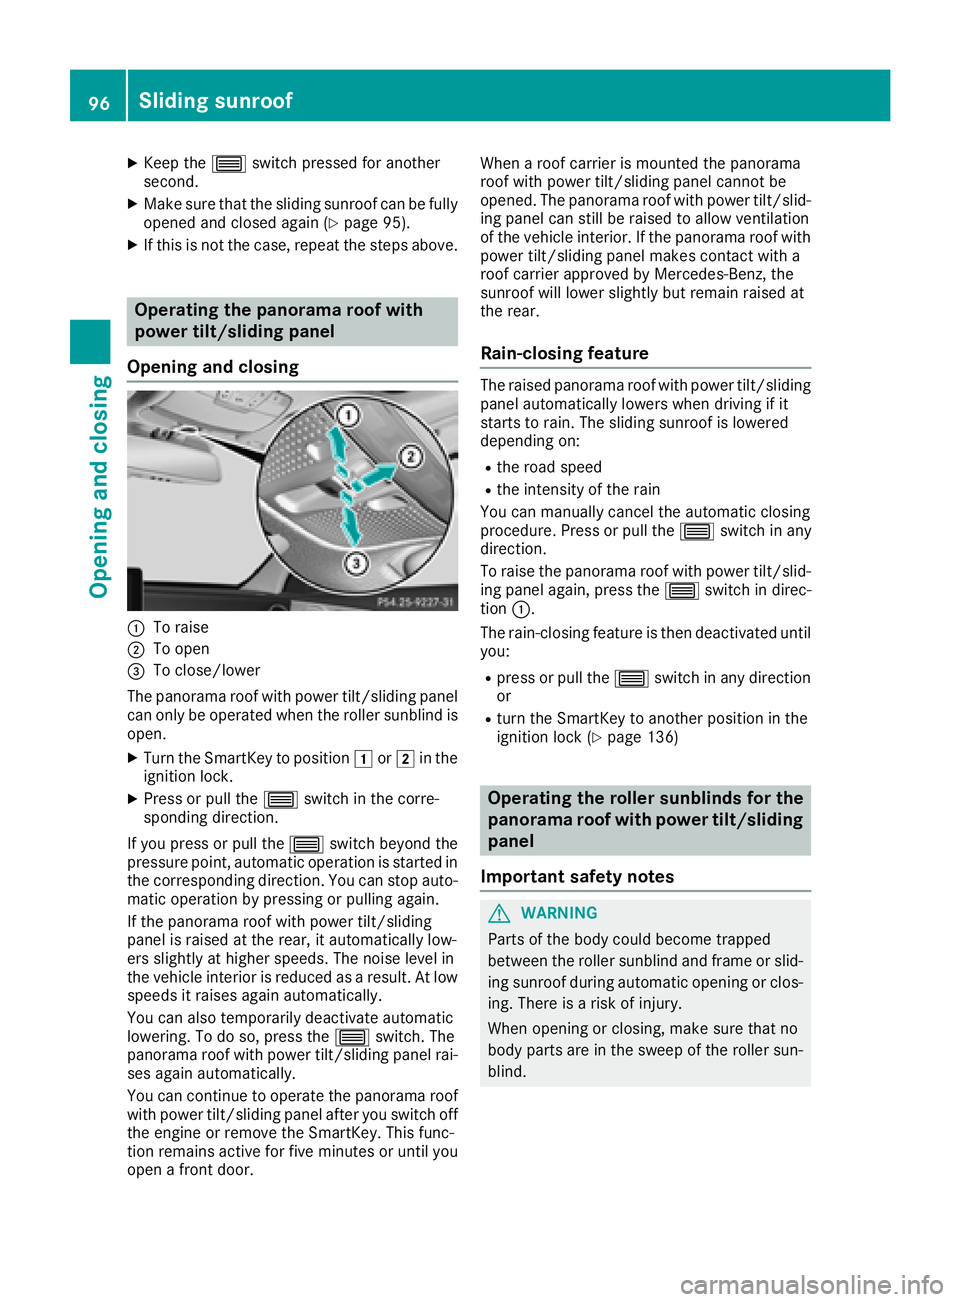
:To raise
;To open
=To close/lower
The panorama roof with power tilt/sliding panel
can only be operated when the roller sunblind is
open.
XTurn the SmartKey to position 1or2 in the
ignition lock.
XPress or pull the 3switch in the corre-
sponding direction.
If you press or pull the 3switch beyond the
pressure point, automatic operation is started in the corresponding direction. You can stop auto-
matic operation by pressing or pulling again.
If the panorama roof with power tilt/sliding
panel is raised at the rear, it automatically low-
ers slightly at higher speeds. The noise level in
the vehicle interior is reduced as a result. At low
speeds it raises again automatically.
You can also temporarily deactivate automatic
lowering. To do so, press the 3switch. The
panorama roof with power tilt/sliding panel rai-
ses again automatically.
You can continue to operate the panorama roof
with power tilt/sliding panel after you switch off the engine or remove the SmartKey. This func-
tion remains active for five minutes or until you
open a front door. When a roof carrier is mounted the panorama
roof with power tilt/sliding panel cannot be
opened. The panorama roof with power tilt/slid-
ing panel can still be raised to allow ventilation
of the vehicle interior. If the panorama roof with
power tilt/sliding panel makes contact with a
roof carrier approved by Mercedes-Benz, the
sunroof will lower slightly but remain raised at
the rear.
Rain-closing feature
The raised panorama roof with power tilt/sliding
panel automatically lowers when driving if it
starts to rain. The sliding sunroof is lowered
depending on:
Rthe road speed
Rthe intensity of the rain
You can manually cancel the automatic closing
procedure. Press or pull the 3switch in any
direction.
To raise the panorama roof with power tilt/slid- ing panel again, press the 3switch in direc-
tion :.
The rain-closing feature is then deactivated until
you:
Rpress or pull the 3switch in any direction
or
Rturn the SmartKey to another position in the
ignition lock (Ypage 136)
Operating the roller sunblinds for the
panorama roof with power tilt/sliding
panel
Important safety notes
GWARNING
Parts of the body could become trapped
between the roller sunblind and frame or slid-
ing sunroof during automatic opening or clos-
ing. There is a risk of injury.
When opening or closing, make sure that no
body parts are in the sweep of the roller sun-
blind.
96Sliding sunroof
Opening and closing