seat adjustment MERCEDES-BENZ C-CLASS CABRIOLET 2016 Owners Manual
[x] Cancel search | Manufacturer: MERCEDES-BENZ, Model Year: 2016, Model line: C-CLASS CABRIOLET, Model: MERCEDES-BENZ C-CLASS CABRIOLET 2016Pages: 377, PDF Size: 6.9 MB
Page 50 of 377

Basic illustration
X Adjust the seat (Y page 100).
The seat backrest must be in an almost ver-
tical position.
X Pull the seat belt smoothly out of seat-belt
extender =and engage belt tongue ;into
belt buckle :.
The seat belt on the driver's seat and the
front-passenger seat may be tightened auto-
matically; see "Belt adjustment"
(Y page 47).
X If necessary, pull upwards on the seat belt in
front of your chest so that the belt sits tightly
across your body.
Releasing seat belts !
Make sure that the seat belt is fully rolled up.
Otherwise, the seat belt or belt tongue will be
trapped in the door or in the seat mechanism. This could damage the door, the door trim
panel and the seat belt. Damaged seat belts
can no longer fulfil their protective function
and must be replaced. Visit a qualified spe-
cialist workshop.
X Press release button in belt buckle, hold belt
tongue firmly and guide the seat belt back.
Seat belt adjustment The seat-belt adjustment is an integral part of
the PRE-SAFE ®
convenience function. This func-
tion adjusts the driver's and front-passenger
seat belt to the upper body of the occupants. The belt strap is tightened slightly when:
R the seat belt tongue is engaged in the belt
buckle and
R the ignition is switched on
The seat-belt adjustment will apply a certain
tightening force if any slack is detected between
the vehicle occupant and the seat belt. Do not
hold on to the seat belt tightly while it is adjust-
ing.
You can activate and deactivate the seat-belt
adjustment function using the multimedia sys-
tem. Information on activating and deactivating
the seat-belt adjustment function can be found
in the Digital Owner's Manual.
Belt warning for the driver and front
passenger The
7 seat belt warning lamp in the instru-
ment cluster reminds you that all vehicle occu-
pants must fasten their seat belts. It may light up
continuously or flash. A warning tone may also
sound.
The 7 seat belt warning lamp goes out and
the warning tone stops as soon as the driver's
and the co-driver's seat belts have been fas-
tened.
Rear seat belt status indicator The rear seat belt status indicator is available
only in certain countries.
The rear seat belt status indicator informs you
which rear seat belt is not fastened.
Cancelling the rear seat belt status indicator
immediately (Y page 241). Airbags
Introduction The airbag installation location is identified by
the label AIRBAG. Occupant safety
47Safety Z
Page 58 of 377
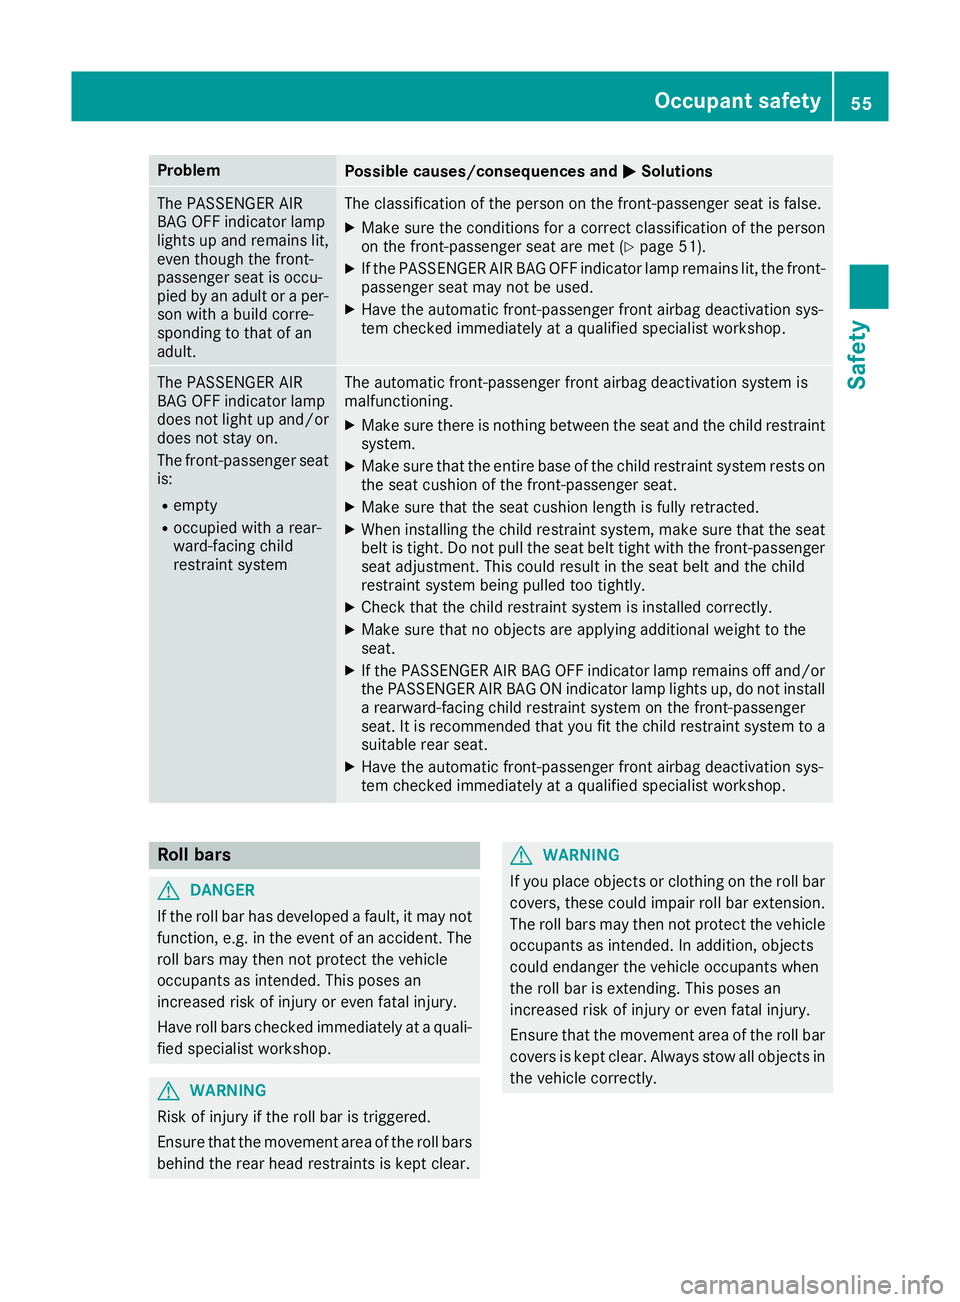
Problem
Possible causes/consequences and
M
MSolutions The PASSENGER AIR
BAG OFF indicator lamp
lights up and remains lit,
even though the front-
passenger seat is occu-
pied by an adult or a per-
son with a build corre-
sponding to that of an
adult. The classification of the person on the front-passenger seat is false.
X Make sure the conditions for a correct classification of the person
on the front-passenger seat are met (Y page 51).
X If the PASSENGER AIR BAG OFF indicator lamp remains lit, the front-
passenger seat may not be used.
X Have the automatic front-passenger front airbag deactivation sys-
tem checked immediately at a qualified specialist workshop. The PASSENGER AIR
BAG OFF indicator lamp
does not light up and/or
does not stay on.
The front-passenger seatis:
R empty
R occupied with a rear-
ward-facing child
restraint system The automatic front-passenger front airbag deactivation system is
malfunctioning.
X Make sure there is nothing between the seat and the child restraint
system.
X Make sure that the entire base of the child restraint system rests on
the seat cushion of the front-passenger seat.
X Make sure that the seat cushion length is fully retracted.
X When installing the child restraint system, make sure that the seat
belt is tight. Do not pull the seat belt tight with the front-passenger
seat adjustment. This could result in the seat belt and the child
restraint system being pulled too tightly.
X Check that the child restraint system is installed correctly.
X Make sure that no objects are applying additional weight to the
seat.
X If the PASSENGER AIR BAG OFF indicator lamp remains off and/or
the PASSENGER AIR BAG ON indicator lamp lights up, do not install
a rearward-facing child restraint system on the front-passenger
seat. It is recommended that you fit the child restraint system to a suitable rear seat.
X Have the automatic front-passenger front airbag deactivation sys-
tem checked immediately at a qualified specialist workshop. Roll bars
G
DANGER
If the roll bar has developed a fault, it may not function, e.g. in the event of an accident. The
roll bars may then not protect the vehicle
occupants as intended. This poses an
increased risk of injury or even fatal injury.
Have roll bars checked immediately at a quali-
fied specialist workshop. G
WARNING
Risk of injury if the roll bar is triggered.
Ensure that the movement area of the roll bars behind the rear head restraints is kept clear. G
WARNING
If you place objects or clothing on the roll bar covers, these could impair roll bar extension.
The roll bars may then not protect the vehicle occupants as intended. In addition, objects
could endanger the vehicle occupants when
the roll bar is extending. This poses an
increased risk of injury or even fatal injury.
Ensure that the movement area of the roll barcovers is kept clear. Always stow all objects in
the vehicle correctly. Occupant safety
55Safety Z
Page 61 of 377

Function
PRE-SAFE
®
intervenes:
R in emergency braking situations, e.g. when
BAS is activated
R in critical driving situations, e.g. when physi-
cal limits are exceeded and the vehicle under- steers or oversteers severely
R vehicles with the Driving Assistance package:
when a driver assistance system intervenes
powerfully or the radar sensor system detects
an imminent danger of collision in certain sit- uations
PRE-SAFE ®
takes the following measures
depending on the hazardous situation detected:
R the front seat belts are pre-tensioned
R if the vehicle skids, the front side windows are
closed
R vehicles with the memory function for the
front-passenger seat: the front-passenger
seat is adjusted if it is in an unfavourable
position
If the hazardous situation passes without result- ing in an accident, PRE-SAFE ®
slackens the belt
pre-tensioning. All settings made by PRE-SAFE ®
can then be reversed.
If the seat belt pre-tensioning is not reduced:
X Move the seat backrest or seat back slightly
when the vehicle is stationary.
Seat belt pre-tensioning is reduced and the
locking mechanism is released.
The seat-belt adjustment is an integral part of
the PRE-SAFE ®
convenience function. Informa-
tion about the convenience function can be
found under "Belt adjustment" (Y page 47).PRE-SAFE
®
PLUS (anticipatory occu-
pant protection PLUS)
Introduction PRE-SAFE
®
PLUS is only available in vehicles
with the Driving Assistance package.
Using the radar sensor system, PRE-SAFE ®
PLUS is able to detect that a head-on or rear-end
collision is imminent. In certain hazardous sit-
uations, PRE-SAFE ®
PLUS takes pre-emptive
measures to protect the vehicle occupants. Important safety notes The intervention of PRE-SAFE
®
PLUS cannot
prevent an imminent collision.
The driver is not warned before the intervention
of PRE-SAFE ®
PLUS.
PRE-SAFE ®
PLUS does not intervene:
R if the vehicle is reversing
R when the vehicle is towing a trailer and there
is a risk of a rear-end collision
When driving, or when parking or exiting a park- ing space with assistance from Active Parking
Assist, PRE-SAFE ®
PLUS will not apply the
brakes.
Function PRE-SAFE
®
PLUS intervenes in certain situa-
tions if the radar sensor system detects an
imminent head-on or rear-end collision.
PRE-SAFE ®
PLUS takes the following measures
depending on the hazardous situation detected:
R if the radar sensor system detects that a
head-on collision is imminent, the seat belts
are pre-tensioned
R if the radar sensor system detects that a rear-
end collision is imminent:
- the rear hazard warning lamps are activa-
ted and flash at a higher frequency
- the brake pressure is increased if the driver
applies the brakes when the vehicle is sta-
tionary
- the seat belts are pre-tensioned
The PRE-SAFE ®
PLUS braking application is can-
celled:
R if the accelerator pedal is depressed when a
gear is engaged
R if the risk of a collision passes or is no longer
detected
R if DISTRONIC PLUS indicates an intention to
pull away
If the hazardous situation passes without result- ing in an accident, the original settings are
restored. 58
Occupant safetySafety
Page 104 of 377
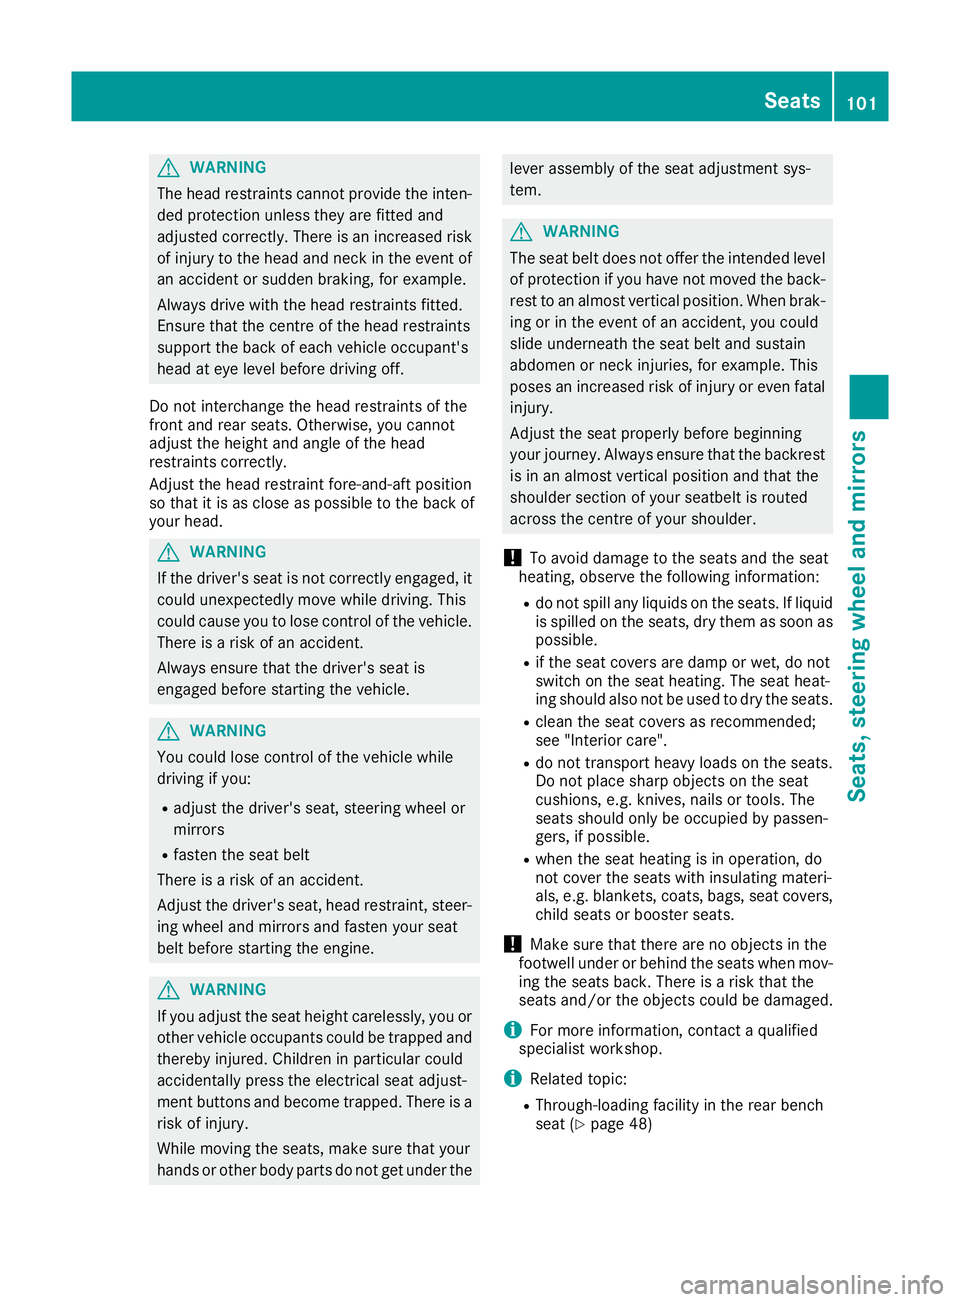
G
WARNING
The head restraints cannot provide the inten-
ded protection unless they are fitted and
adjusted correctly. There is an increased risk of injury to the head and neck in the event of
an accident or sudden braking, for example.
Always drive with the head restraints fitted.
Ensure that the centre of the head restraints
support the back of each vehicle occupant's
head at eye level before driving off.
Do not interchange the head restraints of the
front and rear seats. Otherwise, you cannot
adjust the height and angle of the head
restraints correctly.
Adjust the head restraint fore-and-aft position
so that it is as close as possible to the back of
your head. G
WARNING
If the driver's seat is not correctly engaged, it could unexpectedly move while driving. This
could cause you to lose control of the vehicle. There is a risk of an accident.
Always ensure that the driver's seat is
engaged before starting the vehicle. G
WARNING
You could lose control of the vehicle while
driving if you:
R adjust the driver's seat, steering wheel or
mirrors
R fasten the seat belt
There is a risk of an accident.
Adjust the driver's seat, head restraint, steer-
ing wheel and mirrors and fasten your seat
belt before starting the engine. G
WARNING
If you adjust the seat height carelessly, you or other vehicle occupants could be trapped andthereby injured. Children in particular could
accidentally press the electrical seat adjust-
ment buttons and become trapped. There is a
risk of injury.
While moving the seats, make sure that your
hands or other body parts do not get under the lever assembly of the seat adjustment sys-
tem.
G
WARNING
The seat belt does not offer the intended level of protection if you have not moved the back-
rest to an almost vertical position. When brak-
ing or in the event of an accident, you could
slide underneath the seat belt and sustain
abdomen or neck injuries, for example. This
poses an increased risk of injury or even fatal injury.
Adjust the seat properly before beginning
your journey. Always ensure that the backrest
is in an almost vertical position and that the
shoulder section of your seatbelt is routed
across the centre of your shoulder.
! To avoid damage to the seats and the seat
heating, observe the following information:
R do not spill any liquids on the seats. If liquid
is spilled on the seats, dry them as soon as possible.
R if the seat covers are damp or wet, do not
switch on the seat heating. The seat heat-
ing should also not be used to dry the seats.
R clean the seat covers as recommended;
see "Interior care".
R do not transport heavy loads on the seats.
Do not place sharp objects on the seat
cushions, e.g. knives, nails or tools. The
seats should only be occupied by passen-
gers, if possible.
R when the seat heating is in operation, do
not cover the seats with insulating materi-
als, e.g. blankets, coats, bags, seat covers,
child seats or booster seats.
! Make sure that there are no objects in the
footwell under or behind the seats when mov- ing the seats back. There is a risk that the
seats and/or the objects could be damaged.
i For more information, contact a qualified
specialist workshop.
i Related topic:
R Through-loading facility in the rear bench
seat (Y page 48) Seats
101Seats, steering wheel and mirrors Z
Page 105 of 377
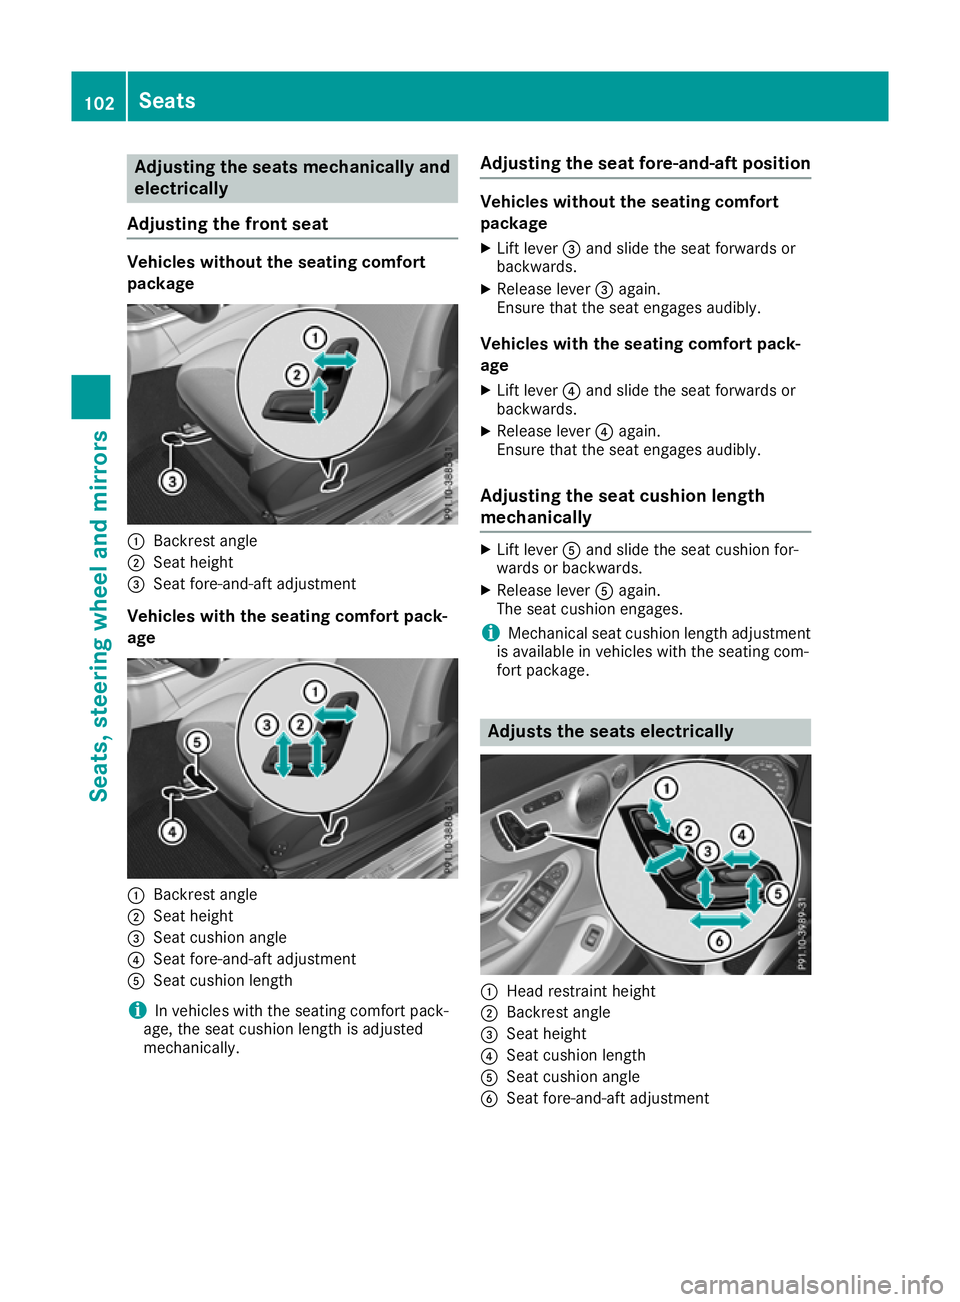
Adjusting the seats mechanically and
electrically
Adjusting the front seat Vehicles without the seating comfort
package :
Backrest angle
; Seat height
= Seat fore-and-aft adjustment
Vehicles with the seating comfort pack-
age :
Backrest angle
; Seat height
= Seat cushion angle
? Seat fore-and-aft adjustment
A Seat cushion length
i In vehicles with the seating comfort pack-
age, the seat cushion length is adjusted
mechanically. Adjusting the seat fore-and-aft position Vehicles without the seating comfort
package
X Lift lever =and slide the seat forwards or
backwards.
X Release lever =again.
Ensure that the seat engages audibly.
Vehicles with the seating comfort pack-
age X Lift lever ?and slide the seat forwards or
backwards.
X Release lever ?again.
Ensure that the seat engages audibly.
Adjusting the seat cushion length
mechanically X
Lift lever Aand slide the seat cushion for-
wards or backwards.
X Release lever Aagain.
The seat cushion engages.
i Mechanical seat cushion length adjustment
is available in vehicles with the seating com-
fort package. Adjusts the seats electrically
:
Head restraint height
; Backrest angle
= Seat height
? Seat cushion length
A Seat cushion angle
B Seat fore-and-aft adjustment 102
SeatsSeats
, steering wheel and mirrors
Page 107 of 377
Adjusting the head restraints electri-
cally X
To adjust the head restraint height: slide
the switch for the head restraint adjustment
(Y page 102) up or down in the direction of the
arrow.
Vehicles with AMG Performance Seat: the
height of the head restraint cannot be adjusted.
Fitting and removing rear head
restraints You can have the head restraints of the rear
seats removed and installed by a qualified spe-
cialist workshop. This may be necessary for the use of certain child seats. Folding the front seat backrests for-
wards/back
Important safety notes G
WARNING
The seat belt does not offer the intended level of protection if you have not moved the back-
rest to an almost vertical position. When brak-
ing or in the event of an accident, you could
slide underneath the seat belt and sustain
abdomen or neck injuries, for example. This
poses an increased risk of injury or even fatal injury.
Adjust the seat properly before beginning
your journey. Always ensure that the backrest
is in an almost vertical position and that the
shoulder section of your seatbelt is routed
across the centre of your shoulder. G
WARNING
When adjusting a seat, you or another vehicle occupant could become trapped by the guiderail of the seat, for instance. There is a risk of
injury.
Make sure that no one has any part of their
body within the sweep of the seat when
adjusting it. Observe the safety notes on "Airbags"
(Y
page 48) and "Children in the vehicle"
(Y page 59).
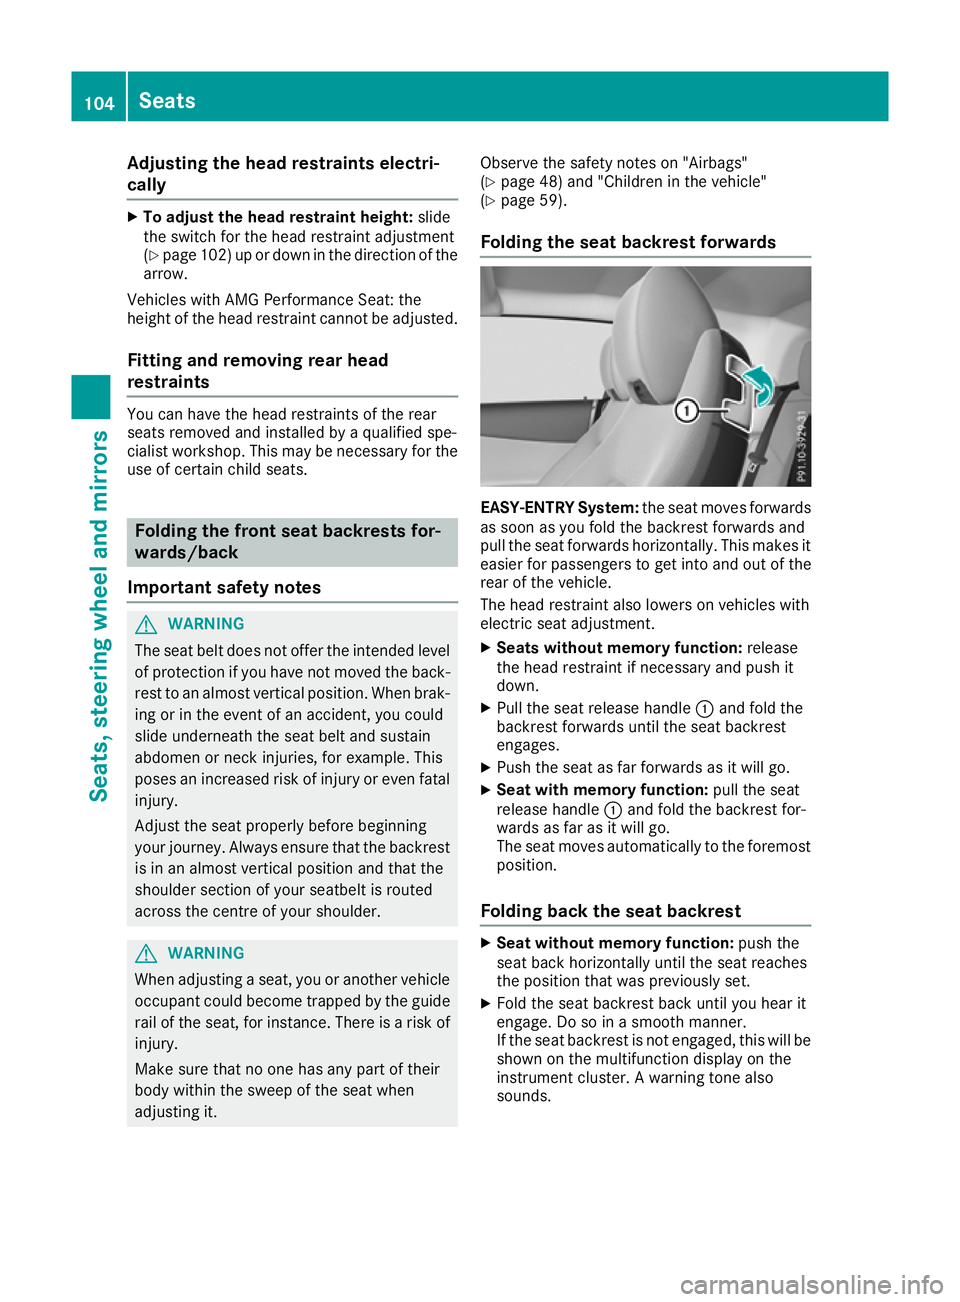
Folding the seat backrest forwards EASY-ENTRY System:
the seat moves forwards
as soon as you fold the backrest forwards and
pull the seat forwards horizontally. This makes it
easier for passengers to get into and out of the
rear of the vehicle.
The head restraint also lowers on vehicles with
electric seat adjustment.
X Seats without memory function: release
the head restraint if necessary and push it
down.
X Pull the seat release handle :and fold the
backrest forwards until the seat backrest
engages.
X Push the seat as far forwards as it will go.
X Seat with memory function: pull the seat
release handle :and fold the backrest for-
wards as far as it will go.
The seat moves automatically to the foremost
position.
Folding back the seat backrest X
Seat without memory function: push the
seat back horizontally until the seat reaches
the position that was previously set.
X Fold the seat backrest back until you hear it
engage. Do so in a smooth manner.
If the seat backrest is not engaged, this will be
shown on the multifunction display on the
instrument cluster. A warning tone also
sounds. 104
SeatsSeats
, steering wheel and mirrors
Page 110 of 377
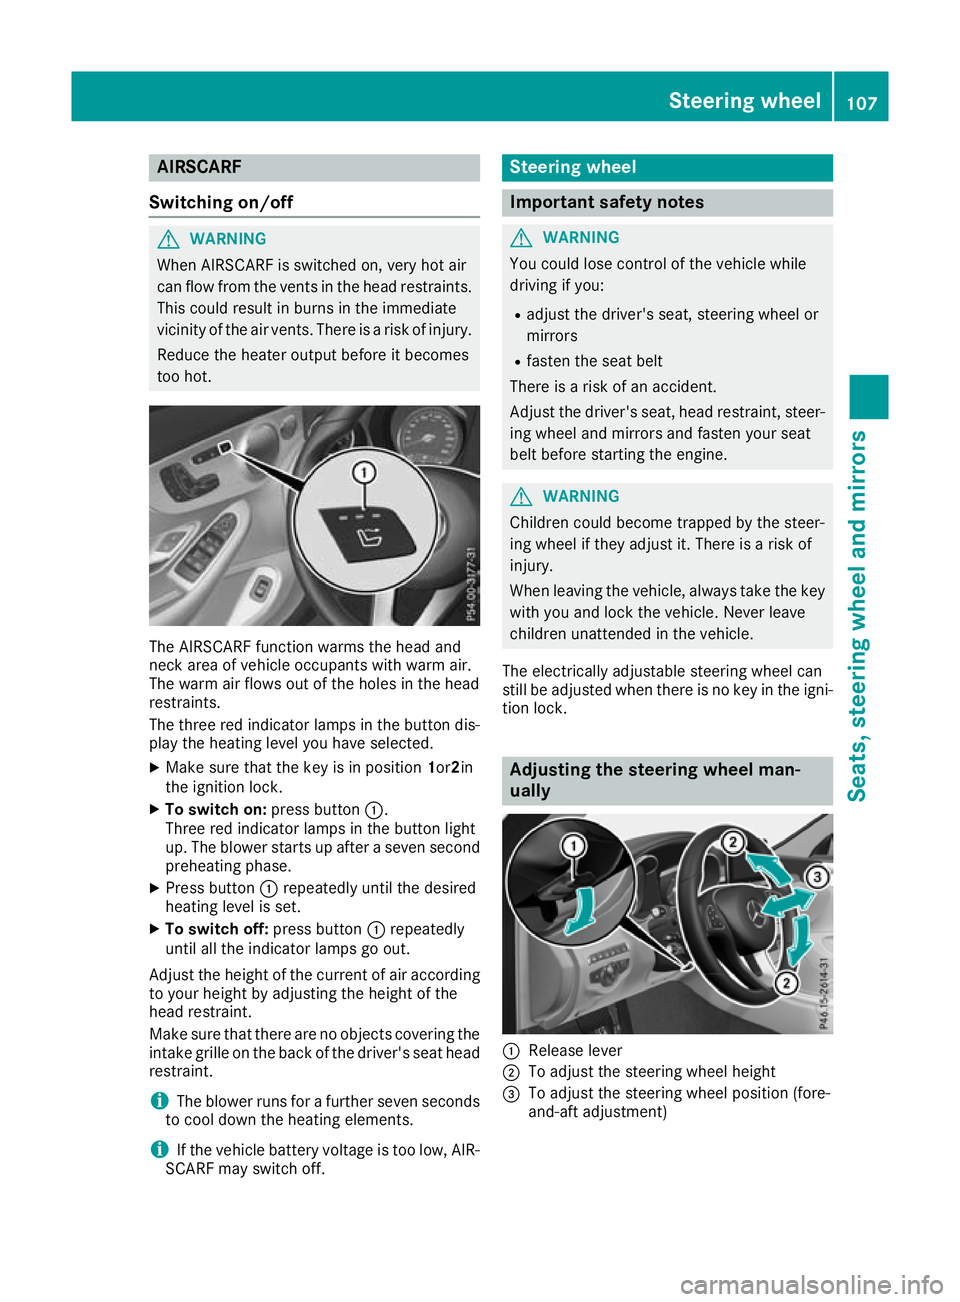
AIRSCARF
Switching on/off G
WARNING
When AIRSCARF is switched on, very hot air
can flow from the vents in the head restraints. This could result in burns in the immediate
vicinity of the air vents. There is a risk of injury.
Reduce the heater output before it becomes
too hot. The AIRSCARF function warms the head and
neck area of vehicle occupants with warm air.
The warm air flows out of the holes in the head
restraints.
The three red indicator lamps in the button dis-
play the heating level you have selected.
X Make sure that the key is in position 1or2in
the ignition lock.
X To switch on: press button:.
Three red indicator lamps in the button light
up. The blower starts up after a seven second
preheating phase.
X Press button :repeatedly until the desired
heating level is set.
X To switch off: press button:repeatedly
until all the indicator lamps go out.
Adjust the height of the current of air according
to your height by adjusting the height of the
head restraint.
Make sure that there are no objects covering the intake grille on the back of the driver's seat headrestraint.
i The blower runs for a further seven seconds
to cool down the heating elements.
i If the vehicle battery voltage is too low, AIR-
SCARF may switch off. Steering wheel
Important safety notes
G
WARNING
You could lose control of the vehicle while
driving if you:
R adjust the driver's seat, steering wheel or
mirrors
R fasten the seat belt
There is a risk of an accident.
Adjust the driver's seat, head restraint, steer-
ing wheel and mirrors and fasten your seat
belt before starting the engine. G
WARNING
Children could become trapped by the steer-
ing wheel if they adjust it. There is a risk of
injury.
When leaving the vehicle, always take the key with you and lock the vehicle. Never leave
children unattended in the vehicle.
The electrically adjustable steering wheel can
still be adjusted when there is no key in the igni-
tion lock. Adjusting the steering wheel man-
ually
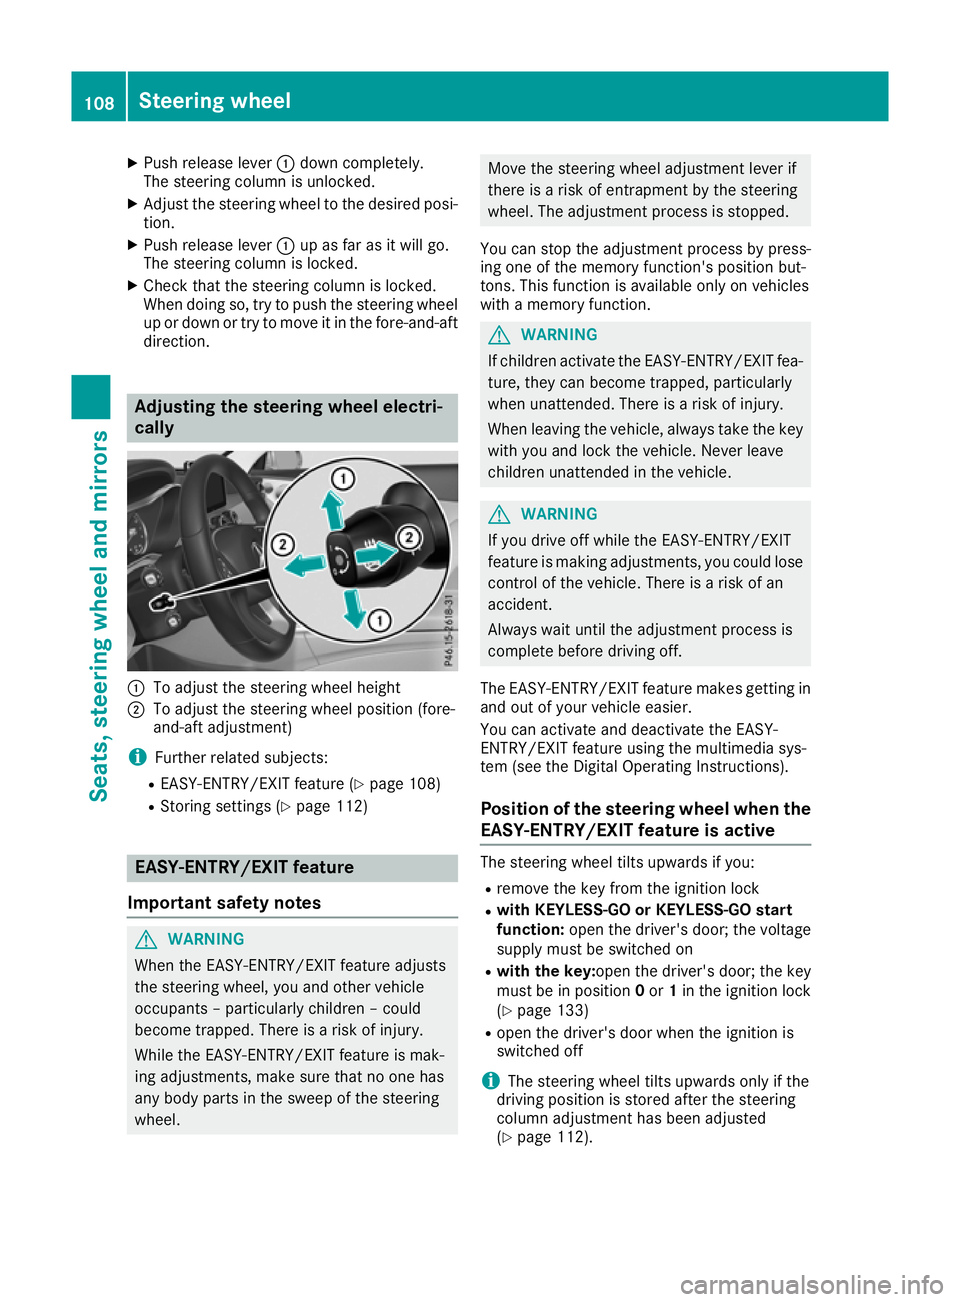
:
Release lever
; To adjust the steering wheel height
= To adjust the steering wheel position (fore-
and-aft adjustment) Steering wheel
107Seats, steering wheel and mirrors Z
Page 111 of 377
X
Push release lever :down completely.
The steering column is unlocked.
X Adjust the steering wheel to the desired posi-
tion.
X Push release lever :up as far as it will go.
The steering column is locked.
X Check that the steering column is locked.
When doing so, try to push the steering wheel up or down or try to move it in the fore-and-aft
direction. Adjusting the steering wheel electri-
cally
:
To adjust the steering wheel height
; To adjust the steering wheel position (fore-
and-aft adjustment)
i Further related subjects:
R EASY-ENTRY/EXIT feature (Y page 108)
R Storing settings (Y page 112)EASY-ENTRY/EXIT feature
Important safety notes G
WARNING
When the EASY-ENTRY/EXIT feature adjusts
the steering wheel, you and other vehicle
occupants – particularly children – could
become trapped. There is a risk of injury.
While the EASY-ENTRY/EXIT feature is mak-
ing adjustments, make sure that no one has
any body parts in the sweep of the steering
wheel. Move the steering wheel adjustment lever if
there is a risk of entrapment by the steering
wheel. The adjustment process is stopped.
You can stop the adjustment process by press-
ing one of the memory function's position but-
tons. This function is available only on vehicles
with a memory function. G
WARNING
If children activate the EASY-ENTRY/EXIT fea- ture, they can become trapped, particularly
when unattended. There is a risk of injury.
When leaving the vehicle, always take the key with you and lock the vehicle. Never leave
children unattended in the vehicle. G
WARNING
If you drive off while the EASY-ENTRY/EXIT
feature is making adjustments, you could lose
control of the vehicle. There is a risk of an
accident.
Always wait until the adjustment process is
complete before driving off.
The EASY-ENTRY/EXIT feature makes getting in
and out of your vehicle easier.
You can activate and deactivate the EASY-
ENTRY/EXIT feature using the multimedia sys-
tem (see the Digital Operating Instructions).
Position of the steering wheel when the
EASY-ENTRY/EXIT feature is active The steering wheel tilts upwards if you:
R remove the key from the ignition lock
R with KEYLESS-GO or KEYLESS-GO start
function: open the driver's door; the voltage
supply must be switched on
R with the key: open the driver's door; the key
must be in position 0or 1in the ignition lock
(Y page 133)
R open the driver's door when the ignition is
switched off
i The steering wheel tilts upwards only if the
driving position is stored after the steering
column adjustment has been adjusted
(Y page 112). 108
Steering wheelSeats, steering wheel and mirrors
Page 115 of 377

X
If the exterior mirror moves out of position,
repeat the steps.
X After successfully storing, reset the driving
position of the exterior mirror.
Calling up a stored parking position X
Turn the key to position 2in the ignition lock
(Y page 133).
X Select the front-passenger-side exterior mir-
ror using button =.
X Engage reverse gear.
The exterior mirror on the front-passenger
side moves to the stored parking position.
The exterior mirror on the front-passenger side
moves back to its original position:
R as soon as you exceed a speed of 15 km/h
R about ten seconds after you have disengaged
reverse gear
R when you press button ?to select the exte-
rior mirror on the driver's side Memory function
Important safety notes
G
WARNING
If you use the memory function on the driver's side while driving, the adjustments could
cause you to lose control of the vehicle. There
is a risk of an accident.
Only use the memory function on the driver's
side while the vehicle is stationary. G
WARNING
When the memory function adjusts the seat or steering wheel, you and other vehicle occu-
pants – particularly children – could become
trapped. There is a risk of injury.
While the memory function is making adjust-
ments, make sure that no one has any body
parts in the sweep of the seat or steering
wheel. If somebody becomes trapped, imme-
diately release the memory function position
button. The adjustment process is stopped. G
WARNING
If children activate the memory function, they
could become trapped, especially if they are
unattended. There is a risk of injury.
When leaving the vehicle, always take the key with you and lock the vehicle. Never leave
children unattended in the vehicle.
The memory function can be used at any time,
e.g. even when the key is not in the ignition lock. Storing settings
Using the memory function, you can store up to three different settings, e.g. for three different
people.
The following settings are stored as a single
memory preset:
R position of the seat, backrest and head
restraint
R driver's side: position of the exterior mirrors
on the driver's and front-passenger sides
R position of the head-up display X
Adjust the seat accordingly (Y page 102).
X On the driver's side, adjust the steering wheel
(Y page 108) and the exterior mirrors
(Y page 110).
X Press memory button Mand then press one of
the memory position buttons 1,2or 3within
three seconds.
The settings are stored in the selected mem-
ory position. A tone sounds when the settings have been completed. 112
Memory functionSeats, steering wheel and mirrors