wheel bolt torque MERCEDES-BENZ C-CLASS CABRIOLET 2016 Owners Manual
[x] Cancel search | Manufacturer: MERCEDES-BENZ, Model Year: 2016, Model line: C-CLASS CABRIOLET, Model: MERCEDES-BENZ C-CLASS CABRIOLET 2016Pages: 377, PDF Size: 6.9 MB
Page 27 of 377

Data acquisition ............................... 31
Display message ............................ 267
Electronics ....................................
.358
Equipment ....................................... 28
Implied warranty .............................. 31
Individual settings .......................... 232
Leaving parked up ......................... 163
Locking (in an emergency) .............. .89
Locking (key) ................................... 82
Lowering ........................................ 355
Operating safety .............................. 28
Parking .......................................... 159
Pulling away ................................... 135
Raising ........................................... 352
Registration ..................................... 31
Securing from rolling away ............ 352
Technical data ............................... 358
Towing away .................................. 336
Transporting .................................. 338
Unlocking (in an emergency) ........... 89
Unlocking (key) ................................ 82
Vehicle data ................................... 367
Vehicle data
Boot load (maximum) ..................... 367
Vehicle dimensions ........................... 367
Vehicle emergency locking ................ 89
Vehicle identification number
see VIN
Vehicle identification plate .............. 359
Vehicle level
AIRMATIC ...................................... 182
Display message ............................ 258
Vehicle tool kit .................................. 325
Video
Operating the DVD ......................... 229
See also Digital Owner's Manua l... 284
VIN
Seat ............................................... 360
Type plate ...................................... 359 W
Warning and indicator lamps ABS ................................................ 275
Brakes ........................................... 274
Distance warning signal ................. 281
ESP ®
.............................................. 275
ESP ®
OFF ....................................... 277 Fuel tank ........................................ 278
General notes ................................ 273
LIM (cruise control) ........................ 168
LIM (DISTRONIC PLUS) .................. 172
LIM (variable SPEEDTRONIC) ......... 170
Overview .......................................... 35
Parking brake ................................ 278
PASSENGER AIR BAG ...................... 43
Reserve fue
l................................... 278
Seat belt ........................................ 273
Steering ......................................... 283
Tyre pressure monitor ................... 282
Warning triangle ................................ 324
Washer fluid
Display message ............................ 271
Weather display (COMAND Online)
See also Digital Owner's Manua l... 284
Wheel and tyre combinations
Tyres .............................................. 355
Wheel bolt tightening torque ........... 355
Wheel chock ...................................... 352
Wheels
Changing a whee l.......................... 350
Changing/replacing ....................... 350
Checking ........................................ 343
Cleaning ......................................... 318
Emergency spare whee l................. 356
Fitting a new wheel ........................ 354
Fitting a wheel ............................... 351
Important safety notes .................. 342
Information on driving .................... 342
Removing a whee l.......................... 354
Snow chains .................................. 345
Storing ........................................... 351
Tightening torque ........................... 355
Wheel size/tyre size ...................... 355
Wind deflector (cleaning instruc-
tions) .................................................. 317
Windows
Cleaning ......................................... 318
see Side windows
Windscreen
Demisting ...................................... 128
Windscreen washer fluid
see Windscreen washer system
Windscreen washer system
Important safety notes .................. 367
Topping up ..................................... 312 24
Index
Page 356 of 377

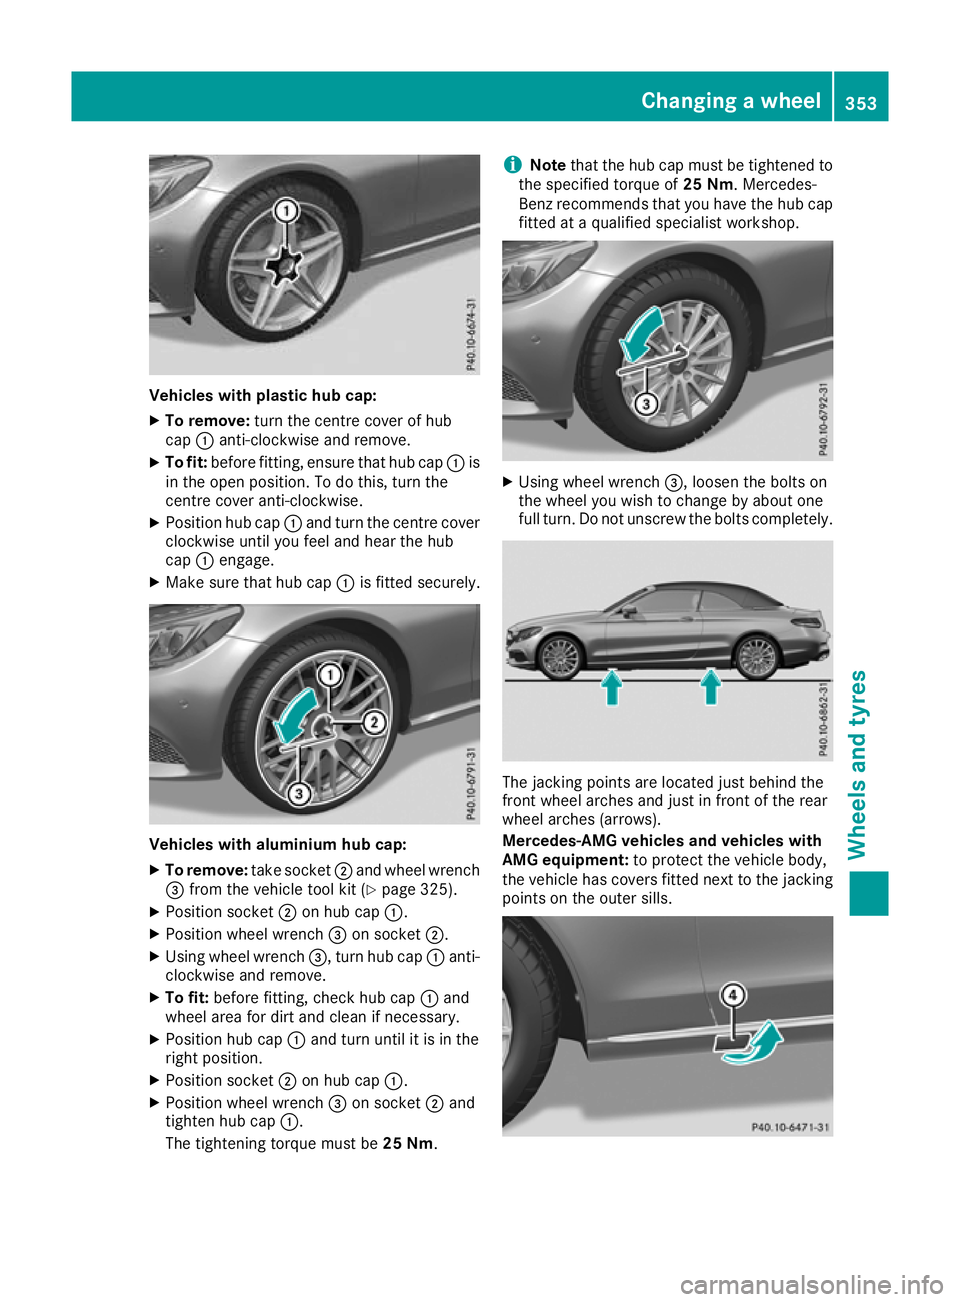
Vehicles with plastic hub cap:
X To remove: turn the centre cover of hub
cap :anti-clockwise and remove.
X To fit: before fitting, ensure that hub cap :is
in the open position. To do this, turn the
centre cover anti-clockwise.
X Position hub cap :and turn the centre cover
clockwise until you feel and hear the hub
cap :engage.
X Make sure that hub cap :is fitted securely. Vehicles with aluminium hub cap:
X To remove: take socket;and wheel wrench
= from the vehicle tool kit (Y page 325).
X Position socket ;on hub cap :.
X Position wheel wrench =on socket ;.
X Using wheel wrench =, turn hub cap:anti-
clockwise and remove.
X To fit: before fitting, check hub cap :and
wheel area for dirt and clean if necessary.
X Position hub cap :and turn until it is in the
right position.
X Position socket ;on hub cap :.
X Position wheel wrench =on socket ;and
tighten hub cap :.
The tightening torque must be 25 Nm.i
Note
that the hub cap must be tightened to
the specified torque of 25 Nm. Mercedes-
Benz recommends that you have the hub cap fitted at a qualified specialist workshop. X
Using wheel wrench =, loosen the bolts on
the wheel you wish to change by about one
full turn. Do not unscrew the bolts completely. The jacking points are located just behind the
front wheel arches and just in front of the rear
wheel arches (arrows).
Mercedes-AMG vehicles and vehicles with
AMG equipment:
to protect the vehicle body,
the vehicle has covers fitted next to the jacking
points on the outer sills. Changing a wheel
353Wheels and tyres Z
Page 358 of 377

for Mercedes-Benz vehicles and the respective
wheel.
! Mercedes AMG vehicles with ceramic-
brake disc: during removal and repositioning
of the wheel, the wheel rim can strike the
ceramic-brake disc and damage it. Therefore,
take precautions and have a second person
assist you. Alternatively, you can use a sec-
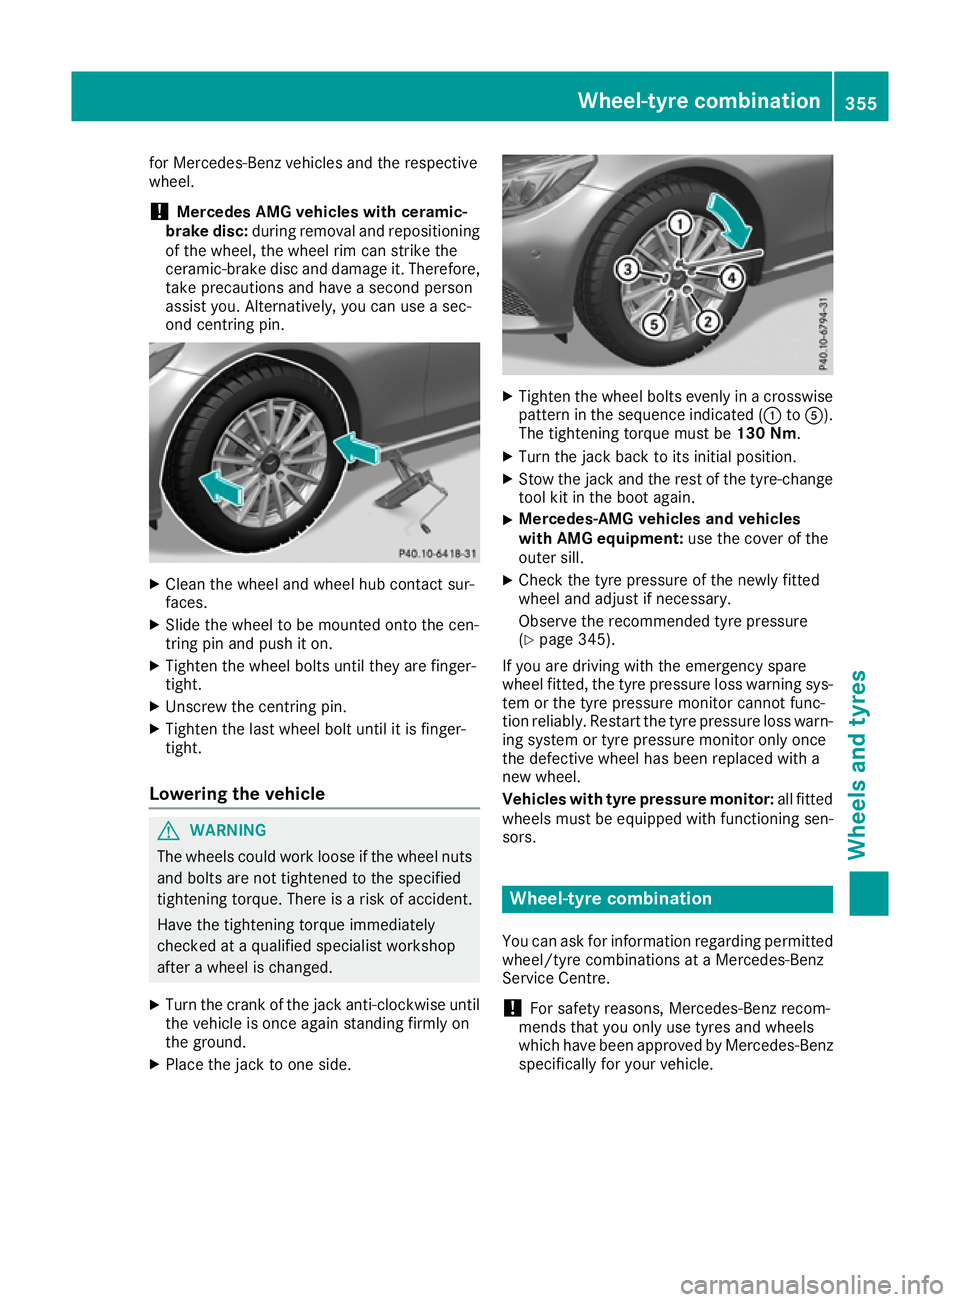
ond centring pin. X
Clean the wheel and wheel hub contact sur-
faces.
X Slide the wheel to be mounted onto the cen-
tring pin and push it on.
X Tighten the wheel bolts until they are finger-
tight.
X Unscrew the centring pin.
X Tighten the last wheel bolt until it is finger-
tight.
Lowering the vehicle G
WARNING
The wheels could work loose if the wheel nuts and bolts are not tightened to the specified
tightening torque. There is a risk of accident.
Have the tightening torque immediately
checked at a qualified specialist workshop
after a wheel is changed.
X Turn the crank of the jack anti-clockwise until
the vehicle is once again standing firmly on
the ground.
X Place the jack to one side. X
Tighten the wheel bolts evenly in a crosswise
pattern in the sequence indicated (: toA).
The tightening torque must be 130 Nm.
X Turn the jack back to its initial position.
X Stow the jack and the rest of the tyre-change
tool kit in the boot again.
X Mercedes-AMG vehicles and vehicles
with AMG equipment:
use the cover of the
outer sill.
X Check the tyre pressure of the newly fitted
wheel and adjust if necessary.
Observe the recommended tyre pressure
(Y page 345).
If you are driving with the emergency spare
wheel fitted, the tyre pressure loss warning sys-
tem or the tyre pressure monitor cannot func-
tion reliably. Restart the tyre pressure loss warn- ing system or tyre pressure monitor only once
the defective wheel has been replaced with a
new wheel.
Vehicles with tyre pressure monitor: all fitted
wheels must be equipped with functioning sen-
sors. Wheel-tyre combination
You can ask for information regarding permitted
wheel/tyre combinations at a Mercedes-Benz
Service Centre.
! For safety reasons, Mercedes-Benz recom-
mends that you only use tyres and wheels
which have been approved by Mercedes-Benz specifically for your vehicle. Wheel-tyre combination
355Wheels and tyres Z