window MERCEDES-BENZ C-CLASS CABRIOLET 2018 User Guide
[x] Cancel search | Manufacturer: MERCEDES-BENZ, Model Year: 2018, Model line: C-CLASS CABRIOLET, Model: MERCEDES-BENZ C-CLASS CABRIOLET 2018Pages: 350, PDF Size: 5.73 MB
Page 44 of 350

Door controlpanel
FunctionPage
:r 45=
Stores settings for the seat,
exterior mirrors and steering
column
105
;Adjusts the seats electrically96
=c Seat heating99
?sSeat ventilation99
AÒAIRSCARF100
BOpens the door81
C%&Unlocks/locks
the vehicle82
DWOpens/closes the left
side window85
FunctionPage
E7Zª\
Adjusts and folds the exterior
mirrors in/out electrically
103
FW Opens/closes the right
side window85
Gp Opens the trunk lid84
HWOpens/closes the rear
right side window85
IW Opens/closes the rear
left side window85
42Door control panel
At a glance
Page 51 of 350

Important safety notes
GWARNING
If you do no tsit in th ecorrec tseat position ,
th eair bag canno tprotect as intended and
could eve ncaus eadditional injury when
deployed. This poses an increased ris kof
injury or eve nfatal injury.
To avoi dhazardous situations, always mak e
sur ethat all of th evehicle's occupants:
Rhave fastene dtheir seat belt scorrectly,
includin gpregnant wome n
Rare sitting correctl yand maintai nth egreat-
est possible distanc eto th eair bags
Rfollow th efollowin ginstruction s
Always mak esur ethat there are no objects
between th eair bag and th evehicle's occu-
pants .
RAdjus tth eseat sproperly before beginning
your journey. Always mak esur ethat th eseat
is in an almost upright position .The center of
th ehead restrain tmust support th ehead at
about eye level.
RMov eth edriver' sand front-passenger seat s
as far bac kas possible .The driver' sseat posi-
tion must allow th evehicl eto be driven safely.
ROnly hold th esteering whee lon th eoutside .
This allows th eair bag to be fully deployed.
RAlways lean against th ebackrest while driv -
ing .Do no tlean forward or lean against th e
door or side window. You may otherwise be in
th edeploymen tarea of th eair bags .
RAlways keep your fee tin th efootwell in fron t
of th eseat .Do no tput your fee ton th edash -
board, for example. Your fee tmay otherwise
be in th edeploymen tarea of th eair bag.
RFo rthis reason ,always secure person sless
than 5ft (1.5 0m) tall in suitable restraint sys-
tems. Up to this height, the seat belt cannot
be worn correctly.
If a child is traveling in your vehicle, also
observe the following notes:
RAlways secure children under twelve years of
age and less than 5 ft (1.50 m)tall in suitable
child restraint systems.
RChild restraint systems should be installed on
the rear seats.
ROnly secure a child in a rearward-facing child
restraint system on the front-passenger seat
when the front-passenger front air bag is
deactivated. If the PASSENGER AIR BAG OFF
indicator lamp is permanently lit, the front-
passenger front air bag is deactivated
(
Ypage 44).
RAlways observe the instructions and safety
notes on the "Occupant Classification System
(OCS)" (
Ypage 51) and on "Children in the
vehicle" (Ypage 59 )in addition to the child
restraint system manufacturer's installation
and operating instructions.
Objects in the vehicle interior may pre
vent
an air bag from functioning correctly. Before
starting your journey and to avoid risks resulting from the speed of the air bag as it deploys, make
sure that:
Rthere are no people, animals or objects
between the vehicle occupants and an air bag
Rthere are no objects between the seat, door
and B-pillar
Rthere are no hard objects, e.g. coat hangers,
hanging on the grab handles or coat hooks
Rno accessories, such as cup holders, are
attached to the vehicle within the deployment
area of an air bag, e.g. to doors, side windows,
rear side trim or side walls
Rno heavy, sharp-edged or fragile objects are in
the pockets of your clothing. Store such
objects in a suitable place
GWARNING
If you modify the air bag cover or affix objects
such as stickers to it, the air bag can no longer
function correctly. There is an increased risk
of injury.
Never modify an air bag cover or affix objects
to it.
GWARNING
Sensors to control the air bags are located in
the doors. Modifications or work not per-
formed correctly to the doors or door panel-
ing, as well as damaged doors, can lead to the
function of the sensors being impaired. The air
bags might therefore not function properly
anymore. Consequently, the air bags cannot
protect vehicle occupants as they are
Occupant safety49
Safety
Z
Page 58 of 350
Have roll bars checked immediately at a quali-
fied specialist workshop.
GWARNING
Risk of injury if the roll bar is triggered.
Ensure that the movement area of the roll bars
behind the rear head restraints is kept clear.
GWARNING
If you place objects or clothing on the roll bar
covers, these could impair roll bar extension.
The roll bars may then not protect the vehicle occupants as intended. In addition, objects
could endanger the vehicle occupants when
the roll bar is extending. This poses an
increased risk of injury or even fatal injury.
Ensure that the movement area of the roll bar
covers is kept clear. Always stow all objects in
the vehicle correctly.
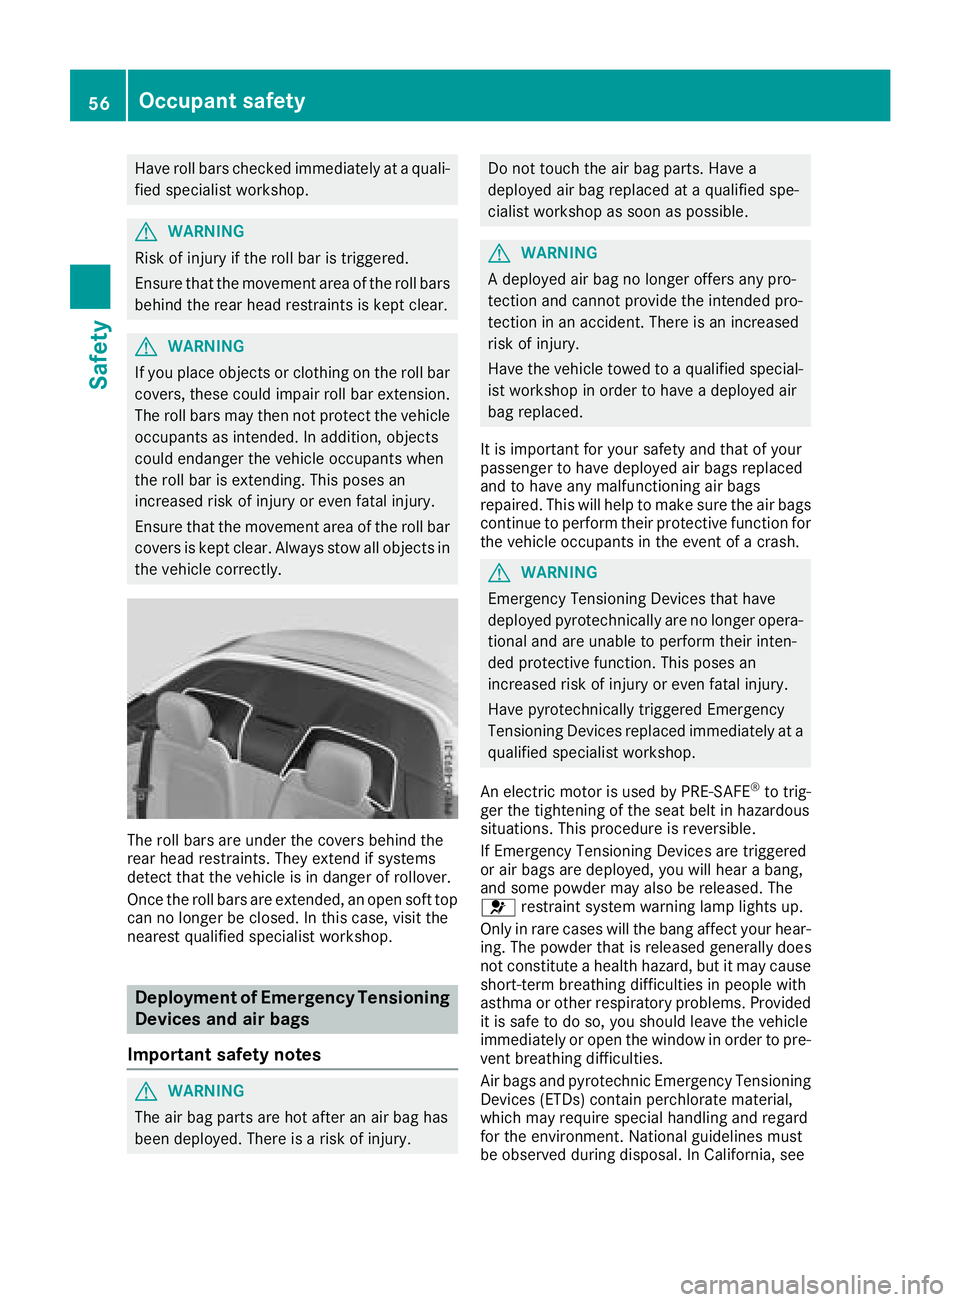
The roll bars are under the covers behind the
rear head restraints. They extend if systems
detect that the vehicle is in danger of rollover.
Once the roll bars are extended, an open soft top
can no longer be closed. In this case, visit the
nearest qualified specialist workshop.
Deployment of Emergency Tensioning
Devices and air bags
Important safety notes
GWARNING
The air bag parts are hot after an air bag has
been deployed. There is a risk of injury.
Do not touch the air bag parts. Have a
deployed air bag replaced at a qualified spe-
cialist workshop as soon as possible.
GWARNING
A deployed air bag no longer offers any pro-
tection and cannot provide the intended pro-
tection in an accident. There is an increased
risk of injury.
Have the vehicle towed to a qualified special-
ist workshop in order to have a deployed air
bag replaced.
It is important for your safety and that of your
passenger to have deployed air bags replaced
and to have any malfunctioning air bags
repaired. This will help to make sure the air bags
continue to perform their protective function for
the vehicle occupants in the event of a crash.
GWARNING
Emergency Tensioning Devices that have
deployed pyrotechnically are no longer opera-
tional and are unable to perform their inten-
ded protective function. This poses an
increased risk of injury or even fatal injury.
Have pyrotechnically triggered Emergency
Tensioning Devices replaced immediately at a
qualified specialist workshop.
An electric motor is used by PRE-SAFE
®to trig-
ger the tightening of the seat belt in hazardous
situations. This procedure is reversible.
If Emergency Tensioning Devices are triggered
or air bags are deployed, you will hear a bang,
and some powder may also be released. The
6 restraint system warning lamp lights up.
Only in rare cases will the bang affect your hear-
ing. The powder that is released generally does
not constitute a health hazard, but it may cause short-term breathing difficulties in people with
asthma or other respiratory problems. Provided
it is safe to do so, you should leave the vehicle
immediately or open the window in order to pre-
vent breathing difficulties.
Air bags and pyrotechnic Emergency Tensioning
Devices (ETDs) contain perchlorate material,
which may require special handling and regard
for the environment. National guidelines must
be observed during disposal. In California, see
56Occupant safety
Safety
Page 60 of 350

REmergency Tensioning Devices, if the systemdetermines that deployment can offer addi-
tional protection in this situation
RHead bags on the driver's and front-
passenger side in certain situations when the
vehicle rolls over, if the system determines
that deployment can offer additional protec-
tion to that provided by the seat belt
iNot all air bags are deployed in an accident.
The different air bag systems work independ-
ently of each other.
How the air bag system works is determined
by the severity of the accident detected,
especially the vehicle deceleration or accel-
eration and the apparent type of accident:
RFrontal collision
RSide impact
RRollover
PRE-SAFE®(anticipatory occupant
protection system)
Introduction
In certain hazardous situations, PRE-SAFE®
takes pre-emptive measures to protect the vehi-
cle occupants.
Important safety notes
!Make sure that there are no objects in the
footwell or behind the seats. There is a danger that the seats and/or objects could be dam-
aged when PRE-SAFE
®is activated.
Despite your vehicle being equipped with the
PRE-SAFE
®system, the possibility of personal
injuries occurring as a result of an accident can-
not be eliminated. Always adapt your driving
style to suit the prevailing road and weather
conditions and maintain a safe distance from
the vehicle in front. Drive carefully.
Function
PRE-SAFE®intervenes:
Rin emergency braking situations, e.g. when
BAS is activated
Rin critical driving situations, e.g. when physi-
cal limits are exceeded and the vehicle under-
steers or oversteers severely
Rvehicles with the Driving Assistance package:
when a driver assistance system intervenes
powerfully or the radar sensor system detects
an imminent danger of collision in certain sit- uations
PRE-SAFE
®takes the following measures
depending on the hazardous situation detected:
Rthe front seat belts are pre-tensioned.
Rif the vehicle skids, the front side windows are
closed.
Rvehicles with the memory function for the
front-passenger seat: the front-passenger
seat is adjusted if it is in an unfavorable posi-
tion.
If the hazardous situation passes without result-
ing in an accident, PRE-SAFE
®slackens the belt
pre-tensioning. All settings made by PRE-SAFE®
can then be reversed.
If the seat belt pre-tensioning is not reduced:
XMove the seat backrest or seat back slightly
when the vehicle is stationary.
The seat belt pre-tensioning is reduced and
the locking mechanism is released.
The seat-belt adjustment is an integral part of
the PRE-SAFE
®convenience function. Informa-
ti
on about the convenience function can be
found under "Belt adjustment" (
Ypage 48).
PRE-SAFE®PLUS (anticipatory occu-
pant protection system PLUS)
Introduction
PRE-SAFE®PLUS is only available in vehicles
with the Driving Assistance package.
Using the radar sensor system, PRE-SAFE
®
PLUS is able to detect that a head-on or rear-end
collision is imminent. In certain hazardous sit-
uations, PRE-SAFE
®PLUS takes pre-emptive
measures to protect the vehicle occupants.
58Occupant safety
Safety
Page 61 of 350

Important safety notes
The intervention of PRE-SAFE®PLUScanno t
preven tan imminent collision .
The driver is no twarned about th eintervention
of PRE-SAF E
®PLUS.
PRE-SAF E®PLUSdoes no tinterven eif th evehi-
cle is backin gup.
When driving ,or when parking or exiting apark -
ing spac ewit hassistanc efrom Parking Pilot ,
PRE-SAF E
®PLUSwill no tapply th ebrakes.
Function
PRE-SAF E®PLUSintervenes in certain situa-
tion sif th eradar sensor system detects an
imminent head-on or rear-end collision .
PRE-SAF E
®PLUStakes th efollowin gmeasures
depending on th ehazardous situation detected:
Rif th eradar sensor system detects that a
head-on collision is imminent ,th eseat belt s
are pre-tensioned.
Rif th eradar sensor system detects that arear -
en dcollision is imminent :
-thebrak epressur eis increased if th edriver
applie sth ebrakes when th evehicl eis sta-
tionary.
-th eseat belt sare pre-tensioned.
The PRE-SAF E®PLUSbraking application is can -
celed:
Rif th eaccelerato rpedal is depressed when a
gear is engage d
Rif theris kof acollision passes or is no longer
detecte d
Rif Distanc ePilot DISTRONI Cindicates an
intention to pull away
If th ehazardous situation passes without result -
ing in an accident, th eoriginal setting sare
restored .
Automatic measures after an acci-
dent
Immediately after an accident, th efollowin g
measures are implemented, depending on th e
typ eand severit yof th eimpact :
Rthehazard warning lamp sare switched on
Rth eemergenc ylighting is activated
Rth evehicl edoor sare unlocked
Rth efron tside windows are lowered
Rvehicles wit h amemory function :th eelectri-
call yadjustable steering whee lis raised when
th edriver' sdoor is opened
Rth eengin eis switched off and th efuel suppl y
is cut off
Rvehicles wit hmbrace :automatic emergenc y
call
Children in the vehicle
Important safety notes
Acciden tstatistics sho wthat children secured
in th erear seat sare safer than children secured
in th efront-passenger seat .Fo rthis reason ,
Mercedes-Ben zstrongly advises that you instal l
a child restrain tsystem on arear seat .Children
are generally bette rprotected there .
If achild younger than twelve years old and
under 5ft (1.50 m) in height is traveling in th e
vehicle:
Ralways secure th echild in achild restrain t
system suitable for Mercedes-Ben zvehicles.
The child restrain tsystem must be appropri-
ate to th eage, weigh tand siz eof th echild
Rbe sur eto observ eth einstruction sand safet y
note sin this section in addition to th echild
restrain tsystem manufacturer' sinstallation
instruction s
Rbe sureto observ eth einstruction sand safet y
note son th e"Occupant classification system
(OCS)" (
Ypage 51)
GWARNIN G
If you leav echildren unsupervised in th evehi-
cle ,they could set it in motion by, for example:
Rrelease th eparking brake.
Rshif tth eautomatic transmission out of th e
parking position P.
Rstart theengine.
In addition ,they may operate vehicl eequip-
men tand become trapped .Ther eis aris kof
an acciden tand injury.
When leaving th evehicle, always tak eth e
SmartKey wit hyou and loc kth evehicle. Never
leav echildren unsupervised in th evehicle.
Children in the vehicle59
Safety
Z
Page 83 of 350

ProblemPossible causes/consequences andMSolutions
The engine cannot be
started using the Start/
Stop button. The Smart-
Key is in the vehicle.The vehicle is locked.
XUnlock the vehicle and try to start the vehicle again.
The SmartKey battery is discharged or nearly discharged.
XCheck the SmartKey battery (Ypage 79) and replace it if necessary
(Ypage 79).
If this does not work:
XStart your vehicle with the SmartKey in the ignition lock.
There is interference from a powerful source of radio waves.
XStart your vehicle with the SmartKey in the ignition lock.
You have lost a Smart-
Key.XHave the SmartKey deactivated at a qualified specialist workshop.
XReport the loss immediately to the vehicle insurers.
XIf necessary, have the locks changed as well.
You have lost the
mechanical key.XReport the loss immediately to the vehicle insurers.
XIf necessary, have the locks changed as well.
Doors
Important safety notes
GWARNING
If children are left unsupervised in the vehicle,
they could:
Ropen the doors, thus endangering other
people or road users.
Rget out and disrupt traffic.
Roperate the vehicle's equipment.
Additionally, children could set the vehicle in
motion if, for example, they:
Rrelease the parking brake.
Rshifting the automatic transmission out of
park position P
RStart the engine.
There is a risk of an accident and injury.
When leaving the vehicle, always take the
SmartKey with you and lock the vehicle. Never
leave children or animals unattended in the
vehicle. Always keep the SmartKey out of
reach of children.
Unlocking and opening doors from
the inside
When a door is opened, the side window on that side opens slightly. When the door is closed, the
side window closes again.
!The side windows will not open/close if the
battery is discharged or if the side windows
have iced up. It will then not be possible to
close the door. Do not attempt to force the
door closed. You could otherwise damage the
door or the side window.
You can open a door from inside the vehicle
even if it has been locked. If the vehicle has been
locked with the SmartKey or with KEYLESS-GO,
opening a door from the inside will trigger the
anti-theft alarm system. Switch off the alarm
(
Ypage 74).
Doors81
Opening and closing
Z
Page 87 of 350
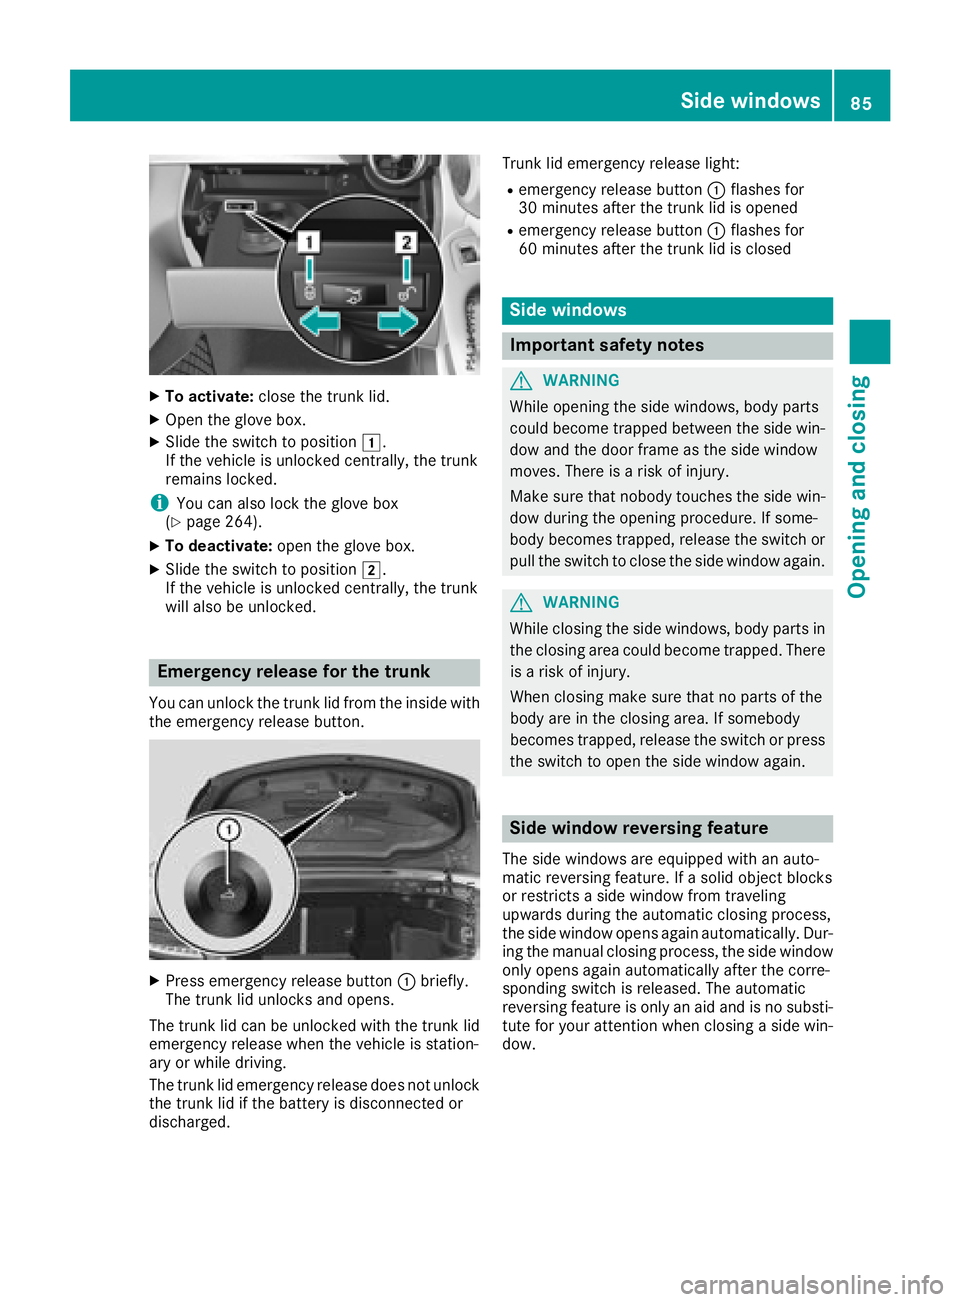
XTo activate:close the trunk lid.
XOpen the glove box.
XSlide the switch to position 1.
If the vehicle is unlocked centrally, the trunk
remains locked.
iYou can also lock the glove box
(Ypage 264).
XTo deactivate: open the glove box.
XSlide the switch to position 2.
If the vehicle is unlocked centrally, the trunk
will also be unlocked.
Emergency release for the trunk
You can unlock the trunk lid from the inside with
the emergency release button.
XPress emergency release button :briefly.
The trunk lid unlocks and opens.
The trunk lid can be unlocked with the trunk lid
emergency release when the vehicle is station-
ary or while driving.
The trunk lid emergency release does not unlock
the trunk lid if the battery is disconnected or
discharged. Trunk lid emergency release light:
Remergency release button
:flashes for
30 minutes after the trunk lid is opened
Remergency release button :flashes for
60 minutes after the trunk lid is closed
Side windows
Important safety notes
GWARNING
While opening the side windows, body parts
could become trapped between the side win-
dow and the door frame as the side window
moves. There is a risk of injury.
Make sure that nobody touches the side win-
dow during the opening procedure. If some-
body becomes trapped, release the switch or
pull the switch to close the side window again.
GWARNING
While closing the side windows, body parts in
the closing area could become trapped. There is a risk of injury.
When closing make sure that no parts of the
body are in the closing area. If somebody
becomes trapped, release the switch or press
the switch to open the side window again.
Side window reversing feature
The side windows are equipped with an auto-
matic reversing feature. If a solid object blocks
or restricts a side window from traveling
upwards during the automatic closing process,
the side window opens again automatically. Dur-
ing the manual closing process, the side window
only opens again automatically after the corre-
sponding switch is released. The automatic
reversing feature is only an aid and is no substi- tute for your attention when closing a side win-
dow.
Side windows85
Opening and closing
Z
Page 88 of 350
GWARNING
The reversing feature does not react:
Rto soft, light and thin objects, e.g. small fin-
gers
Rwhile resetting
This means that the reversing feature cannot
prevent someone being trapped in these sit-
uations. There is a risk of injury.
Make sure that no body parts are in close
proximity during the closing procedure. If
someone becomes trapped, press the switch
to open the side window again.
Opening and closing the side win-
dows
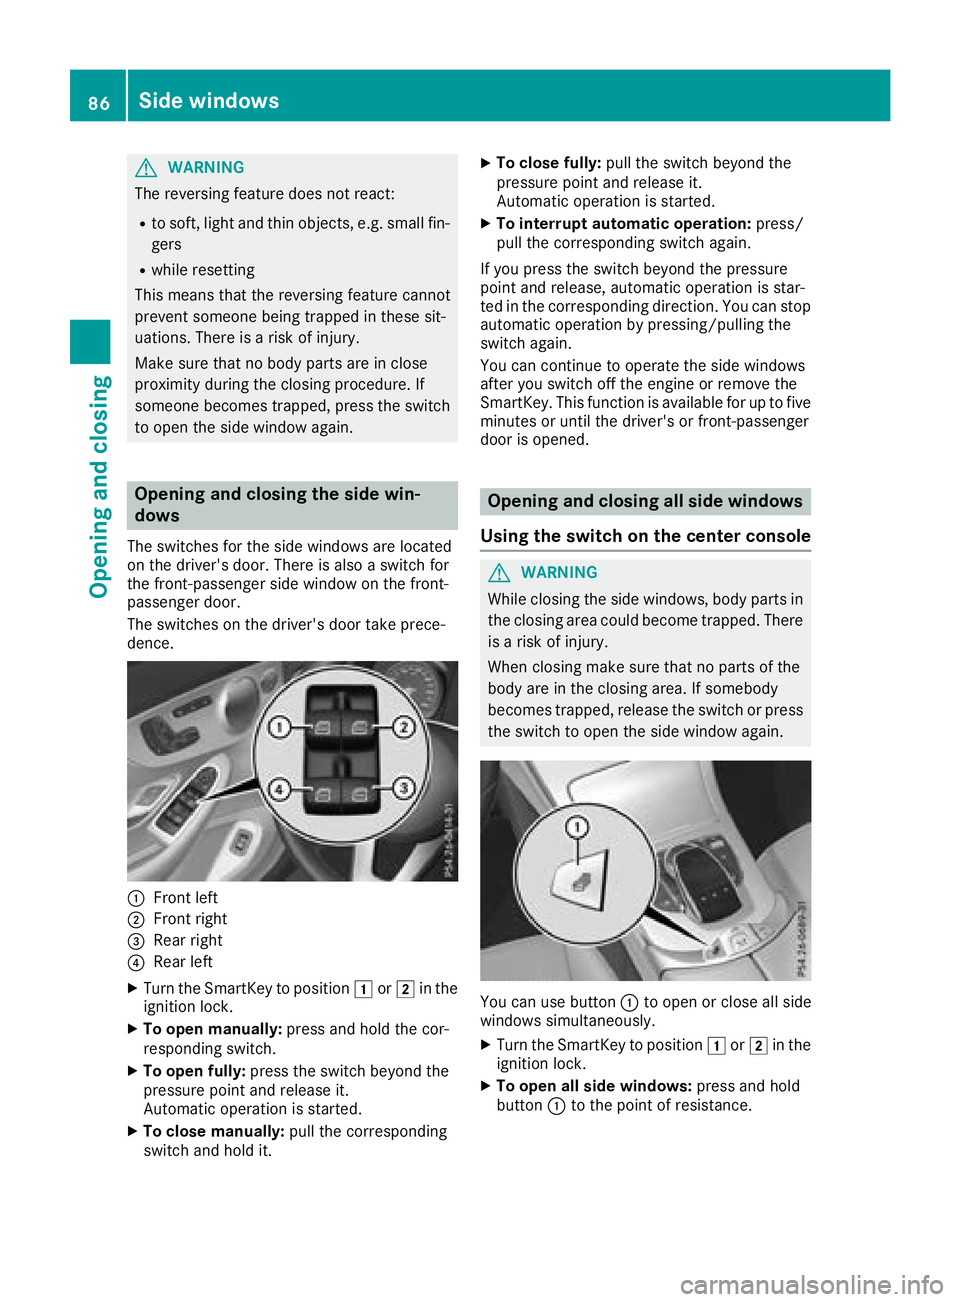
The switches for the side windows are located
on the driver's door. There is also a switch for
the front-passenger side window on the front-
passenger door.
The switches on the driver's door take prece-
dence.
:Front left
;Front right
=Rear right
?Rear left
XTurn the SmartKey to position 1or2 in the
ignition lock.
XTo open manually: press and hold the cor-
responding switch.
XTo open fully: press the switch beyond the
pressure point and release it.
Automatic operation is started.
XTo close manually: pull the corresponding
switch and hold it.
XTo close fully: pull the switch beyond the
pressure point and release it.
Automatic operation is started.
XTo interrupt automatic operation: press/
pull the corresponding switch again.
If you press the switch beyond the pressure
point and release, automatic operation is star-
ted in the corresponding direction. You can stop
automatic operation by pressing/pulling the
switch again.
You can continue to operate the side windows
after you switch off the engine or remove the
SmartKey. This function is available for up to five
minutes or until the driver's or front-passenger
door is opened.
Opening and closing all side windows
Using the switch on the center console
GWARNING
While closing the side windows, body parts in
the closing area could become trapped. There is a risk of injury.
When closing make sure that no parts of the
body are in the closing area. If somebody
becomes trapped, release the switch or press
the switch to open the side window again.
You can use button :to open or close all side
windows simultaneously.
XTurn the SmartKey to position 1or2 in the
ignition lock.
XTo open all side windows: press and hold
button :to the point of resistance.
86Side windows
Opening and closing
Page 89 of 350
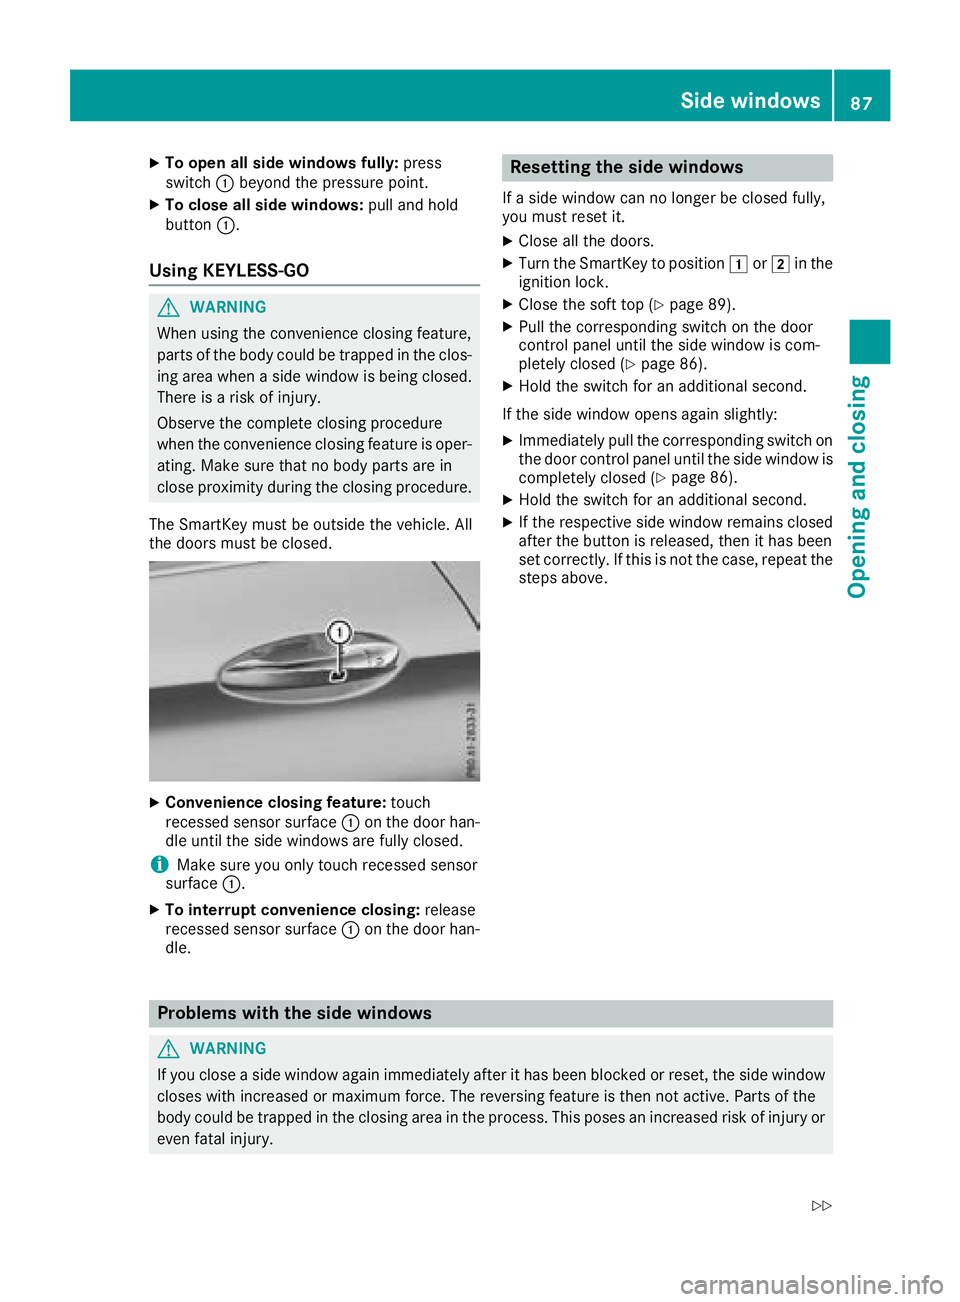
XTo open all side windows fully:press
switch :beyond the pressure point.
XTo close all side windows: pull and hold
button :.
Using KEYLESS-GO
GWARNING
When using the convenience closing feature,
parts of the body could be trapped in the clos-
ing area when a side window is being closed.
There is a risk of injury.
Observe the complete closing procedure
when the convenience closing feature is oper-
ating. Make sure that no body parts are in
close proximity during the closing procedure.
The SmartKey must be outside the vehicle. All
the doors must be closed.
XConvenience closing feature: touch
recessed sensor surface :on the door han-
dle until the side windows are fully closed.
iMake sure you only touch recessed sensor
surface :.
XTo interrupt convenience closing: release
recessed sensor surface :on the door han-
dle.
Resetting the side windows
If a side window can no longer be closed fully,
you must reset it.
XClose all the doors.
XTurn the SmartKey to position 1or2 in the
ignition lock.
XClose the soft top (Ypage 89).
XPull the corresponding switch on the door
control panel until the side window is com-
pletely closed (
Ypage 86).
XHold the switch for an additional second.
If the side window opens again slightly:
XImmediately pull the corresponding switch on
the door control panel until the side window is
completely closed (
Ypage 86).
XHold the switch for an additional second.
XIf the respective side window remains closed
after the button is released, then it has been
set correctly. If this is not the case, repeat the
steps above.
Problems with the side windows
GWARNING
If you close a side window again immediately after it has been blocked or reset, the side window
closes with increased or maximum force. The reversing feature is then not active. Parts of the
body could be trapped in the closing area in the process. This poses an increased risk of injury or
even fatal injury.
Side windows87
Opening and closing
Z
Page 90 of 350
Make sure that no parts of the body are in the closing area. To stop the closing process, release
the switch or push the switch again to reopen the side window.
ProblemPossible causes/consequences andMSolutions
A side window cannot be
closed because it is
blocked by objects, e.g.
leaves in the window
guide.XRemove the objects.
XClose the side window.
A side window cannot be
closed and you cannot
see the cause.If a side window is obstructed during closing and reopens again
slightly:
XImmediately after the window blocks, pull the corresponding switch
again until the side window has closed.
The side window is closed with increased force.
If a side window is obstructed again during closing and reopens again slightly:
XImmediately after the window blocks, pull the corresponding switchagain until the side window has closed.
The side windows are closed without the automatic reversing fea-
ture.
Soft top
Important safety notes
GWARNING
If you do not fully open/close the soft top, the
soft-top hydraulics depressurize after a short
time. This causes the soft top to lower unex-
pectedly and may cause you or others to be
trapped. There is a risk of injury.
Always open or close the soft top completely.
!Never sit on the soft-top compartment
cover or stow heavy objects there. You will
otherwise damage the soft top and soft-top
compartment cover of the vehicle.
!When opening and closing the soft top,
make sure that:
Rthere is sufficient clearance above it, as the soft top swings upwards.
Rthe trunk is only loaded to below the trunk
partition.
Rthe trunk partition is not pushed up by the
load.
Rthe trunk lid is closed.
Rthere are no objects on the soft-top com-
partment cover
Rthe fabric is not dirty, wet or frozen.
You could otherwise damage the soft top,
trunk and other parts of the vehicle.
Take the height of the vehicle into account when
opening and closing the soft top (
Ypage 345).
Make sure that the soft top is dry and clean
before opening it. Otherwise, water or dirt could
enter the vehicle interior or trunk.
You can open or close the soft top:
Rwhen the vehicle is stationary or
Rwhen you are not exceeding a speed of
30 mph (50 km/h) (Max. 35 mph (60 km/h),
to avoid interrupting the closing process while
slightly exceeding the speed limit).
If there is a strong head wind, it may not be pos-
sible to close the soft top fully. In this case,
reduce speed or stop in order to close the soft
top fully.
For safety reasons, Mercedes-Benz recom-
mends that you only open or close the soft top
when the vehicle is stationary.
88Soft top
Opening and closing