roof MERCEDES-BENZ C-CLASS CABRIOLET 2018 Owner's Manual
[x] Cancel search | Manufacturer: MERCEDES-BENZ, Model Year: 2018, Model line: C-CLASS CABRIOLET, Model: MERCEDES-BENZ C-CLASS CABRIOLET 2018Pages: 350, PDF Size: 5.73 MB
Page 9 of 350
see Flat tire
see Towing away
Brightness control (instrument
cluster lighting) ................................... 35
Buttons on the steering wheel ......... 193
C
California
Important notice for retail cus-
tomers and lessees .......................... 28
Calling up a malfunction
see Display messages
Calling up the climate control bar
Multimedia system ........................ 258
Calling up the climate control
menu
Multimedia system ........................ 258
Camera
see 360° camera
see Rear view camera
Car
see Vehicle
Car wash
see Care
Care
360° camera ................................. 292
AIRCAP .......................................... 289
Car wash ........................................2 86
Carpets .......................................... 294
Display ...........................................2 93
Exhaust pipe .................................. 292
Exterior lights ................................ 291
General notes ................................ 286
Interior ...........................................2 93
Matte finish ................................... 289
Paint .............................................. 288
Plastic trim ....................................2 93
Power washer ................................ 288
Rear view camera .......................... 292
Roof lining ...................................... 294
Seat belt ........................................ 294
Seat cover ..................................... 294
Selector lever ................................ 293
Sensors ......................................... 292
Soft top .......................................... 289
Steering wheel ............................... 293
Trim pieces .................................... 293 Washing by hand ........................... 287
Wheels ........................................... 291
Wind deflector ............................... 289
Wind screen ................................... 290
Windows ........................................ 291
Wiper blades .................................. 291
Wooden trim .................................. 293
Cargo tie down rings ......................... 266
CD
see also Digital Operator's Man-
ual .................................................. 253
CD player (on-board computer) ........ 201
Center console
Lower section .................................. 39
Lower section (Mercedes-AMG
vehicles) .......................................... 40
Upper section .................................. 38
Central locking
Locking/u
nlocking (SmartKey) ........ 76
Change of address .............................. 29
Change of ownership .......................... 29
Changing the media source ............. 200
Charge-air pressure (on-board
computer, Mercedes-AMG vehi-
cles) .................................................... 208
Child
Restraint system .............................. 60
Child seat
Forward-facing restraint system ...... 63
LATCH-type (ISOFIX) child seat
anchors ............................................ 61
On the front-passenger seat ............ 63
Rearward-facing restraint system .... 63
Top Tether ....................................... 62
Children
Special seat belt retractor ............... 60
Children in the vehicle
Important safety notes .................... 59
Cigarette lighter ................................ 270
Cleaning
Mirror turn signal ........................... 292
Climate control
Control panel for dual-zone auto-
matic climate control ..................... 115
Controlling automatically ............... 117
Cooling with air dehumidification .. 117
Index7
Page 20 of 350
Cleaning instructions .....................292
Display in the multimedia system .. 173
General notes ................................ 173
Object detection (function/
notes) ............................................ 176
Switching on/off ........................... 173
Wide-angle function ....................... 176
Rear window defroster
Problem (malfunction) ................... 119
Switching on/off ........................... 119
Rear-view mirror
Dipping (automatic) ....................... 104
Recuperation display ........................ 197
Reflective safety jacket .................... 295
Refrigerant (air-conditioning sys-
tem)
Important safety notes .................. 344
Refueling
Fuel gauge ....................................... 36
Important safety notes .................. 141
Refueling process .......................... 142
see Fuel
Remote control
Garage door opener ....................... 277
Programming (garage door
opener) .......................................... 278
Replacing bulbs
General notes ................................ 111
Reporting safety defects .................... 31
Rescue card ......................................... 32
Reserve (fuel tank)
see Fuel
Reserve fuel
Display message ............................ 227
Warning lamp ................................. 247
Restraint system
Display message ............................ 220
Introduction ..................................... 43
Warning lamp ................................. 247
Warning lamp (function) ................... 44
Reversing feature
Side windows ................................... 85
Roadside Assistance (breakdown) .... 29
Roll away protection
see HOLD function
Roll bar
Display message ............................ 221 Operation ......................................... 55
Roof
Overview .......................................... 88
see Soft top
Roof lining and carpets (cleaning
guidelines) ......................................... 294
Route guidance
see also Digital Operator's Man-
ual .................................................. 253
Route guidance active ...................... 198
S
Safety
Children in the vehicle ..................... 59
see Occupant safety
see Operating safety
Safety system
see Driving safety systems
SD card
Inserting/removing ........................ 261
Selecting ........................................ 201
SD memory card
see also Digital Operator's Man-
ual .................................................. 253
Search & Send
see also Digital Operator's Man-
ual .................................................. 253
Seat
Correct driver's seat position ........... 94
Seat belts
Adjusting the driver's and front-
passenger seat belt ......................... 48
Cleaning ......................................... 294
Correct usage .................................. 46
Fastening ......................................... 47
Important safety guidelines ............. 45
Introduction ..................................... 44
Releasing ......................................... 48
Warning lamp ................................. 241
Warning lamp (function) ................... 48
Seat function
see Seat
Seats
Adjusting (AMG Performance
Seat) ................................................ 98
Adjusting (electrically) ..................... 96
18Index
Page 29 of 350

Protecting the environment
General notes
HEnvironmental note
Daimler's declared policy is one of compre-
hensive environmental protection.
The objectives are for the natural resources
that form the basis of our existence on this
planet to be used sparingly and in a manner
that takes the requirements of both nature
and humanity into account.
You too can help to protect the environment
by operating your vehicle in an environmen-
tally responsible manner.
Fuel consumption and the rate of engine,
transmission, brake and tire wear are affected by these factors:
Roperating conditions of your vehicle
Ryour personal driving style
You can influence both factors. You should
bear the following in mind:
Operating conditions:
Ravoid short trips as these increase fuel con-
sumption.
Ralways make sure that the tire pressures
are correct.
Rdo not carry any unnecessary weight.
Rremove roof racks once you no longer need
them.
Ra regularly serviced vehicle will contribute
to environmental protection. You should
therefore adhere to the service intervals.
Ralways have service work carried out at a
qualified specialist workshop.
Personal driving style:
Rdo not depress the accelerator pedal when
starting the engine.
Rdo not warm up the engine when the vehicle
is stationary.
Rdrive carefully and maintain a safe distance
from the vehicle in front.
Ravoid frequent, sudden acceleration and
braking.
Rchange gear in good time and use each gear
only up to Ôof its maximum engine speed.
Rswitch off the engine in stationary traffic.
Rkeep an eye on the vehicle's fuel consump-
tion.
Environmental concerns and recom-
mendations
Wherever the Operator's Manual requires you to
dispose of materials, first try to regenerate or re-
use them. Observe the relevant environmental
rules and regulations when disposing of materi-
als. In this way you will help to protect the envi-
ronment.
Genuine Mercedes-Benz parts
HEnvironmental note
Daimler AG also supplies reconditioned major
assemblies and parts which are of the same
quality as new parts. They are covered by the
same Limited Warranty entitlements as new
parts.
!Air bags and Emergency Tensioning Devi-
ces, as well as control units and sensors for
these restraint systems, may be installed in
the following areas of your vehicle:
Rdoors
Rdoor pillars
Rdoor sills
Rseats
Rcockpit
Rinstrument cluster
Rcenter console
Do not install accessories such as audio sys-
tems in these areas. Do not carry out repairs or welding. You could impair the operating
efficiency of the restraint systems.
Have aftermarket accessories installed at a
qualified specialist workshop.
You could jeopardize the operating safety of
your vehicle if you use parts, tires and wheels as
well as accessories relevant to safety which
have not been approved by Mercedes-Benz. This
could lead to malfunctions in safety-relevant
Genuine Mercedes-Benz parts27
Introduction
Z
Page 54 of 350
cushion. Fully retract the seat cushion length.
The entire base of the child restraint system
must always rest on the seat cushion of the
front-passenger seat. The backrest of the
forward-facing child restraint system must lie as
flat as possible against the backrest of the front-
passenger seat.
The child restraint system must not touch the
roof or be subjected to a load by the head
restraint. Adjust the angle of the seat backrest
and the head restraint position accordingly.
Only then can OCS be guaranteed to function
correctly. Always observe the child restraint sys-
tem manufacturer's installation and operating
instructions.
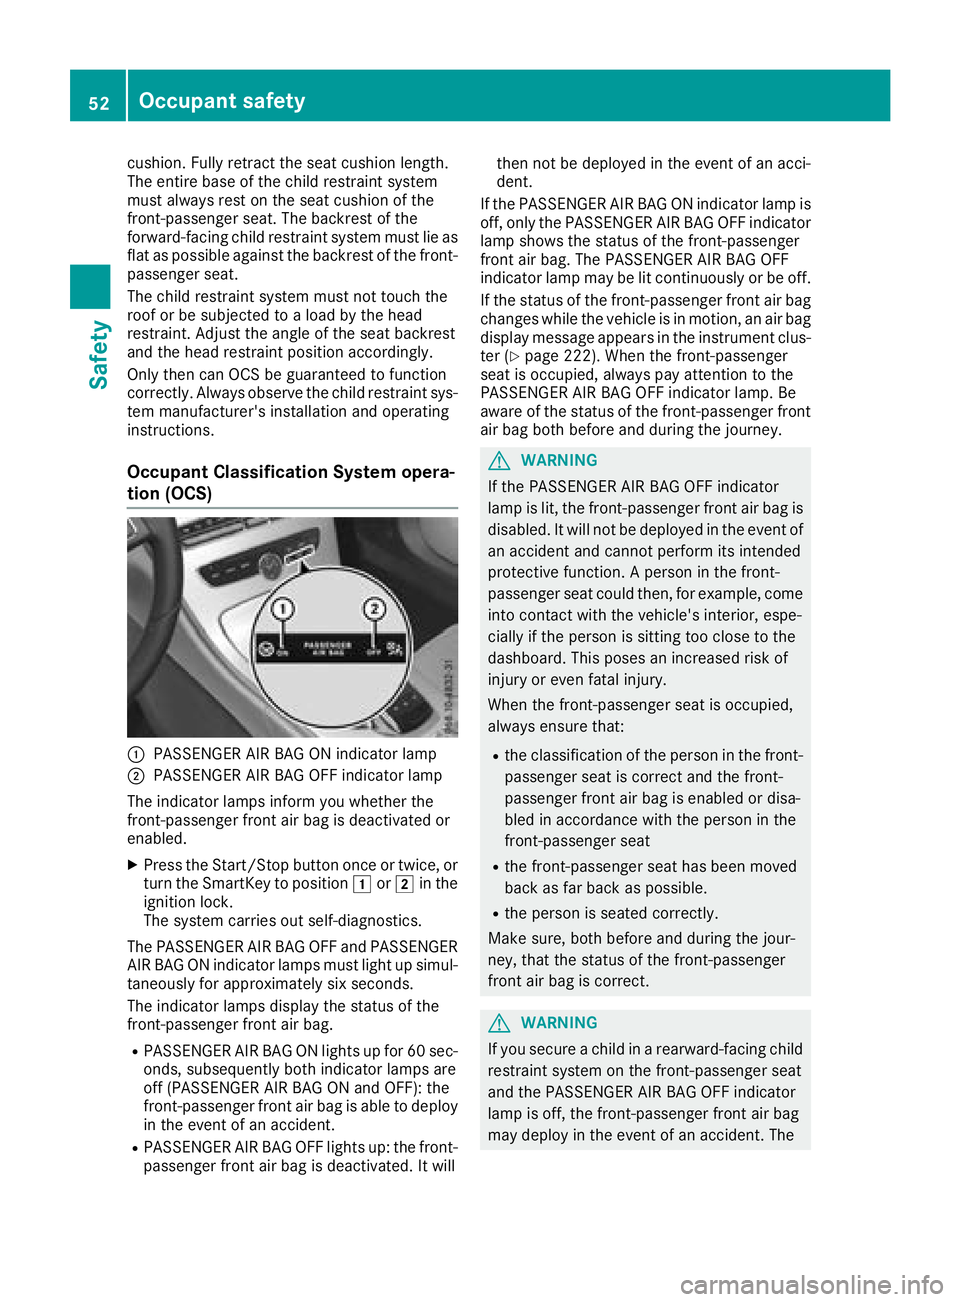
Occupant Classification System opera-
tion (OCS)
:PASSENGER AIR BAG ON indicator lamp
;PASSENGER AIR BAG OFF indicator lamp
The indicator lamps inform you whether the
front-passenger front air bag is deactivated or
enabled.
XPress the Start/Stop button once or twice, or turn the SmartKey to position 1or2 in the
ignition lock.
The system carries out self-diagnostics.
The PASSENGER AIR BAG OFF and PASSENGER
AIR BAG ON indicator lamps must light up simul-
taneously for approximately six seconds.
The indicator lamps display the status of the
front-passenger front air bag.
RPASSENGER AIR BAG ON lights up for 60 sec-
onds, subsequently both indicator lamps are
off (PASSENGER AIR BAG ON and OFF): the
front-passenger front air bag is able to deploy
in the event of an accident.
RPASSENGER AIR BAG OFF lights up: the front-
passenger front air bag is deactivated. It will then not be deployed in the event of an acci-
dent.
If the PASSENGER AIR BAG ON indicator lamp is
off, only the PASSENGER AIR BAG OFF indicator lamp shows the status of the front-passenger
front air bag. The PASSENGER AIR BAG OFF
indicator lamp may be lit continuously or be off.
If the status of the front-passenger front air bag
changes while the vehicle is in motion, an air bag
display message appears in the instrument clus-
ter (
Ypage 222). When the front-passenger
seat is occupied, always pay attention to the
PASSENGER AIR BAG OFF indicator lamp. Be
aware of the status of the front-passenger front air bag both before a
nd during the journey.
GWARNING
If the PASSENGER AIR BAG OFF indicator
lamp is lit, the front-passenger front air bag is
disabled. It will not be deployed in the event of
an accident and cannot perform its intended
protective function. A person in the front-
passenger seat could then, for example, come
into contact with the vehicle's interior, espe-
cially if the person is sitting too close to the
dashboard. This poses an increased risk of
injury or even fatal injury.
When the front-passenger seat is occupied,
always ensure that:
Rthe classification of the person in the front- passenger seat is correct and the front-
passenger front air bag is enabled or disa-
bled in accordance with the person in the
front-passenger seat
Rthe front-passenger seat has been moved
back as far back as possible.
Rthe person is seated correctly.
Make sure, both before and during the jour-
ney, that the status of the front-passenger
front air bag is correct.
GWARNING
If you secure a child in a rearward-facing child
restraint system on the front-passenger seat
and the PASSENGER AIR BAG OFF indicator
lamp is off, the front-passenger front air bag
may deploy in the event of an accident. The
52Occupant safety
Safety
Page 65 of 350
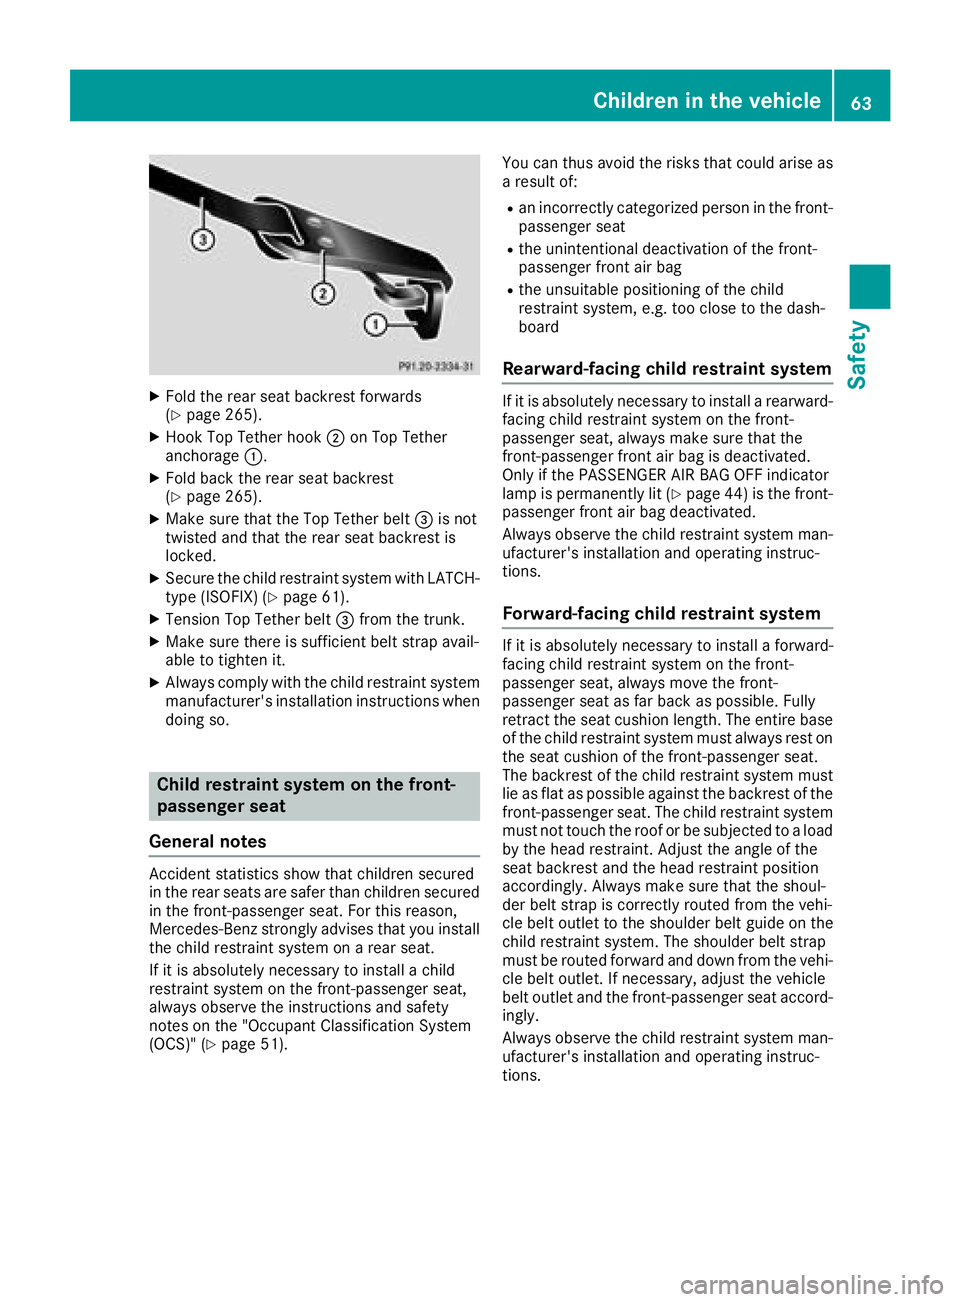
XFold the rear seat backrest forwards
(Ypage 265).
XHook Top Tether hook;on Top Tether
anchorage :.
XFold back the rear seat backrest
(Ypage 265).
XMake sure that the Top Tether belt =is not
twisted and that the rear seat backrest is
locked.
XSecure the child restraint system with LATCH-
type (ISOFIX) (Ypage 61).
XTension Top Tether belt =from the trunk.
XMake sure there is sufficient belt strap avail-
able to tighten it.
XAlways comply with the child restraint system
manufacturer's installation instructions when
doing so.
Child restraint system on the front-
passenger seat
General notes
Accident statistics show that children secured
in the rear seats are safer than children secured
in the front-passenger seat. For this reason,
Mercedes-Benz strongly advises that you install
the child restraint system on a rear seat.
If it is absolutely necessary to install a child
restraint system on the front-passenger seat,
always observe the instructions and safety
notes on the "Occupant Classification System
(OCS)" (
Ypage 51). You can thus avoid the risks that could arise as
a result of:
Ran incorrectly categorized person in the front-
passenger seat
Rthe unintentional deactivation of the front-
passenger front air bag
Rthe unsuitable positioning of the child
restraint system, e.g. too close to the dash-
board
Rearward-facing child restraint system
If it is absolutely necessary to install a rearward-
facing child restraint system on the front-
passenger seat, always make sure that the
front-passenger front air bag is deactivated.
Only if the PASSENGER AIR BAG OFF indicator
lamp is permanently lit (
Ypage 44 )is the front-
passenger front air bag deactivated.
Always observe the child restraint system man-
ufacturer's installation and operating instruc-
tions.
Forward-facing child restraint system
If it is absolutely necessary to install a forward-
facing child restraint system on the front-
passenger seat, always move the front-
passenger seat as far back as possible. Fully
retract the seat cushion length. The entire base of the child restraint system must always rest on
the seat cushion of the front-passenger seat.
The backrest of the child restraint system must
lie as flat as possible against the backrest of thefront-passenger seat. The child restraint system
must not touch the roof or be subjected to a load
by the head restraint. Adjust the angle of the
seat backrest and the head restraint position
accordingly. Always make sure that the shoul-
der belt strap is correctly routed from the vehi-
cle belt outlet to the shoulder belt guide on the
child restraint system. The shoulder belt strap
must be routed forward and down from the vehi-
cle belt outlet. If necessary, adjust the vehicle
belt outlet and the front-passenger seat accord-
ingly.
Always observe the child restraint system man-
ufacturer's installation and operating instruc-
tions.
Children in the vehicle63
Safety
Z
Page 91 of 350

If the soft top does not open or close fully, the
soft-top hydraulics are depressurized and the
soft top is lowered:
Rafter approximately 7 minutes when the igni-
tion is switched on
Rafter about
20 seconds if the ignition is switched off
Opening/closing with the soft top
switch
Important safety notes
GWARNING
When opening or closing the soft top, there is a risk that parts of the body could become
trapped by moving parts such as the roof
mechanism, the trunk lid, or the side win-
dows. There is a risk of injury.
When opening or closing the roof, make sure
that no parts of the body are in the vicinity of
moving parts. Release the switch if somebody
becomes trapped.
GWARNING
If the vehicle speed exceeds 35 mph
(60 km/h), the soft top stops during the open- ing or closing process. This impairs your view
to the rear. There is a risk of an accident.
Reduce your speed to below 35 mph
(60 km/h) or stop the vehicle in accordance
with the traffic conditions. Press or pull the
soft-top switch again in order to open or close
the soft top fully.
Opening and closing
XMake sure that the trunk partition is closed
(Ypage 90).
XClose the trunk lid.
XTurn the SmartKey to position 2in the igni-
tion lock.
XWhen the vehicle is stationary, depress the
brake pedal and keep it depressed.
XTo open: pull and hold soft top switch :until
the entire soft top is stowed away in the trunk.
The multifunction display shows the opening
process of the soft top.
If, when opening, you drive at speeds above
35 mph (60 km/h), the opening process is
stopped. The Open/Close Convertible
Top Completelymessage is shown in the
multifunction display. In order to open the
soft top fully, reduce your speed again to
below 35 mph (60 km/h) and pull the soft-top
switch again.
XTo close: pull and hold soft top switch :until
the soft top is completely closed.
The multifunction display shows the closing
process of the soft top.
If, when closing, you drive at speeds above
35 mph (60 km/h), the closing process is
stopped. The Open/Close Convertible
Top Completelymessage is shown on the
multifunction display. In order to close the
soft top fully, reduce your speed again to
below 35 mph (60 km/h) and press the soft-
top switch again.
Opening/closing using the SmartKey
Important safety notes
GWARNING
When opening or closing the soft top, there is a risk that parts of the body could become
trapped by moving parts such as the roof
mechanism, the trunk lid, or the side win-
dows. There is a risk of injury.
When opening or closing the roof, make sure
that no parts of the body are in the vicinity of
Soft top89
Opening and closing
Z
Page 93 of 350

To open:
XAll vehicles:push trunk partition ;using
the handle against the direction of the arrow
to its upper end position.
To close:
XVehicles with a partially electrical trunk
partition: press button :.
Trunk partition ;closes automatically.
iIf the system fails, the partially electrical
trunk partition can be closed manually.
XVehicles with a manual trunk partition:
pull trunk partition ;by the handle in the
direction of the arrow until it rests on the
sides of the trunk.
AIRCAP
Important safety notes
GWARNING
When retracting the AIRCAP, persons could
become caught in the moving mechanism.
There is a risk of injury.
Ensure that persons do not hold onto the
upper frame of the windshield and do not
touch the AIRCAP wind deflector.
With AIRCAP, four people can travel comfortably
with the soft top open. AIRCAP reduces the draft
for the driver and passengers in both the front
and the rear compartment in a vehicle with the
soft top down.
In particularly turbulent air, e.g. when following
a vehicle or in a crosswind, AIRCAP's effect may
be reduced.
AIRCAP has the following components:
Ra wind deflector above the windshield
Ra wind screen behind the two rear-seat head
restraints
When AIRCAP has been activated, the wind
screen extends up between the two rear-seat
head restraints. At the same time, the wind
deflector extends out along the front wind-
shield.
AIRCAP can be activated or deactivated up to
speeds of approximately 100 mph (160 km/h).
Activating and deactivating AIRCAP
XTurn the SmartKey to position 2in the igni-
tion lock.
XTo activate: pull switch:.
The wind screen behind the rear-seat headr-
ests and the wind deflector in the roof frame
extend simultaneously. The indicator lamp in
switch :lights up.
XTo deactivate: press switch:.
The wind screen behind the rear-seat headr-
ests and the wind deflector in the roof frame
retract simultaneously. The indicator lamp in
switch :goes out.
If you park your vehicle with the soft top down
and remove the SmartKey, the wind deflector
and the wind screen retract automatically.
When you restart your engine after having been
parked, the wind deflector and the wind screen
extend again automatically.
AIRCAP cannot be extended or retracted if the
vehicle speed exceeds approximately 100 mph
(160 km/h).
Folding wind screen
Important safety notes
GWARNING
If you use the wind screen in darkness or in
other conditions offering poor visibility, your
view to the rear is further impaired. There is a
risk of an accident.
Only use the wind screen when visibility con-
ditions are good.
Soft top91
Opening and closing
Z
Page 117 of 350

Overview of climate control systems
General notes
Observe the settings recommended on the fol-
lowing pages. The windows could otherwise fog
up.
To prevent the windows from fogging up:
Rswitch off climate control only briefly
Rswitch on air-recirculation mode only briefly
Rswitch on the cooling with air dehumidifica-
tion function
Ractivate the "Windshield defrosting" function
briefly, if required
Climate control regulates the temperature and
air humidity in the vehicle interior. The interior
filter cleans the air, thus improving the interior
climate.
The "Cooling with air dehumidification" function
is only available when the engine is running.
Optimum climate control is only achieved with
the side windows and roof closed.
If you start the engine using your smartphone,
the last selected climate control setting is reac-
tivated (
Ypage 126). The integrated filter filters out most particles of
dust and soot and completely filters out pollen.
It also reduces gaseous pollutants and odors. A
clogged filter reduces the amount of air suppliedto the vehicle interior. For this reason, you
should always observe the interval for replacing
the filter, which is specified in the Maintenance
Booklet. As it depends on environmental condi-
tions, e.g. heavy air pollution, the interval may
be shorter than stated in the Maintenance Book-
let.
iVentilate the vehicle for a brief period during
warm weather, e.g. using the convenience
opening feature (
Ypage 90). This will speed
up the cooling process and the desired inte-
rior temperature will be reached more
quickly.
iIt is possible that the blower may be activa-
ted automatically 60 minutes after the Smart-
Key has been removed depending on various
factors, e.g. the outside temperature. The
vehicle is then ventilated for 30 minutes to dry
the automatic climate control.
Control panel for dual-zone automatic climate control
Example: control panel for dual-zone automatic climate control
:
Sets the temperature, left (Ypage 118)
;Sets the air distribution (Ypage 118)
=Sets the airflow (Ypage 118)
Switches off climate control (
Ypage 116)
Overview of climate control systems115
Climate control
Page 128 of 350

take the SmartKey with you when leaving the
vehicle, even if you only leave it for a short time.
Pay attention to the important safety notes.
XDepress the brake pedal and keep it
depressed.
XPress the Start/Stop button once
(Ypage 124).
The engine starts.
Starting procedure via smartphone
Observe the important safety notes on starting
the engine (Ypage 125).
You can also start your engine via your smart-
phone from outside the vehicle. In this case, the
previously selected climate control setting is
activated. In this way you can cool or heat the
interior of the vehicle before starting the jour-
ney.
Only start the engine via your smartphone if it is
safe to start and run the engine where your vehi-
cle is parked.
Observe the legal stipulations in the area where your vehicle is parked. Engine start via smart-
phone may be limited to certain countries or
regions.
You can execute a maximum of two consecutive
starting attempts via your smartphone. If you
press the start/stop button or insert the Smart-
Key into the ignition lock, you can carry out two
more starting attempts with your smartphone.
The engine runs for ten minutes when starting
with the smartphone.
Once you have started the engine, you can
switch the engine off via your smartphone at any
time.
You can only start the engine via your smart-
phone if:
Rthe SmartKey is in the ignition lock
Rpark position jis selected
Rthe accelerator pedal is not depressed
Rthe anti-theft alarm system is not activated
Rthe panic alarm is not activated
Rthe hazard warning lamps are switched off
Rthe hood is closed
Rthe doors are closed and locked
Rthe windows and sliding sunroof are closed Also make sure that:
Rthe fuel tank is sufficiently filled
Rthe starter battery has been sufficiently
charged
GWARNING
Limbs could be crushed or trapped if the
engine is started unintentionally during ser-
vice or maintenance work. There is a risk of
injury.
Always secure the engine against uninten-
tional starting before carrying out mainte-
nance or repair work.
Make sure that the engine cannot be started via
your smartphone before carrying out mainte-
nance or repairs. You can prevent an engine
start via your smartphone, for example, if you:
Rswitch on the hazard warning lamps
Rdo not lock the doors
Ropen a side window
Pulling away
General notes
GWARNING
If the engine speed is above the idling speed
and you engage transmission position Dor R,
the vehicle could pull away suddenly. There is
a risk of an accident.
When engaging transmission position Dor R,
always firmly depress the brake pedal and do not simultaneously accelerate.
Depress the accelerator carefully when pulling
away.
The vehicle locks centrally once you have pulled
away. The locking knobs in the doors drop down.
You can open the doors from the inside at any
time.
You can also deactivate the automatic locking
feature, see the Digital Operator's Manual.
It is possible to shift the transmission from posi-
tion jto the desired position only if you
depress the brake pedal. Only then is the park-
ing lock released. If you do not depress the
brake pedal, the DIRECT SELECT lever can still
126Driving
Dr iving an d parking
Page 149 of 350
Bear in mind that at a speed of only 30 mph
(approximately 50 km/h), the vehicle covers a
distance of 44 ft (approximately 14m)per sec-
ond.
Drive sensibly – save fuel
Observe the following tips to save fuel:
XThe tires should always be inflated to the rec-
ommended tire pressure.
XRemove unnecessary loads.
XRemove roof racks when they are not needed.
XWarm up the engine at low engine speeds.
XAvoid frequent acceleration or braking.
XHave all maintenance work carried out as
indicated by the service intervals in the Main-
tenance Booklet or by the service interval dis-
play.
Fuel consumption also increases when driving in cold weather, in stop-start traffic and in hilly ter-
rain.
Drinking and driving
GWARNING
Drinking and driving and/or taking drugs and driving are very dangerous combinations.
Even a small amount of alcohol or drugs can
affect your reflexes, perceptions and judg-
ment.
The possibility of a serious or even fatal acci-
dent is greatly increased when you drink or
take drugs and drive.
Do not drink or take drugs and drive or allow
anyone to drive who has been drinking or tak-
ing drugs.
Emission control
GWARNING
Combustion engines emit poisonous exhaust
gases such as carbon monoxide. Inhaling
these exhaust gases leads to poisoning. There
is a risk of fatal injury. Therefore never leave
the engine running in enclosed spaces with-
out sufficient ventilation. Certain engine systems are designed to keep
the level of poisonous components in exhaust
fumes within legal limits.
These systems only work at peak efficiency if
they are serviced exactly in accordance with the
manufacturer's specifications. Always have
work on the engine carried out at a qualified
specialist workshop. Mercedes-Benz recom-
mends that you use an authorized Mercedes-
Benz Center for this purpose. In particular, work
relevant to safety or on safety-related systems
must be carried out at a qualified specialist
workshop.
The engine settings must not be changed under any circumstances. Furthermore, all specific
service work must be carried out at regular
intervals and in accordance with the Mercedes-
Benz service requirements. Details can be found in the Maintenance Booklet.
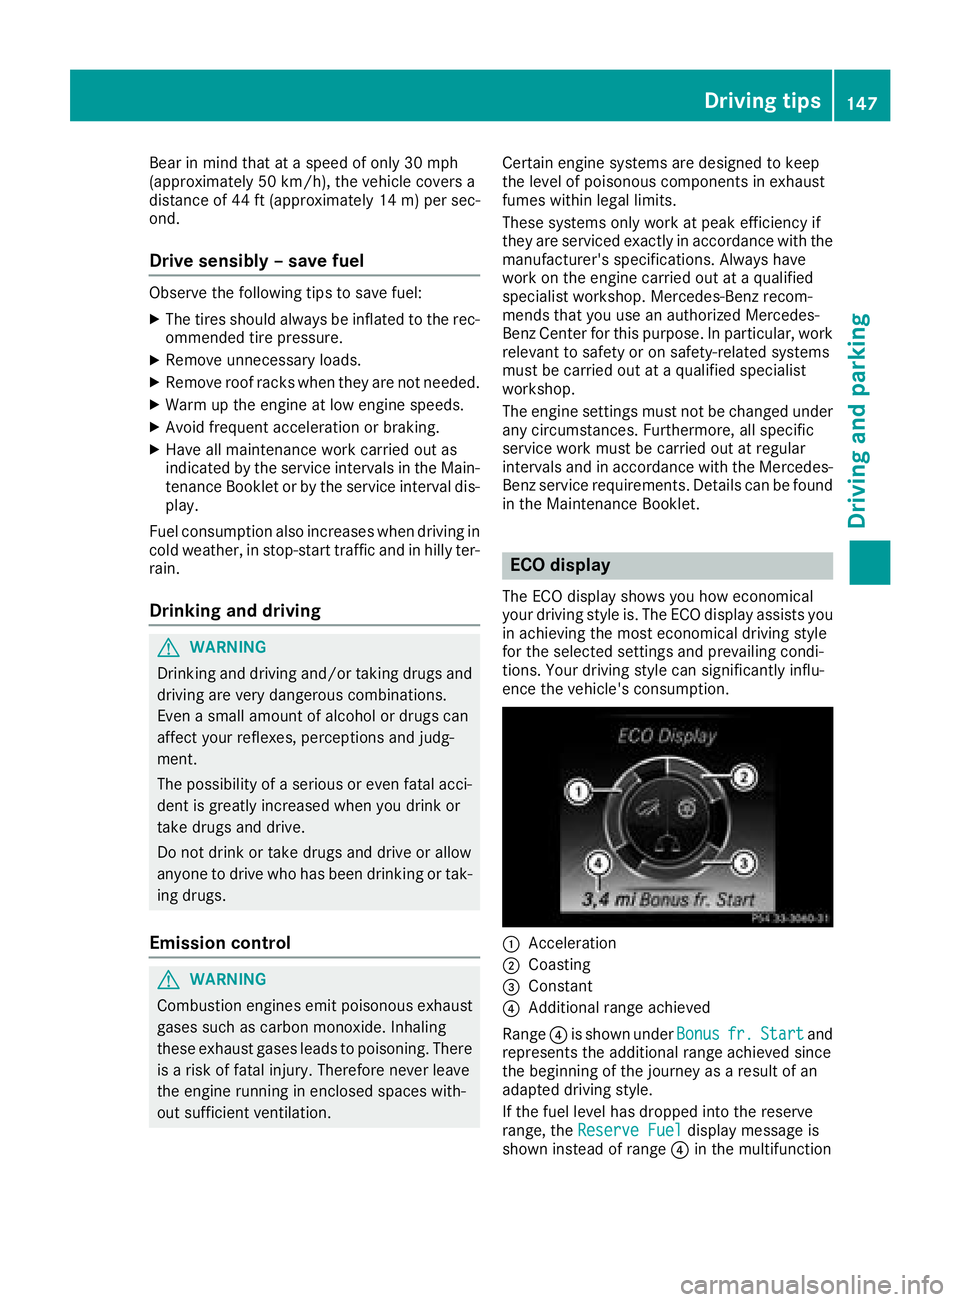
ECO display
The ECO display shows you how economical
your driving style is. The ECO display assists you
in achieving the most economical driving style
for the selected settings and prevailing condi-
tions. Your driving style can significantly influ-
ence the vehicle's consumption.
:Acceleration
;Coasting
=Constant
?Additional range achieved
Range ?is shown under Bonus
fr.Startand
represents the additional range achieved since
the beginning of the journey as a result of an
adapted driving style.
If the fuel level has dropped into the reserve
range, the Reserve Fuel
display message is
shown instead of range ?in the multifunction
Driving tips147
Driving and parking
Z