MERCEDES-BENZ C CLASS COUPE 2002 Owners Manual
Manufacturer: MERCEDES-BENZ, Model Year: 2002, Model line: C CLASS COUPE, Model: MERCEDES-BENZ C CLASS COUPE 2002Pages: 399, PDF Size: 16.59 MB
Page 351 of 399

348
Exterior lamps
Te ch n i c a l
data
Instruments
and controls Operation Driving
Instrument
cluster display Practical hints
Car care Index
Taillamp assemblies
Open trunk lid.
Turn both handles (2) and remove trim panel (1). Press together the latches (3) and remove bulb carrier.
Push bulb into socket, turn counterclockwise and
remove.
Insert new bulb in socket, push in and reinstall bulb
carrier.
Reinstall trim panel.
Page 352 of 399

349
Exterior lamps
Te ch n i c a l
data
Instruments
and controls Operation Driving
Instrument
cluster display Practical hints
Car care Index
4
Stop lamp (P 21 W/32 cp bulb)
5 tail, parking, standing and
side marker lamp (R 5 W / 4 cp bulb)
6 Turn signal lamp (PY 21 W bulb [yellow])
7 Driver’s side:
rear fog lamp
(P 21 W/32 cp bulb) License plate lamp
Loosen both securing screws (1), remove lamp and
replace tubular lamp (C 5 W/4 cp).
Page 353 of 399

350
Exterior lamps
Te ch n i c a l
data
Instruments
and controls Operation Driving
Instrument
cluster display Practical hints
Car care Index
Side marker lamp, front (5 W/4 cp bulb)
Carefully slide lamp towards rear (arrow 1), and remove
front end first (arrow 2).
Twist bulb socket counterclockwise and pull out.
Remove bulb from socket.
Insert new bulb in socket. Reinstall bulb socket, push in
and twist clockwise.
To reinstall lamp, set rear end of lamp in bumper and let
front end snap into place. High mounted stop lamp,
Additional turn signals on the exterior mirror
The high mounted stop lamp (3rd brake lamp). The
additional turn signals on the exterior mirrors are
equipped with incandescent bulbs.
Have the system checked at an authorized
Mercedes-Benz Center if a malfunction occurs.
Standby bulb function
The stop lamps, dimmed, will act as a replacement lamp,
if one taillamp stops working.
The left stop lamp acts as
a replacement for the rear fog
lamp, if it stops working.
The respective fog lamp, dimmed, will act as a
replacement lamp, if the left or right standing lamp
stops working.
Notes:
The multifunction display will indicate that a bulb has
failed. See malfunction and warning messages on
page 290.
2
1P82.10-2799-26
Page 354 of 399

351
Electronic main key
Te ch n i c a l
data
Instruments
and controls Operation Driving
Instrument
cluster display Practical hints
Car care Index
Changing batteries in the electronic key
1 Transmit buttons
2 Lamp for battery check and function control
Checking batteries
If one of the transmit buttons (1) is pressed, the battery
check lamp (2) lights up briefly – indicating that the
batteries are in order.
Change batteries if the battery check lamp (2) does not
light up briefly. Changing batteries
Move locking tab (3) in direction of right arrow and
remove mechanical key (4, left arrow).
P80.20-2200-26
1
2
P80.35-2028-26
4
3
Page 355 of 399

352
Electronic main key
Te ch n i c a l
data
Instruments
and controls Operation Driving
Instrument
cluster display Practical hints
Car care Index
Insert mechanical key (4) in side opening (5) to open
latch. Press briefly (do not use mechanical key as lever)
to release battery compartment.
Remove mechanical key from side opening.
Carefully remove battery compartment in direction of
arrow (6). Change batteries (7), inserting new ones under contact
spring (8) with plus (+) side facing up.
Return battery compartment into housing until locked
in place and slide mechanical key back into electronic
key.
P80.35-2026-26
5
4
6
P80.35-2027-26
78
Page 356 of 399

353
Emergency engine shut-down
Te ch n i c a l
data
Instruments
and controls Operation Driving
Instrument
cluster display Practical hints
Car care Index
Important!
Batteries contain materials that can harm the
environment if disposed of improperly. Recycling of
batteries is the preferred method of disposal. For
disposal, please follow manufacturer’s recommendation
on battery package.
Replacement Battery:
Lithium, type CR 2025 or equivalent.
Synchronizing remote control
The remote control may have to be resynchronized, if
the vehicle cannot be locked or unlocked.
To synchronize insert electronic key in starter switch.
The remote control should once again be operational.
Emergency engine shut-down
If the engine can no longer be stopped using the
electronic key, the engine can be turned off by removing
two fuses.
For easy removal of fuses use the fuse puller (located in
the auxiliary fuse box in the trunk) to pull out the fuses
marked on the fuse chart as “ENGINE EMERGENCY
OFF”.
The fuse chart is located in the fuse box in the
passenger compartment.
For fuses see page 311.
Page 357 of 399

354
Fuel filler flap, manual release
Te ch n i c a l
data
Instruments
and controls Operation Driving
Instrument
cluster display Practical hints
Car care Index
Fuel filler flap, manual release
Open the trunk lid and fold right-side taillamp trim
aside. Reach inside and turn the release knob (arrow)
clockwise. Open the fuel filler flap. Emergency operation of sliding / pop-up roof
The panorama sliding / pop-up roof can be opened or
closed manually should an electrical malfunction occur.
The panorama sliding / pop-up roof drive is located
behind the lens (1) of the interior overhead light.
Pry off the lens (1) using a screwdriver.
P47.25-2031-26
Page 358 of 399

355
Emergency operation of sliding / pop-up roof
Te ch n i c a l
data
Instruments
and controls Operation Driving
Instrument
cluster display Practical hints
Car care Index
Slide both locking tabs (2) in direction of arrow, lower
rear of cover and remove.
Note:
Do not disconnect electrical connectors.
Obtain crank (3) (supplied with vehicle) and insert
through left hand side motor hole (4).
To slide roof closed or to raise the roof at the rear:
turn crank clockwise.
To slide the roof open or to lower the roof at the rear:
turn crank counterclockwise.
See page 202 for instructions on synchronizing the
panorama sliding / pop-up roof after closing manually.
Page 359 of 399

356
Replacing wiper blade insert
Te ch n i c a l
data
Instruments
and controls Operation Driving
Instrument
cluster display Practical hints
Car care Index
Replacing wiper blade inserts
For safety reasons, remove electronic key from starter
switch before replacing the wiper blades, otherwise the
motor can suddenly turn on and cause injury.
Notes:
Do not open engine hood with wiper arm folded forward.
Do not allow the wiper arm to contact the windshield
glass without a wiper blade inserted. The glass may be
scratched or broken.
Make certain that the wiper blades are properly
installed. Improperly installed wiper blades may cause
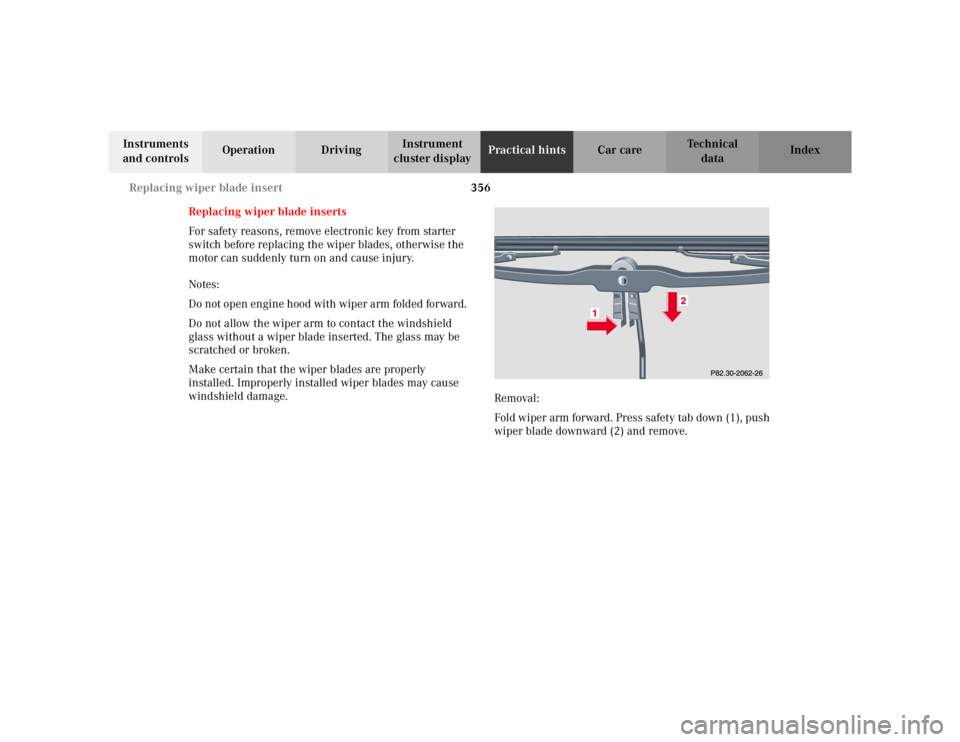
windshield damage. Removal:
Fold wiper arm forward. Press safety tab down (1), push
wiper blade downward (2) and remove.
Page 360 of 399

357
Replacing wiper blade insert
Te ch n i c a l
data
Instruments
and controls Operation Driving
Instrument
cluster display Practical hints
Car care Index
Place wiper blade on firm support. Press down both tabs
and slide (direction of arrow) the wiper blade insert out
of the retainer claws.
Installation:
Slide (direction of arrow) wiper blade insert into
retainer claws until tabs are engaged.
Slide wiper blade onto wiper arm until it locks in place. Roof rack
Mount roof racks only between the fastening points (1)
(see arrows) and in the recess of the rubber strip (2).
Use only those roof racks approved by Mercedes-Benz to
avoid damage to the vehicle. Follow manufacturer’s
installation instructions.