Check MERCEDES-BENZ C CLASS COUPE 2002 Workshop Manual
[x] Cancel search | Manufacturer: MERCEDES-BENZ, Model Year: 2002, Model line: C CLASS COUPE, Model: MERCEDES-BENZ C CLASS COUPE 2002Pages: 399, PDF Size: 16.59 MB
Page 302 of 399

299
Malfunction and warning messages
Te ch n i c a l
data
Instruments
and controls Operation Driving
Instrument
cluster display Practical hints Car care Index
ENGINE OIL LEVEL
* C = Category, see page 290.
1 The engine oil level must be checked immediately. See Engine oil
level indicator on page 141.
2 There is no oil in the engine. There is a danger of engine damage. 3 There is a risk of damaging the engine or catalytic converter. The
engine oil level must be checked immediately. See Engine oil level
indicator on page 141.
4 The engine oil level has dropped to a critical level. Check the engine oil level immediately. See Engine oil level
indicator on page 141 and check the engine for visible leakage (loss
of oil).
It may be that there is water in the engine oil. Have the engine oil
checked.
5 The measuring system is malfunctioning.
When the “ENGINE OIL LEVEL – CHECK LEVEL!”
message appears while the engine is running and at
operating temperature, the engine oil level has dropped
to approximately the minimum mark on the dipstick.
When this occurs, the warning will first come on
intermittently and then stay on if the oil level drops
further.
If no oil leaks are noted, continue to drive to the nearest
service station where the engine oil should be topped to
the “full” mark on the dipstick with an approved oil.
The engine oil level warnings should not be ignored.
Extended driving with the symbol displayed could
result in serious engine damage that is not covered by
the Mercedes-Benz Limited Warranty.
Line 1 Line 2C*
ENGINE OIL LEVEL CHECK LEVEL!
1
2
ENGINE OIL LEVEL STOP, ENGINE OFF!
2
1
ENGINE OIL LEVEL REDUCE OIL LEVEL1
3
2
ENGINE OIL VISIT WORKSHOP!
4
2
ENGINE OIL LEVEL VISIT WORKSHOP!
5
2
Page 303 of 399

300
Malfunction and warning messages
Te ch n i c a l
data
Instruments
and controls Operation Driving
Instrument
cluster display Practical hints Car care Index
LIGHTING SYSTEM
Line 1 Line 2C*
LOW BEAM,L CHECK LAMP!2
LOW BEAM,R CHECK LAMP!2
DISPLAY DEFECTIVE VISIT WORKSHOP!
1
2
TURN SIGNAL, L CHECK LAMP! 2
TURN SIGNAL, R CHECK LAMP! 2
L. TURN SIG. RFLECTR CHECK LAMP! 2
R. TURN SIG. RFLECTR CHECK LAMP! 2
TURN SIGNAL F, L CHECK LAMP! 2
TURN SIGNAL F, R CHECK LAMP!2
BRAKE LIGHT
2
VISIT WORKSHOP! 2
BRAKE LIGHT, L
3
CHECK LAMP! 2
BRAKE LIGHT, R
3
CHECK LAMP! 2
3RD STOP LAMP
3
CHECK LAMP! 2
HIGH BEAM, L CHECK LAMP!2
HIGH BEAM, R CHECK LAMP!2
LICENSE PLATE L, L CHECK LAMP! 2
LICENSE PLATE L, R CHECK LAMP! 2
LIGHTS SWITCH OFF LIGHTS! 1
AUTOM. LIGHT ON REMOVE KEY!1
FRONT FOGLAMP, L CHECK LAMP! 2
FRONT FOGLAMP, R CHECK LAMP! 2
REAR FOGLAMP CHECK LAMP! 2
Line 1
Line 2C*
Page 304 of 399

301
Malfunction and warning messages
Te ch n i c a l
data
Instruments
and controls Operation Driving
Instrument
cluster display Practical hints Car care IndexIn the case of bulb failures in certain lamps, other lamps
will substitute. See page 345 for instructions on
replacing bulbs.
* C = Category, see page 290
1 The display or the system is malfunctioning.
2 The brake lamps are switching on after a delay or are permanently
on – visit workshop immediately.
3 The brake lamp comprises several light emitting diodes. The warning message will only appear if all light emitting diodes have
stopped working.
4 Other bulbs will be brought into use as replacements when certain lamps blow.
REAR FOGLAMP SWITCH OFF
SUBSTITUTE LAMP ON!
4
2
REVERSE LIGHT, L CHECK LAMP! 2
REVERSE LIGHT, R CHECK LAMP! 2
TAIL LIGHT, L CHECK LAMP! SUBSTITUTE LAMP ON!
4
2
TAIL LIGHT, R CHECK LAMP! SUBSTITUTE LAMP ON!
4
2
SIDELIGHT, L CHECK LAMP! SUBSTITUTE LAMP ON!
4
2
SIDELIGHT, R CHECK LAMP! SUBSTITUTE LAMP ON!
4
2
Line 1
Line 2C*
Page 307 of 399

304
Malfunction and warning messages
Te ch n i c a l
data
Instruments
and controls Operation Driving
Instrument
cluster display Practical hints Car care Index
TELEPHONE – FUNCTION
* C = Category, see page 290.The display appears if button í or ì on the
multifunction steering wheel is pressed and the vehicle
is not equipped with a telephone. TELE AID
* C = Category, see page 290.
1 The Tele Aid system consists of three types of response; automatic
and manual emergency, roadside assistance and information. With
this message displayed, one or more functions may not be
avai lable.
See page 228 for notes on the Tele Aid.If a malfunction is indicated as outlined above, have the
system checked at the nearest Mercedes-Benz Center as
soon as possible.
Line 1 Line 2C*
FUNCTION NOT AVAILABLE! 3
Line 1Line 2C*
TELE AID VISIT WORKSHOP!
1
1
Page 308 of 399

305
Malfunction and warning messages
Te ch n i c a l
data
Instruments
and controls Operation Driving
Instrument
cluster display Practical hints Car care Index
WA S H E R F L U I D
* C = Category, see page 290.
When this message appears while the engine is
running, the level of the reservoir has dropped to
approximately
1/3 of the total volume. The reservoir
should be refilled with the prescribed mixture of MB
Windshield washer concentrate and water or the
concentrate and commercially available premixed
windshield washer solvent / antifreeze, depending on
ambient temperature, at the next opportunity. The
reservoir for the windshield and headlamp washer
systems is located in the engine compartment.
See windshield and headlamp washer system on
page 320 for instructions on topping up the washer
fluid.
Line 1 Line 2C*
WASHER FLUID CHECK LEVEL!3
Page 313 of 399

310
First aid kit
Te ch n i c a l
data
Instruments
and controls Operation Driving
Instrument
cluster display Practical hints
Car care Index
First aid kit
The first aid kit is located behind trim panel (1) in left
hand side of trunk.
To o pen :
Turn handles (2) and remove trim panel (1). Loosen securing strap (3) and remove first aid kit (4).
Note:
Check contents of first aid kit for completeness on a
regular basis.
Page 320 of 399

317
Engine compartment
Te ch n i c a l
data
Instruments
and controls Operation Driving
Instrument
cluster display Practical hints
Car care Index
To c lo se:
Lower the hood and let it drop into lock from a height of
approximately 1 ft. (30 cm), assisting with hands placed
flat on edges of hood (3).
To avoid hood damage, please make sure that hood is
fully closed. If not, repeat closing procedure. Do not
push down on hood to attempt to fully close it. Automatic transmission fluid level
The transmission has a permanent fill of automatic
transmission fluid.
Regular automatic transmission fluid level checks and
changes are not required. For this reason the dipstick is
omitted.
If you notice fluid leaks or gear shifting malfunctions,
have your authorized Mercedes-Benz Center check the
transmission fluid level.
P88.40-2188-26
Page 321 of 399

318
Engine compartment
Te ch n i c a l
data
Instruments
and controls Operation Driving
Instrument
cluster display Practical hints
Car care Index
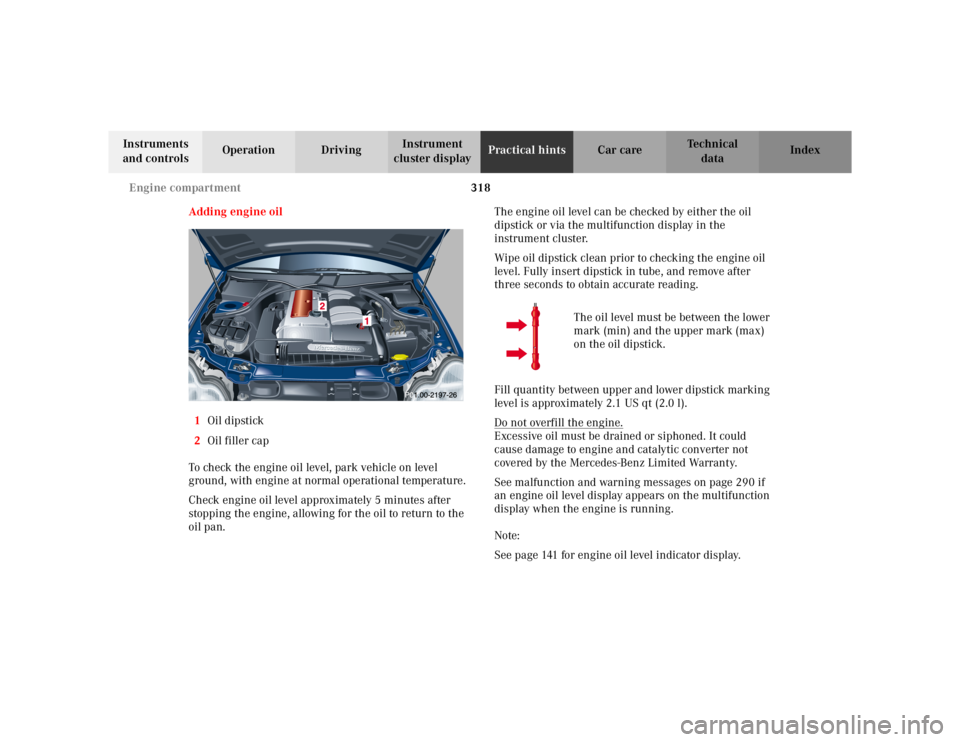
Adding engine oil
1 Oil dipstick
2 Oil filler cap
To check the engine oil level, park vehicle on level
ground, with engine at normal operational temperature.
Check engine oil level approximately 5 minutes after
stopping the engine, allowing for the oil to return to the
oil pan. The engine oil level can be checked by either the oil
dipstick or via the multifunction display in the
instrument cluster.
Wipe oil dipstick clean prior to checking the engine oil
level. Fully insert dipstick in tube, and remove after
three seconds to obtain accurate reading.
The oil level must be between the lower
mark (min) and the upper mark (max)
on the oil dipstick.
Fill quantity between upper and lower dipstick marking
level is approximately 2.1 US qt (2.0 l).
Do not overfill the engine.
Excessive oil must be drained or siphoned. It could
cause damage to engine and catalytic converter not
covered by the Mercedes-Benz Limited Warranty.
See malfunction and warning messages on page 290 if
an engine oil level display appears on the multifunction
display when the engine is running.
Note:
See page 141 for engine oil level indicator display.
Page 322 of 399

319
Engine compartment
Te ch n i c a l
data
Instruments
and controls Operation Driving
Instrument
cluster display Practical hints
Car care Index
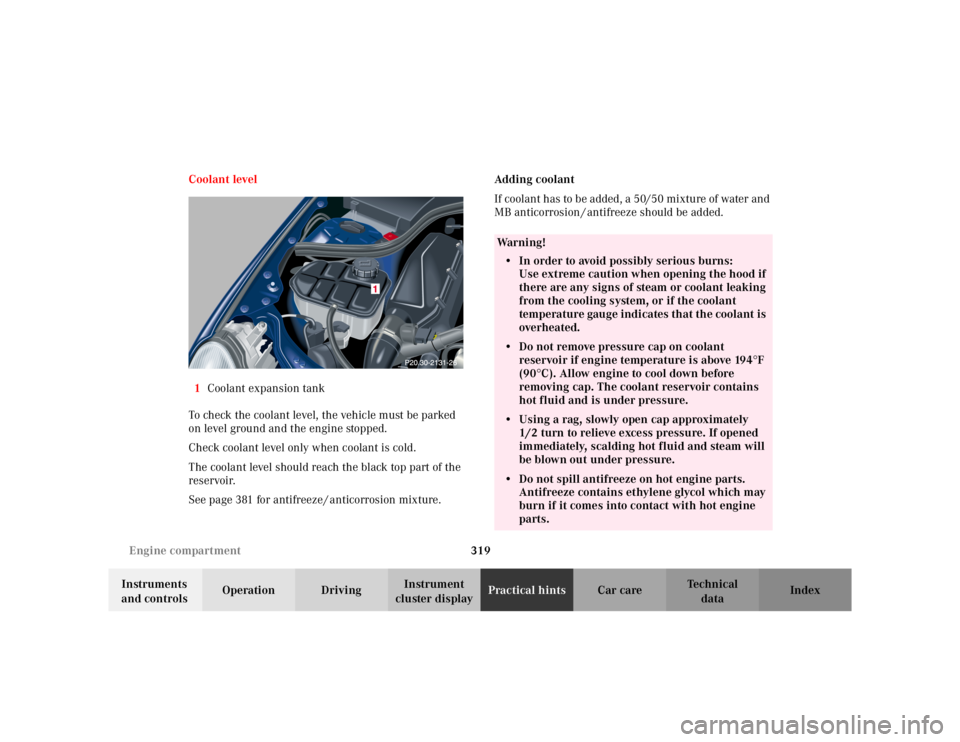
Coolant level
1 Coolant expansion tank
To check the coolant level, the vehicle must be parked
on level ground an d the engine stopped.
Check coolant level only when coolant is cold.
The coolant level should reach the black top part of the
reservoir.
See page 381 for antifreeze / anticorrosion mixture. Adding coolant
If coolant has to be added, a 50/50 mixture of water and
MB anticorrosion / antifreeze should be added.
Wa r n i n g !
• In order to avoid possibly serious burns: Use extreme caution when opening the hood if
there are any signs of steam or coolant leaking
from the cooling system, or if the coolant
temperature gauge indicates that the coolant is
overheated.• Do not remove pressure cap on coolant
reservoir if engine temperature is above 194
°F
(90
°C). Allow engine to cool down before
removing cap. The coolant reservoir contains
hot fluid and is under pressure.
• Using a rag, slowly open cap approximately
1/2 turn to relieve excess pressure. If opened
immediately, scalding hot fluid and steam will
be blown out under pressure.• Do not spill antifreeze on hot engine parts. Antifreeze contains ethylene glycol which may
burn if it comes into contact with hot engine
parts.
Page 328 of 399

325
Tires, Wheels
Te ch n i c a l
data
Instruments
and controls Operation Driving
Instrument
cluster display Practical hints
Car care Index
It is imperative that the wheel mounting bolts be
fastened to a tightening torque of 80 ft.lb. (110 Nm)
whenever wheels are mounted.
For rim and tire specifications, refer to “Technical Data”.
Rotating wheels
The wheels can be rotated according to the degree of
tire wear while retaining the same direction of travel.
Rotating, however, should be carried out as
recommended by the tire manufacturer, before the
characteristic tire wear pattern (shoulder wear on front
wheels and tread center wear on rear wheels) becomes
visible, as otherwise the driving properties deteriorate.
Notes:
Thoroughly clean the inner side of the wheels any time
you rotate the wheels or wash the vehicle underside.
The use of retread tires is not recommended. Retread
tires may adversely affect the handling characteristics
and safety of the vehicle.
Dented or bent rims can cause tire pressure loss and
damage to the tire beads. For this reason, check rims for
damage at regular intervals. The rim flanges must be
checked for wear before a tire is mounted. Remove
burrs, if any.
Check and ensure proper tire inflation pressure after
rotating the wheels. For tire inflation pressure see
inside of fuel filler flap and also page 278.
Wa r n i n g !
Worn, old tires can cause accidents. If the tire tread
is badly worn, or if the tires have sustained
damage, replace them.When replacing rims, use only genuine
Mercedes-Benz wheel bolts specified for the
particular rim type. Failure to do so can result in
the bolts loosening and possibly an accident.