MERCEDES-BENZ C-CLASS COUPE 2011 Owners Manual
Manufacturer: MERCEDES-BENZ, Model Year: 2011, Model line: C-CLASS COUPE, Model: MERCEDES-BENZ C-CLASS COUPE 2011Pages: 373, PDF Size: 8.17 MB
Page 131 of 373
Auxiliary heating
Important safety notes G
WARNING
Exhaust fumes are produced when the auxili-
ary heating is in operation .Inhaling these
exhaus tfumes can be poisonous. You should
therefore switch off the auxiliary heating in
confined spaces without an extraction sys-
tem, e.g .agarage. G
WARNING
When operating the auxiliary heating, parts of
the vehicle may become very hot, and highly
inflammable material such as fuels could be
ignited. Operating the auxiliary heating is thus
prohibited at filling station sorwhen your vehi-
cle is being refuelled. You must therefore
switch off the auxiliary heating at filling sta-
tions.
! Operating the auxiliary heating/ventila-
tion draws on the vehicle battery. After you
have heated or ventilated the vehicle a
maximum of two times, drive for a longer
distance.
i Switch on the auxiliary heating regularly,
e.g. for about ten minutes every month.
The auxiliary heating heats the air in the vehi-
cle interior to the set temperature without
using the heat of the running engine. The aux-
iliary heating is operated directly using the
vehicle's fuel. For this reason, the tank con-
tent must be at least at reserve fuel level to
ensure that the auxiliary heating functions.
The auxiliary heating/ventilation automati-
cally adjusts to changes in temperature and
weather conditions. For this reason, the aux-
iliary heating could switch from ventilation
mode to heating mode or from heating mode
to ventilation mode.
The auxiliary heating switches off automati-
cally after 50 minutes. This time limit can be
altered. To do this, visit a qualified specialist
workshop, e.g. a Mercedes-Ben zService
Centre. You cannot use the auxiliary ventilation to
cool the vehicle interior to a temperature
lower than the outside temperature.
Before switching on X
Turn the key to position 2in the ignition
lock.
X Set the temperature.
The auxiliary heating/ventilation can be acti-
vated even when the climate control is being
controlled manually. Optimum comfort can
be attained when the system is set to auto-
matic mode. Set the temperature to 22 †.
The auxiliary heating/ventilation can be acti-
vated or deactivated using the remote control
or the button on the centre console.
The on-board computer can be used to spec-
ify up to three departure times, one of which
may be preselected (Y page 227).
Switching the auxiliar yheating/venti-
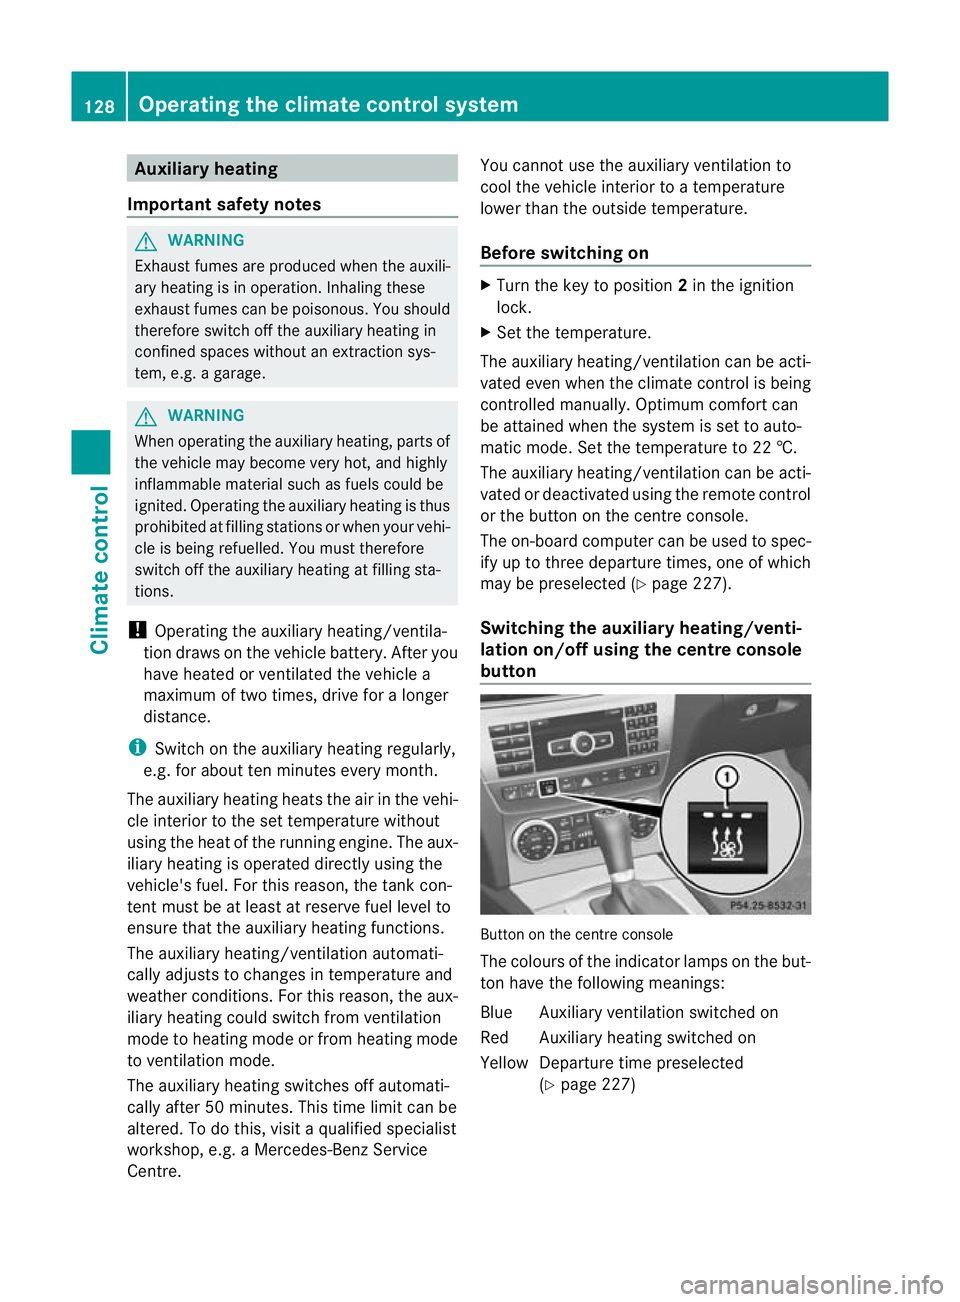
lation on/off using the centre console
button Button on the centre console
The colours of the indicator lamps on the but-
to nh ave the following meanings:
Blue Auxiliary ventilatio nswitched on
Red Auxiliary heating switched on
Yellow Departure time preselected (Ypage 227) 128
Operating the climate control systemClimate control
Page 132 of 373
Switching on auxiliary heating/ventila-
tion
X
Press button :.
The red or blue indicator lamp in but-
ton :lights up.
Switching off auxiliary heating/ventila-
tion
X Press button :.
The red or blue indicator lamp in but-
ton :goes out.
Switching the auxiliary heating/venti-
lation on/off using the remote control Your vehicle comes with one remote control.
You may use two additional remote controls
for your vehicle. For further information, con-
sult a qualified specialist workshop, e.g. a
Mercedes-Benz Service Centre.
The remote control has a maximum range of
approximately 300 metres. This range is
reduced by:
R sources of radio interference
R solid objects between the remote control
and the vehicle
R the remote control being in an unfavoura-
ble position in relation to the vehicle
R transmitting from an enclosed space
i The optimum range can be achieved if you
hold the remote control vertically, pointing
upwards when you press one of the but-
tons.
i Abattery symbol appears in the display
when the battery in the remote control is
low. Replace the remote control battery
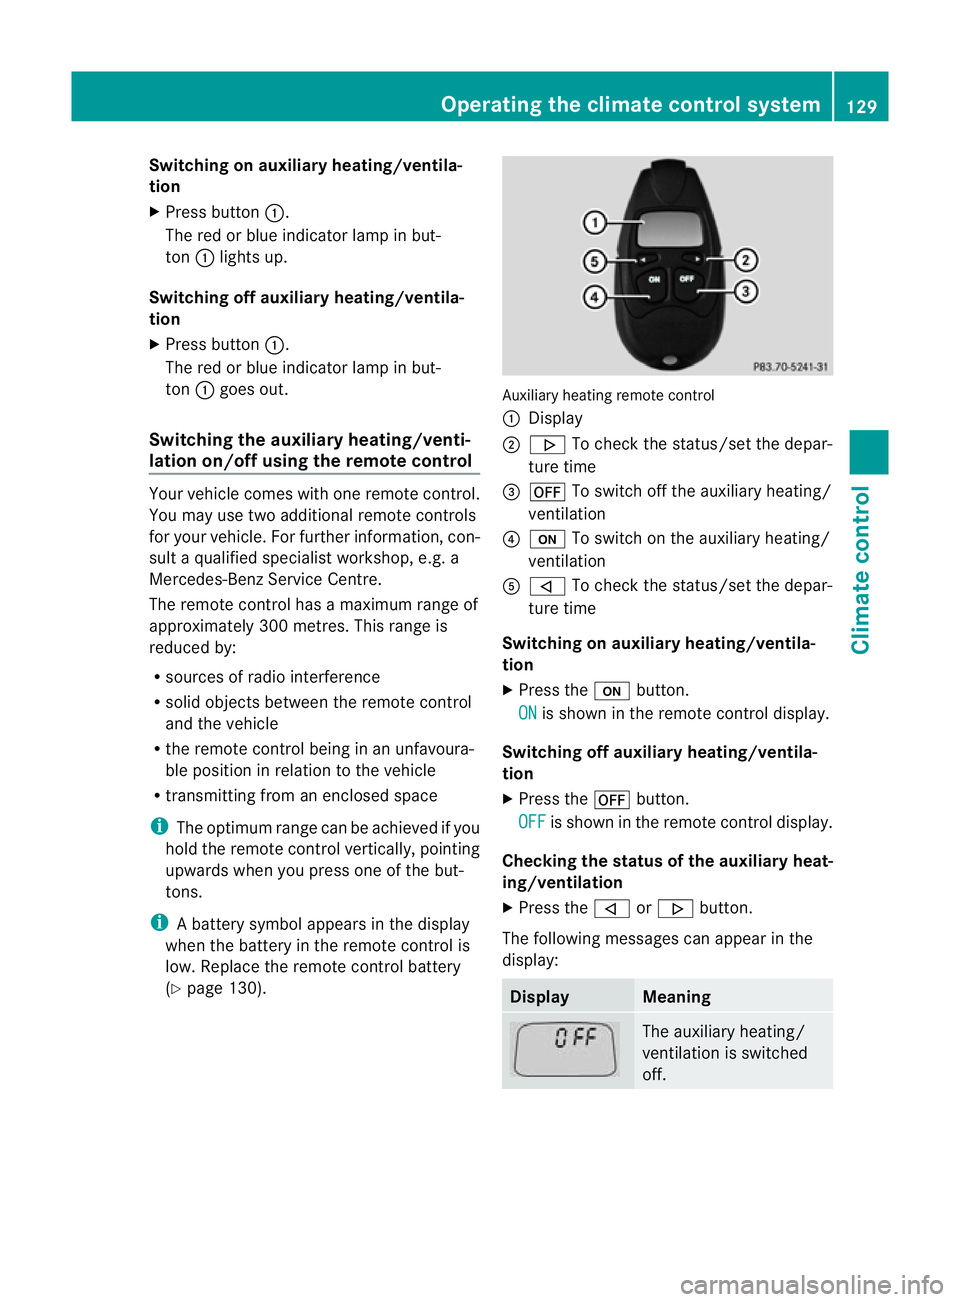
(Y page 130). Auxiliary heating remote control
:
Display
; . To check the status/set the depar-
ture time
= ^ To switch off the auxiliary heating/
ventilation
? u To switch on the auxiliary heating/
ventilation
A , To check the status/set the depar-
ture time
Switching on auxiliary heating/ventila-
tion
X Press the ubutton.
ON is shown in the remote control display.
Switching off auxiliary heating/ventila-
tion
X Press the ^button.
OFF is shown in the remote control display.
Checking th estatus of the auxiliary heat-
ing/ventilation
X Press the ,or. button.
The following messages can appear in the
display: Display Meaning
The auxiliary heating/
ventilatio
nis switched
off. Operating the climate control system
129Climate control Z
Page 133 of 373
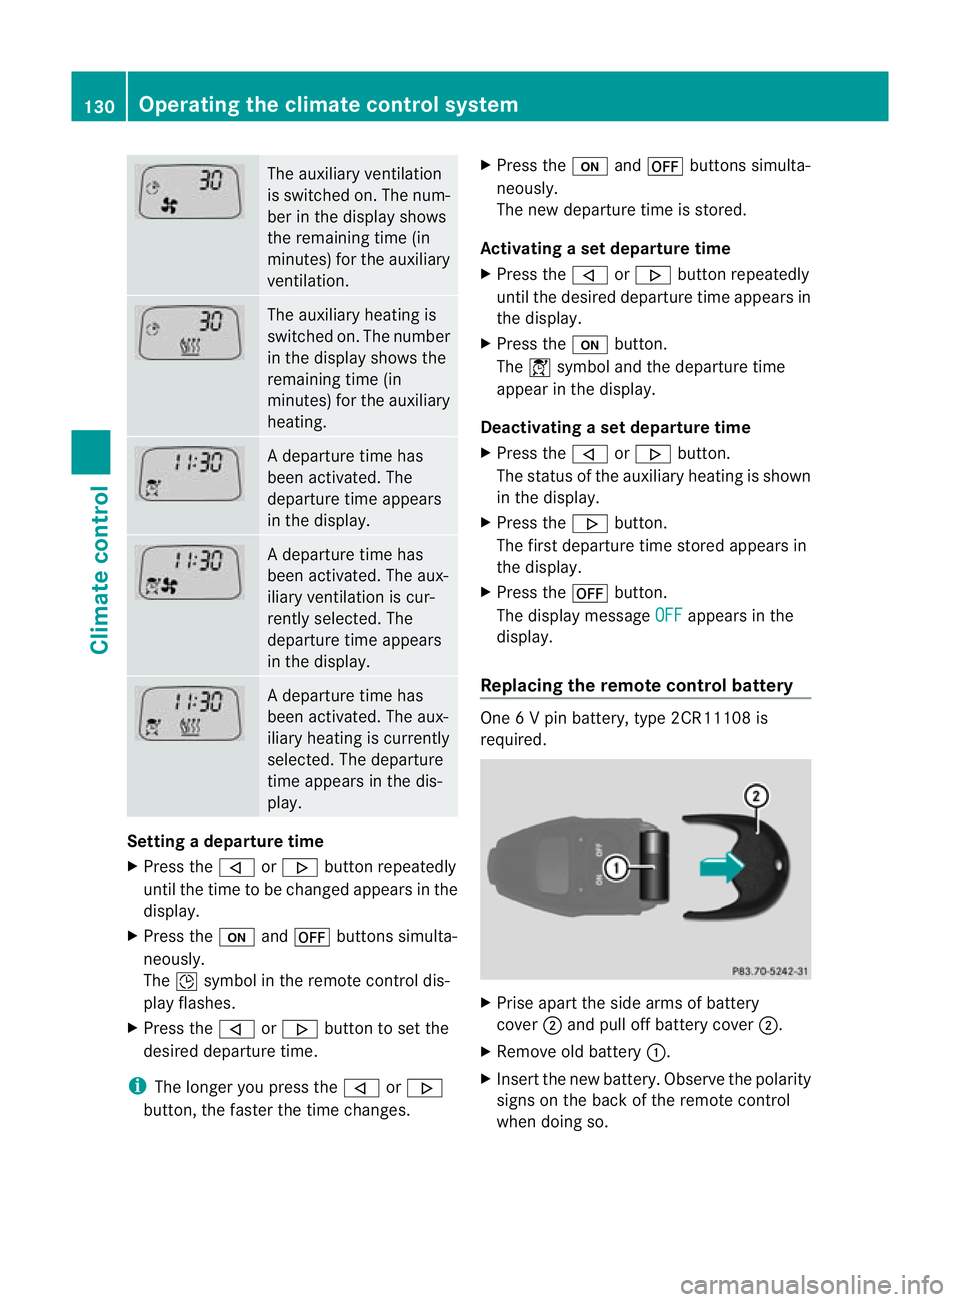
The auxiliary ventilation
is switched on. The num-
ber in the display shows
the remaining time (in
minutes) for the auxiliary
ventilation.
The auxiliary heating is
switched on. The number
in the display shows the
remaining time (in
minutes) for the auxiliary
heating.
Ad
eparture time has
been activated. The
departure time appears
in the display. Ad
eparture time has
been activated. The aux-
iliary ventilation is cur-
rently selected. The
departure time appears
in the display. Ad
eparture time has
been activated. The aux-
iliary heating is currently
selected. The departure
time appears in the dis-
play. Setting a departure time
X
Press the ,or. button repeatedly
until the time to be changed appears in the
display.
X Press the uand^ buttons simulta-
neously.
The Îsymbol in the remote control dis-
play flashes.
X Press the ,or. button to set the
desired departure time.
i The longer you press the ,or.
button, the faster the time changes. X
Press the uand^ buttons simulta-
neously.
The new departure time is stored.
Activating a set departure time
X Press the ,or. button repeatedly
until the desired departure time appears in
the display.
X Press the ubutton.
The Ísymbol and the departure time
appear in the display.
Deactivating a set departure time
X Press the ,or. button.
The status of the auxiliary heating is shown
in the display.
X Press the .button.
The first departure time stored appears in
the display.
X Press the ^button.
The display message OFF appears in the
display.
Replacing the remote control battery One 6 V pin battery, type 2CR11108 is
required.
X
Prise apart the side arms of battery
cover ;and pull off battery cover ;.
X Remove old battery :.
X Inser tthe new battery. Observe the polarity
signs on the back of the remote control
when doing so. 130
Operating the climate control systemClimate control
Page 134 of 373

X
Slide battery cover ;back onto the
remote control.
X Use the remote control to check the vehi-
cle's auxiliary heating functions. Operating the climate control system
131Climate control Z
Page 135 of 373
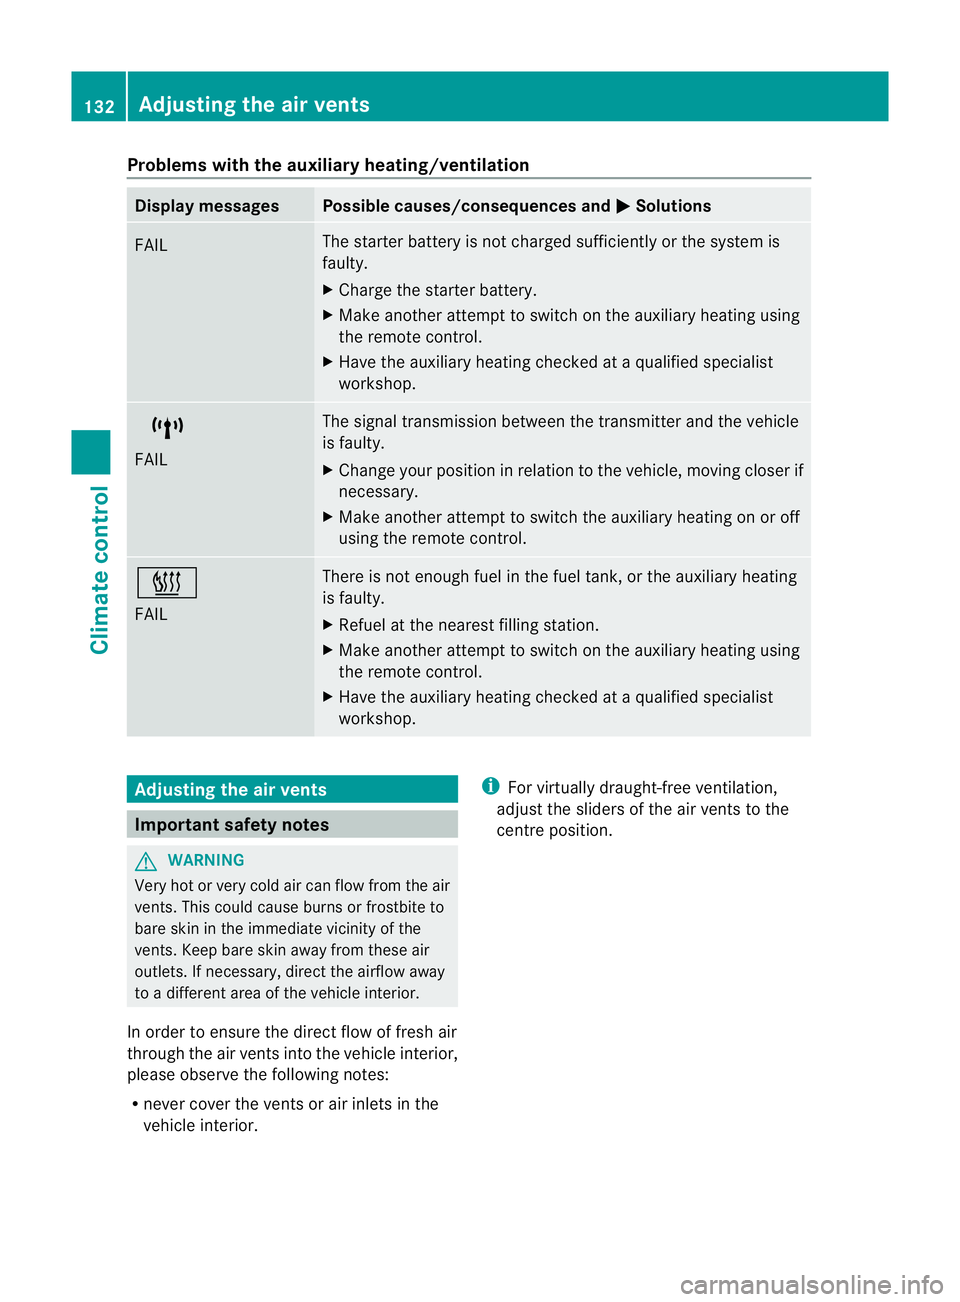
Problems with the auxiliary heating/ventilation
Display messages Possible causes/consequences and
M Solutions
FAIL The starter battery is not charged sufficiently or the system is
faulty.
X
Charge the starter battery.
X Make another attempt to switch on the auxiliary heating using
the remote control.
X Have the auxiliary heating checked at a qualified specialist
workshop. $
FAIL The signal transmission between the transmitter and the vehicle
is faulty.
X
Change your position in relation to the vehicle, moving closer if
necessary.
X Make another attempt to switch the auxiliary heating on or off
using the remote control. ©
FAIL There is not enough fuel in the fuel tank, or the auxiliary heating
is faulty.
X
Refuel at the nearest filling station.
X Make another attempt to switch on the auxiliary heating using
the remote control.
X Have the auxiliary heating checked at a qualified specialist
workshop. Adjusting the air vents
Important safety notes
G
WARNING
Very hot or very cold air can flow from the air
vents. This could cause burns or frostbite to
bare skin in the immediate vicinity of the
vents. Keep bare skin away from these air
outlets. If necessary, direct the airflow away
to a different area of the vehicle interior.
In order to ensure the direct flow of fresh air
through the air vents into the vehicle interior,
please observe the following notes:
R never cover the vents or air inlets in the
vehicle interior. i
For virtually draught-free ventilation,
adjust the sliders of the air vents to the
centre position. 132
Adjusting the air ventsClimate control
Page 136 of 373
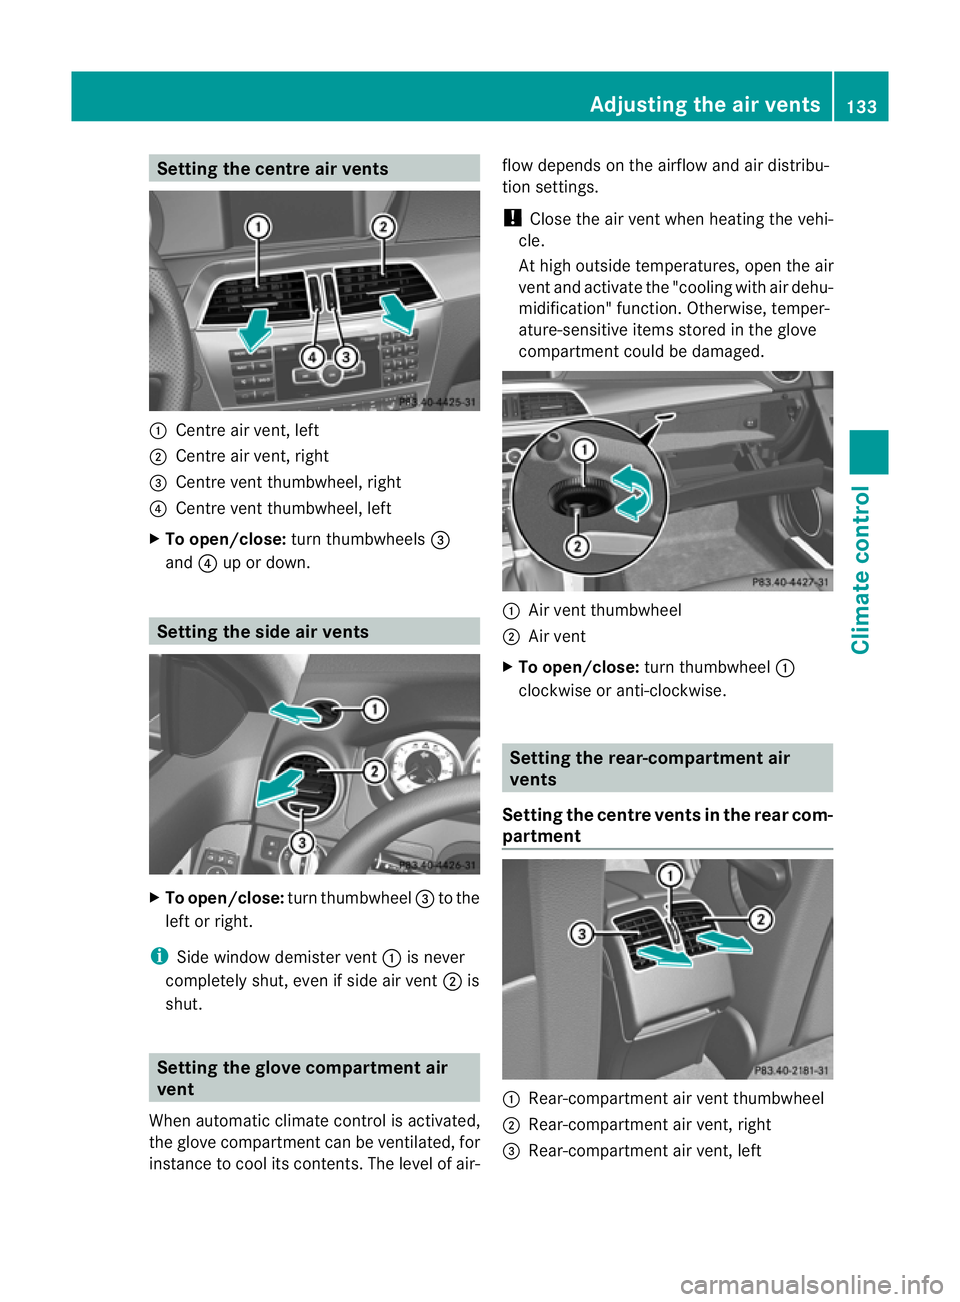
Setting the centre air vents
:
Centre air vent, left
; Centre air vent, right
= Centre vent thumbwheel, right
? Centre vent thumbwheel, left
X To open/close: turn thumbwheels =
and ?up or down. Setting the side air vents
X
To open/close: turn thumbwheel =to the
left or right.
i Side window demister vent :is never
completely shut, even if side air vent ;is
shut. Setting the glove compartment air
vent
When automatic climate control is activated,
the glove compartmen tcan be ventilated, for
instance to cool its contents .The level of air- flow depends on the airflow and air distribu-
tion settings.
!
Close the air vent when heating the vehi-
cle.
At high outside temperatures, open the air
vent and activate the "cooling with air dehu-
midification" function. Otherwise, temper-
ature-sensitive items stored in the glove
compartmentc ould be damaged. :
Air vent thumbwheel
; Air vent
X To open/close: turn thumbwheel :
clockwise or anti-clockwise. Setting the rear-compartment air
vents
Setting the centre vents in the rear com-
partment :
Rear-compartment air vent thumbwheel
; Rear-compartment air vent, right
= Rear-compartment air vent, left Adjusting the air vents
133Climate control Z
Page 137 of 373

X
To open/close: turnthumbwheel :up or
down. 134
Adjusting the air ventsClimate control
Page 138 of 373
Useful information
............................136
Running-in notes ............................... 136
Driving ............................................... 136
Manual transmission ........................144
Automatic transmission ...................145
Refuelling ........................................... 152
Parking ............................................... 158
Driving tips ........................................ 159
Driving systems ................................ 162
Trailer towing .................................... 199 135Driving and parking
Page 139 of 373
Useful information
i This Owner's Manual describes all models
and all standard and optional equipment
available to your vehicle at the time of pub-
lication of the Owner's Manual. Country-
specific deviations are possible. Please
note that your vehicle may not be equipped
with all features described. This also
applies to safety-relevan tsystems and
functions.
i Please read the information on qualified
specialist workshops (Y page 26).Running-in notes
Important safety notes
G
WARNING
New brake pads/linings only have optimal
braking performance after several hundred
kilometres .Until then, compensate for this by
applying greate rforce to the brake pedal. This
also applies when brake pads/linings or
brake discs have been changed. The first 1,500 km
The more you look after the engine when it is
new, the more satisfied you will be with its
performance in the future.
R Therefore, drive at varying speeds and
engine speeds for the first 1,500 km.
R Avoid heavy loads on the engine during this
period, e.g. driving at full throttle.
R Change gear in good time, at the latest
when the rev counter needle is 2
/ 3 of the
way to the red area in the rev counter dis-
play.
R Do not manually shift to a lower gear to
brake the vehicle. Vehicles with automatic transmission:
R
If possible, do not depress the accelerator
pedal past the point of resistance (kick-
down).
R Only select shift ranges 3,2or 1when driv-
ing slowly, e.g. in mountainous terrain.
After 1,500 km, you may gradually bring the
vehicle up to full road and engine speeds.
Additional running-in notes for AMG vehicles:
R do not drive at speeds above 140 km/hf or
the first 1,500 km.
R only allow the engine to reach a maximum
engine speed of 4,500 rpm briefly.
i You should also observe these notes on
running in if the engine or parts of the drive
train on your vehicle have been replaced. AMG vehicles with rear axle locking
differential
Your vehicle is fitted with a self-locking dif-
ferential on the rear axle. Change the oil after
a running-in period of 3,000 km to improve
protection of the rear axle differential. This oil
change extends the service life of the differ-
ential. Have the oil change carried out at a
qualified specialist workshop. Mercedes-
Benz recommends that you use a Mercedes-
Benz Service Centre for this purpose. Driving
Important safety notes
G
WARNING
Do not place any objects in the driver's foot-
well. If you use a floormat or carpet in the
driver's footwell, make sure that it is correctly
secured and that there is sufficient clearance
for the pedals.
Do not place several floormats on top of one
another.
Loose objects or the floormats could other-
wise get caught between the pedals if you 136
DrivingDriving and parking
Page 140 of 373
accelerate or brake suddenly. You will then
no tb e able to brake, declutch or accelerate
as intended. This could lead to accidents and
injury. G
WARNING
Do not change down for additional engine
braking on a slippery road surface. This could
cause the drive wheels to lose their grip and
the vehicle could skid. This could cause you
to lose control of your vehicle and cause an
accident.
! Warm up the engine quickly. Do not use
the engine's full performance until it has
reached operating temperature.
Only set the automatic transmission to the
respective drive positions when the vehicle
is stationary.
Where possible, avoid spinning the drive
wheels when pulling away on slippery
roads. Otherwise, you could damage the
drive train.
! AMG vehicles: at low engine oil tempera-
tures (below +20 †), the maximum engine
speed is restricted in order to protec tthe
engine. To protect the engine and maintain
smooth engine operation, avoid driving at
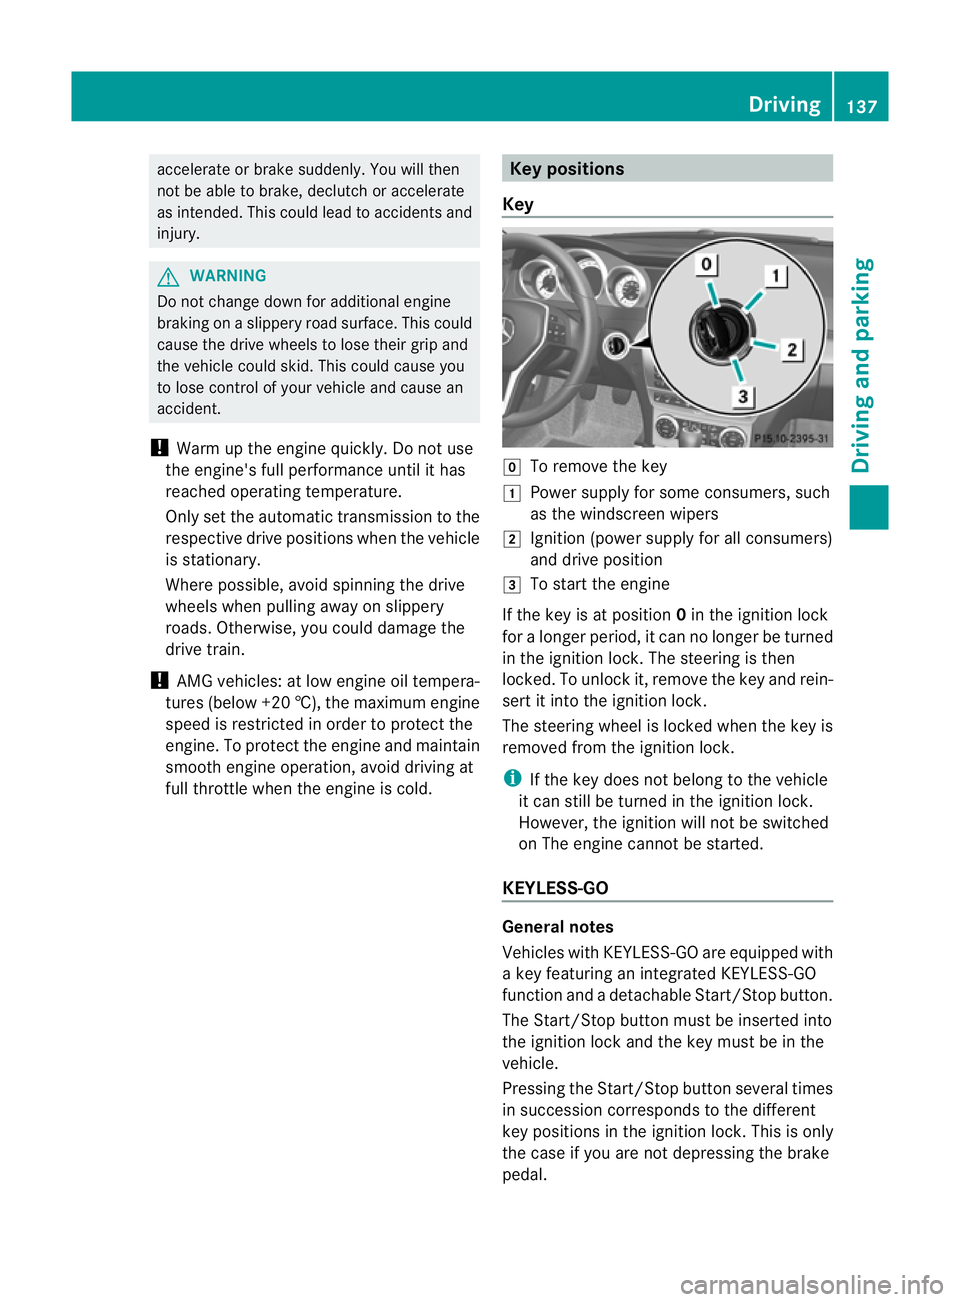
full throttle when the engine is cold. Key positions
Key g
To remove the key
1 Power supply for some consumers, such
as the windscreen wipers
2 Ignition (power supply for all consumers)
and drive position
3 To start the engine
If the key is at position 0in the ignition lock
for a longer period, it can no longer be turned
in the ignition lock. The steering is then
locked. To unlock it, remove the key and rein-
sert it into the ignition lock.
The steering wheel is locked when the key is
removed from the ignition lock.
i If the key does not belong to the vehicle
it can still be turned in the ignition lock.
However, the ignition will not be switched
on The engine cannot be started.
KEYLESS-GO General notes
Vehicles with KEYLESS-GO are equipped with
a key featuring an integrated KEYLESS-GO
function and a detachable Start/Stop button.
The Start/Stop button must be inserted into
the ignition lock and the key must be in the
vehicle.
Pressing the Start/Stop button several times
in succession corresponds to the different
key positions in the ignition lock. This is only
the case if you are not depressing the brake
pedal. Driving
137Driving and parking Z