sensor MERCEDES-BENZ C-Class COUPE 2012 CL204 Service Manual
[x] Cancel search | Manufacturer: MERCEDES-BENZ, Model Year: 2012, Model line: C-Class COUPE, Model: MERCEDES-BENZ C-Class COUPE 2012 CL204Pages: 336, PDF Size: 12.67 MB
Page 224 of 336
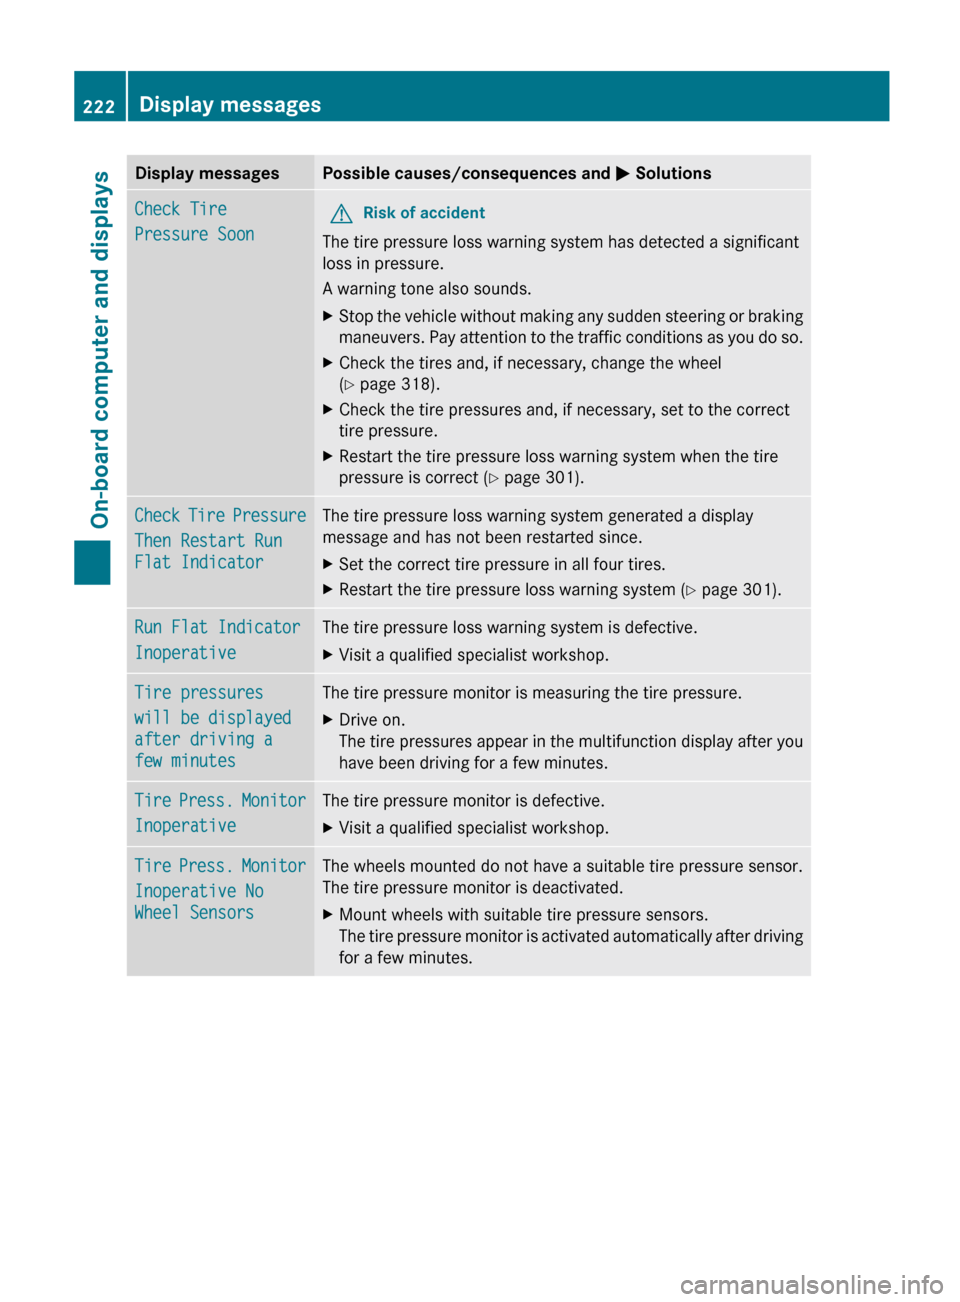
Display messagesPossible causes/consequences and M SolutionsCheck Tire
Pressure SoonGRisk of accident
The tire pressure loss warning system has detected a significant
loss in pressure.
A warning tone also sounds.
XStop the vehicle without making any sudden steering or braking
maneuvers. Pay attention to the traffic conditions as you do so.XCheck the tires and, if necessary, change the wheel
( Y page 318).XCheck the tire pressures and, if necessary, set to the correct
tire pressure.XRestart the tire pressure loss warning system when the tire
pressure is correct ( Y page 301).Check Tire Pressure
Then Restart Run
Flat IndicatorThe tire pressure loss warning system generated a display
message and has not been restarted since.XSet the correct tire pressure in all four tires.XRestart the tire pressure loss warning system ( Y page 301).Run Flat Indicator
InoperativeThe tire pressure loss warning system is defective.XVisit a qualified specialist workshop.Tire pressures
will be displayed
after driving a
few minutesThe tire pressure monitor is measuring the tire pressure.XDrive on.
The tire pressures appear in the multifunction display after you
have been driving for a few minutes.Tire Press. Monitor
InoperativeThe tire pressure monitor is defective.XVisit a qualified specialist workshop.Tire Press. Monitor
Inoperative No
Wheel SensorsThe wheels mounted do not have a suitable tire pressure sensor.
The tire pressure monitor is deactivated.XMount wheels with suitable tire pressure sensors.
The tire pressure monitor is activated automatically after driving
for a few minutes.222Display messagesOn-board computer and displays
Page 225 of 336
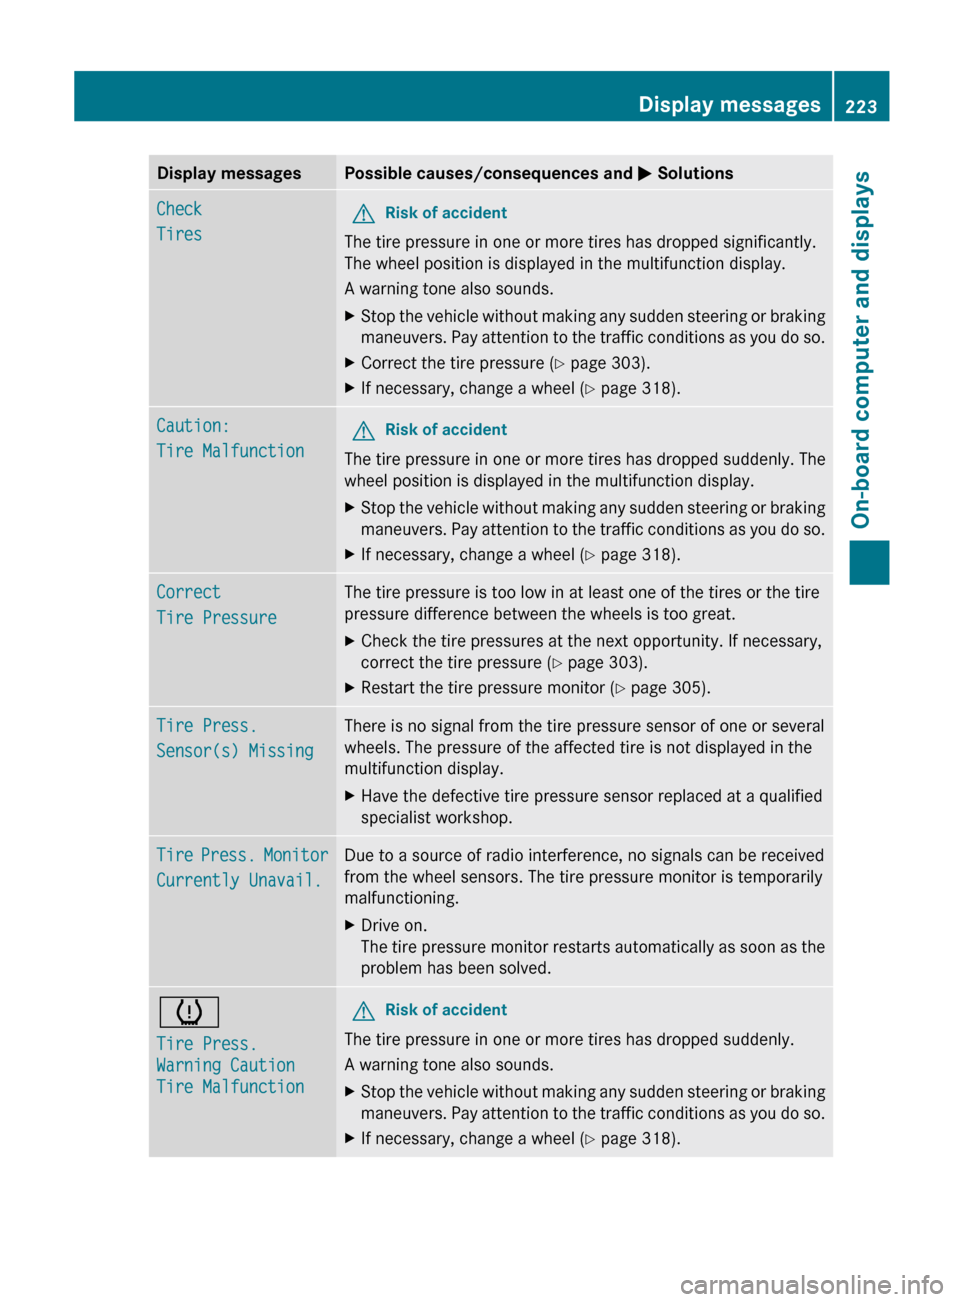
Display messagesPossible causes/consequences and M SolutionsCheck
TiresGRisk of accident
The tire pressure in one or more tires has dropped significantly.
The wheel position is displayed in the multifunction display.
A warning tone also sounds.
XStop the vehicle without making any sudden steering or braking
maneuvers. Pay attention to the traffic conditions as you do so.XCorrect the tire pressure ( Y page 303).XIf necessary, change a wheel ( Y page 318).Caution:
Tire MalfunctionGRisk of accident
The tire pressure in one or more tires has dropped suddenly. The
wheel position is displayed in the multifunction display.
XStop the vehicle without making any sudden steering or braking
maneuvers. Pay attention to the traffic conditions as you do so.XIf necessary, change a wheel ( Y page 318).Correct
Tire PressureThe tire pressure is too low in at least one of the tires or the tire
pressure difference between the wheels is too great.XCheck the tire pressures at the next opportunity. If necessary,
correct the tire pressure ( Y page 303).XRestart the tire pressure monitor ( Y page 305).Tire Press.
Sensor(s) MissingThere is no signal from the tire pressure sensor of one or several
wheels. The pressure of the affected tire is not displayed in the
multifunction display.XHave the defective tire pressure sensor replaced at a qualified
specialist workshop.Tire Press. Monitor
Currently Unavail.Due to a source of radio interference, no signals can be received
from the wheel sensors. The tire pressure monitor is temporarily
malfunctioning.XDrive on.
The tire pressure monitor restarts automatically as soon as the
problem has been solved.h
Tire Press.
Warning Caution
Tire MalfunctionGRisk of accident
The tire pressure in one or more tires has dropped suddenly.
A warning tone also sounds.
XStop the vehicle without making any sudden steering or braking
maneuvers. Pay attention to the traffic conditions as you do so.XIf necessary, change a wheel ( Y page 318).Display messages223On-board computer and displaysZ
Page 237 of 336
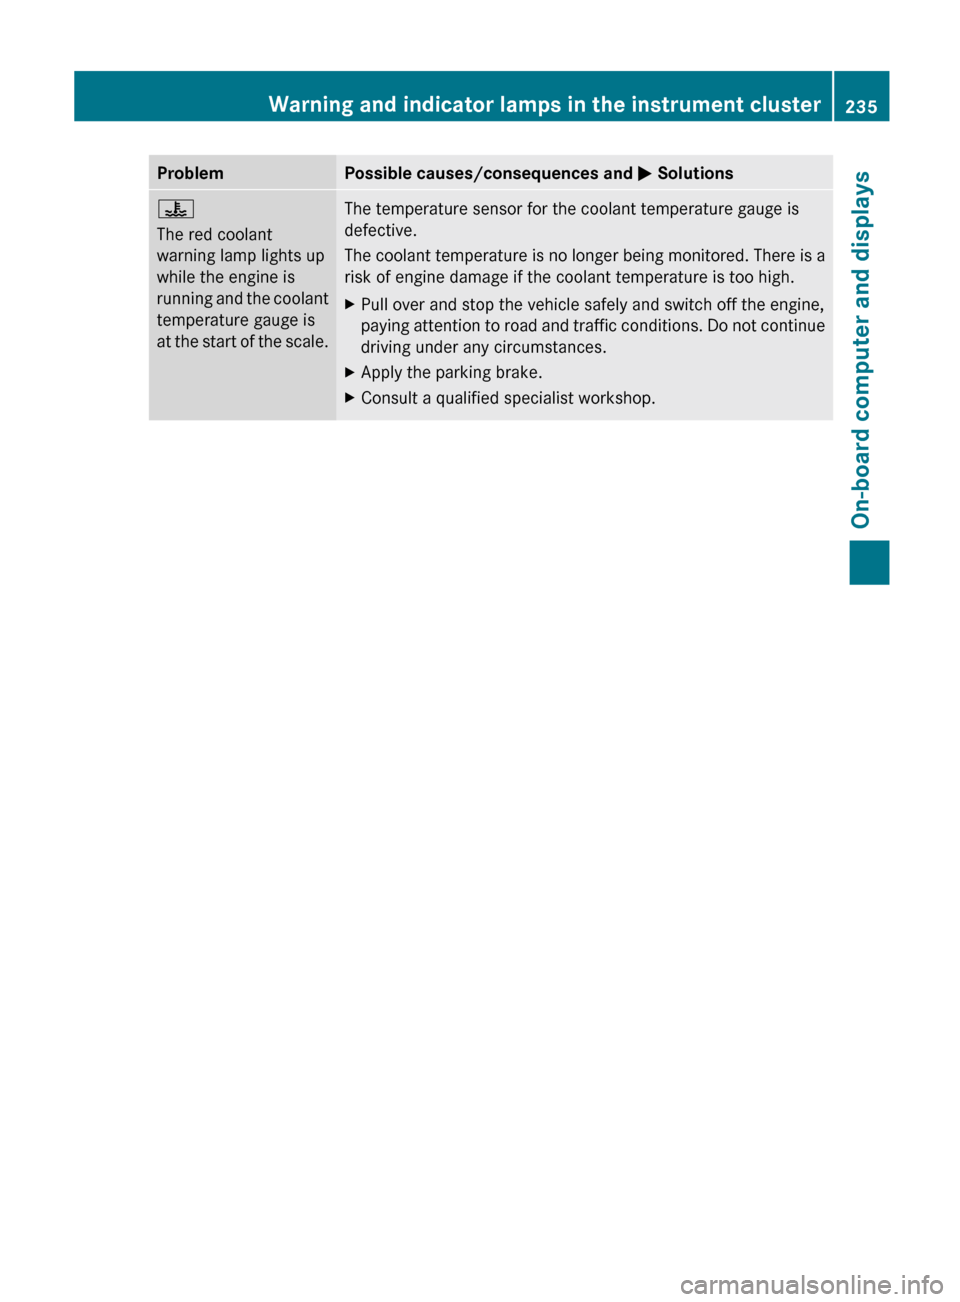
ProblemPossible causes/consequences and M Solutions?
The red coolant
warning lamp lights up
while the engine is
running and the coolant
temperature gauge is
at the start of the scale.The temperature sensor for the coolant temperature gauge is
defective.
The coolant temperature is no longer being monitored. There is a
risk of engine damage if the coolant temperature is too high.XPull over and stop the vehicle safely and switch off the engine,
paying attention to road and traffic conditions. Do not continue
driving under any circumstances.XApply the parking brake.XConsult a qualified specialist workshop.Warning and indicator lamps in the instrument cluster235On-board computer and displaysZ
Page 269 of 336
coolant reservoir contains hot fluid and is
under pressure.
R using a rag, slowly turn the cap
approximately 1
/ 2 turn to relieve excess
pressure. If opened immediately, scalding
hot fluid and steam will be blown out under
pressure.
R do not spill antifreeze on hot engine parts.
Antifreeze contains ethylene glycol which
may burn if it comes into contact with hot
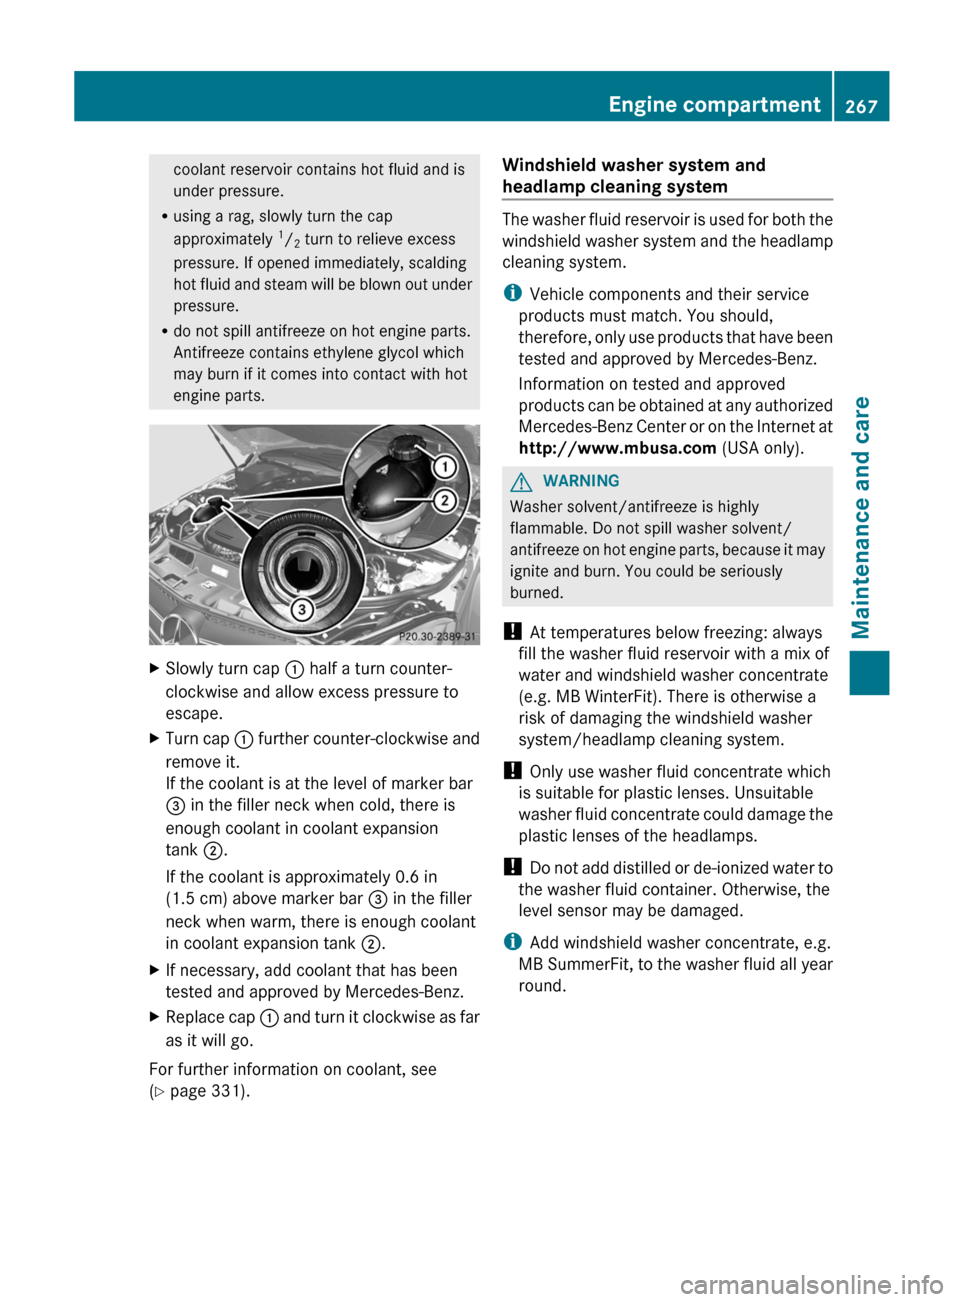
engine parts.XSlowly turn cap : half a turn counter-
clockwise and allow excess pressure to
escape.XTurn cap : further counter-clockwise and
remove it.
If the coolant is at the level of marker bar
= in the filler neck when cold, there is
enough coolant in coolant expansion
tank ;.
If the coolant is approximately 0.6 in
(1.5 cm) above marker bar = in the filler
neck when warm, there is enough coolant
in coolant expansion tank ;.XIf necessary, add coolant that has been
tested and approved by Mercedes-Benz.XReplace cap : and turn it clockwise as far
as it will go.
For further information on coolant, see
( Y page 331).
Windshield washer system and
headlamp cleaning system
The washer fluid reservoir is used for both the
windshield washer system and the headlamp
cleaning system.
i Vehicle components and their service
products must match. You should,
therefore, only use products that have been
tested and approved by Mercedes-Benz.
Information on tested and approved
products can be obtained at any authorized
Mercedes-Benz Center or on the Internet at
http://www.mbusa.com (USA only).
GWARNING
Washer solvent/antifreeze is highly
flammable. Do not spill washer solvent/
antifreeze on hot engine parts, because it may
ignite and burn. You could be seriously
burned.
! At temperatures below freezing: always
fill the washer fluid reservoir with a mix of
water and windshield washer concentrate
(e.g. MB WinterFit). There is otherwise a
risk of damaging the windshield washer
system/headlamp cleaning system.
! Only use washer fluid concentrate which
is suitable for plastic lenses. Unsuitable
washer fluid concentrate could damage the
plastic lenses of the headlamps.
! Do not add distilled or de-ionized water to
the washer fluid container. Otherwise, the
level sensor may be damaged.
i Add windshield washer concentrate, e.g.
MB SummerFit, to the washer fluid all year
round.
Engine compartment267Maintenance and careZ
Page 275 of 336
graphite coating could be damaged. This
could cause wiper noise.XFold the wiper arms away from the
windshield.XCarefully clean the wiper blades with a
damp cloth.XFold the windshield wipers back again
before switching on the ignition.
! Hold the wiper arm securely when folding
back. The windshield could be damaged if
the wiper arm smacks against it suddenly.
Cleaning the exterior lighting
XClean the plastic lenses of the exterior
lights with a wet sponge and a mild cleaning
agent, e.g. Mercedes-Benz car shampoo or
cleaning cloths.
! Only use cleaning agents or cleaning
cloths which are suitable for plastic light
lenses. Unsuitable cleaning agents or
cleaning cloths could scratch or damage
the plastic light lenses.
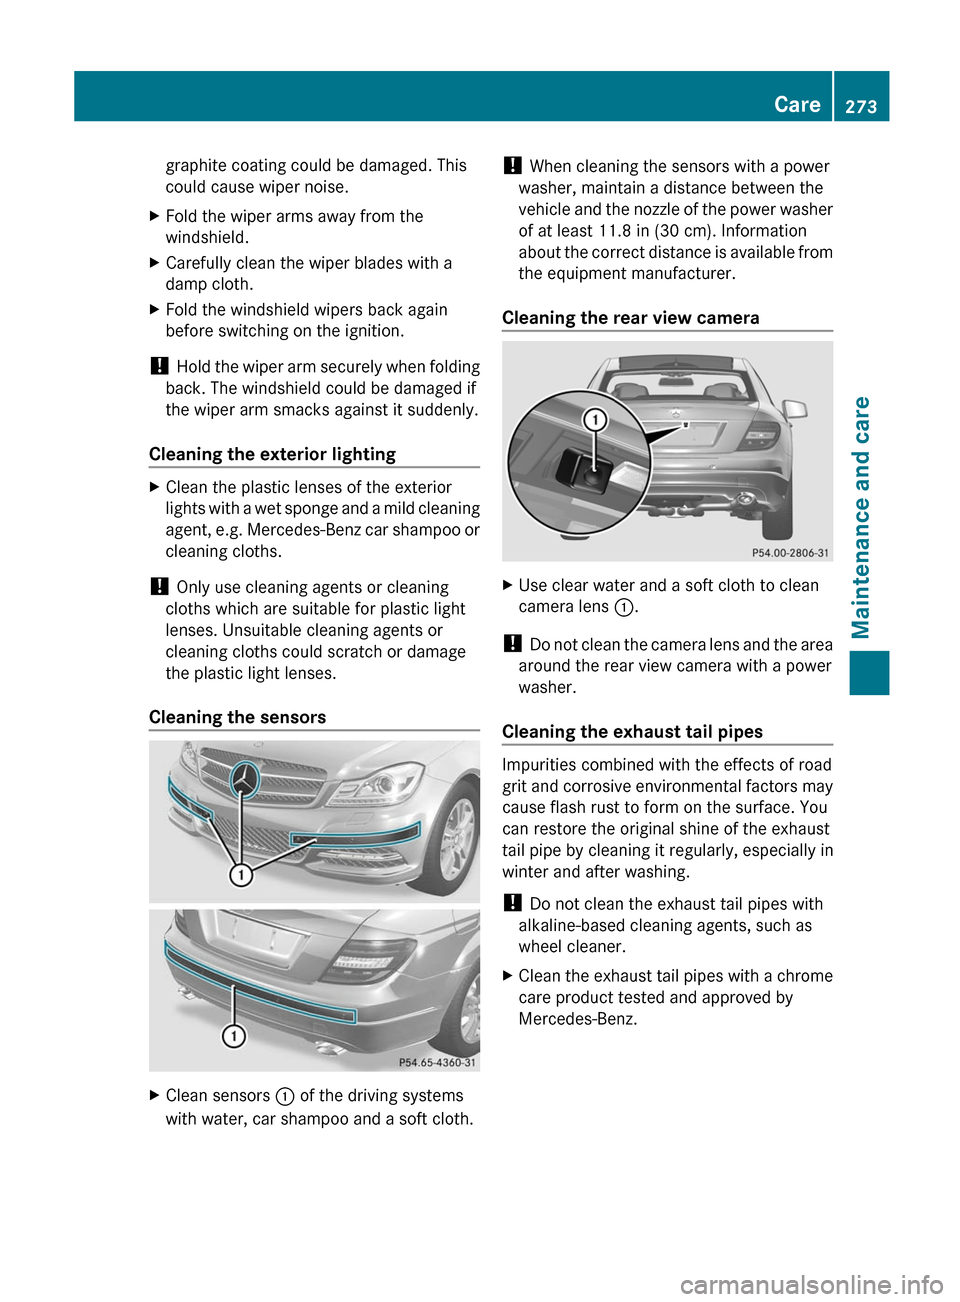
Cleaning the sensors
XClean sensors : of the driving systems
with water, car shampoo and a soft cloth.! When cleaning the sensors with a power
washer, maintain a distance between the
vehicle and the nozzle of the power washer
of at least 11.8 in (30 cm). Information
about the correct distance is available from
the equipment manufacturer.
Cleaning the rear view cameraXUse clear water and a soft cloth to clean
camera lens :.
!
Do not clean the camera lens and the area
around the rear view camera with a power
washer.
Cleaning the exhaust tail pipes
Impurities combined with the effects of road
grit and corrosive environmental factors may
cause flash rust to form on the surface. You
can restore the original shine of the exhaust
tail pipe by cleaning it regularly, especially in
winter and after washing.
! Do not clean the exhaust tail pipes with
alkaline-based cleaning agents, such as
wheel cleaner.
XClean the exhaust tail pipes with a chrome
care product tested and approved by
Mercedes-Benz.Care273Maintenance and careZ
Page 285 of 336
XTighten the wheel bolts until they are
finger-tight.
Lowering the vehicle
XTurn the crank of the jack counter-
clockwise until the vehicle is once again
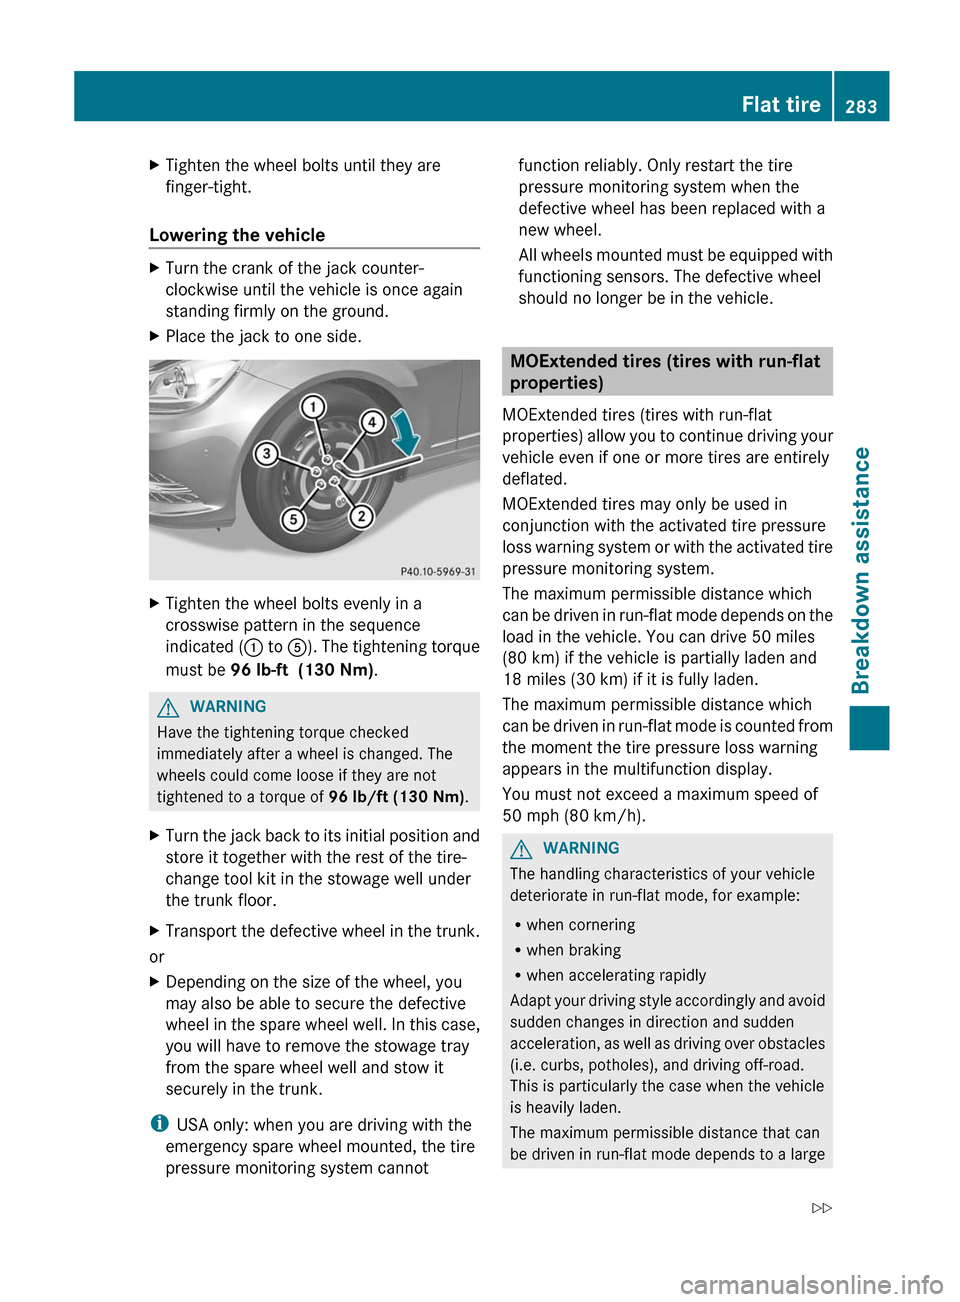
standing firmly on the ground.XPlace the jack to one side.XTighten the wheel bolts evenly in a
crosswise pattern in the sequence
indicated ( : to A). The tightening torque
must be 96 lb-ft (130 Nm) .GWARNING
Have the tightening torque checked
immediately after a wheel is changed. The
wheels could come loose if they are not
tightened to a torque of 96 lb/ft (130 Nm).
XTurn the jack back to its initial position and
store it together with the rest of the tire-
change tool kit in the stowage well under
the trunk floor.XTransport the defective wheel in the trunk.
or
XDepending on the size of the wheel, you
may also be able to secure the defective
wheel in the spare wheel well. In this case,
you will have to remove the stowage tray
from the spare wheel well and stow it
securely in the trunk.
i USA only: when you are driving with the
emergency spare wheel mounted, the tire
pressure monitoring system cannot
function reliably. Only restart the tire
pressure monitoring system when the
defective wheel has been replaced with a
new wheel.
All wheels mounted must be equipped with
functioning sensors. The defective wheel
should no longer be in the vehicle.
MOExtended tires (tires with run-flat
properties)
MOExtended tires (tires with run-flat
properties) allow you to continue driving your
vehicle even if one or more tires are entirely
deflated.
MOExtended tires may only be used in
conjunction with the activated tire pressure
loss warning system or with the activated tire
pressure monitoring system.
The maximum permissible distance which
can be driven in run-flat mode depends on the
load in the vehicle. You can drive 50 miles
(80 km) if the vehicle is partially laden and
18 miles (30 km) if it is fully laden.
The maximum permissible distance which
can be driven in run-flat mode is counted from
the moment the tire pressure loss warning
appears in the multifunction display.
You must not exceed a maximum speed of
50 mph (80 km/h).
GWARNING
The handling characteristics of your vehicle
deteriorate in run-flat mode, for example:
R when cornering
R when braking
R when accelerating rapidly
Adapt your driving style accordingly and avoid
sudden changes in direction and sudden
acceleration, as well as driving over obstacles
(i.e. curbs, potholes), and driving off-road.
This is particularly the case when the vehicle
is heavily laden.
The maximum permissible distance that can
be driven in run-flat mode depends to a large
Flat tire283Breakdown assistanceZ
Page 305 of 336
XPress the a button.
The tire pressure values stored at the last
restart will continue to be monitored.
Tire pressure monitor
Important safety notes
If a tire pressure monitor system is installed,
the vehicle's wheels have sensors that
monitor the tire pressures in all four tires. The
tire pressure monitor warns you if the
pressure drops in one or more of the tires. The
tire pressure monitor only functions if the
correct wheel electronics units are installed
on all wheels.
The tire pressure monitor has a yellow
warning lamp in the instrument cluster for
indicating pressure loss/malfunctions (USA)
or pressure loss (Canada). Whether the
warning lamp flashes or lights up indicates
whether a tire pressure is too low or the tire
pressure monitoring system is
malfunctioning:
R if the warning lamp is lit continuously, the
tire pressure on one or more tires is
significantly too low. The tire pressure
monitor is not malfunctioning.
R USA only: if the warning lamp flashes for
60 seconds and then remains lit constantly,
the tire pressure monitor is malfunctioning.
GWARNING
Each tire, including the spare (if provided),
should be checked at least once a month
when cold and inflated to the pressure
recommended by the vehicle manufacturer
on the Tire and Loading Information placard
on the driver's door B-pillar or the tire
pressure label on the inside of the fuel filler
flap. If your vehicle has tires of a different size
than the size indicated on the Tire and Loading
Information placard or the tire pressure label,
you should determine the proper tire pressure
for those tires.
As an added safety feature, your vehicle has
been equipped with a tire pressure monitoring
system (TPMS) that illuminates a low tire
pressure telltale when one or more of your
tires are significantly underinflated.
Accordingly, when the low tire pressure
telltale illuminates, you should stop and check
your tires as soon as possible, and inflate
them to the proper pressure. Driving on a
significantly underinflated tire causes the tire
to overheat and can lead to tire failure.
Underinflation also reduces fuel efficiency
and tire tread life, and may affect the vehicle's
handling and stopping ability.
Please note that the TPMS is not a substitute
for proper tire maintenance, and it is the
driver's responsibility to maintain correct tire
pressure, even if underinflation has not
reached the level to trigger illumination of the
TPMS low tire pressure telltale.
USA only:
Your vehicle has also been equipped with a
TPMS malfunction indicator to indicate when
the system is not operating properly. The
TPMS malfunction indicator is combined with
the low tire pressure telltale. When the
system detects a malfunction, the telltale will
flash for approximately one minute and then
remain continuously illuminated. This
sequence will be repeated every time the
vehicle is started as long as the malfunction
exists.
When the malfunction indicator is illuminated,
the system may not be able to detect or signal
low tire pressure as intended. TPMS
malfunctions may occur for a variety of
reasons, including the installation of
incompatible replacement or alternate tires
or wheels on the vehicle that prevent the
TPMS from functioning properly. Always
check the TPMS malfunction telltale after
replacing one or more tires or wheels on your
vehicle to ensure that the replacement or
alternate tires and wheels allow the TPMS to
continue to function properly.
i USA only:Tire pressure303Wheels and tiresZ
Page 306 of 336
If the tire pressure monitor is
malfunctioning, it may take more than
10 minutes for the tire pressure warning
lamp to inform you of the malfunction by
flashing for 60 seconds and then remaining
lit.
When the malfunction has been rectified,
the tire pressure warning lamp goes out
after driving for a few minutes.
Information on tire pressures is displayed in
the multifunction display. After a few minutes
of driving, the current tire pressure of each
tire is shown in the multifunction display.
i The tire pressure values indicated by the
on-board computer may differ from those
measured at a gas station with a pressure
gauge. The tire pressures shown by the on-
board computer refer to those measured at
sea level. At high altitudes, the tire pressure
values indicated by a pressure gauge are
higher than those shown by the on-board
computer. In this case, do not reduce the
tire pressures.
i The operation of the tire pressure monitor
can be affected by interference from radio
transmitting equipment (e.g. radio
headphones, two-way radios) that may be
being operated in or near the vehicle.
i USA only:
This device complies with Part 15 of the
FCC Rules. Operation is subject to the
following two conditions:
1. This device may not cause interference,
and
2. this device must accept any interference
received, including interference that may
cause undesired operation.
Any unauthorized modification to this
device could void the user’s authority to
operate the equipment.
i Canada only:
This device complies with RSS-210 of
Industry Canada. Operation is subject to
the following two conditions:1. This device may not cause interference,
and
2. this device must accept any interference
received, including interference that may
cause undesired operation of the device.
Any unauthorized modification to this
device could void the user’s authority to
operate the equipment.
Checking tire pressure electronicallyXMake sure that the SmartKey is in position
2 (Y page 125) in the ignition lock.XPress the = or ; button on the
steering wheel to select the Service
menu.XPress the 9 or : button to select
Tire Pressure .XPress the a button.
The current tire pressure for each wheel will
be displayed in the multifunction display.
If the vehicle has been parked for longer than
20 minutes, the Tire pressures will be
displayed after driving a few
minutes message appears in the display.
After a teach-in period, the tire pressure
monitor automatically recognizes new wheels
or new sensors. If a clear allocation of the tire
pressure values to the individual wheels is not
possible, the Tire Pressure Monitor
Active message is shown instead of the tire
pressure display. The tire pressures are
already being monitored.
i If a spare wheel/emergency spare wheel
is mounted, the system may continue to
show the tire pressure of the wheel that has
been removed for a few minutes. If this
occurs, note that the value displayed for
the position where the spare tire is
mounted is not the same as the spare
wheel/emergency spare wheel's current
tire pressure.
304Tire pressureWheels and tires
Page 326 of 336
Useful information
i This Operator's Manual describes all
models and all standard and optional
equipment of your vehicle available at the
time of publication of the Operator's
Manual. Country-specific differences are
possible. Please note that your vehicle may
not be equipped with all features
described. This also applies to safety-
related systems and functions.
i Please read the information on qualified
specialist workshops ( Y page 23).
Notes on technical data
i The data stated here specifically refers to
a vehicle with standard equipment. Consult
an authorized Mercedes-Benz Center for
the data for all vehicle variants and trim
levels.
Genuine Mercedes-Benz parts
All Mercedes-Benz Centers maintain a supply
of genuine Mercedes-Benz parts for
necessary service and repair work. In
addition, strategically located parts delivery
centers provide for quick and reliable parts
service.
There are more than 300,000 different
genuine Mercedes-Benz parts available for
Mercedes-Benz models.
Genuine Mercedes-Benz parts are subject to
strict quality control. Each part has been
specially developed, manufactured or
selected for Mercedes-Benz vehicles and
fine-tuned for them.
Therefore, only genuine Mercedes-Benz parts
should be used.
GWARNING
Driving safety may be impaired if non-
approved parts, tires and wheels or safety-
relevant accessories are used.
This could lead to malfunctions in safety-
relevant systems, e.g. the brake system. This
could cause you to lose control of your vehicle
and cause an accident.
For this reason, Mercedes-Benz recommends
that you use genuine Mercedes-Benz parts or
parts of equal quality. Only use tires, wheels
and accessories that have been specifically
approved for your vehicle.
! Air bags and Emergency Tensioning
Devices, as well as control units and
sensors for these restraint systems may be
installed in the following areas of your
vehicle:
R doors
R door pillars
R door sills
R seats
R dashboard
R instrument cluster
R center console
Do not install accessories such as audio
systems in these areas. Do not carry out
repairs or welding. You could impair the
operating efficiency of the restraint
systems.
Have aftermarket accessories installed at
a qualified specialist workshop. Mercedes-
Benz recommends that you use an
authorized Mercedes-Benz Center for this
purpose.
HEnvironmental note
Daimler AG also supplies reconditioned major
assemblies and parts which are of the same
quality as new parts. They are covered by the
same Limited Warranty entitlements as new
parts.
Always specify the vehicle identification
number (VIN) ( Y page 325) and the engine
324Genuine Mercedes-Benz partsTechnical data