start stop button MERCEDES-BENZ C-Class COUPE 2013 CL204 Owner's Guide
[x] Cancel search | Manufacturer: MERCEDES-BENZ, Model Year: 2013, Model line: C-Class COUPE, Model: MERCEDES-BENZ C-Class COUPE 2013 CL204Pages: 350, PDF Size: 4.81 MB
Page 157 of 350
Wet roads
If you have drive
nfor a long time in heavy rain
without braking, there may be a delayed
reaction from the brakes when braking for the
first time. This may also occur after the
vehicle has been washed.
You have to depress the brake pedal more
firmly. Maintain a greater distance from the
vehicle in front.
After driving on a wet road or having the
vehicle washed, brake firmly while paying
attention to the traffic conditions. This will
warm up the brake discs, thereby drying them
more quickly and protecting them against
corrosion.
Limited braking performance on salt-
treated roads If you drive on salted roads, a layer of salt
residue may form on the brake discs and
brake pads. This can result in a significantly
longer braking distance.
R Brake occasionally to remove any possible
salt residue. Make sure that you do not
endanger other road users when doing so.
R Carefully depress the brake pedal and the
beginning and end of a journey.
R Maintain a greater distance to the vehicle
ahead.
Servicing the brakes !
If the red brake warning lamp lights up in
the instrument cluster and you hear a
warning tone while the engine is running,
the brake fluid level may be too low.
Observe additional warning messages in
the multifunction display.
The brake fluid level may be too low due to
brake pad wear or leaking brake lines.
Have the brake system checked
immediately. This work should be carried
out at a qualified specialist workshop.
All checks and maintenance work on the
brake system must be carried out at a qualified specialist workshop. Consult a
qualified specialist workshop to arrange this.
Have brake pads installed and brake fluid
replaced at a qualified specialist workshop.
!
Vehicles with 4MATIC: function or
performance tests may only be carried out
on a 2-axle dynamometer. If you are
planning to have the vehicle tested on such
a dynamometer, contact an authorized
Mercedes-Benz Center to obtain further
information first. Otherwise, you could
damage the drive train or the brake system.
! Vehicles with 4MATIC: as the ESP®
system operates automatically, the engine
and the ignition must be switched off
(SmartKey in position 0or 1in the ignition
lock or Start/Stop button in position 0or
1) while the parking brake is being tested
on a brake dynamometer.
Braking maneuvers triggered automatically
by ESP ®
may seriously damage the brake
system.
! Vehicles with 4MATIC: as the ESP®
system operates automatically, the engine
and the ignition system must be switched
off (SmartKey in position 0or 1in the
ignition lock or Start/Stop button in
position 0or 1) when:
R testing the parking brake on a brake
dynamometer.
R you intend to have the vehicle towed with
the front axle raised.
Braking maneuvers triggered automatically
by ESP ®
may seriously damage the brake
system.
If the brake system has only been subject to
moderate loads, you should test the
functionality of your brakes at regular
intervals. To do so, press firmly on the brake
pedal when driving at a high speed. This
improves the grip of the brake pads.
You can find a description of Brake Assist
(BAS) on (Y page 63) or of BAS PLUS on
(Y page 63). Driving tips
155Driving and parking Z
Page 194 of 350
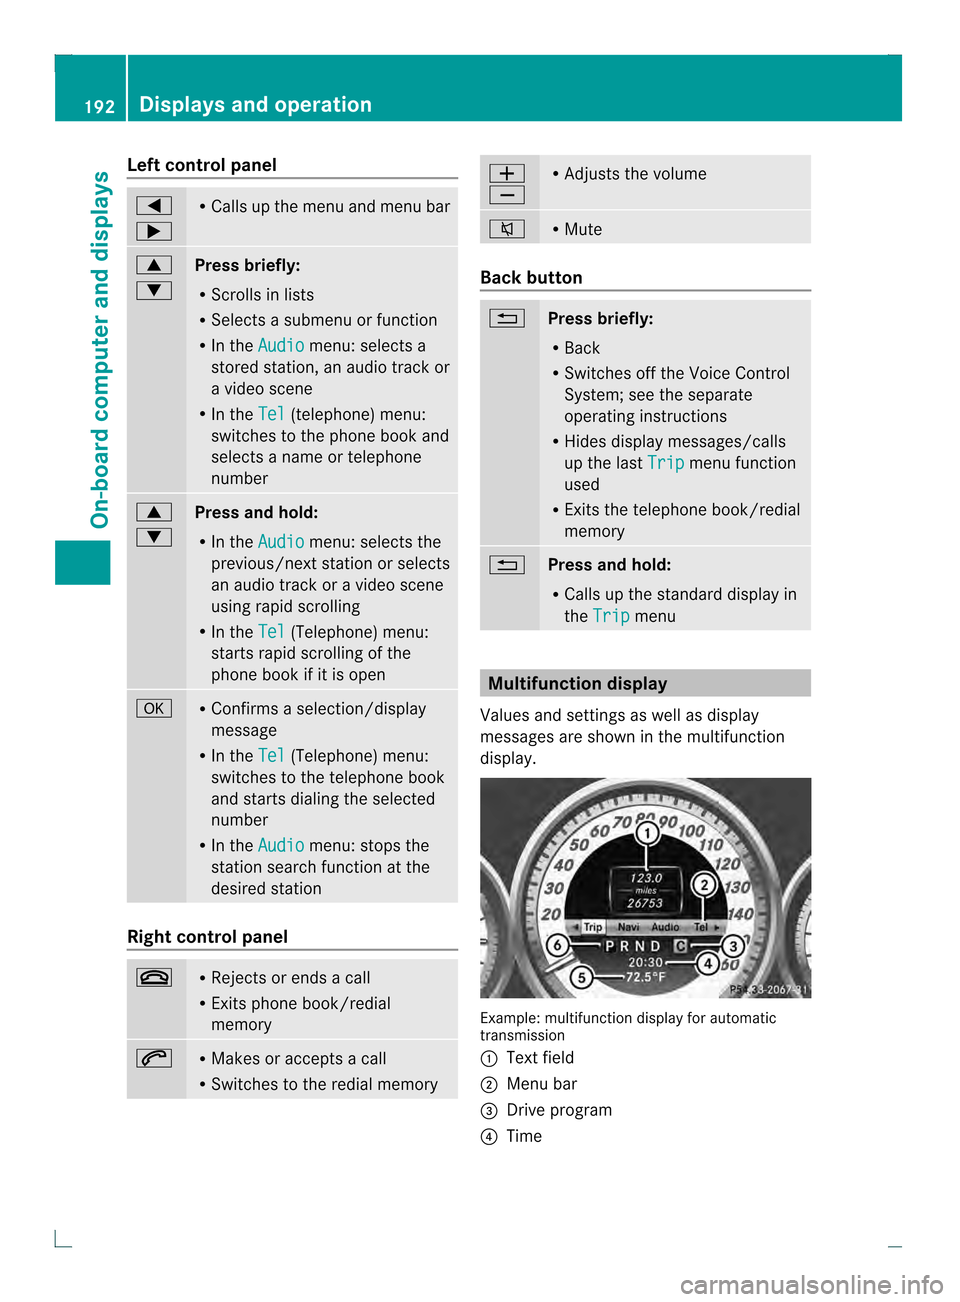
Left control panel
0002
0005 R
Calls up the menu and menu bar 0003
0004
Press briefly:
R
Scrolls in lists
R Selects a submenu or function
R In the Audio menu: selects a
stored station, an audio track or
a video scene
R In the Tel (telephone) menu:
switches to the phone book and
selects a name or telephone
number 0003
0004
Press and hold:
R
In the Audio menu: selects the
previous/nex tstation or selects
an audio track or a video scene
using rapid scrolling
R In the Tel (Telephone) menu:
starts rapid scrolling of the
phone book if it is open 000B R
Confirms a selection/display
message
R In the Tel (Telephone) menu:
switches to the telephone book
and starts dialing the selected
number
R In the Audio menu: stops the
station search function at the
desired station Right control panel
0009 R
Rejects or ends a call
R Exits phone book/redial
memory 0003 R
Makes or accepts a call
R Switches to the redial memory 0009
000A R
Adjusts the volume 0005 R
Mute Back button
0006
Press briefly:
R
Back
R Switches off the Voice Control
System; see the separate
operating instructions
R Hides display messages/calls
up the last Trip menu function
used
R Exits the telephone book/redial
memory 0006
Press and hold:
R
Calls up the standard display in
the Trip menu
Multifunction display
Values and settings as well as display
messages are shown in the multifunction
display. Example: multifunction display for automatic
transmission
0002
Text field
0003 Menu bar
0022 Drive program
0021 Time 192
Displays and operationOn-boa
rdcompu ter and displays
Page 195 of 350
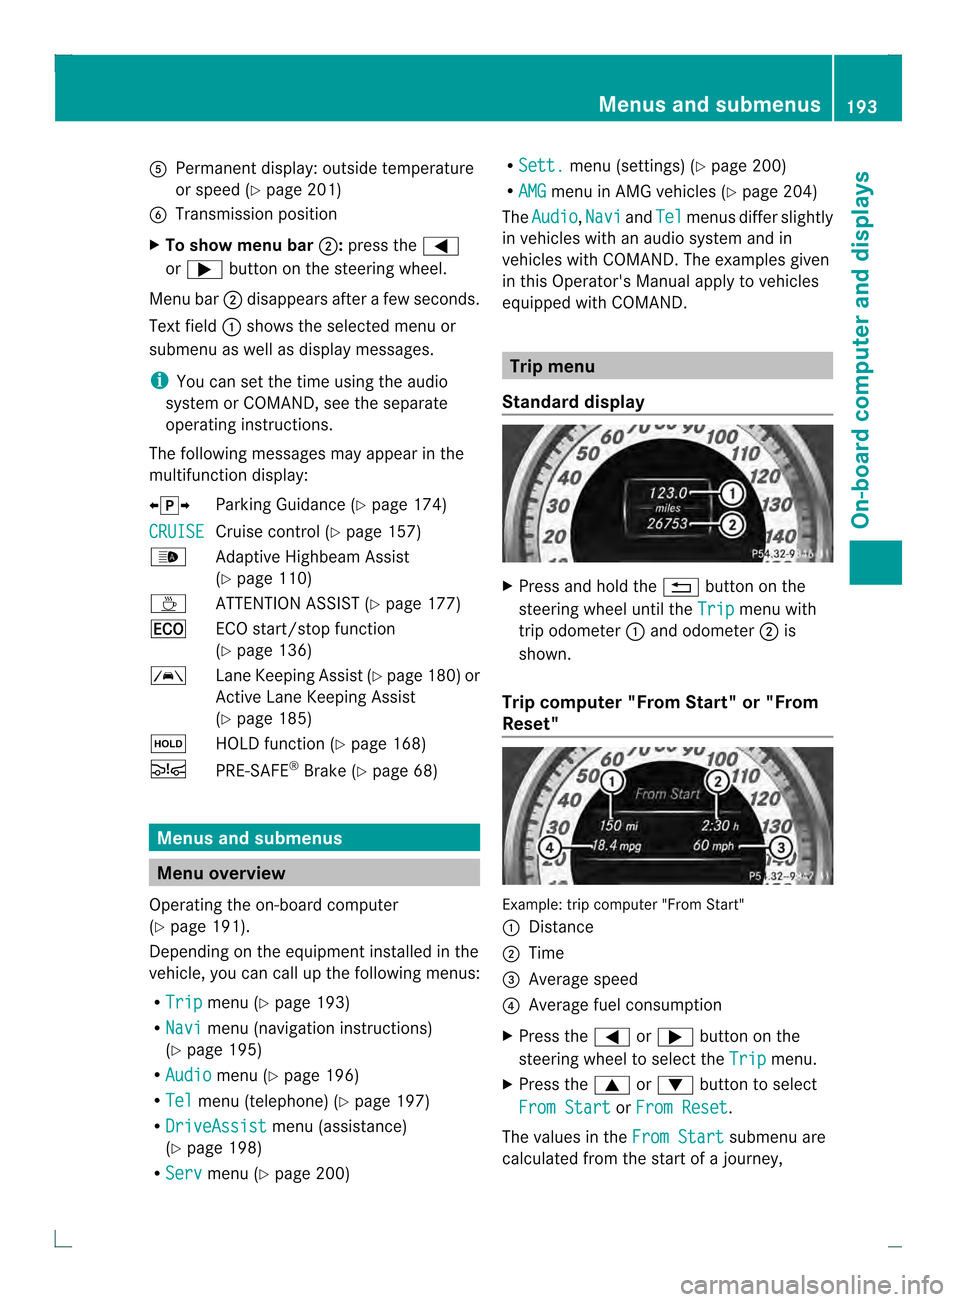
001F
Permanen tdisplay: outside temperature
or speed (Y page 201)
0020 Transmission position
X To show menu bar 0003:press the 0002
or 0005 button on the steering wheel.
Menu bar 0003disappears after a few seconds.
Text field 0002shows the selected menu or
submenu as well as display messages.
i You can set the time using the audio
system or COMAND, see the separate
operating instructions.
The following messages may appear in the
multifunction display:
000700110008 Parking Guidance (Y page 174)
CRUISE Cruise control (Y
page 157)
0003 Adaptive Highbeam Assist
(Ypage 110)
0003 ATTENTION ASSIS T(Ypage 177)
000D ECO start/stop function
(Ypage 136)
0001 Lane Keeping Assist (Y page 180)or
Active Lane Keeping Assist
(Y page 185)
0001 HOLD function ( Ypage 168)
0001 PRE-SAFE ®
Brake (Y page 68) Menus and submenus
Menu overview
Operating the on-board computer
(Y page 191).
Depending on the equipment installed in the
vehicle, you can call up the following menus:
R Trip menu (Y
page 193)
R Navi menu (navigation instructions)
(Y page 195)
R Audio menu (Y
page 196)
R Tel menu (telephone) (Y
page 197)
R DriveAssist menu (assistance)
(Y page 198)
R Serv menu (Y
page 200) R
Sett. menu (settings) (Y
page 200)
R AMG menu in AMG vehicles (Y
page 204)
The Audio ,
Navi and
Tel menus diffe
rslightly
in vehicles with an audio system and in
vehicles with COMAND .The examples given
in this Operator's Manual apply to vehicles
equipped with COMAND. Trip menu
Standard display X
Press and hold the 0006button on the
steering wheel until the Trip menu with
trip odometer 0002and odometer 0003is
shown.
Trip computer "From Start" or "From
Reset" Example: trip computer "From Start"
0002
Distance
0003 Time
0022 Average speed
0021 Average fuel consumption
X Press the 0002or0005 button on the
steering wheel to select the Trip menu.
X Press the 0003or0004 button to select
From Start or
From Reset .
The values in the From Start submenu are
calculated from the start of a journey, Menus and submenus
193On-board computer and displays Z
Page 200 of 350

Dialing a number from the phone book
X
Press the 0002or0005 button on the
steering wheel to selec tthe Tel menu.
X Press the 0003,0004or000B button to
switch to the phone book.
X Press the 0003or0004 button to select the
desired name.
or
X To begin rapid scrolling: press and hold
the 0003 or0004 button for longer than
one second.
Rapid scrolling stops when you release the
button or reach the end of the list.
X If only one telephone number is stored
for a name: press the0003or000B button
to start dialing.
or
X If there is more than one number for a
particular name: press the0003or000B
button to display the numbers.
X Press the 0003or0004 button to select the
number you want to dial.
X Press the 0003or000B button to start
dialing.
or
X To exit the telephone book: press the
0009 or0006 button.
Redialing The on-board computer saves the last names
or numbers dialed in the redial memory.
X Press the 0002or0005 button on the
steering wheel to select the Tel menu.
X Press the 0003button to switch to the
redial memory.
X Press the 0003or0004 button to select the
desired name or number.
X Press the 0003or000B button to start
dialing.
or
X If you do not want to make a call: press
the 0009 or0006 button. Assistance menu
Introduction In the
DriveAssist menu, you have the
following options:
R Showing the distance display
(Y page 198)
R Activating/deactivating
ESP ®
(Y page 199)
R Activating/deactivating PRE-SAFE ®
Brake
(Y page 199)
R Activating/deactivating ATTENTION
ASSIST (Y page 199)
R Activating/deactivating Blind Spot Assist
or Active Blind Spot Assist (Y page 200)
R Activating/deactivating Lane Keeping
Assist or Active Lane Keeping Assist
(Y page 200)
Showing the distance display This function is only available with
DISTRONIC PLUS.
X
Press the 0002or0005 button on the
steering wheel to select the DriveAssist menu.
X Press the 0003or0004 button to select
Distance Display .
X Press the 000Bbutton.
The DISTRONIC PLUS distance display
(Y page 165) appears in the multifunction
display.
If the Sensors Deactivated message
appears, the radar sensor system is
deactivated.
X Switch on the radar sensor system
(Y page 203). 198
Menus and submenusOn-board computer and displays
Page 208 of 350
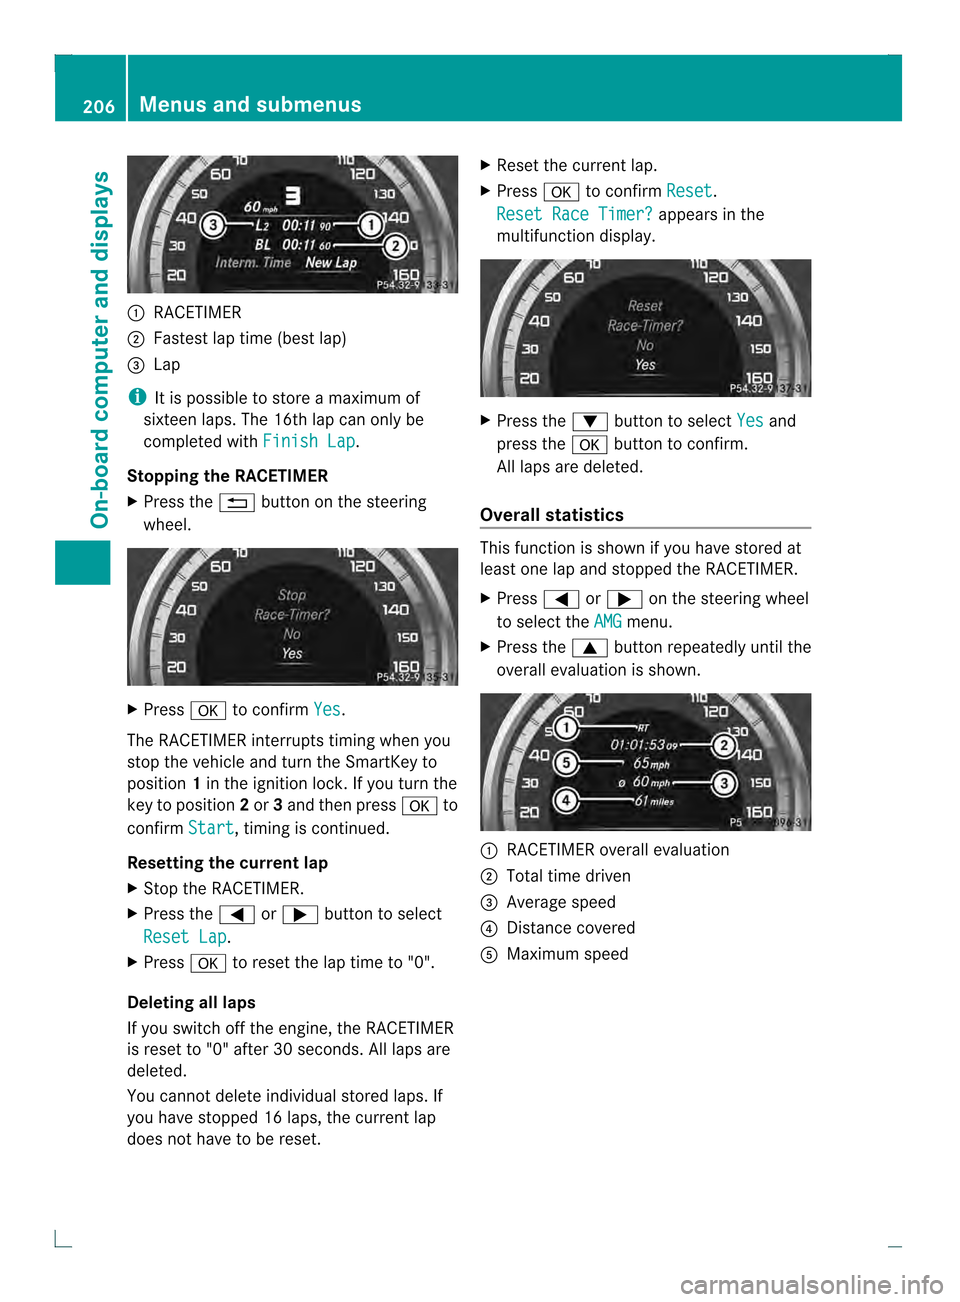
0002
RACETIMER
0003 Fastest lap time (bes tlap)
0022 Lap
i It is possible to store a maximum of
sixteen laps. The 16th lap can only be
completed with Finish Lap .
Stopping the RACETIMER
X Press the 0006button on the steering
wheel. X
Press 000Bto confirm Yes .
The RACETIMER interrupts timing when you
stop the vehicle and turn the SmartKey to
position 1in the ignition lock. If you turn the
key to position 2or 3and then press 000Bto
confirm Start , timing is continued.
Resetting the current lap
X Stop the RACETIMER.
X Press the 0002or0005 buttonto select
Reset Lap .
X Press 000Bto reset the lap time to "0".
Deleting all laps
If you switch off the engine, the RACETIMER
is reset to "0" after 30 seconds. All laps are
deleted.
You cannot delete individual stored laps. If
you have stopped 16 laps, the current lap
does not have to be reset. X
Reset the current lap.
X Press 000Bto confirm Reset .
Reset Race Timer? appears in the
multifunction display. X
Press the 0004button to select Yes and
press the 000Bbutton to confirm.
All laps are deleted.
Overall statistics This function is shown if you have stored at
least one lap and stopped the RACETIMER.
X
Press 0002or0005 on the steering wheel
to select the AMG menu.
X Press the 0003button repeatedly until the
overall evaluation is shown. 0002
RACETIMER overall evaluation
0003 Total time driven
0022 Average speed
0021 Distance covered
001F Maximum speed 206
Menus and submenusOn-board computer and displays
Page 232 of 350

Display messages Possible causes/consequences and
0001 Solutions
Tire Press. Monitor
Currently
Unavailable Due to a source of radi
ointerference, no signals can be received
from the wheel sensors .The tire pressure monitor is temporarily
malfunctioning.
X Drive on.
The tire pressure monitor restarts automatically as soon as the
problem has been solved. TirePress.
Sensor(s) Missing There is no signal from the tire pressure sensor of one or several
wheels. The pressure of the affected tire is not displayed in the
multifunction display.
X
Have the faulty tire pressure sensor replaced at a qualified
specialist workshop. Tire Pressure
Monitor
Inoperative No
Wheel Sensors The wheels mounted do not have a suitable tire pressure sensor.
The tire pressure monitor is deactivated.
X
Mount wheels with suitable tire pressure sensors.
The tire pressure monitor is activated automatically after driving
for a few minutes. Tire Press. Monitor
Inoperative The tire pressure monitor is faulty.
X
Visit a qualified specialist workshop. Vehicle
Display messages Possible causes/consequences and
0001 Solutions
Shift to 'P' or 'N'
to Start Engine You have attempted to start the engine with the transmission in
position
Ror D.
X Shift the transmission to position Por N. P
Shift to P You have attempted to stop the engine with the Start/Stop button
while the transmission was not in position
P.
X Shift the transmission to position P.230
Display messagesOn-board computer and displays
Page 278 of 350
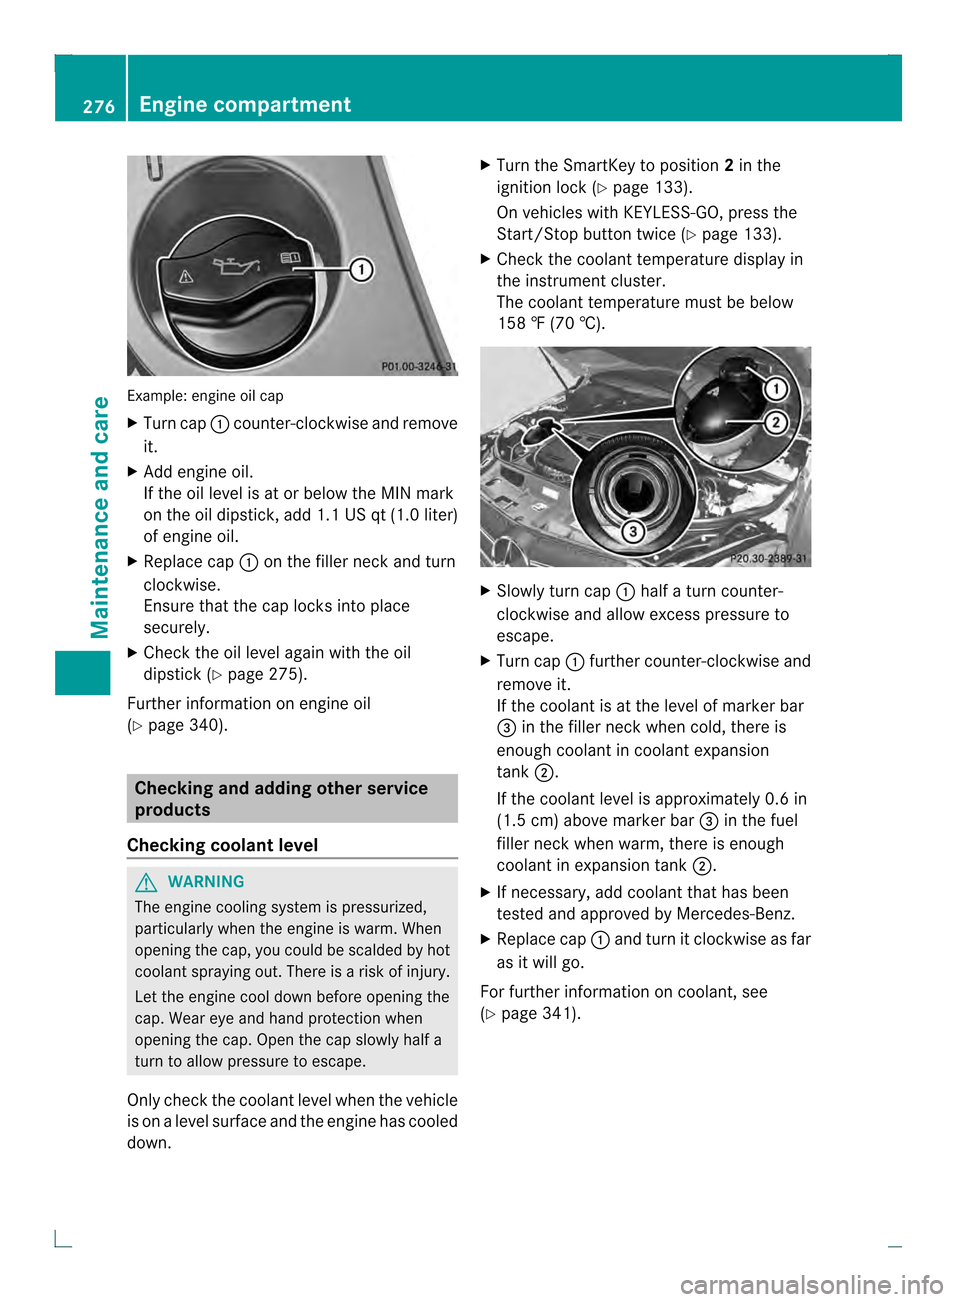
Example: engine oil cap
X Turn cap 0002counter-clockwise and remove
it.
X Add engine oil.
If the oil level is at or below the MIN mark
on the oil dipstick, add 1.1 US qt (1.0 liter)
of engine oil.
X Replace cap 0002on the filler neck and turn
clockwise.
Ensure that the cap locks into place
securely.
X Check the oil level agai nwith the oil
dipstick (Y page 275).
Further information on engine oil
(Y page 340). Checking and adding other service
products
Checking coolant level G
WARNING
The engine cooling system is pressurized,
particularly when the engine is warm. When
opening the cap, you could be scalded by hot
coolan tspraying out. There is a risk of injury.
Let the engine cool down before opening the
cap. Wear eye and hand protection when
opening the cap. Open the cap slowly half a
turn to allow pressure to escape.
Only chec kthe coolant level when the vehicle
is on a level surface and the engine has cooled
down. X
Turn the SmartKey to position 2in the
ignition lock (Y page 133).
On vehicles with KEYLESS-GO, press the
Start/Stop button twice (Y page 133).
X Check the coolant temperature display in
the instrument cluster.
The coolant temperature must be below
158 ‡ (70 †). X
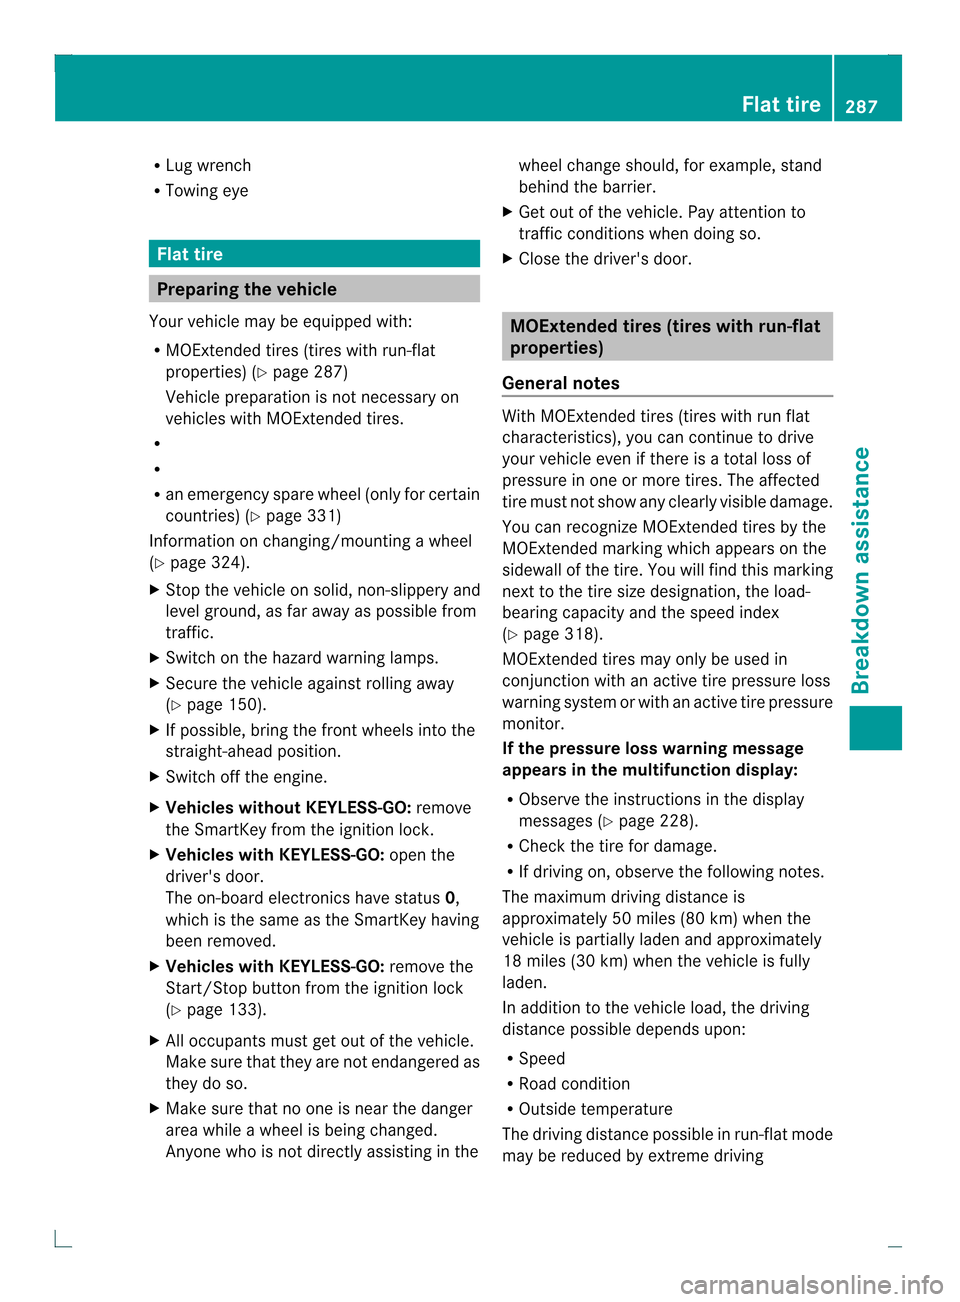
Slowly turn cap 0002half a turn counter-
clockwise and allow excess pressure to
escape.
X Turn cap 0002further counter-clockwise and
remove it.
If the coolant is at the level of marker bar
0022 in the filler neck when cold, there is
enough coolant in coolant expansion
tank 0003.
If the coolant level is approximately 0.6 in
(1.5 cm) above marker bar 0022in the fuel
filler neck when warm, there is enough
coolant in expansion tank 0003.
X If necessary, add coolant that has been
tested and approved by Mercedes-Benz.
X Replace cap 0002and turn it clockwise as far
as it will go.
For further information on coolant, see
(Y page 341). 276
Engine compartmentMaintenance and care
Page 289 of 350
R
Lug wrench
R Towing eye Flat tire
Preparing the vehicle
Yourv ehicle may be equipped with:
R MOExtended tires (tires with run-flat
properties) (Y page 287)
Vehicle preparation is not necessary on
vehicles with MOExtended tires.
R
R
R an emergency spare wheel (only for certain
countries) (Y page 331)
Information on changing/mounting a wheel
(Y page 324).
X Stop the vehicle on solid, non-slippery and
level ground, as far away as possible from
traffic.
X Switch on the hazard warning lamps.
X Secure the vehicle against rolling away
(Y page 150).
X If possible, bring the fron twheels into the
straight-ahead position.
X Switch off the engine.
X Vehicles without KEYLESS-GO: remove
the SmartKey from the ignition lock.
X Vehicles with KEYLESS-GO: open the
driver's door.
The on-board electronics have status 0,
which is the same as the SmartKey having
been removed.
X Vehicles with KEYLESS-GO: remove the
Start/Stop button from the ignition lock
(Y page 133).
X All occupants must get out of the vehicle.
Make sure that they are not endangered as
they do so.
X Make sure that no one is near the danger
area while a wheel is being changed.
Anyone who is not directly assisting in the wheel change should, for example, stand
behind the barrier.
X Get out of the vehicle. Pay attention to
traffic conditions when doing so.
X Close the driver's door. MOExtended tires (tires with run-flat
properties)
General notes With MOExtended tires (tires with run flat
characteristics), you can continue to drive
your vehicle even if there is a total loss of
pressure in one or more tires. The affected
tire must not show any clearly visible damage.
You can recognize MOExtended tires by the
MOExtended marking which appears on the
sidewall of the tire. You will find this marking
next to the tire size designation, the load-
bearing capacity and the speed index
(Y
page 318).
MOExtended tires may only be used in
conjunction with an active tire pressure loss
warning system or with an active tire pressure
monitor.
If the pressure loss warning message
appears in the multifunction display:
R Observe the instructions in the display
messages (Y page 228).
R Check the tire for damage.
R If driving on, observe the following notes.
The maximum driving distance is
approximately 50 miles (80 km) when the
vehicle is partially laden and approximately
18 miles (30 km) when the vehicle is fully
laden.
In addition to the vehicle load, the driving
distance possible depends upon:
R Speed
R Road condition
R Outside temperature
The driving distance possible in run-flat mode
may be reduced by extreme driving Flat tire
287Breakdown assistance
Page 296 of 350
X
Close cover 0002of positive terminal 0003after removing the jumper cables.
X Have the battery checked at a qualified specialist workshop.
i Jump-starting is no tconsidered to be a normal operating condition.
i Jumper cables and further information regarding jump-starting can be obtained at any
qualified specialist workshop. Towing and tow-starting
Important safety notes
G
WARNING
You can no longer steer the vehicle if the
steering wheel lock has been engaged. There
is a risk of an accident.
Always switch off the ignition when towing the
vehicle with a tow cable or a tow bar. G
WARNING
If the weight of the vehicle to be towed or tow-
started is greater than the permissible gross
weight of your vehicle:
R the towing eye could detach itself
R the vehicle/trailer combination could
rollover.
There is a risk of an accident.
When towing or tow-starting another vehicle,
its weight should not be greater than the
permissible gross weight of your vehicle.
Information on your vehicle's gross vehicle
weight rating can be found on the vehicle
identification plate (Y page 336).
! If DISTRONIC PLUS or the HOLD function
is activated, the vehicle brakes
automatically in certain situations. To
prevent damage to the vehicle, deactivate
DISTRONIC PLUS and the HOLD function in
the following or other similar situations:
R when towing the vehicle
R in the car wash
! The vehicle can be towed a maximum of
30 miles (50km). The towing speed of
30 mph (50 km/h) must not be exceeded. If the vehicle has to be towed more than
30 miles
(50km), the entire vehicle must be
raised and transported.
! Only secure the tow rope or tow bar at the
towing eyes. Otherwise, the vehicle could
be damaged.
! Do not use the towing eyes for recovery
purposes as this could damage the vehicle.
If in doubt, recover the vehicle with a crane.
! When towing, pull away slowly and
smoothly. If the tractive power is too high,
the vehicles could be damaged.
! Do not tow with sling-type equipment.
This could damage the vehicle.
! On vehicles with KEYLESS-GO, use the
SmartKey instead of the Start/Stop
button. Turn the SmartKey to position 2in
the ignition lock and shift the automatic
transmission to N. Then, turn the SmartKey
back to 0and leave it in the ignition lock.
It is better to have the vehicle transported
than to have it towed.
The automatic transmission must be in
position Nwhen the vehicle is being towed.
The battery must be connected and charged.
Otherwise, you:
R cannot turn the SmartKey to position 2in
the ignition lock
R cannot shift the automatic transmission to
position N
Release the selector lever lock manually to
move it out of position P(Ypage 147).
i Deactivate the automatic locking feature
(Y page 78). You could otherwise be locked
out when pushing or towing the vehicle. 294
Towing and tow-startingBreakdown assistance
Page 327 of 350

X
Bring the front wheels into the straight-
ahead position.
X Secure the vehicle against rolling away
(Y page 150).
X Switch off the engine.
X Vehicles without KEYLESS-GO: remove
the SmartKey from the ignition lock.
X Vehicles with KEYLESS-GO: openthe
driver's door.
The on-board electronics have status 0,
which is the same as the SmartKey having
been removed.
X Vehicles with KEYLESS-GO: remove the
Start/Stop button from the ignition lock
(Y page 133).
X If included in the vehicle equipment,
remove the tire-change tool kit from the
vehicle.
X Secure the vehicle to prevent it from rolling
away. Securing the vehicle to prevent it
from rolling away If your vehicle is equipped with a wheel chock,
it can be found in the tire-change tool kit
(Y page 286).
The folding wheel chock is an additional
safety measure to prevent the vehicle from
rolling away, for example when changing a
wheel. X
Fold both plates upwards 0002.
X Fold out lower plate 0003.
X Guide the lugs on the lower plate fully into
the openings in base plate 0022. Securing the vehicle on level ground
X
On level ground: place chocks or other
suitable items under the front and rear of
the wheel that is diagonally opposite the
wheel you wish to change. Securing the vehicle on slight downhill gradients
X
On light downhill gradients: place
chocks or other suitable items in front of
the wheels of the front and rear axle. Raising the vehicle
G
WARNING
If you do not position the jack correctly at the
appropriate jacking point of the vehicle, the
jack could tip over with the vehicle raised.
There is a risk of injury.
Only position the jack at the appropriate
jacking point of the vehicle. The base of the Mounting
awheel
325Wheels and tires
Z