driver seat adjustment MERCEDES-BENZ C-CLASS COUPE 2015 Owners Manual
[x] Cancel search | Manufacturer: MERCEDES-BENZ, Model Year: 2015, Model line: C-CLASS COUPE, Model: MERCEDES-BENZ C-CLASS COUPE 2015Pages: 385, PDF Size: 13.12 MB
Page 46 of 385
Fastening seat belts
Observ
ethe safet ynotes on seat belts
(Y page 41 )and th enotes on th ecorre ct use of
th es eat belt (Y page 42). G
WARNING
If th eseat-belt extender extend sdurin gthe
journey, th eseat belt is no tsitting correctly
across your body. The seat belt then cannot
perfor mitsintended protective function.
Ther eisani ncreased ris kofinjury, possibly
eve nfatal.
During ajou rney, mak esure that th eseat-belt
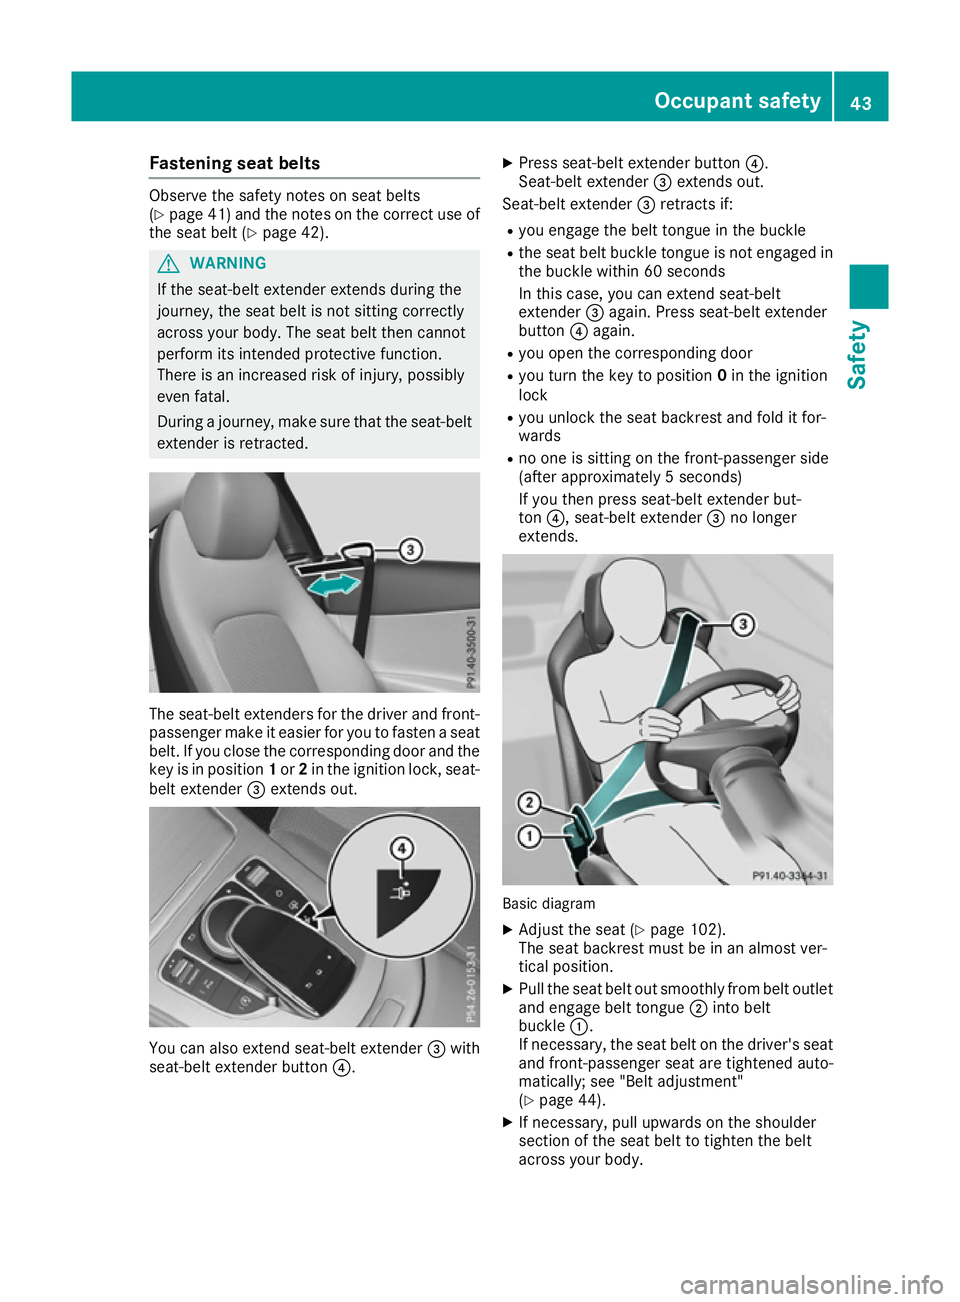
extender is retracted. The seat-belt extenders for th
edriver and front-
passenger mak eiteasierfor you to faste naseat
belt .Ify ou close th ecorre sponding door and the
ke yisinp osition 1or 2in th eignition lock, seat-
belt extender =extend sout. You can also extend seat-belt extender
=with
seat-belt extender button ?.X
Press seat-belt extender button ?.
Seat-belt extender =extend sout.
Seat-belt extender =retracts if:
R you engage th ebelt tongue in th ebuckle
R thes eat belt buckle tongue is no tengage din
th eb uckle within 60 seconds
In this case, you can extend seat-belt
extender =again .Press seat-belt extender
button ?again.
R you open th ecorre sponding door
R you tur nthe keyt op osition 0in th eignition
lock
R you unlock th eseat backrest and fol ditfor-
wards
R no on eissitting on th efront-pa ssenger side
(after approximately 5seconds)
If you then press seat-belt extender but-
ton ?,s eat-belt extender =no longer
extends. Basic diagram
X Adjus tthe seat (Y page 102).
The seat backrest must be in an almost ver-
tical position.
X Pull th eseat belt out smoothly from belt outlet
and engage belt tongue ;intob elt
buckle :.
If necessary, th eseat belt on th edriver' sseat
and front-passenger seat are tightened auto-
matically; see "Belt adjustment"
(Y page 44).
X If necessary, pull upward sontheshoulder
section of th eseat belt to tighten th ebelt
across your body. Occupant safety
43Safety Z
Page 47 of 385
Releasin
gthe seat belts !
Make sure that the sea
tbeltisf ully rolle dup.
Otherwise, the sea tbeltorb eltt ongu ewillbe
trapped in the doo rorinthe seatmechanism.
Thi scould damag ethe door, the doo rtrim
panel and the sea tbelt. Damaged sea tbelts
can no longer fulfil thei rprotectiv efunction
and mus tbereplaced .Visit aquali fied spe-
cialist workshop.
X Press release button in bel tbuckle ,holdb elt
tongu efirmly and guid ethe sea tbeltb ack.
Seat belt adjustment The sea
tbelta djustment is an integral part of
the PRE-SAFE ®
convenience function. Thi sfunc-
tion adjusts the driver' sand co-driver's sea tbelt
to the upper bod yofthe occupants.
The bel tstra pist ightened slightl ywhen:
R the bel ttongu eise ngaged in the buckle and
R the ignition is switched on
The sea tbelta djustment will appl yacertain
tightening force if any slack is detected between
the vehicl eoccupant and the sea tbelt. Do not
hol dontot he seatbeltt ightly whil eitisadjust-
ing.
Yo uc an switch the sea tbelta djustment on and
off using the multimedi asystem. Information on
switching the sea tbelta djustment function on
and off can be found in the Digital Operating
Instructions or in the separate multimedi asys-
tem operating instructions.
Bel twarnin gfor the drive rand front
passenger The
7 seatbeltw arning lamp in the instru-
ment cluster is areminder for al lvehicl eoccu-
pants to fasten thei rseatb elts. It may light up
continuously or flash. In addition, awarning tone
may sound.
The 7 seatbeltw arning lamp goe soutand
the warning tone switches off, as soo nasthe
driver and front-passenger have fastened their
sea tbelts. Rear seat belt status indicator The rea
rseatb elts tatu sindicator is only avail-
able for certain countries.
The rea rseatb elts tatu sindicator shows which
rea rseatb elti sn ot fastened.
Hiding the rea rseatb elts tatu sindicator imme-
diately (Y page 253). Airbags
Introduction The airba
ginstallation location is identifie dby
the label AIRBAG.
An airba gsupplem entsacorrectly fastened seat
belt. It is not asubstitute for sea tbelts. The air-
ba gp rovides additiona lprotectio ninthe corre-
sponding accident situations.
Not al lairbags are deploye dinanaccident. The
various airba gsystems work independentl yof
one another (Y page 52).
However, no system available toda ycan com-
pletel yeliminate injurie sand fatalities.
Due to the required speed of the airba gafter
deployment, it is also not possible to entirely
rul eo utthe ris kofinjurie scaused by the airbag.
Important safety notes G
WARNING
If yo udeviate from the correct sea tposition,
the airba gcanno tperform its intended pro-
tectiv efunction and can eve ncause addi-
tiona linjurie swhend eployed. There is an
increased ris kofserious or eve nfata linjuries. 44
Occupan
tsafetySafety
Page 57 of 385
the front-passenge
rsided eploys under the
following conditions:
- an occupant is detecte donthe front-
passenge rseator
- the belt tongue is engaged in the belt
buckle of the front-passenge rseat
R Windowbag on the side on which an impact
occurs, independent of seat belt usag eand
regardles sofwhether the front-passenger
seat is occupied
R Fron tseatb eltt ensioners ,ifthe system
determine sthatd eployme nt can offer addi-
tional protection for the vehicl eoccupants in
thi ss ituation
i Not al
lairbags ar edeployed in an accident.
The different airba gsystems work independ-
entl yofe acho ther.
How the airba gsystemw orks is determined
by the severity of the accident detected,
especiall ythe vehicl edeceleratio noraccel-
eration, and the apparent typ eofaccident:
R frontal collision
R side impact PRE-SAFE
®
(anticipatory occupant
protection)
Introduction PRE-SAFE
®
take spre-emptive measures to pro-
tect occupants in certain hazardous situations.
Important safety notes !
Make sure tha
tthere ar enoobjects in the
footwell or behind the seats .There is arisk
tha tthe seats and/or the objects could be
damage dwhenP RE-SAFE ®
is activated.
Although your vehicl eisequippe dwithaP RE-
SAFE ®
system, the possibility of injury in the
event of an accident cannot be rule dout.A lways
adap tyou rd rivin gstyle to suit the prevailing
roa dand weather conditions and maintain a
safe distance fro mthe vehicl einfront. Drive
carefully. Function PRE-SAFE
®
intervenes:
R in emergency braking situations, e.g .when
BAS is activated
R in critica ldrivin gsituations, e.g .whenp hysi-
cal limits ar eexceeded and the vehicl eunder-
steers or oversteers severely
R vehicles with the Drivin gAssistance package:
when adriver assistance syste mintervenes
powerfull yorthe rada rsen sorsystemd etects
an imminent dange rofcollision in certai nsit-
uations
PRE-SAFE ®
take sthe following measures
depending on the hazardous situatio ndetected:
R the front seat belts ar epre-tensioned.
R if the vehicl eskids ,the side windows and the
panorama sliding sunroo fare closed.
R vehicles with the memory functio nfor the
front-passenge rseat: the front-passenger
seat is adjusted if it is in an unfavourable
position.
If the hazardous situatio npasse sw ithou tresult-
ing in an accident, PRE-SAFE ®
slackens the belt
pre-tensioning .All setting smadebyP RE-SAFE ®
can the nbereversed.
If the seat belt pre-tensioning is not reduced:
X Mov ethe seat backrest or seat back slightly
when the vehicl eisstationary.
Sea tbeltp re-tensioning is reduce dand the
locking mechanis misreleased.
The seat-bel tadjustment is an integra lpartof
the PRE-SAFE ®
convenience function. Informa-
tio na bout the convenience functio ncan be
found under "Belt adjustment" (Y page 44). PRE-SAFE
®
PLUS (anticipatory occu-
pant protection PLUS)
Introduction PRE-SAFE
®
PLU Siso nlya vailable in vehicles
with the Drivin gAssistance package.
Using the rada rsensors ystem, PRE-SAFE ®
PLU Sisa bletod etect tha tahead-o norrear-end
collision is imminent. In certai nhazardous sit-
uations, PRE-SAFE ®
PLU Stake spre-emptive
measures to protect the vehicl eoccupants. 54
Occupant safetySafety
Page 105 of 385
Correct driver's seat position
G
WARNING
You coul dlose control of th evehicle while
driving if you:
R adjust th edriver' sseat ,steering wheel or
mirrors
R fasten th eseat belt
Ther eisar iskofana ccident.
Adjust th edriver' sseat ,head restraint ,steer-
ing wheel and mirror sand fasten your seat
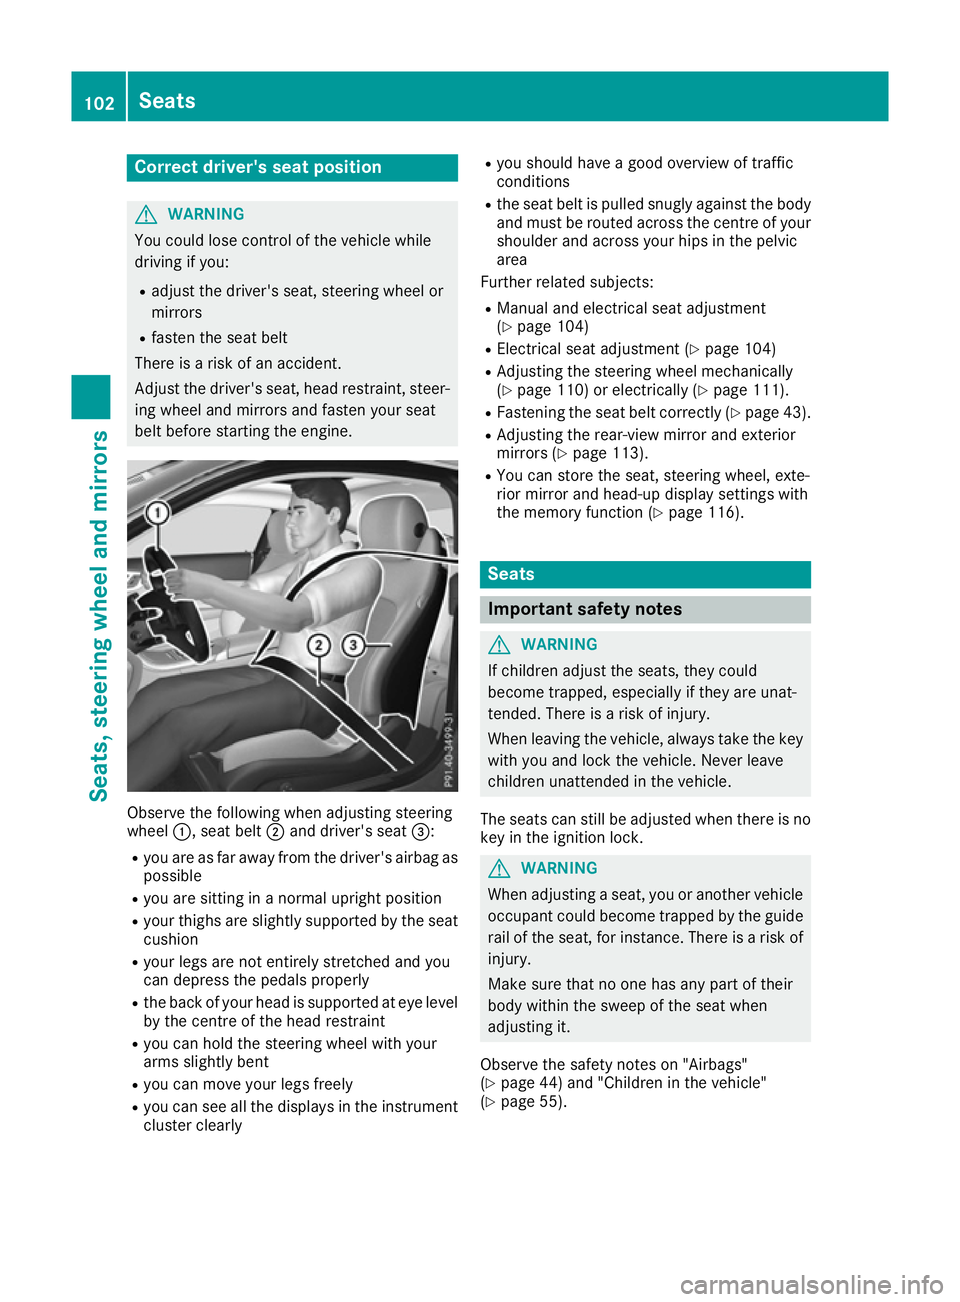
belt before starting th eengine. Observ
ethe followin gwhen adjusting steering
wheel :,seat belt ;and driver' sseat =:
R you are as far away from th edriver' sairbag as
possible
R you are sittin ginanormalupright position
R your thighs are slightly supported by th eseat
cushion
R your legs are no tentirely stretched and you
can depress th epedals properly
R theb ack of your head is supported at eye level
by th ecentr eoft hehead restraint
R you can hold th esteering wheel wit hyour
arm sslightly bent
R you can mov eyour legs freely
R you can see all th edisplays in th einstrument
cluste rclearly R
you should have agood overview of traffic
conditions
R thes eat belt is pulled snugly against th ebody
and must be routed across th ecentr eofy our
shoulder and across your hips in th epelvic
area
Further related subjects:
R Manual and electrical seat adjustment
(Y page 104)
R Electrical seat adjustmen t(Ypage 104)
R Adjusting th esteering wheel mechanically
(Y page 110) or electricall y(Ypage 111).
R Fastenin gthe seat belt correctly (Y page 43).
R Adjustin gthe rear-view mirror and exterior
mirror s(Ypage 113).
R You can store th eseat ,steering wheel ,exte-
rior mirror and head-up display settings with
th em emory function (Y page 116). Seats
Important safety notes
G
WARNING
If childre nadjust th eseats, they could
become trapped, especiall yiftheya re unat-
tended. Ther eisariskofi njury.
When leaving th evehicle ,always tak ethe key
wit hyou and loc kthe vehicle .Never leave
childre nunattende dinthevehicle.
The seat scan still be adjusted when there is no
ke yint heignition lock. G
WARNING
When adjusting aseat ,you or another vehicle
occupan tcoul db ecome trapped by th eguide
rail of th eseat ,for instance. Ther eisariskof
injury.
Mak esure that no on ehas any part of their
body within th esweep of th eseat when
adjusting it.
Observ ethe safety note son"Airbags"
(Y page 44) and "Children in th evehicle"
(Y page 55). 102
SeatsSeats, steerin
gwheel and mirrors
Page 106 of 385
G
WARNING
If the driver's seat is not correctly engaged, it coul dunexpectedly move while driving. This
coul dcausey ou to lose control of the vehicle.
There is arisk of an accident.
Always ensure that the driver's seat is
engaged before starting the vehicle. G
WARNING
You coul dlose control of the vehicl ewhile
driving if you:
R adjust the driver's seat, steering whee lor
mirrors
R fasten the seat belt
There is arisk of an accident.
Adjust the driver's seat, headr estraint, steer-
ing whee land mirrors and fasten yours eat
beltb efore starting the engine. G
WARNING
If you adjust the seat height carelessly, you or other vehicl eoccupants coul dbetrappe dand
thereby injured .Childre ninparticular could
accidentally press the electrica lseat adjust-
ment buttons and become trapped. There is a
risk of injury.
Whil emoving the seats, make sure that your
hands or other body parts do not get under the
leve rassembly of the seat adjustment sys-
tem. G
WARNING
The headr estraints cannot provid ethe inten-
ded protection unless they are fitted and
adjusted correctly. There is an increased risk of injury to the heada nd neck in the event of
an accident or sudden braking, for example.
Always drive with the headr estraints fitted.
Ensure that the centre of the headr estraints
support the back of each vehicl eoccupant's
headate ye levelbefore driving off. G
WARNING
The seat beltd oes not offer the intended level
of protection if you have not moved the back- rest to an almost vertical position. When brak-
ing or in the event of an accident, you could
slid eunderneath the seat belta nd sustain
abdomen or neck injuries, for example. This
poses an increased risk of injury or even fatal
injury.
Adjust the seat properly before beginning
yourj ourney .Always ensure that the backrest
is in an almost vertical position and that the
shoulders ection of yours eatbelt is routed
across the centre of yours houlder.
! To avoi
ddamage to the seats and the seat
heating, observe the following information:
R do not spil lany liquidsont he seats. If liquid
is spilled on the seats, dry them as soon as possible.
R if the seat covers are damp or wet, do not
switch on the seat heating. The seat heat-
ing should alson ot be used to dry the seats.
R clea nthe seat covers as recommended;
see "Interio rcare".
R do not transport heav yloads on the seats.
Do not place sharp objects on the seat
cushions, e.g. knives, nail sortools. The
seats should only be occupied by passen-
gers, if possible.
R when the seat heating is in operation, do
not cover the seats with insulating materi-
als,e .g. blankets, coats, bags, seat covers,
child seats or booster seats.
! Make sure that there are no objects in the
footwel lunder or behind the seats when mov-
ing the seats back. There is arisk that the
seats and/or the objects coul dbedamaged.
i The rear-compartment head restraints can
be removed (Y page106).
Vehicles without the through-loading feature:
the head restraints cannot be removed from
the rear-compartment seats.
For more information, contact aqualified spe-
cialist workshop.
i Related topic:
R Through-loading facility in the rear bench
seat (Y page102) Seats
103Seats, steering wheel and mirrors Z
Page 109 of 385
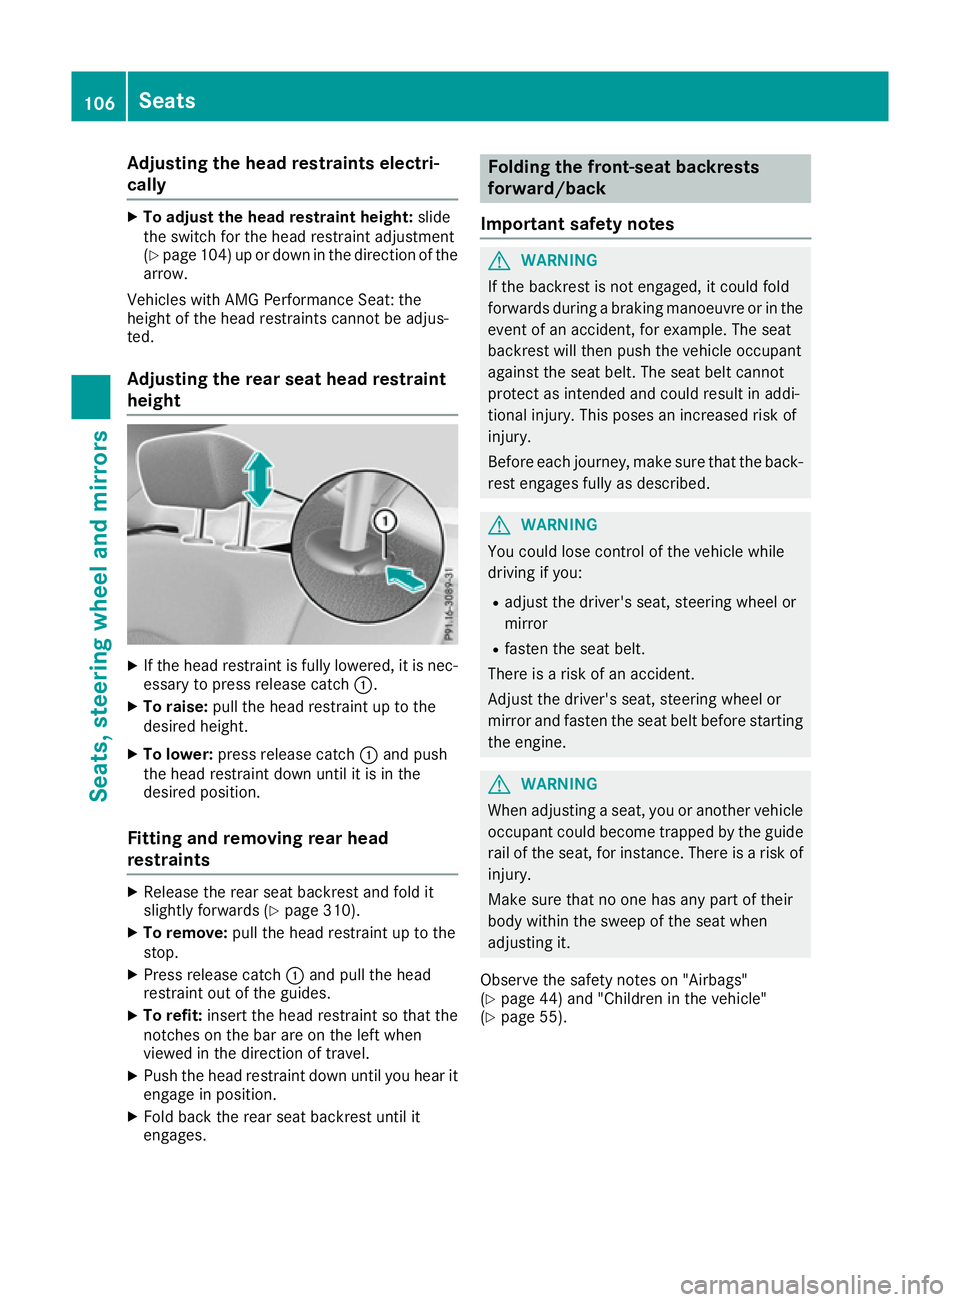
Adjusting th
eheadr estraints electri-
cally X
To adjust th eheadr estrain theight: slide
th es witch for th ehead restrain tadjustment
(Y page 104) up or down in th edirection of the
arrow.
Vehicles wit hAMG Performance Seat: the
height of th ehead restraints canno tbeadjus-
ted.
Adjusting th erears eath eadr estraint
height X
If th ehead restrain tisfully lowered, it is nec-
essary to press release catch :.
X To raise: pull thehead restrain tuptothe
desired height.
X To lower: press release catch :and push
th eh ead restrain tdown until it is in the
desired position.
Fitting and removing rea rhead
restraints X
Releas ethe rear seat backrest and fol dit
slightly forward s(Ypage 310).
X To remove: pull thehead restrain tuptothe
stop.
X Press release catch :and pull th ehead
restrain tout of th eguides.
X To refit: insert thehead restrain tsothatthe
notches on th ebar are on th eleftw hen
viewed in th edirection of travel.
X Push th ehead restrain tdown until you hear it
engage in position.
X Fold bac kthe rear seat backrest until it
engages. Folding th
efront-seat backrests
forward/back
Important safety notes G
WARNING
If th ebackrest is no tengaged, it could fold
forward sduring abraking manoeuvre or in the
event of an accident, for example. The seat
backrest will then push th evehicl eoccupant
against th eseat belt .The seat belt cannot
protect as intended and could result in addi-
tional injury. This poses an increased ris kof
injury.
Befor eeachjou rney, mak esuret ha tthe back-
res tengage sfully as described. G
WARNING
You could lose control of th evehicl ewhile
drivin gifyou:
R adjust th edriver's seat ,steering whee lor
mirror
R faste nthe seat belt.
There is ariskofana ccident.
Adjus tthe driver's seat ,steering whee lor
mirror and faste nthe seat belt before starting
th ee ngine. G
WARNING
When adjusting aseat ,you or another vehicle
occupant could become trapped by th eguide
rail of th eseat ,for instance .There is ariskof
injury.
Mak esuret hatnoo nehas any part of their
body within th eswee poft heseat when
adjusting it.
Observ ethe safet ynotes on "Airbags"
(Y page 44) and "Children in th evehicle"
(Y page 55). 106
SeatsSeats
,steering wheel and mirrors
Page 113 of 385
Problems with the seat heating or seat ventilation
Problem
Possible causes/consequences and
M
MSolutions Seat heating or seat ven-
tilation has been
switched off prematurely
or cannot be switched
on. The on-board voltage is too low because too many electrical consum-
ers are switched on.
X Switch off electrical consumers that you do not need, such as the
rear window heating or interior lighting.
Once the battery is sufficiently charged, the seat heating or seat
ventilation can be switched back on manually. Steering wheel
Important safety notes
G
WARNING
You could lose control of the vehicle while
driving if you:
R adjust the driver's seat, steering wheel or
mirrors
R fasten the seat belt
There is arisk of an accident.
Adjust the driver's seat, head restraint ,steer-
ing wheel and mirrors and fasten your seat
belt before startingt he engine.G
WARNING
Children could become trapped by the steer-
ing wheel if they adjust it. There is arisk of
injury.
When leaving the vehicle, always take the key with you and lock the vehicle. Never leave
children unattended in the vehicle.
The electrically adjustable steering wheel can
still be adjusted when there is no key in the igni-
tion lock. Adjusting the steering wheel man-
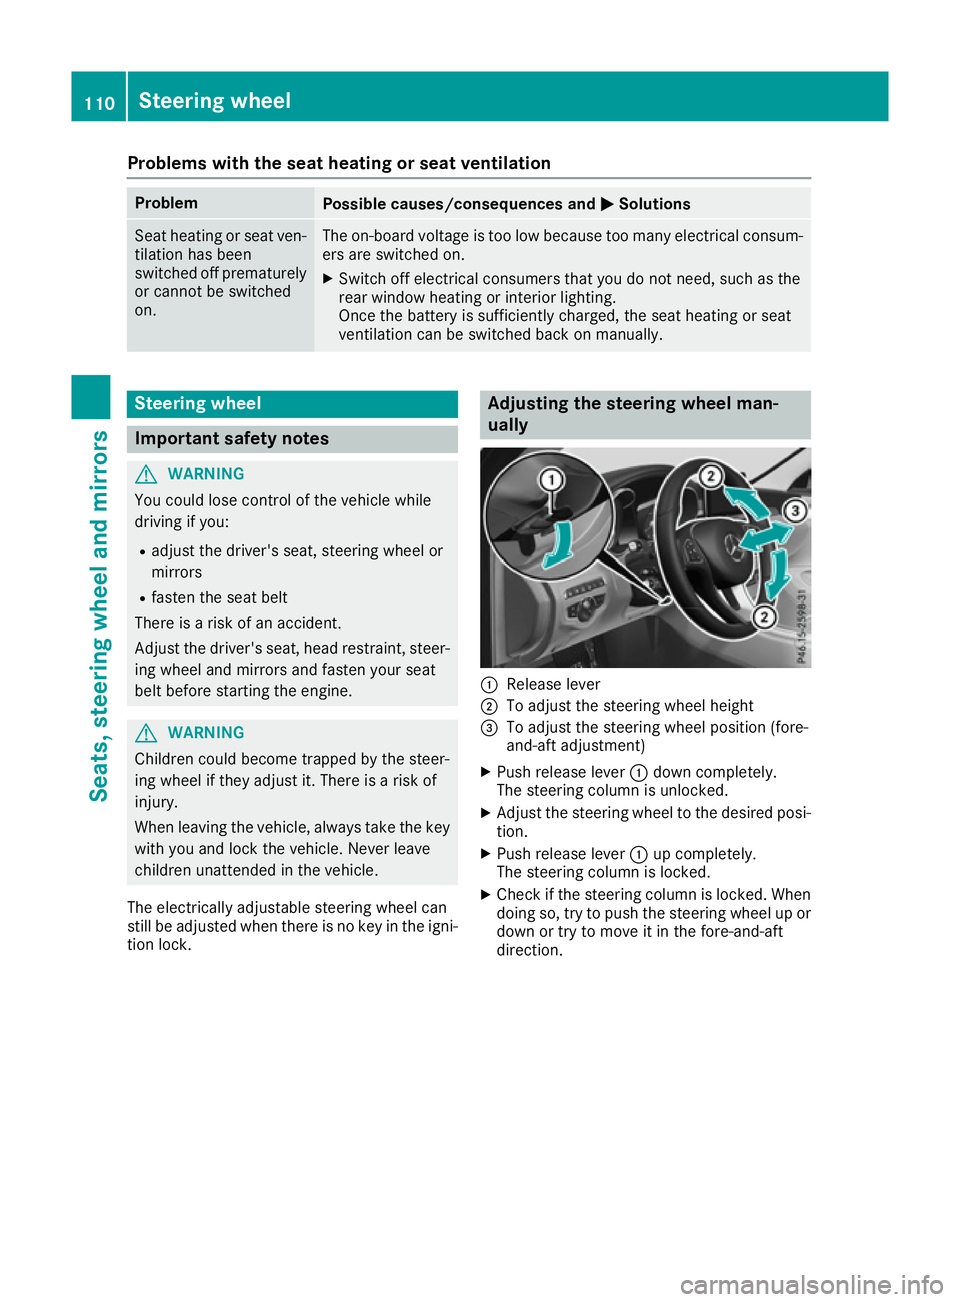
ually
:
Release lever
; To adjust the steering wheel height
= To adjust the steering wheel position (fore-
and-aft adjustment)
X Push release lever :down completely.
The steering column is unlocked.
X Adjust the steering wheel to the desired posi-
tion.
X Push release lever :up completely.
The steering column is locked.
X Check if the steering column is locked. When
doing so, try to push the steering wheel up or
down or try to move it in the fore-and-aft
direction. 110
Steering wheelSeats, steering wheela
nd mirrors
Page 114 of 385
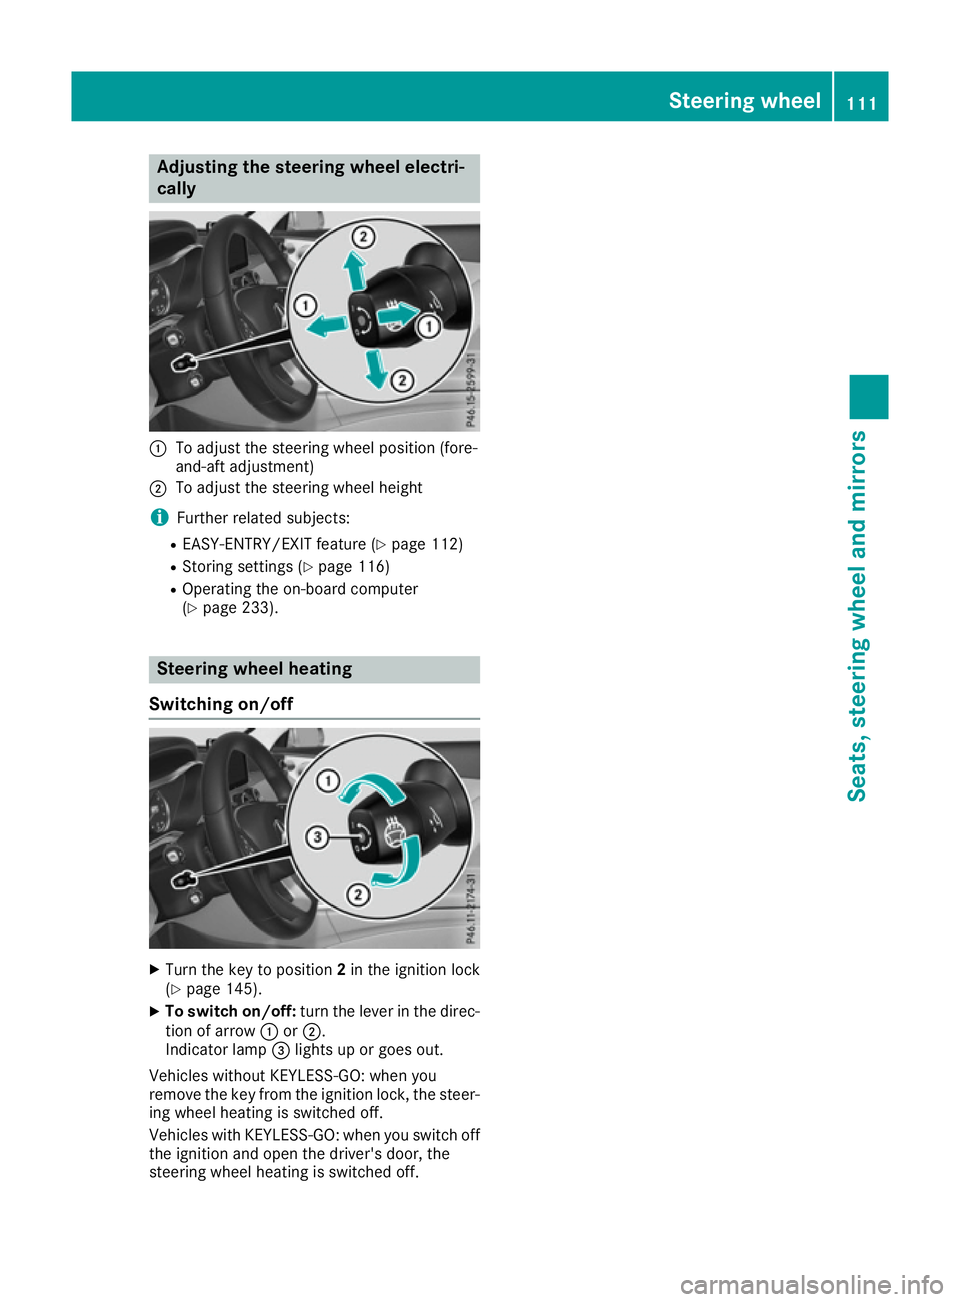
Adjusting th
esteering wheel electri-
cally :
To adjust th esteering whee lposition (fore-
and-af tadjustment)
; To adjust th esteering whee lheight
i Further relate dsubjects:
R EASY-ENTRY/EXIT feature (Y page 112)
R Storing setting s(Ypage 116)
R Operating th eon-bo ard computer
(Y page 233). Steering wheel heating
Switchin gon/off X
Turn th ekeyto position 2in th eignition lock
(Y page 145).
X To switch on/off: turnthe lever in th edirec-
tion of arrow :or;.
Indicato rlamp =lights up or goe sout.
Vehicles without KEYLESS-GO :when you
remove th ekeyfrom th eignition lock, th esteer-
ing whee lheating is switched off.
Vehicles wit hKEYLESS-GO :when you switch off
th ei gnition and open th edriver's door ,the
steering whee lheating is switched off. Steering wheel
111Seats,steering wheel and mirrors Z
Page 115 of 385
Problems with the steering wheel heating
Problem
Possible causes/consequences and
M
MSolutions The steering wheel heat-
ing has switched itself
off prematurely or can-
not be switched on. The on-board voltage is too low because too many electrical consum-
ers are switched on.
X Switch off electrical consumers that you do not need, such as the
rear window heating or interior lighting. EASY-ENTRY/EXIT feature
Important safety notes G
WARNING
When the EASY-ENTRY/EXIT feature adjusts
the steering wheel, you and other vehicle
occupants –particularly children –could
become trapped. There is arisk of injury.
While the EASY-ENTRY/EXIT feature is mak-
ing adjustments, make sure that no one has
any body parts in the sweep of the steering
wheel.
Move the steering wheel adjustment lever if
there is arisk of entrapment by the steering
wheel. The adjustment process is stopped.
Press one of the memory function position but-
tons. The adjustment process is stopped. This
function is only available on vehicles with a
memory function. G
WARNING
If children activate the EASY-ENTRY/EXIT fea- ture, they can become trapped, particularly
when unattended. There is arisk of injury.
When leaving the vehicle, always take the key with you and lock the vehicle. Never leave
children unattended in the vehicle. G
WARNING
If you drive off while the EASY-ENTRY/EXIT
feature is making adjustments, you could lose
control of the vehicle. There is arisk of an
accident.
Always wait until the adjustment process is
complete before driving off. The EASY-ENTRY/EXIT feature makes gettingin
and out of your vehicle easier.
You can activate and deactivate the EASY-
ENTRY/EXIT feature using the multimedia sys-
tem (see the separate operating instructions).
Position of the steering wheel when the EASY-ENTRY/EXIT featureisa ctive The steering wheel tilts upwards if you:
R remove the key from the ignition lock
R with KEYLESS-GO: open the driver's door;
KEYLESS-GO must be in position 1
R with the key: open the driver's door; the key
must be in position 0or 1in the ignition lock
(Y page 145)
R open the driver's door when the ignition is
switched off
i The steering wheel only tilts upwards if the
driving position is stored after the steering
column adjustment has been adjusted
(Y page 116).
The most recent driving position of the steering
wheel is stored if:
R the ignition is switched off
R the settingiss tored using the memory func-
tion (Y page 116)
i The steering wheel only moves upwards if it
has not already reached the upper steering
limiter. 112
Steering wheelSeats, steering wheela
nd mirrors
Page 118 of 385
If you come into contact with electrolyte,
observe the following:
R immediately rinse off electrolyte from your
skin with water.
R immediately and thoroughl yrinse electro-
lyte out of eyes using clean water.
R if electrolyte is swallowed, immediately
rinse out yourm outh thoroughly. Do not
induce vomiting.
R if electrolyte comes into contact with skin
or eyes or is swallowed, seek medica latten-
tion immediately.
R immediately change out of clothing that has
been in contact with electrolyte.
R if an allergic reaction occurs, seek medical
attention immediately.
The rear-view mirror and the exterior mirror on
the driver's side automatically go into anti-daz-
zle mode if the following conditions are met
simultaneously:
R the ignition is switched on
R incident light from headlampss trikes the sen-
sor in the rear-view mirror
The mirrors do not dip if reverse gear is engaged
or if the interior lighting is switched on. Parking positio
nofthe exterio rmirror
on the front-passenge rside
Storing the parking position You can set the front-passenger side exterior
mirror so that you can see the rear wheel on that
side as soon as you engage reverse gear. You
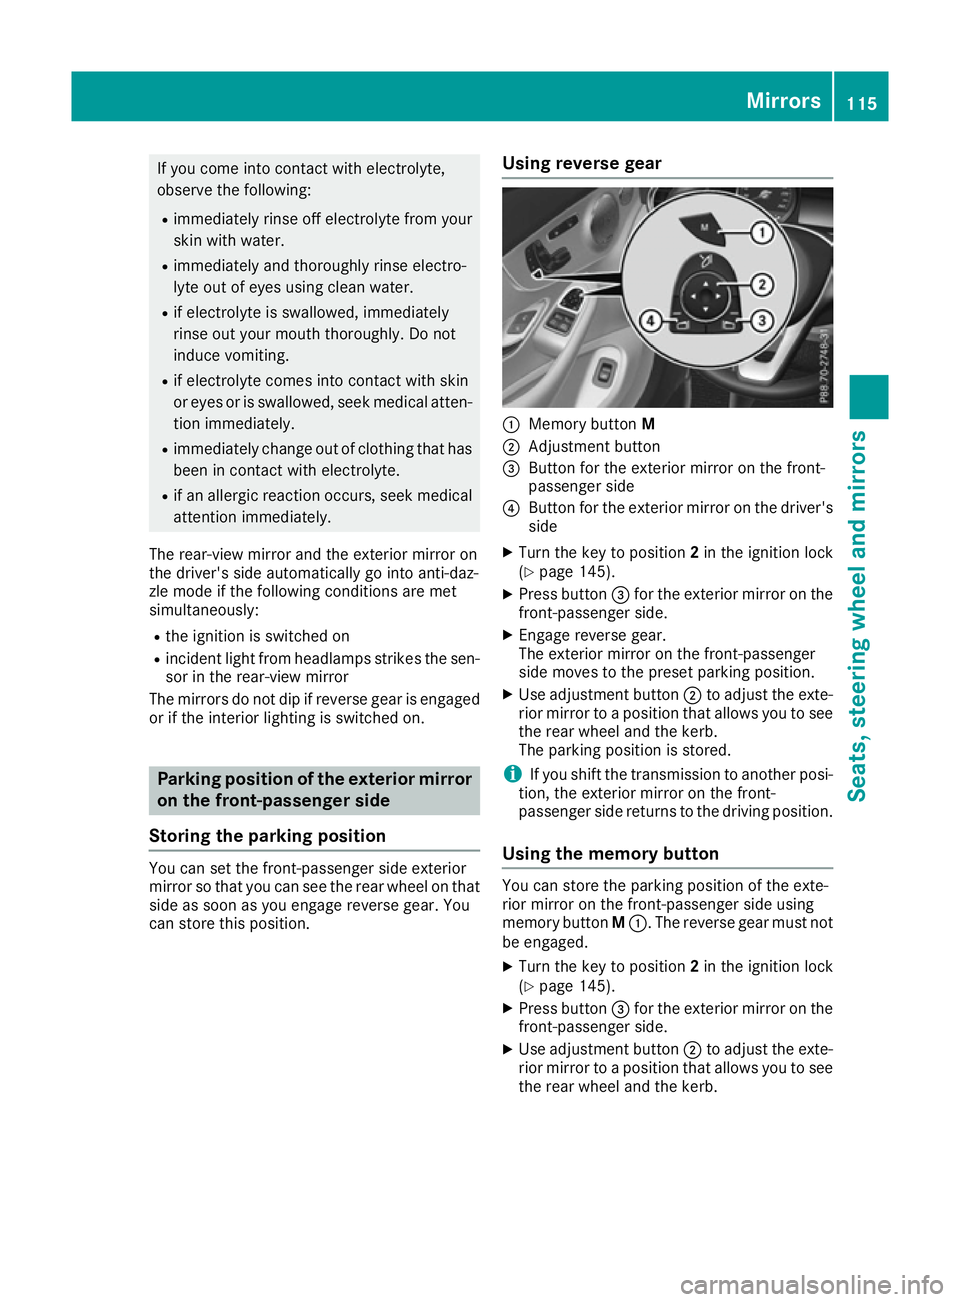
can store this position. Usingr
everse gear :
Memory button M
; Adjustment button
= Button for the exterior mirror on the front-
passenger side
? Button for the exterior mirror on the driver's
side
X Turn the key to position 2in the ignition lock
(Y page 145).
X Press button =for the exterior mirror on the
front-passenger side.
X Engage reverse gear.
The exterior mirror on the front-passenger
side moves to the preset parking position.
X Use adjustment button ;to adjust the exte-
rior mirror to apositio nthat allows you to see
the rear wheel and the kerb.
The parking positio nisstored.
i If you shift the transmission to another posi-
tion, the exterior mirror on the front-
passenger side returns to the driving position.
Usingt he memory button You can store the parking positio
nofthe exte-
rior mirror on the front-passenger side using
memory button M:.T he reverse gear must not
be engaged.
X Turn the key to position 2in the ignition lock
(Y page 145).
X Press button =for the exterior mirror on the
front-passenger side.
X Use adjustment button ;to adjust the exte-
rior mirror to apositio nthat allows you to see
the rear wheel and the kerb. Mirrors
115Seats, steeringw heel and mirrors Z