manual radio set MERCEDES-BENZ C-CLASS COUPE 2015 Owners Manual
[x] Cancel search | Manufacturer: MERCEDES-BENZ, Model Year: 2015, Model line: C-CLASS COUPE, Model: MERCEDES-BENZ C-CLASS COUPE 2015Pages: 385, PDF Size: 13.12 MB
Page 20 of 385
R
RAC ESTART (Mercedes-AMG vehi-
cles) .................................................... 194
RACETIMER (on-board computer) .... 251
Radiato rcover ................................... 322
Radio
Selecting astation ......................... 240
Radio mode
See also Digital Owner's Manua l... 296
Radio-based vehicle components
Declaration of conformity ................ 27
Rain closin gfeature
Sliding sunroo f................................. 98
Reading lamp ..................................... 123
Rear compartment
Setting the ai rvents ...................... 143
Rear foglamp
Displa ymessage ............................ 265
Switching on/of f........................... 119
Rear lamps
see Lights
Rear seat (folding the backres tfor-
wards/back) ...................................... 310
Rear windo wheating
Problem (fault) ............................... 135
Switching on/of f........................... 134
Rear-compartment seat belt sta-
tus indicator ........................................ 44
Rear-vie wmirror
Anti-dazzle mod e(automatic) ........ 114
Dipping (manual) ........................... 113
Reflective safety vest ....................... 334
Refuelling
AdBlue ®
......................................... 169
Fue lgauge ....................................... 32
Important safety notes .................. 166
Note sfor Mercedes‑ AMG vehi-
cle s................................................ 373
Refuelling process ......................... 167
see Fuel
Remote control
Auxiliary heating/ventilation .......... 140
Changing the batteries (auxiliary
heating) ......................................... 141
Replacing bulbs
Important safety notes .................. 123
Overview of bulb types .................. 124 Removing/replacing the cover
(front whee
larch) .......................... 124
Replacing the battery (auxiliary
heatin gremote control) .................... 141
Rescue card ......................................... 28
Reserve (fuel tank)
see Fuel
Reserve fuel
Displa ymessage ............................ 269
Warning lamp ................................. 290
Residual hea t(clim ate control) ........ 136
Restrain tsystem
Displa ymessage ............................ 261
Introduction ..................................... 39
Warning lamp ................................. 290
Warning lamp (function) ................... 40
Rev counter ........................................ 233
Revers egear
Engaging (manua ltransmission) .... 156
Reversin gcamera
Cleaning instructions ..................... 330
Displa yinthe multimedi asystem .. 207
Function/note s............................. 206
Switching on/of f........................... 206
Reversin gfeature
Panorama sliding sunroo f................ 97
Roller sunblind s............................... 99
Sid ew indow s................................... 93
Sliding sunroo f................................. 97
Reversin gfunction
Boot li d............................................ 89
Reversin glamp (display message) .. 265
Rolle rsunblind
Panorama sliding sunroo f................ 99
Roo fcarrier ........................................ 313
Roo flinin gand carpets (cleaning
instructions) ...................................... 333
Roo floa d( maximum) ........................ 377
Route guidance
See also Digital Owner' sManual... 296 S
Safety Childre ninthe vehicl e..................... 55
see Occupant safety
see Operating safety Index
17
Page 83 of 385
Key
Important safety notes
United Kingdom only: G
WARNING
Whe nthe doubl elocks are activated, the
door scan no longer be opened from the
inside. People in th evehicl ecan no longer get
out ,e.g.inh azardous situations. There is a
ris kofi njury.
Therefore ,donotleav eany people unsuper-
vised in th evehicle, particularly children ,eld-
erl yp eople or people in need of special assis-
tance .Don otactivat ethe doubl eloc kw hen
people are in th evehicle.
If th evehicl ehas been locke dfromt heoutside,
th ed oubl eloc kf unction is activated as stand-
ard. It is then no tpossibl etoopen th edoors
from inside th evehicle. You can deactivat ethe
doubl eloc kfunction by deactivating th einterior
motion sensor (see th eseparat emultimedia
system operating instructions). The door scan
then be opened from th einside after th evehicle
has been locke dfromt heoutside .The anti-theft
alarm system is triggered if th edoor is opened
from th einside. Switc hoff th ealarm
(Y page 78).
All countries: G
WARNING
If children are lef tunsupervised in th evehicle,
they could:
R open doors, thereby endangering other per-
son sorr oad users
R get out and be struc kbyoncomingt raffic
R operate vehicl eequipmen tand become
trapped ,for example
In addition ,the children could also set the
vehicl einm otion,for example, if they:
R release th eparking brake
R shift th eautomatic transmission out of park
position Porshift manual transmission into
neutral
R start th eengine
There is ariskofana ccidentand injury. Whe
nleaving th evehicle, always tak ethe key
wit hyou and loc kthe vehicle. Never leave
children and animals unattended in th evehi-
cle .Keept he keys out of th ereac hofc hildren. G
WARNING
If you attach heav yorlargeobjects to th ekey,
th ek eycould be unintentionally turne dinthe
ignition lock. This could caus ethe engin eto
be switched off .There is ariskofana ccident.
Do no tattach any heav yorlargeobjects to the
key. Remove any bulk ykeyrings before insert-
ing th ekeyintot he ignition lock.
! Kee
pthe keya way from stron gmagnetic
fields. Otherwise ,the remot econtro lfunction
could be affected.
Stron gmagnetic fields can occur in th evicin-
it yofp owerful electrical installations.
Do no tkeept he key:
R wit he lectronic devices, e.g. amobile phone
or another key
R wit hm etallic objects ,e.g.c oins or metal film
R inside metallic objects ,e.g.a metal case
This can affec tthe key's functionality.
Vehicles wit hKEYLESS-G Ostart function: do
no tk eept he keyo nthe parcel shelf or in the
boot .Otherwise ,the keym ay no tbed etected,
e.g. when starting th eengineu singthe Start/
Stop button.
Ac heck whichperiodically establishes aradio
connection between th evehicl eand th ekey
determine swhether avalid ke yisint hevehicle.
This occurs, for example:
R when starting th eengine
R whils tdriving
R when th eexternal door handles are touched
R during convenience closing 80
KeyOpening and closing
Page 236 of 385
The segment
sbetween the speed of the vehi-
cle in front and the stored speed light up. Rev counter
! Do not drive in the overrevving range. Doing
so will damage the engine.
The red band in the rev counter indicates the
engine's overrevving range.
The fuel supply is interrupted to protec tthe
engine when the red band is reached. Outside temperature display
You should pay special attention to road condi-
tions when temperatures are around freezing
point.
Bear in mind that the outside temperature dis-
play indicates the measured air temperature
and not the road surface temperature.
The outside temperature display is in the multi-
function display (Y page 234).
Changes in the outside temperature are dis-
played after ashort delay. Coolant temperature gauge
G
WARNING
If you open the bonnet while the engine is
overheatin gorwhile there is afire in the
engine compartment,y ou could come into
contact with hot gases or other leaking ser-
vice products. There is adanger of injury.
Allow an overheatin gengine to cool down
before opening the bonnet .Ifthere is afire in
the engine compartment,l eave the bonnet
closed and notify the fire brigade.
The multifunction display shows the coolant
temperature gauge in the lower section of the
rev counter (Y page 32).
At high outside temperatures and when driving
uphill, the coolant temperature may rise to the
end of the scale.
Under normal operating conditions and with the
specified coolant level, the coolant temperature may rise to 120 †. Operating the on-board computer
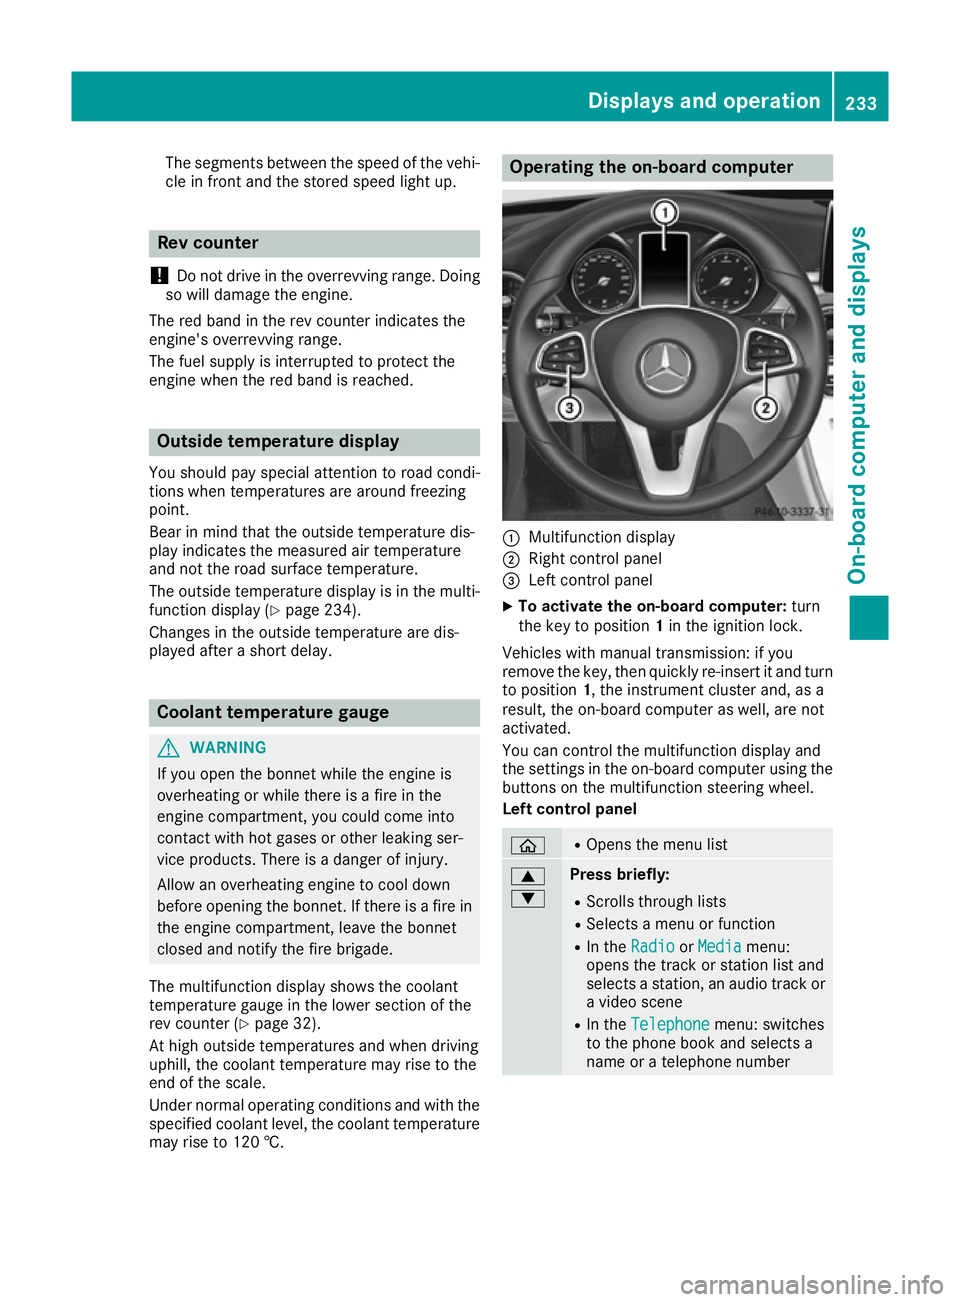
:
Multifunction display
; Right control panel
= Left control panel
X To activat ethe on-board computer: turn
the key to position 1in the ignition lock.
Vehicles with manual transmission: if you
remove the key, then quickly re-insert it and turn
to position 1,the instrument cluster and, as a
result, the on-board computer as well, are not
activated.
You can control the multifunction display and
the settings in the on-board computer using the button sonthe multifunction steerin gwheel.
Left control panel ò R
Opens the menu list 9
: Press briefly:
R Scrolls through lists
R Select samenu or function
R In the Radio Radio orMedia
Media menu:
opens the track or station list and
selects astation ,anaudio track or
av ideo scene
R In the Telephone Telephone menu: switches
to the phone book and selects a
name or atelephone number Displays and operation
233On-board computer and displays Z
Page 239 of 385
AMG displays in th
ehead-up display
AM Gd isplays are available in Mercedes-AMG
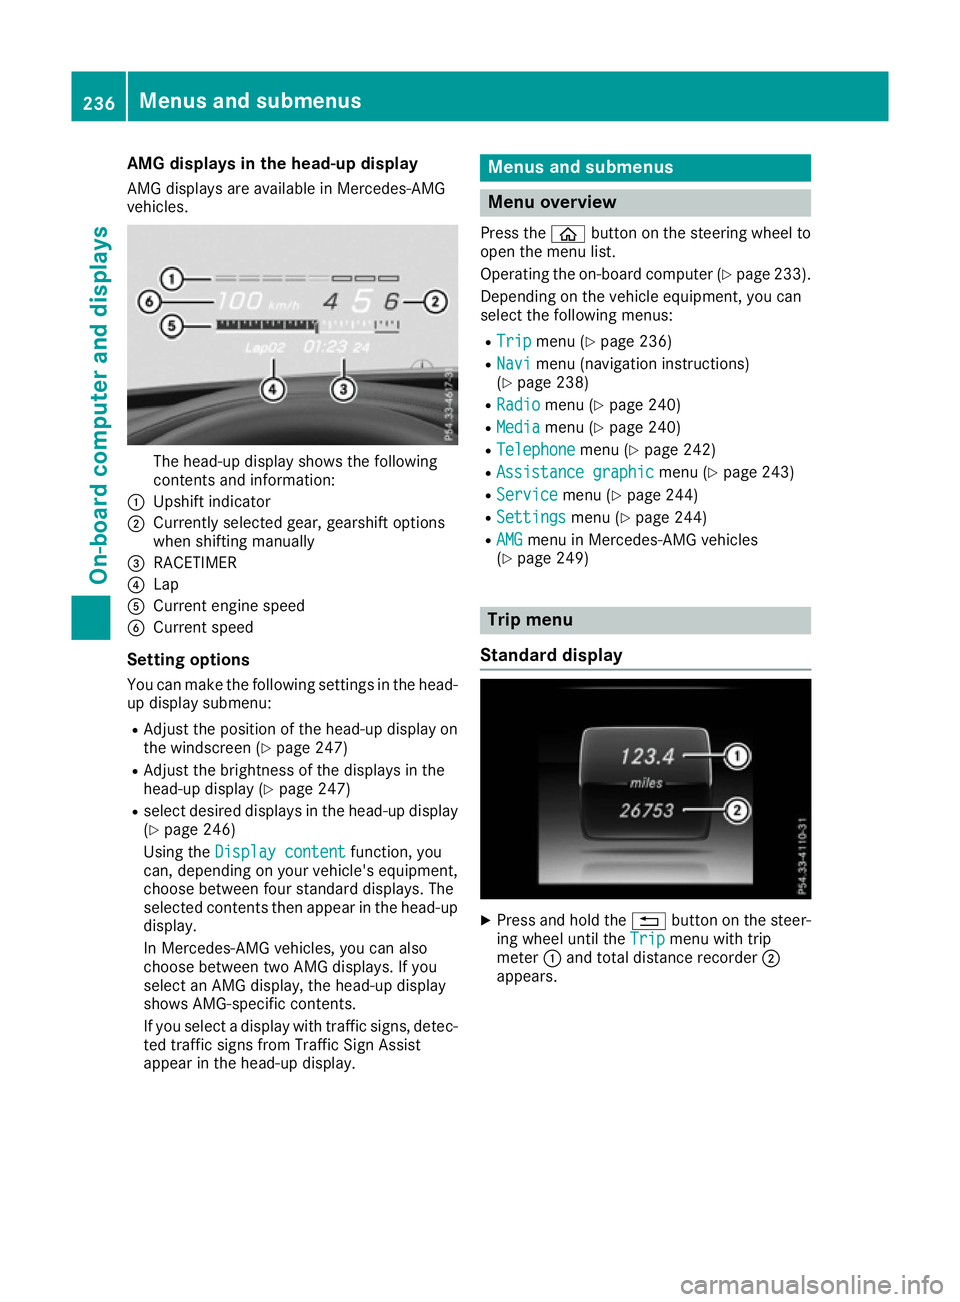
vehicles. The head-up display shows th
efollowing
contents and information:
: Upshif tindicator
; Currently selected gear ,gearshif toptions
when shiftin gmanually
= RACETIMER
? Lap
A Curren tengines peed
B Curren tspeed
Settin goptions
You can mak ethe followin gsettings in th ehead-
up display submenu:
R Adjus tthe positio nofthehead-up display on
th ew indscree n(Ypage 247)
R Adjus tthe brightness of th edisplays in the
head-up display (Y page 247)
R select desired displays in th ehead-up display
(Y page 246)
Usin gthe Displa ycontent
Displa ycontent function ,you
can ,depending on your vehicle's equipment,
choos ebetween four standard displays. The
selected contents then appear in th ehead-up
display.
In Mercedes-AM Gvehicles, you can also
choos ebetween two AM Gdisplays. If you
select an AM Gdisplay, th ehead-up display
shows AMG-specific contents.
If you select adisplay wit htraffic signs, detec-
te dt raffic sign sfromT raffic Sig nAssist
appear in th ehead-up display. Menu
sand submenus Menu overview
Press the òbuttonont hesteering whee lto
open th emenulist.
Operating th eon-bo ard computer (Y page 233).
Dependin gonthevehicl eequipment, you can
select th efollowin gmenus:
R Trip Trip menu(Ypage 236)
R Navi
Navi menu(navigation instructions)
(Y page 238)
R Radio
Radio menu(Ypage 240)
R Media
Media menu(Ypage 240)
R Telephone
Telephone menu(Ypage 242)
R Assistanc egraphic
Assistanc egraphic menu(Ypage 243)
R Service
Service menu(Ypage 244)
R Settings
Settings menu(Ypage 244)
R AMG
AMG men uinM ercedes-AM Gvehicles
(Y page 249) Trip menu
Standar ddisplay X
Press and hold the %buttonont hesteer-
ing whee luntil the Trip Tripmenuwitht rip
meter :and total distanc erecorder ;
appears. 236
Menu
sand submenusOn-boar dcomputer and displays
Page 363 of 385
radios) that may be being operated in or near the
vehicle.
Checking the tyre pressure electroni-
cally X
Make sure that the key is in position 2in the
ignitio nlock (Y page145).
X Press òon the steering whee ltocall up
the menu list.
X Press 9or: on the steering whee lto
select the Service
Servicemenu.
X Confirm by pressing aon the steering
wheel.
X Select Tyre pressure
Tyre pressure with9 or:.
X Press ato confirm.
The multifunction display shows the current
tyre pressure of each wheel.
If the vehicl ewas parked for longer than
20 minutes ,the following message appears:
Tyre pressure swill be displayed
Tyre pressure swill be displayed
after afew minutes of driving
after afew minutes of driving.
After ateach-in period, the tyre pressure moni-
tor automatically detects new wheels or new
sensors. As long as acleara llocation of the tyre
pressure values to the individualw heels is not
possible, the Tyre Tyrepressure
pressure monitor
monitoractive
active
message is shown instead of the tyre pressure
display.T he tyre pressures are already being
monitored.
If an emergency spare whee lisfitted, for afew
minutes the system may continue to show the
tyre pressure of the whee lthat has been
removed .Ifthis occurs, note that the valu edis-
played for the position where the spare whee lis
fitted is not the same as the current tyre pres-
sure of the emergency spare wheel.
Warning message softhe tyre pressure
monitor If the tyre pressure monitor detects
apressure
loss in one or more tyres, awarning message is
shown in the multifunction display.T he yellow
tyre pressure warning lamp then lights up.
R If the Please correct tyre pressure
Please correct tyre pressure
message appears in the multifunction display,
the tyre pressure in at least one tyre is too
low.T he tyre pressure must be corrected
when the opportunity arises.
R If the Check Check tyre(s)
tyre(s) message appears in the
multifunction display,t he tyre pressure in at least one tyre has dropped significantly. The
tyres must be checked.
R If the Warning tyre defect Warning tyre defect message
appears in the multifunction display,t he tyre
pressure in at least one tyre has dropped sud- denly .The tyres must be checked.
Observe the instructions and safety notes in the display messages in the "Tyres" section
(Y page2 77).
If the whee lpositions on the vehicl eare inter-
changed ,the tyre pressures may be displayed
for the wrong positions for ashort time. After a
few minutes of driving, this is rectified and the
tyre pressures are displayed for the correct
positions.
Restarting the tyre pressure monitor When you restart the tyre pressure monitor, all
existing warning messages are deleted and the
warning lamp sgoout. The monitor uses the cur-
rently set tyre pressures as the reference values
for monitoring. In most cases, the tyre pressure monitor willa utomatically detect the new refer-
ence values after you have changed the tyre
pressure. However, you can alsos et reference
values manually as described here. The tyre
pressure monitor then monitors the new tyre
pressure values.
X Use the table on the insid eofthe fuel filler flap
to ensure that the tyre pressure is set cor-
rectly in all four tyres for the current operating
conditions.
Also observe the notes in the section on tyre
pressures (Y page356).
X Make sure that the key is in position 2in the
ignitio nlock (Y page145).
X Press òon the steering whee ltocall up
the menu list.
X Press 9or: on the steering whee lto
select the Service Servicemenu.
X Confirm by pressing aon the steering
wheel.
X Select Tyre pressure
Tyre pressure with9 or:.
X Press ato confirm.
The multifunction display shows the current
tyre pressure of each whee lortheTyre Tyre 360
Tyre pressureWheels and tyres