tow MERCEDES-BENZ C-Class COUPE 2017 CL205 Workshop Manual
[x] Cancel search | Manufacturer: MERCEDES-BENZ, Model Year: 2017, Model line: C-Class COUPE, Model: MERCEDES-BENZ C-Class COUPE 2017 CL205Pages: 354, PDF Size: 8.66 MB
Page 286 of 354
these exhaust gasesleadsto poisoning. There
is ar iskoff atal injury.T herefore neve rleave
the engine running in enclose dspacesw ith-
ou tsufficient ventilation.
Programming
Programming buttons
Pa ya ttentio ntothe "Important safety notes"
(Ypage 283).
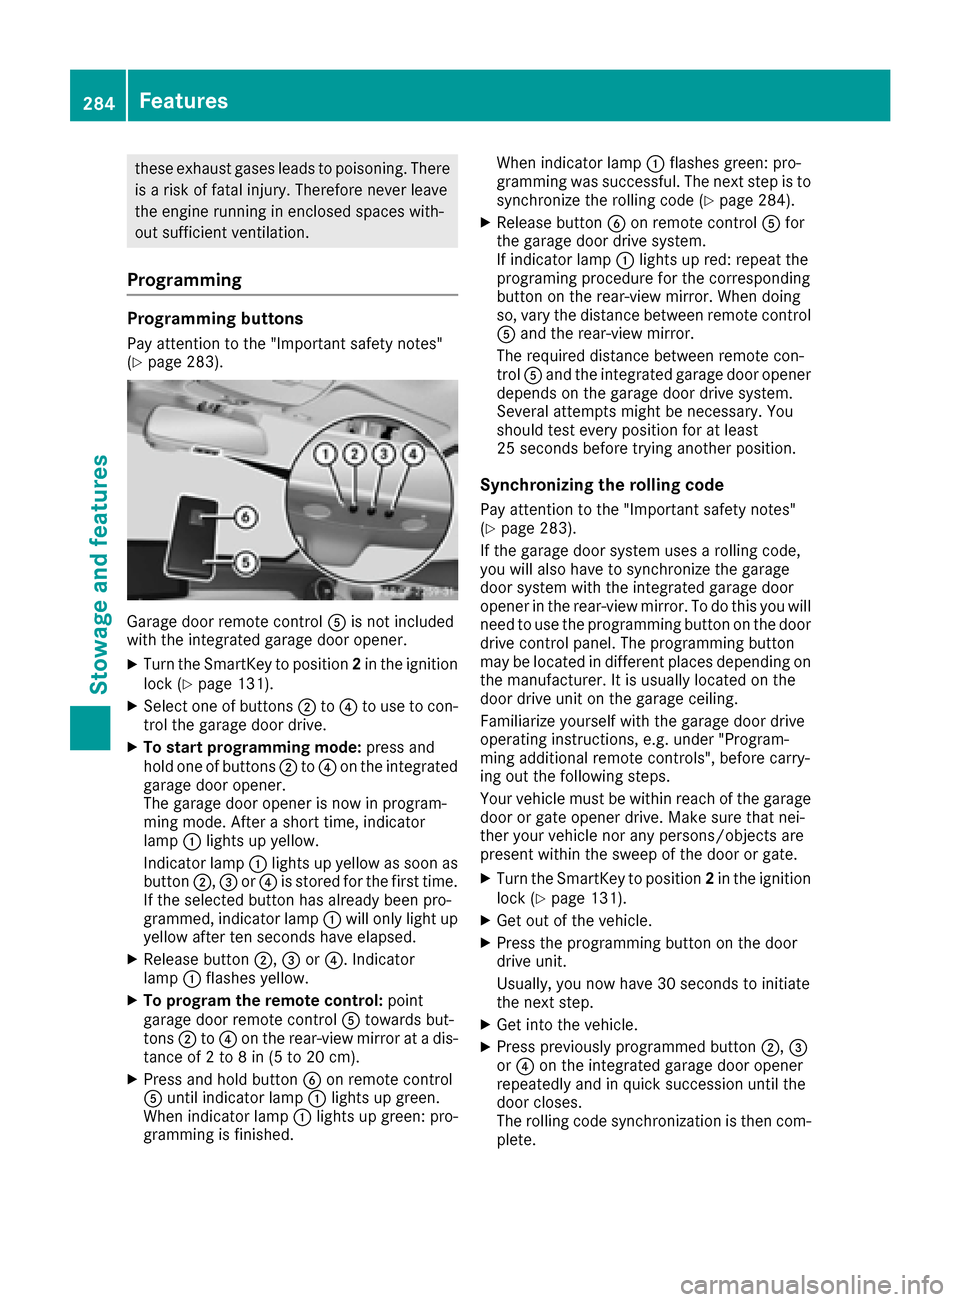
Garage door remote control Ais not included
with the integrated garage door opener.
XTurn the SmartKeytop osition2in the ignition
lock (Ypage 131).
XSelect one of buttons ;to? to us etoc on-
trol the garage door drive.
XTo start programmin gmode: press and
hol done of buttons ;to? on the integrated
garage door opener.
The garage door opene risnow in program-
ming mode. After ashort time, indicator
lamp :lights up yellow.
Indicato rlam p: lights up yellow as soo nas
button ;,=or? is stored for the first time.
If the selected button hasa lready been pro-
grammed, indicator lamp :will onl ylight up
yellow after ten second shavee lapsed .
XReleas ebutton ;, =or?.I ndicator
lamp :flashe syellow.
XTo program the remote control: point
garage door remote control Atowards but-
tons ;to? on the rear-view mirrorata dis-
tance of 2to8in(5t o20cm).
XPress and hol dbutton Bon remote control
A unti lindicator lamp :lights up green.
When indicator lamp :lights up green: pro-
gramming is finished. When indicator lamp
:flashe sgreen: pro-
gramming wa ssuccessful. Th enext stepist o
synchronize the rolling cod e(
Ypage 284).
XReleasebutton Bon remote control Afor
the garage door drive system.
If indicator lamp :lights up red :repea tthe
programing procedur efor the corresponding
button on the rear-view mirror. When doing
so, vary the distance between remote control
A and the rear-view mirror.
Th er equired distance between remote con-
trol Aand the integrated garage door opener
depends on the garage door drive system.
Severala ttempts might be necessary.Y ou
shoul dteste very positio nfor at least
25 second sbefor et rying anotherp osition.
Synchronizing the rolling code
Paya ttentio ntothe "Important safety notes"
(Ypage 283).
If the garage door systemu sesar olling code,
yo uw illa lsoh avetos ynchronize the garage
door systemw itht he integrated garage door
opene rinthe rear-view mirror. To do thisy ouwill
nee dtou sethe programming button on the door
drive contro lpan el.T he programming butto n
may be located in differen tplace sd epen ding on
the manufacturer .Itisusually locatedonthe
door drive uni tonthe garage ceiling.
Familiariz eyoursel fwitht he garage door drive
operating instructions, e.g .under "Program-
ming additional remo
te controls",b
efor ec arry-
ing ou tthe following steps.
Your vehicl emustbew ithinr each of the garage
door or gate opene rdrive. Make sure thatn ei-
thery ourv ehicl enor any persons/objects are
present withint he sweepofthe door or gate.
XTurn the SmartKeytop osition2in the ignition
lock (Ypage 131).
XGe toutof the vehicle.
XPress the programming button on the door
drive unit.
Usually ,you now have 30 second stoinitiate
the next step.
XGe tinto the vehicle.
XPress previously programmedb utton ;, =
or ? on the integrated garage door opener
repeatedly and in quick succession unti lthe
door closes.
Th er olling cod esynchronizatio nist henc om-
plete.
284Features
Stowag eand featur es
Page 287 of 354
Notesonp rogrammin gthe remote con-
trol
Canadia nradio frequency laws require a"break"
(o ri nterruption) of the transmission signals
after broadcasting for afew seconds. Therefore,
these signals mayn ot last long enoughfor the
integrated garage door opener. Th esigna lisn ot
recognize dduringp rogramming. Comparable
with Canadia nlaw ,som eU .S. garage door open-
ers also featur ea"break".
Procee dasfollows:
Rif youliveinC anada
Rif yo uhaved ifficultie sprogramming the
garage door opene r(regardles sofwhere you
live) when using the programming steps
XPress and hol done of buttons ;to? on the
integrated garage door opener.
After ashort time, indicator lamp :lights up
yellow.
XReleas ethe button.
Indicato rlam p: flashe syellow.
XPress button Bof garage door remote con-
trol Afor two seconds, thenr elease it for two
seconds.
XPress button Bagai nfor two seconds.
XRepeat thiss equence on button Bof remote
control Aunti lindicator lamp :lights up
green.
When indicator lamp :lights up green: pro-
gramming is finished.
When indicator lamp :flashe sgreen: pro-
gramming wa ssuccessful. Th enext stepi
sto
s
ynchronize the rolling code.
XReleas ebutton Bof remote control Aof the
garage door drive.
If indicator lamp :lights up red :repea tthe
programming proces sfor the corresponding
button on the rear-view mirror. When doing
so, vary the distance between remote control
A and the rear-view mirror.
Th er equired distance between remote con-
trol Aand the integrated garage door opener
depends on the garage door drive system.
Severala ttempts might be necessary.Y ou
shoul dteste very positio nfor at least
25 second sbefor etrying another position.
Problems whe nprogramming
If you are experiencing problems programing
the integrated garage door opener on the rear-
view mirror, take note of the following instruc-
tions:
RCheck the transmitter frequency use dby
garage door drive remote control Aand
whethe ritissupported. The transmitter fre-
quency can usuall ybefound on the back of
the garage door drive remote control.
The integrated garage door opener is com-
patible with devices that have units which
operate in the frequency range of 280 to
433 MHz.
RReplace the batteries in garage door remote
control A.This increases the likelihoo dthat
garage door remote control Awilltransmit a
strong and precis esigna ltot he integrated
garage door opener.
RWhen programming, hold remote control A
at varying distances and angle sfrom the but-
ton which you are programming. Try various
angle satad istance between 2and 12 inches
(5to 30 cm) or at the same angle but at varying
distances.
RIf another remote control is available for the
same garage door drive ,repeatt he same pro-
gramming steps with this remote control.
Before performing these steps, make sure
that new batteries have been installed in
garage door drive remote control A.
RNote that some remote controls only transmit
foralimited amount of time (the indicator
lam pont he remote control goes out). Press
button Bon remote control Aagain before
transmission ends.
RAlign the antenna cabl eofthe garage door
opener unit. This can improve signa lrecep-
tion/transmission.
Opening/closingt he garage door
After it has been programmed, the integrated
garage door opener performs the function of the
garage door system remote control. Please also
read the operating instructions for the garage
door system.
XTurn the SmartKey to position 2in the ignition
lock (Ypag e131).
XPress button ;,=or? which you have
programmed to operate the garage door.
Garage door syste mwithafixed code: indi-
cator lamp :lights up green.
Features285
Stowage and features
Z
Page 288 of 354
Garage door system witharolling code: indi-
cator lamp :flashes green.
The transmitte rwill transmit asignal as long
as th ebutton is pressed. The transmission is
halted after amaximum of te nseconds and
indicator lamp :lightsupy ellow.
XPress button ;,=or? again if necessary.
Clearing th ememory
Makes ure that you clear th ememory of the
integrate dgarag edoor opener before sellingt he
vehicle.
XTurn th eSma rtKey to position 2in th eignition
lock(Ypage 131).
XPress and hold buttons ;and ?.
The indicator lamp initially lightsupy ellow
and then green.
XRelease buttons ;and ?.
The memory of th eintegrate dgarag edoor
opener in th erear-view mirror is cleared.
Floormats
GWARNING
Object sinthedriver'sf ootwell can restrict the
pedal travel or obstruc tadepressedp edal.
The operatin gand road safety of th evehicle is
jeopardized. Thereisar isk of an accident.
Makes ure that all object sinthevehicle are
stowed correctly, and that they canno tenter
th ed river'sf ootwell. Install th efloormats
securely and as specified in order to ensure
sufficient clearance for th epedals.Don otuse
loosef loormats and do no tplace floormats on
to pofo neanother.
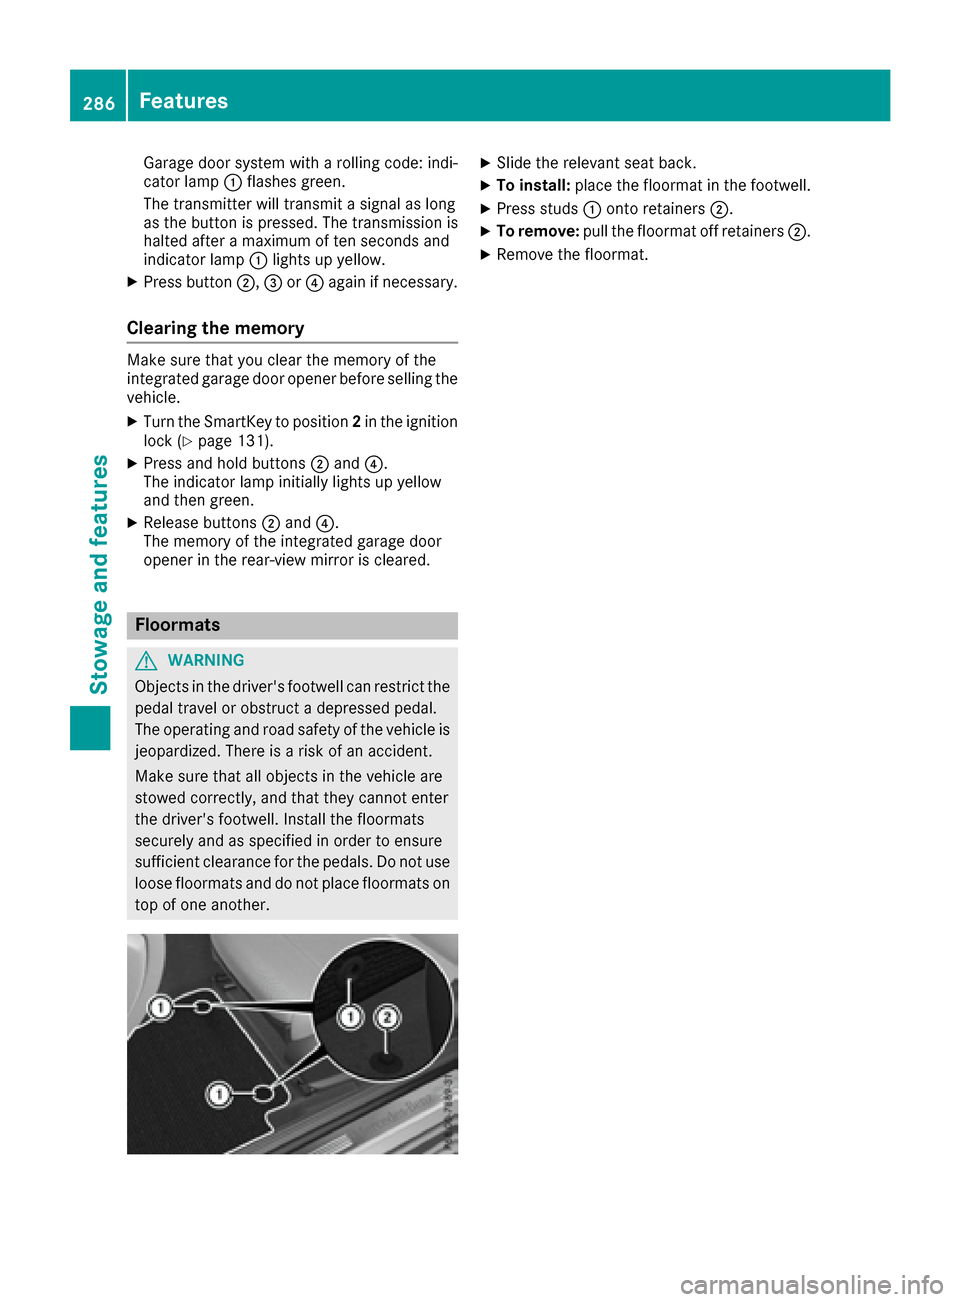
XSlid ethe relevan tseat back.
XTo install: place thefloormat in th efootwell.
XPress studs :onto retainers ;.
XTo remove:pull thefloormat off retainers ;.
XRemovethefloormat.
286Features
Stowage and features
Page 294 of 354
Drivingabroad
An extensive Mercedes-Ben zService networ kis
also available in other countries. You can obtain
further information from any authorized
Mercedes-Ben zCenter.
Car e
General notes
HEnvironmental not e
Dispose of empty packagin gand cleanin g
cloths in an environmentally responsible man -
ner.
!Fo rc leanin gyour vehicle, do no tuse any of
th ef ollowing:
Rdry, rough or har dcloths
Rabrasiv ecleanin gagents
Rsolvents
Rcleanin gagents containin gsolvents
Do no tscrub .
Do no ttou ch th esurfaces or protective films
wit hh ardo bjects ,e.g.a ringori cescraper.
You could otherwise scratch or damage th e
surfaces and protective film.
!Do no tparkt he vehicle fo ranextende d
period straight after cleanin git,particularly
after havin gcleaned th ewheels wit hwhee l
cleaner. Wheel cleaners could cause
increase dcorro sion of th ebrake discs and
brake pads/linings. Fo rthisr eason ,you
should drive fo rafewminutes after cleaning.
Brakin gheat sthe brake discs and th ebrake
pads/linings, thus drying them. The vehicle
can then be parked.
Regular car eofyour vehicle is aconditi on for
retainin gthe qualit yint he longterm.
Use car eproducts and cleanin gagents recom -
mended and approved by Mercedes-Benz.
Washing th evehicle an dcleaning th e
paintwor k
Automatic car was h
GWARNING
Brakin gefficiency is reduce dafter washin g
th ev ehicle. There is ariskofana ccident.
Afte rthe vehicle has bee nwashed, brake
carefully whil epayin gattenti on to th etraffic
condition suntil full braking powe risrestored .
!If DISTRONIC PLU SortheHOLD function is
activated, th evehicle brake sautomatically in
certain situations.
To preven tdamage to th evehicle, deactivat e
DISTRONIC PLU Sand th eHOLDf unction in
th ef ollowin goro ther similar situations:
Rwhen towin gthe vehicle
Rin th ecar wash
!Never clean your vehicle in aTouchless
Automatic Car Wash as these use special
cleanin gagents .These cleanin gagents can
damage th epaintwor korplasticparts .
!Mak esuret hat:
Rthes idew indows and th eslidin gsunroof
are full yclosed.
Rth ev entilation/heatin gisswitched of f(th e
OF Fb utto nhas bee npressed).
Rthew indshield wipe rswitch is at position 0.
Rthe3 60°c amera or rea rviewc amera is
switched off.
The vehicle may otherwise be damaged .
!If theSmartKey is within th ereard etection
range of KEYLESS-GO ,the followin gsitua-
tions, fo rexample, could lead to th euninte
n
-
tional opening of th etrunk :
Rusin gac ar wash
Rusingap owerwasher
Mak esuret hatthe SmartKey is at leas t10ft
(3 m) away from th evehicle.
!Mak esuret hatthe automatic transmissio n
is in neutral position Nwhen washin gyour
vehicle in atow-throu gh car wash .The vehicle
may otherwise be damaged .
ROperatingwitht he SmartKey:
Do no tremov ethe SmartKey from th eigni-
tion lock. Do no topent he driver's doo r
292Care
Maintenance an dcare
Page 295 of 354
when theengine is switche doff or at very
low speeds.O therwise, when in transmis-
sion position Dor Rthea utomatic trans-
mission will automatically switch to park
position Pand blockt hewheels.
ROperatin gwith th eStart/Stop button:
Do not open th edriver's door when the
engine is switche doff or at veryl ow
speeds.O therwise, when in transmission
position Dor Rth ea utomatic transmission
will automatically switch to park position P
and blockt hewheels.
Observe th efollowing to makes ure that the
automatic transmission stays in position Nneu-
tral:
Operatin gwith th eSmartKey and th eStart/
Stop button:
XMake sure that th eignitio nisswitche don.
XMake sure that th evehicle is stationary.
XDepress and hold th ebrakep edal.
Operatin gwith th eStart/Stop button only:
XEngage park position P.
XRelease thebrakep edal.
XRemoveS tart/Stop button fromi gnitionlock
(Ypage 131).
XInsert th eSmartKey int othe ignitio nlock.
XSwitch on th eignition.
XDepress and hold th ebrakep edal.
Operatin gwith th eSmartKey and th eStart/
Stop button:
XShif tton eutral N.
XRelease th ebrakep edal.
XRelease th eelectric parking brake, if neces-
sary.
XSwitch off th eignitio nand leave th eSma rtKey
in th eignitio nlock.
You can wash th evehicle in an automatic car
wash fromt heverys tart.
If th evehicle is veryd irty, pre-wash it bef
ore
cleaning it in an automatic car wash.
After using an automatic car wash, wipe off wax
fromt hewindshield and th ewiper blades. This
will prevent smearsa nd reducewiping noises
caused by residue on th ewindshield.
Washing by hand
In some countries, washingbyh and is only
allowed at specially equipped washingb ays.
Observe th elegal requirements in each country.
XDo not use hot water and do not wash the
vehicle in directs unlight.
XUseasofts ponge to clean.
XUse amild cleaning agent, such as acar
shampoo approved by Mercedes-Benz.
XThoroughly hose down th evehicle with agen-
tle jet of water.
XDo not pointt hewater jet directly towards the
air inlet.
XUse plenty of water and rinse out th esponge
frequently.
XRinse th evehicle with clean water and dry
thoroughly with achamois.
XDo not let th ecleaning agentd ry on thepaint-
work.
Carefull yremove all deposits of road salt as
soon as possible when driving in winter.
Power washers
GWARNING
The water jet fromac ircular jet nozzle (dirt
blasters) can cause invisible exterior damage
to th etires or chassis components. Compo-
nents damaged in this way may fail unexpect-
edly. Thereisar isk of an accident.
Do not use power washersw ith circular jet
nozzles to clean th evehicle. Have damaged
tires or chassis component sreplaced imme-
diately.
!Always maintain adistanc eofatl east
11.8 in (30 cm) between th evehicle and the
power washer nozzle. Information about the
correctd istanceisavailable fromt heequip-
mentm anufacturer.
Move th epower washer nozzle aroundw hen
cleaning your vehicle.
Do not aim directly at any of th efollowing:
Rtires
Rdoor gaps, roof gaps, joints, etc.
Relectrical components
Rbattery
Rconnectors
Care293
Maintenance and care
Z
Page 301 of 354
Where willIfind...?
Reflective safety jacket
Removing/stowing the reflective
safety jackets
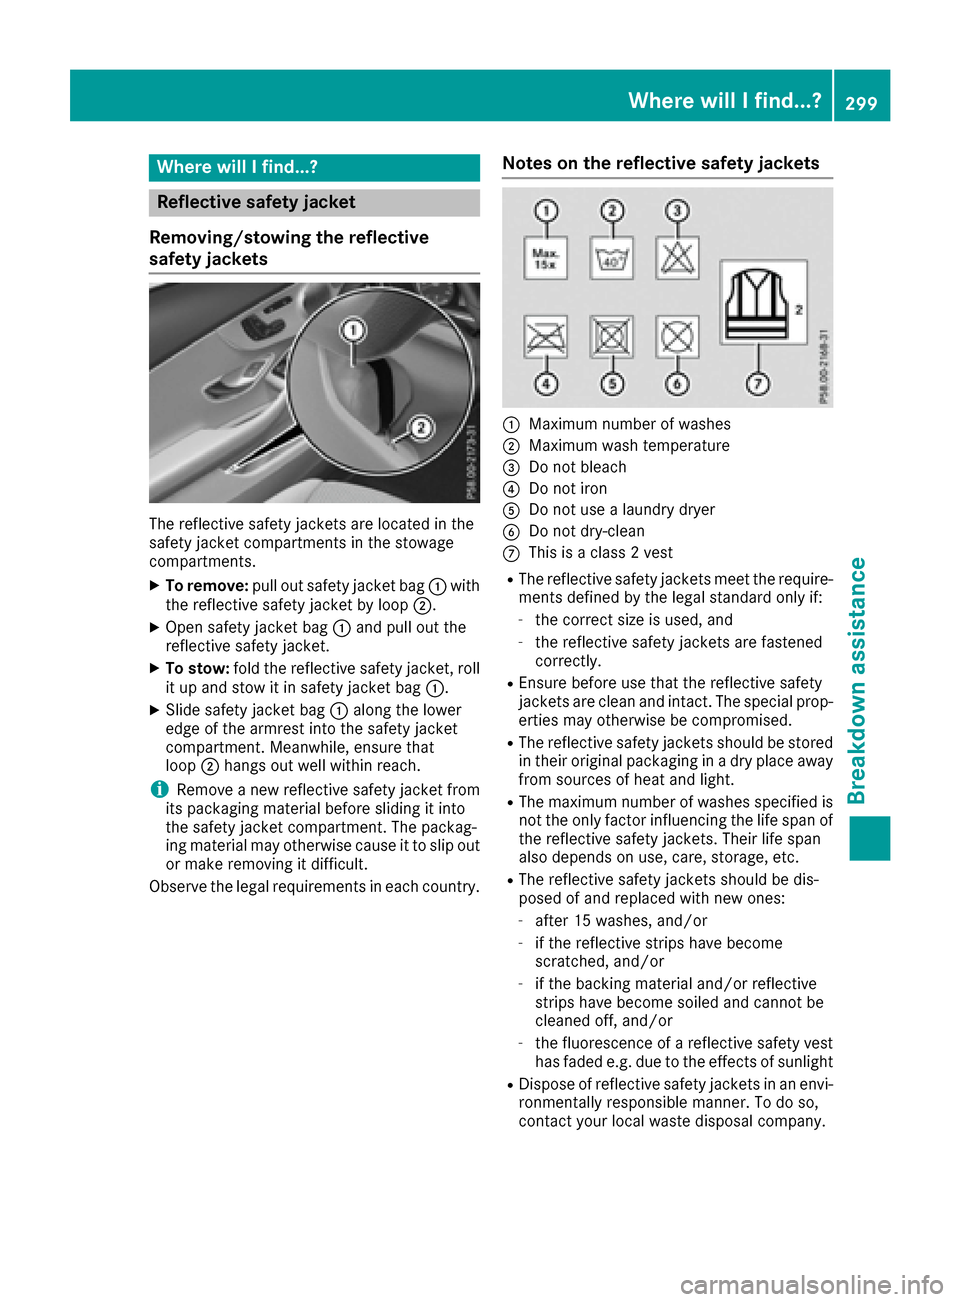
The reflective safety jackets are located in the
safety jacket compartments in the stowage
compartments.
XTo remove: pullout safety jacket bag :with
the reflective safety jacket by loop ;.
XOpen safety jacket bag:and pul lout the
reflective safety jacket.
XTo stow: fold the reflective safety jacket, roll
it up and stow it in safety jacket bag :.
XSlidesafety jacket bag :along the lower
edge of the armres tinto the safety jacket
compartment. Meanwhile, ensure that
loop ;hangs out wel lwithi nreach.
iRemove anew reflective safety jacket from
its packaging material before sliding it into
the safety jacket compartment. The packag-
ing material may otherwise caus eittoslipo ut
or make removing it difficult.
Observe the lega lrequirements in each country.
Notes on the reflective safety jackets
:Maximum numbe rofwashes
;Maximum wash temperature
=Do not bleach
?Do not iron
ADo not use alaundry dryer
BDo not dry-clean
CThis is aclass2v est
RThe reflective safety jackets meet the require-
ments defined by the lega lstandard only if:
-the correct size is used, and
-the reflective safety jackets are fastened
correctly.
REnsure before use that the reflective safety
jackets are cleana nd intact. The special prop-
erties may otherwise be compromised.
RThe reflective safety jackets should be stored
in their original packaging in adry place away
from sources of heata nd light.
RThe maximumnumbe rofwashes specified is
not the only factor influencing the life spano f
the reflective safety jackets. Theirl ife span
als od epends on use ,care, storage ,etc.
RThe reflective safety jackets should be dis-
posedofa nd replaced with new ones:
-after 15 washes, and/or
-if the reflective strips have become
scratched,and/or
-if the backing material and/or reflective
strips have become soiled and cannot be
cleaned off, and/or
-the fluorescence of areflective safety vest
has fade de.g. due to the effects of sunlight
RDispos eofreflective safety jackets in an envi-
ronmentall yresponsiblem anner. To do so,
contact you rlocalw aste disposal company.
Where will Ifind...?299
Breakdown assistance
Page 302 of 354
Vehicletoolkit
General notes
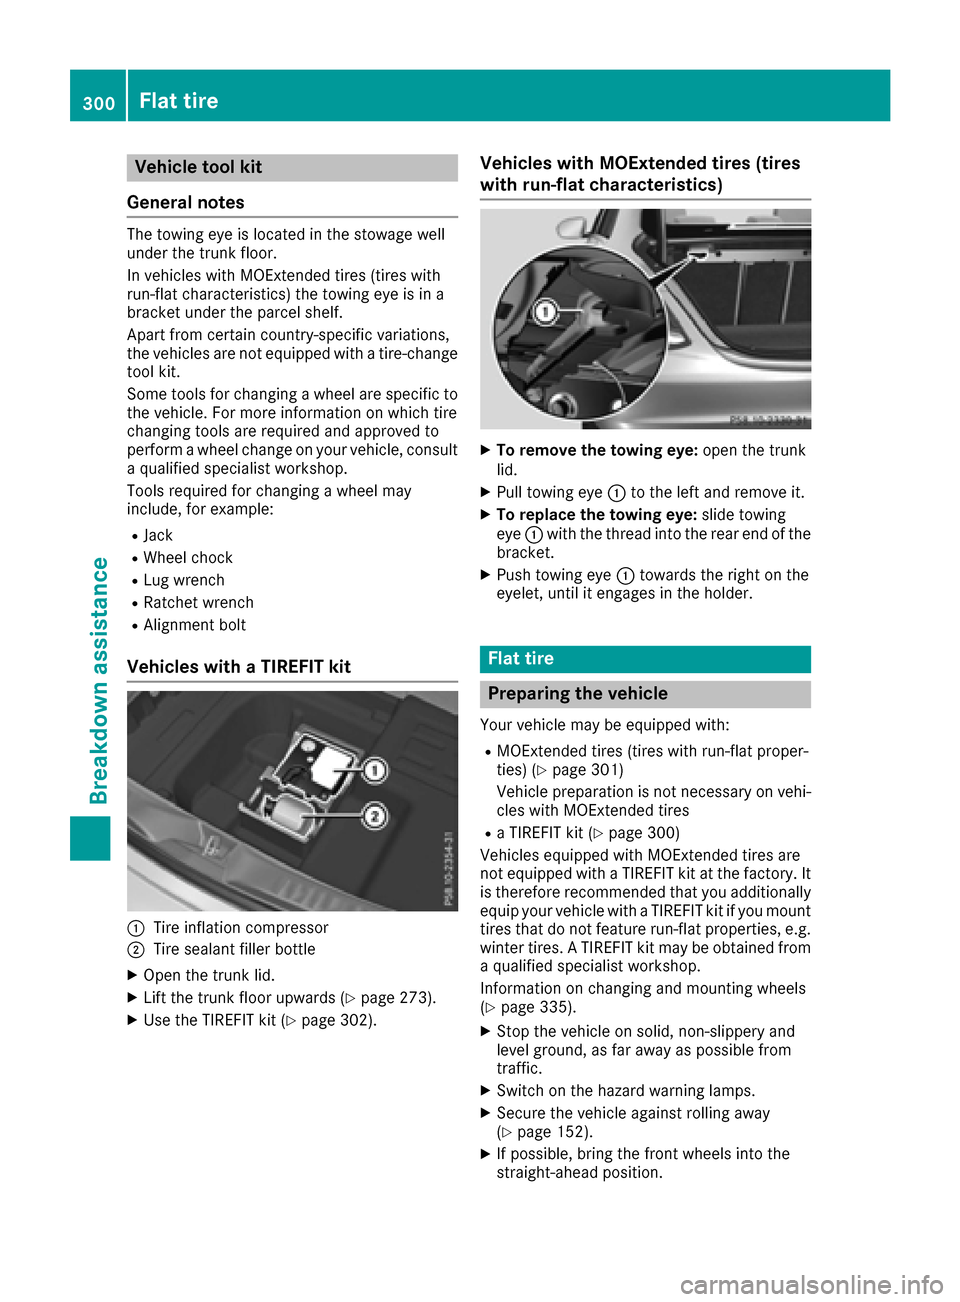
The towing ey eislocate dint he stowag ewell
under the trunk floor.
In vehicles with MOExtende dtires(tires with
run-fla tcharacteristics) the towing ey eisina
bracket under the parcel shelf.
Apart from certain country-specifi cvariations,
the vehicles are not equipped with atire-change
tool kit.
Some tool sfor changing awheel are specifi cto
the vehicle. For more informatio nonwhich tire
changing tool sare required and approved to
perfor mawheelchange on your vehicle, consult
aq uali fied specialist workshop.
Tools required for changing awheel may
include, for example:
RJack
RWheel chock
RLugw rench
RRatchet wrench
RAlignment bolt
Vehicles with aTIREFI Tkit
:Tire inflation compressor
;Tire sealant fille rbottle
XOpe nthe trunk lid.
XLiftthe trunk floor upwards (Ypage 273).
XUse the TIREFIT kit (Ypage 302).
Vehicles with MOExtende dtires(tires
with run-flat characteristics)
XTo remove the towin geye:open the trunk
lid.
XPull towing eye :to the left and remove it.
XTo replace the towin geye:slid etowing
eye :with the thread into the rea rend of the
bracket.
XPush towing eye :toward sthe right on the
eyelet, unti litengages in the holder.
Flat tire
Preparin gthe vehicle
Your vehicl emaybe equipped with:
RMOExtende dtires(tires with run-fla tproper-
ties) (Ypage 301)
Vehicl epreparation is not necessary on vehi-
cle sw ithM OExtende dtires
RaT IREFIT kit (Ypage 300)
Vehicles equipped with MOExtende dtiresa re
not equipped with aTIREFIT kit at the factory .It
is therefore recommende dthaty ouadditionally
equi pyourvehicl ewithaT IREFIT kit if yo umount
tire sthatd onot feature run-fla tproperties, e.g.
winter tires. ATIREFIT kit maybeo btained from
aq uali fied specialist workshop.
Informatio nonchanging and mounting wheels
(
Ypage 335).
XStop the vehicl eonsolid,non-slippery and
level ground ,asfar away as possibl efrom
traffic.
XSwitch on the hazard warning lamps.
XSecure the vehicl eagain st rolling away
(Ypage 152).
XIf possible, bring the front wheels into the
straight-ahea dposition.
300Flat tire
Breakdo wn assis tance
Page 304 of 354
Ryou see smokeand smell rubber.
RESP®is intervenin gconstantly .
Rthere are tears in th esidewalls of th etire.
Afte rdrivin gine mergenc ymode, hav ethe
whee lrim sc hecked ataq ualified specialist
workshop wit hregard to their further use. The
defective tire mus tbereplaced in every case.
TIREFIT kit
Impor tant safety notes
TIREFITisat ires ealant .
You can use TIREFI Ttoseal punctures of up to
0.16 in (4 mm), particularly those in th etire
tread. You can use TIREFI Tatoutside tempera-
tures down to Ò4‡(Ò20 †).
GWARNIN G
In th efollowin gsituations, th etires ealant is
unable to provid esufficien tbreakdown assis-
tance ,asitisu nable to seal th etirep roperly:
Rthere are cut sorpunctures in th etirel arger
than those mentioned above.
Rth ew hee lrim is damaged.
Ryou hav edriven at ver ylow tire pressures or
on aflat tire.
There is ariskofana ccident.
Do no tdrive th evehicle. Contac taqualified
specialist workshop .
GWARNING
The tire sealant is harmful and causes irrita-
tion .Itm ustn otcome into contact wit hyour
skin ,eyes or clothin gorbeswallowed .Donot
inhale TIREFI Tfumes. Kee ptires ealant away
from children .There is ariskofi njury.
If you come into contact wit hthe tire sealant ,
observ ethe following:
RRinse off th etires ealant from your skin
immediately wit hwater.
RIf th etires ealant comes into contact wit h
your eyes ,immediately rinse them thor-
oughly wit hclean water.
RIf tire sealant is swallowed ,immediately
rinse your mout hout thoroughl yand drink
plenty of water. Do no tind ucev omiting,
and see kmedica lattention immediately.
RImmediately chang eout of clothin gwhich
has come into contact wit htires ealant .
RIf an allergic reaction occurs, see kmedica l
attention immediately.
!Do no toperate th etirei nflation compressor
for longer than te nminute satat imew ithout
ab reak. It may otherwise overheat.
The tire inflation compressor can be operate d
again once it has cooled down .
Comply wit hthe manufacturer’s safet yinstruc-
tion sont hesticker on th etirei nflation com-
pressor.
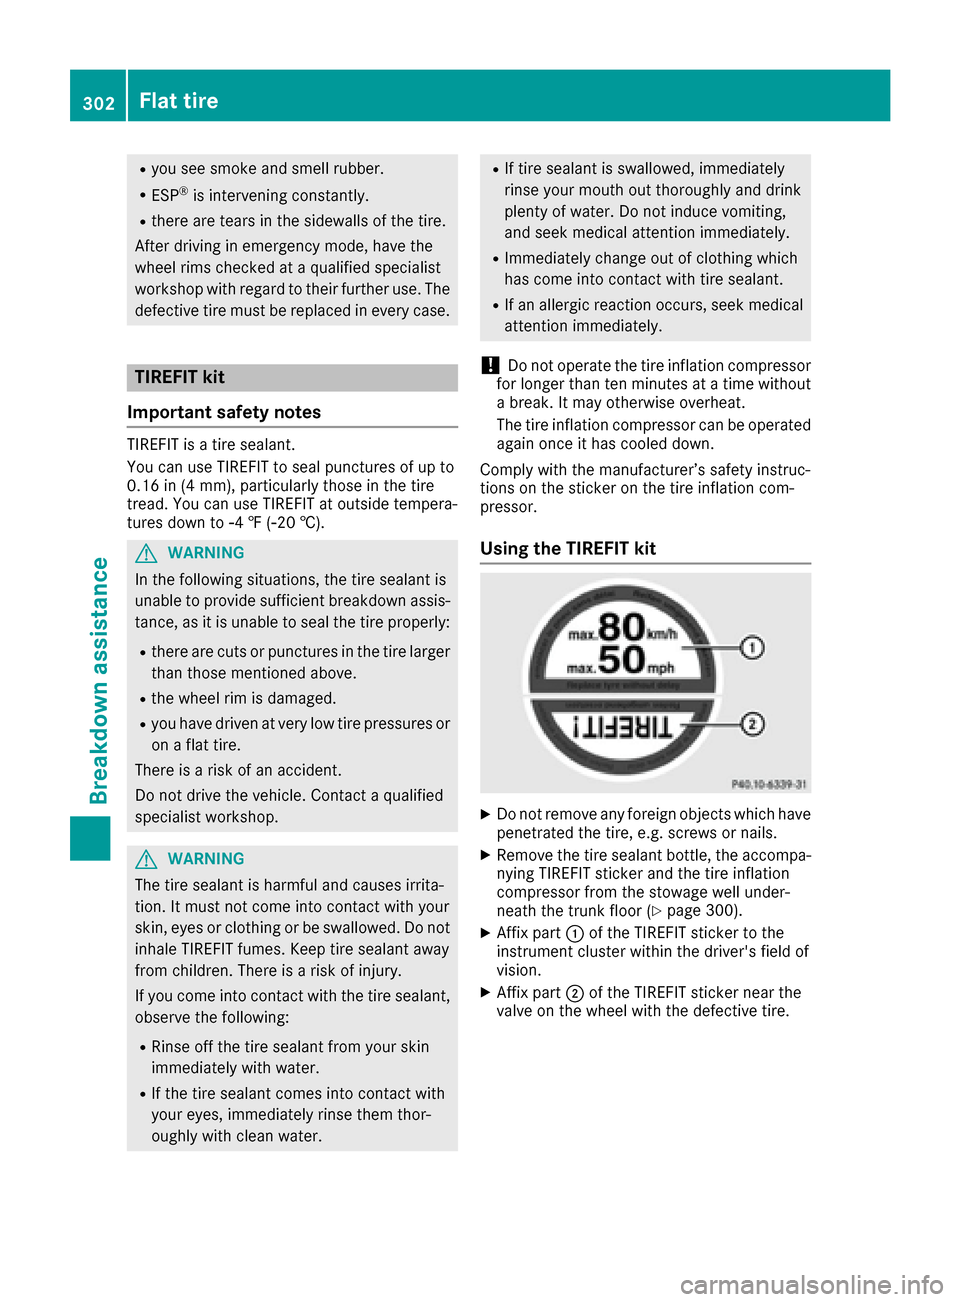
Usingt heTIREFIT kit
XDo no tremove any foreign objects whic hhave
penetrated th etire, e.g. screw sornails.
XRemove th etires ealant bottle, th eaccompa-
nying TIREFI Tsticker and th etirei nflation
compressor from th estowage well under-
neath th etrunk floor (
Ypage 300).
XAffix part :of th eTIREFI Tsticker to th e
instrumen tcluste rwithin th edriver's field of
vision .
XAffix part ;of th eTIREFI Tsticker near th e
valv eont hewhee lwitht he defective tire.
302Flat tire
Breakdown assis tance
Page 306 of 354
Tire pressure reached
GWARNING
At ire temporaril yseale dwitht ire sealant
impairs the drivin gcharacteristics and is not
suitabl efor highe rspeeds. There is arisko f
accident.
Yo us houl dtherefore adap tyou rd rivin gstyle
accordingly and drive carefully. Do not exceed the specifie dmaximum spee dwithat ire that
hasb eenr epaired using tire sealant.
The maximum permissibl espeed foratire
seale dwitht ire sealant is 50 mph (80 km/h).
The uppe rpartoft he TIREFIT sticker must be
affixe dtothe instrument cluster in the driver's
field of vision.
!Residu efromt he tire sealant mayc ome out
of the fille rhosea fter use. Thi scould cause
stains.
Therefore ,place the fille rhoseint he plastic
ba gw hich containe dthe TIREFIT kit.
HEnvironmental note
Hav ethe used tire sealant bottle dispose dof
professionally, e.g .ataqualified specialist
workshop.
If at ire pressure of 200 kPa (2.0 bar/29 psi) has
been attaine dafter ten minutes:
XSwitch off the tire inflation compressor.
XUnscrew the fille rhosef romt he valve of the
faulty tire.
XStow the tire sealant bottle and the tire infla-
tio nc ompressor.
XPul lawa yimmediately.
XStop after drivin gfor approximately ten
minute sand check the tire pressure with the
tire inflation compressor.
The tire pressure must now be at least
130 kPa (1.3 bar/19 psi).
GWARNING
If the required tire pressure is not reached
after drivin gfor as hort period, the tire is too
badl ydamaged .The tire sealant canno trepair
the tire in thisi nstance.Damaged tire sand a
tire pressure thati stoo lo wcan significantly
impai rthe vehicle's braking and drivin gchar-
acteristics .There is ariskofa ccident.
Do not continue driving. Contact aquali fied
specialis tworkshop.
iIn cases such as the one mentione dabove,
contact an authorize dMercedes-Benz Cen-
ter. Or cal l1-800-FOR-MERCede s(in the
USA) or 1-800-387-0100 (i nCanada).
XCorrect the tire pressure if it is stil latleast
130 kPa (1.3 bar/19 psi). See the Tire and
Loading Informatio nplacard on the driver's
side B-pillar or the tire pressure table in the
fue lfille rflapf or values.
XTo increase the tire pressure: switch on the
tire inflation compressor.
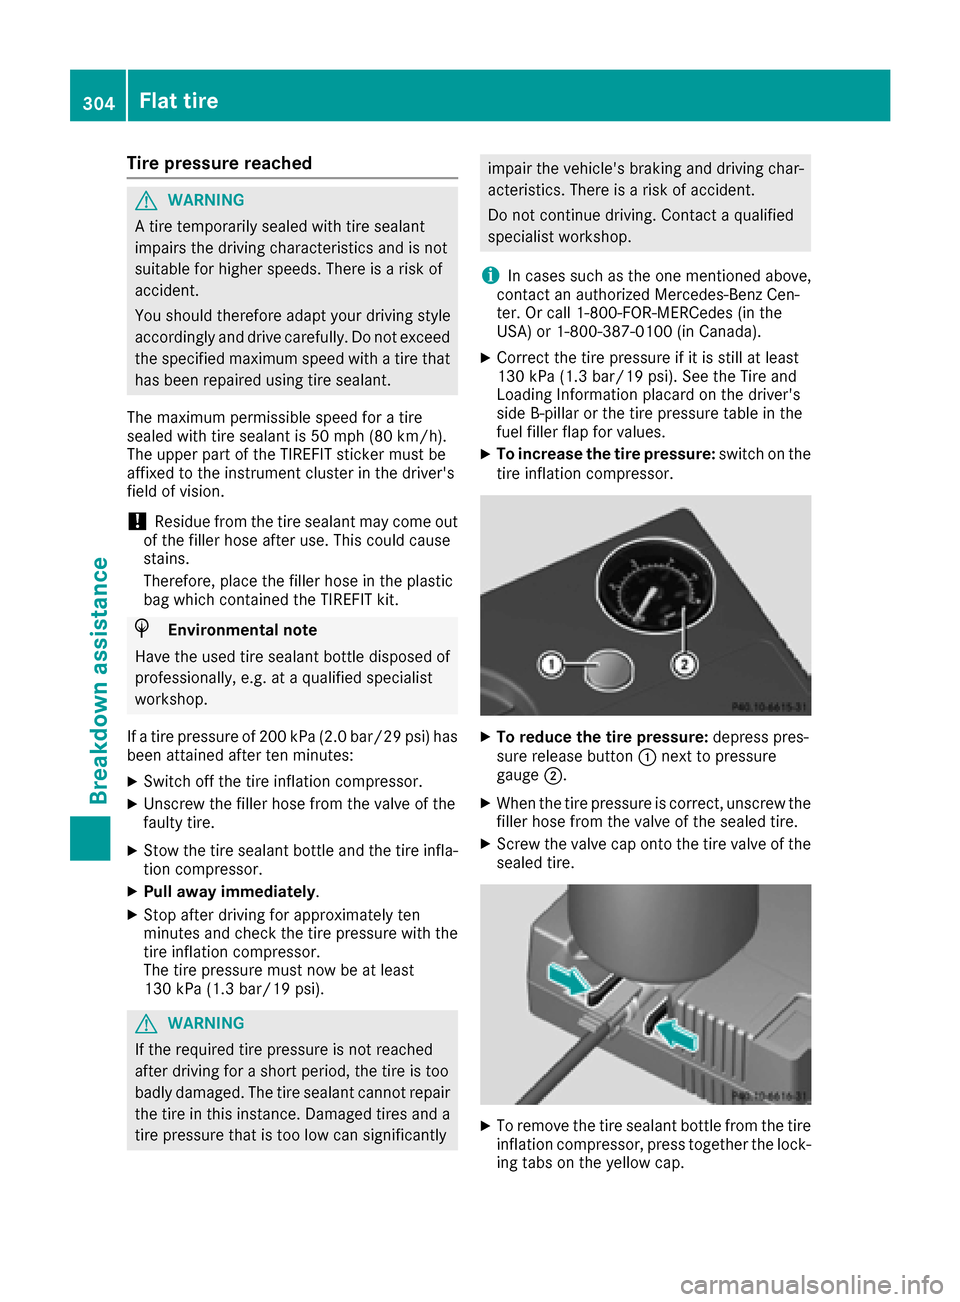
XTo reduc ethe tire pressure: depress pres-
sure release button :next to pressure
gauge ;.
XWhenthe tire pressure is correct, unscrew the
fille rhosef rom the valve of the seale dtire.
XScrew the valve cap onto the tire valve of the
seale dtire.
XTo remove the tire sealant bottle from the tire
inflation compressor ,press together the lock-
ing tab sonthe yellow cap.
304Flat tire
Breakdo wn assis tance
Page 312 of 354
XStart the engine of the donorvehicl eand run it at idling speed.
XConnect negative terminal =of dono rbattery Bto ground point ?of your vehicl eusing the
jumper cable ,connecting the jumper cable to dono rbattery Bfirst.
XStart the engine.
XBefore disconnecting the jumper cables, le tthe engine run for several minutes.
XFirst, remove the jumper cable sfrom ground point ?and negative terminal =,then from pos-
itive clamp :and positive terminal ;.Begineacht ime at the contacts on your ownv ehiclefirst.
XClose cover Aof positive terminal :afte rremoving jumper cables.
XHave the battery checke dataqualified specialist workshop.
Jump-starting is not considered to be anorma loperating condition.
iJumpe rcable sand further information regarding jump-starting can be obtaine datany qualified
specialist workshop.
Towin gand tow-starting
Important safety notes
GWARNING
Functions relevant to safety are restricted or
no longer available if:
Rthe engine is not running.
Rthe brake system or the power steering is
malfunctioning.
Rthere is amalfunction in the voltag esupply
or the vehicle's electrical system.
If your vehicl eisbeing towed, much more
force may be necessary to stee rorbrake.
There is ariskofana ccident.
In such cases, us eatow bar. Before towing,
make sure that the steering move sfreely.
GWARNING
You can no longer stee rthe vehicl eifthe
steering wheel lock hasb eene ngaged .There
is ar iskofana ccident.
Alway sswitch off the ignition when towing the
vehicl ewithat ow cable or atow bar.
GWARNING
Whe ntowing or tow-starting another vehicle
and its weight is greate rthan the permissible
gross weigh tofyourv ehicle, the:
Rthe towing eyec ould detach itself
Rthe vehicle/trailer combination could roll-
over.
There is ariskofana ccident.
Whe ntowing or tow-starting another vehicle,
its weight shoul dnot be greate rthan the per-
missible gross weight of your vehicle.
Details on the permissible gross vehicl eweight
of your vehicl ecan be found on the vehicl eide n-
tification plate (
Ypage 343).
!Whe nCOLLISIONP REVENTION ASSIST
PLUS, DISTRONIC PLU Sorthe HOLD function
is activated, the vehicl ebrakes automatically
in certain situations.
To avoid damag etothe vehicle, deactivate
thes esystems in the following or similar sit-
uations:
Rwhen towing the vehicle
Rin the car wash
!Make sure that the electri cparking brake is
released .Ifthe electri cparking brake is faulty,
visit aquali fied specialist workshop.
!Secure the tow rop eortow ba rtothe towing
eyeo nly.Otherwise, the vehicl ecould
become damaged.
310Towinga nd tow-starting
Breakdown assistance