center console MERCEDES-BENZ C-CLASS COUPE 2018 User Guide
[x] Cancel search | Manufacturer: MERCEDES-BENZ, Model Year: 2018, Model line: C-CLASS COUPE, Model: MERCEDES-BENZ C-CLASS COUPE 2018Pages: 354, PDF Size: 5.88 MB
Page 171 of 354
more comfortable driving style. Select comfort
mode also when driving fast on straight roads,
e.g. on straight stretches of highway.
XSelect theEor Cdrive program with the
DYNAMIC SELECT switch (Ypage 134).
The vehicle is raised to the normal level.
When driving at speeds above 78 mph
(125 km/h), the vehicle is automatically low-
ered by 0.6 in (15 mm) in the Eand Cdrive pro-
grams. When driving at speeds below 50 mph
(80 km/h) the vehicle is raised again.
AMG adaptive sport suspension sys-
tem
General notes
The electronically controlled damping system
works continuously. This improves driving
safety and ride comfort.
The damping is tuned individually to each wheel
and depends on:
Ryour driving style, e.g. sporty
Rthe road surface condition, e.g. bumps
Ryour individual selection of Sport, Sport + or
Comfort
The suspension setting is adjusted using the
corresponding button in the center console.
iThe mode can also be set using the
DYNAMIC SELECT switch (Ypage 134).
This is only possible if:
Rusing the AMG adaptive sport suspension
system button on the center console, and
Rusing the DYNAMIC SELECT switch, the
same mode is selected for the chassis. This
is the case, for example, when both are set
to Comfort mode.
Each time you start the engine with the Smart-
Key or the Start/Stop button, Comfort mode is
activated. For further information about starting
the engine, see (
Ypage 128).
Sport mode
The firmer setting of the suspension tuning in
Sport mode ensures even better contact with
the road. Select this mode when employing a
sporty driving style, e.g. on winding country
roads.
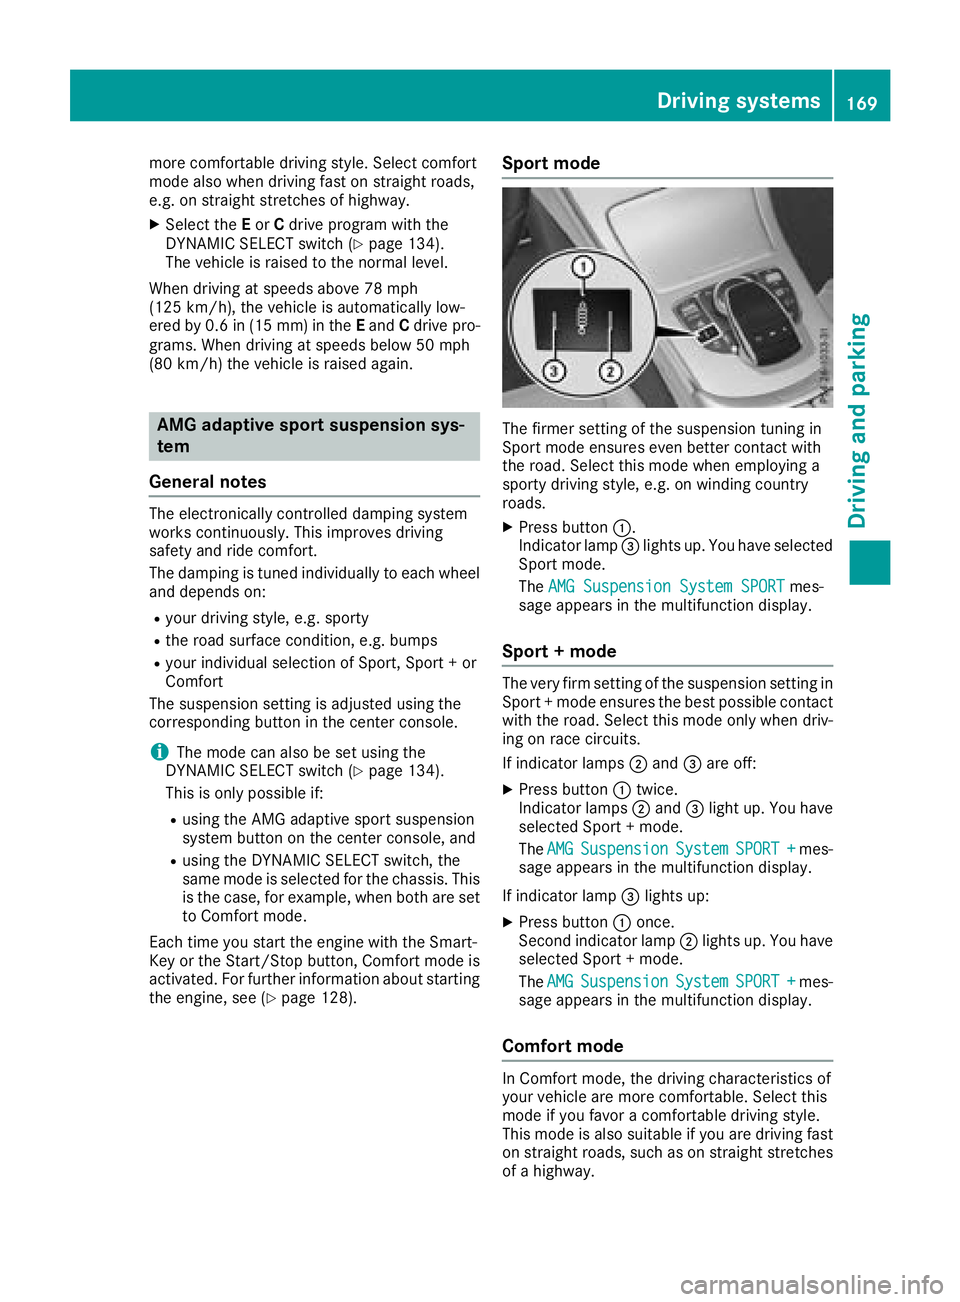
XPress button :.
Indicator lamp =lights up. You have selected
Sport mode.
The AMG Suspension System SPORT
mes-
sage appears in the multifunction display.
Sport + mode
The very firm setting of the suspension setting in
Sport + mode ensures the best possible contact
with the road. Select this mode only when driv-
ing on race circuits.
If indicator lamps ;and =are off:
XPress button :twice.
Indicator lamps ;and =light up. You have
selected Sport + mode.
The AMG
SuspensionSystemSPORT +mes-
sage appears in the multifunction display.
If indicator lamp =lights up:
XPress button :once.
Second indicator lamp ;lights up. You have
selected Sport + mode.
The AMG
SuspensionSystemSPORT +mes-
sage appears in the multifunction display.
Comfort mode
In Comfort mode, the driving characteristics of
your vehicle are more comfortable. Select this
mode if you favor a comfortable driving style.
This mode is also suitable if you are driving fast
on straight roads, such as on straight stretches
of a highway.
Driving systems169
Driving and parking
Z
Page 178 of 354
Activating/deactivating Parking Assist
PARKTRONIC
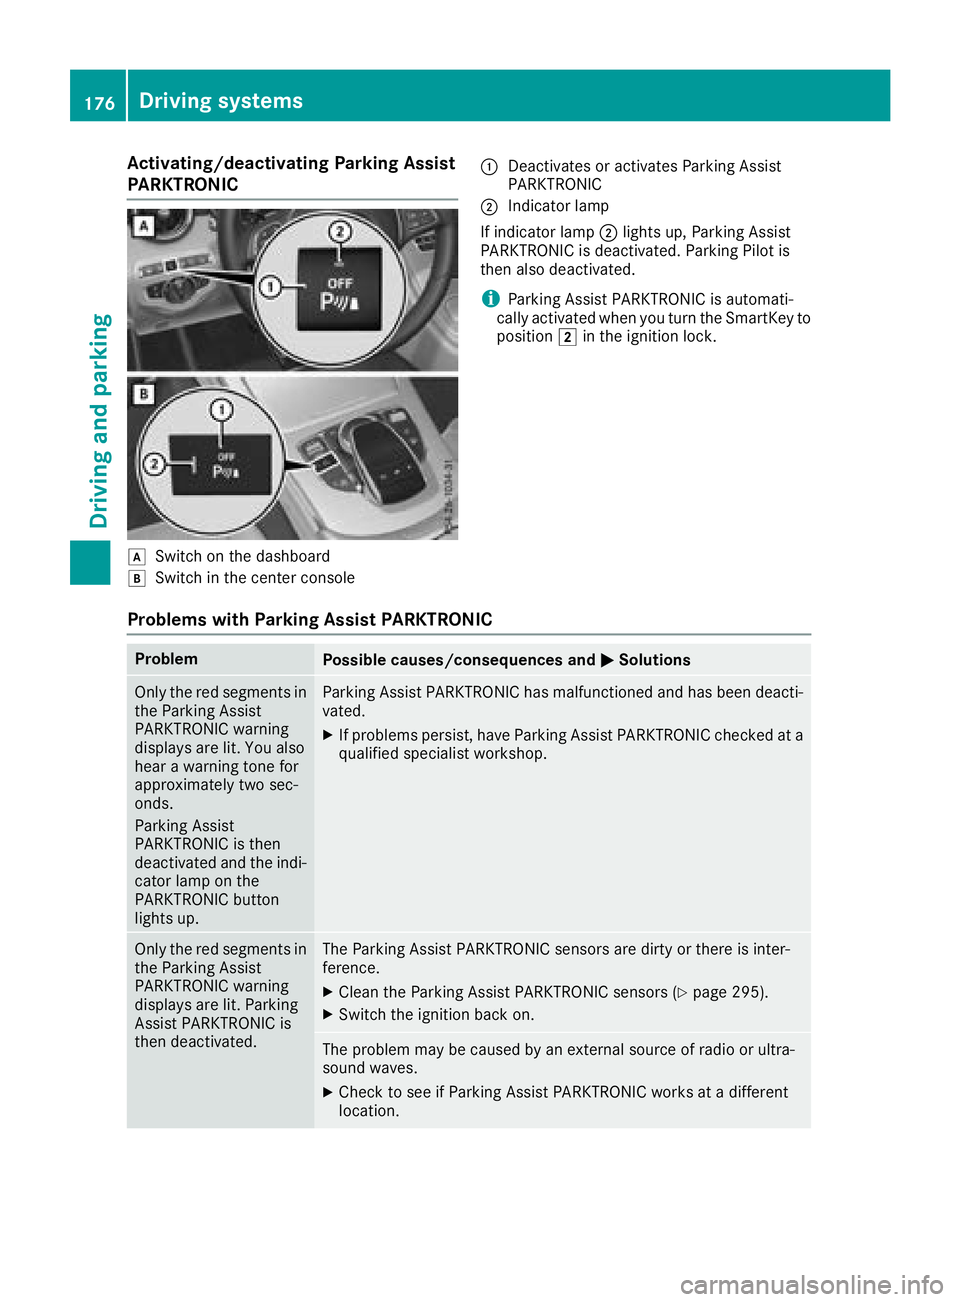
dSwitc hon th edashboar d
eSwitchin th ecenter console
:Deactivates or activates Parking Assis t
PARKTRONI C
;Indicatorlamp
If indicator lamp ;lights up, Parking Assis t
PARKTRONI Cis deactivated. Parking Pilo tis
then also deactivated.
iParking Assis tPARKTRONI Cis automati-
call yactivated when you tur nth eSmartKey to
position 2in th eignition lock.
Problems with Park ing Assist PARKTRONIC
ProblemPossible causes/consequences and MSolutions
Only thered segments in
th eParking Assis t
PARKTRONI Cwarning
displays are lit .You also
hear awarning tone for
approximately two sec -
onds.
Parking Assis t
PARKTRONI Cis then
deactivated and th eindi-
cator lamp on th e
PARKTRONI Cbutto n
lights up.Parking Assis tPARKTRONI Chas malfunctioned and has been deacti -
vated.
XIf problem spersist, hav eParking Assis tPARKTRONI Cchecke dat a
qualified specialis tworkshop .
Only thered segments in
th eParking Assis t
PARKTRONI Cwarning
displays are lit .Parking
Assis tPARKTRONI Cis
then deactivated.The Parking Assis tPARKTRONI Csensor sare dirty or there is inter-
ference .
XClean th eParking Assis tPARKTRONI Csensor s (Ypage 295).
XSwitchth eignition bac kon .
The problem may be caused by an external source of radi oor ultra-
soun dwaves.
XChec kto see if Parking Assis tPARKTRONI Cworks at adifferen t
location .
176Driving systems
Driving and parking
Page 228 of 354
Display messagesPossible causes/consequences andMSolutions
FrontPassengerAir‐bag Disabled SeeOperator' sManual
The front-passenger fron tair bag and front-passenger knee bag are
deactivated during th ejourney although:
Ran adult
or
Raperson of th ecorrespondin gstatur eis on th efront-passenger seat
If additional force sare applie dto th eseat ,th esystem may interpret
th eoccupant's weigh tas lower than it actually is.
GWARNIN G
The front-passenger air bag and front-passenger knee bag will no tbe
triggered in th eevent of an accident.
There is an increased ris kof injury.
XPull ove rand stop th evehicl esafely as soo nas possible, payin g
attention to roa dand traffic conditions.
XSecur eth evehicl eagainst rollin gaway (Ypage 147).
XSwitchth eignition off .
XHaveth eoccupant on th efront-passenger seat get out of th evehi-
cle .
XKee pth eseat unoccupied ,close th efront-passenger door and
switch on th eignition .
XObserveth ePASSENGER AI RBA Gindicator lamp sin th ecenter
console and th emultifunction display and chec kth efollowing:
Seat unoccupied and ignition switched on :
Raself-diagnosis is carrie dout .The PASSENGER AI RBA GOF Fand
PASSENGER AI RBA GON indicator lamp smus tligh tup simulta-
neousl yfor approximat ely s
ix seconds
Rth
ePASSENGER AI RBA GOF Findicator lamp mus tthen ligh tup
and remain lit after th eself-diagnosis .If th eindicator lamp is on ,
th eOCS (Occupant Classification System) has disabled th efront-
passenger fron tair bag and front-passenger knee bag
(
Ypage 52 )
Rthedisplay message sFront Passenger Airbag Enable dSee Operator'sManualor Front Passenger Airbag Dis ‐abled See Operator'sManualmus tno tappear in th emulti-
function display
XWait for aperiod of at least 60 seconds until th enecessar ysystem
checks hav ebeen completed.
XMak esur ethat th edisplay message sdo no tappear in th emulti-
function display.
If these condition sare fulfilled ,th efront-passenger seat can be occu-
pied again .Whether th ePASSENGER AI RBA GOF Findicator lamp
remain slit or goe sout depend son how OCS classifies th eoccupant .
If th econdition sare no tfulfilled ,th esystem is no toperating correctly.
XVisit aqualified specialist workshop immediately.
Fo rfurther information about th eOccupant Classification System, see
(
Ypage 52).
226Display messages
On-board computer and displays
Page 259 of 354
Operating system
Overview
General notes
Wearing polarized sunglasses may impair your
ability to read the display.
The display has an automatic temperature-con-
trolled switch-off feature. The brightness is
automatically reduced if the temperature is too
high. The display may temporarily switch off
completely.
Cleaning instructions
!Do not touch the display. The display has a
very sensitive high-gloss surface; there is a
risk of scratching. If you have to clean the
screen, however, use a mild cleaning agent
and a soft, lint-free cloth.
The display must be switched off and have
cooled down before you start cleaning. Do not
apply pressure to the display surface when
cleaning it, as this could cause irreversible dam-
age to the display.
Switching the multimedia system
on/off
XPress the Übutton on the center console
to the right of the controller.
XFor Mercedes-AMG vehicles with a switch- able AMG Performance exhaust system:
press the thumbwheel which is to the right of
the controller.
Adjusts the volume
XTurn the thumbwheel to the right of the con-
troller.
The volume is adjusted:
Rfor the currently selected media source
Rduring traffic or navigation announcements
Rin hands-free mode during a phone call
Switching the sound on or off
This function is only available on the multifunc-
tion steering wheel for Mercedes-AMG vehicles
with a selectable AMG Performance exhaust
system.
XPress the thumbwheel to the right of the con-
troller.
or
XPress the 8button on the multifunction
steering wheel.
If the audio output is switched off, the status
line will show the 8symbol. If you switch
the media source or change the volume, the
sound is automatically switched on.
iNavigation announcements will be heard
even if the sound is muted.
Functions
The multimedia system has the following func-
tions:
RRadio mode
RMedia mode with media search
RSound system
RNavigation system
COMAND: navigation via the hard drive
Audio 20: navigation via SD card
RCommunication functions
RSIRIUS Weather (COMAND)
RVehicle functions with system settings
RFavorites functions
Controller
The controller in the center console lets you:
Rselect menu items on the display
Renter characters
Rselect a destination on the map
Rsave entries
The controller can be:
Rturned 3
Rslid left or right 1
Rslid forwards or back 4
Rslid diagonally2
Rpressed briefly or pressed and held 7
Back button
You can use the%button to exit a menu or to
call up the display of the current operating
mode.
Operating system257
Multimedia system
Z
Page 269 of 354
Stowage compartments in the front
Glove box
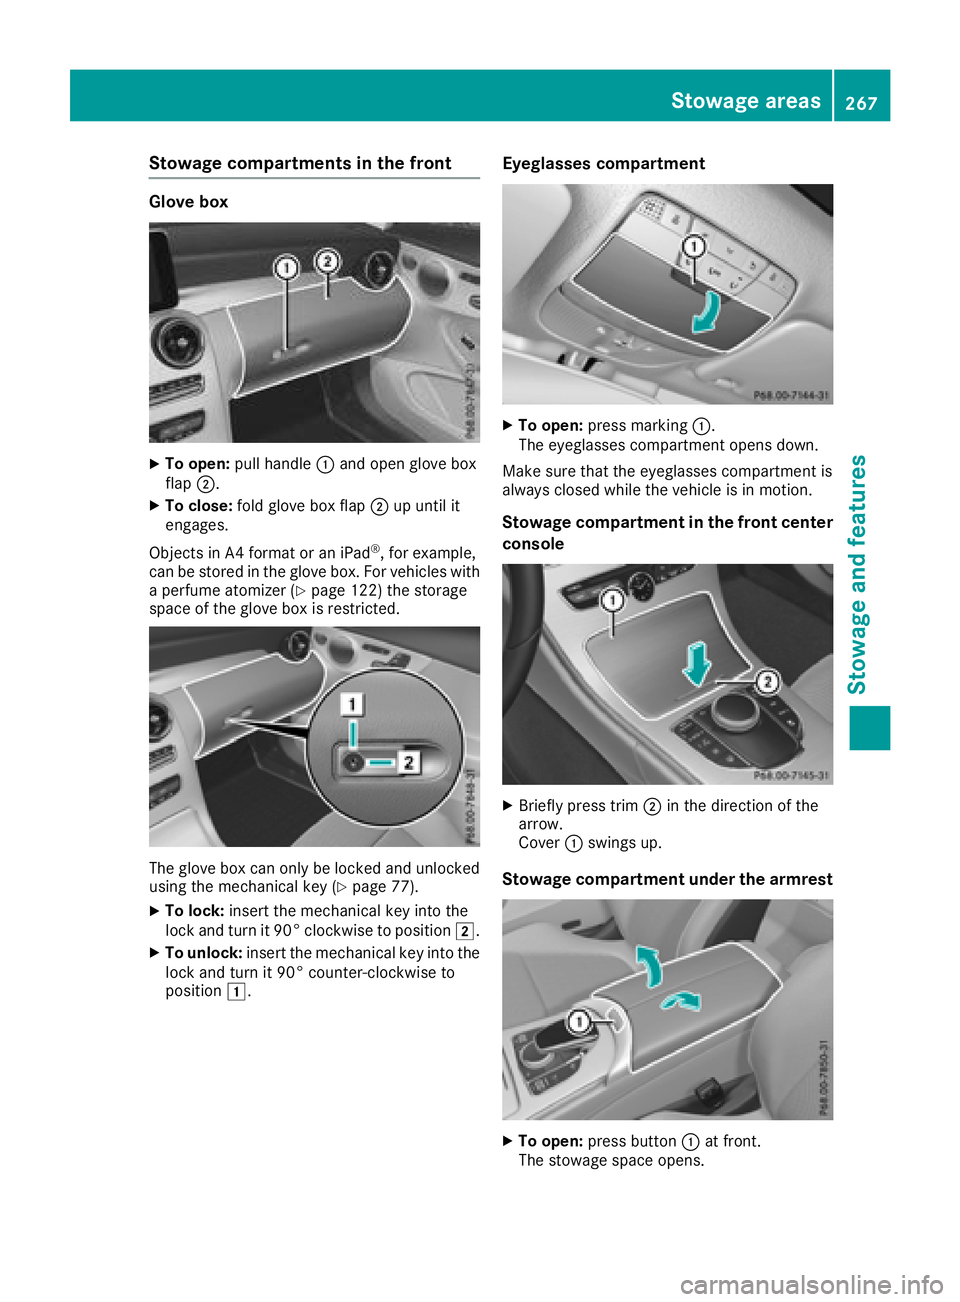
XTo open:pull handle :and open glove box
flap ;.
XTo close: fold glove box flap ;up until it
engages.
Objects in A4 format or an iPad
®, for example,
can be stored in the glove box. For vehicles with
a perfume atomizer (
Ypage 122) the storage
space of the glove box is restricted.
The glove box can only be locked and unlocked
using the mechanical key (Ypage 77).
XTo lock: insert the mechanical key into the
lock and turn it 90° clockwise to position 2.
XTo unlock:insert the mechanical key into the
lock and turn it 90° counter-clockwise to
position 1.
Eyeglasses compartment
XTo open: press marking :.
The eyeglasses compartment opens down.
Make sure that the eyeglasses compartment is
always closed while the vehicle is in motion.
Stowage compartment in the front center
console
XBriefly press trim ;in the direction of the
arrow.
Cover :swings up.
Stowage compartment under the armrest
XTo open: press button :at front.
The stowage space opens.
Stowage areas267
Stowage and features
Z
Page 270 of 354
Depending on the vehicle's equipment, the fol-
lowing may be in the stowage space:
Ran SD card slot
Ra multimedia connector unit with two USB
ports, e.g. for iPod®, iPhone®or MP3 player
(see the Digital Operator's Manual)
Ra mobile phone bracket
Ra small stowage space in the upper front sec-
tion
Stowage compartment in the doors
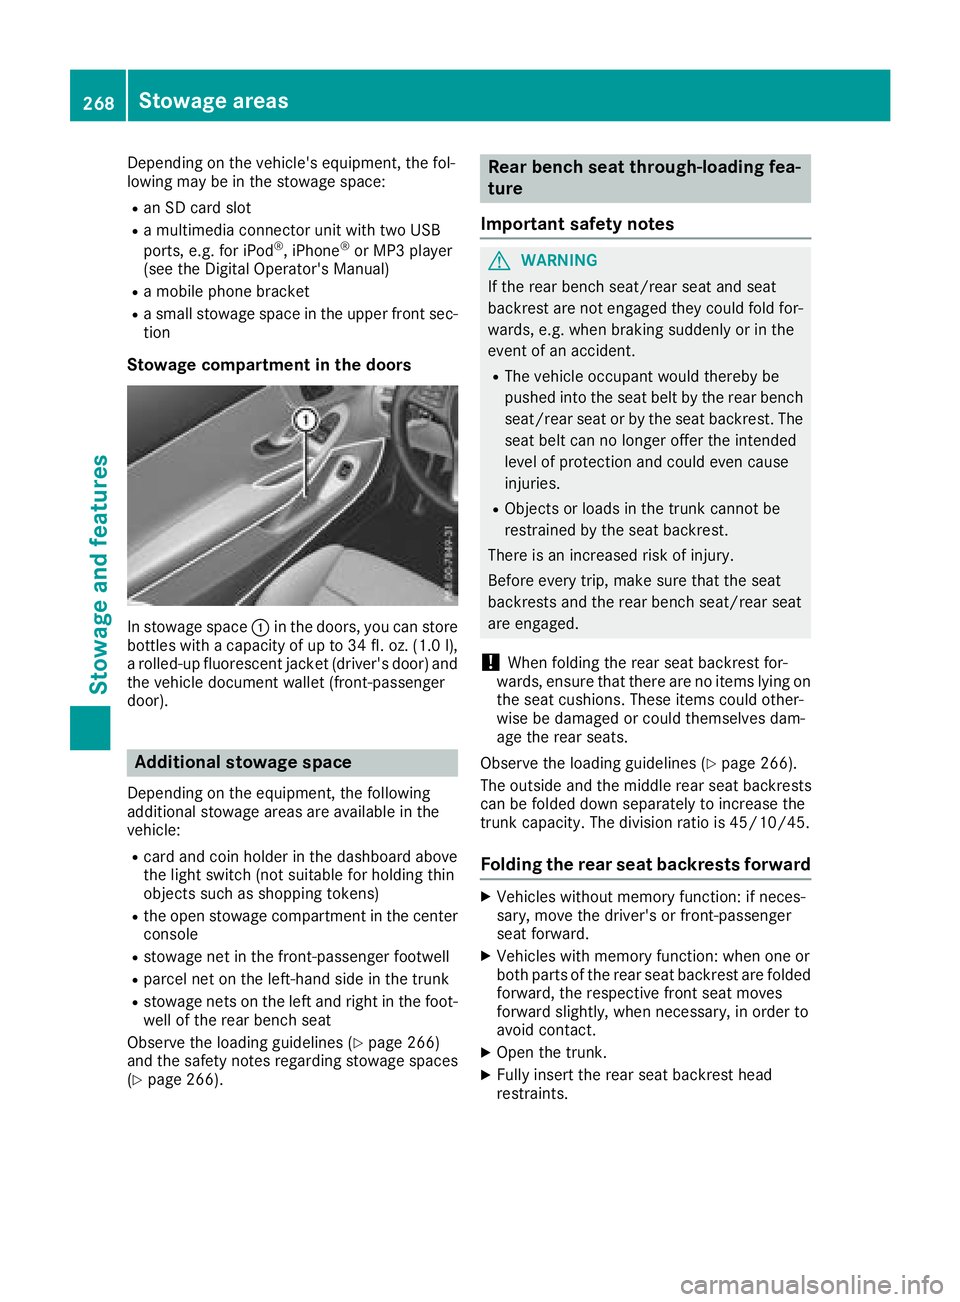
In stowage space :in the doors, you can store
bottles with a capacity of up to 34 fl. oz. (1.0 l),
a rolled-up fluorescent jacket (driver's door) and
the vehicle document wallet (front-passenger
door).
Additional stowage space
Depending on the equipment, the following
additional stowage areas are available in the
vehicle:
Rcard and coin holder in the dashboard above
the light switch (not suitable for holding thin
objects such as shopping tokens)
Rthe open stowage compartment in the center
console
Rstowage net in the front-passenger footwell
Rparcel net on the left-hand side in the trunk
Rstowage nets on the left and right in the foot- well of the rear bench seat
Observe the loading guidelines (
Ypage 266)
and the safety notes regarding stowage spaces
(
Ypage 266).
Rear bench seat through-loading fea-
ture
Important safety notes
GWARNING
If the rear bench seat/rear seat and seat
backrest are not engaged they could fold for-
wards, e.g. when braking suddenly or in the
event of an accident.
RThe vehicle occupant would thereby be
pushed into the seat belt by the rear bench
seat/rear seat or by the seat backrest. The
seat belt can no longer offer the intended
level of protection and could even cause
injuries.
RObjects or loads in the trunk cannot be
restrained by the seat backrest.
There is an increased risk of injury.
Before every trip, make sure that the seat
backrests and the rear bench seat/rear seat
are engaged.
!When folding the rear seat backrest for-
wards, ensure that there are no items lying on the seat cushions. These items could other-
wise be damaged or could themselves dam-
age the rear seats.
Observe the loading guidelines (
Ypage 266).
The outside and the middle rear seat backrests
can be folded down separately to increase the
trunk capacity. The division ratio is 45/10/45.
Folding the rear seat backrests forward
XVehicles without memory function: if neces-
sary, move the driver's or front-passenger
seat forward.
XVehicles with memory function: when one or
both parts of the rear seat backrest are folded
forward, the respective front seat moves
forward slightly, when necessary, in order to
avoid contact.
XOpen the trunk.
XFully insert the rear seat backrest head
restraints.
268Stowage areas
Stowage and features
Page 275 of 354
!Only use the cup holders for containers of
the right size and which have lids. The drinks
could otherwise spill.
!Do not expose drinks bottles in the cup
holder in the center console to continuous,
strong and direct sunlight. The passenger
compartment in the area of the center con-
sole can otherwise be damaged by the con-
centrated and reflected sunlight.
Observe the loading guidelines (
Ypage 266).
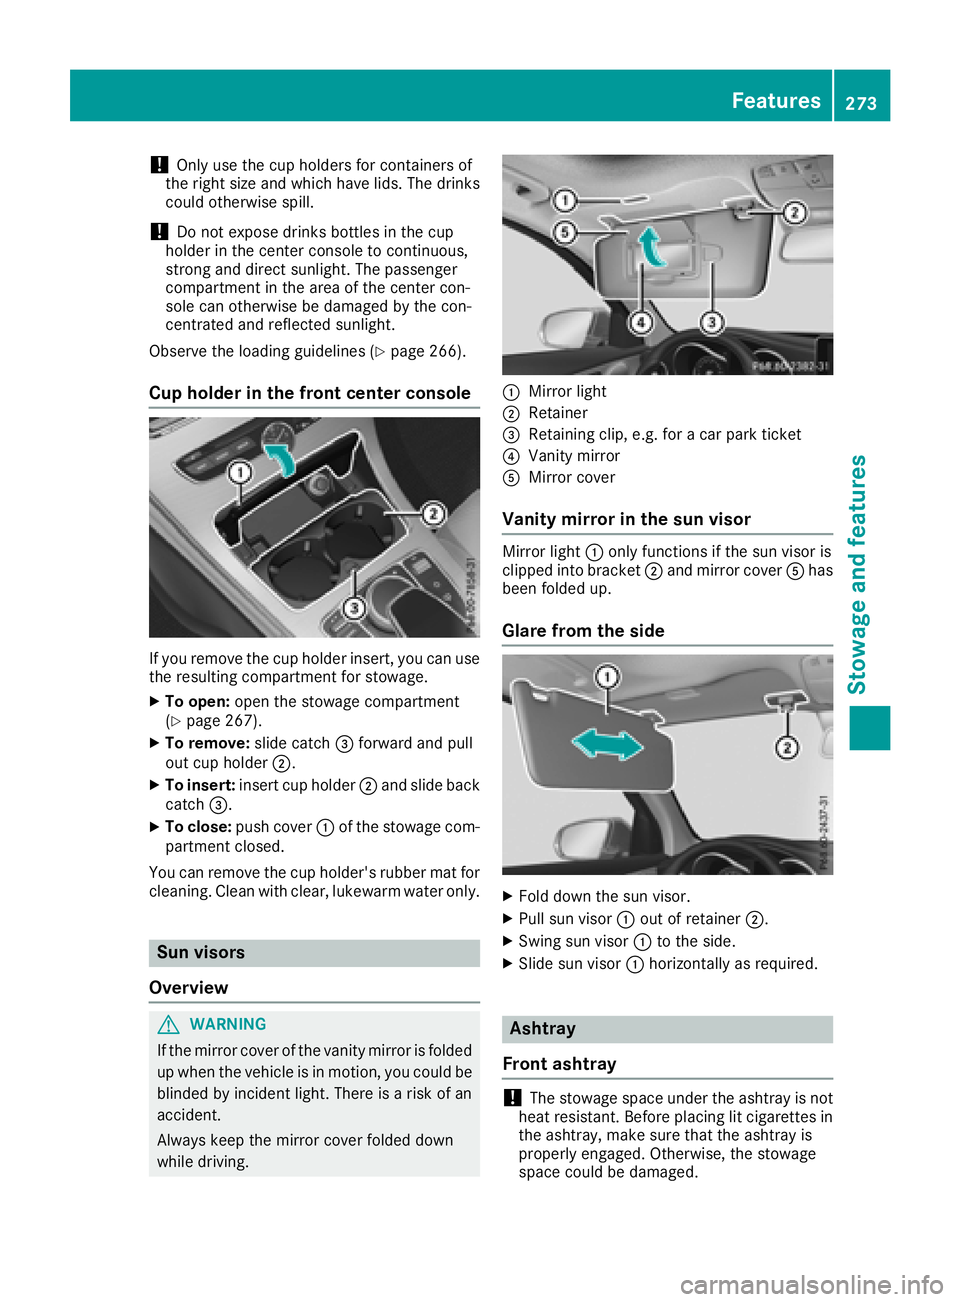
Cup holder in the front center console
If you remove the cup holder insert, you can use
the resulting compartment for stowage.
XTo open: open the stowage compartment
(Ypage 267).
XTo remove: slide catch=forward and pull
out cup holder ;.
XTo insert:insert cup holder ;and slide back
catch =.
XTo close: push cover :of the stowage com-
partment closed.
You can remove the cup holder's rubber mat for
cleaning. Clean with clear, lukewarm water only.
Sun visors
Overview
GWARNING
If the mirror cover of the vanity mirror is folded
up when the vehicle is in motion, you could be
blinded by incident light. There is a risk of an
accident.
Always keep the mirror cover folded down
while driving.
:Mirror light
;Retainer
=Retaining clip, e.g. for a car park ticket
?Vanity mirror
AMirror cover
Vanity mirror in the sun visor
Mirror light :only functions if the sun visor is
clipped into bracket ;and mirror cover Ahas
been folded up.
Glare from the side
XFold down the sun visor.
XPull sun visor :out of retainer ;.
XSwing sun visor :to the side.
XSlide sun visor :horizontally as required.
Ashtray
Front ashtray
!The stowage space under the ashtray is not
heat resistant. Before placing lit cigarettes in the ashtray, make sure that the ashtray is
properly engaged. Otherwise, the stowage
space could be damaged.
Features273
Stowage and features
Z
Page 277 of 354
The sockets can be used for accessories with a
maximum draw of 180 W (15 A). Accessories
include such items as chargers for mobile
phones.
If you use the sockets for long periods when the
engine is switched off, the battery may dis-
charge.
An emergency cut-out ensures that the on-
board voltage does not drop too low. If the on-
board voltage is too low, the power to the sock-
ets is automatically cut. This ensures that there
is sufficient power to start the engine.
If you have connected a device to the 12 V
socket, leave the cover of the stowage com-
partment open. This prevents the cover from
being blocked.
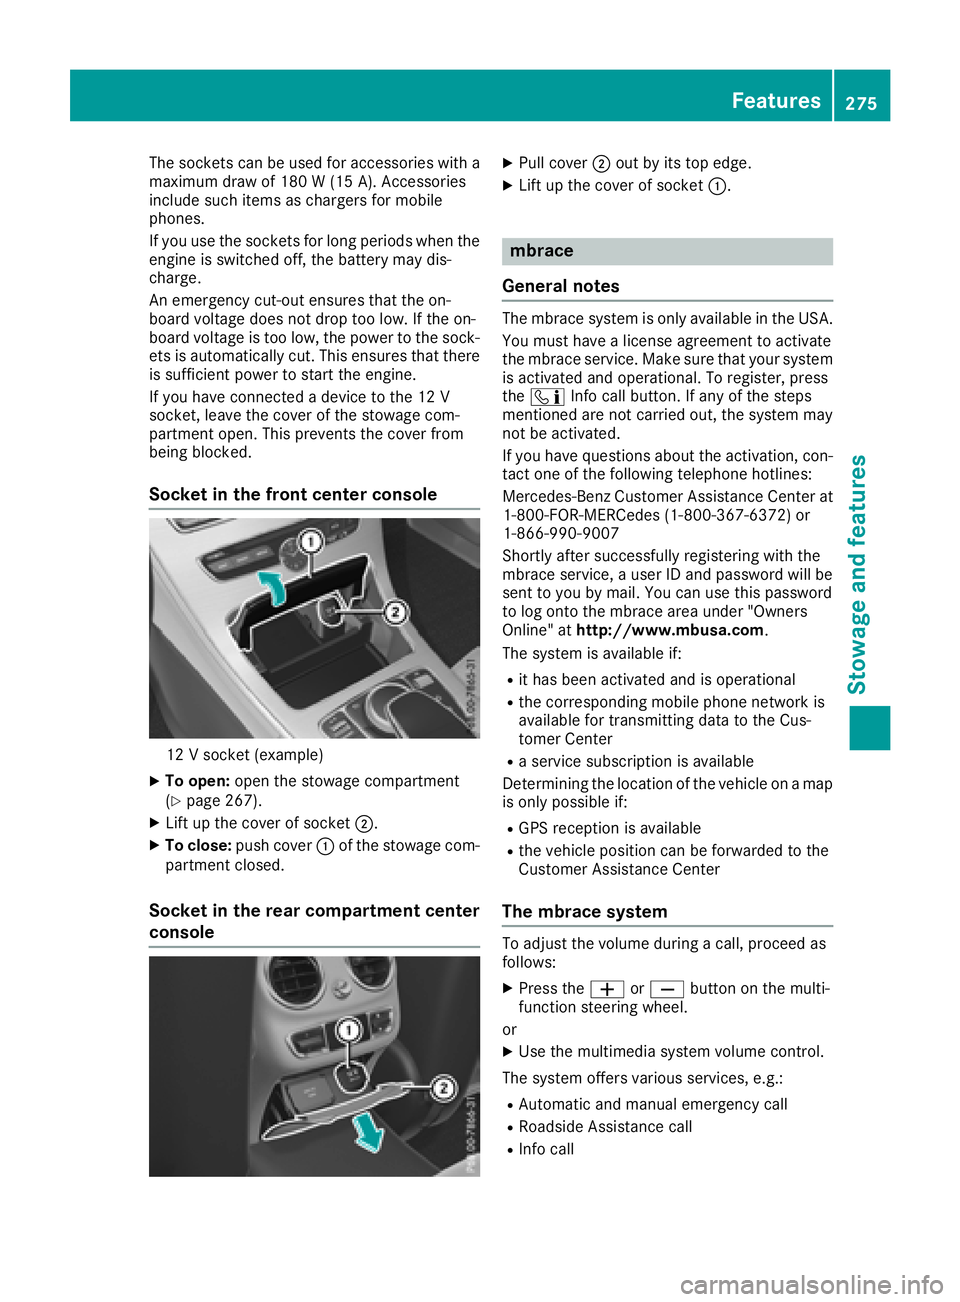
Socket in the front center console
12 V socket (example)
XTo open:open the stowage compartment
(Ypage 267).
XLift up the cover of socket ;.
XTo close:push cover :of the stowage com-
partment closed.
Socket in the rear compartment center
console
XPull cover ;out by its top edge.
XLift up the cover of socket :.
mbrace
General notes
The mbrace system is only available in the USA.
You must have a license agreement to activate
the mbrace service. Make sure that your system
is activated and operational. To register, press
the ï Info call button. If any of the steps
mentioned are not carried out, the system may
not be activated.
If you have questions about the activation, con-
tact one of the following telephone hotlines:
Mercedes-Benz Customer Assistance Center at 1-800-FOR-MERCedes (1-800-367-6372) or
1-866-990-9007
Shortly after successfully registering with the
mbrace service, a user ID and password will be
sent to you by mail. You can use this password
to log onto the mbrace area under "Owners
Online" at http://www.mbusa.com.
The system is available if:
Rit has been activated and is operational
Rthe corresponding mobile phone network is
available for transmitting data to the Cus-
tomer Center
Ra service subscription is available
Determining the location of the vehicle on a map
is only possible if:
RGPS reception is available
Rthe vehicle position can be forwarded to the
Customer Assistance Center
The mbrace system
To adjust the volume during a call, proceed as
follows:
XPress the WorX button on the multi-
function steering wheel.
or
XUse the multimedia system volume control.
The system offers various services, e.g.:
RAutomatic and manual emergency call
RRoadside Assistance call
RInfo call
Features275
Stowage and features
Z