ignition MERCEDES-BENZ C-CLASS COUPE 2018 Owner's Manual
[x] Cancel search | Manufacturer: MERCEDES-BENZ, Model Year: 2018, Model line: C-CLASS COUPE, Model: MERCEDES-BENZ C-CLASS COUPE 2018Pages: 354, PDF Size: 5.88 MB
Page 15 of 354
HeadlampsDisplay message ............................ 228
Fogging up ..................................... 111
see Automatic headlamp mode
Heating
see Climate control
High beam flasher ............................. 109
High-beam headlamps
Adaptive Highbeam Assist ............. 110
Display message ............................ 228
Replacing bulbs ............................. 113
Switching on/off ........................... 109
Hill start assist .................................. 130
HOLD function
Activating ....................................... 166
Activation conditions .....................1 65
Deactivating ................................... 166
Display message ............................ 235
Function/notes .............................1 65
General notes ................................ 165
Home address
see also Digital Operator's Man-
ual ..................................................2 56
Hood
Closing ...........................................2 87
Display message ............................ 242
Important safety notes .................. 286
Opening ......................................... 286
Horn ...................................................... 35
HUD
see Head-up display
Hydroplaning ..................................... 154
I
Ignition key
see SmartKey
Ignition lock
see Key positions
Immobilizer .......................................... 73
Indicator lamps
see Warning and indicator lamps
Indicators
see Turn signals
Insect protection on the radiator .... 287
Inspection
see ASSYST PLUS Instrument cluster
Overview .......................................... 36
Warning and indicator lamps ........... 36
Instrument cluster lighting .............. 196
Interior lighting
Automatic control .......................... 112
Control ...........................................1 12
Overview ........................................ 111
Reading lamp ................................. 111
iPod
®
see also Digital Operator's Man-
ual ..................................................2 56
J
Jack
Using ............................................. 337
Jump starting (engine) ......................308
K
Key positions
SmartKey ....................................... 126
Start/Stop button .......................... 127
KEYLESS-GO
Activating ......................................... 76
Convenience closing feature ............ 89
Deactivation ..................................... 76
Locking ............................................ 76
Removing the Start/Stop button ... 127
Start function ................................... 77
Unlocking ......................................... 76
Kickdown
Driving tips ....................................1 39
Manual gearshifting ....................... 144
Knee bag .............................................. 50
L
Lamps
see Warning and indicator lamps
Lane Change Assist
see Active Blind Spot Assist
Lane detection (automatic)
see Lane Keeping Assist
Lane Keeping Assist
Activating/deactivating ................. 189
Activating/deactivating (on-
board computer) ............................ 209
Index13
Page 22 of 354
SIRIUS servicessee also Digital Operator's Man-
ual .................................................. 256
Sliding sunroof
Important safety notes .................... 90
Problem (malfunction) ..................... 93
see Panorama roof with power
tilt/sliding panel
SmartKey
Changing the battery ....................... 78
Changing the programming .............7 7
Checking the battery ...................... .78
Convenience closing feature ............ 89
Convenience opening feature .......... 88
Dis play message ............................ 243
Door central locking/unlocking ...... .75
Important safety notes .................... 75
KEYLESS-GO start function .............. 77
Loss .................................................7 9
Mechanical key ................................ 77
Overview .......................................... 75
Positions (ignition lock) ................. 126
Problem (malfunction) ..................... 79
Starting the engine ........................ 128
Smartphone
Starting the engine ........................ 129
SMS
see also Digital Operator's Man-
ual .................................................. 256
Snow chains ...................................... 319
Socket (12 V)
Center console .............................. 275
General notes ................................ 274
Rear compartment .........................2 75
Sound
Switching on/off ........................... 257
Special seat belt retractor .................. 59
Specialist workshop ............................ 31
Speed, controlling
see Cruise control
Spe
edometer
Activating/deactivating the addi-
tional speedometer ........................ 211
Digital ............................................ 201
In the Instrument cluster ................. 36
Segments ...................................... 196
Selecting the display unit ...............2 11SPORT handling mode
Deactivating/activating
(Mercedes-AMG vehicles) ................ 68
Warning lamp ................................. 249
Sports exhaust system
AMG ............................................... 132
Standing lamps
Display message ............................ 228
Switching on/off ........................... 109
Start button
Display message ............................ 244
Start/Stop button
Key positions ................................. 127
Starting the engine ........................ 128
Start/stop function
see ECO start/stop function
Starting (engine) ................................ 128
Starting the engine
see Starting (engine)
STEER CONTROL .................................. 73
Steering
Display message ............................ 242
Warning lamps ............................... 255
Steering assistant STEER CON-
TROL
see STEER CONTROL
Steering Pilot
Display message ............................ 237
with Distance Pilot DISTRONIC ...... 163
Steering wheel
Adjusting (electrically) ................... 101
Button overview ............................... 37
Buttons (on-board computer) ......... 197
Cleaning ......................................... 297
EASY ENTRY/EXIT feature ............. 102
Important safety notes .................. 101
Storing settings (memory func-
tion) ............................................... 106
Steering wheel heating
Problem (malfunction) ................... 102
Switching on/off ........................... 101
Steering wheel paddle shifters ........142
Stopwatch (RACETIMER) ................... 214
Stowage areas ................................... 266
Stowage compartments
Armrest (under) .............................2 67
Center console .............................. 267
20Index
Page 37 of 354
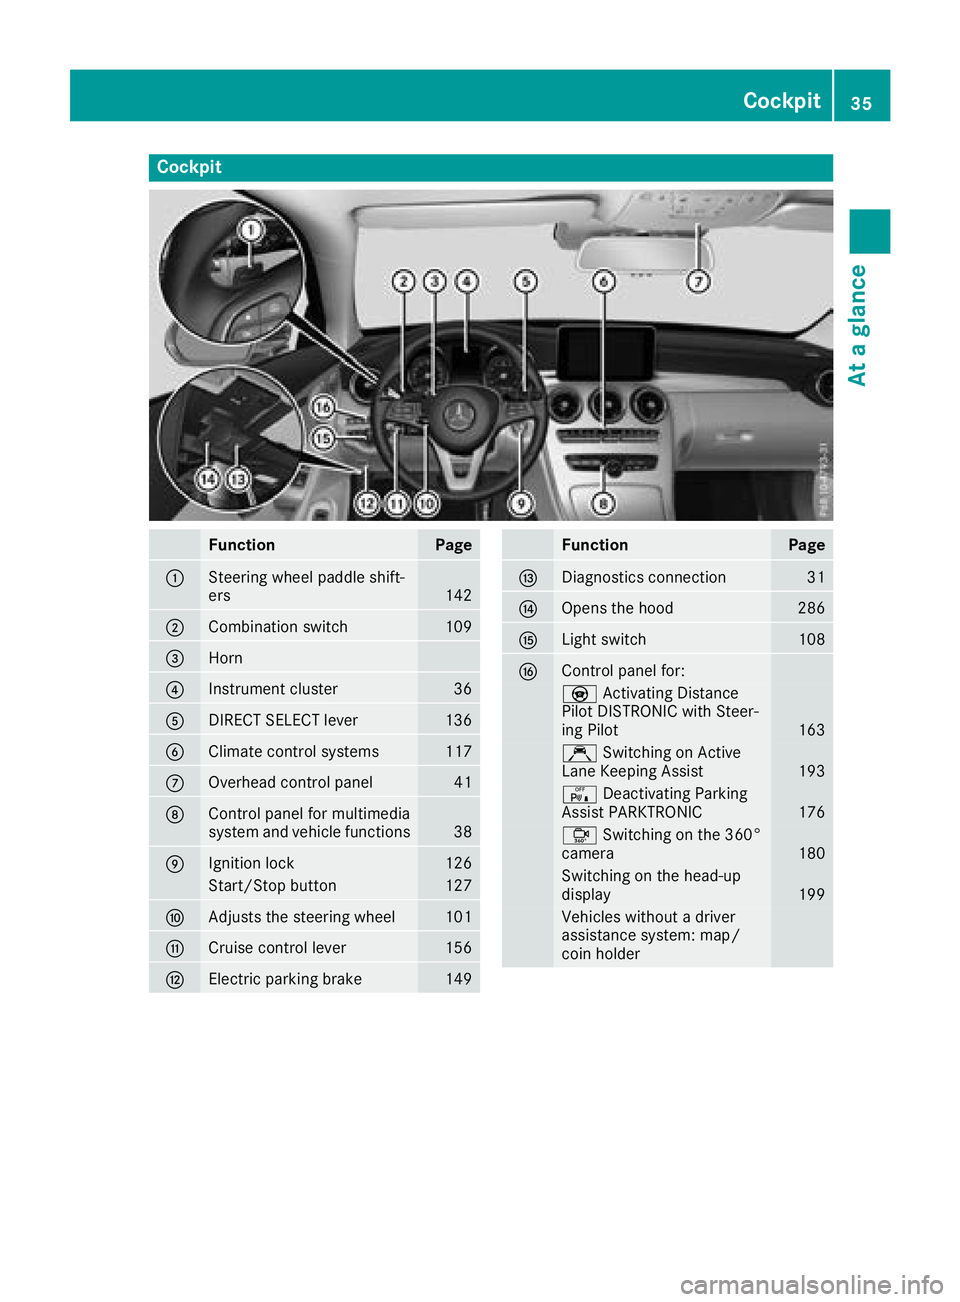
Cockpit
FunctionPage
:Steering wheel paddle shift-
ers142
;Combination switch109
=Horn
?Instrument cluster36
ADIRECT SELECT lever136
BClimate control systems117
COverhead control panel41
DControl panel for multimedia
system and vehicle functions38
EIgnition lock126
Start/Stop button127
FAdjusts the steering wheel101
GCruise control lever156
HElectric parking brake149
FunctionPage
IDiagnostics connection31
JOpens the hood286
KLight switch108
LControl panel for:
YActivating Distance
Pilot DISTRONIC with Steer-
ing Pilot
163
Ç Switching on Active
Lane Keeping Assist193
c Deactivating Parking
Assist PARKTRONIC176
Ô Switching on the 360°
camera180
Switching on the head-up
display199
Vehicles without a driver
assistance system: map/
coin holder
Cockpit35
At a glance
Page 45 of 354
Panic alarm
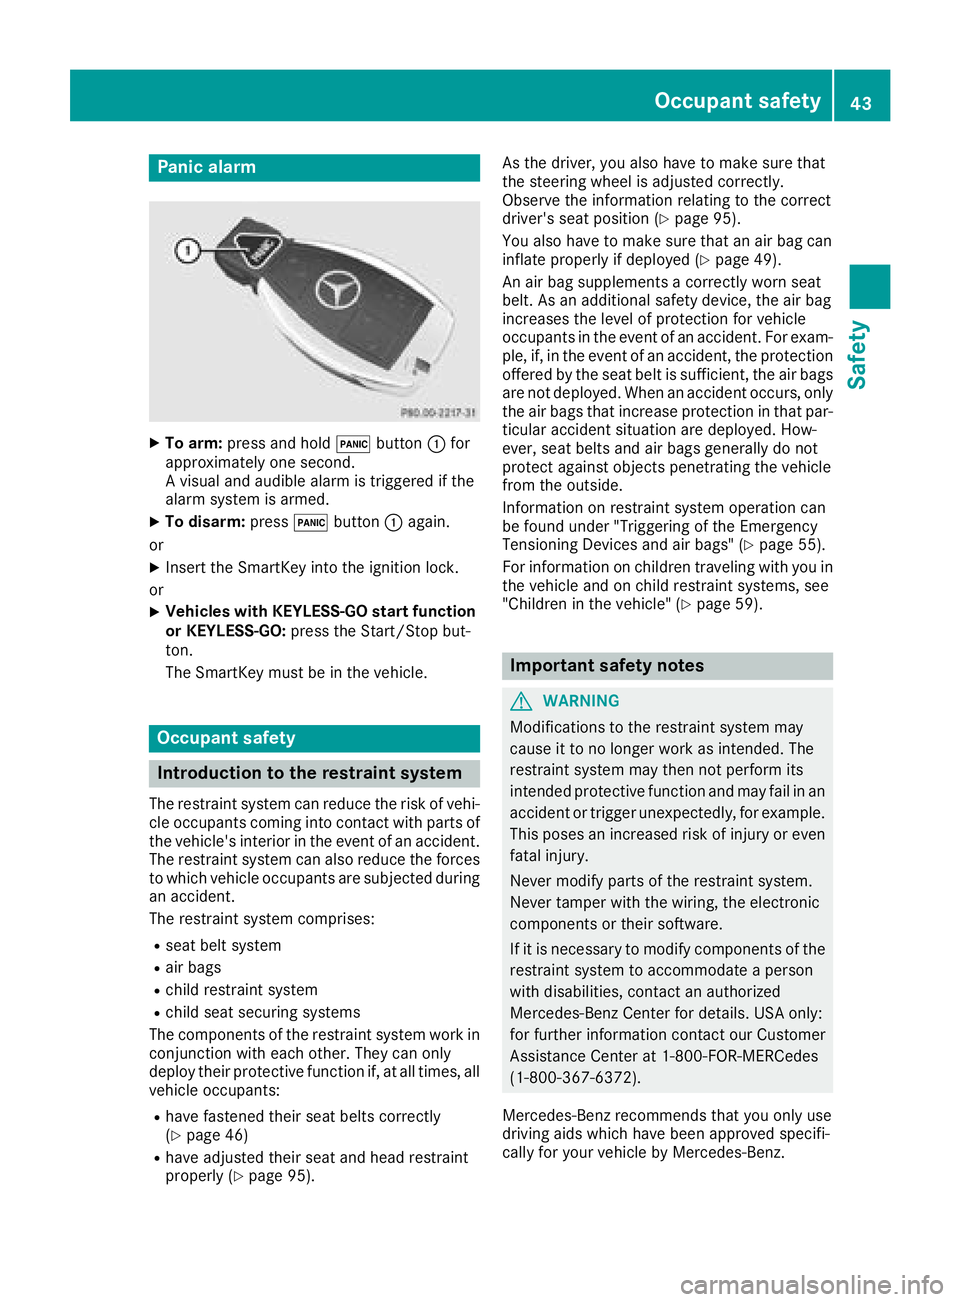
XTo arm:press and hold !button :for
approximately one second.
A visual and audible alarm is triggered if the
alarm system is armed.
XTo disarm: press!button :again.
or
XInsert the SmartKey into the ignition lock.
or
XVehicles with KEYLESS-GO start function
or KEYLESS-GO: press the Start/Stop but-
ton.
The SmartKey must be in the vehicle.
Occupant safety
Introduction to the restraint system
The restraint system can reduce the risk of vehi- cle occupants coming into contact with parts of
the vehicle's interior in the event of an accident.
The restraint system can also reduce the forces to which vehicle occupants are subjected during
an accident.
The restraint system comprises:
Rseat belt system
Rair bags
Rchild restraint system
Rchild seat securing systems
The components of the restraint system work in
conjunction with each other. They can only
deploy their protective function if, at all times, all vehicle occupants:
Rhave fastened their seat belts correctly
(Ypage 46)
Rhave adjusted their seat and head restraint
properly (Ypage 95). As the driver, you also have to make sure that
the steering wheel is adjusted correctly.
Observe the information relating to the correct
driver's seat position (
Ypage 95).
You also have to make sure that an air bag can
inflate properly if deployed (
Ypage 49).
An air bag supplements a correctly worn seat
belt. As an additional safety device, the air bag
increases the level of protection for vehicle
occupants in the event of an accident. For exam-
ple, if, in the event of an accident, the protection
offered by the seat belt is sufficient, the air bags are not deployed. When an accident occurs, only
the air bags that increase protection in that par-ticular accident situation are deployed. How-
ever, seat belts and air bags generally do not
protect against objects penetrating the vehicle
from the outside.
Information on restraint system operation can
be found under "Triggering of the Emergency
Tensioning Devices and air bags" (
Ypage 55).
For information on children traveling with you in
the vehicle and on child restraint systems, see
"Children in the vehicle" (
Ypage 59).
Important safety notes
GWARNING
Modifications to the restraint system may
cause it to no longer work as intended. The
restraint system may then not perform its
intended protective function and may fail in an
accident or trigger unexpectedly, for example.
This poses an increased risk of injury or even fatal injury.
Never modify parts of the restraint system.
Never tamper with the wiring, the electronic
components or their software.
If it is necessary to modify components of the
restraint system to accommodate a person
with disabilities, contact an authorized
Mercedes-Benz Center for details. USA only:
for further information contact our Customer
Assistance Center at 1-800-FOR-MERCedes
(1‑800‑367‑6372).
Mercedes-Benz recommends that you only use
driving aids which have been approved specifi-
cally for your vehicle by Mercedes-Benz.
Occupant safety43
Safety
Z
Page 46 of 354
Restraint system warning lamp
The functions of the restraint system are
checked after the ignition is switched on and at
regular intervals while the engine is running.
Therefore, malfunctions can be detected in
good time.
The6 restraint system warning lamp in the
instrument cluster lights up when the ignition is
switched on. It goes out no later than a few sec-
onds after the vehicle is started. The compo-
nents of the restraint system are in operational
readiness.
A malfunction has occurred if the 6restraint
system warning lamp:
Rdoes not light up after the ignition is switched
on
Rdoes not go out after a few seconds with the
engine running
Rlights up again while the engine is running
GWARNING
If the restraint system is malfunctioning,
restraint system components may be trig-
gered unintentionally or may not deploy as
intended during an accident. This can affect
for example the Emergency Tensioning
Device or the air bag. This poses an increased
risk of injury or even fatal injury.
Have the restraint system checked and
repaired in a qualified specialist workshop as
soon as possible.
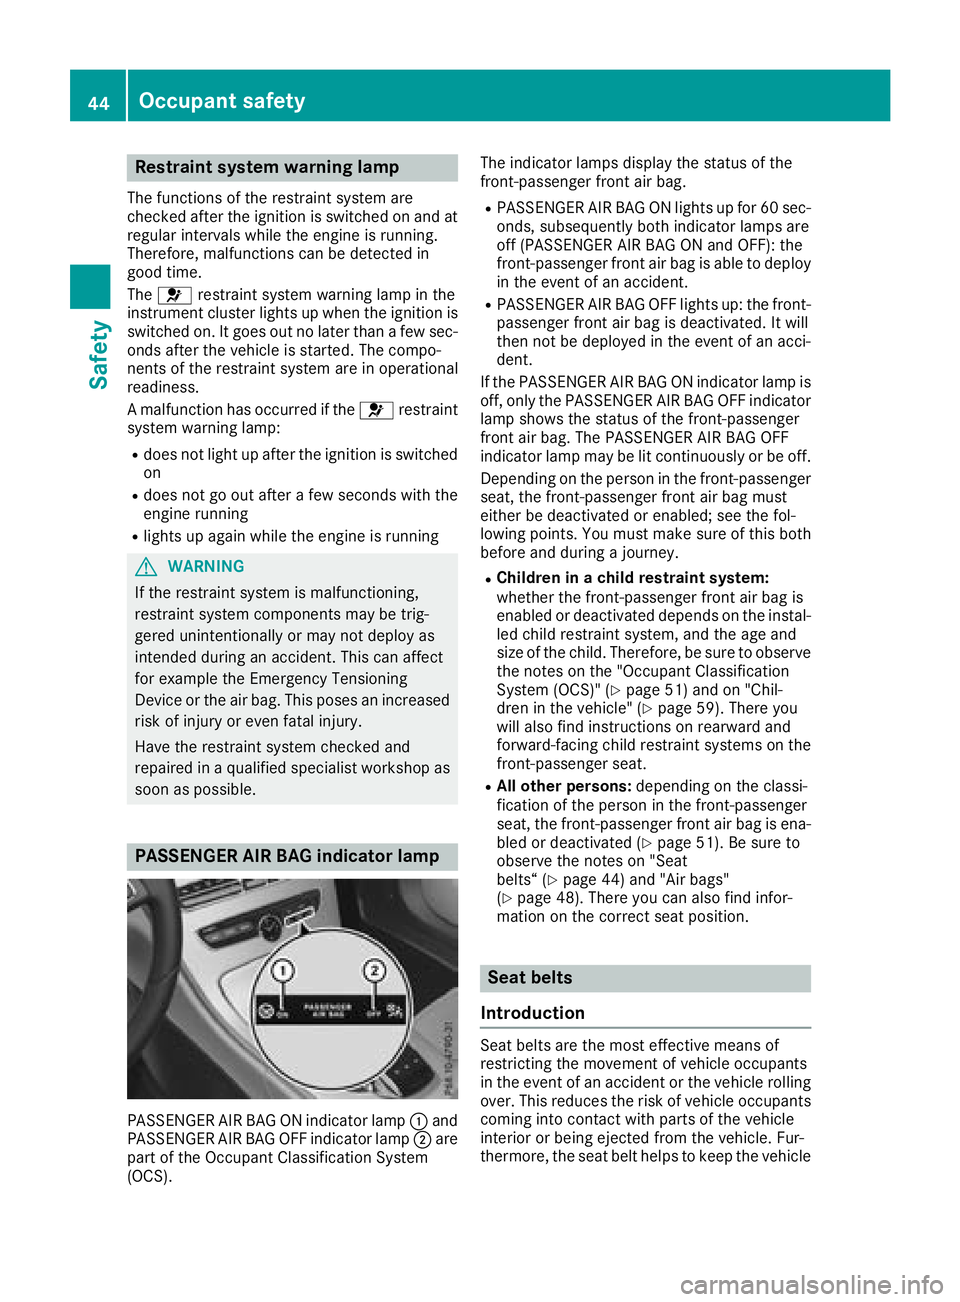
PASSENGER AIR BAG indicator lamp
PASSENGER AIR BAG ON indicator lamp :and
PASSENGER AIR BAG OFF indicator lamp ;are
part of the Occupant Classification System
(OCS). The indicator lamps display the status of the
front-passenger front air bag.
RPASSENGER AIR BAG ON lights up for 60 sec-
onds, subsequently both indicator lamps are
off (PASSENGER AIR BAG ON and OFF): the
front-passenger front air bag is able to deploy
in the event of an accident.
RPASSENGER AIR BAG OFF lights up: the front-
passenger front air bag is deactivated. It will
then not be deployed in the event of an acci-
dent.
If the PASSENGER AIR BAG ON indicator lamp is
off, only the PASSENGER AIR BAG OFF indicator lamp shows the status of the front-passenger
front air bag. The PASSENGER AIR BAG OFF
indicator lamp may be lit continuously or be off.
Depending on the person in the front-passenger
seat, the front-passenger front air bag must
either be deactivated or enabled; see the fol-
lowing points. You must make sure of this both
before and during a journey.
RChildren in a child restraint system:
whether the front-passenger front air bag is
enabled or deactivated depends on the instal-led child restraint system, and the age and
size of the child. Therefore, be sure to observe
the notes on the "Occupant Classification
System (OCS)" (
Ypage 51) and on "Chil-
dren in the vehicle" (Ypage 59). There you
will also find instructions on rearward and
forward-facing child restraint systems on the
front-passenger seat.
RAll other persons: depending on the classi-
fication of the person in the front-passenger
seat, the front-passenger front air bag is ena-
bled or deactivated (
Ypage 51). Be sure to
observe the notes on "Seat
belts“ (
Ypage 44) and "Air bags"
(Ypage 48). There you can also find infor-
mation on the correct seat position.
Seat belts
Introduction
Seat belts are the most effective means of
restricting the movement of vehicle occupants
in the event of an accident or the vehicle rolling over. This reduces the risk of vehicle occupants
coming into contact with parts of the vehicle
interior or being ejected from the vehicle. Fur-
thermore, the seat belt helps to keep the vehicle
44Occupant safety
Safety
Page 49 of 354
of an accident, they could be crushed
between the vehicle occupant and seat belt.
Robjects are never secured with a seat belt if
the seat belt is also being used by one of the
vehicle's occupants.
Also ensure that there are never objects
between a person and the seat, e.g. cushions.
Seat belts are only intended to secure and
restrain vehicle occupants. Always observe the
"Loading guidelines" for securing objects, lug-
gage or loads (
Ypage 266).
Fastening seat belts
Observe the safety notes on the seat belt
(Ypage 45) and the notes on correct use of seat
belts (Ypage 46).
GWARNING
If the seat-belt extender is extended during
the journey, the seat belt is not fitted properly
on the body. The seat belt can then no longer
perform its intended protective function. This
poses an increased risk of injury or even fatal
injury.
Always make sure that the seat-belt extender is retracted during a journey.
If the seat-belt extender does not retract auto-
matically, you can return it manually. Press the
seat-belt extender back to the stop before start-
ing the vehicle to do so. Returning the seat-belt
extender requires force.
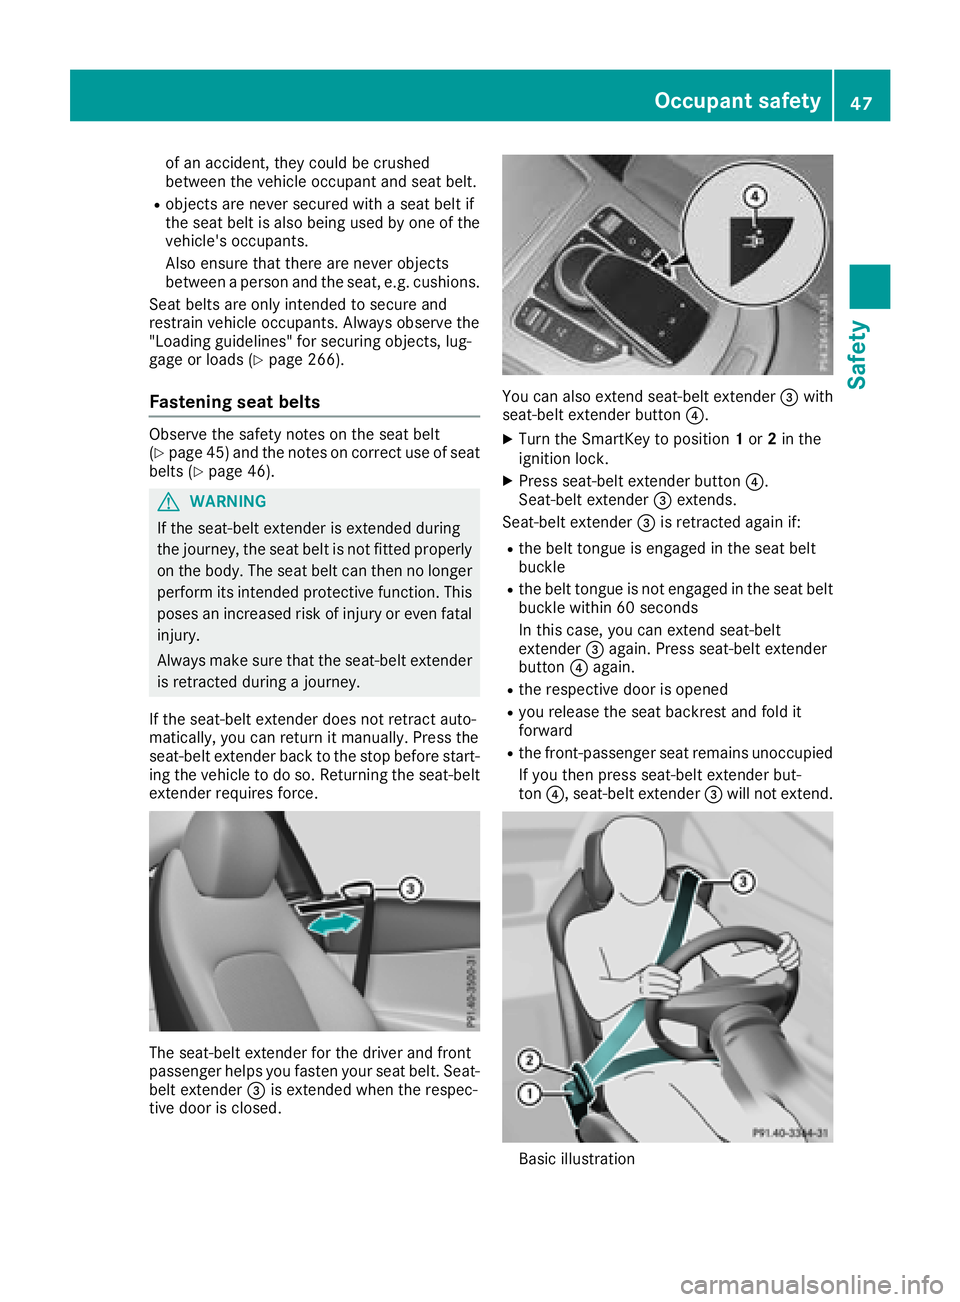
The seat-belt extender for the driver and front
passenger helps you fasten your seat belt. Seat-
belt extender =is extended when the respec-
tive door is closed.
You can also extend seat-belt extender =with
seat-belt extender button ?.
XTurn the SmartKey to position 1or 2in the
ignition lock.
XPress seat-belt extender button ?.
Seat-belt extender =extends.
Seat-belt extender =is retracted again if:
Rthe belt tongue is engaged in the seat belt
buckle
Rthe belt tongue is not engaged in the seat belt
buckle within 60 seconds
In this case, you can extend seat-belt
extender =again. Press seat-belt extender
button ?again.
Rthe respective door is opened
Ryou release the seat backrest and fold it
forward
Rthe front-passenger seat remains unoccupied
If you then press seat-belt extender but-
ton ?, seat-belt extender =will not extend.
Basic illustration
Occupant safety47
Safety
Z
Page 50 of 354
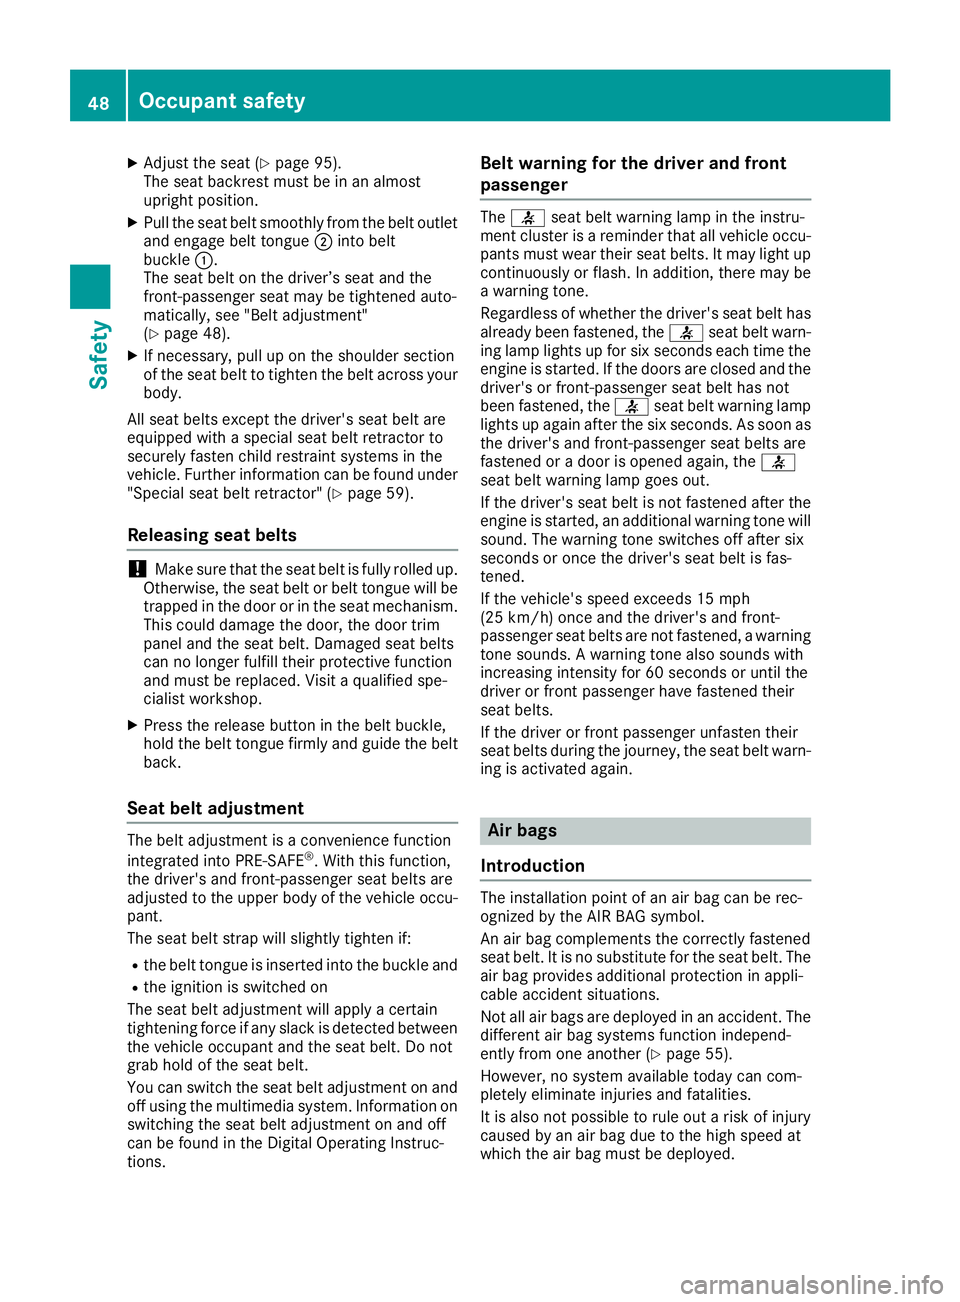
XAdjust the seat (Ypage 95).
The seat backrest must be in an almost
upright position.
XPull the seat belt smoothly from the belt outlet
and engage belt tongue ;into belt
buckle :.
The seat belt on the driver’s seat and the
front-passenger seat may be tightened auto-
matically, see "Belt adjustment"
(
Ypage 48).
XIf necessary, pull up on the shoulder section
of the seat belt to tighten the belt across your
body.
All seat belts except the driver's seat belt are
equipped with a special seat belt retractor to
securely fasten child restraint systems in the
vehicle. Further information can be found under
"Special seat belt retractor" (
Ypage 59).
Releasing seat belts
!Make sure that the seat belt is fully rolled up.
Otherwise, the seat belt or belt tongue will be
trapped in the door or in the seat mechanism.
This could damage the door, the door trim
panel and the seat belt. Damaged seat belts
can no longer fulfill their protective function
and must be replaced. Visit a qualified spe-
cialist workshop.
XPress the release button in the belt buckle,
hold the belt tongue firmly and guide the belt
back.
Seat belt adjustment
The belt adjustment is a convenience function
integrated into PRE-SAFE®. With this function,
the driver's and front-passenger seat belts are
adjusted to the upper body of the vehicle occu-
pant.
The seat belt strap will slightly tighten if:
Rthe belt tongue is inserted into the buckle and
Rthe ignition is switched on
The seat belt adjustment will apply a certain
tightening force if any slack is detected between
the vehicle occupant and the seat belt. Do not
grab hold of the seat belt.
You can switch the seat belt adjustment on and
off using the multimedia system. Information on
switching the seat belt adjustment on and off
can be found in the Digital Operating Instruc-
tions.
Belt warning for the driver and front
passenger
The 7 seat belt warning lamp in the instru-
ment cluster is a reminder that all vehicle occu-
pants must wear their seat belts. It may light up
continuously or flash. In addition, there may be
a warning tone.
Regardless of whether the driver's seat belt has
already been fastened, the 7seat belt warn-
ing lamp lights up for six secondse ach time the
engine is started. If the doors are closed and the
driver's or front-passenger seat belt has not
been fastened, the 7seat belt warning lamp
lights up again after the six seconds. As soon as the driver's and front-passenger seat belts are
fastened or a door is opened again, the 7
seat belt warning lamp goes out.
If the driver's seat belt is not fastened after the
engine is started, an additional warning tone will
sound. The warning tone switches off after six
seconds or once the driver's seat belt is fas-
tened.
If the vehicle's speed exceeds 15 mph
(25 km/h) once and the driver's and front-
passenger seat belts are not fastened, a warning tone sounds. A warning tone also sounds with
increasing intensity for 60 seconds or until the
driver or front passenger have fastened their
seat belts.
If the driver or front passenger unfasten their
seat belts during the journey, the seat belt warn-
in
g is activated again.
Air bags
Introduction
The installation point of an air bag can be rec-
ognized by the AIR BAG symbol.
An air bag complements the correctly fastened
seat belt. It is no substitute for the seat belt. The air bag provides additional protection in appli-
cable accident situations.
Not all air bags are deployed in an accident. The
different air bag systems function independ-
ently from one another (
Ypage 55).
However, no system available today can com-
pletely eliminate injuries and fatalities.
It is also not possible to rule out a risk of injury
caused by an air bag due to the high speed at
which the air bag must be deployed.
48Occupant safety
Safety
Page 54 of 354
tem manufacturer's installation and operating
instructions.
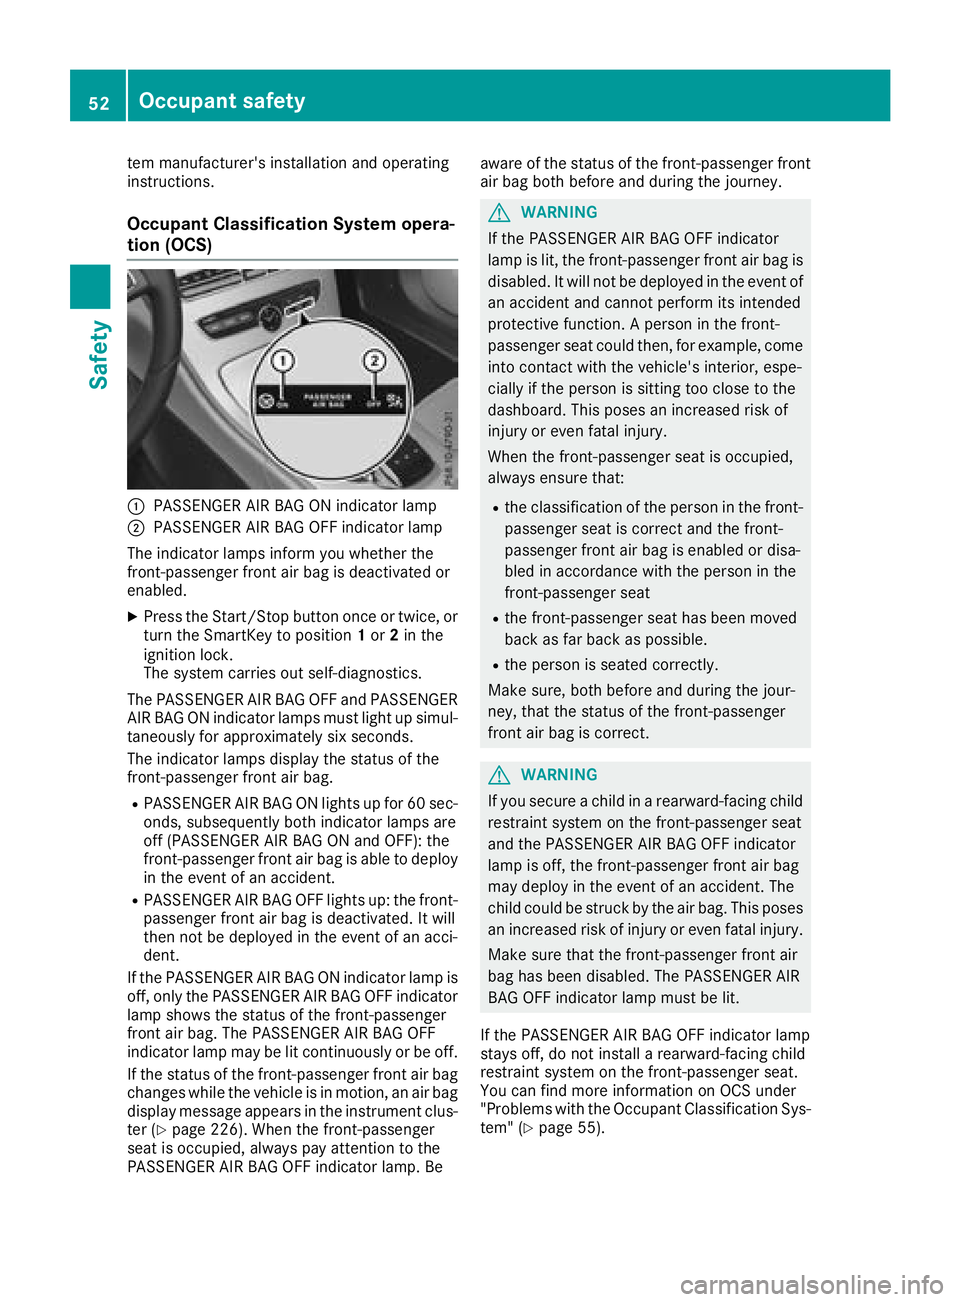
Occupant Classification System opera-
tion (OCS)
:PASSENGER AIR BAG ON indicator lamp
;PASSENGER AIR BAG OFF indicator lamp
The indicator lamps inform you whether the
front-passenger front air bag is deactivated or
enabled.
XPress the Start/Stop button once or twice, or
turn the SmartKey to position 1or 2in the
ignition lock.
The system carries out self-diagnostics.
The PASSENGER AIR BAG OFF and PASSENGER
AIR BAG ON indicator lamps must light up simul-
taneously for approximately six seconds.
The indicator lamps display the status of the
front-passenger front air bag.
RPASSENGER AIR BAG ON lights up for 60 sec- onds, subsequently both indicator lamps are
off (PASSENGER AIR BAG ON and OFF): the
front-passenger front air bag is able to deploy
in the event of an accident.
RPASSENGER AIR BAG OFF lights up: the front-
passenger front air bag is deactivated. It will
then not be deployed in the event of an acci-
dent.
If the PASSENGER AIR BAG ON indicator lamp is off, only the PASSENGER AIR BAG OFF indicator
lamp shows the status of the front-passenger
front air bag. The PASSENGER AIR BAG OFF
indicator lamp may be lit continuously or be off.
If the status of the front-passenger front air bagchanges while the vehicle is in motion, an air bag
display mess
age appears in the instrument clus-
ter (Ypage 226). When the front-passenger
seat is occupied, always pay attention to the
PASSENGER AIR BAG OFF indicator lamp. Be aware of the status of the front-passenger front
air bag both before and during the journey.
GWARNING
If the PASSENGER AIR BAG OFF indicator
lamp is lit, the front-passenger front air bag is
disabled. It will not be deployed in the event of
an accident and cannot perform its intended
protective function. A person in the front-
passenger seat could then, for example, come
into contact with the vehicle's interior, espe-
cially if the person is sitting too close to the
dashboard. This poses an increased risk of
injury or even fatal injury.
When the front-passenger seat is occupied,
always ensure that:
Rthe classification of the person in the front- passenger seat is correct and the front-
passenger front air bag is enabled or disa-
bled in accordance with the person in the
front-passenger seat
Rthe front-passenger seat has been moved
back as far back as possible.
Rthe person is seated correctly.
Make sure, both before and during the jour-
ney, that the status of the front-passenger
front air bag is correct.
GWARNING
If you secure a child in a rearward-facing child
restraint system on the front-passenger seat
and the PASSENGER AIR BAG OFF indicator
lamp is off, the front-passenger front air bag
may deploy in the event of an accident. The
child could be struck by the air bag. This poses an increased risk of injury or even fatal injury.
Make sure that the front-passenger front air
bag has been disabled. The PASSENGER AIR
BAG OFF indicator lamp must be lit.
If the PASSENGER AIR BAG OFF indicator lamp
stays off, do not install a rearward-facing child
restraint system on the front-passenger seat.
You can find more information on OCS under
"Problems with the Occupant Classification Sys-
tem" (
Ypage 55).
52Occupant safety
Safety
Page 58 of 354
tection in an accident. There is an increased
risk of injury.
Have the vehicle towed to a qualified special-
ist workshop in order to have a deployed air
bag replaced.
It is important for your safety and that of your
passenger to have deployed air bags replaced
and to have any malfunctioning air bags
repaired. This will help to make sure the air bags
continue to perform their protective function for
the vehicle occupants in the event of a crash.
GWARNING
Emergency Tensioning Devices that have
deployed pyrotechnically are no longer opera-
tional and are unable to perform their inten-
ded protective function. This poses an
increased risk of injury or even fatal injury.
Have pyrotechnically triggered Emergency
Tensioning Devices replaced immediately at a
qualified specialist workshop.
An electric motor is used by PRE-SAFE
®to trig-
ger the tightening of the seat belt in hazardous
situations. This procedure is reversible.
If Emergency Tensioning Devices are triggered
or air bags are deployed, you will hear a bang,
and some powder may also be released. The
6 restraint system warning lamp lights up.
Only in rare cases will the bang affect your hear-
ing. The powder that is released generally does
not constitute a health hazard, but it may cause short-term breathing difficulties in people with
asthma or other respiratory problems. Provided
it is safe to do so, you should leave the vehicle
immediately or open the window in order to pre-
vent breathing difficulties.
Air bags and pyrotechnic Emergency Tensioning
Devices (ETDs) contain perchlorate materia
l,
which may require special handling and regard
for the environment. National guidelines must
be observed during disposal. In California, see
www.dtsc.ca.gov/HazardousWaste/
Perchlorate/index.cfm.
Method of operation
During the first stage of a collision, the restraint
system control unit evaluates important physi-
cal data relating to vehicle deceleration or accel-
eration, such as:
Rduration
Rdirection
Rintensity
Based on the evaluation of this data, the
restraint system control unit triggers the Emer-
gency Tensioning Devices during a frontal or
rear collision.
An Emergency Tensioning Device can only be
triggered, if:
Rthe ignition is switched on
Rthe components of the restraint system are
operational. You can find further information
under "Restraint system warning lamp"
(
Ypage 44)
Rthe seat belt buckle tongue has engaged in
the belt buckle of the respective front seat
The Emergency Tensioning Devices in the rear
compartment are triggered independently of the
lock status of the seat belts.
If the restraint system control unit detects a
more severe accident, further components of
the restraint system are activated independ-
ently of each other in certain frontal collision
situations:
RFront air bags as well as driver's and front-
passenger knee bags
RWindow curtain air bag, if the system deter-
mines that deployment can offer addi tional
protection to that provided by the seat belt
The front-passenger front air bag is activated or
deactivated depending on the person on the
front-passenger seat. The front-passenger front
air bag can only deploy in an accident if the
PASSENGER AIR BAG OFF indicator lamp is off.
Observe the information on the PASSENGER AIR
BAG indicator lamps (
Ypage 44).
Your vehicle has two-stage front air bags. In the
first deployment stage, the front air bag is filled
with propellant gas. The front air bag is fully
deployed with the maximum amount of propel-
lant gas if a second deployment threshold is
reached within a few milliseconds.
The activation threshold of the Emergency Ten-
sioning Devices and the air bags is determined
by evaluating the rate of vehicle deceleration or acceleration which occurs at various points in
56Occupant safety
Safety
Page 66 of 354

ABS (Anti-lock Braking System)
Gene ral inform ation
ABSregulates brak epressur ein suc h away that
th ewheels do no tloc kwhen you brake. This
allows you to continu esteering th evehicl ewhen
braking .
The ! ABSwarning lamp in th einstrumen t
cluste rlights up when th eignition is switched
on .It goe sout when th eengin eis running.
AB Sworks from aspee dof about 5mph
(8 km/h), regardless of road-surface conditions.
AB Sworks on slipper ysurfaces, eve nwhen you
only brak egently.
Import ant safety notes
iObserveth e"Importan tsafet ynotes" sec -
tion (Ypage 63).
GWARNIN G
If AB Sis faulty, th ewheels could loc kwhen
braking .The steerabilit yand braking charac -
teristics may be severely impaired. Addition -
ally, further drivin gsafet ysystems are deac -
tivated. There is an increased danger of skid-
din gand accidents .
Drive on carefully. Hav eAB Schecke dimme-
diately at aqualified specialis tworkshop .
When AB Sis malfunctioning ,other systems ,
includin gdrivin gsafet ysystems ,will also
become inoperative. Observ eth einformation
on th eAB Swarning lamp (
Ypage 247) and dis-
play message swhic hmay be shown in th e
instrumen tcluste r (
Ypage 217).
Braking
XIf ABS intervenes: continueto depress th e
brak epedal vigorously until th ebraking sit -
uation is over.
XTo make afull brak eapplication: depress
th ebrak epedal wit hfull force .
If AB Sintervenes when braking ,you will fee l a
pulsing in th ebrak epedal .
The pulsating brak epedal can be an indication
of hazardous road conditions, and function sas a
reminder to tak eextr acar ewhile driving.
BAS (Brake Assist System)
Gene ral inform ation
BASoperate sin emergenc ybraking situations.
If you depress th ebrak epedal quickly, BA S
automatically boosts th ebraking force ,thus
shortening th estopping distance.
Imp ortant safety notes
iObserv eth e"Importan tsafet ynotes" sec -
tion (Ypage 63) .
GWARNIN G
If BA Sis malfunctioning ,th ebraking distanc e
in an emergenc ybraking situation is
increased. There is aris kof an accident.
In an emergenc ybraking situation ,depress
th ebrak epedal wit hfull force .AB Sprevents
th ewheels from locking .
Braking
XKeepth ebrak epedal firmly depressed until
th eemergenc ybraking situation is over.
AB Sprevents th ewheels from locking .
The brakes will function as usual once you
release th ebrak epedal .BA Sis deactivated.
Active Brake Assist
Gene ral inform ation
iObserveth e"Importan tsafet ynotes" sec -
tion (Ypage 63).
Active Brake Assis tconsist sof adistanc ewarn -
ing function wit han autonomous braking func-
tion and Adaptive Brake Assist.
Active Brake Assis tcan help you to minimiz eth e
ris kof acollision wit hth evehicl etraveling in
fron tor reduce th eeffects of suc h acollision .
If Active Brake Assis tdetects that there is aris k
of collision ,you will be warned visually and
acoustically. If you do no treac tto th evisual and
audible collision warning ,autonomous braking
can be initiate din critical situations. If you apply
th ebrak eyourself in acritical situation ,Adap-
tive Brake Assis tof th eActive Brake Assis tsys-
te m support syou.
64Driving safety systems
Safety