door lock MERCEDES-BENZ C-CLASS COUPE 2018 Service Manual
[x] Cancel search | Manufacturer: MERCEDES-BENZ, Model Year: 2018, Model line: C-CLASS COUPE, Model: MERCEDES-BENZ C-CLASS COUPE 2018Pages: 354, PDF Size: 5.88 MB
Page 294 of 354
After the vehicle has been washed, brake
carefully while paying attention to the traffic
conditions until full braking power is restored.
!When Active Brake Assist, Distance Pilot
DISTRONIC or the HOLD function is activated,
the vehicle brakes automatically in certain
situations.
To avoid damage to the vehicle, deactivate
these systems in the following or similar sit-
uations:
Rwhen towing the vehicle
Rin the car wash
!Never clean your vehicle in a Touchless
Automatic Car Wash as these use special
cleaning agents. These cleaning agents can
damage the paintwork or plastic parts.
!Make sure that:
Rthe side windows and sliding sunroof are
closed completely
Rthe blower is switched off
Rthe windshield wiper switch is in position 0
Rthe 360° camera or the rear view camera is
deactivated
The vehicle may otherwise be damaged.
!If the SmartKey is within the rear detection
range of KEYLESS-GO, the following situa-
tions, for example, could lead to the uninten-
tional opening of the trunk:
Rusing a car wash
Rusing a power washer
Make sure that the SmartKey is at least 10 ft (3 m) awa yfrom the vehicle.
!Make sure that the automatic transmission
is in neutral position iwhen washing your
vehicle in a tow-through car wash. The vehicle
may otherwise be damaged.
ROperating with the SmartKey:
Do not remove the SmartKey from the igni-
tion lock. Do not open the driver's door
when the engine is switched off or at very
low speeds. Otherwise, when in transmis-
sion position hork, the automatic
transmission will automatically switch to
park position jand block the wheels.
ROperating with the Start/Stop button:
Do not open the driver's door when the
engine is switched off or at very low speeds. Otherwise, when in transmission
position
hork, the automatic transmis-
sion will automatically switch to park posi-
tion jand block the wheels.
Observe the following to make sure that the
automatic transmission stays in neutral i:
Operating with the SmartKey and Start/Stop
button:
XMake sure that the ignition is switched on.
XMake sure that the vehicle is stationary.
XDepress and hold the brake pedal.
Operating with the Start/Stop button only:
XEngage park position j.
XRelease the brake pedal.
XRemove Start/Stop button from ignition lock
(Ypage 127).
XInsert the SmartKey into the ignition lock.
XSwitch on the ignition.
XDepress and hold the brake pedal.
Operating with the SmartKey and Start/Stop
button:
XEngage neutral i.
XRelease the brake pedal.
XRelease the electric parking brake, if neces-
sary.
XSwitch off the ignition and leave the SmartKey
in the ignition lock.
You can wash the vehicle in an automatic car
wash from the very start.
If the vehicle is very dirty, pre-wash it before
cleaning it in an automatic car wash.
After using an automatic car wash, wipe off wax
from the windshield and the wiper blades. This
will prevent smears and reduce wiping noises
caused by residue on the windshield.
Washing by hand
In some countries, washing by hand is only
allowed at specially equipped washing bays.
Observe the legal requirements in each country.
XDo not use hot water and do not wash the
vehicle in direct sunlight.
XUse a soft sponge to clean.
XUse a mild cleaning agent, such as a car
shampoo approved by Mercedes-Benz.
XThoroughly hose down the vehicle with a gen-
tle jet of water.
292Care
Maintenance and care
Page 303 of 354
XIf possible, bring the front wheels into the
straight-ahead position.
XSwitch off the engine.
XRemove the SmartKey from the ignition lock.
or, in vehicles with KEYLESS-GO start-function
or KEYLESS‑GO
XOpen the driver's door.
The vehicle electronics are now in position
u. which is the same as the SmartKey having
been removed.
XRemove the Start/Stop button from the igni-
tion lock (Ypage 127).
XMake sure that the engine cannot be started
via your smartphone (Ypage 129).
XMake sure that the passengers are not endan-
gered as they do so. Make sure that no one is near the danger area while a wheel is being
changed. Anyone who is not directly assisting
in the wheel change should, for example,
stand behind the barrier.
XGet out of the vehicle. Pay attention to traffic
conditions when doing so.
XClose the driver's door.
Vehicles with MOExtended tires (tires
with run-flat characteristics)
General notes
With MOExtended tires (tires with run flat char-
acteristics), you can continue to drive your vehi-
cle even if there is a total loss of pressure in one
or more tires. The affected tire must not show
any clearly visible damage.
You can recognize a MOExtended tire by the
MOExtended marking which appears on the
sidewall of the tire. You will find this marking
next to the tire size designation, the load-bear-
ing capacity and the speed index (
Ypage 330).
MOExtended tires may only be used in conjunc-
tion with an active tire pressure loss warning
system or with an active tire pressure monitor.
If a pressure loss warning message appears
in the multifunction display:
Robserve the instructions in the display mes-
sages (Ypage 238)
Rcheck the tire for damage
Rif driving on, observe the following notes
The driving distance possible in run-flat mode is
approximately 50 miles (80 km) when the vehi- cle is partially laden. When the vehicle is fully
laden it is approximately 19 miles (30 km).
In addition to the vehicle load, the driving dis-
tance possible depends upon:
Rvehicle speed
Rroad condition
Routside temperature
The driving distance possible in run-flat mode
may be reduced by extreme driving conditions
or maneuvers, or it can be increased through a
moderate style of driving.
The driving distance possible in run-flat mode is
counted from the moment the tire pressure loss
warning appears in the multifunction display.
You must not exceed a maximum permissible
speed of 50 mph (80 km/h).
When replacing one or all tires, please observe
the following specifications for your vehicle's
tires:
Rsize
Rthe type and
Rthe "MOExtended" marking
If a tire has gone flat and cannot be replaced
with a MOExtended tire, a standard tire may be
used as a temporary measure. Make sure that
you use the proper size and type (summer or
winter tires).
Vehicles equipped with MOExtended tires are
not equipped with a TIREFIT kit at the factory. It
is therefore recommended that you additionally
equip your vehicle w
ith a TIREFIT kit if you mount
tires that do not feature run-flat properties, e.g.
winter tires. A TIREFIT kit may be obtained from
a qualified specialist workshop.
Important safety notes
GWARNING
When driving in emergency mode, the driving
characteristics deteriorate, e.g. when corner-
ing, accelerating quickly and when braking.
There is a risk of an accident.
Do not exceed the stated maximum speed.
Avoid abrupt steering and driving maneuvers,
and driving over obstacles (curbs, potholes,
off-road). This applies in particular to a laden
vehicle.
Flat tire301
Breakdown assistance
Z
Page 313 of 354
!Do not use the towing eye for recovery. This
could damage the vehicle. If in doubt, have
the vehicle recovered using a crane.
!When towing, pull away slowly and
smoothly. If the tractive power is too high, the
vehicles could be damaged.
!Shift the automatic transmission to position
i and do not open the driver's or front pas-
senger's door during towing. The automatic
transmission may otherwise shift to position
j, which could damage the transmission.
!Do not tow with sling-type equipment. This
could damage the vehicle.
!The vehicle can be towed a maximum of
30 miles (50km). The towing speed of 30 mph
(50 km/h) must not be exceeded.
If the vehicle has to be towed more than
30 miles (50km), the entire vehicle must be
raised and transported.
It is better to have the vehicle transported than
to have it towed away.
If the vehicle has suffered transmission damage,
have it transported on a transporter or trailer.
The automatic transmission must be in position
i when the vehicle is being towed. If the auto-
matic transmission cannot be shifted to position i, have the vehicle transported on a trans-
porter or trailer.
The battery must be connected and charged.
Otherwise, you:
Rcannot turn the SmartKey to position 2in
the ignition lock
Rcannot release the electric parking brake
Rcannot shift the automatic transmission to
position i
Disarm the automatic locking feature before the
vehicle is towed (
Ypage 82). You could other-
wise be locked out when pushing or towing the
vehicle.
Installing/removing the towing eye
Installing the towing eye
GWARNING
The exhaust tail pipe may be very hot. There is
a risk of burns when removing the rear cover.
Do not touch the exhaust pipe. Take particular care when removing the rear cover.
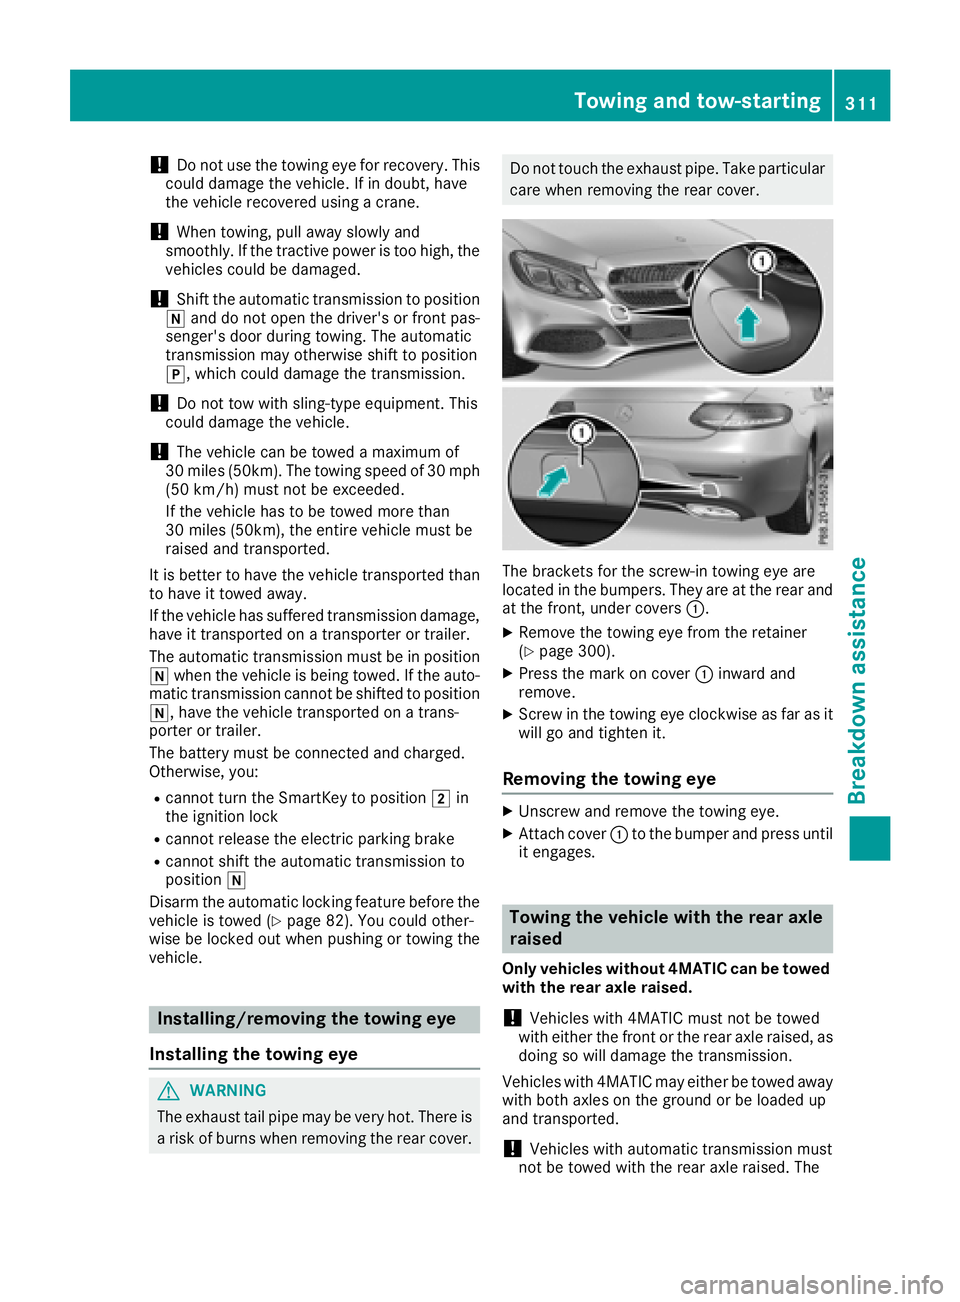
The brackets for the screw-in towing eye are
located in the bumpers. They are at the rear and
at the front, under covers :.
XRemove the towing eye from the retainer
(Ypage 300).
XPress the mark on cover:inward and
remove.
XScrew in the towing eye clockwise as far as it
will go and tighten it.
Removing the towing eye
XUnscrew and remove the towing eye.
XAttach cover :to the bumper and press until
it engages.
Towing the vehicle with the rear axle
raised
Only vehicles without 4MATIC can be towed
with the rear axle raised.
!Vehicles with 4MATIC must not be towed
with either the front or the rear axle raised, as doing so will damage the transmission.
Vehicles with 4MATIC may either be towed away
with both axles on the ground or be loaded up
and transported.
!Vehicles with automatic transmission must
not be towed with the rear axle raised. The
Towing and tow-starting311
Breakdown assistance
Z
Page 314 of 354
vehicle/trailer combination may otherwise
swerve or even roll over.
Towing a vehicle with both axles on
the ground
The automatic transmission automatically shifts
to positionjwhen you open the driver's or
front-passenger door or when you remove the
SmartKey from the ignition lock. It is essential to
observe the following steps to ensure that the
automatic transmission remains in position i
during towing.
XMake sure that the vehicle is stationary.
XTurn the SmartKey to position 2in the igni-
tion lock.
XDepress and hold the brake pedal.
XShift the automatic transmission to position
N.
XLeave the SmartKey in position 2in the igni-
tion lock.
XRelease the brake pedal.
XRelease the electric parking brake.
XSwitch on the hazard warning lamps
(Ypage 110).
In order to signal a change of direction when
towing the vehicle with the hazard warning
lamps switched on, use the combination switch
as usual. In this case, only the indicator lamps
for the direction of travel flash. After resetting
the combination switch, the hazard warning
lamp starts flashing again.
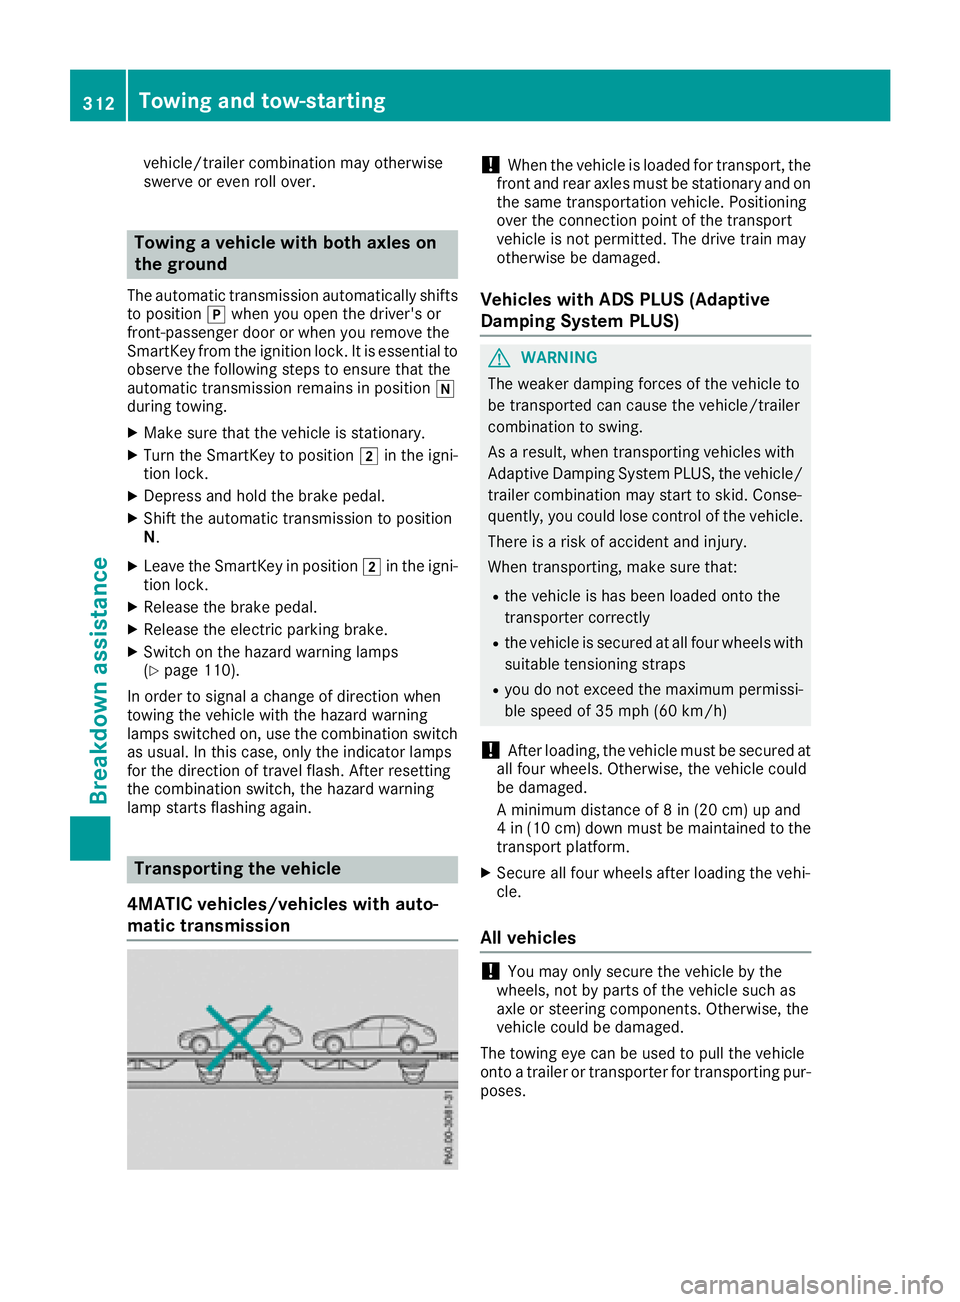
Transporting the vehicle
4MATIC vehicles/vehicles with auto-
matic transmission
!When the vehicle is loaded for transport, the
front and rear axles must be stationary and on
the same transportation vehicle. Positioning
over the connection point of the transport
vehicle is not permitted. The drive train may
otherwise be damaged.
Vehicles with ADS PLUS (Adaptive
Damping System PLUS)
GWARNING
The weaker damping forces of the vehicle to
be transported can cause the vehicle/trailer
combination to swing.
As a result, when transporting vehicles with
Adaptive Damping System PLUS, the vehicle/
trailer combination may start to skid. Conse-
quently, you could lose control of the vehicle.
There is a risk of accident and injury.
When transporting, make sure that:
Rthe vehicle is has been loaded onto the
transporter correctly
Rthe vehicle is secured at all four wheels with
suitable tensioning straps
Ryou do not exceed the maximum permissi-
ble speed of 35 mph (60 km/h)
!After loading, the vehicle must be secured at
all four wheels. Otherwise, the vehicle could
be damaged.
A minimum distance of 8 in (20 cm) up and
4 in (10 cm) down must be maintained to the
transport platform.
XSecure all four wheels after loading the vehi-
cle.
All vehicles
!You may only secure the vehicle by the
wheels, not by parts of the vehicle such as
axle or steering components. Otherwise, the
vehicle could be damaged.
The towing eye can be used to pull the vehicle
onto a trailer or transporter for transporting pur-
poses.
312Towing and tow-starting
Breakdown assistance
Page 316 of 354
XMake sure that the ignition is switched off
(Ypage 127).
or
XWhen using the SmartKey, turn the SmartKey to position uin the ignition lock and remove
it (
Ypage 126).
XSecure the vehicle against rolling away
(Ypage 147).
All indicator lamps in the instrument cluster
must be off.
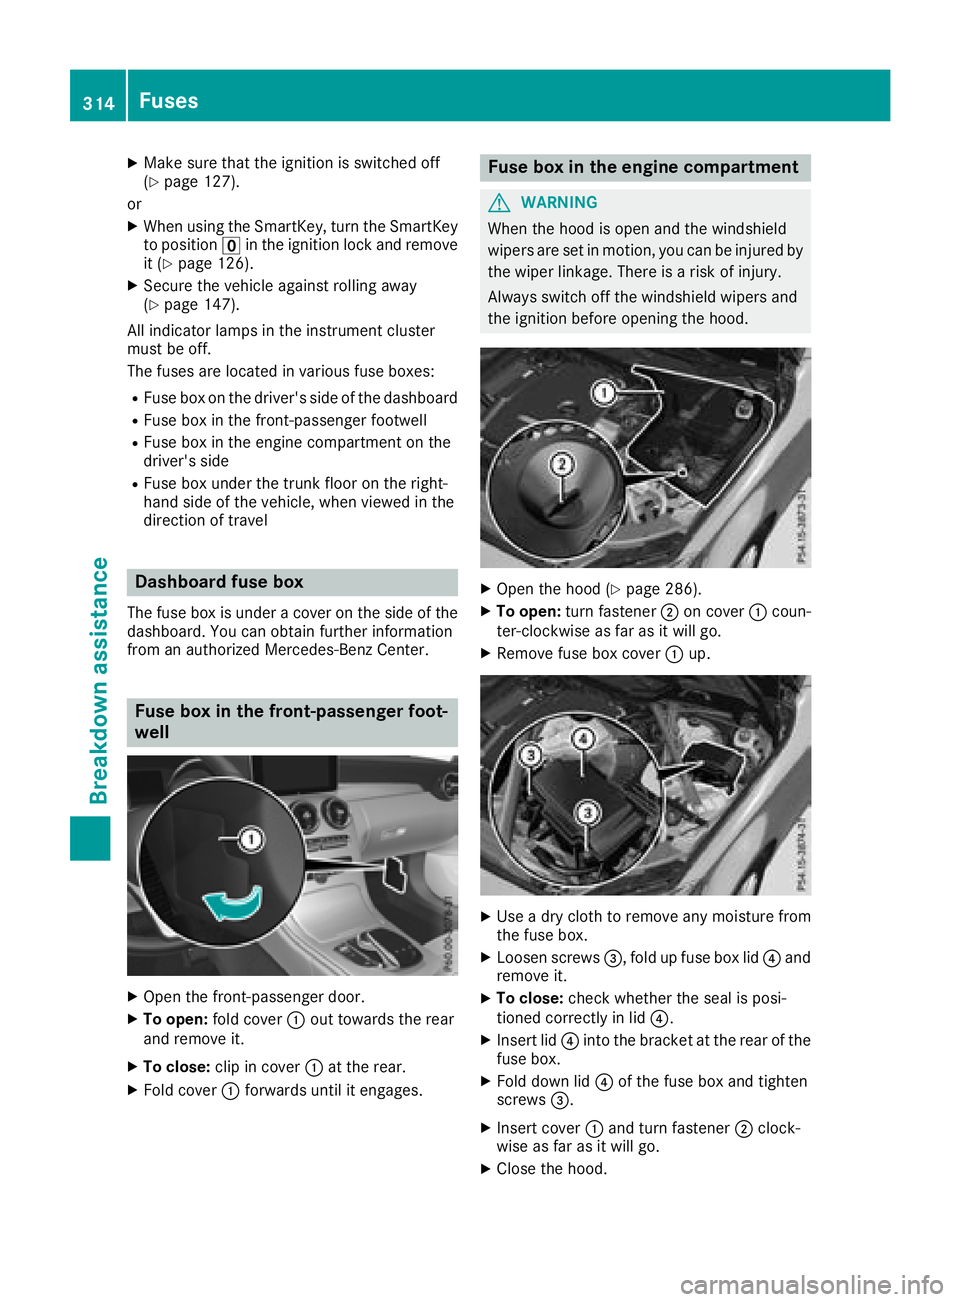
The fuses are located in various fuse boxes:
RFuse box on the driver's side of the dashboard
RFuse box in the front-passenger footwell
RFuse box in the engine compartment on the
driver's side
RFuse box under the trunk floor on the right-
hand side of the vehicle, when viewed in the
direction of travel
Dashboard fuse box
The fuse box is under a cover on the side of the dashboard. You can obtain further information
from an authorized Mercedes-Benz Center.
Fuse box in the front-passenger foot-
well
XOpen the front-passenger door.
XTo open: fold cover :out towards the rear
and remove it.
XTo close: clip in cover :at the rear.
XFold cover :forwards until it engages.
Fuse box in the engine compartment
GWARNING
When the hood is open and the windshield
wipers are set in motion, you can be injured by
the wiper linkage. There is a risk of injury.
Always switch off the windshield wipers and
the ignition before opening the hood.
XOpen the hood (Ypage 286).
XTo open: turn fastener ;on cover :coun-
ter-clockwise as far as it will go.
XRemove fuse box cover :up.
XUse a dry cloth to remove any moisture from
the fuse box.
XLoosen screws =, fold up fuse box lid ?and
remove it.
XTo close: check whether the seal is posi-
tioned correctly in lid ?.
XInsert lid?into the bracket at the rear of the
fuse box.
XFold down lid ?of the fuse box and tighten
screws =.
XInsert cover :and turn fastener ;clock-
wise as far as it will go.
XClose the hood.
314Fuses
Breakdown assistance
Page 338 of 354
Tire-mounting tools should not be used near
the valve. This could damage the electronic
components.
Only have tires changed at a qualified spe-
cialist workshop.
Always observe the instructions and safety
notes in the "Mounting a wheel" section
(
Ypage 336).
The wear patterns on the front and rear tires
differ, depending on the operating conditions.
Rotate the wheels before a clear wear pattern
has formed on the tires. Front tires typically
wear more on the shoulders and the rear tires in the center.
On vehicles that have the same size front and
rear wheels, you can rotate the wheels accord-
ing to the intervals in the tire manufacturer's
warranty book in your vehicle documents. If no
warranty book is available, the tires should be
rotated every 3,000 to 6,000 miles (5,000 to
10,000 km). Depending on tire wear, this may
be required earlier. Do not change the direction
of wheel rotation.
Clean the contact surfaces of the wheel and the
brake disc thoroughly every time a wheel is rota-
ted. Check the tire pressure and, if necessary,
restart the tire pressure loss warning system
(
Ypage 323) or the tire pressure monitor
(Ypage 325).
Direction of rotation
Tires with a specified direction of rotation have
additional benefits, e.g. if there is a risk of hydro- planing. These advantages can only be gained if
the tires are installed corresponding to the
direction of rotation.
An arrow on the sidewall of the tire indicates its
correct direction of rotation.
Storing wheels
Store wheels that are not being used in a cool,
dry and preferably dark place. Protect the tires
from oil, grease, gasoline and diesel.
Mounting a wheel
Preparing the vehicle
XStop the vehicle on solid, non-slippery and
level ground.
XApply the electric parking brake manually.
XBring the front wheels into the straight-ahead position.
XShift the transmission to position j.
XMake sure that the vehicle level is set to "Nor-
mal" on vehicles with AIRMATIC (Ypage 168).
XSwitch off the engine.
XVehicles without KEYLESS-GO:remove the
SmartKey from the ignition lock.
XVehicles with KEYLESS-GO start-function
or KEYLESS-GO: open the driver's door.
The vehicle electronics are now in key posi-
tion u. This is the same as the key having
been removed.
XVehicles with KEYLESS-GO start-function
or KEYLESS-GO: remove the Start/Stop but-
ton from the ignition lock (
Ypage 127).
XMake sure that the engine cannot be started
via your smartphone (Ypage 129).
XIf included in the vehicle equipment, remove
the tire-change tool kit from the vehicle.
XSafeguard the vehicle against rolling away.
Securing the vehicle to prevent it from
rolling away
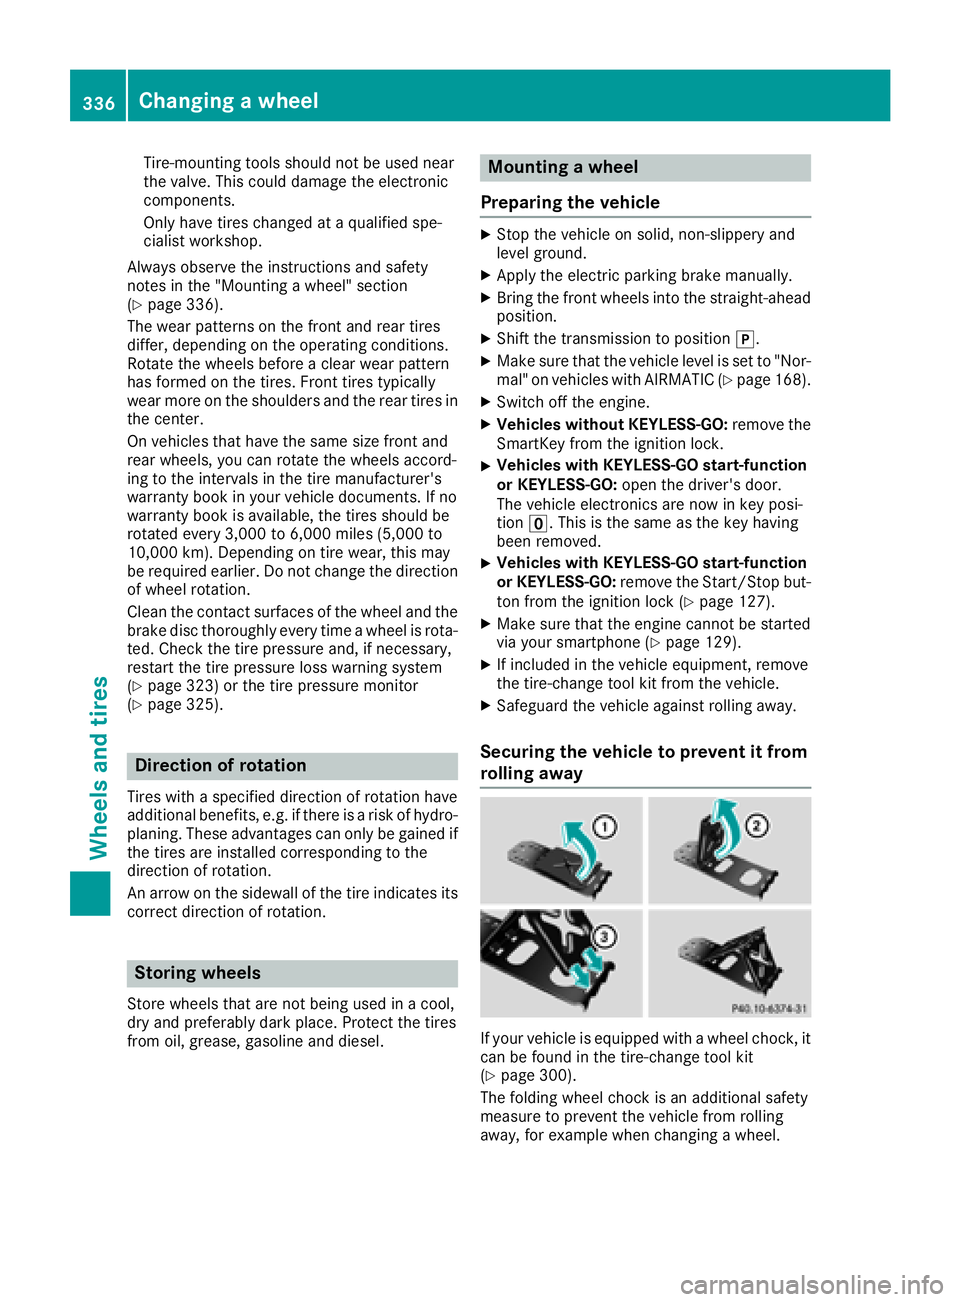
If your vehicle is equipped with a wheel chock, it
can be found in the tire-change tool kit
(
Ypage 300).
The folding wheel chock is an additional safety
measure to prevent the vehicle from rolling
away, for example when changing a wheel.
336Changing a wheel
Wheels and tires
Page 339 of 354
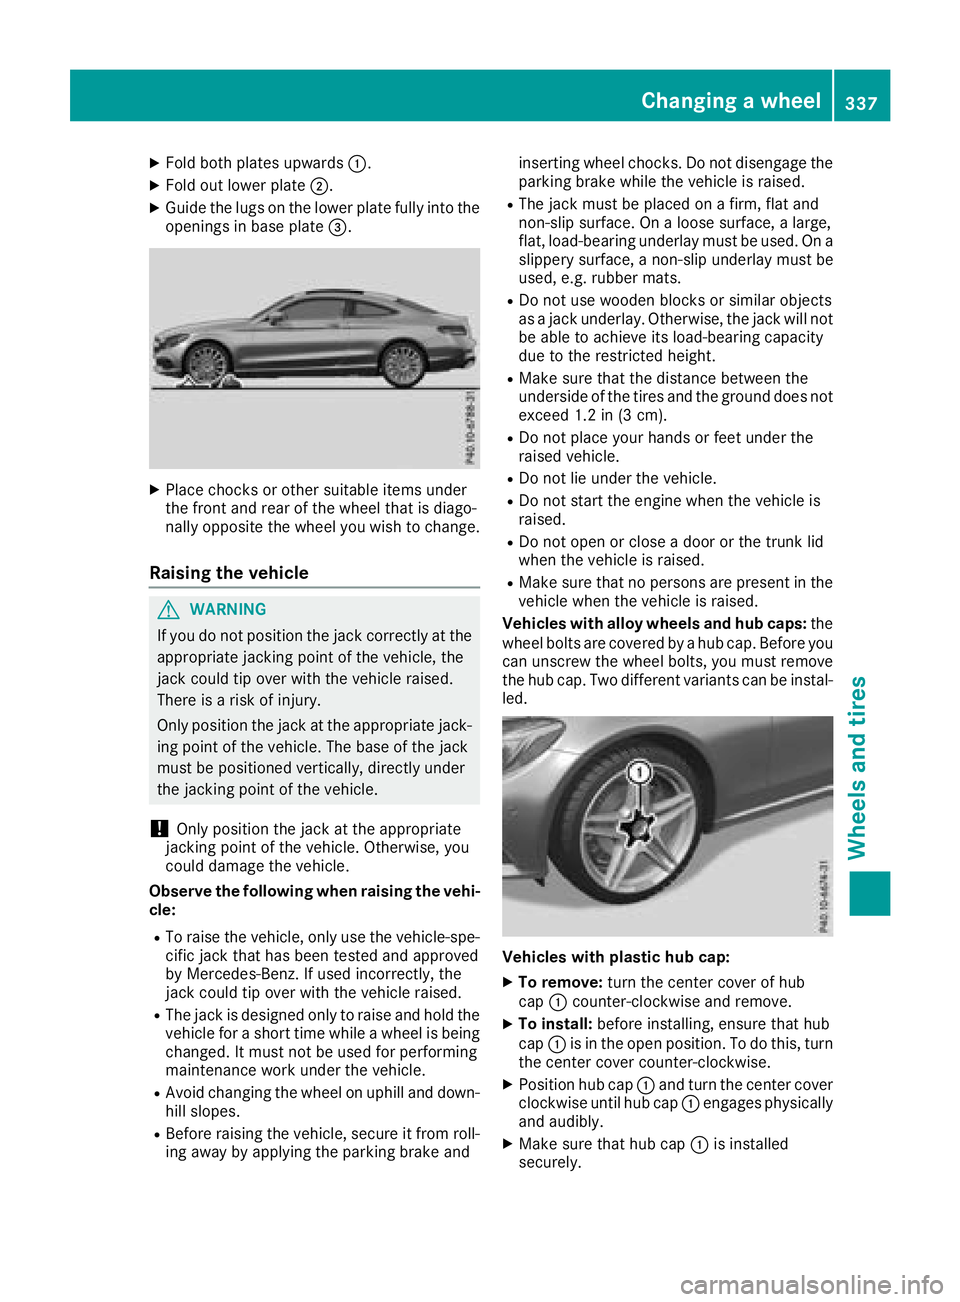
XFold both plates upwards:.
XFold out lower plate;.
XGuide the lugs on the lower plate fully into the
openings in base plate =.
XPlace chocks or other suitable items under
the front and rear of the wheel that is diago-
nally opposite the wheel you wish to change.
Raising the vehicle
GWARNING
If you do not position the jack correctly at the
appropriate jacking point of the vehicle, the
jack could tip over with the vehicle raised.
There is a risk of injury.
Only position the jack at the appropriate jack-
ing point of the vehicle. The base of the jack
must be positioned vertically, directly under
the jacking point of the vehicle.
!Only position the jack at the appropriate
jacking point of the vehicle. Otherwise, you
could damage the vehicle.
Observe the following when raising the vehi-
cle:
RTo raise the vehicle, only use the vehicle-spe-
cific jack that has been tested and approved
by Mercedes-Benz. If used incorrectly, the
jack could tip over with the vehicle raised.
RThe jack is designed only to raise and hold the
vehicle for a short time while a wheel is being
changed. It must not be used for performing
maintenance work under the vehicle.
RAvoid changing the wheel on uphill and down- hill slopes.
RBefore raising the vehicle, secure it from roll-
ing away by applying the parking brake and inserting wheel chocks. Do not disengage the
parking brake while the vehicle is raised.
RThe jack must be placed on a firm, flat and
non-slip surface. On a loose surface, a large,
flat, load-bearing underlay must be used. On a
slippery surface, a non-slip underlay must be
used, e.g. rubber mats.
RDo not use wooden blocks or similar objects
as a
jack underlay. Otherwise, the jack will not
be able to achieve its load-bearing capacity
due to the restricted height.
RMake sure that the distance between the
underside of the tires and the ground does not
exceed 1.2 in (3 cm).
RDo not place your hands or feet under the
raised vehicle.
RDo not lie under the vehicle.
RDo not start the engine when the vehicle is
raised.
RDo not open or close a door or the trunk lid
when the vehicle is raised.
RMake sure that no persons are present in the
vehicle when the vehicle is raised.
Vehicles with alloy wheels and hub caps: the
wheel bolts are covered by a hub cap. Before you
can unscrew the wheel bolts, you must remove
the hub cap. Two different variants can be instal- led.
Vehicles with plastic hub cap:
XTo remove: turn the center cover of hub
cap :counter-clockwise and remove.
XTo install: before installing, ensure that hub
cap :is in the open position. To do this, turn
the center cover counter-clockwise.
XPosition hub cap :and turn the center cover
clockwise until hub cap :engages physically
and audibly.
XMake sure that hub cap :is installed
securely.
Changing a wheel337
Wheels and tires
Z