child lock MERCEDES-BENZ C-CLASS COUPE 2018 Owner's Manual
[x] Cancel search | Manufacturer: MERCEDES-BENZ, Model Year: 2018, Model line: C-CLASS COUPE, Model: MERCEDES-BENZ C-CLASS COUPE 2018Pages: 354, PDF Size: 5.88 MB
Page 9 of 354
Calling up a malfunctionsee Display messages
Calling up the climate control bar
Multimedia system ........................ 261
Calling up the climate control
menu
Multimedia system ........................ 261
Camera
see 360° camera
see Rear view camera
Car
see Vehicle
Car wash
see Care
Care
360° camera ................................ .295
Car wash ........................................ 291
Carpets .......................................... 298
Display ...........................................2 96
Exhaust pipe .................................. 296
Exterior lights ................................ 295
General notes ................................ 291
Interior ...........................................2 96
Matte finish ................................... 294
Paint .............................................. 293
Plastic trim ....................................2 96
Power washer ................................ 293
Rear view camera .......................... 295
Roof lining ...................................... 298
Seat belt ........................................ 297
Seat cover ..................................... 297
Selector lever ................................ 297
Sensors ......................................... 295
Steering wheel ............................... 297
Trim pieces ....................................2 97
Washing by hand ........................... 292
Wheels ...........................................2 94
Windows ........................................ 294
Wiper blades .................................. 295
Wooden trim .................................. 297
Cargo tie down rings ......................... 270
CD
see also Digital Operator's Man-
ual ..................................................2 56
CD player (on-board computer) ........205
Center console
Lower section .................................. 39 Lower section (Mercedes-AMG
vehicles) .......................................... 40
Upper section .................................. 38
Central locking
Locking/unlocking (SmartKey) ........7 5
Change of address .............................. 29
Change of ownership .......................... 29
Changing the media source .............204
Charge-air pressure (on-board
computer, Mercedes-AMG vehi-
cles) .................................................... 212
Child
Restraint system .............................. 60
Child seat
Forward-facing restraint system ...... 63
LATCH-type (ISOFIX) child seat
anchors ............................................ 61
On the front-passenger seat ............ 62
Rearward-facing restraint system .... 62
Top Tether ....................................... 61
Children
Special seat belt retractor ............... 59
Children in the vehicle
Important safety notes .................... 59
Cigarette lighter ................................ 274
Cleaning
Mirror turn signal ........................... 295
Climate control
Control panel for dual-zone auto-
matic climate control ..................... 117
Controlling automatically ............... 119
Cooling with air dehumidification .. 119
Cooling with air dehumidification
(multimedia system) ...................... 261
Defrosting the windows ................. 121
Defrosting the windshield .............. 120
ECO start/stop function ................ 118
General notes ................................ 117
Indicator lamp ................................ 119
Ionization ....................................... 123
Ionization (multimedia system) ...... 261
Notes on using the automatic cli-
mate control .................................. 118
Overview ........................................ 260
Overview of systems ...................... 117
Perfume atomizer .......................... 122
Index7
Page 16 of 354
Display message ............................ 234
Function/information .................... 188
see Active Lane Keeping Assist
Lane Tracking package ..................... 186
Lap time (RACETIMER) ...................... 214
LATCH-type (ISOFIX) child seat
anchors ................................................ 61
License plate lamp (display mes-
sage) ................................................... 228
Light function, active
Display message ............................ 228
Light switch
Operation ....................................... 108
Lights
Adaptive Highbeam Assist .............1 10
Automatic headlamp mode ............ 108
Cornering light function ................. 110
Fogged up headlamps .................... 111
General notes ................................ 108
Hazard warning lamps ................... 110
High beam flasher .......................... 109
High-beam headlamps ................... 109
Light switch ................................... 108
Low-beam headlamps .................... 109
Parking lamps ................................ 109
Rear fog lamp ................................ 109
Setting exterior lighting ................. 108
Standing lamps .............................. 109
Switching the daytime running
lamps on/off (on-board com-
puter) ............................................. 211
Turn signals ................................... 109
see Interior lighting
Loading guidelines ............................ 266
Locking
see Central locking
Locking (doors)
Automatic ........................................ 82
Emergency locking ........................... 82
From inside (central locking but-
ton) ..................................................8 1
Locking centrally
see Central locking
Low-beam headlamps
Display message ............................ 228
Replacing bulbs .......................... ..
.1 13
Sw
itching on/off ........................... 109 Lubricant additives
see Additives (engine oil)
Lumbar support
Adjusting the 4-way lumbar sup-
port ..................................................9 9
M
M+S tires............................................ 318
Malfunction message
see Display messages
Matte finish (cleaning instruc-
tions) .................................................. 294
mbrace
Call priority ....................................2 78
Display message ............................ 222
Downloading destinations
(COMAND) ..................................... 279
Downloading routes ....................... 281
Emergency call .............................. 276
General notes ................................ 275
Geo fencing ................................... 282
Info call button .............................. 278
Locating a stolen vehicle ...............2 80
Remote fault diagnosis .................. 280
Remote vehicle locking .................. 280
Roadside assistance button ........... 277
Search & Send ............................... 279
Self-test ......................................... 276
Speed alert .................................... 281
System .......................................... 275
Triggering the vehicle alarm ........... 282
Vehicle remote unlocking .............. 280
Mechanical key
Function/notes ................................ 77
General notes .................................. 77
Inserting .......................................... 77
Locking vehicle ................................ 82
Removing ......................................... 77
Unlocking the driver's door .............. 82
Media Interface
see Digital Operator's Manual
Memory card (audio) ......................... 205
Memory function
Seats, steering wheel, exterior
mirrors ........................................... 106
Mercedes-Benz Intelligent Drive
360°camera .................................. 180
14Index
Page 45 of 354
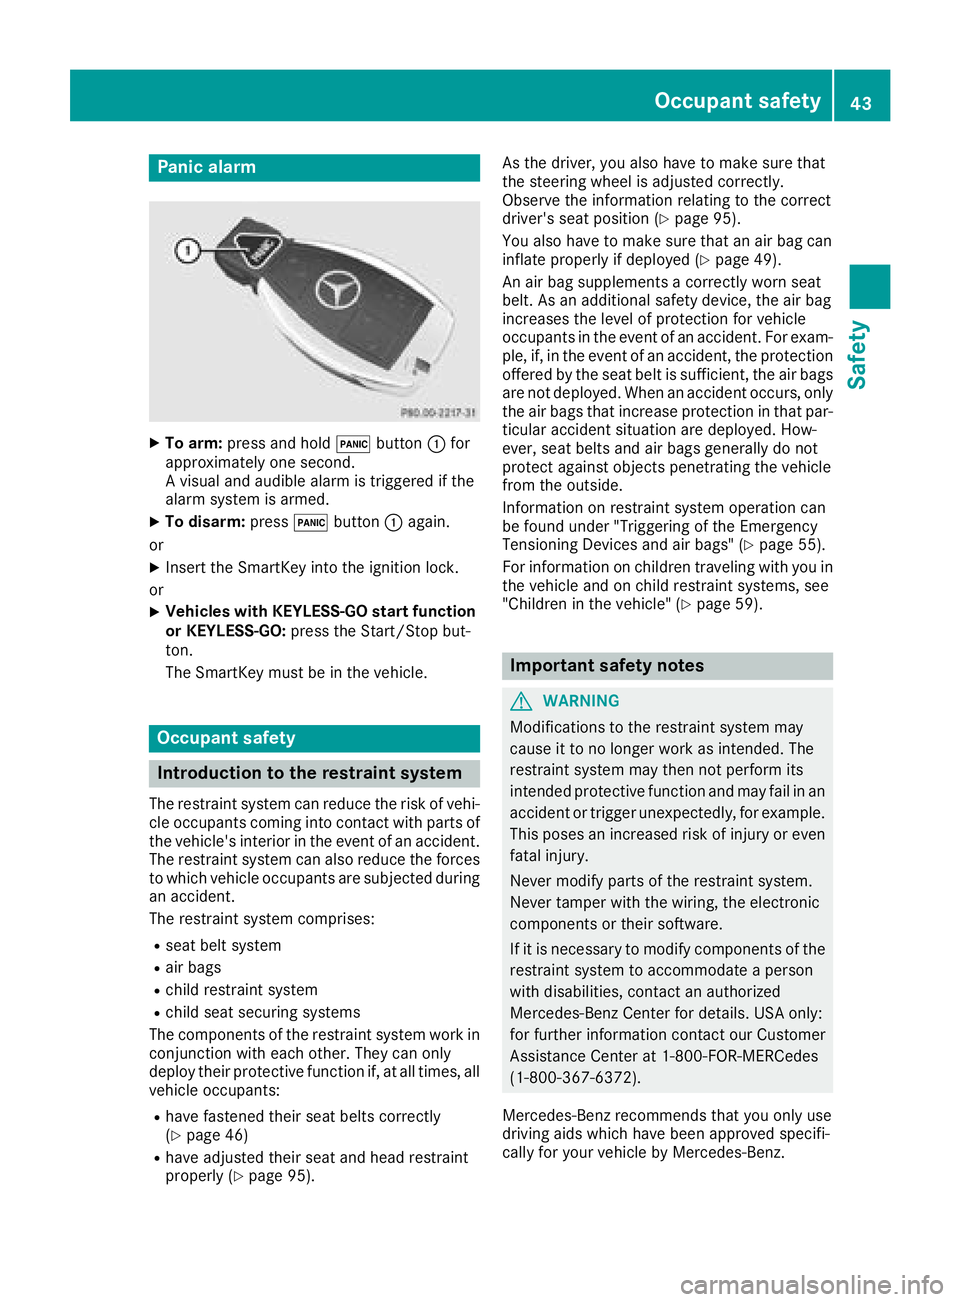
Panic alarm
XTo arm:press and hold !button :for
approximately one second.
A visual and audible alarm is triggered if the
alarm system is armed.
XTo disarm: press!button :again.
or
XInsert the SmartKey into the ignition lock.
or
XVehicles with KEYLESS-GO start function
or KEYLESS-GO: press the Start/Stop but-
ton.
The SmartKey must be in the vehicle.
Occupant safety
Introduction to the restraint system
The restraint system can reduce the risk of vehi- cle occupants coming into contact with parts of
the vehicle's interior in the event of an accident.
The restraint system can also reduce the forces to which vehicle occupants are subjected during
an accident.
The restraint system comprises:
Rseat belt system
Rair bags
Rchild restraint system
Rchild seat securing systems
The components of the restraint system work in
conjunction with each other. They can only
deploy their protective function if, at all times, all vehicle occupants:
Rhave fastened their seat belts correctly
(Ypage 46)
Rhave adjusted their seat and head restraint
properly (Ypage 95). As the driver, you also have to make sure that
the steering wheel is adjusted correctly.
Observe the information relating to the correct
driver's seat position (
Ypage 95).
You also have to make sure that an air bag can
inflate properly if deployed (
Ypage 49).
An air bag supplements a correctly worn seat
belt. As an additional safety device, the air bag
increases the level of protection for vehicle
occupants in the event of an accident. For exam-
ple, if, in the event of an accident, the protection
offered by the seat belt is sufficient, the air bags are not deployed. When an accident occurs, only
the air bags that increase protection in that par-ticular accident situation are deployed. How-
ever, seat belts and air bags generally do not
protect against objects penetrating the vehicle
from the outside.
Information on restraint system operation can
be found under "Triggering of the Emergency
Tensioning Devices and air bags" (
Ypage 55).
For information on children traveling with you in
the vehicle and on child restraint systems, see
"Children in the vehicle" (
Ypage 59).
Important safety notes
GWARNING
Modifications to the restraint system may
cause it to no longer work as intended. The
restraint system may then not perform its
intended protective function and may fail in an
accident or trigger unexpectedly, for example.
This poses an increased risk of injury or even fatal injury.
Never modify parts of the restraint system.
Never tamper with the wiring, the electronic
components or their software.
If it is necessary to modify components of the
restraint system to accommodate a person
with disabilities, contact an authorized
Mercedes-Benz Center for details. USA only:
for further information contact our Customer
Assistance Center at 1-800-FOR-MERCedes
(1‑800‑367‑6372).
Mercedes-Benz recommends that you only use
driving aids which have been approved specifi-
cally for your vehicle by Mercedes-Benz.
Occupant safety43
Safety
Z
Page 47 of 354
occupant in the best position in relation to the
air bag.
The seat belt system comprises:
RSeat belts
REmergency Tensioning Devices and seat belt
force limiters
If the seat belt is pulled out of the belt outlet
quickly or with a jerky movement, the belt
retractor locks. The belt strap cannot be extrac-
ted any further.
The Emergency Tensioning Device tightens the
seat belt in an accident, pulling the belt close
against the body. However it does not pull the
vehicle occupant back in the direction of the
backrest.
The Emergency Tensioning Device does not cor-
rect an incorrect seat position or the routing of
an incorrectly fastened seat belt.
When triggered, a seat belt force limiter helps to
reduce the force exerted by the seat belt on the
vehicle occupant.
The seat belt force limiters for the front seats are
synchronized with the front air bags, which
absorb part of the deceleration force. This can
reduce the force exerted on the vehicle occu-
pants during an accident.
!If the front-passenger seat is unoccupied,
do not insert the belt tongue into the buckle of
the front-passenger seat. This may otherwise
lead to the triggering of the Emergency Ten-
sioning Device in the event of an accident,
which will then need to be replaced.
Important safety notes
The use of seat belts and child restraint systems
is required by law in:
Rall 50 states
Rthe U.S. territories
Rthe District of Columbia
Rall Canadian provinces
Even where this is not required by law, all vehicle
occupants should correctly fasten their seat
belts before starting the journey.
GWARNING
If the seat belt is not worn correctly, it cannot
perform its intended protective function. An
incorrectly fastened seat belt can also cause
injuries, for example, in the event of an acci-
dent or when braking or changing direction
abruptly. This poses an increased risk of injury or even fatal injury.
Always ensure that all vehicle occupants have
their seat belts fastened correctly and are sit-
ting properly.
The components of the restraint system work in
conjunction with each other. They can only
deploy their protective function if, at all times, all vehicle occupants:
Rhave fastened their seat belts correctly
(Ypage 46)
Rhave the seat and head restraint adjusted
properly (Ypage 95)
GWARNING
The seat belt does not offer the intended level of protection if you have not moved the back-
rest to an almost vertical position. When brak-
ing or in the event of an accident, you could
slide underneath the seat belt and sustain
abdomen or neck injuries, for example. This
poses an increased risk of injury or even fatal injury.
Adjust the seat properly before beginning
your journey. Always ensure that the backrest
is in an almost vertical position and that the
shoulder section of your seat belt is routed
across the center of your shoulder.
GWARNING
Persons less than 5 ft (1.50 m) tall cannot
wear the seat belt correctly without an addi-
tional and suitable restraint system. If the
seat belt is not worn correctly, it cannot per-
form its intended protective function. An
incorrectly fastened seat belt can also cause
injuries, for example, in the event of an acci-
dent or when braking or changing direction
abruptly. This poses an increased risk of injury or even fatal injury.
For this reason, always secure persons under
5 ft (1.50 m) tall in suitable additional restraint
systems.
Occupant safety45
Safety
Z
Page 54 of 354
tem manufacturer's installation and operating
instructions.
Occupant Classification System opera-
tion (OCS)
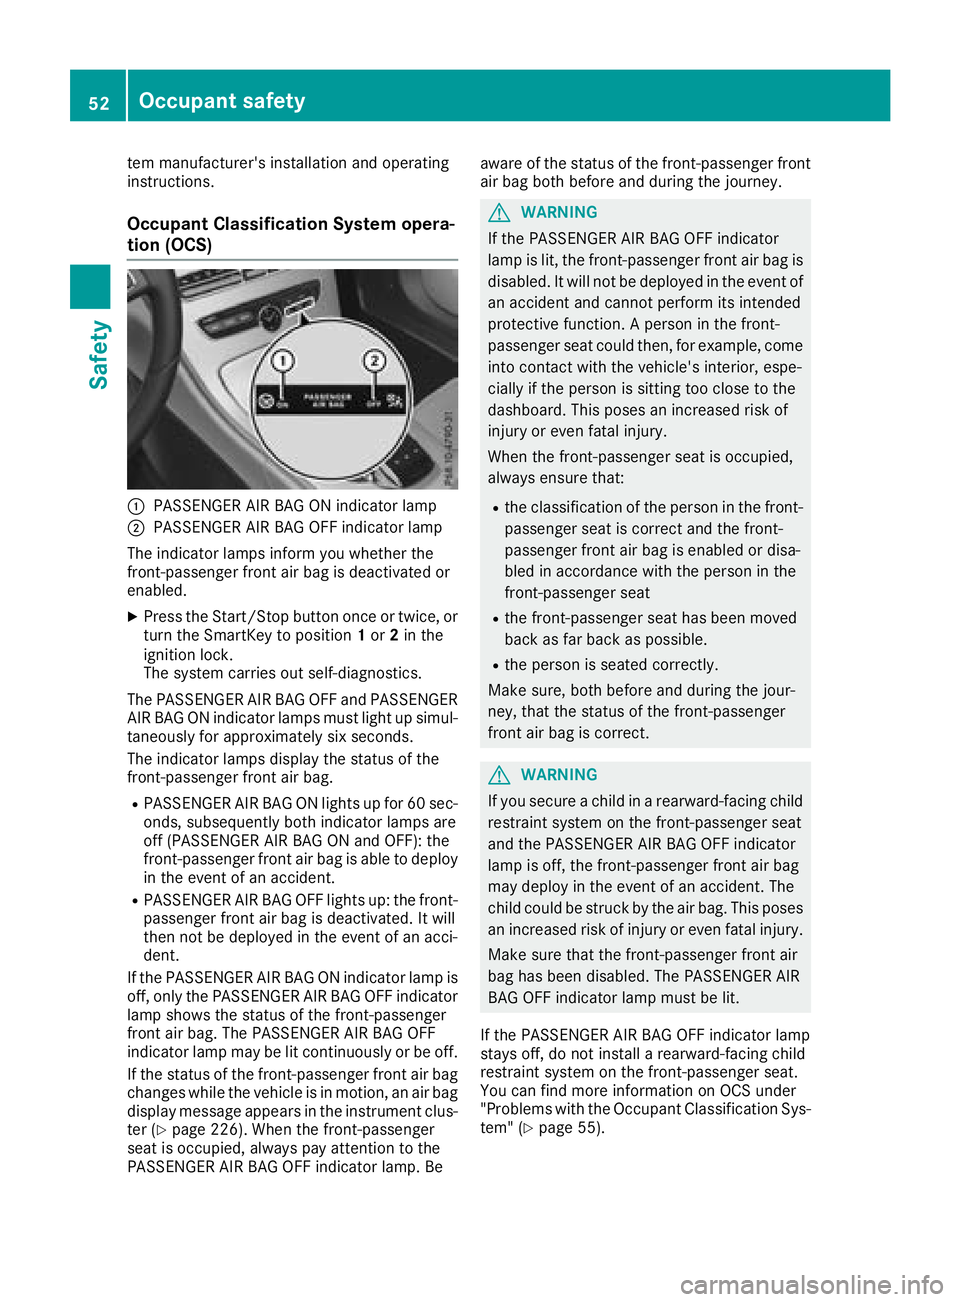
:PASSENGER AIR BAG ON indicator lamp
;PASSENGER AIR BAG OFF indicator lamp
The indicator lamps inform you whether the
front-passenger front air bag is deactivated or
enabled.
XPress the Start/Stop button once or twice, or
turn the SmartKey to position 1or 2in the
ignition lock.
The system carries out self-diagnostics.
The PASSENGER AIR BAG OFF and PASSENGER
AIR BAG ON indicator lamps must light up simul-
taneously for approximately six seconds.
The indicator lamps display the status of the
front-passenger front air bag.
RPASSENGER AIR BAG ON lights up for 60 sec- onds, subsequently both indicator lamps are
off (PASSENGER AIR BAG ON and OFF): the
front-passenger front air bag is able to deploy
in the event of an accident.
RPASSENGER AIR BAG OFF lights up: the front-
passenger front air bag is deactivated. It will
then not be deployed in the event of an acci-
dent.
If the PASSENGER AIR BAG ON indicator lamp is off, only the PASSENGER AIR BAG OFF indicator
lamp shows the status of the front-passenger
front air bag. The PASSENGER AIR BAG OFF
indicator lamp may be lit continuously or be off.
If the status of the front-passenger front air bagchanges while the vehicle is in motion, an air bag
display mess
age appears in the instrument clus-
ter (Ypage 226). When the front-passenger
seat is occupied, always pay attention to the
PASSENGER AIR BAG OFF indicator lamp. Be aware of the status of the front-passenger front
air bag both before and during the journey.
GWARNING
If the PASSENGER AIR BAG OFF indicator
lamp is lit, the front-passenger front air bag is
disabled. It will not be deployed in the event of
an accident and cannot perform its intended
protective function. A person in the front-
passenger seat could then, for example, come
into contact with the vehicle's interior, espe-
cially if the person is sitting too close to the
dashboard. This poses an increased risk of
injury or even fatal injury.
When the front-passenger seat is occupied,
always ensure that:
Rthe classification of the person in the front- passenger seat is correct and the front-
passenger front air bag is enabled or disa-
bled in accordance with the person in the
front-passenger seat
Rthe front-passenger seat has been moved
back as far back as possible.
Rthe person is seated correctly.
Make sure, both before and during the jour-
ney, that the status of the front-passenger
front air bag is correct.
GWARNING
If you secure a child in a rearward-facing child
restraint system on the front-passenger seat
and the PASSENGER AIR BAG OFF indicator
lamp is off, the front-passenger front air bag
may deploy in the event of an accident. The
child could be struck by the air bag. This poses an increased risk of injury or even fatal injury.
Make sure that the front-passenger front air
bag has been disabled. The PASSENGER AIR
BAG OFF indicator lamp must be lit.
If the PASSENGER AIR BAG OFF indicator lamp
stays off, do not install a rearward-facing child
restraint system on the front-passenger seat.
You can find more information on OCS under
"Problems with the Occupant Classification Sys-
tem" (
Ypage 55).
52Occupant safety
Safety
Page 61 of 354
Children in the vehicle
Important safety notes
Accident statistics show that children secured
in the rear seats are safer than children secured
in the front-passenger seat. For this reason,
Mercedes-Benz strongly advises that you install
a child restraint system on a rear seat. Children are generally better protected there.
If a child younger than twelve years old and
under 5 ft (1.50 m) in height is traveling in the
vehicle:
Ralways secure the child in a child restraint
system suitable for Mercedes-Benz vehicles.
The child restraint system must be appropri-
ate to the age, weight and size of the child
Rbe sure to observe the instructions and safety
notes in this section in addition to the child
restraint system manufacturer's installation
instructions
Rbe sure to observe the instructions and safetynotes on the "Occupant classification system
(OCS)" (
Ypage 51)
GWARNING
If you leave children unsupervised in the vehi-
cle, they could set it in motion by, for example:
Rrelease the parking brake.
Rshift the automatic transmission out of the
parking position P.
Rstart the engine.
In addition, they may operate vehicle equip-
ment and become trapped. There is a risk of
an accident and injury.
When leaving the vehicle, always take the
SmartKey with you and lock the vehicle. Never
leave children unsupervised in the vehicle.
GWARNING
If persons, particularly children are subjected to prolonged exposure to extreme heat or
cold, there is a risk of injury, possibly even
fatal. Never leave children unattended in the
vehicle.
GWARNING
If the child restraint system is subjected to
direct sunlight, parts may get very hot. Chil-
dren may burn themselves on these parts,
particularly on the metal parts of the child
restraint system. There is a risk of injury.
If you leave the vehicle, taking the child with
you, always ensure that the child restraint
system is not exposed to direct sunlight. Pro- tect it with a blanket, for example. If the child
restraint system has been exposed to direct
sunlight, let it cool down before securing the
child in it. Never leave children unattended in
the vehicle.
Always ensure that all vehicle occupants have
their seat belts fastened correctly and are sitting
properly. Particular attention must be paid to
children.
Observe the safety notes on the seat belt
(
Ypage 45 )and the notes on correct use of seat
belts (Ypage 46).
A booster seat may be necessary to achieve
proper seat belt positioning for children over
41 lb s(18 kg) until they reach a height where a
three-point seat belt can be properly fastened
without a booster seat.
Special seatbelt retractor
GWARNING
If the seat belt is released while driving, the
child restraint system will no longer be
secured properly. The special seat belt retrac- tor is disabled and the inertia real draws in a
portion of the seat belt. The seat belt cannot
be immediately refastened. There is an
increased risk of injury, possibly even fatal.
Stop the vehicle immediately, paying atten-
tion to road and traffic conditions. Reactivate
the special seat belt retractor and secure the
child restraint system properly.
All seat belts in the vehicle, except the driver's
seat belt, are equipped with a special seat belt
retractor. When activated, the special seat belt
retractor ensures that the seat belt cannot
slacken once the child seat is secured.
Children in the vehicle59
Safety
Z
Page 63 of 354
If it is absolutely necessary to carry a child on
the front-passenger seat, be sure to observe the
information on the "Occupant Classification
System (OCS)" (
Ypage 51). There you will also
find information on deactivating the front-
passenger front air bag.
All child restraint systems must meet the fol-
lowing standards:
RU.S. Federal Motor Vehicle Safety Standards
213 and 225
RCanadian Motor Vehicle Safety Standards
213 and 210.2
Confirmation that the child restraint system cor-
responds to the standards can be found on an
instruction label on the child restraint system.
This confirmation can also be found in the instal-
lation instructions that are included with the
child restraint system.
Observe the warning labels in the vehicle inte-
rior and on the child restraint system.
LATCH-type (ISOFIX) child seat secur-
ing system
GWARNING
LATCH-type (ISOFIX) child restraint systems
do not offer sufficient protection for children
whose weight combined with the child
restraint system is greater than 65 lbs (29 kg) and who are secured using the safety belt
integrated in the child restraint system. In the
event of an accident, a child might not be
restrained correctly. This poses an increased
risk of injury or even fatal injury.
If the child and the child restraint system
together weigh more than 65 lbs (29 kg), only
use LATCH-type (ISOFIX) child restraint sys-
tems with which the child is also secured with
the vehicle seat belt. Also secure the child
restraint system with the Top Tether belt, if
available.
Always comply with the manufacturer's instal-
lation and operating instructions for the child
restraint system used.
Before every trip, make sure that the LATCH-
type (ISOFIX) child restraint system is engaged
correctly in both LATCH-type (ISOFIX) securing
rings
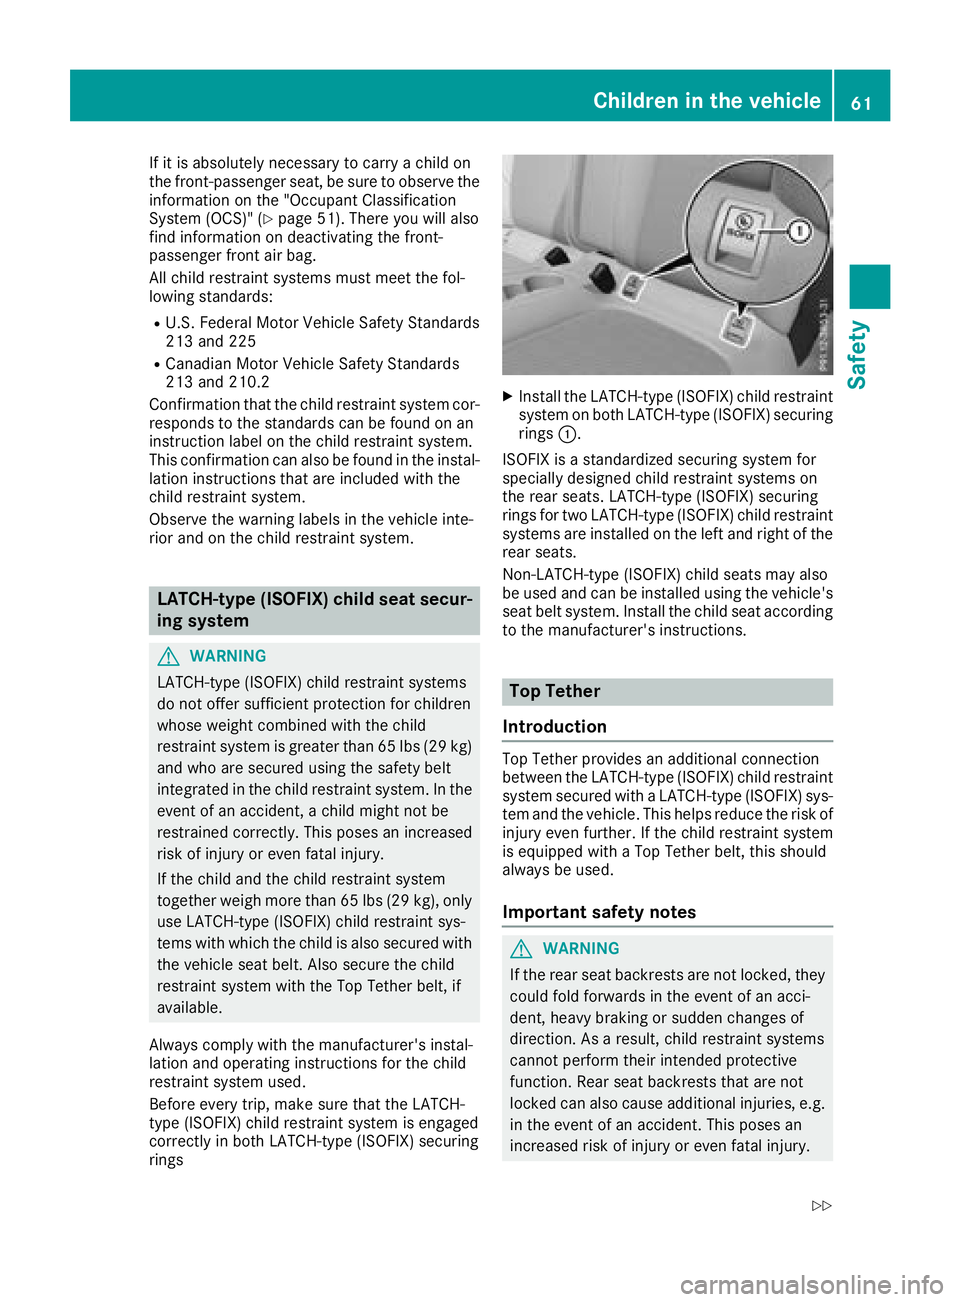
XInstall the LATCH-type (ISOFIX) child restraint system on both LATCH-type (ISOFIX) securing
rings :.
ISOFIX is a standardized securing system for
specially designed child restraint systems on
the rear seats. LATCH-type (ISOFIX) securing
rings for two LATCH-type (ISOFIX) child restraint
systems are installed on the left and right of the
rear seats.
Non-LATCH-type (ISOFIX) child seats may also
be used and can be installed using the vehicle's
seat belt system. Install the child seat according
to the manufacturer's instructions.
Top Tether
Introduction
Top Tether provides an additional connection
between the LATCH-type (ISOFIX) child restraint system secured with a LATCH-type (ISOFIX) sys-
tem and the vehicle. This helps reduce the risk of
injury even further. If the child restraint system
is equipped with a Top Tether belt, this should
always be used.
Important safety notes
GWARNING
If the rear seat backrests are not locked, they
could fold forwards in the event of an acci-
dent, heavy braking or sudden changes of
direction. As a result, child restraint systems
cannot perform their intended protective
function. Rear seat backrests that are not
locked can also cause additional injuries, e.g.
in the event of an accident. This poses an
increased risk of injury or even fatal injury.
Children in the vehicle61
Safety
Z
Page 64 of 354
Always lock rear seat backrests after instal-
ling a Top Tether belt. Observe the lock veri-
fication indicator.
If the rear seat backrest is not engaged and
locked, this will be shown in the multifunction
display in the instrument cluster.
Top Tether anchorages
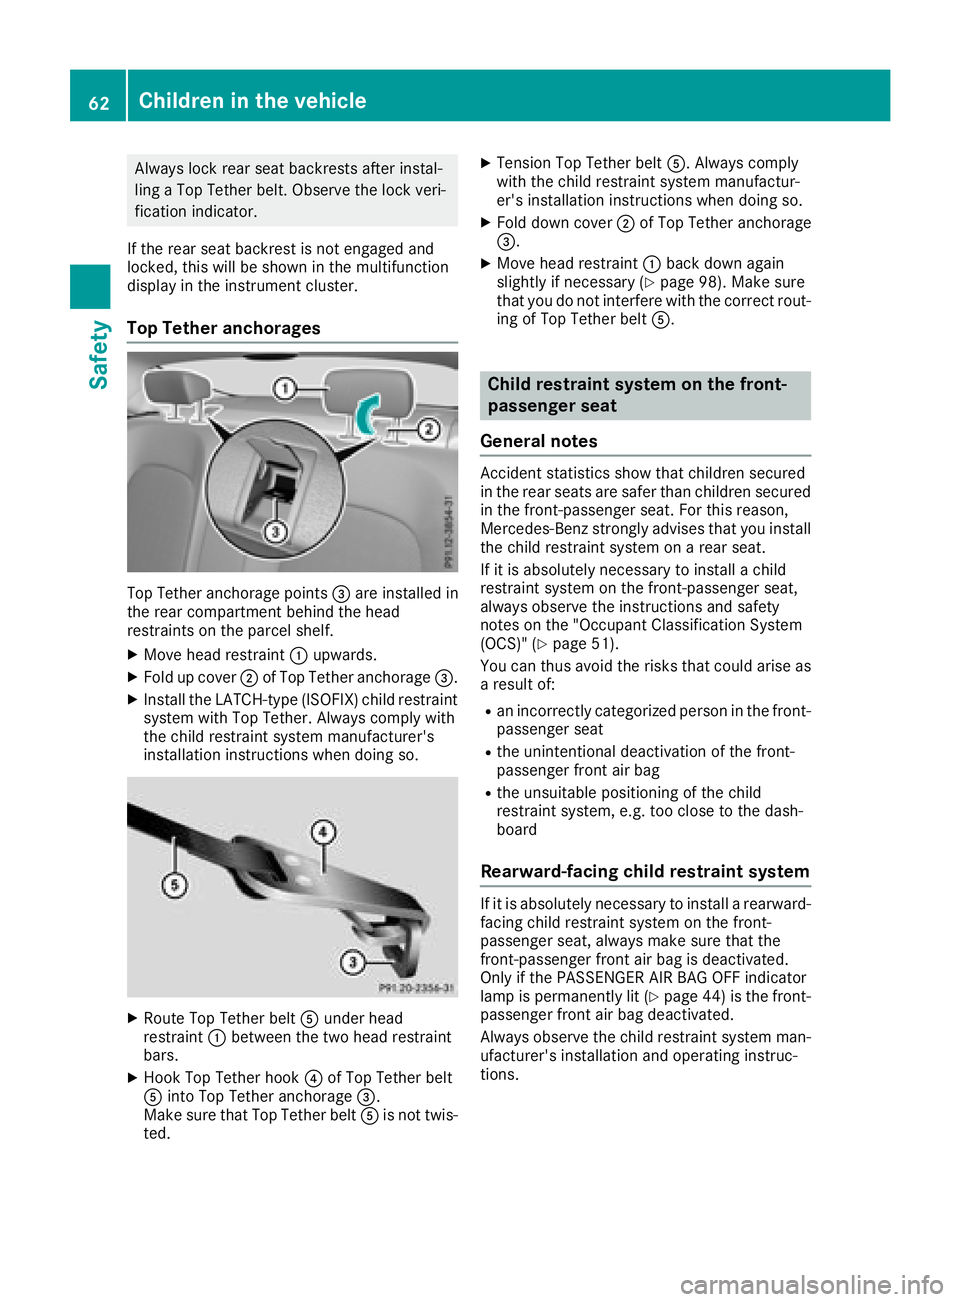
Top Tether anchorage points =are installed in
the rear compartment behind the head
restraints on the parcel shelf.
XMove head restraint :upwards.
XFold up cover ;of Top Tether anchorage =.
XInstall the LATCH-type (ISOFIX) child restraint
system with Top Tether. Always comply with
the child restraint system manufacturer's
installation instructions when doing so.
XRoute Top Tether belt Aunder head
restraint :between the two head restraint
bars.
XHook Top Tether hook ?of Top Tether belt
A into Top Tether anchorage =.
Make sure that Top Tether belt Ais not twis-
ted.
XTension Top Tether belt A. Always comply
with the child restraint system manufactur-
er's installation instructions when doing so.
XFold down cover ;of Top Tether anchorage
=.
XMove head restraint :back down again
slightly if necessary (Ypage 98). Make sure
that you do not interfere with the correct rout-
ing of Top Tether belt A.
Child restraint system on the front-
passenger seat
General notes
Accident statistics show that children secured
in the rear seats are safer than children secured
in the front-passenger seat. For this reason,
Mercedes-Benz strongly advises that you install
the child restraint system on a rear seat.
If it is absolutely necessary to install a child
restraint system on the front-passenger seat,
always observe the instructions and safety
notes on the "Occupant Classification System
(OCS)" (
Ypage 51).
You can thus avoid the risks that could arise as a result of:
Ran incorrectly categorized person in the front-
passenger seat
Rthe unintentional deactivation of the front-
passenger front air bag
Rthe unsuitable positioning of the child
restraint system, e.g. too close to the dash-
board
Rearward-facing child restraint system
If it is absolutely necessary to install a rearward-
facing child restraint system on the front-
passenger seat, always make sure that the
front-passenger front air bag is deactivated.
Only if the PASSENGER AIR BAG OFF indicator
lamp is permanently lit (
Ypage 44 )is the front-
passenger front air bag deactivated.
Always observe the child restraint system man-
ufacturer's installation and operating instruc-
tions.
62Children in the vehicle
Safety
Page 65 of 354
Forward-facing child restraint system
If it is absolutely necessaryto instal l aforward-
facing child restrain tsystem on th efront-
passenger seat ,always mov eth efront-
passenger seat as far bac kas possible. Full y
retrac tth eseat cushion length. The entire base
of th echild restrain tsystem must always res ton
th eseat cushion of th efront-passenger seat .
The backrest of th echild restrain tsystem must
lie as flat as possible against th ebackrest of th e
front-passenger seat .The child restrain tsystem
must no ttouch th eroo for be subjected to aload
by th ehead restraint. Adjus tth eangle of th e
seat backrest and th ehead restraint position
accordingly. Always mak esure that th eshoul-
der belt strap is correctly routed from th evehi-
cle belt outlet to th eshoulder belt guide on th e
child restrain tsystem. The shoulder belt strap
must be routed forward and down from th evehi-
cle belt outlet .If necessary, adjust th evehicl e
belt outlet and th efront-passenger seat accord -
ingly.
Always observ eth echild restrain tsystem man -
ufacturer' sinstallation and operating instruc-
tions.
Pets in the vehicle
GWARNIN G
If you leav eanimals unattended or unsecured
in th evehicle, they could press buttons or
switches, for example .
As aresult ,they could:
Ractivat evehicl eequipmen tand become
trapped ,for example
Ractivat eor deactivat esystems ,thereby
endangering other road user s
Unsecured animals could also be flun garoun d
th evehicl ein th eevent of an acciden tor sud-
den steering or braking ,thereby injurin gvehi-
cle occupants. Ther eis aris kof an acciden t
and injury.
Never leav eanimals unattended in th evehi-
cle .Always secure animals properly durin g
th ejourney, e.g. use asuitable animal trans -
por tbox .
Driving safety systems
Overview of driving safety systems
In this section ,you will fin dinformation about
th efollowin gdriving safet ysystems :
RABS (Anti-lock Braking System)
(Ypage 64)
RBA S (B rakeAssist System) (Ypage 64)
RActive Brake Assist (Ypage 64)
RESP®(Electronic StabilityProgram )
(Ypage 67)
REB D (Electronic Brak eforce Distribution )
(Ypage 70 )
RADAPTIV EBRAKE (Ypage 70 )
RActive Brake Assist wit hcross-traffic function
(Ypage 70)
RSTEE RCONTROL (Ypage 73)
Important safety notes
If you fail to adapt your driving style or if you are
inattentive, th edriving safet ysystems can nei-
ther reduce th eris kof an acciden tno roverride
th elaws of physics .Drivin gsafet ysystems are
merely aids designed to assist driving .You are
responsible for maintainin gth edistanc eto th e
vehicl ein front, for vehicl espeed, for braking in
goo dtime, and for staying in lane. Always adapt
your driving style to suit th eprevailing road and
weather condition sand maintai n asafedistanc e
from th evehicl ein front. Drive carefully.
The driving safet ysystems describe donly work
as effectivel yas possible when there is ade-
quat econtact between th etires and th eroad
surface .Pay particular attention to th einforma-
tion regarding tires ,recommended minimum
tire tread depths etc. in th e"Wheels and tires "
section (
Ypage 316).
In wintr ydriving conditions, always use winte r
tires (M+ Stires )and if necessary, snow chains.
Only in this way will the driving safety systems
described in this section work as effectively as
possible.
Driving safety systems63
Safety
Z
Page 77 of 354
SmartKey
Important safety notes
GWARNING
If children are left unsupervised in the vehicle,
they could:
Ropen the doors, thus endangering other
people or road users.
Rget out and disrupt traffic.
Roperate the vehicle's equipment.
Additionally, children could set the vehicle in
motion if, for example, they:
Rrelease the parking brake.
Rshifting the automatic transmission out of
park position P
RStart the engine.
There is a risk of an accident and injury.
When leaving the vehicle, always take the
SmartKey with you and lock the vehicle. Never
leave children or animals unattended in the
vehicle. Always keep the SmartKey out of
reach of children.
GWARNING
If you attach heavy or large objects to the
SmartKey, the SmartKey could be uninten-
tionally turned in the ignition lock. This could
cause the engine to be switched off. There is a risk of an accident.
Do not attach any heavy or large objects to the
SmartKey. Remove any bulky key rings before
inserting the SmartKey into the ignition lock.
!Keep the SmartKey away from strong mag-
netic fields. Otherwise, the remote control
function could be affected.
Strong magnetic fields can occur in the vicin-
ity of powerful electrical installations.
Do not keep the SmartKey:
Rwith electronic devices, e.g. a mobile phone
or another SmartKey.
Rwith metallic objects, e.g. coins or metal foil.
Rinside metallic objects, e.g. a metal case.
This can affect the functionality of the Smart- Key. Vehicles with KEYLESS-GO start function:
do
not keep the SmartKey on the parcel shelf or in
the trunk. Otherwise, the SmartKey may not be
detected, e.g. when starting the engine using
the Start/Stop button.
A brief radio connection between the vehicle
and the SmartKey determines whether a valid
SmartKey is in, or in the direct vicinity of, the
vehicle. This occurs, for example:
Rwhen starting the engine
Rwhile driving
Rwhen using HANDS-FREE ACCESS
Rwhen the external door handles are touched
Rduring convenience closing
SmartKey functions
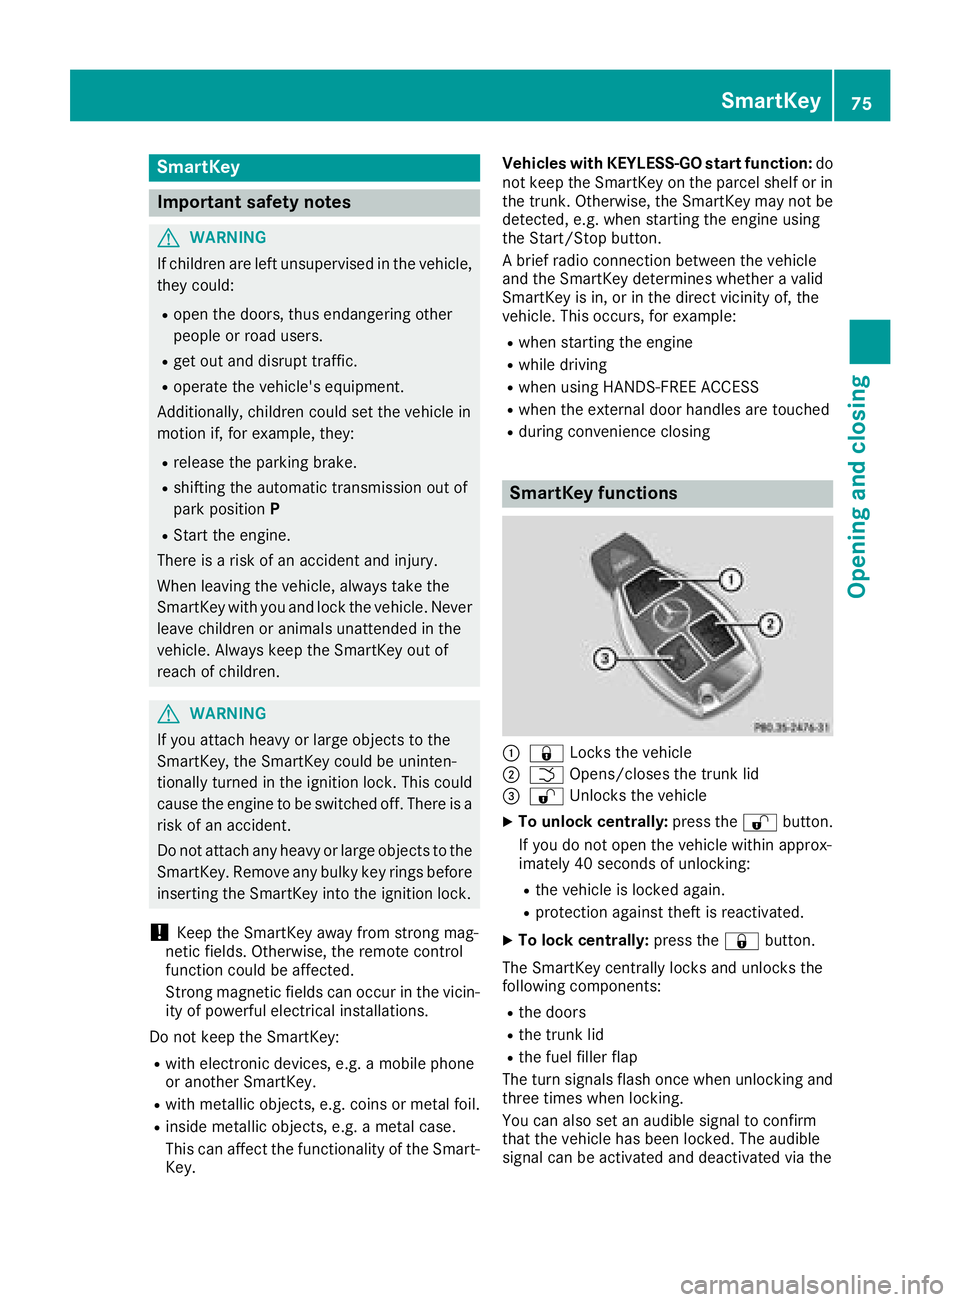
:& Locks the vehicle
;FOpens/closes the trunk lid
=%Unlocks the vehicle
XTo unlock centrally: press the%button.
If you do not open the vehicle within approx-
imately 40 seconds of unlocking:
Rthe vehicle is locked again.
Rprotection against theft is reactivated.
XTo lock centrally: press the&button.
The SmartKey centrally locks and unlocks the
following components:
Rthe doors
Rthe trunk lid
Rthe fuel filler flap
The turn signals flash once when unlocking and
three times when locking.
You can also set an audible signal to confirm
that the vehicle has been locked. The audible
signal can be activated and deactivated via the
SmartKey75
Opening and closing
Z