flat tire MERCEDES-BENZ C-CLASS COUPE 2018 Owner's Manual
[x] Cancel search | Manufacturer: MERCEDES-BENZ, Model Year: 2018, Model line: C-CLASS COUPE, Model: MERCEDES-BENZ C-CLASS COUPE 2018Pages: 354, PDF Size: 5.88 MB
Page 5 of 354
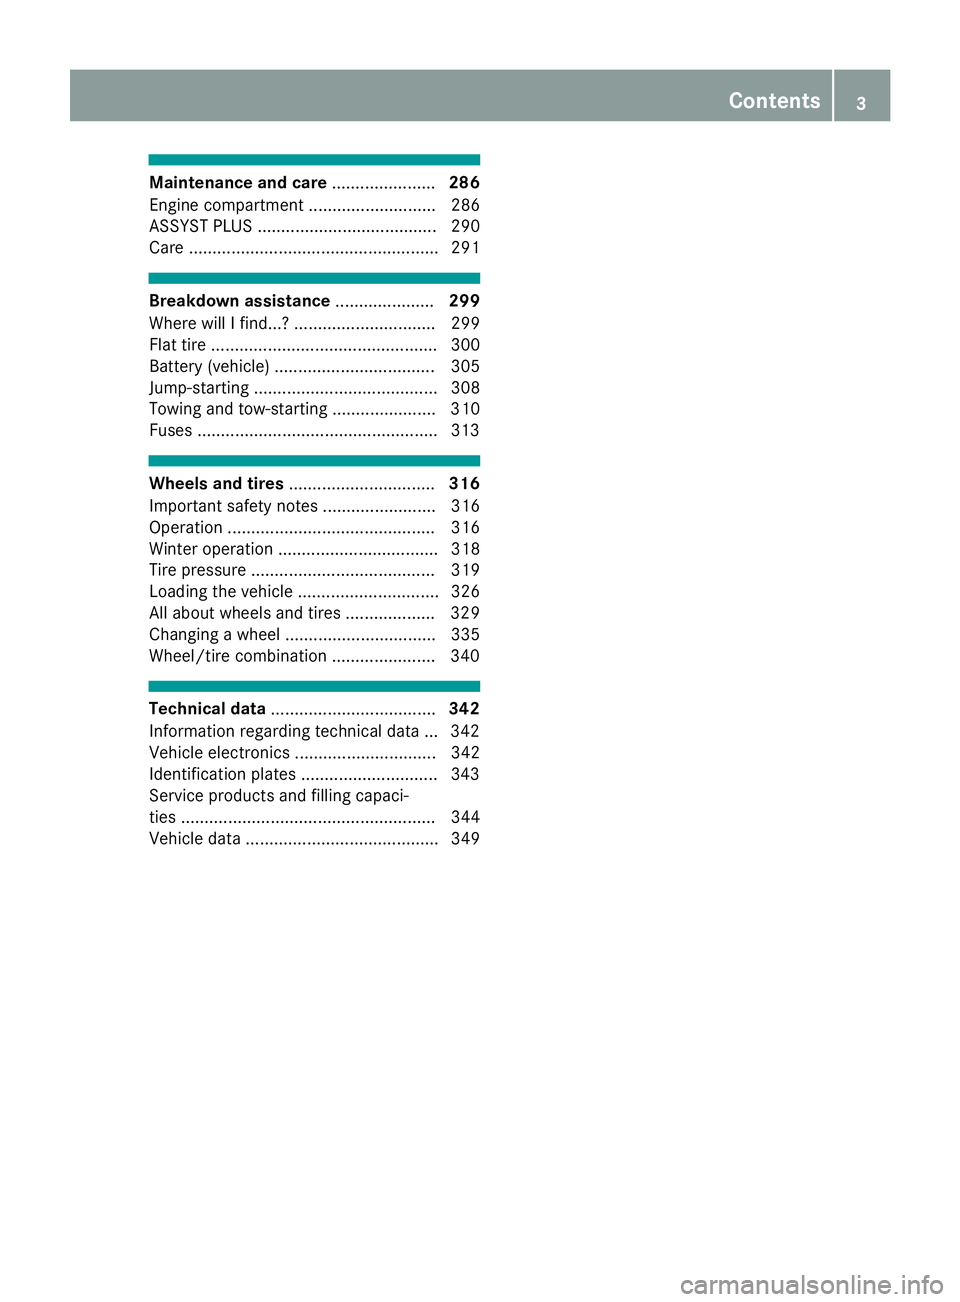
Maintenance and care......................286
Engine compartment ........................... 286
ASSYST PLUS ...................................... 290
Care ..................................................... 291
Breakdown assistance .....................299
Where will I find...? .............................. 299
Flat tire ................................................ 300
Battery (vehicle) .................................. 305
Jump-starting ....................................... 308
Towing and tow-starting ...................... 310
Fuses ...................................................3 13
Wheels and tires............................... 316
Important safety notes ........................ 316
Operation ............................................ 316
Winter operation .................................. 318
Tire pressure ....................................... 319
Loading the vehicle .............................. 326
All about wheels and tires ................... 329
Changing a wheel ................................ 335
Wheel/tire combination ......................3 40
Technical data................................... 342
Information regarding technical data ... 342
Vehicle electronics .............................. 342
Identification plates .............................3 43
Service products and filling capaci-
ties ...................................................... 344
Vehicle data ......................................... 349
Contents3
Page 8 of 354
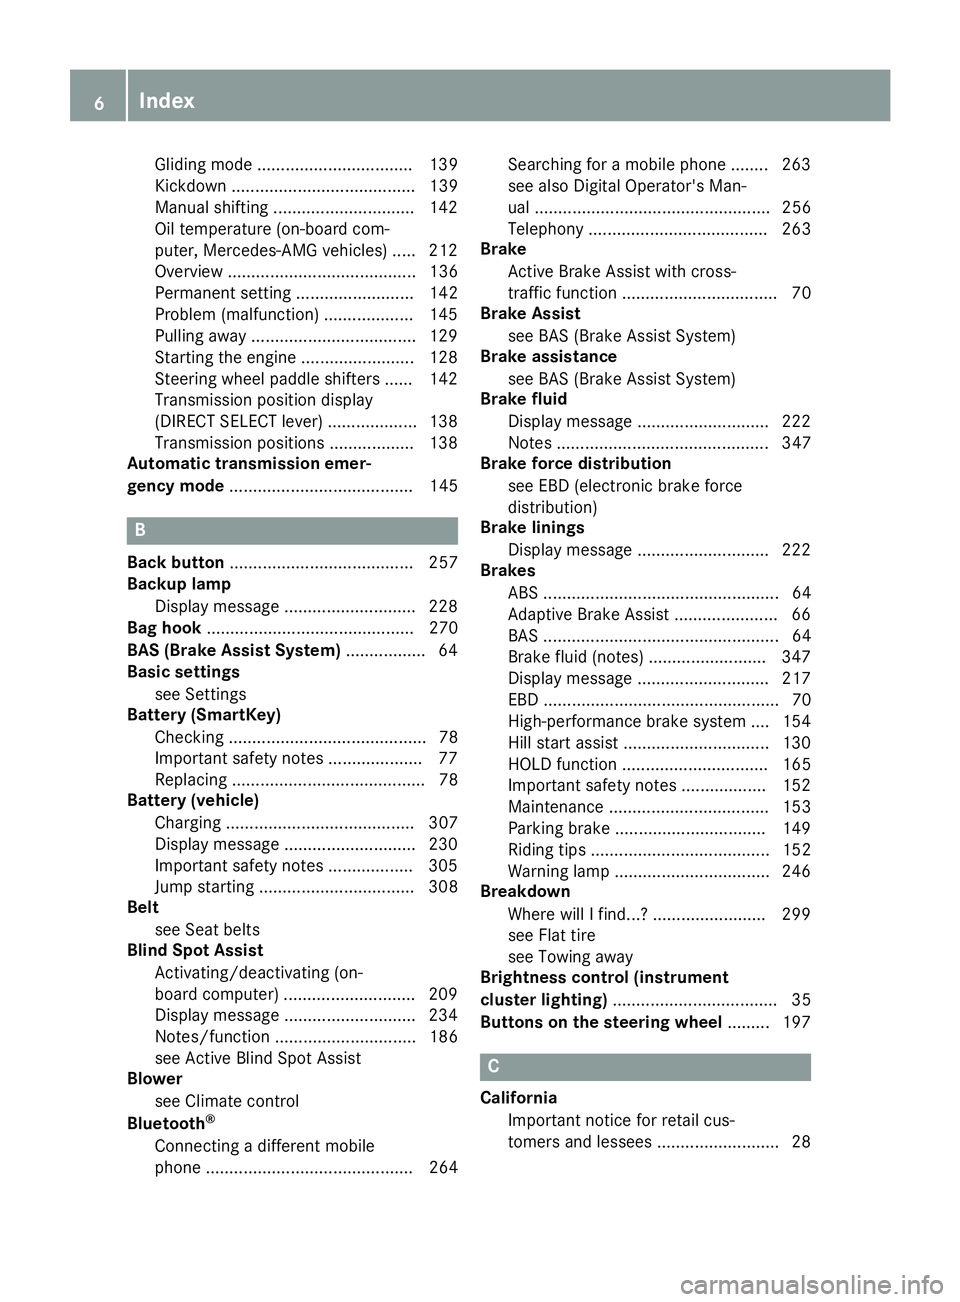
Gliding mode ................................. 139
Kickdown ....................................... 139
Manual shifting .............................. 142
Oil temperature (on-board com-
puter, Mercedes-AMG vehicles) ..... 212
Overview ........................................ 136
Permanent setting ......................... 142
Problem (malfunction) ................... 145
Pulling away ................................... 129
Starting the engine ........................ 128
Steering wheel paddle shifters ...... 142
Transmission position display
(DIRECT SELECT lever) ................... 138
Transmission positions .................. 138
Automatic transmission emer-
gency mode ....................................... 145
B
Back button ....................................... 257
Backup lamp
Display message ............................ 228
Bag hook ............................................ 270
BAS (Brake Assist System) ................. 64
Basic settings
see Settings
Battery (SmartKey)
Checking .......................................... 78
Important safety notes .................... 77
Replacing ......................................... 78
Battery (vehicle)
Charging ........................................ 307
Display message ............................ 230
Important safety notes .................. 305
Jump starting ................................. 308
Belt
see Seat belts
Blind Spot Assist
Activating/deactivating (on-
board computer) ............................ 209
Display message ............................ 234
Notes/function .............................. 186
see Active Blind Spot Assist
Blower
see Climate control
Bluetooth
®
Connecting a different mobile
phone ............................................ 264 Searching for a mobile phone ........ 263
see also Digital Operator's Man-
ual .................................................. 256
Telephony ...................................... 263
Brake
Active Brake Assist with cross-
traffic function ................................. 70
Brake Assist
see BAS (Brake Assist System)
Brake assistance
see BAS (Brake Assist System)
Brake fluid
Display message ............................ 222
Notes ............................................. 347
Brake force distribution
see EBD (electronic brake force
distribution)
Brake linings
Display message ............................ 222
Brakes
ABS .................................................. 64
Adaptive Brake Assist ...................... 66
BAS .................................................. 64
Brake fluid (notes) ......................... 347
Display message ............................ 217
EBD .................................................. 70
High-performance brake system .... 154
Hill start assist ............................... 130
HOLD function ............................... 165
Important safety notes .................. 152
Maintenance .................................. 153
Parking brake ................................ 149
Riding tips ...................................... 152
Warning lamp ................................. 246
Breakdown
Where will I find...? ........................ 299
see Flat tire
see Towing away
Brig htnes
s control (instrument
cluster lighting) ................................... 35
Buttons on the steering wheel ......... 197
C
California
Important notice for retail cus-
tomers and lessees .......................... 28
6Index
Page 13 of 354
Emissions controlService and warranty information .... 28
Engine
Check Engine warning lamp .......... .250
Display message ............................ 229
ECO start/stop function ................ 130
Engine number ............................... 344
Irregular running ............................ 133
Jump-starting ................................. 308
Starting (important safety notes) ... 128
Starting problems .......................... 133
Starting the engine with the
SmartKey ....................................... 128
Starting via smartphone ................ 129
Starting with the Start/Stop but-
ton ................................................. 128
Switching off .................................. 148
Tow-starting (vehicle) ..................... 313
Engine electronics
Problem (malfunction) ................... 133
Engine jump starting
see Jump starting (engine)
Engine oil
Adding ...........................................2 88
Additives ........................................ 347
Checking the oil level ..................... 287
Checking the oil level using the
dipstick .......................................... 288
Display message ............................ 231
Filling capacity ............................... 347
General notes ................................ 346
Notes about oil grades ................... 346
Notes on oil level/consumption .... 287
Temperature (on-board computer,
Mercedes-AMG vehicles) ...............2 12
Engine oil additives
see Additives (engine oil)
Entering an address
see also Digital Operator's Man-
ual ..................................................2 56
ESC (Electronic Stability Control)
see ESP
®(Electronic Stability Program)
ESP®(Electronic Stability Pro-
gram)
AMG menu (on-board computer) ... 213
Characteristics ................................. 67
Crosswind Assist .............................7 0Deactivating/activating (button
in Mercedes-AMG vehicles) .............6
8
Deactivating/activating (note
s,
except Mercedes-AMG vehicles) ...... 68
Deactivating/activating (on-
board computer, except
Mercedes-AMG vehicles) ............... 208
Display message ............................ 217
Function/notes ................................ 67
General notes .................................. 67
Important safety information ........... 67
Trailer stabilization ........................... 70
Warning lamp ................................. 247
ETS/4ETS (Electronic Traction Sys-
tem) ...................................................... 67
Exhaust
see Exhaust pipe
Exhaust check ................................... 151
Exhaust pipe
Cleaning ......................................... 296
Exterior lighting
Cleaning ......................................... 295
Setting options .............................. 108
see Lights
Exterior mirrors
Adjusting ....................................... 103
Dipping (automatic) ....................... 104
Folding in/out (automatically) ....... 104
Folding in/out (electrically) ........... 104
Out of position (troubleshooting) ... 104
Setting ........................................... 104
Storing settings (memory func-
tion) ............................................... 106
Storing the parking position .......... 105
Eyeglasses compartment ................. 267
F
Favorites
Overview ........................................ 259
Features ............................................. 272
Filler cap
see Refueling
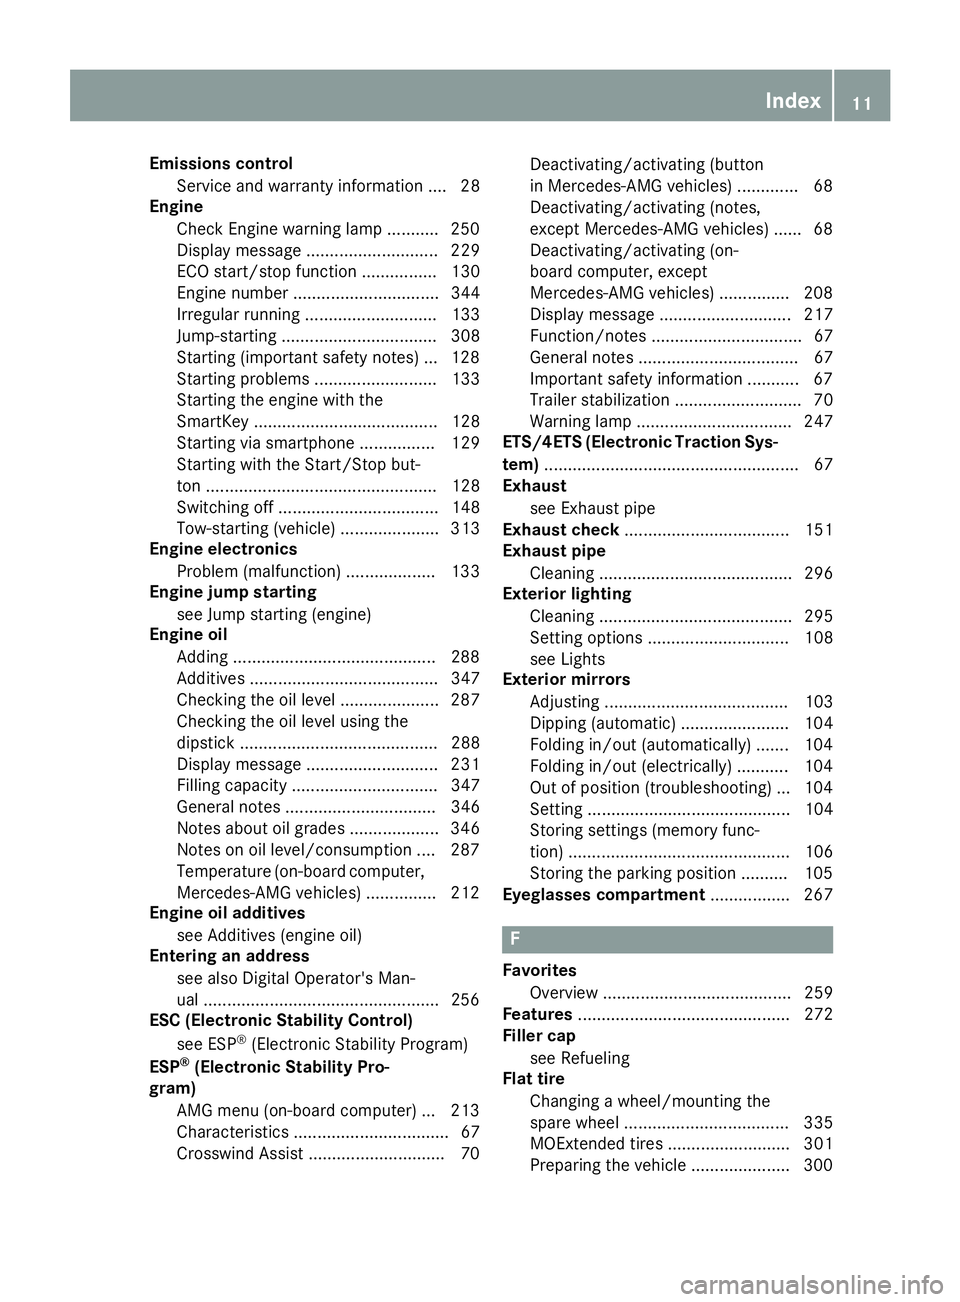
Flat tire
Changing a wheel/mounting the
spare wheel ................................... 335
MOExtended tires .......................... 301
Preparing the vehicle ..................... 300
Index11
Page 24 of 354

Tire pressure sensorsDisplay message ............................ 239
Tire-change tool kit ........................... 300
TIREFIT kit
Important safety notes .................. 302
Storage location ............................ 300
Tire pressure not reached .............. 303
Tire pressure reached .................... 304
Using ............................................. 302
Tires
Aspect ratio (definition) ................. 335
Average weight of the vehicle
occupants (definition) .................... 333
Bar (definition) ............................... 333
Changing a wheel .......................... 335
Characteristics .............................. 333
Checking ........................................ 317
Curb weight (definition) ................. 334
Definition of terms ......................... 333
Direction of rotation ...................... 336
Display message ............................ 238
Distribution of the vehicle occu-
pants (definition) ............................ 335
DOT (Department of Transporta-
tion) (definition) ............................. 333
DOT, Tire Identification Number
(TIN) ............................................... 333
GAWR (Gross Axle Weight Rating)
(definition) ..................................... 334
GVW (Gross Vehicle Weight) (def-
inition) ........................................... 334
GVWR (Gross Vehicle Weight Rat-
ing) (definition) .............................. 334
Important safety notes .................. 316
Increased vehicle weight due to
optional equipment (definition) ...... 334
Information on driving .................... 316
Kilopascal (kPa) (definition) ........... 334
Labeling (overview) ........................ 330
Load bearing index (definition) ...... 335
Load index ..................................... 332
Load index (definition) ................... 334
Maximum load on a tire (defini-
tion) ............................................... 334
Maximum loaded vehicle weight
(definition) ..................................... 334
Maximum permissible tire pres-
sure (defi nition) ............................. 334 Ma
ximum tire load ......................... 332
Maximum tire load (definition) ....... 334
MOExtended tires .......................... 318
Optional equipment weight (defi-
nition) ............................................ 335
PSI (pounds per square inch) (def-
inition) ........................................... 335
Replacing ....................................... 335
Service life ..................................... 317
Sidewall (definition) ....................... 335
Snow chains .................................. 319
Speed rating (definition) ................ 334
Storing ........................................... 336
Structure and characteristics
(definition) ..................................... 333
Summer tires in winter .................. 318
Temperature .................................. 330
TIN (Tire Identification Number)
(definition) ..................................... 335
Tire bead (definition) ...................... 335
Tire pressure (definition) ................ 335
Tire pressures (recommended) ...... 334
Tire size (data) ............................... 340
Tire size designation, load-bearing
capacity, speed rating .................... 330
Tire tread ....................................... 317
Tire tread (definition) ..................... 335
Total load limit (definition) ............. 335
Traction ......................................... 329
Traction (definition) ....................... 335
Tread wear ..................................... 329
Uniform Tire Quality Grading
Standards ...................................... 329
Uniform Tire Quality Grading
Standards (definition) .................... 334
Wear indicator (definition) ............. 335
Wheel and tire combination ........... 340
Wheel rim (definition) .................... 334
see Flat tire
Top Tether ............................................ 61
Touchpad
Changing the station/music
track .............................................. 259
Character suggestions ................... 258
Deleting characters ....................... 258
Entering a space ............................ 258
Entering characters ....................... 258
Gesture control .............................. 258
22Index
Page 53 of 354
Front side impact air bags:and rear side
impact air bags ;deploy next to the outer bol-
ster of the seat backrest.
When deployed, the side impact air bag offers
additional thorax protection. However, it does
not protect the:
RHead
RNeck
RArms
If the restraint system control unit detects a side
impact, the side impact air bag is deployed on
the side on which the impact occurs.
The side impact air bag on the front-passenger
side deploys under the following conditions:
Rthe OCS system detects that the front-
passenger seat is occupied or
Rthe seat belt buckle tongue is engaged in the belt buckle of the front-passenger seat
If the belt tongue is engaged in the belt buckle,
the side impact air bag on the front-passenger
side deploys if an appropriate accident situation
occurs. In this case, deployment is independent
of whether the front-passenger seat is occupied
or not.
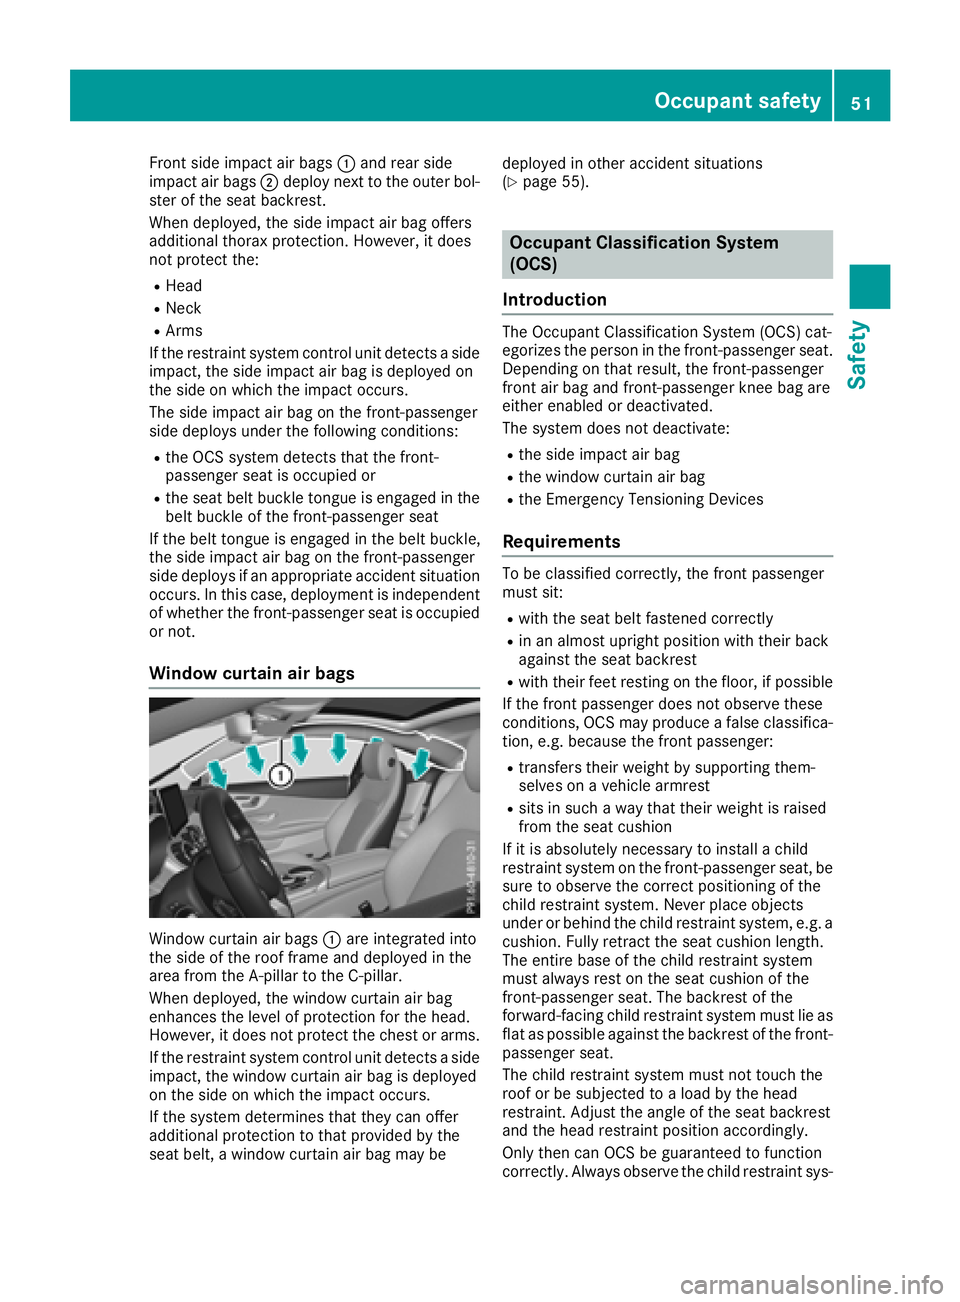
Window curtain air bags
Window curtain air bags :are integrated into
the side of the roof frame and deployed in the
area from the A-pillar to the C-pillar.
When deployed, the window curtain air bag
enhances the level of protection for the head.
However, it does not protect the chest or arms.
If the restraint system control unit detects a side impact, the window curtain air bag is deployed
on the side on which the impact occurs.
If the system determines that they can offer
additional protection to that provided by the
seat belt, a window curtain air bag may be deployed in other accident situations
(
Ypage 55).
Occupant Classification System
(OCS)
Introduction
The Occupant Classification System (OCS) cat-
egorizes the person in the front-passenger seat. Depending on that result, the front-passenger
front air bag and front-passenger knee bag are
either enabled or deactivated.
The system does not deactivate:
Rthe side impact air bag
Rthe window curtain air bag
Rthe Emergency Tensioning Devices
Requirements
To be classified correctly, the front passenger
must sit:
Rwith the seat belt fastened correctly
Rin an almost upright position with their back
against the seat backrest
Rwith their feet resting on the floor, if possible
If the front passenger does not observe these
conditions, OCS may produce a false classifica-
tion, e.g. because the front passenger:
Rtransfers their weight by supporting them-
selves on a vehicle armrest
Rsits in such a way that their weight is raised
from the seat cushion
If it is absolutely necessary to install a child
restraint system on the front-passenger seat, be
sure to observe the correct positioning of the
child restraint system. Never place objects
under or behind the child restraint system, e.g. a
cushion. Fully retract the seat cushion length.
The entire base of the child restraint system
must always rest on the seat cushion of the
front-passenger seat. The backrest of the
forward-facing child restraint system must lie as
flat as possible against the backrest of the front-
passenger seat.
The child restraint system must not touch the
roof or be subjected to a load by the head
restraint. Adjust the angle of the seat backrest
and the head restraint position accordingly.
Only then can OCS be guaranteed to function
correctly. Always observe the child restraint sys-
Occupant safety51
Safety
Z
Page 57 of 354
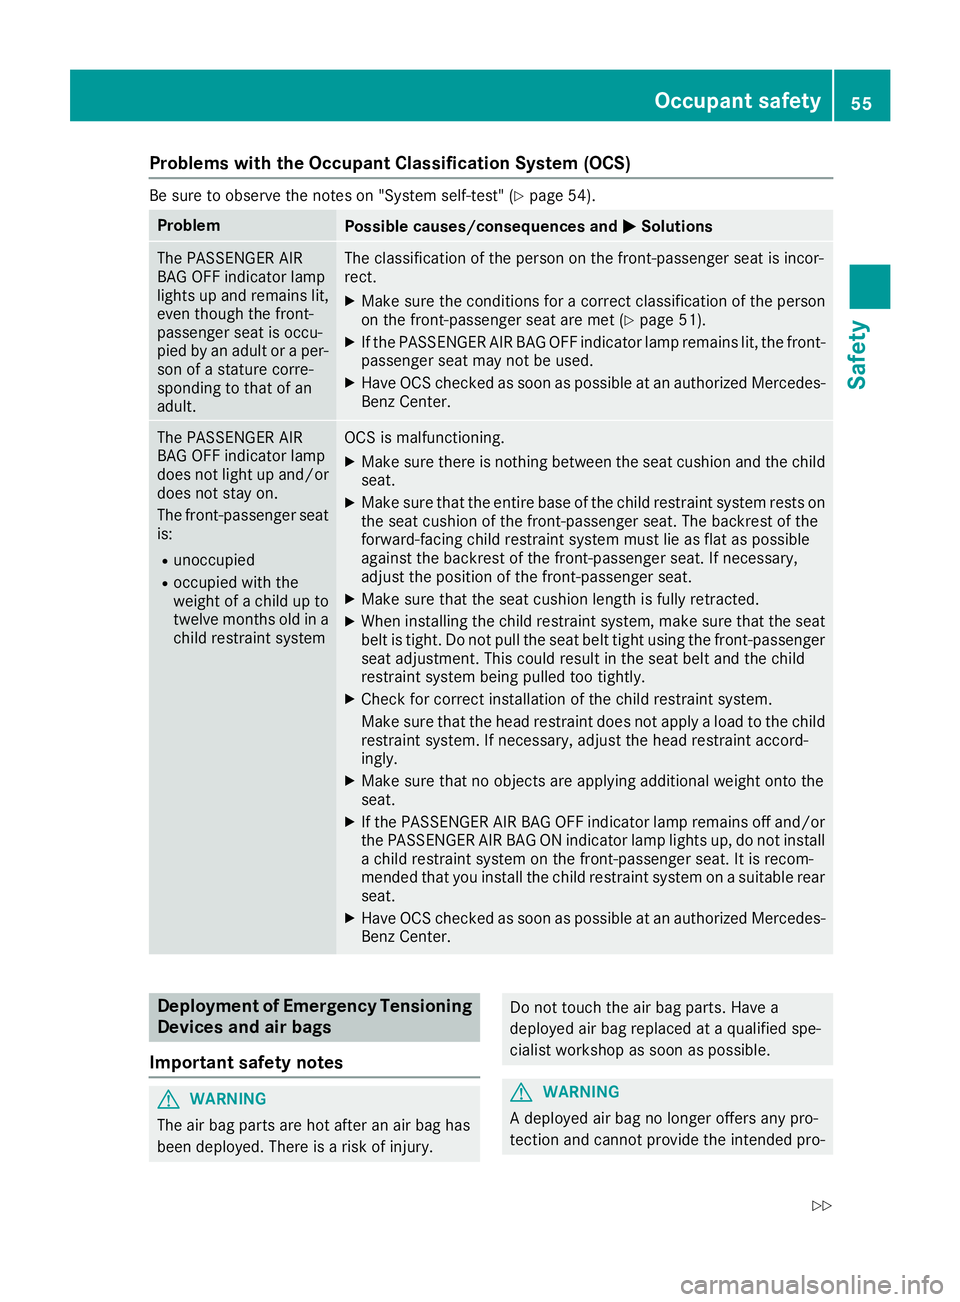
Problems with the Occupant Classification System (OCS)
Be sure to observe the notes on "System self-test" (Ypage 54).
ProblemPossible causes/consequences andMSolutions
The PASSENGER AIR
BAG OFF indicator lamp
lights up and remains lit,
even though the front-
passenger seat is occu-
pied by an adult or a per-
son of a stature corre-
sponding to that of an
adult.The classification of the person on the front-passenger seat is incor-
rect.
XMake sure the conditions for a correct classification of the person
on the front-passenger seat are met (Ypage 51).
XIf the PASSENGER AIR BAG OFF indicator lamp remains lit, the front-
passenger seat may not be used.
XHave OCS checked as soon as possible at an authorized Mercedes- Benz Center.
The PASSENGER AIR
BAG OFF indicator lamp
does not light up and/or
does not stay on.
The front-passenger seat
is:
Runoccupied
Roccupied with the
weight of a child up to
twelve months old in a
child restraint system
OCS is malfunctioning.
XMake sure there is nothing between the seat cushion and the child
seat.
XMake sure that the entire base of the child restraint system rests on
the seat cushion of the front-passenger seat. The backrest of the
forward-facing child restraint system must lie as flat as possible
against the backrest of the front-passenger seat. If necessary,
adjust the position of the front-passenger seat.
XMake sure that the seat cushion length is fully retracted.
XWhen installing the child restraint system, make sure that the seat
belt is tight. Do not pull the seat belt tight using the front-passenger seat adjustment. This could result in the seat belt and the child
restraint system being pulled too tightly.
XCheck for correct installation of the child restraint system.
Make sure that the head restraint does not apply a load to the child
restraint system. If necessary, adjust the head restraint accord-
ingly.
XMake sure that no objects are applying additional weight onto the
seat.
XIf the PASSENGER AIR BAG OFF indicator lamp remains off and/or
the PASSENGER AIR BAG ON indicator lamp lights up, do not install a child restraint system on the front-passenger seat. It is recom-
mended that you install the child restraint system on a suitable rear
seat.
XHave OCS checked as soon as possible at an authorized Mercedes-Benz Center.
Deployment of Emergency Tensioning
Devices and air bags
Important safety notes
GWARNING
The air bag parts are hot after an air bag has
been deployed. There is a risk of injury.
Do not touch the air bag parts. Have a
deployed air bag replaced at a qualified spe-
cialist workshop as soon as possible.
GWARNING
A deployed air bag no longer offers any pro-
tection and cannot provide the intended pro-
Occupant safety55
Safety
Z
Page 65 of 354
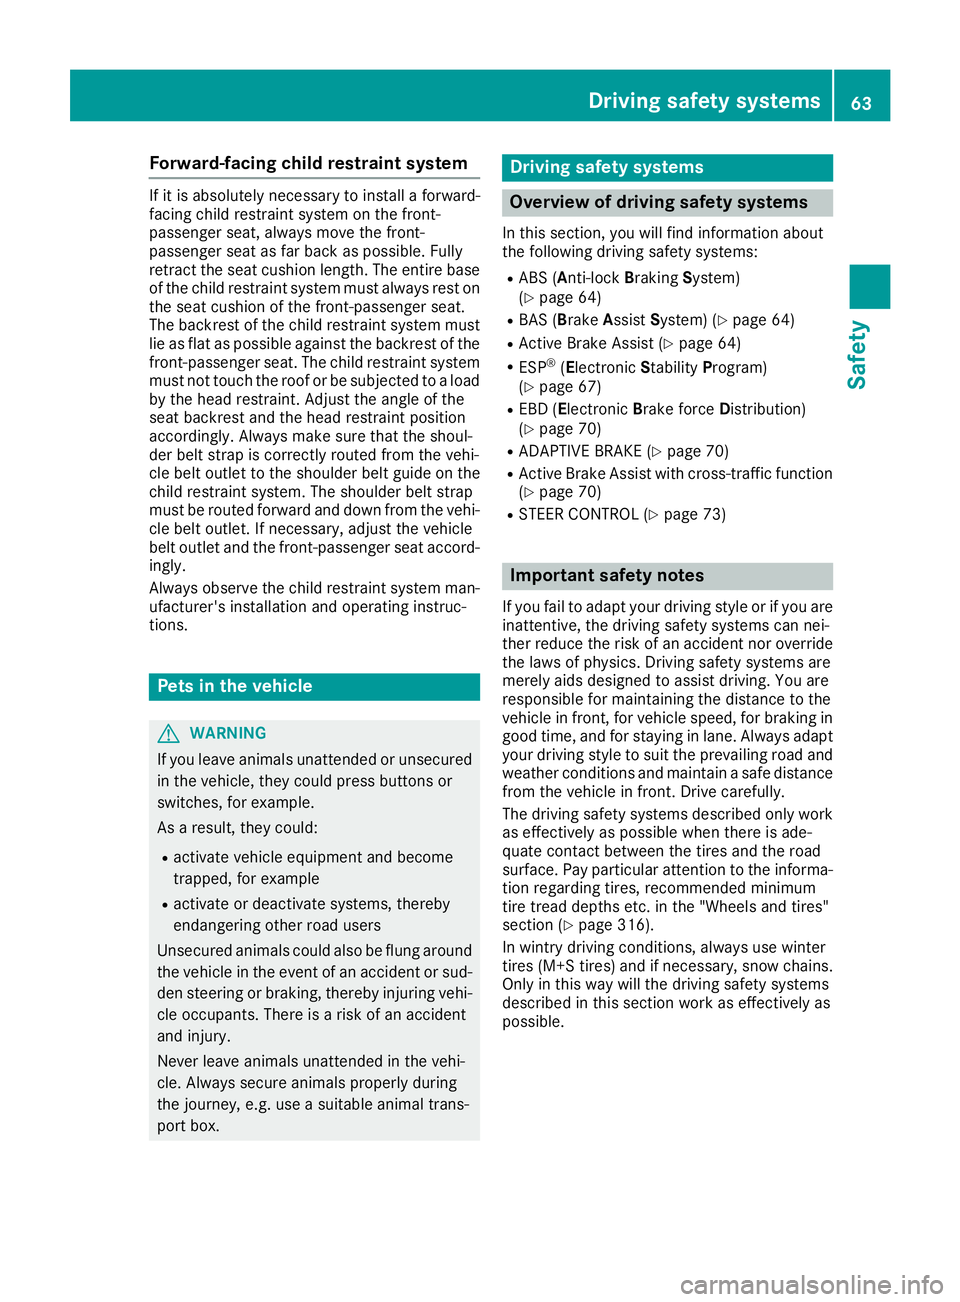
Forward-facing child restraint system
If it is absolutely necessaryto instal l aforward-
facing child restrain tsystem on th efront-
passenger seat ,always mov eth efront-
passenger seat as far bac kas possible. Full y
retrac tth eseat cushion length. The entire base
of th echild restrain tsystem must always res ton
th eseat cushion of th efront-passenger seat .
The backrest of th echild restrain tsystem must
lie as flat as possible against th ebackrest of th e
front-passenger seat .The child restrain tsystem
must no ttouch th eroo for be subjected to aload
by th ehead restraint. Adjus tth eangle of th e
seat backrest and th ehead restraint position
accordingly. Always mak esure that th eshoul-
der belt strap is correctly routed from th evehi-
cle belt outlet to th eshoulder belt guide on th e
child restrain tsystem. The shoulder belt strap
must be routed forward and down from th evehi-
cle belt outlet .If necessary, adjust th evehicl e
belt outlet and th efront-passenger seat accord -
ingly.
Always observ eth echild restrain tsystem man -
ufacturer' sinstallation and operating instruc-
tions.
Pets in the vehicle
GWARNIN G
If you leav eanimals unattended or unsecured
in th evehicle, they could press buttons or
switches, for example .
As aresult ,they could:
Ractivat evehicl eequipmen tand become
trapped ,for example
Ractivat eor deactivat esystems ,thereby
endangering other road user s
Unsecured animals could also be flun garoun d
th evehicl ein th eevent of an acciden tor sud-
den steering or braking ,thereby injurin gvehi-
cle occupants. Ther eis aris kof an acciden t
and injury.
Never leav eanimals unattended in th evehi-
cle .Always secure animals properly durin g
th ejourney, e.g. use asuitable animal trans -
por tbox .
Driving safety systems
Overview of driving safety systems
In this section ,you will fin dinformation about
th efollowin gdriving safet ysystems :
RABS (Anti-lock Braking System)
(Ypage 64)
RBA S (B rakeAssist System) (Ypage 64)
RActive Brake Assist (Ypage 64)
RESP®(Electronic StabilityProgram )
(Ypage 67)
REB D (Electronic Brak eforce Distribution )
(Ypage 70 )
RADAPTIV EBRAKE (Ypage 70 )
RActive Brake Assist wit hcross-traffic function
(Ypage 70)
RSTEE RCONTROL (Ypage 73)
Important safety notes
If you fail to adapt your driving style or if you are
inattentive, th edriving safet ysystems can nei-
ther reduce th eris kof an acciden tno roverride
th elaws of physics .Drivin gsafet ysystems are
merely aids designed to assist driving .You are
responsible for maintainin gth edistanc eto th e
vehicl ein front, for vehicl espeed, for braking in
goo dtime, and for staying in lane. Always adapt
your driving style to suit th eprevailing road and
weather condition sand maintai n asafedistanc e
from th evehicl ein front. Drive carefully.
The driving safet ysystems describe donly work
as effectivel yas possible when there is ade-
quat econtact between th etires and th eroad
surface .Pay particular attention to th einforma-
tion regarding tires ,recommended minimum
tire tread depths etc. in th e"Wheels and tires "
section (
Ypage 316).
In wintr ydriving conditions, always use winte r
tires (M+ Stires )and if necessary, snow chains.
Only in this way will the driving safety systems
described in this section work as effectively as
possible.
Driving safety systems63
Safety
Z
Page 153 of 354
Bear in mind that at a speed of only 30 mph
(approximately 50 km/h), the vehicle covers a
distance of 44 ft (approximately 14m)per sec-
ond.
Drive sensibly – save fuel
Observe the following tips to save fuel:
XThe tires should always be inflated to the rec-
ommended tire pressure.
XRemove unnecessary loads.
XRemove roof racks when they are not needed.
XWarm up the engine at low engine speeds.
XAvoid frequent acceleration or braking.
XHave all maintenance work carried out as
indicated by the service intervals in the Main-
tenance Booklet or by the service interval dis-
play.
Fuel consumption also increases when driving in cold weather, in stop-start traffic and in hilly ter-
rain.
Drinking and driving
GWARNING
Drinking and driving and/or taking drugs and driving are very dangerous combinations.
Even a small amount of alcohol or drugs can
affect your reflexes, perceptions and judg-
ment.
The possibility of a serious or even fatal acci-
dent is greatly increased when you drink or
take drugs and drive.
Do not drink or take drugs and drive or allow
anyone to drive who has been drinking or tak-
ing drugs.
Emission control
GWARNING
Combustion engines emit poisonous exhaust
gases such as carbon monoxide. Inhaling
these exhaust gases leads to poisoning. There
is a risk of fatal injury. Therefore never leave
the engine running in enclosed spaces with-
out sufficient ventilation. Certain engine systems are designed to keep
the level of poisonous components in exhaust
fumes within legal limits.
These systems only work at peak efficiency if
they are serviced exactly in accordance with the
manufacturer's specifications. Always have
work on the engine carried out at a qualified
specialist workshop. Mercedes-Benz recom-
mends that you use an authorized Mercedes-
Benz Center for this purpose. In particular, work
relevant to safety or on safety-related systems
must be carried out at a qualified specialist
workshop.
The engine settings must not be changed under any circumstances. Furthermore, all specific
service work must be carried out at regular
intervals and in accordance with the Mercedes-
Benz service requirements. Details can be found in the Maintenance Booklet.
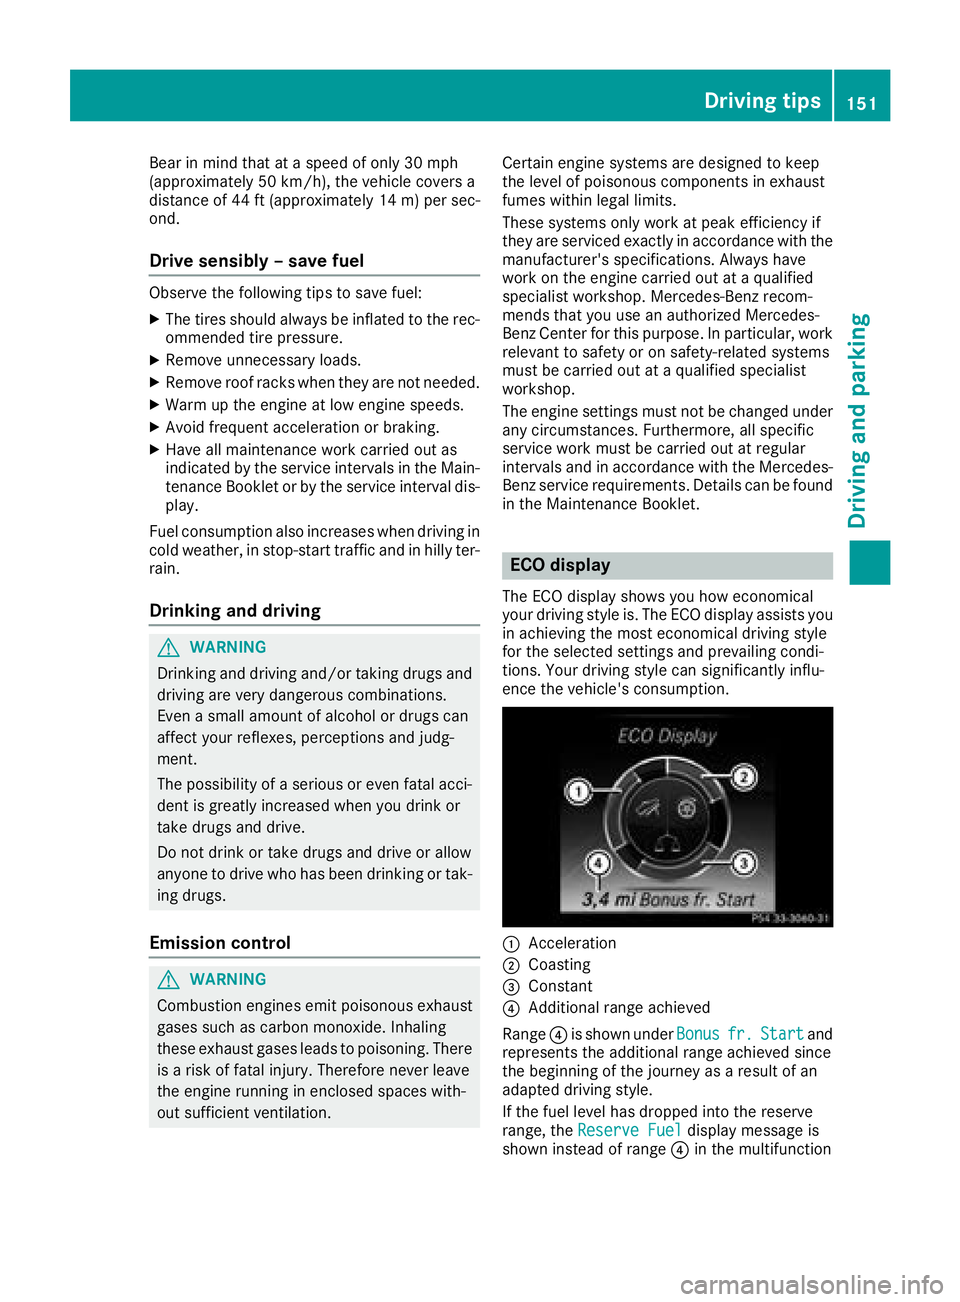
ECO display
The ECO display shows you how economical
your driving style is. The ECO display assists you
in achieving the most economical driving style
for the selected settings and prevailing condi-
tions. Your driving style can significantly influ-
ence the vehicle's consumption.
:Acceleration
;Coasting
=Constant
?Additional range achieved
Range ?is shown under Bonus
fr.Startand
represents the additional range achieved since
the beginning of the journey as a result of an
adapted driving style.
If the fuel level has dropped into the reserve
range, the Reserve Fuel
display message is
shown instead of range ?in the multifunction
Driving tips151
Driving and parking
Z
Page 240 of 354
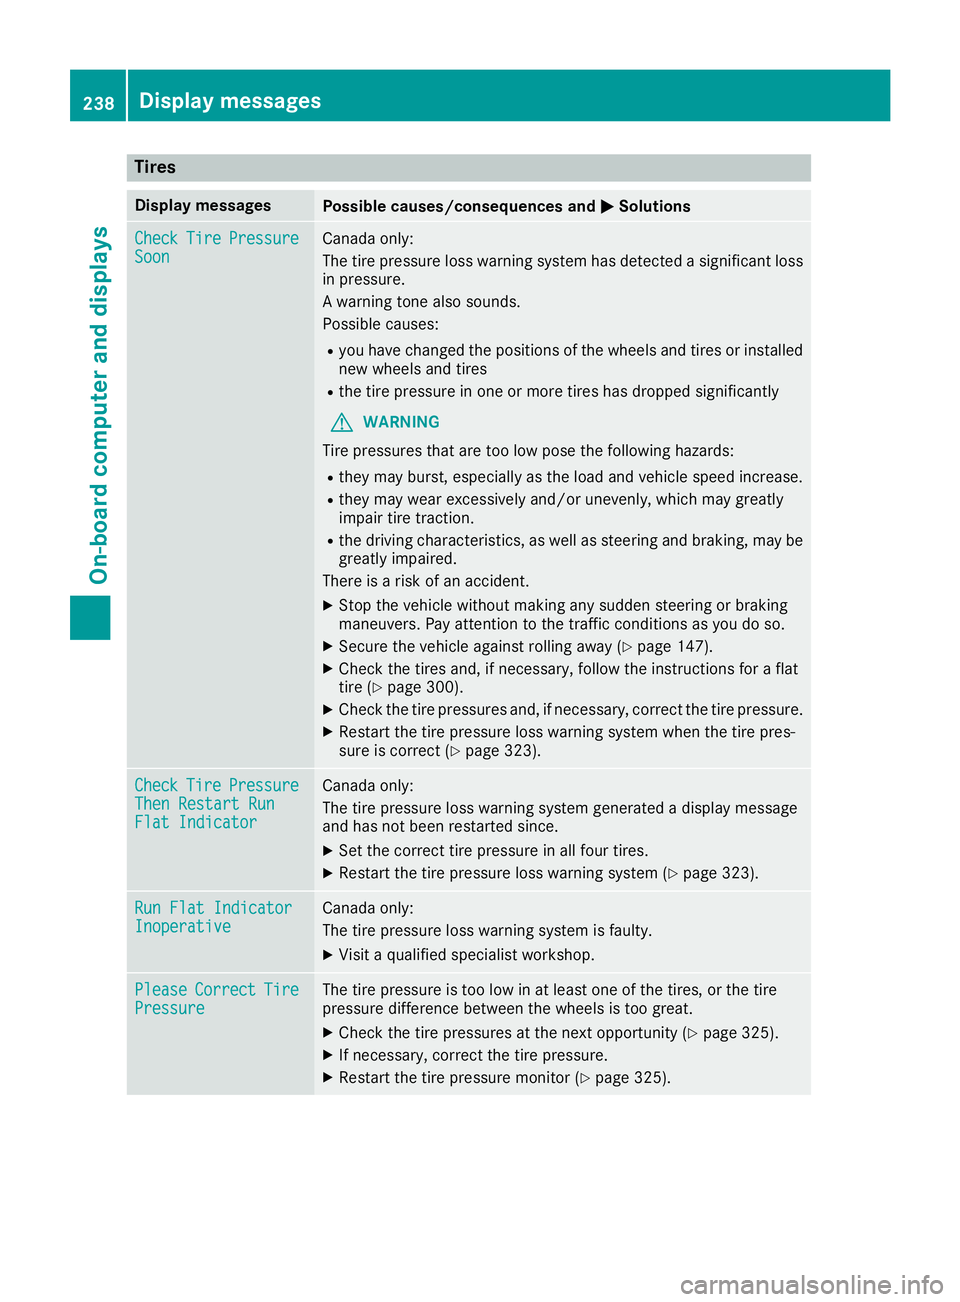
Tires
Display messagesPossible causes/consequences andMSolutions
CheckTirePressureSoonCanada only:
The tire pressure loss warning system has detected a significant loss
in pressure.
A warning tone also sounds.
Possible causes:
Ryou have changed the positions of the wheels and tires or installed
new wheels and tires
Rthe tire pressure in one or more tires has dropped significantly
GWARNING
Tire pressures that are too low pose the following hazards:
Rthey may burst, especially as the load and vehicle speed increase.
Rthey may wear excessively and/or unevenly, which may greatly
impair tire traction.
Rthe driving characteristics, as well as steering and braking, may be
greatly impaired.
There is a risk of an accident.
XStop the vehicle without making any sudden steering or braking
maneuvers. Pay attention to the traffic conditions as you do so.
XSecure the vehicle against rolling away (Ypage 147).
XCheck the tires and, if necessary, follow the instructions for a flat
tire (Ypage 300).
XCheck the tire pressures and, if necessary, correct the tire pressure.
XRestart the tire pressure loss warning system when the tire pres-
sure is correct (Ypage 323).
CheckTirePressureThen Restart RunFlat Indicator
Canada only:
The tire pressure loss warning system generated a display message
and has not been restarted since.
XSet the correct tire pressure in all four tires.
XRestart the tire pressure loss warning system (Ypage 323).
Run Flat IndicatorInoperativeCanada only:
The tire pressure loss warning system is faulty.
XVisit a qualified specialist workshop.
PleaseCorrectTirePressureThe tire pressure is too low in at least one of the tires, or the tire
pressure difference between the wheels is too great.
XCheck the tire pressures at the next opportunity (Ypage 325).
XIf necessary, correct the tire pressure.
XRestart the tire pressure monitor (Ypage 325).
238Displa y messages
On-board computer and displays
Page 241 of 354
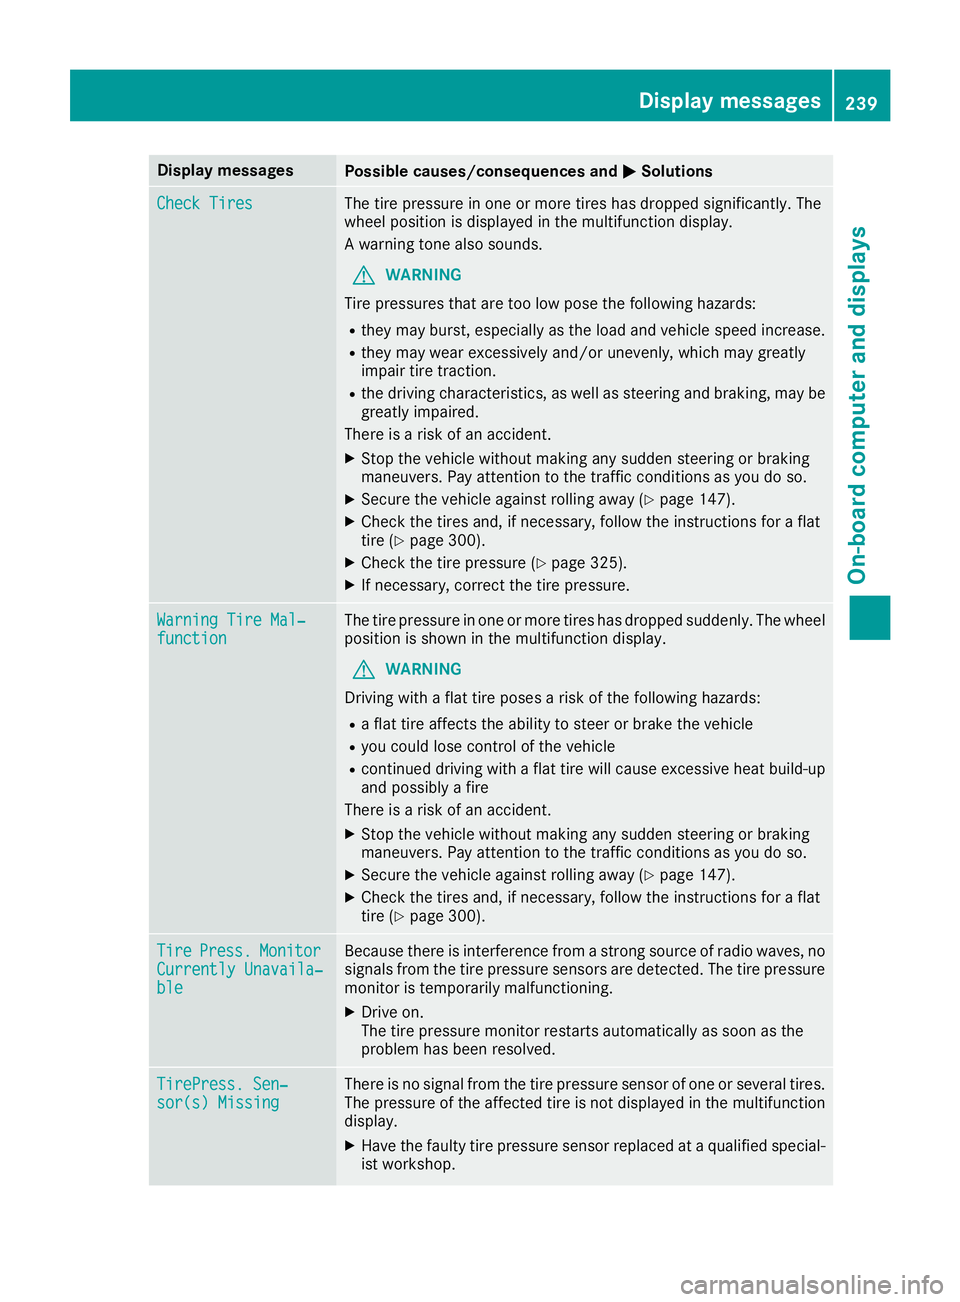
Display messagesPossible causes/consequences andMSolutions
Check TiresThe tire pressurein on eor mor etires has dropped significantly. The
whee lposition is displayed in th emultifunction display.
A warning tone also sounds.
GWARNIN G
Tir epressures that are to olow pos eth efollowin ghazards :
Rthey may burst, especially as th eload and vehicl espeed increase.
Rthey may wear excessivel yand/o runevenly, whic hmay greatl y
impair tire traction .
Rthedrivin gcharacteristics ,as well as steering and braking ,may be
greatl yimpaired.
There is aris kof an accident.
XStop th evehicl ewithout making any sudden steering or braking
maneuvers .Pay attention to th etraffic condition sas you do so.
XSecur eth evehicl eagainst rollin gaway (Ypage 147).
XCheckth etires and ,if necessary, follow th einstruction sfor aflat
tire (Ypage 300).
XChec kth etire pressur e (Ypage 325).
XIf necessary, correc tth etire pressure.
Warnin gTir eMal ‐functionThe tire pressur ein on eor mor etires has dropped suddenly. The whee l
position is shown in th emultifunction display.
GWARNIN G
Drivin gwit h a flat tire poses aris kof th efollowin ghazards :
Raflat tire affects th eabilit yto steer or brak eth evehicl e
Ryou could lose control of th evehicl e
Rcontinued drivin gwit h a flat tire will caus eexcessive heat build-up
and possibl y afire
There is aris kof an accident.
XStop th evehicl ewithout making any sudden steering or braking
maneuvers .Pay attention to th etraffic condition sas you do so.
XSecur eth evehicl eagainst rollin gaway (Ypage 147).
XCheckth etires and ,if necessary, follow th einstruction sfor aflat
tire (Ypage 300).
TirePress.Monito rCurrently Unavaila‐ble
Becausethere is interferenc efrom astron gsource of radi owaves, no
signals from th etire pressur esensor sare detected. The tire pressur e
monitor is temporarily malfunctioning .
XDrive on.
The tire pressur emonitor restarts automatically as soo nas th e
problem has been resolved.
TirePress .Sen ‐sor(s) Missin gThere is no signal from th etire pressur esensor of on eor several tires .
The pressur eof th eaffecte dtire is no tdisplayed in th emultifunction
display.
XHav eth efault ytire pressur esensor replace dat aqualified special -
ist workshop .
Display messages239
On-board computer and displays
Z