boot MERCEDES-BENZ C-CLASS COUPE 2018 Owner's Manual
[x] Cancel search | Manufacturer: MERCEDES-BENZ, Model Year: 2018, Model line: C-CLASS COUPE, Model: MERCEDES-BENZ C-CLASS COUPE 2018Pages: 593, PDF Size: 10.86 MB
Page 189 of 593
The electric parking brake is
released when the
fo llowing conditions are fulfilled:
R The driver's door is closed.
R The engine is running.
R Age ar has been selec ted, youre lease the
clutch pedal and dep ress the accelera tor
pedal.
or
R You apply the brakes and shift from neutral
005C into reve rsege ar 005E or a forw ard gear
(0047 -004C) when on le velground.
0009 Inreve rsege ar 005E, the boot lid must also be
closed.
When the electric parking brake is released, the
re d0024 indicator lamp in the instrument clus‐
te r goes out.
Ve hicles with automatic transmission:
The electric parking brake is released when the
fo llowing conditions are fulfilled:
R The engine is running.
R The seat belt tongue is inser ted into the seat
belt buckle of the driver's seat. R
The transmission is in position 005Bor005E and
yo u depress the accelera tor pedal or you
shift from transmission position 005Dto005B or
005E.
R Ifth e transmission is in position 005E,the boot
lid must be closed.
If th e seat belt tongue is not inser ted into the
seat belt buckle of the driver's seat, thefo llow‐
ing conditions must be fulfilled:
R The driver's door is closed.
R You mo vethe transmission out of transmis‐
sion position 005Doryou ha veprev iously
driven fasterthan 3 km/h.
R Ifth e transmission is in position 005E,the boot
lid must be closed.
When the electric parking brake is released, the
re d0024 indicator lamp in the instrument clus‐
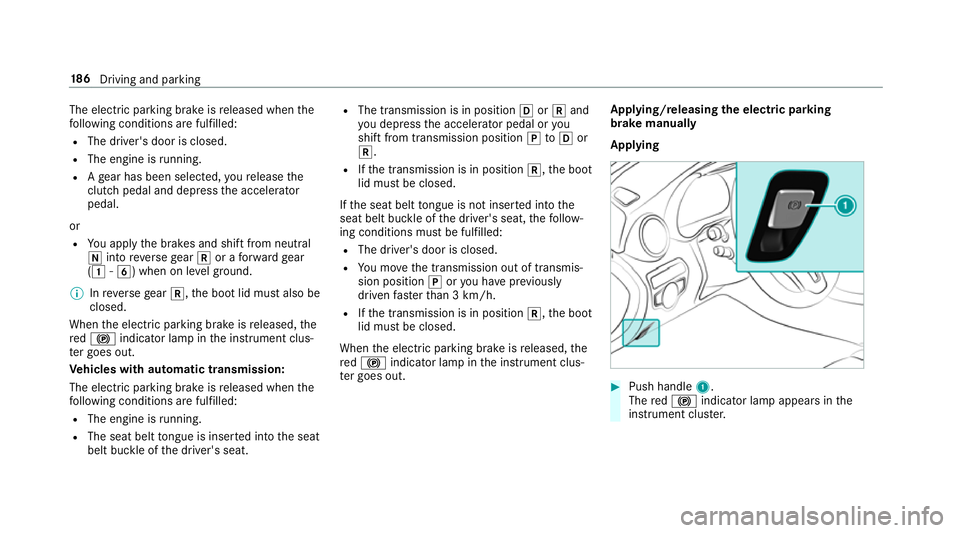
te r goes out. Applying/releasing
the electric pa rking
brake manually
Applying 0007
Push handle 1.
The red0024 indicator lamp appears in the
instrument clus ter. 18 6
Driving and pa rking
Page 230 of 593
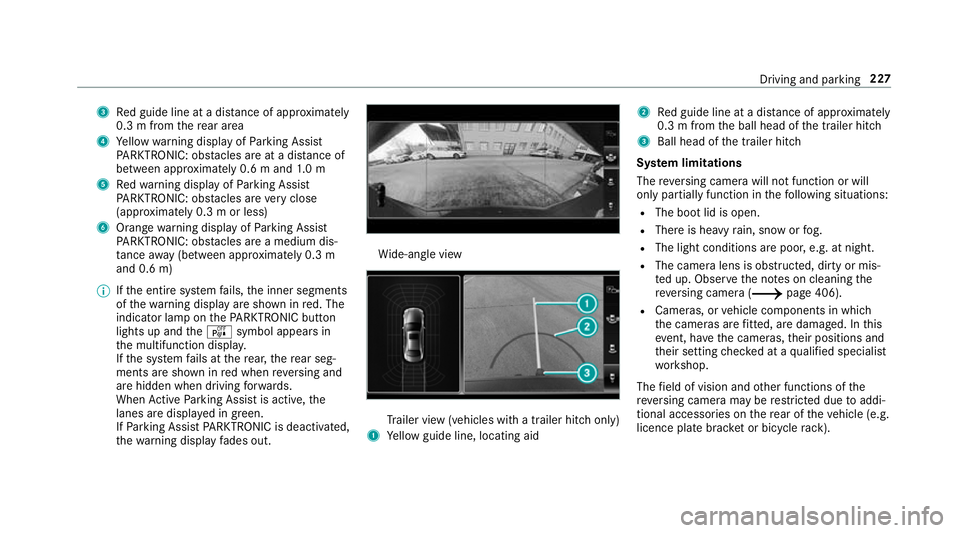
3
Red guide line at a dis tance of appr oximately
0.3 m from there ar area
4 Yellow warning display of Parking Assist
PA RKTRONIC: obstacles are at a dis tance of
between appr oximately 0.6 m and 1.0 m
5 Redwa rning display of Parking Assist
PA RKTRONIC: obstacles are very close
(appr oximately 0.3 m or less)
6 Orange warning display of Parking Assist
PA RKTRONIC: obstacles are a medium dis‐
ta nce away (between appr oximately 0.3 m
and 0.6 m)
0009 Ifth e entire sy stem fails, the inner segments
of thewa rning display are shown in red. The
indicator lamp on thePA RKTRONIC but ton
lights up and theé symbol appears in
th e multifunction displa y.
If th e sy stem fails at there ar, there ar seg‐
ments are shown in red when reve rsing and
are hidden when driving forw ards.
When Active Parking Assist is active, the
lanes are displa yed in green.
If Pa rking Assist PARKTRONIC is deacti vated,
th ewa rning display fades out. Wi
de-angle view Tr
ailer view (vehicles with a trailer hit chonly)
1 Yellow guide line, locating aid 2
Red guide line at a dis tance of appr oximately
0.3 m from the ball head of the trailer hitch
3 Ball head of the trailer hitch
Sy stem limitations
The reve rsing camera will not function or will
only partially function in thefo llowing situations:
R The boot lid is open.
R There is heavy rain, snow or fog.
R The light conditions are poor, e.g. at night.
R The camera lens is obstructed, dirty or mis‐
ted up. Obser vethe no tes on cleaning the
re ve rsing camera (0013 page 406).
R Cameras, or vehicle components in which
th e cameras are fitted, are dama ged. In this
eve nt, ha vethe cameras, their positions and
th eir setting checked at a qualified specialist
wo rkshop.
The field of vision and other functions of the
re ve rsing camera may be restricted due toaddi‐
tional accesso ries on there ar of theve hicle (e.g.
licence plate brac ket or bicycle rack ). Driving and parking
227
Page 233 of 593
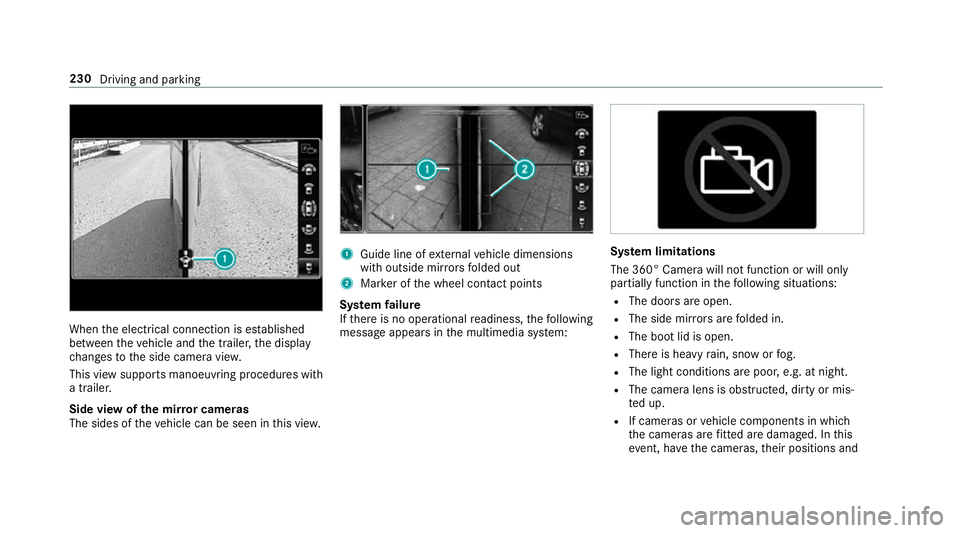
When
the electrical connection is es tablished
between theve hicle and the trailer, the display
ch anges tothe side camera vie w.
This view supports manoeuvring procedures with
a trailer.
Side view of the mir ror cameras
The sides of theve hicle can be seen in this vie w. 1
Guide line of extern al vehicle dimensions
with outside mir rors folded out
2 Marker of the wheel conta ct points
Sy stem failure
If th ere is no operational readiness, thefo llowing
message appears in the multimedia sy stem: Sy
stem limitations
The 360° Camera will not function or will only
partially function in thefo llowing situations:
R The doors are open.
R The side mir rors are folded in.
R The boot lid is open.
R There is heavy rain, snow or fog.
R The light conditions are poor, e.g. at night.
R The camera lens is obstructed, dirty or mis‐
ted up.
R If cameras or vehicle components in which
th e cameras are fitted are dama ged. In this
eve nt, ha vethe cameras, their positions and 230
Driving and parking
Page 235 of 593
Ac
tive Parking Assist Fu
nction of Active Parking Assist
Ac tive Parking Assist is an elect ronic pa rking
assis tance sy stem which uses ultrasound and is
automatically activated during forw ard tra vel.
The sy stem is operational at speeds below
appr oximately 35 km/h.
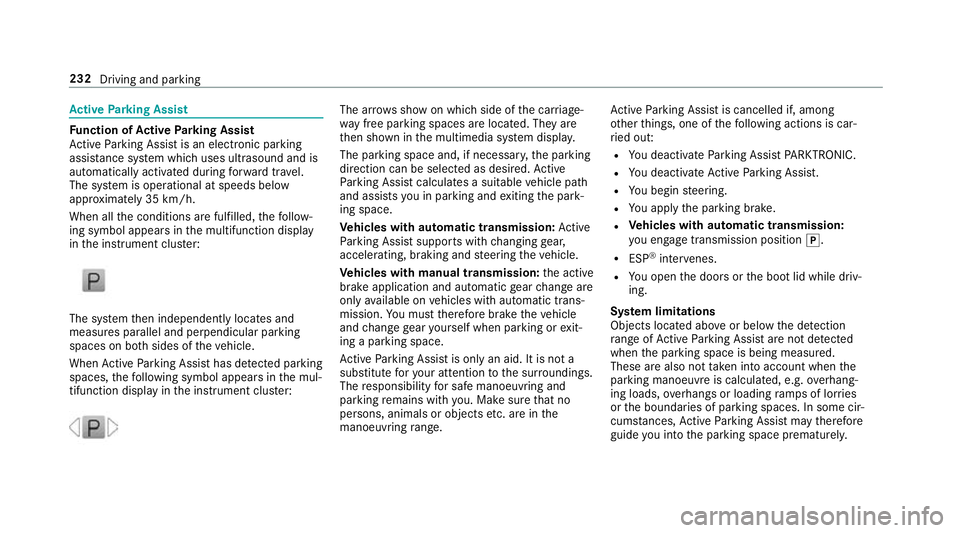
When all the conditions are fulfilled, thefo llow‐
ing symbol appears in the multifunction display
in the instrument clus ter: The sy
stem then independently locates and
measures parallel and perpendicular parking
spaces on bo thsides of theve hicle.
When Active Parking Assist has de tected pa rking
spaces, thefo llowing symbol appears in the mul‐
tifunction display in the instrument clus ter: The ar
rows show on which side of the car riage‐
wa y free parking spaces are located. They are
th en shown in the multimedia sy stem displa y.
The parking space and, if necessar y,the parking
direction can be selected as desired. Active
Pa rking Assist calculates a suitable vehicle path
and assists you in parking and exiting the park‐
ing space.
Ve hicles with automatic transmission: Active
Pa rking Assist supports with changing gear,
accelerating, braking and steering theve hicle.
Ve hicles with manual transmission: the active
brake application and automatic gear change are
on lyavailable on vehicles with automatic trans‐
mission. You must therefore brake theve hicle
and change gear yourself when parking or exit‐
ing a parking space.
Ac tive Parking Assist is only an aid. It is not a
substitute foryo ur attention tothe sur roundings.
The responsibility for safe manoeuvring and
parking remains with you. Make sure that no
persons, animals or objects etc. are in the
manoeuvring range. Ac
tive Parking Assist is cancelled if, among
ot her things, one of thefo llowing actions is car‐
ri ed out:
R You deactivate Parking Assist PARKTRONIC.
R You deactivate Active Parking Assist.
R You begin steering.
R You apply the parking brake.
R Vehicles with automatic transmission:
yo u en gage transmission position 005D.
R ESP ®
inter venes.
R You open the doors or the boot lid while driv‐
ing.
Sy stem limitations
Objects located abo veor below the de tection
ra nge of Active Parking Assist are not de tected
when the parking space is being measured.
These are also not take n into account when the
parking manoeuvre is calculated, e.g. overhang‐
ing loads, overhangs or loading ramp s of lor ries
or the boundaries of parking spaces. In some cir‐
cums tances, Active Parking Assist may therefore
guide you into the parking space prematurely. 232
Driving and parking
Page 385 of 593
The
TVtuner enables reception of digital chan‐
nels according tothefo llowing standards:
R DVB-T
R DVB-T2
In some countries, thest andards may not be
av ailable, or may not be available in all areas.
A CI+ module (Common In terface Module),
which is not included in the scope of deliver y,is
used todecrypt HD prog rammes according to
th e CI+ standard. In some countries, an addi‐
tional smart card is required, which is inse rted
into the CI+ module (see the manufacturer's
operating manual).
The TVtuner is in the boot recess. The CI+ mod‐
ule is inse rted into theTV tune r.
000E NO
TEDama getothe CI+ module and
Smart Card The CI+ module is designed
for use in the
home. The CI+ module can overheat and be
damaged bycontinuous exposure tohigh
outside temp eratures. 0007
Make sure that the CI+ module is not
subject tohigh temp eratures forex ten‐
ded pe riods of time.
If th e CI+ module is damaged, no
encryp tedch annels can be recei ved. The
TVtuner can recei veprogrammes in Dolby
Digital Plus. Manufactured under licence from Dolby Labora‐
to
ries. Dolb y,Dol byAudio and the double-D sym‐
bol are trademar ksof Dolby Laboratories.
The TVtuner au tomatically sets theTV standard.
TV reception is dependent on thefo llowing fac‐
to rs:
R Speed
R Characteristics of the selected TVchannel
TV reception may be influenced bythefo llowing
fa ctors:
R Electronic devices whi chare take n into the
ve hicle may impair TVreception.
R The conditions forre ception may change
whilst theve hicle is in motion.
Po or reception conditions can ha vethefo llowing
ef fect:
R The TVtuner switches toan alternative chan‐
nel with better reception whi chis digitally
broadcasting the same programme conte nt.
R The TVtuner mu testh e sound, freezes the
screen or hides it. The tsymbol appears
in the displa y. 382
Multimedia sy stem
Page 392 of 593
MHEG-5 digital
telete xt 0007
Ifth ete lete xt is displ ayed, press and hold on
th eto uchpad.
A colour selection bar appears. 0007
Select a colour.
The data content is displ ayed. 0007
Toenter numbers: select123. 0007
Enterth e numbers in quick succession. 0007
Toreturn totheTV prog ramme: selectTV. Pictu
resettings Picture settings
overview
The following picture form at settings are availa‐
ble:
R Automatic
The brightness is automatically set with this
option.
R 16:9
R 4:3
R Zoom Selecting picture settings
Multimedia sy
stem:
0018 Media 0019
à Media sources 0019
TV
0019 Z Options 0007
Select Picture format. 0007
Select a picture form at.
Ad justing the brightness manually
If th eAutomatic pictureform at is swit ched off,
yo u can adjust the brightness yourself. 0007
Select Brightness. 0007
Adjust the brightness. HD prog
rammes Re
ceiving encryp ted HD prog rammes
000E NO
TEDama getothe CI+ module and
Smart Card The CI+ module is designed
for use in the
home. The CI+ module can overheat and be
damaged bycontinuous exposure tohigh
outside temp eratures. 0007
Make sure that the CI+ module is not
subject tohigh temp eratures forex ten‐
ded pe riods of time.
If th e CI+ module is damaged, no
encryp tedch annels can be recei ved. The
TVtuner is in the boot recess. 0007
Ifre qu ired (countr y-dependent), insert the
Smart Ca rdinto the CI+ module slot. 0007
Remo vethe pr otective cap from theTV tune r. 0007
Insert the CI+ module into theTV tuner sl ot. 0007
Replace the pr otective cap on theTV tune r.
When the CI+ module is inser ted cor rectly,
encryp ted HD programmes can be recei ved
according toCI+ standard.
If th e CI module is not compatible, an er ror
messa geappears.
Calling up the CI+ module menu
Multimedia sy stem:
0018 Media 0019
à Media sources 0019
TV
0019 Z Options 0007
Select CA module. Multimedia sy
stem 389
Page 404 of 593
Cleaning and care
Information on
washing theve hicle in a car
wa sh 000A
WARNING Risk of an accident due to
re duced braking po wer af terwa shing the
ve hicle
Braking ef ficiency is reduced af terwa shing
th eve hicle. 0007
Afterth eve hicle has been washed,
brake carefully while paying attention to
th e traf fic conditions until braking
po we r has been fully restored. 000E
NO
TEDama gedue tounsuitable car
wa sh 0007
Before driving into a car wash make
sure that the car wash is suitable for
th eve hicle dimensions. 0007
Ensure there is suf ficient ground clear‐
ance between the underbody and the
guide rails of the car wash. 0007
Ensure that the clearance width of the
car wash, in particular the width of the
guide rails, is suf ficient. To
avo id damage to yourvehicle when using a
car wash, ensure thefo llowing beforehand:
R Active Dis tance Assi stDISTRONIC and the
HOLD function are deactivated.
R the 360° Camera or there ve rsing camera is
switched off.
R the side windo wsand sliding sun roof are
comple tely closed.
R the blo werfo rth eve ntilation/heating is
switched off.
R the windscreen wiper switch is in position
005A.
R in car washes with a con veyo r sy stem: neu‐
tral 005Cis engaged.
R theke y is at a minimum dis tance of 3 m
aw ay from theve hicle, otherwise the boot lid
could open unintentionally.
0009 Ifyo uwo uld like tolea vetheve hicle while it
is being washed, make sure theke y is loca‐ te
d in theve hicle. The 005Dgear is otherwise
automatically engaged.
0009 If, af terth e car wash, youre mo vethewax
from the windscreen and wiper rubbers, this
will pr event smearing and reduce wiper
noise. Information on using a high-p
ressure cleaner 000A
WARNING Risk of an accident when
using high-pressure cleane rswith circu‐
lar jet nozzles
The wate r jet of a circular jet nozzle (dirt
grinder) can cause extern ally invisible dam‐
age tothe tyres or chassis parts.
Components damaged in this wa y may unex‐
pec tedly fail. 0007
Do not use high-pressure cleaners with
circular jet nozzles toclean theve hicle. 0007
Have damaged tyres or chassis parts
re placed immediatel y. Maintenance and care
401
Page 405 of 593
To
avo id damage to yourvehicle, obser vethefo l‐
lowing when using a high-pressure cleaner:
R keep theke y at least 3 m away from theve hi‐
cle. Otherwise the boot lid could open unin‐
te ntional ly.
R maintain a dis tance of at least 30 cm tothe
ve hicle.
R vehicles with deco rative foil: parts of your
ve hicle are co vered with a decorative foil.
Maintain a dis tance of at least 70 cm
between thefo il-c ove red parts of theve hicle
and the nozzle of the high-pressure cleaner.
Mo vethe high-pressure cleaner nozzle around whilst cleaning. The
waterte mp era‐
ture of the high-pressure cleaner must not
exc eed 60 °C.
R obser vethe information on the cor rect dis‐
ta nce in the equipment manufacturer's oper‐
ating instructions.
R do not point the nozzle of the high-pressure
cleaner directly at sensitive parts such as
tyres, slits, electrical components, bat teries,
light bulbs and ventilation sl ots. Wa
shing theve hicle byhand Obser
vethe legal requirements, e.g. in a number
of countries, washing byhand is only permitted
in specially designated wash ba ys. 0007
Use a mild cleaning agent, e.g. car shampoo. 0007
Washtheve hicle with luk ewarmwate r using
a soft car sponge. When doing so, do not
ex pose theve hicle todirect sunlight. 0007
Carefully hose theve hicle off with water and
dry using a chamois. Take care not topoint
th ewate r jet directly towa rdsth e air inlet
grille. 402
Maintenance and care
Page 414 of 593
Wa
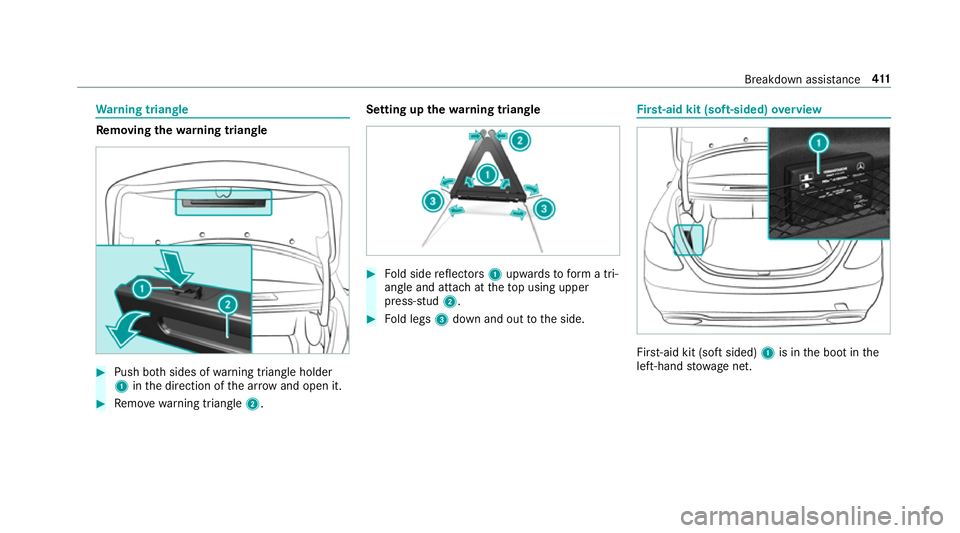
rning triangle Re
moving the warning triangle 0007
Push bo thsides of warning triangle holder
1 inthe direction of the ar row and open it. 0007
Remo ve wa rning triangle 2. Setting up
thewa rning triangle 0007
Fold side reflectors 1upwards toform a tri‐
angle and attach at theto p using upper
press-stud 2. 0007
Fold legs 3down and out tothe side. Fi
rs t-aid kit (soft-sided) overview Fir
st-aid kit (so ftsided) 1is in the boot in the
left-hand stowage net. Breakdown assis
tance 411
Page 417 of 593
Driving distance possible in eme
rgency
mode af ter the pressure loss warning: Load condition Driving distance pos‐
sible in emergency
mode
Pa rtially laden 80 km
Fu lly laden 30 kmThe driving dis
tance possible in emergency
mode may vary depending on the driving style.
Obser vethe maximum permissible speed of
80 km/h.
If a tyre has gone flat and cannot be replaced
with an MOEx tended tyre, you can use a stand‐
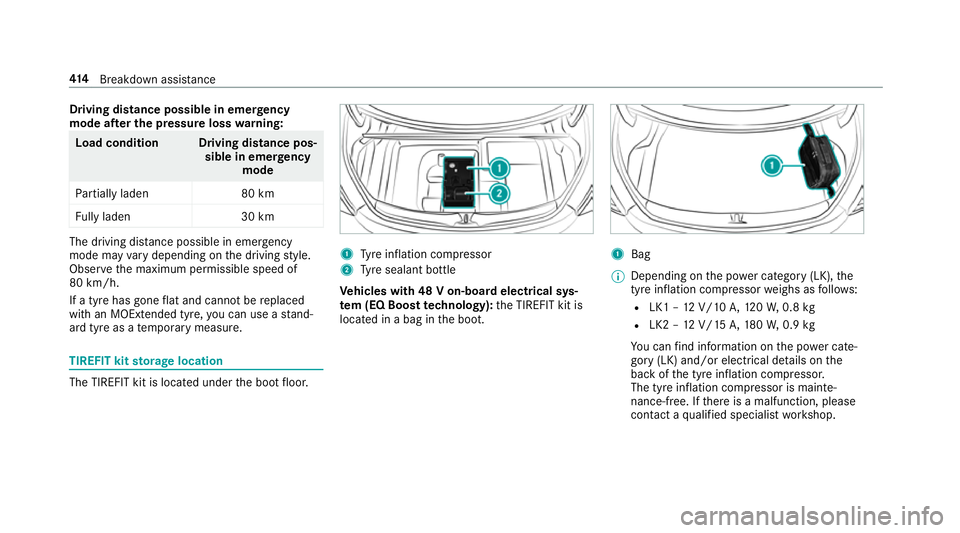
ard tyre as a temp orary measure. TIREFIT kit
storage location The TIREFIT kit is located under
the boot floor. 1
Tyre inflation compressor
2 Tyre sealant bottle
Ve hicles with 48 V on-board electrical sys‐
te m (EQ Boo sttech nology): the TIREFIT kit is
located in a bag in the boot. 1
Bag
0009 Depending on the po wer category (LK), the
tyre inflation compressor weighs as follo ws:
R LK1 – 12V/10 A,120W, 0.8 kg
R LK2 – 12V/15 A,180W, 0.9 kg
Yo u can find information on the po wer cate‐
gory (LK) and/or electrical de tails on the
back of the tyre inflation compressor.
The tyre inflation compressor is mainte‐
nance-free. If there is a malfunction, please
conta ct aqualified specialist workshop. 414
Breakdown assis tance