MERCEDES-BENZ C-CLASS ESTATE 2007 Owners Manual
Manufacturer: MERCEDES-BENZ, Model Year: 2007, Model line: C-CLASS ESTATE, Model: MERCEDES-BENZ C-CLASS ESTATE 2007Pages: 377, PDF Size: 6.19 MB
Page 201 of 377
Features
198
X
Press in cigarette lighter 2.
Cigarette lighter 2will pop out automati-
cally when the heating element is red-hot .12V socket
You can use the socket for accessories up to
a maximum of 180 W.
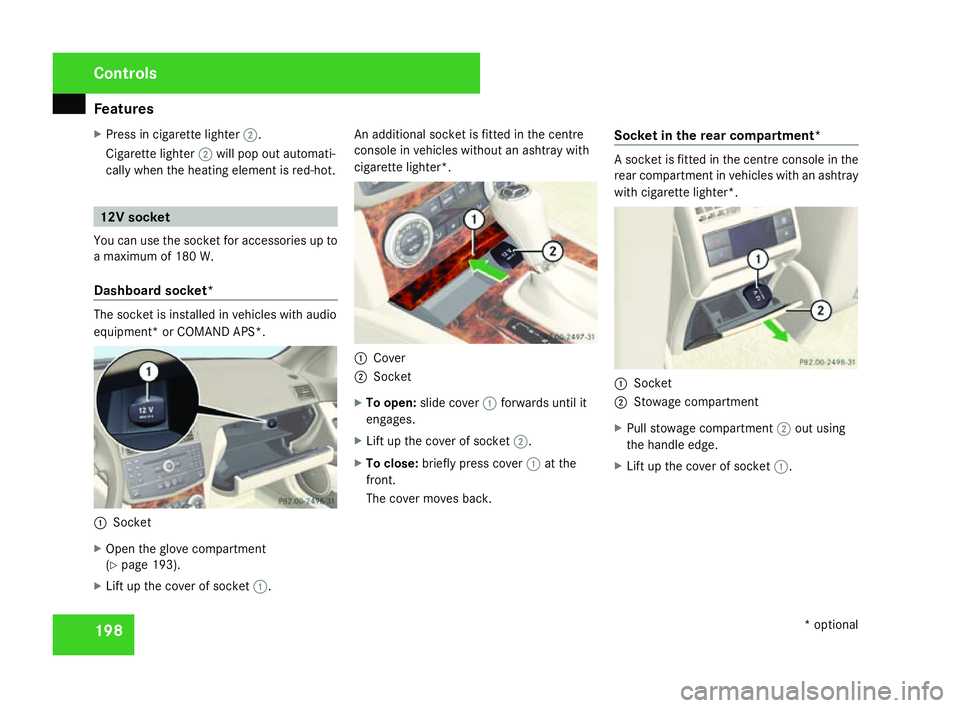
Dashboard socket* The socket is installed in vehicles with audio
equipment* or COMAND APS*.
1
Socket
X Open the glove compartment
(Y page 193).
X Lift up the cover of socket 1. An additional socket is fitted in the centre
console in vehicles without an ashtray with
cigarette lighter*.
1
Cove r
2 Socket
X To open: slide cover 1forwards until it
engages.
X Lift up the cover of socket 2.
X To close: briefly press cover 1at th e
front.
The cover moves back. Socket in the rear compartment* A socket is fitted in the centre console in the
rear compartment in vehicles with an ashtra
y
with cigarette lighter* . 1
Socket
2 Stowage compartment
X Pull stowage compartment 2out using
the handle edge.
X Lift up the cover of socket 1. Cont
rols
* optional
204_AKB; 2; 3, en-GB
mkalafa,
2007-06-26T23:11:51+02:00 - Seite 198
Page 202 of 377
Features
199
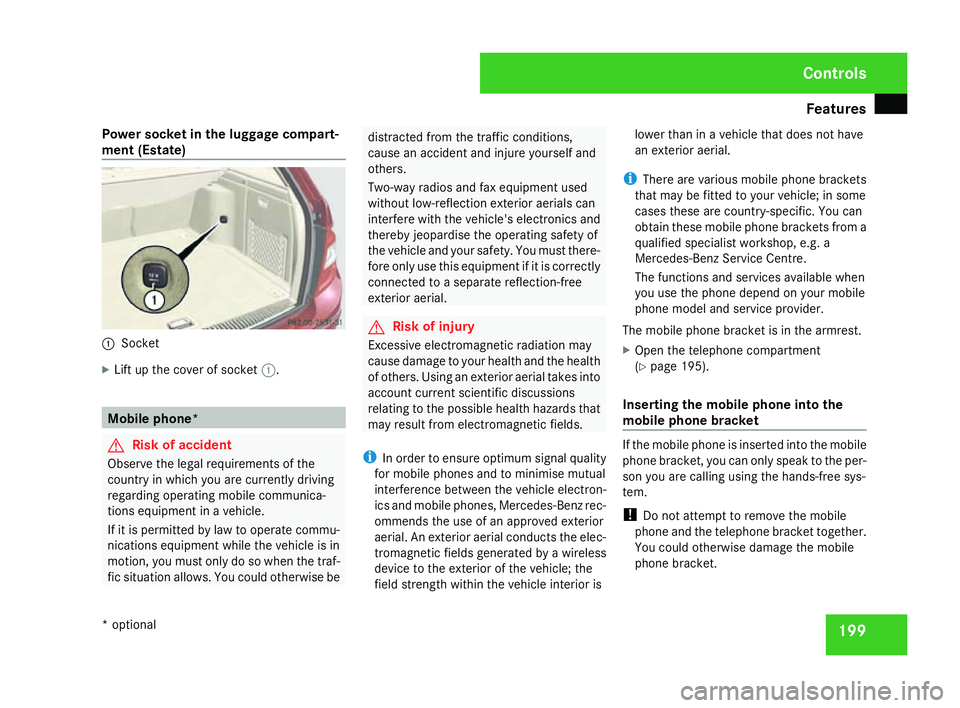
Power socket in the luggage compart
-
ment (Estate ) 1
Socket
X Lift up the cover of socket 1. Mobile phone
* G
Risk of accident
Observe the legal requirements of the
country in which you are currently driving
regarding operating mobile communica -
tions equipment in a vehicle.
If it is permitted by law to operate commu -
nications equipment while the vehicle is in
motion, you must only do so when the traf -
fic situation allows. You could otherwise be distracted from the traffic conditions,
cause an accident and injure yourself and
others.
Two-way radios and fax equipment use
d
without low-reflection exterior aerials can
interfere with the vehicle's electronics and
thereby jeopardise the operating safety of
the vehicle and your safety. You must there-
fore only use this equipment if it is correctly
connected to a separate reflection-free
exterior aerial. G
Risk of injury
Excessive electromagnetic radiation may
cause damage to your health and the health
of others. Using an exterior aerial takes into
account current scientific discussions
relating to the possible health hazards that
may result from electromagnetic fields.
i In order to ensure optimum signal quality
for mobile phones and to minimise mutual
interference between the vehicle electron -
ics and mobile phones, Mercedes-Benz rec -
ommends the use of an approved exterior
aerial. An exterior aerial conducts the elec-
tromagnetic fields generated by a wireless
device to the exterior of the vehicle; the
field strength within the vehicle interior is lower than in a vehicle that does not have
an exterior aerial.
i There are various mobile phone bracket s
that may be fitted to your vehicle; in some
cases these are country-specific. You can
obtain these mobile phone brackets from a
qualified specialist workshop, e.g. a
Mercedes-Benz Service Centre.
The functions and services available when
you use the phone depend on your mobile
phone model and service provider.
The mobile phone bracket is in the armrest.
X Open the telephone compartment
(Y page 195).
Inserting the mobile phone into the
mobile phone bracket If the mobile phone is inserted into the mobile
phone bracket, you can only speak to the per-
son you are calling using the hands-free sys-
tem.
!
Do not attempt to remove the mobile
phone and the telephone bracket together.
You could otherwise damage the mobile
phone bracket. Controls
* optional
204_AKB; 2; 3, en-GB
mkalafa,
2007-06-26T23:11:51+02:00 - Seite 199
Page 203 of 377
Features
200
X
Remove the cover of the aerial plug from
the back of the mobile phone and stow it in
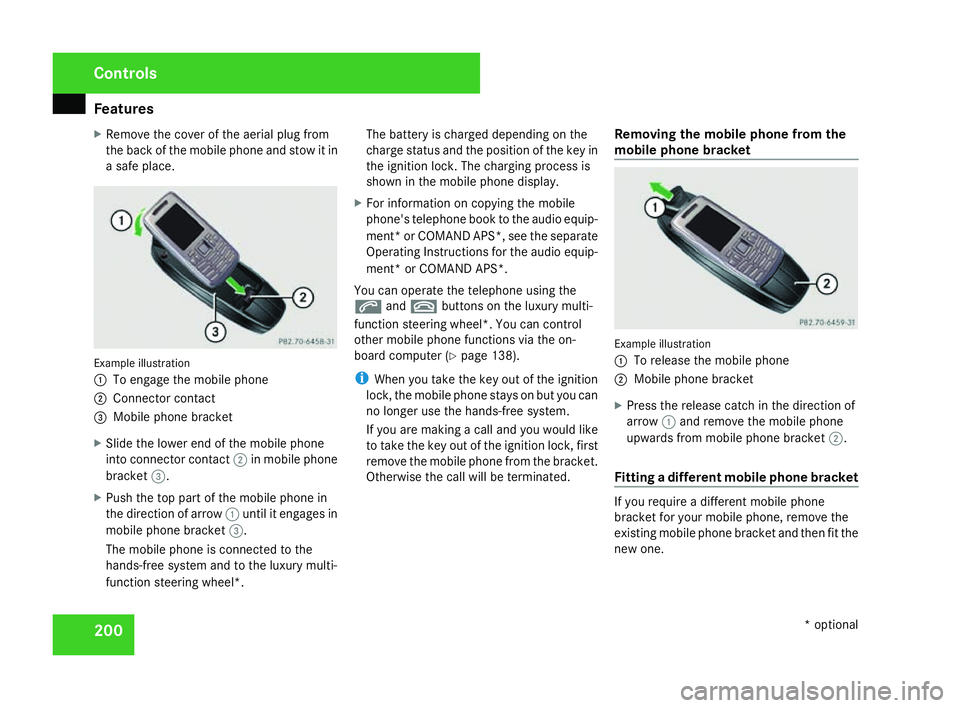
a safe place. Example illustration
1
To engage the mobile phone
2 Connector contact
3 Mobile phone bracket
X Slide the lower end of the mobile phone
into connector contact 2in mobile phon e
bracket 3.
X Push the top part of the mobile phone in
the direction of arrow 1until it engages in
mobile phone bracket 3.
The mobile phone is connected to the
hands-free system and to the luxury multi-
function steering wheel*. The battery is charged depending on the
charge status and the position of the key in
the ignition lock. The charging process is
shown in the mobile phone display
.
X For information on copying the mobil e
phone's telephone book to the audio equip-
ment *or COMAND APS*, see the separate
Operating Instructions for the audio equip-
ment* or COMAND APS* .
You can operate the telephone using the
s andt buttons on the luxury multi-
function steering wheel*. You can contro l
other mobile phone functions via the on-
board computer (Y page 138).
i When you take the key out of the ignition
lock, the mobile phone stays on but you can
no longer use the hands-free system.
If you are making a call and you would like
to take the key out of the ignition lock, first
remove the mobile phone from the bracket .
Otherwise the call will be terminated. Removing the mobile phone from the
mobile phone bracket Example illustration
1
To release the mobile phone
2 Mobile phone bracket
X Press the release catch in the direction of
arrow 1and remove the mobile phon e
upwards from mobile phone bracket 2.
Fitting a different mobile phone bracket If you require a different mobile phon
e
bracket for your mobile phone, remove the
existing mobile phone bracket and then fit the
new one. Controls
* optional
204_AKB; 2; 3, en-GB
mkalafa,
2007-06-26T23:11:51+02:00 - Seite 200
Page 204 of 377
Features
201
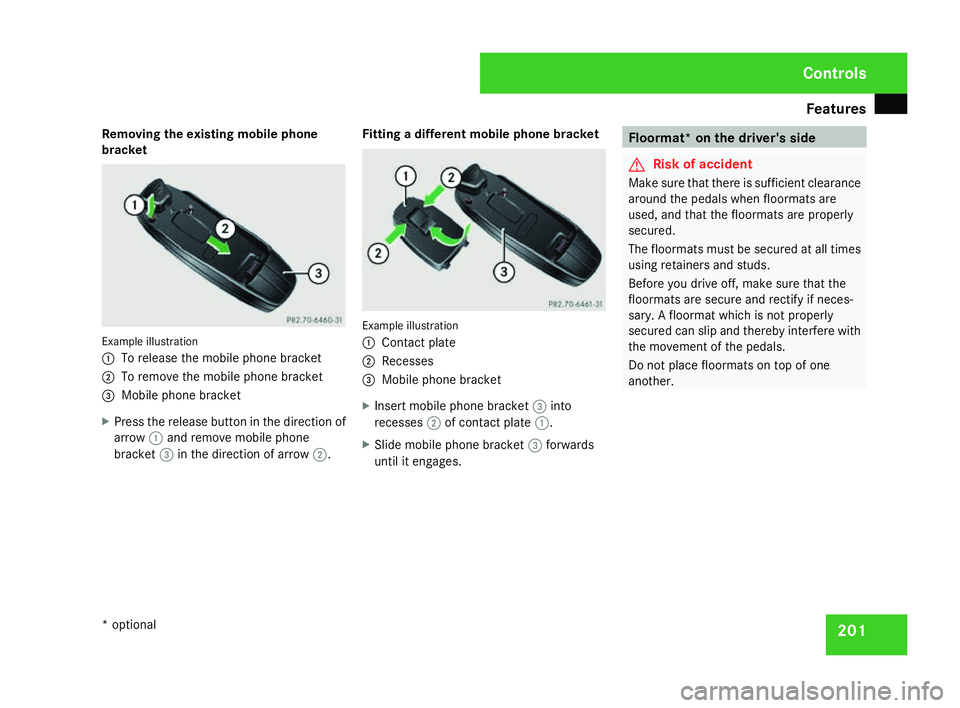
Removing the existing mobile phone
bracket Example illustration
1
To release the mobile phone bracket
2 To remove the mobile phone bracket
3 Mobile phone bracket
X Press the release button in the direction of
arrow 1and remove mobile phon e
bracket 3in the direction of arrow 2. Fitting a different mobile phone bracket Example illustration
1
Contact plat e
2 Recesses
3 Mobile phone bracket
X Insert mobile phone bracket 3into
recesses 2of contact plate 1.
X Slide mobile phone bracket 3forwards
until it engages. Floormat* on the driver's side
G
Risk of accident
Make sure that there is sufficient clearance
around the pedals when floormats are
used, and that the floormats are properly
secured .
The floormats must be secured at all times
using retainers and studs.
Before you drive off, make sure that the
floormats are secure and rectify if neces-
sary. A floormat which is not properly
secured can slip and thereby interfere with
the movement of the pedals.
Do not place floormats on top of one
another . Cont
rols
* optional
204_AKB; 2; 3, en-GB
mkalafa,
2007-06-26T23:11:51+02:00 - Seite 201
Page 205 of 377
Features
2021
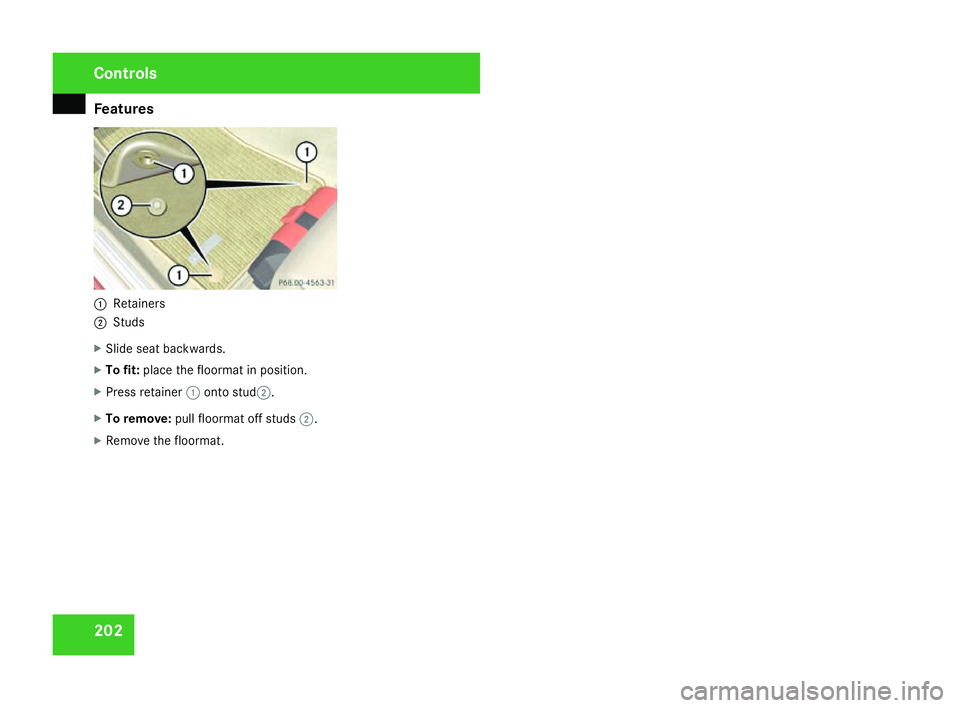
Retainers
2 Stud s
X Slide seat backwards .
X To fit: place the floormat in position.
X Press retainer 1onto stud2 .
X To remove :pull floormat off studs 2.
X Remove the floormat. Cont
rols
204_AKB; 2; 3, en-GB
mkalafa,
2007-06-26T23:11:51+02:00 - Seite 202
Page 206 of 377
203
The first 1,500 km
............................204
Refuelling ........................................... 204
Engine compartment ........................206
Tyres and wheels .............................. 210
Winter driving ................................... 216
Driving tips ........................................ 217
Driving abroad ................................... 220
Trailer towing* .................................. 220
Service ............................................... 226
Care .................................................... 227 Operation
204_AKB; 2; 3, en-GB
mkalafa,
2007-06-26T23:11:51+02:00 - Seite 203
Page 207 of 377
Refuelling
20
4 The first 1,500 km
If you treat the engine with sufficient car e
from the very start, it will reward you with
excellent performance for a very long period
afterwards .
R You should therefore drive at varying road
and engine speeds for the first 1,500 km.
R Avoid heavy loads, e.g. driving at full throt-
tle, during this time. Do not exceed 2
/ 3 of
the maximum permissible engine speed for
each gear.
R Change gear in good time.
R Do not shift down a gear manually in order
to brake.
Vehicles with automatic transmission* :
R Try to avoid depressing the accelerator
pedal beyond the pressure point (kick -
down).
R Only use ranges 3,2 or 1for slow driving,
e.g. in mountainous terrain. Refuellin
g Refuelling
G
Risk of explosion
Fuel is highly flammable. Fire, naked flames
and smoking are therefore prohibited when
handling fuels.
Switch off the engine before refuelling. G
Risk of injury
Avoid any contact with fuels.
You can damage your health if your skin
comes into direct contact with fuel or if yo u
inhale the vapour. G
Risk of fire
Do not use petrol to refuel vehicles with a
diesel engine. Never mix diesel with petrol.
This would damage the fuel system and
engine and could result in a vehicle fire.
! Do not use petrol to refuel vehicles with a
diesel engine. Do not use diesel to refuel
vehicles with a petrol engine. Never mix
diesel with petrol. Even small amounts of
the wrong fuel will damage the injection
system. Damage resulting from adding the
wrong fuel is not covered by the warranty. !
Do not start the engine if you accidentally
refuelled with the wrong fuel. Otherwise
you risk engine damage. Have the fuel sys-
tem emptied completely.
When you open or close the vehicle with the
key or KEYLESS GO*, the fuel filler flap is
automatically unlocked or locked.
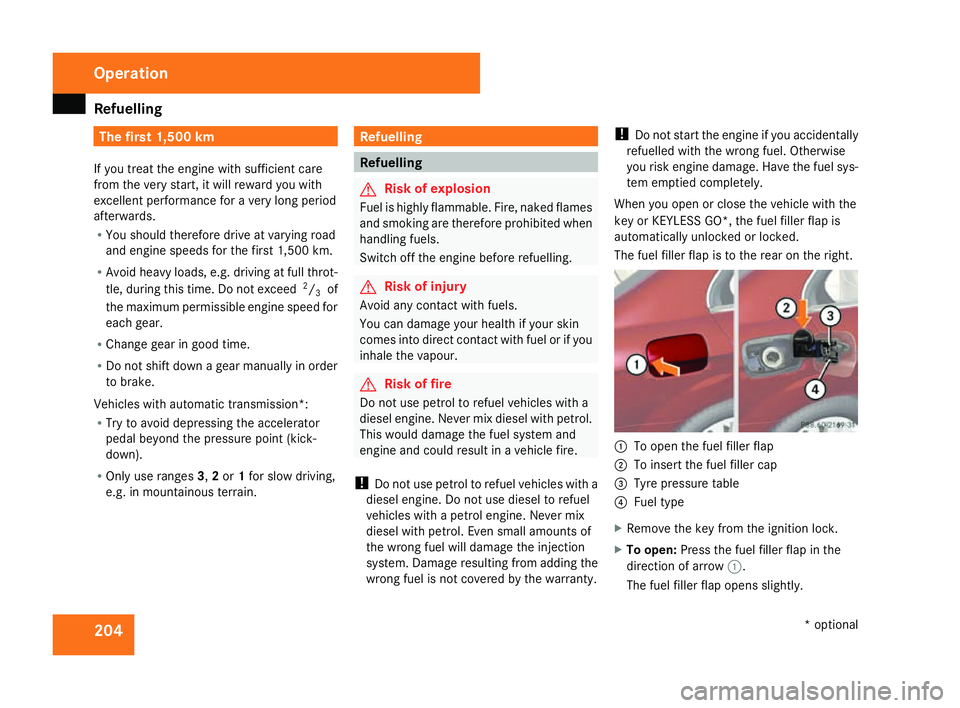
The fuel filler flap is to the rear on the right . 1
To open the fuel filler flap
2 To insert the fuel filler cap
3 Tyre pressure table
4 Fuel typ e
X Remove the key from the ignition lock.
X To open: Press the fuel filler flap in the
direction of arrow 1.
The fuel filler flap opens slightly. Operation
* optional
204_AKB; 2; 3, en-GB
mkalafa,
2007-06-26T23:11:51+02:00 - Seite 204
Page 208 of 377
Refuelling
20
5
X
Open the fuel filler flap.
X Turn the fuel filler cap to the left and
remove it.
X Insert the fuel filler cap into the holder
bracket on the inside of filler flap 2.
X Only fill the tank until the pump nozzle
switches off.
! Overfilling the tank could damage the fuel
system.
X Replace the fuel filler cap and turn it to th e
right. You will hear the fuel filler cap lock.
X Close the fuel filler flap.
i Vehicles with a diesel engine:
If you have run the tank completely dry, it
will be necessary to bleed the fuel system
( Y page 289). Petrol (EN 228)
! Refuel using only unleaded premium
grade petrol with a minimum octane num-
ber of 95 RON/85 MON conforming to
European standard EN 228 .
You could otherwise impair engine output
or damage the engine.
You will find further information about pet-
rol under "Technical data" in the index .
i As a temporary measure, only when the
recommended fuel is not available, yo u
may also use regular unleaded petrol,
91 RON/82.5 MON. This may reduce per-
formance and increase petrol consump-
tion. Avoid driving at full throttle.
In some countries, the available petrol qual-
ity may not be sufficient and could caus e
coking around the inlet valve. In thes e
cases, and in consultation with a
Mercedes-Benz Service Centre, the petrol
may be mixed with the additive recommen-
ded by Mercedes-Benz (part no.
A000989254510). You must observe the
notes and mixing ratios given on the con -
tainer. Diesel (EN 590)
! Only use diesel that complies with the
EN 590 European standard.
You could otherwise impair engine outpu t
or damage the engine.
You will find further information about die-
sel under "Technical data" in the index.
! When refuelling vehicles with a diesel par-
ticle filter in countries outside the EU, only
low-sulphur Euro diesel with less than
0.005 percent sulphur content by weight
should be used. In countries in which diesel
with a higher sulphur content is available
(e.g. 0.035 percent by weight), the engine
oil should be renewed at more frequent
intervals. More information about intervals
for changing the engine oil can be obtained
from any Mercedes-Benz Service Centre.
! Using fuel that does not comply with EN
590 can increase wear and damage the
engine and the exhaust system. Do not use
the following:
R Marine diesel
R Heating oil
R Bio-diesel Operation
204_AKB; 2; 3, en-G
B
mkalafa , 2007-06-26T23:11:51+02:00 - Seite 205 Z
Page 209 of 377
Engine compartment
206R
Vegetable oil
R Petrol
R Petroleum
R Kerosene
Do not add such fuels to diesel fuel and do
not use any special additives (exception:
flow improvers – see "Low outside temper-
atures").
Damage caused by the use of unapproved
fuels or additives is not covered by the war-
ranty.
Low outside temperatures The flow properties of diesel may be insuffi-
cient at low ambient temperatures.
To prevent operating problems, diesel fuel
with improved cold flow qualities is available
during the winter months. Your vehicle must
be refuelled with this winter diesel at temper-
atures of -5 °C or below.
You can use this winter diesel at tempera-
tures down to about -20 °C without problems.
If only summer diesel fuel or less cold-resist-
ant winter diesel fuel (e.g. in Mediterranean
regions) is available, you should add an
amount of flow improver to the fuel corre-
sponding to the outside temperature. Mix the additive with the diesel in good time,
before the flow properties of the diesel
become insufficient. Otherwise, malfunctions
can only be rectified by heating the entire fuel
system, e.g. by parking the vehicle in a heated
garage. G
Risk of fire
Do not use petrol to refuel vehicles with a
diesel engine. Never mix diesel with petrol.
This would damage the fuel system and
engine and could result in a vehicle fire.
Flow improver
The effectiveness of a flow improver is not
guaranteed with every fuel. Observe the infor -
mation provided by the manufacturer when
using a flow improver. Only use flow improv-
ers that have been tested and approved by
Mercedes-Benz. Information about flow
improvers that have been tested and
approved by Mercedes-Benz can be obtained
from any Mercedes-Benz Service Centre. Engine compartment
Bonne
t G
Risk of accident
Do not pull the release lever while the vehi-
cle is in motion. The bonnet could other-
wise open.
Opening G
Risk of injury
There is a risk of injury if the bonnet is open,
even if the engine is not running.
Some engine components can become
very hot.
To avoid the risk of burns, only touch thos e
components described in the Owner’s Man-
ual and observe the relevant safety notes. G
Risk of injury
The radiator fan between the radiator and
the engine can start automatically, even if
the key has been removed from the ignition
lock. For this reason you must not reach
into the turning area of the fan. You could
otherwise sustain an injury.
Vehicles with a petrol engine: Operatio
n
204_AKB; 2; 3, en-GB
mkalafa,
2007-06-26T23:11:51+02:00 - Seite 206
Page 210 of 377
Engine compartment
207The electronic ignition system uses high
voltage. For this reason you must never
touch components of the ignition system
(ignition coil, ignition cable, spark plug con-
nector, test socket) when :
R the engine is running
R the engine is being started
R the ignition is switched on and the engine
is being cranked by hand
Vehicles with a diesel engine :
The electronic injection control uses high
voltage. Therefore, never touch fuel injec -
tion system components when:
R the engine is running
R the engine is being started
R the ignition is switched on
X Make sure that the windscreen wipers are
switched off. G
Risk of injury
The windscreen wipers and wiper rod s
could be set in motion.
When the bonnet is open, you or others
could be injured by the wiper rods. Make sure that the windscreen wipers are
switched off and that the key has bee
n
pulled out of the ignition lock before open-
ing the bonnet.
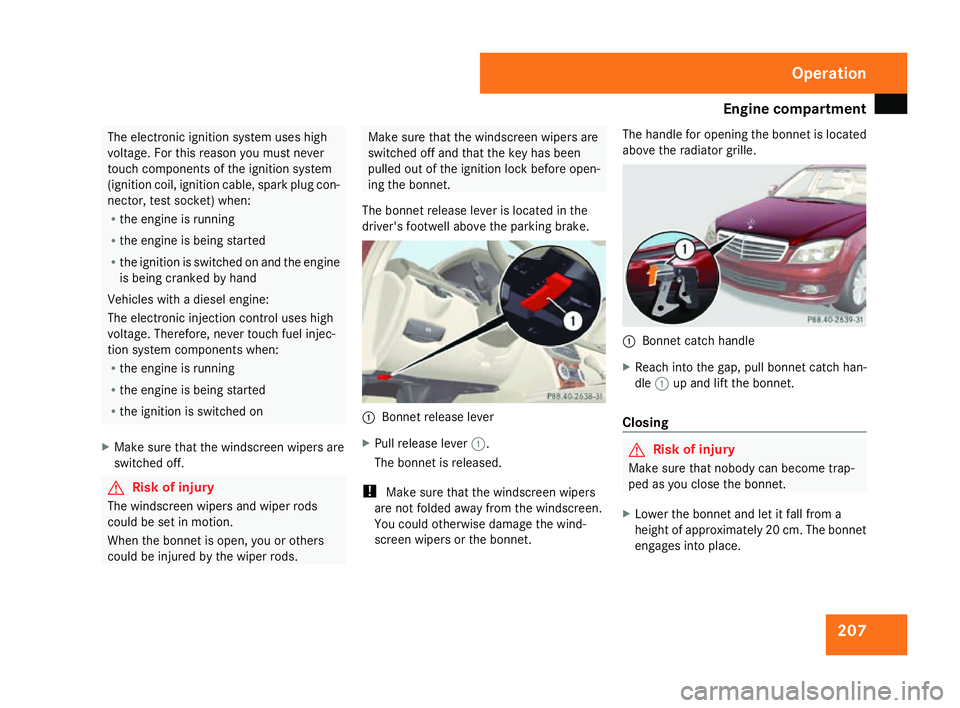
The bonnet release lever is located in the
driver's footwell above the parking brake. 1
Bonnet release lever
X Pull release lever 1.
The bonnet is released.
! Make sure that the windscreen wipers
are not folded away from the windscreen .
You could otherwise damage the wind-
screen wipers or the bonnet. The handle for opening the bonnet is located
above the radiator grille.
1
Bonnet catch handle
X Reach into the gap, pull bonnet catch han -
dle 1up and lift the bonnet.
Closing G
Risk of injury
Make sure that nobody can become trap -
ped as you close the bonnet.
X Lower the bonnet and let it fall from a
height of approximately 20 cm. The bonnet
engages into place. Operation
204_AKB; 2; 3, en-GB
mkalafa,
2007-06-26T23:11:51+02:00 - Seite 207