dimensions MERCEDES-BENZ C-CLASS ESTATE 2014 Owners Manual
[x] Cancel search | Manufacturer: MERCEDES-BENZ, Model Year: 2014, Model line: C-CLASS ESTATE, Model: MERCEDES-BENZ C-CLASS ESTATE 2014Pages: 489, PDF Size: 15.08 MB
Page 23 of 489
Selecting ........................................ 224
Storing the current speed .............. 224
Variabl e......................................... 223
SRS (Supplemental Restraint Sys-
tem)
Warning lamp ................................. 285
Start/Stop button
Starting the engine ........................ 188
Start/stop function
see ECO start/stop function
Starting (engine) ................................ 187
Stationary vehicle ............................. 281
STEER CONTROL .................................. 86
Steering
Warning lamps ............................... 367
Steering (display message) .............. 351
Steering Assist and Stop&Go Pilot
(DISTRONIC PLUS)
Display message ............................ 344
Steering assistant STEER CON-
TROL
see STEER CONTROL
Steering wheel
Adjusting (electrically) ................... 126
Adjusting (manually) ...................... 125
Button overview ............................... 36
Buttons (on-board computer) ......... 295
Cleaning ......................................... 407
EASY ENTRY/EXIT feature ............. 126
Gearshift paddle s........................... 202
Important safety notes .................. 125
Storing settings (memory func-
tion) ............................................... 131
Steering wheel gearshift paddles .... 202
Stowage areas ................................... 370
Stowage compartment
Map pockets .................................. 372
Stowage compartments
Armrest (under) ............................. 372
Centre console .............................. 371
Cup holde r..................................... 381
Door ............................................... 372
Glove compartment ....................... 371
Important safety information ......... 370
Rear ............................................... 372
Spectacles compartment ............... 371
Stowage net ....................................... 372 Stowage space
Stowage net ................................... 372
Summer tyres
In winter ........................................ 434
Sun blind
Rear side window s......................... 383
Sun visor ............................................ 382
Suspension tuning
AIRMATIC ...................................... 239
Switching the auxiliary heating/
ventilation
On/off ........................................... 177 T
Tail lamps Display message ............................ 332
see Lights
Tailgate
Display message ............................ 349
Emergency unlocking ..................... 106
Important safety notes .................. 101
Limiting the opening angle ............. 105
Obstruction detectio n.................... 101
Opening dimensions ...................... 478
Opening/closing ............................ 101
Opening/closing (automatically
from inside) ................................... 105
Opening/closing (automatically
from outside) ................................. 102
Opening/closing (manually from
outside) ......................................... 102
Technical data
Capacities ...................................... 470
Emergency spare wheel ................. 465
Information .................................... 468
Trailer load s................................... 480
Tyres/wheels ................................. 448
Vehicle data ................................... 478
Telephone
Accepting a call (multifunction
steering wheel) .............................. 307
Display message ............................ 351
Introduction ................................... 306
Menu (on-board computer) ............ 306
Number from the phone book ........ 307
Redialling ....................................... 308
Rejecting/ending a call ................. 307 20
Index
Page 24 of 489
Telephone compartment ................3
72
Temperature
Coolant (display in the instrumentcluster) .......................................... 295
Coolant (display in the on-board
computer) ...................................... 309
Outside temperature ..................... .295
Setting (climate control) ................ 163
TEMPOMAT
Function/notes ............................ .220
TIREFIT kit .......................................... 414
Top Tether ............................................ 65
Total distance recorder .................... 300
Tow-away protection
Activating ......................................... 88
Deactivating ..................................... 88
Function .......................................... .87
Tow-starting
Emergency engine starting ............ 428
Important safety notes .................. 424
Towing
Important safety notes .................. 424
Notes for 4MATIC vehicles ............ 427
With the rear axle raised ................ 426
Towing a trailer
Active Blind Spot Assist ................. 269
Active Lane Keeping Assist ............ 272
Active Parking Assist ..................... 243
Axle load, permissibl e.................... 482
Bulb failure indicator for LED
lamps ............................................. 290
ESP® (Electronic Stability Pro-
gram) ............................................... 83
General notes ................................ 287
Pulling away with a traile r.............. 189
Trailer tow hitch display message .. 349
Towing away
Fitting the towing eye .................... 426
Removing the towing eye ............... 426
With both axles on the ground ....... 427
Towing eye ......................................... 411
Traffic Sign Assist
Activating ....................................... 261
Activating/deactivating the warn-
ing function .................................... 310
Display message ............................ 342
Function/note s............................. 260
Important safety notes .................. 261 Instrument cluster display ............. 261
Trailer coupling
see Towing a trailer
Trailer towing
7-pin connecto r............................. 290
Blind Spot Assist ............................ 264
Cleaning the trailer tow hitch ......... 406
Coupling up a traile r...................... 288
Decoupling a trailer ....................... 289
Driving tip s.................................... 287
Folding in the ball coupling ............ 289
Folding out the ball coupling .......... 288
Important safety notes .................. 286
Lights display message .................. 331
Mounting dimensions .................... 478
Parktronic ...................................... 240
Power supply ................................. 290
Problem (fault) ............................... 292
Trailer load s................................... 480
Transfer case ..................................... 204
Transmission
see Automatic transmission
see Manual transmission
Transmission position display ......... 199
Transmission position display
(DIRECT SELECT lever) ...................... 199
Transporting the vehicle .................. 427
Trim pieces (cleaning instruc-
tions) .................................................. 407
Trip computer (on-board com-
puter) .................................................. 301
Trip meter
Calling up ....................................... 300
Resetting (on-board computer) ...... 301
Turn signals
Changing bulbs (front) ................... 144
Changing bulbs (rear) .................... 144
Switching on/of f........................... 137
TV
Operating (on-board computer) ..... 306
Two-way radio
Frequencies ................................... 468
Installation ..................................... 468
Transmission output (maximum) .... 468
Type identification plate
see Vehicle identification plate Index
21
Page 25 of 489
Tyre pressure
Calling up (on-board computer) ..... 437
Display message ............................ 345
Important safety notes .................. 437
Not reached (TIREFIT) .................... 415
Reached (TIREFIT) .......................... 415
Recommended ............................... 436
Tyre pressure loss warning
General notes ................................ 440
Important safety notes .................. 440
Restarting ...................................... 441
Tyre pressure monitor
Checking the tyre pressure elec-
tronically ........................................ 438
Function/note s............................. 437
General notes ................................ 437
Important safety notes .................. 438
Radio type approval for the tyre
pressure monitor ........................... 440
Restarting ...................................... 439
Warning lamp ................................. 366
Warning message .......................... 439
Tyres
Changing a whee l.......................... 441
Checking ........................................ 433
Direction of rotation ...................... 442
Display message ............................ 345
Important safety notes .................. 432
MOExtended tyre s......................... 434
Replacing ....................................... 442
Service life ..................................... 433
Storing ........................................... 442
Summer tyres in winter ................. 434
Tyre size (data ).............................. 448
Tyre tread ...................................... 433
Wheel and tyre combinations ........ 449
see Flat tyre U
Unlocking Emergency unlocking ....................... 99
From inside the vehicle (central
unlocking button) ............................. 97 V
Vanity mirror (in sun visor) .............. 383Vehicle
Correct use ...................................... 28
Data acquisition ............................... 28
Display message ............................ 347
Electronics ..................................... 468
Equipment ....................................... 25
Implied warranty .............................. 28
Individual settings .......................... 309
Leaving parked up ......................... 215
Locking (in an emergency) ............. 100
Locking (key) ................................... 91
Lowering ........................................ 447
Operating safety .............................. 25
Pulling away ................................... 188
Raising ........................................... 443
Registration ..................................... 28
Securing from rolling away ............ 443
Towing away .................................. 424
Transporting .................................. 427
Unlocking (in an emergency) ........... 99
Unlocking (key) ................................ 91
Vehicle data ................................... 478
Vehicle data
Boot load (maximum) ..................... 478
Roof load (maximum) ..................... 478
Vehicle dimensions ........................... 478
Vehicle emergency locking .............. 100
Vehicle identification number
see VIN
Vehicle identification plate .............. 470
Vehicle level
AIRMATIC ...................................... 238
Display message ............................ 339
Vehicle maintenance
see ASSYST PLUS
Vehicle tool kit .................................. 411
Video
Operating the DVD ......................... 305
VIN ...................................................... 470 W
Warning and indicator lamps ABS ................................................ 357
Brakes ........................................... 355
Distance warning signal ................. 365
ESP® ............................................. 359
ESP® OFF ...................................... 360 22
Index
Page 104 of 489
X
Insert the emergency key element into the
lock of the driver's door as far as it will go.
X Turn the emergency key element clockwise
as far as it will go to position 1.
The locking knob drops down and the driv- er's door is locked.
On right-hand-drive vehicles, turn the emer-
gency key element anti-clockwise.
X Turn the emergency key element back and
remove it.
X Insert the emergency key element into the
key (Y page 93).
X Make sure that the doors and the tailgate
are locked.
X Carefully press the protective cap onto the
lock cylinder until it engages and is seated firmly. Do not pull the door handle when
doing so.
All vehicles:
If you lock the vehicle as described above, the
fuel filler flap is not locked. The anti-theft
alarm system is not primed. Luggage compartment
Important safety notes
G
WARNING
Combustion engines emit poisonous exhaust
gases such as carbon monoxide. If the tailgate is open when the engine is running, particu-
larly if the vehicle is moving, exhaust fumes
could enter the passenger compartment.
There is a risk of poisoning.
Turn off the engine before opening the tail-
gate. Never drive with the tailgate open. G
WARNING
If objects, luggage or loads are not secured or not secured sufficiently, they could slip, tip
over or be flung around and thereby hit vehicle
occupants. There is a risk of injury, especially when braking or abruptly changing directions.
Always store objects so that they cannot be
flung around. Secure objects, luggage or loads against slipping or tipping before the
journey.
! The tailgate swings upwards and to the
rear when opened. Therefore, make sure
that there is sufficient clearance above and behind the tailgate.
The opening dimensions on the tailgate can
be found in the "Vehicle data" section
(Y page 478).
i You can limit the opening angle of the
tailgate (Y page 105).
Do not leave the key in the luggage compart- ment. You could otherwise lock yourself out.
Stow luggage or loads preferably in the lug-
gage compartment. Observe the loading
guidelines (Y page 370). Tailgate obstruction detection with
reversing function
Vehicles with remote tailgate closing fea-
ture: the tailgate is equipped with automatic
obstacle recognition with a reversing feature. If a solid object blocks or restricts the tailgate when automatically opening, this procedure
is stopped. If a solid object blocks or restrictsthe tailgate when automatically closing, the
boot lid automatically opens again slightly.
The automatic obstacle recognition with
reversing function is only an aid. It is not a
substitute for your attentiveness when open-
ing and closing the tailgate. G
WARNING
The reversing function does not react:
R to soft, light and thin objects, e.g. small fin-
gers
R over the last 8 mm of the closing path
This means that the reversing feature cannot
prevent someone being trapped in these sit-
uations. There is a risk of injury.
When closing make sure that no parts of the
body are in the closing area. Luggage compartment
101Opening and closing
Z
Page 105 of 489
If someone is trapped:
R press the Fbutton on the key, or
R press the remote operating switch on the
driver’s door, or
R press the closing or locking button on the
tailgate or
R pull the handle on the tailgate.
Vehicles with HANDS-FREE ACCESS: it is
also possible to stop the closing process by
performing a kicking movement under the
rear bumper. Opening/closing from the outside
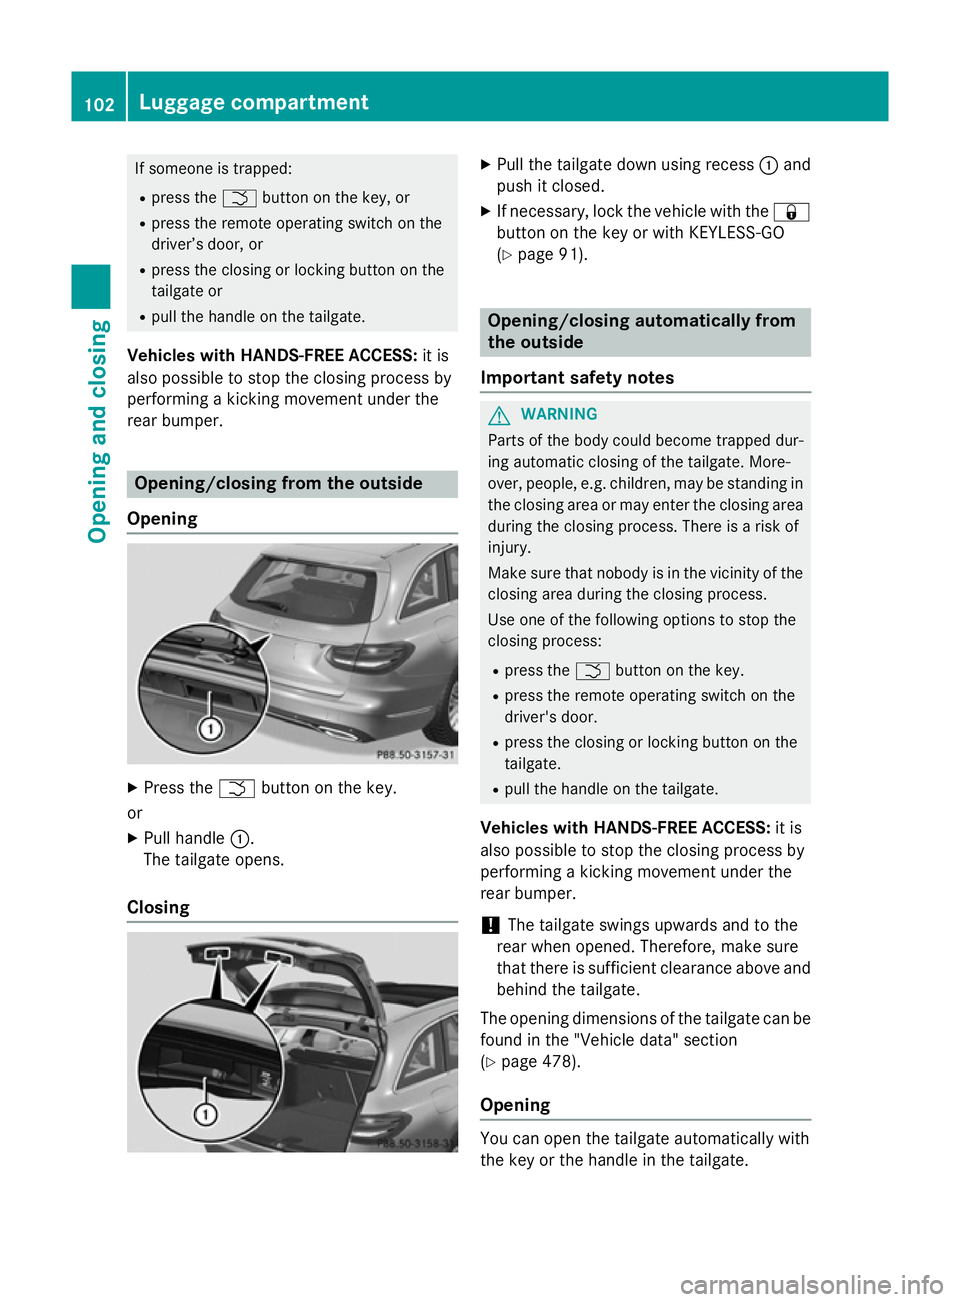
Opening X
Press the Fbutton on the key.
or X Pull handle :.
The tailgate opens.
Closing X
Pull the tailgate down using recess :and
push it closed.
X If necessary, lock the vehicle with the &
button on the key or with KEYLESS-GO
(Y page 91). Opening/closing automatically from
the outside
Important safety notes G
WARNING
Parts of the body could become trapped dur-
ing automatic closing of the tailgate. More-
over, people, e.g. children, may be standing in the closing area or may enter the closing area
during the closing process. There is a risk of
injury.
Make sure that nobody is in the vicinity of the closing area during the closing process.
Use one of the following options to stop the
closing process:
R press the Fbutton on the key.
R press the remote operating switch on the
driver's door.
R press the closing or locking button on the
tailgate.
R pull the handle on the tailgate.
Vehicles with HANDS-FREE ACCESS: it is
also possible to stop the closing process by
performing a kicking movement under the
rear bumper.
! The tailgate swings upwards and to the
rear when opened. Therefore, make sure
that there is sufficient clearance above and behind the tailgate.
The opening dimensions of the tailgate can be
found in the "Vehicle data" section
(Y page 478).
Opening You can open the tailgate automatically with
the key or the handle in the tailgate.102
Luggage compartmentOpening and closing
Page 108 of 489
Opening/closing automatically from
the inside
Important safety notes G
WARNING
Parts of the body could become trapped dur-
ing automatic closing of the tailgate. More-
over, people, e.g. children, may be standing in the closing area or may enter the closing area
during the closing process. There is a risk of
injury.
Make sure that nobody is in the vicinity of the closing area during the closing process.
Use one of the following options to stop the
closing process:
R press the Fbutton on the key.
R press the remote operating switch on the
driver's door.
R press the closing or locking button on the
tailgate.
R pull the handle on the tailgate.
Vehicles with HANDS-FREE ACCESS: it is
also possible to stop the closing process by
performing a kicking movement under the
rear bumper.
! The tailgate swings upwards and to the
rear when opened. Therefore, make sure
that there is sufficient clearance above and behind the tailgate.
The opening dimensions of the tailgate can be
found in the "Vehicle data" section
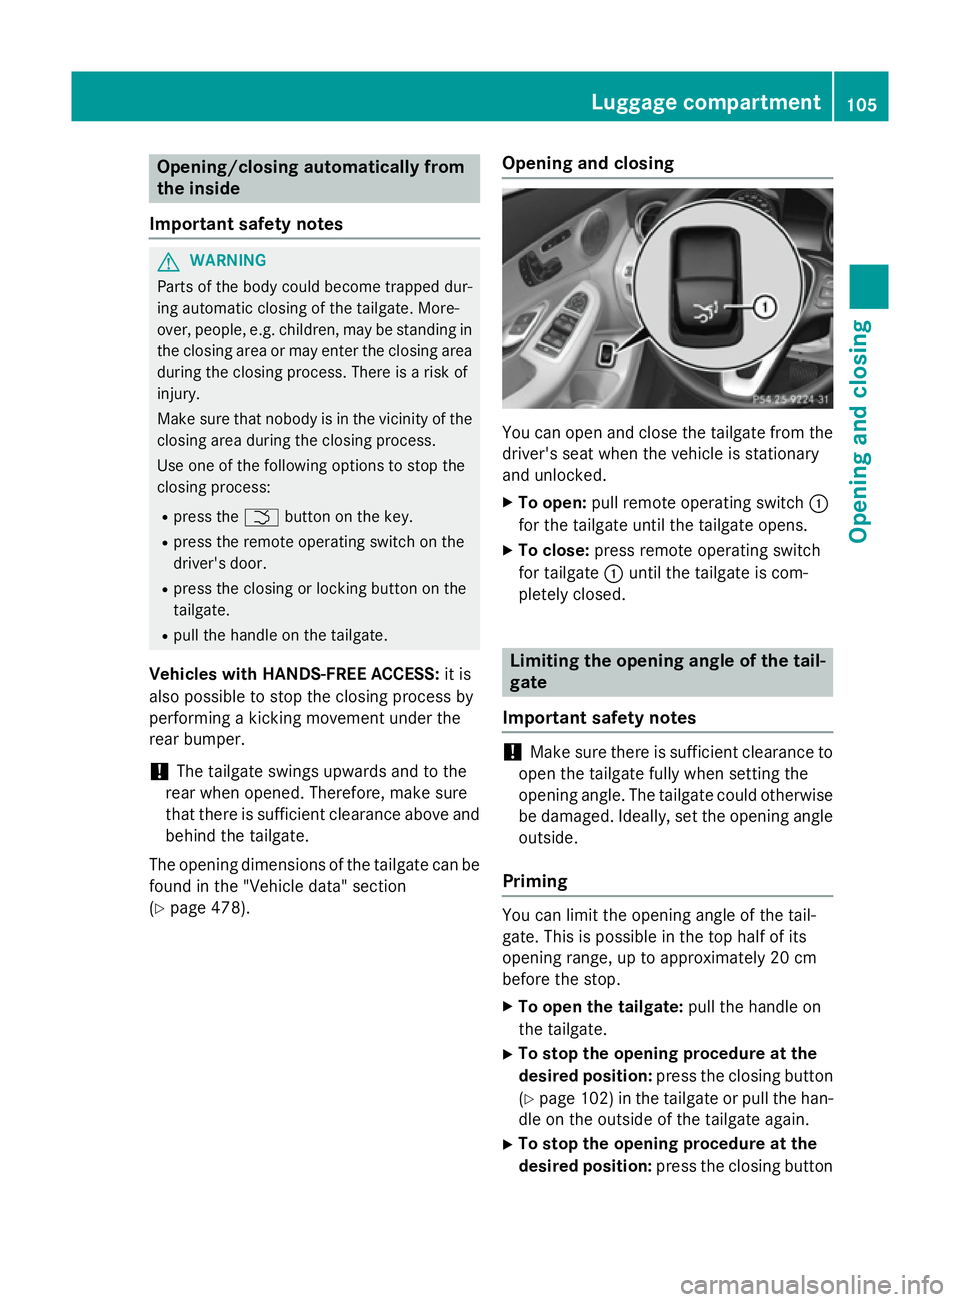
(Y page 478). Opening and closing You can open and close the tailgate from the
driver's seat when the vehicle is stationary
and unlocked.
X To open: pull remote operating switch :
for the tailgate until the tailgate opens.
X To close: press remote operating switch
for tailgate :until the tailgate is com-
pletely closed. Limiting the opening angle of the tail-
gate
Important safety notes !
Make sure there is sufficient clearance to
open the tailgate fully when setting the
opening angle. The tailgate could otherwise be damaged. Ideally, set the opening angleoutside.
Priming You can limit the opening angle of the tail-
gate. This is possible in the top half of its
opening range, up to approximately 20 cm
before the stop.
X To open the tailgate: pull the handle on
the tailgate.
X To stop the opening procedure at the
desired position: press the closing button
(Y page 102)i n the tailgate or pull the han-
dle on the outside of the tailgate again.
X To stop the opening procedure at the
desired position: press the closing button Luggage compartment
105Opening and closing Z
Page 109 of 489
(Y
page 102) in the tailgate or pull the han-
dle on the outside of the tailgate again.
X To store the position: press and hold the
closing button in the tailgate until you hear a short tone.
The opening angle limiter is activated. The
tailgate then stops in the stored position
when opened.
Switching off X
Press and hold the closing button
(Y page 102) in the tailgate until you hear
two short tones.
X Press and hold the closing button
(Y page 102) in the tailgate until you hear
two short tones. Emergency release
General notes !
The tailgate swings upwards and to the
rear when opened. Therefore, make sure
that there is sufficient clearance above and behind the tailgate.
The opening dimensions of the tailgate can be
found in the "Vehicle data" section
(Y page 478).
Use the emergency key element if the tailgate can no longer be unlocked:
R using the key
R using HANDS-FREE ACCESS
R using the remote operating switch in the
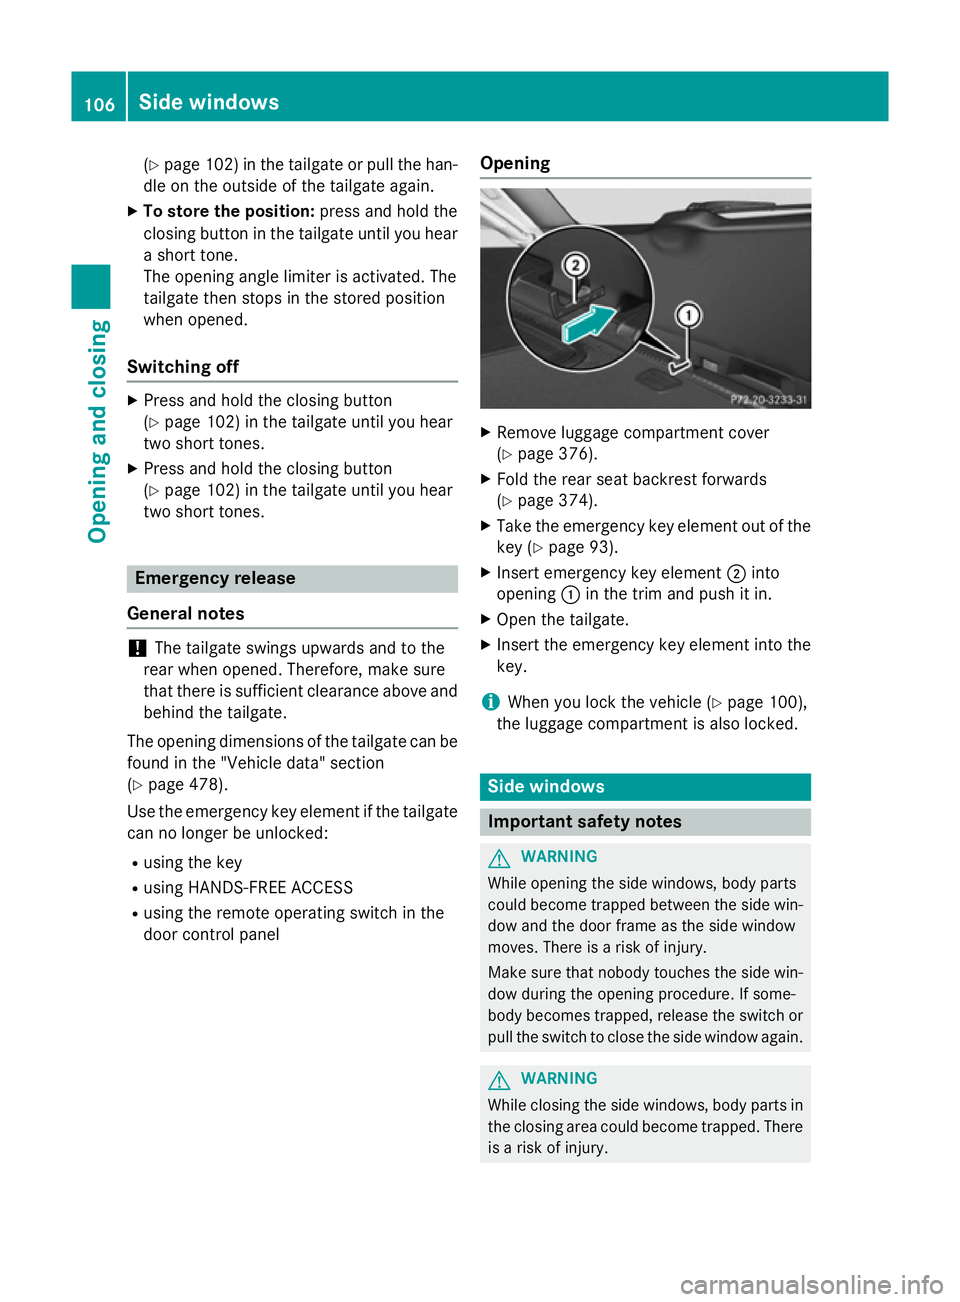
door control panel Opening X
Remove luggage compartment cover
(Y page 376).
X Fold the rear seat backrest forwards
(Y page 374).
X Take the emergency key element out of the
key (Y page 93).
X Insert emergency key element ;into
opening :in the trim and push it in.
X Open the tailgate.
X Insert the emergency key element into the
key.
i When you lock the vehicle (Y
page 100),
the luggage compartment is also locked. Side windows
Important safety notes
G
WARNING
While opening the side windows, body parts
could become trapped between the side win- dow and the door frame as the side window
moves. There is a risk of injury.
Make sure that nobody touches the side win-
dow during the opening procedure. If some-
body becomes trapped, release the switch or pull the switch to close the side window again. G
WARNING
While closing the side windows, body parts in the closing area could become trapped. There is a risk of injury. 106
Side windowsOpening and closing
Page 290 of 489
The vehicle/trailer combination:
R is heavier
R is restricted in its acceleration and gradi-
ent-climbing capability
R has an increased braking distance
R is affected more by strong crosswinds
R demands more sensitive steering
R has a larger turning circle
This can impair the vehicle's handling char-
acteristics. Adapt your driving style accord-
ingly. Maintain a safe distance. Drive care-
fully.
When towing a trailer, always adjust your
speed to the current road and weather con-
ditions. Do not exceed the maximum permis-
sible speed for your vehicle/trailer combina-
tion. Notes on towing a trailer
General notes When towing a trailer, set the tyre pressure on
the rear axle of the towing vehicle for a max-
imum load; see the tyre pressure table in the
fuel filler flap (Y page 436).
On vehicles without level control, the height
of the ball coupling will alter according to the load placed on the vehicle. If necessary, use a
trailer with a height-adjustable drawbar.
You will find fitting dimensions and loads
under "Technical data" (Y page 478).
When towing a trailer, the ECO start/stop
function is deactivated. The èECO sym-
bol appears yellow in the multifunction dis-
play. For further information on the ECO
start/stop function; see (Y page 190).
Driving tips Observe the notes on ESP
®
trailer stabilisa-
tion (Y page 83).
The maximum permissible speed for vehicle/ trailer combinations depends on the type of
trailer. Before beginning the journey, check the trailer's documents to see what the max-
imum permitted speed is. Observe the legally
prescribed maximum speed in the relevant
country.
For certain Mercedes-Benz vehicles, the max-
imum permissible rear axle load is increased
when towing a trailer. See the "Technical
data" section to find out whether this applies
to your vehicle (Y page 480). If you utilise any
of the added maximum rear axle load when
towing a trailer, the vehicle/trailer combina-
tion may not exceed a maximum speed of
100 km/h for reasons concerning the oper-
ating permit. This also applies in countries in
which the permissible maximum speed for
vehicle/trailer combinations is above
100 km/h.
When towing a trailer, your vehicle's handling
characteristics will be different in comparison to when driving without a trailer and it will
consume more fuel.
Change into a lower gear in good time on long
and steep downhill gradients.
This also applies if cruise control, DISTRONIC
PLUS or SPEEDTRONIC are activated.
This will use the braking effect of the engine,
so less braking will be required to maintain
vehicle speed. This relieves the load on the
brake system and prevents the brakes from
overheating and wearing too quickly. If you
need additional braking, depress the brake
pedal repeatedly rather than continuously.
Driving tips If the trailer swings from side to side:
X Do not accelerate.
X Do not countersteer.
X Brake if necessary.
R Maintain a greater distance to the vehicle in
front than when driving without a trailer.
R Avoid braking abruptly. If possible, brake
gently at first to allow the trailer to run on. Then, increase the braking force rapidly.
R The values given for gradient-climbing
capabilities from a standstill refer to sea Towing a trailer
287Driving and parking Z
Page 435 of 489
Useful information
i This Owner's Manual describes all mod-
els, series and optional equipment for your
vehicle that were available at the time of
going to press. National variations are pos- sible. Note that your vehicle may not be
equipped with all of the functions descri-
bed. This is also the case for systems and
functions relevant to safety.
i Read the information on qualified special-
ist workshops: (Y page 27). Important safety notes
G
WARNING
If wheels and tyres of the wrong size are used, the wheel brakes or suspension components
may be damaged. There is a risk of an acci-
dent.
Always replace wheels and tyres with those
that fulfil the specifications of the original
part.
When replacing wheels, make sure to fit the
correct:
R designation
R type
When replacing tyres, make sure to fit the
correct:
R designation
R manufacturer
R type G
WARNING
A flat tyre severely impairs the driving, steer-
ing and braking characteristics of the vehicle.
There is a risk of accident.
Tyres without run-flat characteristics:
R do not drive with a flat tyre.
R immediately replace the flat tyre with your
emergency spare wheel or spare wheel, or
consult a qualified specialist workshop. Tyres with run-flat characteristics:
R pay attention to the information and warn-
ing notices on MOExtended tyres (tyres
with run-flat characteristics).
Accessories that are not approved for your
vehicle by Mercedes-Benz or are not being
used correctly can impair the operating
safety.
Before purchasing and using non-approved
accessories, visit a qualified specialist work-
shop and enquire about:
R suitability
R legal stipulations
R factory recommendations
Information on the dimensions and types of
wheels and tyres for your vehicle can be
found under "Wheel/tyre combinations"
(Y page 448).
Information on air pressure for the tyres on
your vehicle can be found:
R on the tyre pressure label on the fuel filler
flap (Y page 206)
R under "Tyre pressure" (Y page 436)
Modification work on the brake system and
wheels is not permitted. The use of wheel
spacers or brake dust shields is not permit-
ted. This invalidates the general operating
permit for the vehicle.
i Further information on wheels and tyres
can be obtained at any qualified specialist
workshop. Operation
Information on driving
Check the tyre pressures when the vehicle is
heavily laden and, if necessary, adjust.
While driving, pay attention to vibrations,
noises and unusual handling characteristics,
e.g. pulling to one side. This may indicate that the wheels or tyres are damaged. If you sus-
pect that a tyre is defective, reduce your
speed immediately. Stop the vehicle as soon 432
OperationWheels and tyres
Page 445 of 489
Vehicles with an emergency spare wheel:
in the event of a flat tyre, the emergency
spare wheel is fitted according to the descrip-
tion under "Fitting a wheel" (Y page 442).Interchanging the wheels
G
WARNING
Interchanging the front and rear wheels may
severely impair the driving characteristics if
the wheels or tyres have different dimensions. The wheel brakes or suspension components may also be damaged. There is a risk of acci-
dent.
Interchange front and rear wheels only if the
wheels and tyres are of the same dimensions.
! On vehicles fitted with a tyre pressure
monitor, electronic components are loca-
ted in the wheel.
Tyre-fitting tools should not be applied in
the area of the valve, as this could damage
the electronic components.
Only have tyres changed at a qualified spe- cialist workshop.
Interchanging the front and rear wheels of
differing dimensions can render the general
operating permit invalid.
Observe the instructions and safety notes in
the "Fitting a wheel" section (Y page 442).
The wear patterns on the front and rear tyres differ depending on the operating conditions.Interchange the wheels before a clear wear
pattern has formed on the tyres. Front tyres
typically wear more on the shoulders and the
rear tyres in the centre.
On vehicles that have the same size front and
rear wheels, you can interchange the wheels
every 5,000 to 10,000 km depending on the
degree of tyre wear. Ensure the direction of
rotation is maintained.
Clean the contact surfaces of the wheel and
the brake disc thoroughly every time a wheel is interchanged. Check the tyre pressure and,
if necessary, restart the tyre pressure loss warning system (Y
page 441)or the tyre pres-
sure monitor (Y page 439). Direction of rotation
Tyres with a specified direction of rotation
have additional benefits, e.g. if there is a risk of aquaplaning. You will only gain these ben-
efits if the correct direction of rotation is
observed.
An arrow on the sidewall of the tyre indicates
its correct direction of rotation. Storing wheels
Store wheels in a cool, dry and preferably
dark place if they are not being used. Protect
the tyres against oil, grease, petrol and diesel. Fitting a wheel
Preparing the vehicle X
Stop the vehicle on solid, non-slippery and
level ground.
X Apply the electric parking brake manually.
X Move the front wheels to the straight-
ahead position.
X Vehicles with manual transmission:
depress the clutch pedal fully and engage
first or reverse gear.
X Vehicles with automatic transmission:
shift the transmission to position P.
X Make sure that in vehicles with AIRMATIC,
the vehicle level is set to "Normal"
(Y page 238).
X Switch off the engine.
X Vehicles without KEYLESS-GO: remove
the key from the ignition lock.
X Vehicles with KEYLESS-GO start-func-
tion or KEYLESS-GO: open the driver's
door.
The on-board electronics now have status
0. This is the same as the key having been removed. 442
Changing a wheelWheels and tyres